Operating Instructions LCD Television Manual de ... - Panasonic
Operating Instructions LCD Television Manual de ... - Panasonic
Operating Instructions LCD Television Manual de ... - Panasonic

Create successful ePaper yourself
Turn your PDF publications into a flip-book with our unique Google optimized e-Paper software.
English<br />
[Resumen]<br />
R<br />
For assistance, please call : 1-800-211-PANA (7262)<br />
or contact us at www.panasonic.com/contactinfo (U.S.A.)<br />
For assistance, please call : 787-750-4300<br />
or visit us at www.panasonic.com (Puerto Rico)<br />
For assistance, please call : 1-800-561-5505<br />
or visit us at www.panasonic.ca (Canada)<br />
Para solicitar ayuda, llame al: 1-800-211-PANA (7262)<br />
o visítenos en www.panasonic.com/contactinfo (EE.UU.)<br />
Para solicitar ayuda, llame al: 787-750-4300<br />
o visítenos en www.panasonic.com (Puerto Rico)<br />
<strong>Operating</strong> <strong>Instructions</strong><br />
<strong>LCD</strong> <strong>Television</strong><br />
<strong>Manual</strong> <strong>de</strong> instrucciones<br />
Televisor <strong>LCD</strong><br />
Mo<strong>de</strong>l No. TC-26LX600<br />
Número <strong>de</strong> mo<strong>de</strong>lo TC-32LX600<br />
Please read these instructions before operating your set and retain them for future reference.<br />
The images shown in this manual are for illustrative purposes only.<br />
Lea estas instrucciones antes <strong>de</strong> utilizar su televisor y guár<strong>de</strong>las para consultarlas en el futuro.<br />
Las imágenes mostradas en este manual tienen solamente fines ilustrativos.<br />
TQB2AA00681
2<br />
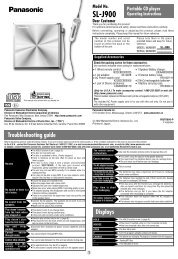
Turn your own living room into a movie theater!<br />
Experience an amazing level of multi-media<br />
excitement<br />
Manufactured un<strong>de</strong>r license from Dolby Laboratories.<br />
“Dolby” and the double-D symbols are tra<strong>de</strong>marks of Dolby<br />
Laboratories.<br />
R<br />
HDMI, the HDMI logo and High-Definition Multimedia<br />
Interface are tra<strong>de</strong>marks<br />
or registered tra<strong>de</strong>marks of HDMI Licensing LLC.
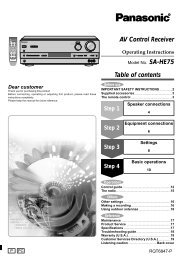
Amplifier<br />
Home theater unit<br />
Enjoy rich multi-media<br />
DVD recor<strong>de</strong>r<br />
Camcor<strong>de</strong>r<br />
Set Top Box<br />
VCR DVD player<br />
Contents<br />
Be Sure to Read<br />
• Important Safety <strong>Instructions</strong> ······················· 4<br />
• Accessories/Option<br />
•<br />
························· 6<br />
•I<strong>de</strong>ntifying Controls ························· 7<br />
Connection<br />
•<br />
····························· 8<br />
First Time Setup ·················· 9<br />
Enjoy your TV !<br />
Basic Features<br />
•<br />
•<br />
Watching TV ··············································· 10<br />
Watching Vi<strong>de</strong>os and DVDs ······················· 12<br />
Advanced Features<br />
•<br />
•<br />
Input Labels/Closed Caption ····················· 13<br />
How to Use Menu Functions<br />
•<br />
(picture, sound quality, etc.) ······················· 14<br />
•<br />
Channel Lock ············································· 16<br />
•<br />
Editing and Setting Channels ···················· 18<br />
•<br />
<strong>Operating</strong> Peripheral Equipment ··············· 20<br />
•<br />
Control with HDMI “HDAVI Control” ··········· 21<br />
Recommen<strong>de</strong>d AV connections ················· 22<br />
•<br />
•<br />
Accesorios/Opción ····································· 24<br />
•<br />
I<strong>de</strong>ntificación <strong>de</strong> los controles ···················· 25<br />
•<br />
Conexiones ················································ 26<br />
•<br />
Ajuste inicial ··············································· 27<br />
•<br />
Para ver la televisión ································· 28<br />
•<br />
Cómo utilizar las funciones <strong>de</strong> los menús ····· 30<br />
•<br />
Para ver ví<strong>de</strong>os y DVDs ····························· 32<br />
•<br />
Control con HDMI “HDAVI Control” ············ 33<br />
Conexiones AV recomendadas ·················· 34<br />
FAQs, etc.<br />
•<br />
•<br />
Remote Control Operation/Co<strong>de</strong> List ········· 36<br />
•<br />
Ratings List for Channel Lock ···················· 39<br />
•<br />
Technical Information ································· 40<br />
•<br />
Maintenance ·············································· 42<br />
•<br />
FAQ ···························································· 42<br />
•<br />
Specifications ············································· 44<br />
•<br />
Limited Warranty (for U.S.A.) ····················· 45<br />
•<br />
Customer Services Directory (for U. S. A.) ······· 46<br />
•<br />
Limited Warranty (for Canada) ······················· 47<br />
Customer Services Directory (for Canada) ······· 48<br />
Quick Start Gui<strong>de</strong><br />
Viewing Advanced<br />
Español<br />
[Resumen]<br />
FAQs, etc.<br />
3
4<br />
Important Safety <strong>Instructions</strong><br />
CAUTION<br />
RISK OF ELECTRIC SHOCK<br />
DO NOT OPEN<br />
WARNING: To reduce the risk of electric shock, do not remove cover or back.<br />
No user-serviceable parts insi<strong>de</strong>. Refer servicing to qualified service personnel.<br />
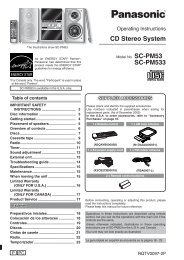
Note to CATV System Installer<br />
EXAMPLE OF ANTENNA<br />
GROUNDING AS PER<br />
(NEC) NATIONAL<br />
ELECTRICAL<br />
CODE<br />
ELECTRIC<br />
SERVICE<br />
EQUIPMENT<br />
GROUND CLAMP<br />
The lightning flash with<br />
arrow head within a triangle<br />
is inten<strong>de</strong>d to tell the user<br />
that parts insi<strong>de</strong> the product<br />
are a risk of electric shock to<br />
persons.<br />
The exclamation point within<br />
a triangle is inten<strong>de</strong>d to<br />
tell the user that important<br />
operating and servicing<br />
instructions are in the papers<br />
with the appliance.<br />
This remin<strong>de</strong>r is provi<strong>de</strong>d to direct the CATV system installer’s attention to Article 820-40 of the NEC that provi<strong>de</strong>s gui<strong>de</strong>lines for<br />
proper grounding and, in particular, specifies that the cable ground shall be connected to the grounding system of the building, as<br />
close to the point of cable entry as practical.<br />
Secure ventilation<br />
Slots and openings in the cabinet and the back or bottom are provi<strong>de</strong>d for ventilation, and to ensure reliable operation of the <strong>LCD</strong><br />
TV and to protect it from overheating. These openings must not be blocked or covered. There should be at least 10 cm of space<br />
from these openings. The openings should never be blocked by placing the <strong>LCD</strong> TV on a bed, sofa, rug or other similar surface.<br />
This <strong>LCD</strong> TV should not be placed in a built-in installation such as a bookcase unless proper ventilation is provi<strong>de</strong>d.<br />
Important Safety <strong>Instructions</strong> for <strong>LCD</strong> TV<br />
1) Read these instructions.<br />
2) Keep these instructions.<br />
3) Heed all warnings.<br />
4) Follow all instructions.<br />
5) Do not use this apparatus near water.<br />
6) Clean only with dry cloth.<br />
7) Do not block any ventilation openings. Install in accordance with the manufacturer’s instructions.<br />
8) Do not install near any heat sources such as radiators, heat registers, stoves, or other apparatus (including amplifiers) that<br />
produce heat.<br />
9) Do not <strong>de</strong>feat the safety purpose of the polarized or grounding-type plug. A polarized plug has two bla<strong>de</strong>s with one wi<strong>de</strong>r than<br />
the other. A grounding type plug has two bla<strong>de</strong>s and a third grounding prong. The wi<strong>de</strong> bla<strong>de</strong> or the third prong are provi<strong>de</strong>d for<br />
your safety. If the provi<strong>de</strong>d plug does not fit into your outlet, consult an electrician for replacement of the obsolete outlet.<br />
10) Protect the power cord from being walked on or pinched particularly at plugs, convenience receptacles, and the point where<br />
they exit from the apparatus.<br />
11) Only use attachments / accessories specified by the manufacturer.<br />
12) Use only with the cart, stand, tripod, bracket, or table specified by the manufacturer, or sold with the<br />
apparatus. When a cart is used, use caution when moving the cart / apparatus combination to avoid injury<br />
from tip-over.<br />
13) Unplug this apparatus during lightning storms or when unused for long periods of time.<br />
14) Refer all servicing to qualified service personnel. Servicing is required when the apparatus has been damaged in any way,<br />
such as power-supply cord or plug is damaged, liquid has been spilled or objects have fallen into the apparatus, the apparatus<br />
has been exposed to rain or moisture, does not operate normally, or has been dropped.<br />
15) Operate only from the type of power source indicated on the marking label. If you are not sure of the type of power supplied to<br />
your home consult your television <strong>de</strong>aler or local power company.<br />
16) Follow all warnings and instructions marked on the <strong>LCD</strong> TV.<br />
17) Never push objects of any kind into this <strong>LCD</strong> TV through cabinet<br />
slots as they may touch dangerous voltage points or short out parts<br />
that could result in a fire or electric shock. Never spill liquid of any<br />
kind on the <strong>LCD</strong> TV.<br />
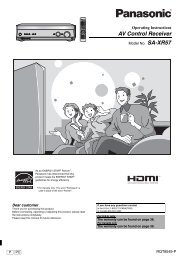
18) If an outsi<strong>de</strong> antenna is connected to the tele vi sion equipment,<br />
be sure the antenna system is groun<strong>de</strong>d so as to provi<strong>de</strong> some<br />
protection against voltage surges and built up static charg es.<br />
In the U.S. Section 810-21 of the National Electrical Co<strong>de</strong><br />
provi<strong>de</strong>s information with respect to proper grounding of the mast<br />
and supporting structure, grounding of the lead-in wire to an<br />
antenna discharge unit, size of grounding conductors, location of<br />
antenna discharge unit, connection to grounding electro<strong>de</strong>s, and<br />
re quire ments for the grounding electro<strong>de</strong>.<br />
ANTENNA<br />
LEAD-IN WIRE<br />
ANTENNA<br />
DISCHARGE UNIT<br />
(NEC SECTION 810-20)<br />
GROUNDING<br />
CONDUCTORS<br />
(NEC SECTION 810-21)<br />
GROUND CLAMPS<br />
POWER SERVICE GROUNDING<br />
ELECTRODE SYSTEM<br />
(NEC ART 250, PART H)
19) An outsi<strong>de</strong> antenna system should not be lo cat ed in the vicinity of overhead power lines or other electric light or power circuits,<br />
or where it can fall into such power lines or circuits. When installing an outsi<strong>de</strong> antenna system extreme care should be taken<br />
to keep from touching such power lines or circuits as contact with them might be fatal.<br />
20) Unplug this <strong>LCD</strong> TV from the wall outlet, and refer servicing to qualified service personnel un<strong>de</strong>r the following conditions:<br />
a. When the power cord or plug is damaged or frayed.<br />
b. If liquid has been spilled into the <strong>LCD</strong> TV.<br />
c. If the <strong>LCD</strong> TV has been exposed to rain or water.<br />
d. If the <strong>LCD</strong> TV does not operate normally by following the operating instructions.<br />
Adjust only those controls that are covered by the operating instructions as improper adjustment of other<br />
controls may result in damage and will often require extensive work by a qualified technician to restore the <strong>LCD</strong><br />
TV to normal operation.<br />
e. If the <strong>LCD</strong> TV has been dropped or the cabinet has been damaged.<br />
f. When the <strong>LCD</strong> TV exhibits a distinct change in performance - this indicates a need for service.<br />
21) When replacement parts are required, be sure the service technician uses replacement parts specified by the manufacturer<br />
that have the same characteristics as the original parts. Unauthorized substitutions may result in fire, electric shock, or other<br />
hazards.<br />
22) WARNING : TO REDUCE THE RISK OF FIRE OR ELECTRIC SHOCK, DO NOT EXPOSE THIS APPARATUS TO RAIN<br />
OR MOISTURE.<br />
DO NOT PLACE LIQUID CONTAINERS (FLOWER VASES, CUPS, COSMETICS, ETC.) ABOVE THE SET.<br />
(INCLUDING ON SHELVES ABOVE, ETC.)<br />
23) WARNING : SMALL PARTS CAN PRESENT CHOKING HAZARD IF ACCIDENTALLY SWALLOWED. KEEP SMALL<br />
PARTS AWAY FROM YOUNG CHILDREN.<br />
DISCARD UNNEEDED SMALL PARTS AND OTHER OBJECTS, INCLUDING PACKAGING MATERIALS<br />
AND PLASTIC BAGS/SHEETS TO PREVENT THEM FROM BEING PLAYED WITH BY YOUNG CHILDREN,<br />
CREATING THE POTENTIAL RISK OF SUFFOCATION.<br />
24) CAUTION : TO PREVENT ELECTRIC SHOCK DO NOT USE THIS PLUG WITH A RECEPTACLE OR OTHER OUTLET<br />
UNLESS THE BLADES CAN BE FULLY INSERTED TO PREVENT BLADE EX PO SURE.<br />
25) CAUTION : USE WITH OTHER STAND MAY RESULT IN INSTABILITY POSSIBLY CAUSING INJURY.<br />
26) CAUTION : DANGER OF EXPLOSION IF BATTERY IS INCORRECTLY REPLACED. REPLACE ONLY WITH THE SAME<br />
OR EQUIVALENT TYPE.<br />
NOTE : This equipment is <strong>de</strong>signed to operate in North America and other countries where the broadcasting system and AC<br />
house current are exactly the same as in North America.<br />
■ This product utilizes tin-lead sol<strong>de</strong>r, and has a fluorescent lamp containing a small amount of mercury. Disposal of<br />
these materials may be regulated in your community due to environmental consi<strong>de</strong>rations. For disposal or re cy cling<br />
information please contact your local authorities, or the Electronics Industries Alliance: www.eiae.org.<br />
Fe<strong>de</strong>ral Communication Commission Information<br />
This equipment has been tested and found to comply with the limits for a TV Broadcast Receiver, pursuant to Part 15 of<br />
the FCC Rules. These limits are <strong>de</strong>signed to provi<strong>de</strong> reasonable protection against harmful interference in a resi<strong>de</strong>ntial<br />
installation. This equipment generates, uses and can radiate radio frequency energy and, if not installed and used in<br />
accordance with the instructions, may cause harmful interference to radio communications. However, there is no guarantee<br />
that interference will not occur in a particular installation. If this equipment does cause or receive interference, which can be<br />
<strong>de</strong>termined by turning equipment off and on, the user is encouraged to try to correct the interference by one or more of the<br />
following measures:<br />
Reorient or relocate the TV antenna.<br />
Increase the separation between TV and other equipment.<br />
Connect TV into separate outlet from other equipment.<br />
Consult the <strong>de</strong>aler or an experienced radio / TV technician for help.<br />
FCC Caution: Any changes or modifications not expressly approved by the party responsible for compliance could void<br />
the user’s authority to operate this equipment.<br />
5
6<br />
Accessories/Option<br />
Check you have all the items shown.<br />
Accessories<br />
□ Remote Control<br />
Transmitter<br />
• EUR7613ZF0<br />
1<br />
2<br />
push<br />
sli<strong>de</strong> open<br />
Note the correct<br />
polarity (+ or -).<br />
close<br />
Please contact your nearest <strong>Panasonic</strong> <strong>de</strong>aler<br />
to purchase the recommen<strong>de</strong>d wall-hanging<br />
bracket. For additional <strong>de</strong>tails, please refer to the<br />
wall-hanging bracket installation manual.<br />
Wall-hanging bracket<br />
(vertical)<br />
• TY-WK32LR2W<br />
□ Batteries for the Remote<br />
Control Transmitter (2)<br />
AA Battery<br />
•<br />
Installing remote’s batteries<br />
•<br />
•<br />
• •<br />
•<br />
□ <strong>Operating</strong> <strong>Instructions</strong><br />
□ Product Registration Card<br />
(U.S.A.)<br />
□ Customer Care Plan Card<br />
(U.S.A.)<br />
Caution<br />
Incorrect installation may cause battery leakage and corrosion,<br />
resulting in damage to the remote control unit.<br />
Do not mix old and new batteries.<br />
Do not mix different battery types (such as alkaline and<br />
manganese batteries).<br />
Do not use rechargeable (Ni-Cd) batteries.<br />
Do not burn or break batteries.<br />
Make a note of the remote control co<strong>de</strong>s before changing<br />
batteries in case the co<strong>de</strong>s are reset. (p. 37-38)<br />
Optional accessory<br />
WARNING<br />
Failure to use a <strong>Panasonic</strong> bracket or choosing to mount the unit<br />
• yourself will be done at the risk of the consumer.<br />
Any damage resulting from not having a professional installer<br />
mount your unit will void your warranty.<br />
Always be sure to ask a qualified technician to carry out set-up.<br />
• Incorrect fitting may cause equipment to fall, resulting in injury<br />
and product damage.<br />
Do not mount this <strong>LCD</strong> <strong>Television</strong> directly below ceiling lights<br />
• (such as spotlights, floodlights or halogen lights) which typically<br />
give off high heat. Doing so may warp or damage plastic cabinet<br />
parts.<br />
How to remove the TV-Stand<br />
1 Remove two screws 2<br />
Pull out the plastic portion<br />
Foam mat or thick soft cloth<br />
Remove four screws<br />
Pull out the metallic portion
I<strong>de</strong>ntifying Controls<br />
Power indicator (on : red, off : no light)<br />
Remote control sensor<br />
Within about 23 feet (7 meters) in front of the TV set.<br />
Note<br />
The TV consumes some power as long as the power cord is inserted into the wall outlet.<br />
•<br />
Turns power On/Off<br />
(used when the unit Power button is on)<br />
Sets the remote to communicate with<br />
other equipments (p. 20)<br />
Volume<br />
Menu navigations<br />
Selects channels in sequence<br />
Menu navigations<br />
Displays Main Menu (p. 14-15)<br />
Selects input mo<strong>de</strong> (p. 12)<br />
Displays or removes the channel banner<br />
(p. 10)<br />
Switches to previously viewed channel<br />
and input mo<strong>de</strong>.<br />
Sleep timer (MINUTES) (p. 10)<br />
Changes aspect ratio (p. 11, 40)<br />
Receiver Location<br />
Locate at a comfortable distance for viewing. Avoid placing where sunlight or other bright light (including reflections)<br />
will fall on the screen.<br />
Use of some types of fluorescent lighting can reduce remote control transmitter range.<br />
A<strong>de</strong>quate ventilation is essential to prevent internal component failure. Keep away from areas of excessive heat or<br />
moisture.<br />
Adjust the stand to your <strong>de</strong>sired angle.<br />
The stand angle can be rotated 20 ° to the right / left.<br />
How to use the <strong>LCD</strong> stand<br />
Switches TV/VIDEO<br />
POWER button<br />
Volume<br />
Menu navigations<br />
Selects channels<br />
in sequence<br />
Selects Audio Mo<strong>de</strong> for TV Viewing<br />
(p. 10)<br />
Selects/OK/Change<br />
RETURN (to previous menu)<br />
Exit (from the menu)<br />
Operates the Favorite channel list<br />
function. (p. 11)<br />
GUIDE for DBS<br />
Sound mute On/Off<br />
Numeric keypad to select<br />
any channel or press to enter<br />
alphanumeric input in menus. (p. 10)<br />
Direct channel access for DTV and<br />
DBS (p. 10)<br />
Demonstrates picture quality in Vivid<br />
mo<strong>de</strong> (p. 10, 14-15)<br />
External equipment operations<br />
(p. 12, 36) (VCRs, DVDs, etc.)<br />
Quick Start Gui<strong>de</strong> I<strong>de</strong>ntifying Controls<br />
Accessories/Options<br />
7
8<br />
Connection<br />
■ Watching TV<br />
•<br />
Back of the unit<br />
Power Cord<br />
(Connect after all the<br />
other connections.)<br />
ANT<br />
To record TV shows<br />
S-Vi<strong>de</strong>o signals have<br />
priority.<br />
Cable BOX<br />
IN OUT<br />
Vi<strong>de</strong>o<br />
IN<br />
L<br />
Audio<br />
OUT<br />
R<br />
Vi<strong>de</strong>o<br />
OUT<br />
L<br />
Audio<br />
IN<br />
R<br />
S-Vi<strong>de</strong>o<br />
OUT<br />
ANT IN<br />
ANT OUT<br />
Note<br />
All cables and external equipments shown in this book are not supplied with the TV.<br />
For additional assistance, visit us at www.panasonic.com<br />
When connecting vi<strong>de</strong>o cables, priority is given to the S-Vi<strong>de</strong>o cable when both the S-VIDEO input terminal and<br />
the VIDEO input terminal are connected.<br />
When receiving digital channel signals, all digital formats are down-converted to composite NTSC vi<strong>de</strong>o to be<br />
output through “OUTPUT” terminals.<br />
Some programs contain a copyright protection signal to prevent VCR recording.<br />
or<br />
or<br />
VHF/UHF aerial<br />
Vi<strong>de</strong>o recor<strong>de</strong>r<br />
with TV Tuner<br />
DVD Recor<strong>de</strong>r /<br />
VCR
First Time Setup<br />
“First time setup” is displayed only when the TV is turned on for the first time after the power cord is<br />
inserted into a wall outlet.<br />
Available only when “Auto power on” (p. 14-15) is set to “Off”.<br />
1<br />
2<br />
3<br />
Turn the TV On with the POWER<br />
button<br />
Select your language<br />
First time setup<br />
Language<br />
Auto program<br />
Language<br />
Language English<br />
English Español Français<br />
First time setup<br />
Language<br />
Auto program<br />
Press to go to previous screen.<br />
Or, select icon, then press OK<br />
for same results.<br />
Auto channel setup<br />
Select “Auto program”<br />
next<br />
select<br />
next<br />
select<br />
Select antenna and input mo<strong>de</strong>s<br />
Auto program<br />
ANT In Cable<br />
Mo<strong>de</strong><br />
All<br />
Start scan<br />
ANT In<br />
Cable: Cable TV Antenna: Antenna<br />
Mo<strong>de</strong><br />
All : digital and analog<br />
Analog : analog only (Reduces time for<br />
scanning)<br />
About broadcasting systems • Analog : traditional TV system<br />
Digital : new system that allows you to view<br />
more channels featuring high-quality<br />
vi<strong>de</strong>o and sound<br />
Start scanning the channels<br />
Auto program<br />
ANT In Cable<br />
Mo<strong>de</strong><br />
All<br />
Start scan<br />
Now scanning analog channel ...<br />
Progress<br />
•<br />
Confirm registered channels<br />
Favorite<br />
- - -<br />
2<br />
Edit<br />
Apply<br />
Add<br />
No<br />
Yes<br />
select<br />
“Start<br />
scan”<br />
Available channels • (analog/digital)<br />
are automatically<br />
set.<br />
If OK is not pressed after selecting “Apply”,<br />
the channels will not be memorized.<br />
■ Press to exit or return to previous screen<br />
start<br />
select<br />
“Apply”<br />
Note<br />
To change setting later, go to Menu screen (p. 14-15)<br />
•<br />
set<br />
select<br />
ok<br />
Quick Start Gui<strong>de</strong> First Time Setup<br />
Connection<br />
9
10<br />
Watching TV<br />
•<br />
Connect cable Box when watching cable TV. (p. 8)<br />
For receiving digital broadcasting of cable TV, connect Cable TV directly to “ANT” terminal.<br />
Switch to TV mo<strong>de</strong><br />
1 3<br />
2<br />
Turn power on<br />
■ Other Useful Functions (Operate after )<br />
Sleep Timer<br />
Picture<br />
Demonstrations<br />
Listen<br />
with SAP<br />
(Secondary<br />
Audio<br />
Program)<br />
Information<br />
Recall<br />
Select a channel number<br />
15-2<br />
ABC - HD CC SAP T V -G 1080I Standard 4 : 3 30<br />
up<br />
down<br />
or<br />
■ To directly input the digital channel<br />
number<br />
When tuning digital channel,<br />
press the button to enter the<br />
minor number in a compound<br />
channel number.<br />
example: CH15-1:<br />
Switches the unit OFF in a preset amount of time from 0 to 90 minutes in 30<br />
minute intervals.<br />
0/30/60/90 (minutes) •<br />
■ Selects Audio Mo<strong>de</strong> for TV Viewing<br />
Demonstrates picture quality in vivid mo<strong>de</strong><br />
(p. 14-15)<br />
Digital mo<strong>de</strong> • Press SAP to select the next audio track (if available) when receiving a digital channel.<br />
Audio track 1 of 1<br />
(English)<br />
on Vivid mo<strong>de</strong><br />
Demo<br />
off<br />
Analog mo<strong>de</strong> • Press SAP to select the <strong>de</strong>sired audio mo<strong>de</strong>.<br />
• Each press of SAP will change the audio mo<strong>de</strong>. (Stereo/SAP/Mono)<br />
Displays or removes the channel banner.<br />
Channel<br />
Station<br />
i<strong>de</strong>ntifier<br />
SAP Signal<br />
resolution<br />
Rating Level<br />
Picture<br />
mo<strong>de</strong><br />
Sleep timer<br />
remaining time<br />
Aspect ratio
Change<br />
aspect<br />
ratio<br />
Call up<br />
a favorite<br />
channel<br />
•<br />
Change the aspect (p. 40)<br />
Setting 1/3<br />
[1]<br />
[2]<br />
[3]<br />
[4]<br />
[5]<br />
3 select Press ▲▼to highlight a position<br />
on the list.<br />
Then, press OK to memorize the<br />
ok displayed CH in that position.<br />
• You can also use the NUMBER<br />
keys (1-9 and 0) to select the<br />
Setting 1/3<br />
recor<strong>de</strong>d list numbers (1-9 and<br />
[1] 26-1<br />
[2]<br />
[3]<br />
[4]<br />
[5]<br />
0). By doing so, the numbers<br />
will be directly recor<strong>de</strong>d without<br />
having to press the OK key.<br />
Each press changes the mo<strong>de</strong>.<br />
•<br />
• 480i, 480p:FULL/JUST/4:3/ZOOM<br />
• 1080i, 720p:FULL/H-FILL/JUST/4:3<br />
■ FAVORITE<br />
Channel numbers registered in Favorite are displayed on the favorite tune<br />
screen. Select the <strong>de</strong>sired broadcast station with the cursor, or using number<br />
keys. (See below)<br />
Note<br />
Reselect “Cable” or “Antenna” in “ANT In” of “Auto program” to switch the signal reception between cable TV and<br />
antenna. (p. 19)<br />
The channel number and volume level remain the same even after the TV is turned off.<br />
Set Favorite Feature Use Favorite Feature<br />
1 Display the channel to be placed on the Favorites list.<br />
2 Hold down FAVORITE for several<br />
seconds.<br />
• Press FAVORITE repeatedly<br />
to change between pages (1/3,<br />
2/3, 3/3, or exit). Pressing ◄ ►<br />
also changes the page.<br />
• To <strong>de</strong>lete a favorite channel<br />
A memorized channel can be removed from the list by<br />
holding down FAVORITE while it’s position is highlighted.<br />
1 Press FAVORITE.<br />
• Press FAVORITE repeatedly<br />
to change between pages (1/3,<br />
2/3, 3/3, or exit). Pressing ◄ ►<br />
also changes the page.<br />
Favorite 1/3<br />
[1]<br />
[2]<br />
[3]<br />
[4]<br />
[5]<br />
2 select Press ▲▼ or a Numbered key<br />
(1-9 and 0) to highlight a channel<br />
on the list.<br />
• Selecting a channel number<br />
from the list with the Number<br />
keys will display the channel<br />
directly.<br />
3 ok<br />
Press OK to display the<br />
highlighted channel.<br />
Viewing Watching TV<br />
11
12<br />
Watching Vi<strong>de</strong>os and DVDs<br />
Some <strong>Panasonic</strong> equipments connected to the TV unit can be operated with the remote control.<br />
Programming the remote control is necessary to operate other manufacturers’ products. (p. 20, 36-38)<br />
■ Press to return to TV<br />
•<br />
Note<br />
For <strong>de</strong>tails, see the<br />
manual of the<br />
equipment<br />
or ask your local<br />
<strong>de</strong>aler.<br />
1<br />
2<br />
3<br />
With VCR or DVD turned On<br />
Switch to external input<br />
Press to display the Input select menu.<br />
Select the input mo<strong>de</strong><br />
Input select<br />
[1] TV<br />
[2] Component<br />
[3] HDMI 1<br />
[4] HDMI 2<br />
[5] Vi<strong>de</strong>o 1<br />
[6] Vi<strong>de</strong>o 2<br />
[7] Vi<strong>de</strong>o 3<br />
(Initial screen)<br />
The terminal and label of the connected<br />
• equipment is indicated.<br />
To label the each connected equipments (p. 13)<br />
Operate<br />
the VCR or DVD with the remote control<br />
(For other operations, see p. 36)<br />
or<br />
select<br />
enter<br />
VCR DVD<br />
Rewind/Fast Forward Reverse/Forward<br />
Play Play<br />
Pause Pause<br />
Stop Stop<br />
VCR Record -<br />
Press corresponding NUMBER<br />
key on the Remote Control to<br />
select the input of your choice.<br />
Press to select the input of your<br />
choice, then press “OK”.<br />
If during selection, no action • is taken for several seconds,<br />
the Input selection menu is<br />
exited.<br />
Label<br />
Vi<strong>de</strong>o 1<br />
VCR<br />
[example]<br />
TV/VCR Open/Close<br />
Terminal<br />
(example)<br />
Channel Down/UP Slow Reverse/Forward
Input Labels/Closed Caption<br />
Input labels<br />
Display<br />
labels of<br />
external<br />
equipments<br />
CC<br />
Display<br />
Closed<br />
Caption<br />
1<br />
2<br />
Display menu<br />
Select “Setup”<br />
Menu<br />
Picture<br />
Audio<br />
Timer<br />
Lock<br />
Setup<br />
(1/3)<br />
next<br />
select<br />
■ To reset the settings<br />
Select “CC reset” and press “OK” button<br />
3<br />
4<br />
Select “Input labels” or “CC”<br />
Setup<br />
CH scan ALL<br />
Language<br />
Program channel<br />
Input labels<br />
CC<br />
Other adjust<br />
Set ■ Press to exit<br />
The labels of equipments connected to external input terminals can be indicated for easy<br />
recognition on the screen. (In selecting input mo<strong>de</strong> of p. 12 )<br />
Select the terminal and the label of the external equipment<br />
Input labels<br />
select Terminal: Comp./HDMI1-2/Vi<strong>de</strong>o1-3<br />
• Comp.<br />
SKIP<br />
Label: SKIP*/VCR/DVD/CABLE/DBS/PVR/<br />
set • HDMI 1<br />
DVD<br />
GAME/AUX/[BLANK] Label Terminal<br />
HDMI 2<br />
Vi<strong>de</strong>o 1<br />
Vi<strong>de</strong>o 2<br />
Vi<strong>de</strong>o 3<br />
SKIP<br />
AUX<br />
SKIP<br />
SKIP<br />
* If “SKIP” is selected for a<br />
non-connected terminal,<br />
its input is skipped when<br />
switched with TV/VIDEO<br />
Vi<strong>de</strong>o 1<br />
VCR<br />
button.<br />
[example]<br />
The television inclu<strong>de</strong>s a built-in <strong>de</strong>co<strong>de</strong>r that is capable or providing a visual display of the<br />
audio portion. The program viewed must provi<strong>de</strong> Closed Captioning (CC) for the television to<br />
display it. (p. 40)<br />
■ Select the item and set<br />
Mo<strong>de</strong> Select “On” (when not using, select “Off”).<br />
CC<br />
select<br />
Analog<br />
(Choose the closed caption service of<br />
Mo<strong>de</strong> Off<br />
Analog broadcasting.)<br />
set<br />
Analog CC1<br />
CC1-4: Information related to pictures<br />
Digital Primary<br />
(Appears at bottom of screen)<br />
Digital setting<br />
T1-4: Textual information<br />
(Appears over entire screen)<br />
CC reset<br />
Digital (The Digital Closed Caption menu lets you<br />
configure the way you choose to view the<br />
The settings in “Analog” or “Digital”<br />
• digital captioning.)<br />
<strong>de</strong>pend on the broadcaster.<br />
Select the setting.<br />
“Primary”, “Second.”, “Service 3”, “Service 4”,<br />
• “Service 5”, “Service 6”<br />
■ To make more in-<strong>de</strong>pth display settings in digital programs<br />
Select “Digital setting” and press “OK” button Select the item and set<br />
Digital setting<br />
select Size: Text size • Font: Text font<br />
Size<br />
set • Style: Text style (Raised, Depressed, etc.)<br />
Automatic • Foreground: Color of text<br />
Font<br />
• Fore opacity: Opacity of text<br />
Automatic • Background: Color of text box<br />
• Style<br />
Back opacity: Opacity of text box<br />
• Automatic<br />
Outline: Outline color of text • (I<strong>de</strong>ntify the setting options on the screen.)<br />
next<br />
select<br />
Input Labels/Closed Caption<br />
Watching Vi<strong>de</strong>os and DVDs<br />
Viewing Advanced<br />
13
14<br />
How to Use Menu Functions<br />
Various menus allow you to change settings for the picture, sound,<br />
and other functions so that you can enjoy watching TV with your<br />
preferences set.<br />
■ Press to exit or return<br />
to previous screen<br />
1<br />
2<br />
3<br />
4<br />
Display menu<br />
Menu<br />
Picture 1/2<br />
Normal<br />
Pic. mo<strong>de</strong><br />
Back light<br />
Picture<br />
Brightness<br />
Color<br />
Tint<br />
Sharpness<br />
Picture 1/2<br />
Normal<br />
Pic. mo<strong>de</strong><br />
Back light<br />
Picture<br />
Brightness<br />
Color<br />
Tint<br />
Sharpness<br />
Displays the functions that • can be set (varies according<br />
to the input signal)<br />
Select the menu<br />
Picture<br />
Audio<br />
Timer<br />
Lock<br />
Setup<br />
Select the item<br />
Set<br />
Standard<br />
+20<br />
+20<br />
0<br />
0<br />
0<br />
0<br />
(example: Picture menu)<br />
Adjust or select<br />
Set<br />
Standard<br />
+20<br />
+20<br />
0<br />
0<br />
0<br />
0<br />
(example: Picture menu)<br />
select<br />
next<br />
select<br />
adjust<br />
or<br />
select<br />
■ Menu list<br />
Menu Item<br />
Picture<br />
Audio<br />
Normal<br />
Pic. mo<strong>de</strong><br />
Back light<br />
Picture, Brightness,<br />
Color, Tint,Sharpness<br />
Color temp<br />
Vivid mo<strong>de</strong><br />
AI picture<br />
Zoom adjust<br />
Vi<strong>de</strong>o NR<br />
Other adjust<br />
3D Y/C filter<br />
Color matrix<br />
Black level<br />
Normal<br />
Bass<br />
Treble<br />
Balance<br />
AI sound<br />
Surround<br />
Other adjust<br />
Timer Sleep<br />
Lock<br />
Setup<br />
HDMI1 in, HDMI2 in<br />
Audio leveler<br />
CH scan<br />
Language<br />
Program channel<br />
Input labels<br />
CC<br />
Other adjust<br />
Auto power on<br />
Prog-out stop<br />
Ctrl with HDMI<br />
Power save<br />
About<br />
Reset
Adjustments/Configurations (alternatives)<br />
Resets all picture adjustments to factory <strong>de</strong>fault settings except for “Other adjust” Normal Set<br />
Basic picture mo<strong>de</strong> (Vivid/Standard/Cinema) Pic. mo<strong>de</strong> Standard<br />
Adjusts luminance of the back light. Back light +20<br />
Adjusts color, brightness, etc. for each picture mo<strong>de</strong> to suit your<br />
taste<br />
Picture +20<br />
Brightness 0<br />
Color 0<br />
Tint 0<br />
Sharpness 0<br />
Selects level of warm colors (red) and cool colors (blue) (Warm/Cool/Normal) Color temp Cool<br />
Enhances green and blue color reproduction, especially outdoor scenes. (On/Off) Vivid mo<strong>de</strong> Off<br />
Controls dark areas without affecting the black level or brightness in the overall picture (On/Off) AI picture On<br />
Adjusts vertical alignment and size when aspect setting is “ZOOM” (p. 40)<br />
Zoom adjust<br />
Reduces noise, commonly called snow. Leave off when receiving a strong signal. (On/Off) Vi<strong>de</strong>o NR Off<br />
Minimizes noise and cross-color in the picture. (On/Off)<br />
Not valid on component and HDMI.<br />
Selects image resolution of component-connected <strong>de</strong>vices (SD/HD)<br />
SD: normal vision HD: high-<strong>de</strong>finition vision<br />
Only 480 p signal accepted; regular TV (NTSC) is not available.<br />
Select Dark or Light <strong>de</strong>pending on the picture conditions. (Dark/Light)<br />
The dark scene becomes easy to see. (Valid only for external input signals.)<br />
On<br />
3D Y/C filter Off<br />
Color matrix SD<br />
Black level Light<br />
Reset Bass, Treble and Balance adjustments to factory <strong>de</strong>fault settings. Normal Set<br />
Increase or <strong>de</strong>crease the bass response. Bass + 4<br />
Increase or <strong>de</strong>crease the treble response. Treble 0<br />
Emphasize the left / right speaker volume. Balance 0<br />
Equalize overall volume levels across all channels and VIDEO inputs. (On/Off) AI sound On<br />
Enhances audio response when listening to stereo. (On/Off) Surround Off<br />
Selects according to the signal when HDMI is connected (Auto/Digital/Analog)<br />
Auto: Automatically selects Analog / Digital signal<br />
HDMI1 in Auto<br />
Minimizes volume disparity after switching to external inputs Audio leveler 0<br />
Automatically turns off the TV after a pre-selected amount of time. 0/30/60/90 (minutes)<br />
Timer setting is also possible by pressing the “Sleep” button on the remote control. (p. 10)<br />
Locks the channels and programs (p. 16-17)<br />
Selects channels to be displayed when pressing “Channel up/down” buttons. (Fav./All)<br />
Fav.: Only channels registered as Favorite (p. 19)<br />
Selects the screen menu language (p. 9) Language<br />
Sets receiving channels. (p. 18-19)<br />
Displays labels of external equipments (p. 13)<br />
Displays subtitles (Closed Caption) (p. 13)<br />
Sets how to power on the TV. (Set/Off)<br />
Set : Connect power cord plug to Cable box etc. and control TV’s On/Off on the connected<br />
equipment. (The Sleep Timer will not function if Auto power on is set.)<br />
Off : Supply Power from wall outlet and control TV’s On/Off on TV si<strong>de</strong>.<br />
(“First time setup” menu is displayed when power cord plug is re-inserted after removing it<br />
from the wall outlet.)<br />
Stops output of the pictures specified in this menu.<br />
(Off/Comp./HDMI 1/HDMI 2/Vi<strong>de</strong>o 1/Vi<strong>de</strong>o 2/Vi<strong>de</strong>o 3)<br />
Comp./HDMI 1/HDMI 2 cannot output vi<strong>de</strong>o signals regardless of “Prog-out stop” setting.<br />
Sleep 60<br />
CH scan All<br />
Program channel<br />
Input labels<br />
CC<br />
Auto power on Off<br />
Prog-out stop Off<br />
Controls equipments connected to HDMI terminals. (p. 21, 22) (On/Off) Ctrl with HDMI On<br />
Reduces screen brightness to lower power consumption. Eye-friendly for viewing in a dark room (Standard/Saving) Power save Standard<br />
Displays TV version and software license.<br />
Performing Reset will clear all items set with Setup, such as channel settings. (p. 18) Use Reset with care.<br />
In VIDEO mo<strong>de</strong>, the Audio menu and Setup menu give a smaller number of options.<br />
•<br />
Reset<br />
On<br />
About<br />
How to Use Menu Functions<br />
(picture, sound quality, etc.)<br />
Advanced<br />
15
16<br />
Channel Lock<br />
You can lock out specified channels or shows to prevent children from watching objectionable content.<br />
■ Press to exit<br />
•<br />
Caution<br />
Make a note of your<br />
password in case<br />
you forget it. (If you<br />
have forgotten your<br />
password, consult your<br />
local <strong>de</strong>aler.)<br />
•<br />
Note<br />
When you select a<br />
locked channel,<br />
a message will be<br />
displayed that allows<br />
you to view the<br />
channel if you input<br />
your password.<br />
1<br />
2<br />
3<br />
4<br />
Display menu<br />
Select “Lock”<br />
You will be asked to enter your password each time you display the Lock menu.<br />
Menu<br />
next<br />
Picture<br />
Audio<br />
Timer<br />
Lock<br />
Setup<br />
Input your 4-digit password<br />
A 4-digit co<strong>de</strong> must be entered to view a blocked program or change rating<br />
settings.<br />
For the first time, input the • number twice to register it.<br />
Enter password.<br />
----<br />
Select the Lock mo<strong>de</strong><br />
Lock<br />
Mo<strong>de</strong> Off<br />
Channel<br />
Program<br />
Change password<br />
•<br />
select<br />
change<br />
Off: “Channel lock” not activated<br />
All: Locks all channels and Vi<strong>de</strong>o inputs<br />
Game: Locks CH3, CH4, and Vi<strong>de</strong>o inputs<br />
CH: Locks specified channels (analog/digital)<br />
■ To change the password<br />
In , select “Change password” and press “OK” button<br />
Input the new 4-digit password twice<br />
■ To cancel the “Channel lock”<br />
Select “Off” in
■ To select the channel or the rating of the program to be locked<br />
Channel<br />
Lock<br />
Block<br />
program<br />
•<br />
•<br />
Select up to 7 (1-7) channels to be blocked out. These channels will be blocked out regardless<br />
of the program rating.<br />
Select “CH” in<br />
Select “Channel”<br />
Lock<br />
Mo<strong>de</strong><br />
Channel<br />
Program<br />
CH<br />
Lock<br />
Mo<strong>de</strong> CH<br />
Channel<br />
Program<br />
Change password<br />
Program lock<br />
MPAA<br />
U.S.TV<br />
C.E.L.R.<br />
C.F.L.R.<br />
Monitor out<br />
Off<br />
Channel lock<br />
CH 1 3 - 0<br />
CH 2<br />
CH 3<br />
■ To set rating level<br />
“V-chip” technology enables restricted shows to be locked according to TV ratings.<br />
Select “Program”<br />
next<br />
select<br />
next<br />
select<br />
Select channel to lock<br />
select “CH1-7”<br />
select channel<br />
Select the rating to be locked<br />
Example of “MPAA” (U.S movie ratings)<br />
Select the rating category you wish Off No rating<br />
to follow<br />
G General Audience: All ages admitted<br />
Program lock<br />
set<br />
PG Parental Guidance Suggested<br />
MPAA<br />
U.S.TV<br />
PG-13<br />
Parents Strongly Cautioned: Inappropriate for<br />
children un<strong>de</strong>r 13<br />
C.E.L.R.<br />
select<br />
C.F.L.R.<br />
Monitor out On<br />
MPAA:U.S movie ratings • U.S.TV:U.S TV program ratings<br />
• C.E.L.R:Canadian English ratings<br />
• C.F.L.R:Canadian French ratings<br />
•<br />
■ To disable recording of the locked program<br />
R<br />
Restricted: Un<strong>de</strong>r 17 requires accompanying<br />
parent or adult guardian<br />
NC-17 No one 17 and un<strong>de</strong>r admitted<br />
X Adults only<br />
To get other information (p. 39)<br />
•<br />
Select “Monitor out” in “Program lock” menu ( )<br />
On : Turns on the monitor terminal output for programs that have<br />
been set to “Blocked.”<br />
Off : Turns off the monitor terminal output for programs that have<br />
been set to “Blocked.”<br />
Caution<br />
The V-Chip system that is used in this set is capable of blocking “NR” programs (non rated, not applicable and<br />
none) as per FCC Rules Section15.120(e)(2). If the option of blocking “NR” programs is chosen “unexpected and<br />
possibly confusing results may occur, and you may not receive emergency bulletins or any of the following types of<br />
programming:”<br />
• Emergency Bulletins (Such as EAS messages, weather warnings and others)<br />
• Locally originated programming • News • Political • Public Service Announcements • Religious • Sports<br />
• Weather<br />
Note<br />
The Off rating is in<strong>de</strong>pen<strong>de</strong>nt of other ratings.<br />
When placing a block on a specific age based rating level, the Off rating and any other more restrictive ratings will<br />
also be blocked.<br />
select<br />
Channel Lock<br />
Advanced<br />
17
18<br />
Editing and Setting Channels<br />
The current channel settings can be changed according to your needs and reception conditions.<br />
■ Press to exit<br />
1<br />
2<br />
3<br />
4<br />
5<br />
Display menu<br />
Select “Setup”<br />
Menu<br />
Picture<br />
Audio<br />
Timer<br />
Lock<br />
Setup<br />
Select “Program channel”<br />
Setup<br />
CH scan ALL<br />
Language<br />
Program channel<br />
Input labels<br />
CC<br />
Other adjust<br />
Select the function<br />
Program channel<br />
Auto<br />
<strong>Manual</strong><br />
Signal meter<br />
Set<br />
next<br />
select<br />
next<br />
select<br />
next<br />
select<br />
■ To reset the settings of setup menu<br />
Select “Reset” in Setup menu ( ) and press “OK” button<br />
Input your 4-digit password with number buttons<br />
Select “YES” on the confirmation screen and press “OK”<br />
button<br />
Auto<br />
Set<br />
automaticallty<br />
<strong>Manual</strong><br />
Set<br />
manually<br />
Signal<br />
meter<br />
Check<br />
signal<br />
strength
Automatically searches and adds receivable channels to memory.<br />
Select “ANT In”<br />
Select “Mo<strong>de</strong>”<br />
Auto program<br />
ANT In Cable<br />
Mo<strong>de</strong><br />
All<br />
Start scan<br />
Favorite<br />
- - -<br />
CH<br />
1<br />
2<br />
3<br />
4<br />
5<br />
Caption<br />
- - -<br />
- - -<br />
- - -<br />
- - -<br />
Add<br />
No<br />
Favorite<br />
- - -<br />
2<br />
- - -<br />
- - -<br />
- - -<br />
Edit<br />
Apply<br />
Add<br />
No<br />
Yes<br />
No<br />
No<br />
No<br />
set<br />
select<br />
Select “Start scan”<br />
Caption select<br />
Preset<br />
Favorite<br />
Favorite<br />
start<br />
select<br />
Caption <strong>de</strong>tail<br />
12<br />
Settings are ma<strong>de</strong> automatically<br />
After completing the setting, • select “Apply”. (see below ).<br />
All previously memorized • channels are erased.<br />
Use this procedure when changing setting of receiving channels or changing the channel display.<br />
Also, use to add or <strong>de</strong>lete channels from channel list manually.<br />
Select “Edit” Edit<br />
Edit Apply<br />
• Apply<br />
Caption<br />
select<br />
Select the item to be edited<br />
(Select Cable or Antenna)<br />
Select All or Analog<br />
All: Analog and digital<br />
Analog: Analog only<br />
next<br />
next<br />
Caption Favorite<br />
Add<br />
• Caption:<br />
Changes the station i<strong>de</strong>ntifier<br />
• Favorite:<br />
Registers channel to Favorites List<br />
• Add:<br />
Adds or <strong>de</strong>letes channels<br />
select item to edit<br />
(Caption/Favorite/Add)<br />
---<br />
• Apply<br />
Favorite<br />
Caption <strong>de</strong>tail<br />
Rename (maximum 7 characters available)<br />
select<br />
Check the signal strength if interference is found or freezing occurs on a digital image.<br />
Signal meter<br />
If the signal is weak, check the antenna.<br />
• If no problem is found, consult your<br />
CH<br />
2 - 1<br />
change channel<br />
local <strong>de</strong>aler.<br />
Signal strength<br />
Current 85 %<br />
Peak level 85 %<br />
ok<br />
Signal intensity<br />
Note<br />
Not available if “Cable” is selected in “ANT In”<br />
• (see above).<br />
Effective only for digital antenna channels.<br />
•<br />
Preset<br />
Select the station i<strong>de</strong>ntifier<br />
select<br />
set/next<br />
next<br />
•<br />
Select “Apply”<br />
Press to move cursor to “Apply”<br />
Add<br />
Favorite<br />
Select the number<br />
Press “OK” button to select “Yes (add)” or “No<br />
(<strong>de</strong>lete)”<br />
ok<br />
(to enter your<br />
program)<br />
If “Channel lock” (p. 16) is activated and “Auto”, “<strong>Manual</strong>” or “Signal meter” is selected, “Enter password.” will be displayed.<br />
•<br />
Editing and Setting Channels<br />
Advanced<br />
19
20<br />
<strong>Operating</strong> Peripheral Equipment<br />
You can operate other manufacturers’ equipments using this TV’s remote control.<br />
•<br />
Connect the external equipments to the TV and<br />
Power Off the external equipments<br />
Press both buttons simultaneously<br />
for more than 3 seconds.<br />
Release the buttons when the equipment selection<br />
• buttons start flashing.<br />
Select the equipment<br />
with the equipment selection button<br />
The selected button remains lit (other buttons are not<br />
• lit).<br />
Input the equipment’s 4-digit remote<br />
control co<strong>de</strong> (p. 37-38)<br />
Operate the equipment with the<br />
remote control (p. 36)<br />
The external equipment turns On.<br />
•<br />
■ If the equipment does not operate with<br />
remote control<br />
When your equipment has a single co<strong>de</strong><br />
• Input the remote control co<strong>de</strong> again<br />
When your equipment has multiple co<strong>de</strong>s<br />
• Change the co<strong>de</strong> with above and test again<br />
Caution<br />
Registration will fail if the wrong co<strong>de</strong> is input or it takes more than 30 seconds to register.<br />
To find a co<strong>de</strong> not listed in the co<strong>de</strong> list<br />
This procedure searches all co<strong>de</strong>s and is called the “sequence method.”<br />
After step above, change the co<strong>de</strong> and<br />
test<br />
•<br />
change<br />
1<br />
2<br />
3<br />
4<br />
5<br />
Operate the equipment with the<br />
remote control (p. 36)<br />
Repeat until the co<strong>de</strong> is found<br />
It may take many attempts before the correct<br />
co<strong>de</strong> is found<br />
+<br />
When the correct co<strong>de</strong> is found<br />
store
Control with HDMI “HDAVI Control”<br />
Newer <strong>Panasonic</strong> audio-vi<strong>de</strong>o products with HDMI output connections can be controlled using the TV’s<br />
remote. Limited features such as automatic switching to the TV’s HDMI input are available.<br />
This feature is limited to mo<strong>de</strong>ls incorporating <strong>Panasonic</strong>’s “Control with HDMI”. Refer to the mo<strong>de</strong>ls listed on page<br />
• 22 or the individual instruction manuals for compatibility information.<br />
Depending on the cable used, this function may not be possible.<br />
•<br />
Automatic<br />
input<br />
switching<br />
Power on<br />
link<br />
Power off<br />
link<br />
•<br />
When “Ctrl with HDMI” is set to “On”, at the start of DIGA playback, TV input automatically<br />
switches to the input compatible with playback equipment.<br />
If using DIGA operation and the DIGA menu is displayed, the TV input automatically<br />
• switches to DIGA. If TV power is Off, it switches On.<br />
When “Ctrl with HDMI” is set to “On”, the TV is automatically turned on and switched to the<br />
appropriate HDMI input whenever a “Control with HDMI” compatible DIGA (<strong>Panasonic</strong> DVD<br />
Recor<strong>de</strong>r) is initially turned on and Play mo<strong>de</strong> is selected.<br />
When “Ctrl with HDMI” is set to “On” and the TV is turned off, the connected DIGA (<strong>Panasonic</strong><br />
DVD<br />
•<br />
Recor<strong>de</strong>r) is also automatically turned off.<br />
DIGA (<strong>Panasonic</strong> DVD Recor<strong>de</strong>r) will not turn off if it is still in rec mo<strong>de</strong>.<br />
Note<br />
Before using HDMI control functions, the connected equipment (DIGA) must also be set. For <strong>de</strong>tails, see the<br />
operation manual for each equipment.<br />
•<br />
For equipment connection <strong>de</strong>tails, see p. 22.<br />
Default setting is “On”. If no HDMI equipments are connected or standard HDMI (non- “Control with HDMI”) are<br />
used, set to “Off”. (see below)<br />
1<br />
2<br />
Display menu<br />
Select “Setup”<br />
Menu<br />
Picture<br />
Audio<br />
Timer<br />
Lock<br />
Setup<br />
select<br />
next<br />
3<br />
4<br />
5<br />
Select “Other adjust”<br />
Setup<br />
CH scan ALL<br />
Language<br />
Program channel<br />
Input labels<br />
CC<br />
Other adjust<br />
Select “Ctrl with HDMI”<br />
Other adjust<br />
Auto power on<br />
Off<br />
Prog-out stop<br />
Off<br />
Ctrl with HDMI On<br />
Power save<br />
Standard<br />
Select “On” or “Off”<br />
■ Press to exit or return to previous screen<br />
select<br />
next<br />
select<br />
change<br />
Control with HDMI “HDAVI Control”<br />
<strong>Operating</strong> Peripheral Equipment<br />
Advanced<br />
21
22<br />
Recommen<strong>de</strong>d AV connections<br />
These diagrams show our recommendations for how to connect the TV unit to your various equipments.<br />
For other connections, consult the instructions of each equipment and the specifications (p. 44).<br />
For additional assistance, please visit our website at www.panasonic.com<br />
•<br />
M3 plug<br />
Headphones/<br />
Earphones<br />
(not supplied)<br />
Back of the unit<br />
■ To watch camcor<strong>de</strong>r<br />
images<br />
Camcor<strong>de</strong>r<br />
VCR<br />
DVD Player<br />
■ To watch digital<br />
vi<strong>de</strong>o image<br />
DVD Player or<br />
Set Top Box<br />
(HDMI compatible<br />
machine only)<br />
Power Cord<br />
(Connect after all the other<br />
connections.)<br />
Audio<br />
cable<br />
1<br />
2<br />
AV IN SERVICE ONLY<br />
HDMI cable<br />
HDMI-DVI<br />
conversion cable<br />
■ Control with HDMI<br />
(p. 21)<br />
Connect with HDMI cable<br />
(HDMI 1 is recommen<strong>de</strong>d)<br />
DIGA<br />
(<strong>Panasonic</strong> DVD Recor<strong>de</strong>r)<br />
Note<br />
Individual HDMI equipments may require additional menu settings specific to each mo<strong>de</strong>l. Please refer to their<br />
respective operating instruction manuals.<br />
When connecting to HDMI 2, set the input mo<strong>de</strong> to HDMI 2 (p. 12) initially before connecting to HDMI 2. After<br />
connection, confirm the HDMI control functions (p. 21).<br />
As of March 2006, mo<strong>de</strong>ls with “Control with HDMI” are: DMR-ES25, DMR-ES45V, DMR-EH55, DMR-EH75V<br />
and DMR-ES46V (USA only)<br />
See www.panasonic.com for future mo<strong>de</strong>ls with “Control with HDMI”<br />
or
ANT<br />
DIGITAL AUDIO OUT<br />
Cable TV<br />
Cable Box<br />
or<br />
Digital Audio Out<br />
or<br />
■ DVD Recor<strong>de</strong>r / VCR<br />
Optical digital<br />
audio cable<br />
•<br />
•<br />
•<br />
OPTICAL IN<br />
Amplifier<br />
■ To watch DVDs<br />
DVD Player<br />
Set Top Box<br />
■ To listen to the TV through<br />
speakers<br />
Turn Off the • TV speakers.<br />
Note<br />
Set the TV channel to CH3 or CH4 for using Cable Box<br />
Connection.<br />
For further information on Cable Box Connection, consult to<br />
your local cable company.<br />
The picture and audio input signals connected to a terminal<br />
specified in “Prog-out stop” (p. 14-15) cannot be output from<br />
“OUTPUT” terminals.<br />
However, audio output can be obtained from “Digital Audio<br />
Out” terminal.<br />
When an equipment (STB, DVD, etc.) is connected to HDMI<br />
or COMPONENT terminals, only audio signals can be<br />
obtained. No vi<strong>de</strong>o signals can be out put.<br />
Recommen<strong>de</strong>d AV connections<br />
Advanced<br />
23
24<br />
Accesorios/Opción<br />
Compruebe que ha recibido todos los elementos que se indican.<br />
□ Transmisor <strong>de</strong><br />
mando a distancia<br />
• EUR7613ZF0<br />
Accesorios<br />
1<br />
2<br />
Empuje<br />
Deslice para abrir<br />
Cierre<br />
Ponga las polarida<strong>de</strong>s (+ ó -)<br />
en las posiciones correctas<br />
Póngase en contacto con su concesionario<br />
<strong>Panasonic</strong> más cercano para adquirir la ménsula<br />
<strong>de</strong> montaje en pared recomendada. Para conocer<br />
más <strong>de</strong>talles, consulte el manual <strong>de</strong> instalación<br />
<strong>de</strong> la ménsula <strong>de</strong> montaje en pared.<br />
Soporte para colgar<br />
en pared (vertical)<br />
• TY-WK32LR2W<br />
□ Pilas para el transmisor<br />
<strong>de</strong> mando a distancia (2)<br />
Pila AA<br />
•<br />
Instalación <strong>de</strong> las pilas <strong>de</strong>l mando a distancia<br />
•<br />
•<br />
□ <strong>Manual</strong> <strong>de</strong> instrucciones<br />
□ Tarjeta <strong>de</strong>l cliente<br />
(para EE. UU.)<br />
□ Tarjeta para el plan <strong>de</strong><br />
asistencia al cliente<br />
(para EE. UU.)<br />
Precaución<br />
La instalación mal hecha pue<strong>de</strong> causar fugas <strong>de</strong> electrolito y<br />
corrosión, lo que podría dañar el mando a distancia.<br />
No mezcle pilas viejas y nuevas.<br />
• No mezcle pilas <strong>de</strong> tipos diferentes (pilas alcalinas y <strong>de</strong><br />
• manganeso, por ejemplo).<br />
No utilice baterías (Ni-Cd). • No queme ni rompa las pilas.<br />
Anote los códigos <strong>de</strong> mando a distancia antes <strong>de</strong> cambiar las<br />
pilas en el caso <strong>de</strong> que tenga que restablecer los códigos.<br />
(págs. 37-38)<br />
Accesorio opcional<br />
Cómo retirar la base <strong>de</strong>l televisor<br />
1 Retire dos tornillos. 2<br />
Saque la parte <strong>de</strong> plástico.<br />
Estera <strong>de</strong> espuma ó paño<br />
blando y grueso<br />
ADVERTENCIA<br />
No utilizar una ménsula <strong>de</strong> <strong>Panasonic</strong> ó montar la unidad usted<br />
• mismo pue<strong>de</strong> ser la causa <strong>de</strong> que el consumidor corra riesgos.<br />
Cualquier daño que resulte <strong>de</strong> no haber sido un instalador<br />
profesional quien montó su unidad anulará su garantía.<br />
Asegúrese <strong>de</strong> pedir siempre a un técnico calificado que lleve a<br />
• cabo la instalación. Una instalación incorrecta podría ser la causa<br />
<strong>de</strong> que el equipo cayera, causando lesiones a personas y daños<br />
en el producto.<br />
No monte el televisor <strong>LCD</strong> directamente <strong>de</strong>bajo <strong>de</strong> las luces<br />
• <strong>de</strong>l techo (luces direccionales, reflectores ó luces halógenas)<br />
que producen típicamente mucho calor. De lo contrario podrían<br />
<strong>de</strong>formarse ó dañarse las piezas <strong>de</strong> plástico <strong>de</strong> la caja.<br />
Retire cuatro tornillos.<br />
Saque la parte metálica.
I<strong>de</strong>ntificación <strong>de</strong> los controles<br />
•<br />
Nota<br />
El<br />
Conecta/<strong>de</strong>sconecta la alimentación.<br />
(Se utiliza cuando está activado el botón <strong>de</strong> la<br />
alimentación.)<br />
Configura el mando a distancia para<br />
hacer la comunicación con otros<br />
dispositivos.<br />
Volúmen<br />
Navegaciones <strong>de</strong>l menú<br />
Selecciona canales en or<strong>de</strong>n.<br />
Navegaciones <strong>de</strong>l menú<br />
Visualiza el menú principal. (págs. 30-31)<br />
Selecciona el modo <strong>de</strong> entrada. (pág. 32)<br />
Visualiza ó elimina la ban<strong>de</strong>ra <strong>de</strong> canal.<br />
(pág. 28)<br />
Cambia al canal visto previamente.<br />
Temporizador para acostarse<br />
(MINUTOS) (pág. 28)<br />
Cambia la relación <strong>de</strong> aspecto<br />
(pág. 29)<br />
Colocación <strong>de</strong>l receptor<br />
Coloque el receptor a una distancia confortable para ver. Evite colocarlo don<strong>de</strong> la luz solar directa u otra luz brillante<br />
(incluidos reflejos) caiga sobre la pantalla.<br />
La utilización <strong>de</strong> algún tipo <strong>de</strong> iluminación fluorescente pue<strong>de</strong> reducir el alcance <strong>de</strong>l transmisor <strong>de</strong>l mando a distancia.<br />
La ventilación a<strong>de</strong>cuada es esencial para impedir el fallo <strong>de</strong> los componentes internos. Manténgase alejado <strong>de</strong> las<br />
áreas don<strong>de</strong> el calor o la humedad sea excesivo.<br />
Cómo utilizar la base <strong>de</strong>l <strong>LCD</strong><br />
Ajuste el soporte con el ángulo <strong>de</strong>seado<br />
El ángulo <strong>de</strong>l soporte se pue<strong>de</strong> girar 20° hacia la <strong>de</strong>recha/izquierda.<br />
El botón POWER<br />
Volúmen<br />
Navegaciones <strong>de</strong>l<br />
menú<br />
Selecciona canales<br />
Cambia TV/VIDEO<br />
en or<strong>de</strong>n.<br />
Indicador <strong>de</strong> alimentación (conectada: rojo, <strong>de</strong>sconectada: apagado)<br />
Sensor <strong>de</strong>l control remoto<br />
Dentro <strong>de</strong> unos 7 metros enfrente <strong>de</strong>l televisor.<br />
televisor consumirá algo <strong>de</strong> corriente siempre que el enchufe <strong>de</strong>l cable <strong>de</strong> alimentación esté introducido en la toma <strong>de</strong> corriente.<br />
Seleccione el modo <strong>de</strong> audio para<br />
ver la televisión. (pág. 28)<br />
Selección/OK/Cambio<br />
RETURN (para volver al menú anterior)<br />
Salir (<strong>de</strong>l menú)<br />
Controla la función <strong>de</strong> la lista <strong>de</strong><br />
canales favoritos. (pág. 29)<br />
GUÍA para DBS<br />
Encendido / Apagado <strong>de</strong>l<br />
silenciamiento <strong>de</strong>l sonido<br />
Teclado numérico para seleccionar<br />
cualquier canal ó para hacer<br />
introducciones alfanuméricas en los<br />
menús. (pág. 28)<br />
Acceso directo a canales para DTV<br />
y DBS (pág. 28)<br />
Demuestra la calidad <strong>de</strong> la imagen<br />
en el modo vivido. (pág. 28, 30-31)<br />
Operaciones <strong>de</strong> equipos externos<br />
(pág. 32) (Vi<strong>de</strong>ograbadoras, DVDs, etc.)<br />
I<strong>de</strong>ntificación <strong>de</strong> los controles<br />
Accesorios/Opción<br />
Español<br />
[Resumen]<br />
25
26<br />
Conexiones<br />
■ Para ver la televisión<br />
•<br />
Parte posterior <strong>de</strong> la unidad<br />
Cable <strong>de</strong> alimentación <strong>de</strong><br />
CA (Conéctelo <strong>de</strong>spués <strong>de</strong><br />
terminar todas las <strong>de</strong>más<br />
conexiones.)<br />
ANT<br />
Para reproducir ví<strong>de</strong>o<br />
Las señales <strong>de</strong><br />
S-Ví<strong>de</strong>o tienen<br />
prioridad.<br />
Receptor <strong>de</strong> televisión<br />
por cable<br />
IN OUT<br />
Vi<strong>de</strong>o<br />
IN<br />
L<br />
Audio<br />
OUT<br />
R<br />
Vi<strong>de</strong>o<br />
OUT<br />
L<br />
Audio<br />
IN<br />
R<br />
S-Vi<strong>de</strong>o<br />
OUT<br />
ANT IN<br />
ANT OUT<br />
Notas<br />
Con este televisor no se suministran todos los cables ni equipos externos mostrados en este manual.<br />
Para obtener más ayuda, visítenos en www.panasonic.com<br />
Al conectar cables <strong>de</strong> ví<strong>de</strong>o se da prioridad al cable <strong>de</strong> S-ví<strong>de</strong>o cuando están conectados el terminal <strong>de</strong> entrada<br />
S-VIDEO y el terminal <strong>de</strong> entrada VIDEO.<br />
Cuando reciba señales <strong>de</strong> canales digitales, todos los formatos digitales serán convertidos en sentido<br />
<strong>de</strong>scen<strong>de</strong>nte en ví<strong>de</strong>o NTSC compuesto que saldrá a través <strong>de</strong> los terminales <strong>de</strong> salida <strong>de</strong> programas.<br />
Algunos programas contienen una señal <strong>de</strong> protección <strong>de</strong> <strong>de</strong>rechos <strong>de</strong> autor para impedir la grabación con una<br />
vi<strong>de</strong>ograbadora.<br />
ó<br />
ó<br />
Antena <strong>de</strong> VHF / UHF<br />
Vi<strong>de</strong>ograbadora con<br />
sintonizador <strong>de</strong> TV<br />
Grabadora DVD /<br />
Vi<strong>de</strong>ograbadora
Ajuste inicial<br />
“Ajuste inicial” sólo se visualiza cuando el televisor se encien<strong>de</strong> por primera vez <strong>de</strong>spués <strong>de</strong> conectar el<br />
cable <strong>de</strong> alimentación <strong>de</strong> CA en una toma <strong>de</strong> corriente.<br />
Sólo disponible cuando “Autoencendido” (págs. 30-31) está en “Sí”.<br />
1<br />
2<br />
3<br />
Encienda el televisor con el<br />
interruptor POWER.<br />
Seleccione su idioma.<br />
Ajuste inicial<br />
Idioma<br />
Programa auto<br />
Idioma<br />
Idioma Español<br />
English Español Français<br />
Ajuste inicial<br />
Idioma<br />
Programa auto<br />
Siguiente<br />
Seleccione<br />
Pulse para ir a la pantalla anterior<br />
ó seleccionar un icono, y luego<br />
pulse OK para obtener el mismo<br />
resultado.<br />
Configuración automática <strong>de</strong> canales<br />
Seleccione “Programa auto”.<br />
Siguiente<br />
Seleccione<br />
Seleccione la antena y los modos <strong>de</strong> entrada<br />
Programa auto<br />
Ent. ANT Cable<br />
Modo Todos<br />
Iniciar escaneo<br />
Ent. ANT<br />
Cable: Televisión por cable Antena: Antena<br />
Modo<br />
Todos : Digital y analógico<br />
Análogo: Analógico solamente (Reduce el<br />
tiempo para la recepción)<br />
Acerca <strong>de</strong> los sistemas <strong>de</strong> emisión<br />
• Analógico : Sistema <strong>de</strong> televisión tradicional<br />
Digital : Un sistema nuevo que le permite<br />
ver más canales con imagen y<br />
sonido <strong>de</strong> alta calidad.<br />
Programa auto<br />
Ent. ANT Cable<br />
Modo Todos<br />
Iniciar escaneo<br />
Escaneando canales análogos ...<br />
Progreso<br />
Favoritos<br />
- - -<br />
2<br />
Editar<br />
Aceptar<br />
Agregar<br />
No<br />
Si<br />
Establezca<br />
Seleccione<br />
Inicie la exploración <strong>de</strong> los canales.<br />
Inicie.<br />
Seleccione<br />
“Iniciar<br />
escaneo”.<br />
Los canales disponibles • (analógicos/digitales)<br />
se establecen<br />
automáticamente.<br />
Confirme los canales registrados.<br />
Seleccione<br />
“Aceptar”.<br />
Aceptar<br />
Para poner en la memoria los canales que<br />
fueron localizados mediante la exploración<br />
automática, mueva el cursor a “Aceptar” y<br />
pulse OK.<br />
■ Pulse para salir ó volver a la pantalla anterior.<br />
•<br />
•<br />
Nota<br />
Para cambiar la configuración posteriormente, vaya a<br />
la pantalla Menu (Págs. 30-31)<br />
Ajuste inicial<br />
Conexiones<br />
Español<br />
[Resumen]<br />
27
28<br />
Para ver la televisión<br />
Conecte el receptor <strong>de</strong> televisión por cable cuando vaya a ver televisión por cable. (Pág. 26)<br />
■ Otras funciones útiles (Utilícelas <strong>de</strong>spués <strong>de</strong> )<br />
Temporizador<br />
para<br />
acostarse<br />
Demostraciones<br />
<strong>de</strong> imágenes<br />
Escucha<br />
con SAP<br />
(Programa<br />
<strong>de</strong> audio<br />
secundario)<br />
Recuperación<br />
<strong>de</strong><br />
información<br />
Apaga la unidad <strong>de</strong>spués <strong>de</strong> pasar un periodo <strong>de</strong> tiempo <strong>de</strong> 0 a 90 minutos que<br />
pue<strong>de</strong> ajustarse a intervalos <strong>de</strong> 30 minutos.<br />
0/30/60/90 (minutos)<br />
■ Seleccione el modo <strong>de</strong> audio para ver la televisión.<br />
Modo digital • Pulse SAP para seleccionar la siguiente pista <strong>de</strong> audio (si está disponible) cuando se recibe un canal digital.<br />
Pista <strong>de</strong> audio 1 <strong>de</strong> 1<br />
(Ingles)<br />
•<br />
1<br />
2<br />
Cambie al modo <strong>de</strong><br />
televisión.<br />
Conecte la<br />
alimentación<br />
•<br />
Sí Modo vivido<br />
Demostración<br />
No<br />
Modo analógico<br />
Pulse SAP para seleccionar el modo <strong>de</strong> audio como se <strong>de</strong>scribe a continuación.<br />
(La flecha muestra la selección.)<br />
• Cada vez que se pulsa el botón SAP, el modo <strong>de</strong> audio cambiará como se muestra a continuación.<br />
(Estereo/SPA/Mono)<br />
Visualice ó elimine la ban<strong>de</strong>ra <strong>de</strong> canales.<br />
Canal<br />
15-2<br />
ABC - HD CC SPA T V -G 1080I Estándar 4 : 3 30<br />
I<strong>de</strong>ntificador<br />
<strong>de</strong> emisora<br />
3<br />
SPA Resolución<br />
<strong>de</strong> señales<br />
Nivel <strong>de</strong> clasificación<br />
Seleccione un número <strong>de</strong><br />
canal.<br />
Modo <strong>de</strong><br />
imagen<br />
Arriba<br />
Abajo<br />
■ Para introducir directamente el<br />
número <strong>de</strong> un canal digital<br />
ó<br />
Cuando se sintonicen canales<br />
digitales, presione el botón<br />
para introducir el número<br />
menor en un número <strong>de</strong> canal<br />
complejo.<br />
Ejemplo: CH15-1:<br />
Demuestra la calidad <strong>de</strong> la imagen en el modo<br />
vivido.(págs. 30-31)<br />
Relación <strong>de</strong> aspecto<br />
Tiempo restante <strong>de</strong>l<br />
temporizador para acostarse
Cambio <strong>de</strong><br />
la relación<br />
<strong>de</strong> aspecto<br />
Llamada<br />
a un canal<br />
favorito<br />
•<br />
Nota<br />
Vuelva a seleccionar “Cable” ó “Antenna” en “ANT In” <strong>de</strong> “Programa auto” para cambiar la recepción <strong>de</strong> la señal<br />
entre televisión por cable y antena.<br />
El número <strong>de</strong>l canal y el nivel <strong>de</strong>l volúmen se fijan incluso <strong>de</strong>spués <strong>de</strong> apagar el televisor. (vea <strong>de</strong>bajo)<br />
Ajustes 1/3<br />
[1]<br />
[2]<br />
[3]<br />
[4]<br />
[5]<br />
Cambie la relación <strong>de</strong> aspecto<br />
1 Visualice el canal que va a colocar en la lista <strong>de</strong> favoritos.<br />
2 Mantenga pulsado FAVORITE<br />
durante varios segundos.<br />
• Pulse repetidamente FAVORITE<br />
para cambiar entre las páginas<br />
(1/3, 2/3, 3/3 ó salir). Al pulsar<br />
◄ ► también cambia la página.<br />
3 Seleccione Pulse ▲▼ para resaltar una<br />
posición en la lista. Y luego pulse<br />
OK para memorizar el canal<br />
Aceptar visualizado en esa posición.<br />
• También pue<strong>de</strong> utilizar las<br />
teclas numéricas (1-9 y 0) para<br />
Ajustes 1/3<br />
seleccionar los números <strong>de</strong> lista<br />
[1] 26-1<br />
[2]<br />
[3]<br />
[4]<br />
[5]<br />
grabados (1-9 y 0). Al hacer<br />
esto, los números se grabarán<br />
directamente sin tener que<br />
pulsar la tecla OK.<br />
• Para eliminar un canal favorito<br />
Un canal memorizado se podrá eliminar <strong>de</strong> la lista<br />
manteniendo pulsado FAVORITE mientras su posición está<br />
resaltada.<br />
El modo cambia con cada pulsación.<br />
•<br />
• 480i, 480p:COMP/JUSTO/4:3/ACERC<br />
• 1080i, 720p:COMP/H-LLENO/JUSTO/4:3<br />
■ FAVORITOS<br />
Los números <strong>de</strong> canales <strong>de</strong> Favoritos se visualizan en la pantalla <strong>de</strong><br />
sintonización <strong>de</strong> favoritos. Seleccione la emisora <strong>de</strong>seada con el cursor ó<br />
usando las teclas <strong>de</strong> números. (vea <strong>de</strong>bajo)<br />
Configuración <strong>de</strong> la función <strong>de</strong> favoritos Utilización <strong>de</strong> la función <strong>de</strong> favoritos<br />
1 Pulse FAVORITE.<br />
• Pulse repetidamente FAVORITE<br />
para cambiar entre las páginas<br />
(1/3, 2/3, 3/3 ó salir). Al pulsar<br />
◄ ► también cambia la página.<br />
Favoritos 1/3<br />
[1]<br />
[2]<br />
[3]<br />
[4]<br />
[5]<br />
2 Seleccione Pulse ▲▼ ó una tecla numerada<br />
(1-9 y 0 ) para resaltar un canal<br />
<strong>de</strong> la lista.<br />
• Al seleccionar un número <strong>de</strong><br />
canal <strong>de</strong> la lista con las teclas<br />
numeradas se visualizará<br />
directamente el canal.<br />
3 Pulse OK para visualizar el canal<br />
Aceptar resaltado.<br />
Para ver la televisión<br />
Español<br />
[Resumen]<br />
29
30<br />
Cómo utilizar las funciones <strong>de</strong> los menús<br />
Varios menús le permiten cambiar ajustes para la imagen, el sonido<br />
y otras funciones, para po<strong>de</strong>r disfrutar viendo la televisión con sus<br />
preferencias establecidas.<br />
■Pulse para salir ó volver<br />
a la pantalla anterior.<br />
1<br />
2<br />
3<br />
4<br />
Visualice el menú<br />
Menú<br />
Imagen<br />
Audio<br />
Imagen 1/2<br />
Normal<br />
Modo<br />
Luz <strong>de</strong> atrás<br />
Contraste<br />
Brillo<br />
Color<br />
Tinte<br />
Niti<strong>de</strong>z<br />
Imagen 1/2<br />
Normal<br />
Modo<br />
Luz <strong>de</strong> atrás<br />
Contraste<br />
Brillo<br />
Color<br />
Tinte<br />
Niti<strong>de</strong>z<br />
• Visualiza las funciones que<br />
pue<strong>de</strong>n establecerse (cambia<br />
según la señal <strong>de</strong> entrada).<br />
Seleccione el menú<br />
Cronόmetro<br />
Bloqueo<br />
Ajuste<br />
Seleccione el elemento<br />
Sí<br />
Estándar<br />
+20<br />
+20<br />
0<br />
0<br />
0<br />
0<br />
(Ejemplo: Menú Imagen)<br />
Ajuste ó seleccione<br />
Sí<br />
Estándar<br />
+20<br />
+20<br />
0<br />
0<br />
0<br />
0<br />
(Ejemplo: Menú Imagen)<br />
Seleccione<br />
Siguiente<br />
Seleccione<br />
Ajuste<br />
ó<br />
Seleccione<br />
■ Lista <strong>de</strong> menús<br />
Menú Elemento<br />
Imagen<br />
Audio<br />
Normal<br />
Modo<br />
Luz <strong>de</strong> atrás<br />
Contraste, Brillo,<br />
Color, Tinte, Niti<strong>de</strong>z<br />
Temp color<br />
Modo vivido<br />
Imagen IA<br />
Ajuste acerc.<br />
Reduc <strong>de</strong> ruido<br />
Otros ajustes<br />
3D Y/C filtro<br />
Matriz color<br />
Nivel obscuro<br />
Normal<br />
Bajos<br />
Altos<br />
Balance<br />
Sonido IA<br />
Envolvente<br />
Otros ajustes<br />
Cronómetro Apagado<br />
Bloqueo<br />
Ajuste<br />
Ent. HDMI1, Ent. HDMI2<br />
Norm. <strong>de</strong> audio<br />
Búsqueda<br />
Idioma<br />
Programa canal<br />
Títulos <strong>de</strong> entradas<br />
CC<br />
Otros ajustes<br />
Autoencendido<br />
Para prog-out<br />
Ctrl con HDMI<br />
Econ. energía<br />
Acerca <strong>de</strong><br />
Restaurar
Ajustes / Configuraciones (alternativas)<br />
Restablece la configuración <strong>de</strong>l menú <strong>de</strong> imagen (excepto para “Otros ajustes”). Normal Sí<br />
Modo <strong>de</strong> imagen básico (Vívido/Estándar/Cinema) Modo Estándar<br />
Ajusta la luminancia <strong>de</strong> la luz <strong>de</strong> fondo. Luz <strong>de</strong> atrás +20<br />
Ajusta el color, el brillo, etc. para que cada modo <strong>de</strong> imagen se<br />
ajuste a sus gustos.<br />
Contraste +20<br />
Brillo 0<br />
Color 0<br />
Reduce el brillo <strong>de</strong> la pantalla para disminuir el consumo <strong>de</strong> energía. Para ver programas en<br />
habitaciones oscuras sin que se canse la vista. (Estándar/Ahorro)<br />
Visualiza la versión <strong>de</strong>l televisor y la licencia <strong>de</strong>l software.<br />
Al realizar la reposición se cancelarán todos los elementos establecidos con Ajuste como, por<br />
ejemplo, los ajustes <strong>de</strong> canales. Utilice la reposición con cuidado.<br />
En el modo Vi<strong>de</strong>o, el menú Audio y el menú Ajuste ofrecen un número inferior <strong>de</strong> opciones.<br />
•<br />
Tinte 0<br />
Niti<strong>de</strong>z 0<br />
Selecciona el nivel <strong>de</strong> los colores cálidos (rojo) y <strong>de</strong> los colores fríos (azul). (Rojo/Azul/Normal) Temp color Azul<br />
Realza la reproducción <strong>de</strong> los colores ver<strong>de</strong> y azul, especialmente en las escenas <strong>de</strong> exteriores. (Sí/No) Modo vivid No<br />
Controla las áreas oscuras sin afectar al nivel <strong>de</strong>l negro ni al brillo <strong>de</strong> la imagen en general. (Sí/No) Imagen IA Sí<br />
Ajusta la alineación vertical y el tamaño cuando el ajuste <strong>de</strong>l aspecto es “ACERC”<br />
Ajuste acerc.<br />
Reduce el ruido en el canal, comúnmente llamado efecto <strong>de</strong> nieve. Permanece en No cuando se recibe una señal intensa. (Sí/No) Reduc <strong>de</strong> ruido No<br />
Minimiza el ruido y la diafotía cromática en la imagen. (Sí/No)<br />
No es válido en componente y HDMI.<br />
Selecciona la resolución <strong>de</strong> la imagen <strong>de</strong> los dispositivos conectados a componentes. (SD/HD)<br />
SD: Visión normal HD: Visión <strong>de</strong> alta <strong>de</strong>finición<br />
Sólo se acepta la señal 480 p, la televisión convencional (NTSC) no se está disponible.<br />
Selecciona Oscuro ó Claro <strong>de</strong>pendiendo <strong>de</strong> las condiciones <strong>de</strong> la imagen. (Obscuro/Claro)<br />
Las escenas oscuras se pue<strong>de</strong>n ver fácilmente. (Sólo es válido para señales <strong>de</strong> entrada externas.)<br />
On<br />
3D Y/C filtro No<br />
Matriz color SD<br />
Nivel obscuro Claro<br />
Repone los ajustes <strong>de</strong> Bajos, Altos y Balance los ajustes pre<strong>de</strong>terminados en la fábrica. Normal Sí<br />
Aumenta ó disminuye la respuesta <strong>de</strong> los graves. Bajos + 4<br />
Aumenta ó disminuye la respuesta <strong>de</strong> los agudos. Altos 0<br />
Repone los ajustes <strong>de</strong> Bajos, Altos y Balance los ajustes pre<strong>de</strong>terminados en la fábrica. Balance 0<br />
Iguale los niveles <strong>de</strong>l sonido en todos los canales y entradas VIDEO. (Sí/No) Sonido IA Sí<br />
Mejora la respuesta <strong>de</strong> audio cuando se escucha sonido estéreo. (Sí/No) Envolvente No<br />
Selecciona según la señal cuando está conectado HDMI. (Auto/Digital/Análogo)<br />
Auto: Selecciona automáticamente la señal analógica/digital.<br />
Ent. HDMI1 Auto<br />
Minimiza la diferencia <strong>de</strong> volúmen <strong>de</strong>spués <strong>de</strong> cambiar a entradas externas. Norm. <strong>de</strong> audio 0<br />
Apaga automáticamente el televisor <strong>de</strong>spués <strong>de</strong> transcurrido el periodo <strong>de</strong> tiempo preestablecido. 0/30/60/90 (minutos)<br />
También es posible hacer el ajuste <strong>de</strong>l temporizador pulsando el botón “Sleep” <strong>de</strong>l mando a distancia. (pág. 28)<br />
Bloquea canales y programas.<br />
Selecciona los canales que van a visualizarse cuando se pulsan los botones “canal arriba/abajo”. (Fav./Todos)<br />
Fav.: Sólo cuando se registran canales como Favoritos<br />
Selecciona el idioma para los menús <strong>de</strong> la pantalla. (pág. 27) Idioma<br />
Establece los canales <strong>de</strong> recepción.<br />
Etiquetas <strong>de</strong> visualización <strong>de</strong> dispositivos externos<br />
Visualiza subtítulos (subtítulos)<br />
Establece cómo se va a conectar la alimentación <strong>de</strong>l televisor. (Sí/No)<br />
Sí : Conecte la clavija <strong>de</strong>l cable <strong>de</strong> alimentación al receptor <strong>de</strong> televisión por cable, etc., y<br />
controle el encendido/apagado <strong>de</strong>l televisor en el equipo conectado. (El temporizador para<br />
acostarse no funcionará si está activado “Autoencendido”.)<br />
No : Suministre alimentación <strong>de</strong>s<strong>de</strong> una toma <strong>de</strong> corriente y controle el encendido/apagado <strong>de</strong>l<br />
televisor en el propio televisor.<br />
(El menú “Ajuste inicial” se visualiza cuando la clavija <strong>de</strong>l cable <strong>de</strong> alimentación vuelve a<br />
conectarse <strong>de</strong>spués <strong>de</strong> <strong>de</strong>sconectarla <strong>de</strong> la toma <strong>de</strong> corriente.)<br />
Detiene la salida <strong>de</strong> las imágenes especificadas en este menú.<br />
(No/Comp./HDMI 1/HDMI 2/Vi<strong>de</strong>o 1/Vi<strong>de</strong>o 2/Vi<strong>de</strong>o 3)<br />
Comp./HDMI 1/HDMI 2 no pue<strong>de</strong> dar salida a señales <strong>de</strong> ví<strong>de</strong>o in<strong>de</strong>pendientemente <strong>de</strong>l ajuste <strong>de</strong> “Para prog-out”.<br />
Apagado 60<br />
Búsqueda Todos<br />
Programa canal<br />
Títulos <strong>de</strong> entradas<br />
CC<br />
Autoencendido No<br />
Para prog-out No<br />
Controla los equipos conectados a los terminales HDMI (pág. 33, 34) (Sí/No) Ctrl con HDMI Sí<br />
Econ. energía Estándar<br />
Acerca <strong>de</strong><br />
Restaurar<br />
On<br />
Cómo utilizar las funciones <strong>de</strong> los menús<br />
Español<br />
[Resumen]<br />
31
32<br />
Para ver ví<strong>de</strong>os y DVDs<br />
Algunos dispositivos <strong>de</strong> <strong>Panasonic</strong> conectados al televisor pue<strong>de</strong>n ser controlados con el mando a<br />
distancia.<br />
Para controlar los productos <strong>de</strong> otros fabricantes se necesita programar el mando a distancia.<br />
■ Para volver<br />
al televisor<br />
•<br />
Nota<br />
Para conocer <strong>de</strong>talles,<br />
vea el manual <strong>de</strong>l<br />
equipo ó pregunte a su<br />
concesionario local.<br />
1<br />
2<br />
3<br />
Con la vi<strong>de</strong>ograbadora ó DVD encendido<br />
Cambie a entrada externa.<br />
Pulse para visualizar el menú <strong>de</strong> selección <strong>de</strong> entrada.<br />
Seleccione el modo <strong>de</strong> entrada.<br />
Seleccionar entrada<br />
[1] TV<br />
[2] Componente<br />
[3] HDMI 1<br />
[4] HDMI 2<br />
[5] Vi<strong>de</strong>o 1<br />
[6] Vi<strong>de</strong>o 2<br />
[7] Vi<strong>de</strong>o 3<br />
(Pantalla inicial)<br />
ó<br />
Vi<strong>de</strong>ograbadora DVD<br />
Retroceso/Avance rápido Retroceso/Avance<br />
Reproducción Reproducción<br />
Pausa Pausa<br />
Parada Parada<br />
Grabación <strong>de</strong><br />
vi<strong>de</strong>ograbadora<br />
Seleccione.<br />
Introducir.<br />
El terminal y la etiqueta <strong>de</strong>l dispositivo<br />
• conectado se indican.<br />
Para etiquetar cada dispositivo conectado (pág. 13)<br />
-<br />
Etiqueta<br />
Vi<strong>de</strong>o 1<br />
VCR<br />
[ejemplo]<br />
Utilice<br />
la vi<strong>de</strong>ograbadora ó DVD con el mando a distancia<br />
Pulse la tecla <strong>de</strong> número<br />
correspondiente en el mando<br />
a distancia para seleccionar la<br />
entrada <strong>de</strong> su elección.<br />
Pulse para seleccionar la<br />
entrada <strong>de</strong> su elección y luego<br />
pulse “OK”.<br />
Si, durante la selección, no<br />
Televisor/Vi<strong>de</strong>ograbadora Abertura/Cierre<br />
•<br />
se realiza ninguna acción<br />
durante varios segundos, se<br />
saldrá <strong>de</strong>l menú <strong>de</strong> selección<br />
<strong>de</strong> entrada.<br />
Terminal<br />
(ejemplo)<br />
Canal abajo/arriba Retroceso/avance lento
Control con HDMI “HDAVI Control”<br />
Los productos <strong>de</strong> audio-ví<strong>de</strong>o <strong>de</strong> <strong>Panasonic</strong> más recientes equipados con conexiones <strong>de</strong> salida HDMI<br />
pue<strong>de</strong>n ser controlados utilizando el mando a distancia <strong>de</strong>l televisor. Se encuentran disponibles funciones<br />
limitadas como, por ejemplo, el cambio automático a la entrada HDMI <strong>de</strong>l televisor.<br />
Esta función se limita a los mo<strong>de</strong>los que incorporan “Control con HDMI” <strong>de</strong> <strong>Panasonic</strong>.<br />
• Consulte los mo<strong>de</strong>los listados en la página 34 ó los manuales <strong>de</strong> instrucciones individuales para obtener<br />
información relacionada con la compatibilidad.<br />
Dependiendo <strong>de</strong>l cable utilizado, pue<strong>de</strong> que resulte imposible emplear esta función.<br />
•<br />
Cambio<br />
<strong>de</strong> entrada<br />
automático<br />
Apaga<br />
control<br />
Apaga<br />
control<br />
•<br />
Cuando “Ctrl con HDMI” se ponga en “Sí”, al empezar la reproducción <strong>de</strong> DIGA la entrada <strong>de</strong>l<br />
televisor<br />
•<br />
cambia automáticamente a la entrada compatible con el equipo <strong>de</strong> reproducción.<br />
Si se utiliza la operación DIGA y se visualiza el menú DIGA, la entrada <strong>de</strong>l televisor cambia<br />
automáticamente a DIGA. Si el televisor está apagado, éste se encen<strong>de</strong>rá.<br />
Cuando “Ctrl con HDMI” se ponga en “Sí”, el televisor se encen<strong>de</strong>rá y cambiará a la entrada<br />
HDMI apropiada, automáticamente, siempre que un DIGA (Grabadora DVD <strong>de</strong> <strong>Panasonic</strong>)<br />
compatible con “Control con HDMI” se encuentre inicialmente encendido y el modo <strong>de</strong><br />
reproducción esté seleccionado.<br />
Cuando “Ctrl con HDMI” se ponga en “Sí” y se apague el televisor, el DIGA (Grabadora DVD<br />
<strong>de</strong><br />
•<br />
<strong>Panasonic</strong>) conectado también se apagará automáticamente.<br />
DIGA (grabadora DVD <strong>de</strong> <strong>Panasonic</strong>) no se apagará si aún está en el modo <strong>de</strong> grabación.<br />
Nota<br />
Antes <strong>de</strong> utilizar las funciones <strong>de</strong> control HDMI, el equipo conectado (DIGA) <strong>de</strong>berá configurarse. Para conocer<br />
<strong>de</strong>talles, vea el manual <strong>de</strong> funcionamiento <strong>de</strong> cada equipo.<br />
Para conocer <strong>de</strong>talles <strong>de</strong> la conexión <strong>de</strong>l equipo, vea la pág. 34.<br />
• •El ajuste pre<strong>de</strong>terminado es “Sí”. Si no están conectados equipos HDMI ó se utilizan equipos HDMI estándar (que<br />
no sean “Control con HDMI”), ajuste en “No”. (vea <strong>de</strong>bajo)<br />
1<br />
2<br />
Visualice el menú.<br />
Seleccione “Ajuste”.<br />
Menú<br />
Imagen<br />
Audio<br />
Cronόmetro<br />
Bloqueo<br />
Ajuste<br />
Seleccione<br />
Siguiente<br />
3<br />
4<br />
5<br />
Seleccione “Otros ajustes”.<br />
Ajuste<br />
Búsqueda Todos<br />
Idioma<br />
Programa canal<br />
Títulos <strong>de</strong> entradas<br />
CC<br />
Otros ajustes<br />
Seleccione “Ctrl con HDMI”.<br />
Otros ajustes<br />
Autoencendido<br />
Para prog-out<br />
Ctrl con HDMI<br />
Econ. energía<br />
No<br />
No<br />
Sí<br />
Estándar<br />
Seleccione “Sí” ó “No”.<br />
■Pulse para salir ó volver a la pantalla anterior.<br />
Seleccione<br />
Siguiente<br />
Seleccione.<br />
Cambie<br />
Control con HDMI “HDAVI Control”<br />
Para ver ví<strong>de</strong>os y DVDs<br />
Español<br />
[Resumen]<br />
33
34<br />
Conexiones AV recomendadas<br />
Estos diagramas muestran nuestras recomendaciones sobre cómo conectar el televisor a varios equipos.<br />
Para hacer otras conexiones, consulte las instrucciones <strong>de</strong> cada equipo y las especificaciones (pág. 44).<br />
Para obtener ayuda adicional, visite nuestro sitio Web www.panasonic.com.<br />
•<br />
•<br />
Clavija M3<br />
Parte posterior <strong>de</strong> la<br />
unidad<br />
Los cascos auriculares/<br />
auriculares (no suministrados)<br />
■ Para ver imágenes <strong>de</strong><br />
cámara <strong>de</strong> ví<strong>de</strong>o<br />
Cámara <strong>de</strong> ví<strong>de</strong>o<br />
Vi<strong>de</strong>ograbadora<br />
Reproductor DVD<br />
■ Para ver imágenes<br />
<strong>de</strong> ví<strong>de</strong>o digital<br />
Reproductor DVD<br />
ó receptor digital<br />
multimedia (Máquinas<br />
compatibles con HDMI<br />
solamente)<br />
Cable <strong>de</strong> alimentación <strong>de</strong> CA<br />
(Conéctelo <strong>de</strong>spués <strong>de</strong> terminar<br />
todas las <strong>de</strong>más conexiones.)<br />
Cable <strong>de</strong><br />
audio<br />
1<br />
2<br />
AV IN SERVICE ONLY<br />
Cable HDMI<br />
Cable <strong>de</strong><br />
conversión<br />
HDMI-DVI<br />
■ Control con HDMI<br />
(pág. 33)<br />
Conecte con cable HDMI<br />
(se recomienda HDMI 1).<br />
DIGA<br />
(Grabadora DVD <strong>de</strong><br />
<strong>Panasonic</strong>)<br />
Notas<br />
Los equipos HDMI individuales tal vez requieran configuraciones <strong>de</strong> menús específicas adicionales para cada<br />
mo<strong>de</strong>lo. Consulte sus manuales <strong>de</strong> instrucciones respectivos.<br />
Cuando conecte a HDMI 2, ponga inicialmente el modo <strong>de</strong> entrada en HDMI 2 (pág. 12) antes <strong>de</strong> conectar a HDMI<br />
2. Después <strong>de</strong> conectar, confirme que funcione el control con HDMI (pág. 33).<br />
A partir <strong>de</strong> marzo <strong>de</strong> 2006, los mo<strong>de</strong>los con “Control con HDMI” son: DMR-ES25, DMR-ES45V, DMR-EH55,<br />
DMR-EH75V y DNR-ES46V (EE.UU. solamente)<br />
Visite www.panasonic.com para conocer los futuros mo<strong>de</strong>los con “Control con HDMI”.<br />
ó
ANT<br />
DIGITAL AUDIO OUT<br />
Cable TV<br />
Cable Box<br />
ó<br />
Salida <strong>de</strong> audio digital<br />
ó<br />
■ Grabadora DVD /<br />
Vi<strong>de</strong>ograbadora<br />
Cable óptica<br />
digital <strong>de</strong> audio<br />
•<br />
•<br />
•<br />
OPTICAL IN<br />
Amplificador<br />
■ Para ver DVDs<br />
Reproductor DVD<br />
Receptor digital<br />
multimedia<br />
■ Para escuchar la<br />
televisión por altavoces<br />
Apague los • altavoces <strong>de</strong>l televisor.<br />
Notas<br />
Ponga el canal <strong>de</strong> televisión en CH3 ó CH4 para utilizar la<br />
conexión <strong>de</strong>l receptor <strong>de</strong> televisión por cable.<br />
Para tener más información acerca <strong>de</strong> la conexión <strong>de</strong>l<br />
receptor <strong>de</strong> televisión por cable, consulte a su compañía <strong>de</strong><br />
televisión por cable local.<br />
Las señales <strong>de</strong> entrada <strong>de</strong> ví<strong>de</strong>o y audio conectadas a un<br />
terminal especificado en “Para-prog-out” (págs. 30-31) no<br />
pue<strong>de</strong>n salir por los terminales “OUTPUT”.<br />
Sin embargo, sí se obtendrá salida <strong>de</strong> audio por el terminal<br />
“Digital Audio Out”.<br />
Cuando se conecte un equipo (STB, DVD, etc.) a los<br />
terminales HDMI ó COMPONENT sólo se podrán obtener<br />
señales <strong>de</strong> audio. No se pue<strong>de</strong>n reproducir señales <strong>de</strong> ví<strong>de</strong>o.<br />
Conexiones AV recomendadas<br />
Español<br />
[Resumen]<br />
35
36<br />
Remote Control Operation/Co<strong>de</strong> List<br />
•<br />
•<br />
The following explains how to operate external equipments with the remote control.<br />
Register the remote control co<strong>de</strong>s (p. 20) if you want to operate an external equipment of another manufacturer. (p. 37-38)<br />
Note<br />
Operation may not be possible <strong>de</strong>pending on the available memory size of the remote control.<br />
This remote control is not <strong>de</strong>signed to cover operation of all functions of all mo<strong>de</strong>ls.<br />
■ Remote Control Operation List<br />
This chart <strong>de</strong>fines which keys are operational after programming (if nee<strong>de</strong>d),<br />
while in the selected remote control mo<strong>de</strong>, DTV, CABLE, DBS, VCR, DVD.<br />
KEY NAME VCR MODE<br />
DBS/CBL MODE<br />
(DBS) (CBL)<br />
Power Power Power Power<br />
- CH Up, Cursor Up CH Up, Cursor Up Skip Up<br />
- CH Down, Cursor Down CH Down, Cursor Down Skip Down<br />
Vol Down DBS Cursor Left CBL Cursor Left Vol Down<br />
Vol Up DBS Cursor Right CBL Cursor Right Vol Up<br />
- DBS Menu CBL Menu -<br />
- Exit Exit -<br />
TV Input Switch TV Input Switch TV Input Switch TV Input Switch<br />
DVD MODE<br />
Onscreen Display Onscreen Display Recall Onscreen Display<br />
TV Mute TV Mute TV Mute TV Mute<br />
- Gui<strong>de</strong> Gui<strong>de</strong> -<br />
- - 0-9 0-9 -<br />
Rewind - - Reverse<br />
Play - - Play<br />
Fast Forward - - Forward<br />
Pause - - Pause<br />
Stop - - Stop<br />
VCR Record - PVR Record * 1 -<br />
TV/VCR Aspect Aspect Open/Close<br />
Channel Down Page Down Page Down Slow Reverse<br />
Channel Up Page Up Page Up Slow Forward<br />
*1: Combination type
■ Remote Control Co<strong>de</strong> List<br />
Cable Converter ( )<br />
Brand Co<strong>de</strong> Brand Co<strong>de</strong> Brand Co<strong>de</strong> Brand Co<strong>de</strong><br />
ABC 0003, 0008<br />
Hamlin 0009, 0273<br />
Philips 0317, 1305<br />
Scientific Atlanta 0008, 0477, 0877, 1877<br />
Americast 0899<br />
Jerrold 0003, 0276, 0476, 0810 Pioneer 0144, 0533, 0877, 1877 Sony 1006<br />
Bell South 0899<br />
Memorex 0000<br />
Pulsar 0000<br />
Starcom 0003<br />
Digeo 1187<br />
Motorola 1376, 0276, 0476, 0810, 1187 Quasar 0000<br />
Supercable 0276<br />
Director 0476<br />
Pace 0008, 0237, 1877 Regal 0273, 0279<br />
Torx 0003<br />
General Instrument 0003, 0276, 0476, 0810 <strong>Panasonic</strong> 0000, 0107<br />
Runco 0000<br />
Toshiba 0000<br />
GoldStar 0144<br />
Paragon 0000<br />
Samsung 0144<br />
Zenith 0000, 0525, 0899<br />
Satellite Receiver ( )<br />
AlphaStar<br />
Chaparral<br />
0772<br />
0216<br />
General<br />
Instrument<br />
0869<br />
Magnavox<br />
Memorex<br />
0722, 0724<br />
0724<br />
Samsung<br />
1108, 1109, 1142, 1276,<br />
1377, 1442, 1609<br />
Crossdigital 1109<br />
GOI 0775, 1775<br />
Mitsubishi 0749<br />
Sanyo 1219<br />
DirecTV<br />
0099, 0247, 0392, 0566,<br />
0639, 0724, 0749, 0819,<br />
1076, 1108, 1109, 1142,<br />
1377, 1392, 1414, 1442,<br />
1443, 1444, 1609, 1639,<br />
1640, 1749, 1856<br />
Goodmans<br />
Hisense<br />
Hitachi<br />
HTS<br />
Hughes<br />
1246<br />
1535<br />
0819, 1250<br />
0775, 1775<br />
0749, 1442, 1749<br />
Motorola<br />
NEC<br />
Next Level<br />
<strong>Panasonic</strong><br />
Paysat<br />
0856, 0869<br />
1270<br />
0869<br />
0152, 0247, 0701, 1786<br />
0724<br />
Sony<br />
Star Choice<br />
Tivo<br />
Toshiba<br />
UltimateTV<br />
0639, 1639, 1640<br />
0869<br />
1142, 1442, 1443, 1444<br />
0749, 0790, 0819, 1285, 1749<br />
1392, 1640<br />
Dish Network 0775, 1005, 1170,<br />
System 1505, 1775<br />
Hughes Network<br />
Systems<br />
0749, 1142, 1442,<br />
1443, 1444, 1749<br />
Philips<br />
0099, 0722, 0724, 0749,<br />
0819, 1076, 1142, 1442, 1749<br />
Uni<strong>de</strong>n<br />
US Digital<br />
0722, 0724<br />
1535<br />
Dishpro 0775, 1005, 1505, 1775 iLo 1535<br />
Pioneer 1442<br />
USDTV 1535<br />
Echostar 0775, 1005, 1170, 1505, 1775 Janeil 0152<br />
Proscan 0392, 0566<br />
Voom 0869<br />
Expressvu 0775, 1775<br />
Jerrold 0869<br />
Proton 1535<br />
Zenith 1856<br />
GE 0392, 0566<br />
JVC 0775, 1170, 1775 RadioShack 0869<br />
LG 1226, 1414<br />
RCA 0143, 0392, 0566, 0855, 1392<br />
Cable/PVR Combination ( )<br />
Americast 0899<br />
Jerrold 0476, 0810<br />
Pioneer 0877, 1877<br />
Supercable 0276<br />
Digeo 1187<br />
Motorola 0476, 0810, 1187, 1376 Scientific Atlanta 0877, 1877<br />
Zenith 0899<br />
General Instrument 0476, 0810<br />
Pace 0237, 1877<br />
Sony 1006<br />
DBS/PVR Combination ( )<br />
0099, 0392, 0639, 1076, Dishpro 0775, 1505<br />
JVC 1170<br />
Samsung 1442<br />
DirecTV 1142, 1377, 1392, 1442,<br />
1443, 1444, 1640<br />
Echostar<br />
Expressvu<br />
0775, 1170, 1505<br />
0775<br />
Motorola<br />
Philips<br />
0869<br />
1142, 1442<br />
Sony<br />
Star Choice<br />
0639, 1640<br />
0869<br />
Dish Network<br />
System<br />
0775, 1505<br />
Hughes Network<br />
Systems<br />
1142, 1442, 1443, 1444<br />
Proscan<br />
RCA<br />
0392<br />
1392<br />
VCR ( )<br />
ABS 1972<br />
Hewlett Packard 1972<br />
NEC 0067<br />
Scott 0043, 0045<br />
Adventura 0000<br />
Hitachi 0000, 0042, 0089 Nikko 0037<br />
Sears 0000, 0035, 0037, 0042, 1237<br />
Aiwa 0000, 0037, 0124<br />
Howard Computers 1972<br />
Niveus Media 1972<br />
Sharp 0807, 0848<br />
Akai 0175<br />
HP 1972<br />
Northgate 1972<br />
Sonic Blue 0614, 0616<br />
Alienware<br />
American High<br />
1972<br />
0035<br />
Hughes<br />
Network Systems<br />
0042, 0739<br />
Olympus<br />
Onkyo<br />
0035, 0226<br />
0222<br />
Sony<br />
0000, 0032, 0033, 0035,<br />
0636, 1032, 1232, 1972<br />
Audiovox 0037<br />
Humax 0739<br />
Optimus 0037<br />
Stack 9 1972<br />
Broksonic 1479<br />
Hush 1972<br />
Orion 1479<br />
STS 0042<br />
Calix<br />
Canon<br />
0037<br />
0035<br />
iBUYPOWER 1972<br />
JVC 0067<br />
<strong>Panasonic</strong><br />
0035, 0077, 0225, 0226,<br />
0227, 0378, 0616, 1035, 1244<br />
Sylvania<br />
Symphonic<br />
0000, 0035, 0043, 1781<br />
0000<br />
Citizen 0037, 1278<br />
KEC 0037<br />
Penney 0035, 0037, 0042, 1035, 1237 Systemax 1972<br />
Craig 0037<br />
Kenwood 0067<br />
Pentax 0042<br />
Tagar Systems 1972<br />
Curtis Mathes 0035, 0060, 1035 Kodak 0035, 0037<br />
Philco 0035<br />
Teac 0000<br />
CyberPower 1972<br />
Linksys 1972<br />
Philips 0035, 0618, 0739, 1081, 1181 Technics 0035<br />
Daewoo 0045, 1278<br />
Lloyd’s 0000<br />
Pilot 0037<br />
Teknika 0000, 0035, 0037<br />
Dell 1972<br />
LXI 0037<br />
Pioneer 0067<br />
Thomas 0000<br />
Denon 0042<br />
Magnasonic 1278<br />
Proscan 0060, 1060<br />
Tivo 0618, 0636, 0739<br />
DirecTV<br />
Durabrand<br />
0739<br />
0039<br />
Magnavox<br />
Marantz<br />
0000, 0035, 0039, 1781<br />
0035<br />
Pulsar<br />
Quasar<br />
0039<br />
0035, 0077, 1035<br />
Toshiba<br />
0043, 0045, 0845,<br />
1008, 1145, 1972<br />
Dynatech 0000<br />
Marta 0037<br />
RadioShack 0000<br />
Totevision 0037<br />
Electrohome 0037, 0043<br />
Matsushita 0035<br />
Radix 0037<br />
Touch 1972<br />
Electrophonic 0037<br />
Media Center PC 1972<br />
Ran<strong>de</strong>x 0037<br />
Vector 0045<br />
Emerex<br />
Emerson<br />
0032<br />
0000, 0037, 0043, 1278, 1479<br />
MEI<br />
Memorex<br />
0035<br />
0000, 0035, 0037, 0039, 1237<br />
RCA<br />
0042, 0060, 0077, 0807,<br />
0880, 1035, 1060<br />
Vi<strong>de</strong>o Concepts<br />
Vi<strong>de</strong>omagic<br />
0045<br />
0037<br />
Fuji 0033, 0035<br />
MGA 0043<br />
Realistic 0000, 0035, 0037 Viewsonic 1972<br />
Funai 0000<br />
Microsoft 1972<br />
ReplayTV 0614, 0616<br />
Villain 0000<br />
Garrard 0000<br />
Mind 1972<br />
Ricavision 1972<br />
Voodoo 1972<br />
Gateway 1972<br />
Minolta 0042<br />
Runco 0039<br />
Wards 0000, 0035, 0042, 0060<br />
GE 0035, 0060, 0807, 1035, 1060 Mitsubishi 0043, 0067, 0807 Samsung 0045, 0739, 1014 XR-1000 0000, 0035<br />
GoldStar 0037, 1237<br />
Motorola 0035<br />
Sanky 0039<br />
Zenith 0000, 0033, 0039, 1479<br />
Gradiente 0000<br />
MTC 0000<br />
Sansui 0000, 0067, 1479 ZT Group 1972<br />
Harley Davidson 0000<br />
Multitech 0000<br />
Sanyo 0159<br />
Remote Control Operation/Co<strong>de</strong> List<br />
FAQs, etc.<br />
37
38<br />
Remote Control Operation/Co<strong>de</strong> List<br />
■ Remote Control Co<strong>de</strong> List<br />
DBS/PVR Combination ( )<br />
Brand Co<strong>de</strong> Brand Co<strong>de</strong> Brand Co<strong>de</strong> Brand Co<strong>de</strong><br />
Hughes Network<br />
Systems<br />
0739<br />
PVR( )<br />
ABS 1972<br />
Alienware 1972<br />
CyberPower 1972<br />
Dell 1972<br />
DirecTV 0739<br />
Gateway 1972<br />
Hewlett Packard 1972<br />
Howard<br />
Computers<br />
1972<br />
HP 1972<br />
DVD ( )<br />
Adcom 1094<br />
Allegro 0869<br />
0672, 0794, 0796,<br />
Apex Digital 0797, 1004, 1056,<br />
1061, 1100<br />
Aspire Digital 1168<br />
Blue Para<strong>de</strong> 0571<br />
Broksonic 0695<br />
California<br />
Audio Labs<br />
0490<br />
CineVision 0833, 0869<br />
Coby 1086<br />
CyberHome 0816, 1023, 1024, 1129<br />
Daewoo 0833, 0869<br />
Denon 0490<br />
Disney 0675<br />
DVD2000 0521<br />
Emerson 0591, 0675<br />
Enterprise 0591<br />
Funai 0675<br />
Gateway 1158<br />
GE 0522<br />
Go Vi<strong>de</strong>o<br />
0741, 0833, 0869,<br />
1075, 1158, 1304, 1730<br />
DVD Recor<strong>de</strong>r ( )<br />
Apex Digital 1056<br />
Aspire Digital 1168<br />
Coby 1086<br />
CyberHome 1129<br />
Funai 0675<br />
Gateway 1158<br />
Philips 0739<br />
Samsung 0739<br />
Hughes Network<br />
Systems<br />
0739<br />
Humax 0739<br />
Hush 1972<br />
iBUYPOWER 1972<br />
Linksys 1972<br />
Media Center<br />
PC<br />
1972<br />
Microsoft 1972<br />
Mind 1972<br />
GoldStar 0741<br />
Gradiente 0490<br />
Grundig 0539<br />
Hitachi 0573, 0664<br />
Hiteker 0672<br />
Integra 0571<br />
JVC<br />
0558, 0623, 0867, 1164,<br />
1275<br />
Kenwood 0490, 0534<br />
Lecson 1533<br />
LG<br />
0591, 0741, 0801,<br />
0869<br />
LiteOn 1158, 1440<br />
Loewe 0511<br />
Magnavox<br />
0503, 0539, 0646,<br />
0675<br />
Marantz 0539<br />
McIntosh 1533<br />
Memorex 0695<br />
Microsoft 0522<br />
Mitsubishi 0521, 1521<br />
NAD 0591, 0741<br />
NEC 0785<br />
Go Vi<strong>de</strong>o 0741, 1158, 1304, 1730<br />
JVC 1164, 1275<br />
LG 0741<br />
LiteOn 1158, 1440<br />
Magnavox 0646<br />
<strong>Panasonic</strong> 0490, 1010, 1011<br />
Niveus Media 1972<br />
Northgate 1972<br />
<strong>Panasonic</strong> 0616<br />
Philips 0618, 0739<br />
RCA 0880<br />
ReplayTV 0614, 0616<br />
Sonic Blue 0614, 0616<br />
Sony 0636, 1972<br />
Stack 9 1972<br />
Onkyo 0503, 0792<br />
<strong>Panasonic</strong><br />
Philips<br />
Philips 0646<br />
Pioneer 0631<br />
Polaroid 1086<br />
RCA 0522<br />
Samsung 0490<br />
0490, 0503, 0632,<br />
0703, 1010, 1011,<br />
1362, 1462, 1490,<br />
1762, 1967<br />
0503, 0539, 0646,<br />
0675, 1267, 1354<br />
PianoDisc 1024<br />
Pioneer<br />
0525, 0571, 0631,<br />
0632<br />
Polaroid 1061, 1086<br />
Polk Audio 0539<br />
Proceed 0672<br />
Proscan 0522<br />
RCA 0522, 0571, 0822<br />
Rio 0869<br />
Rotel 0623<br />
Sampo 0752<br />
Samsung<br />
0490, 0573, 0820,<br />
1075<br />
Sansui 0695<br />
Sanyo 0695, 0873, 1967<br />
Systemax 1972<br />
Tagar<br />
Systems<br />
1972<br />
Tivo 0618, 0636, 0739<br />
Toshiba 1008, 1972<br />
Touch 1972<br />
Viewsonic 1972<br />
Voodoo 1972<br />
ZT Group 1972<br />
Sensory<br />
Science<br />
Sharp<br />
1158<br />
0630, 0675, 0752,<br />
1256<br />
Shinsonic 0533<br />
Sonic Blue 0869<br />
Sony<br />
0533, 0864, 1033, 1431,<br />
1533<br />
Sylvania 0675<br />
Symphonic 0675<br />
Teac 0809<br />
Technics 0490, 0703<br />
Theta Digital 0571<br />
Toshiba 0503, 0695, 1045, 1154<br />
Urban<br />
Concepts<br />
0503<br />
Xbox 0522<br />
Yamaha 0490, 0539, 0545<br />
Zenith 0503, 0591, 0741,0869<br />
Sensory<br />
Science<br />
1158<br />
Sharp 0675<br />
Sony 1033, 1431<br />
Sylvania 0675<br />
Zenith 0741
Ratings List for Channel Lock<br />
“V-chip” technology enables you to lock out channels or shows according to<br />
standard ratings set by the entertainment industry. (p. 17)<br />
■ U.S. MOVIE RATINGS (MPAA)<br />
NO RATING (NOT RATED) AND NA (NOT APPLICABLE) PROGRAMS. Movie has not been rated or<br />
Off<br />
rating does not apply.<br />
G GENERAL AUDIENCES. All ages admitted.<br />
PG PARENTAL GUIDANCE SUGGESTED. Some material may not be suitable for children.<br />
PG-13 PARENTS STRONGLY CAUTIONED. Some material may be inappropriate for children un<strong>de</strong>r 13.<br />
R RESTRICTED. Un<strong>de</strong>r 17 requires accompanying parent or adult guardian.<br />
NC-17 NO ONE 17 AND UNDER ADMITTED.<br />
X ADULTS ONLY.<br />
■ U.S. TV PROGRAMS RATINGS (U. S. T. V)<br />
Age-based<br />
Group<br />
NR<br />
(Not Rated)<br />
Youth<br />
Guidance<br />
Age-based<br />
Ratings<br />
TV-NR<br />
TV-Y<br />
TV-Y7<br />
TV-G<br />
TV-PG<br />
TV-14<br />
TV-MA<br />
Possible Content<br />
Selections<br />
Viewable<br />
Blocked<br />
Viewable<br />
Blocked<br />
FV Blocked<br />
Viewable<br />
Blocked<br />
Viewable<br />
Blocked<br />
D,L,S,V (all selected)<br />
Any combination of D,<br />
L, S, V<br />
D,L,S,V (all selected)<br />
Any combination of D,<br />
L, S, V<br />
D,L,S,V (all selected)<br />
Any combination of L,<br />
S, V<br />
Not Rated.<br />
Description<br />
All children. The themes and elements in this program are specifically<br />
<strong>de</strong>signed for a very young audience, including children from ages 2-6.<br />
Directed to ol<strong>de</strong>r children. Themes and elements in this program may<br />
inclu<strong>de</strong> mild physical or comedic violence, or may frighten children un<strong>de</strong>r<br />
the age of 7.<br />
General audience. It contains little or no violence, no strong language,<br />
and little or no sexual dialogue or situations.<br />
Parental guidance suggested. The program may contain infrequent<br />
coarse language, limited violence, some suggestive sexual dialogue and<br />
situations.<br />
Parents strongly cautioned. This program may contain sophisticated<br />
themes, sexual content, strong language and more intense violence.<br />
Mature audiences only. This program may contain mature themes,<br />
profane language, graphic violence, and explicit sexual content.<br />
FV: Fantasy/Cartoon Violence. V: Violence S: Sex L: Offensive Language D: Dialogue with sexual content.<br />
■ CANADIAN ENGLISH RATINGS (C. E. L. R)<br />
Exempt - Exempt programming inclu<strong>de</strong>s: news, sports, documentaries and other information programming,<br />
E<br />
talk shows, music vi<strong>de</strong>os, and variety programming.<br />
C Programming inten<strong>de</strong>d for children un<strong>de</strong>r age 8. No offensive language, nudity or sexual content.<br />
C8+ Programming generally consi<strong>de</strong>red acceptable for children 8 years and over. No profanity, nudity or sexual content.<br />
G General programming, suitable for all audiences.<br />
PG Parental Guidance suggested. Some material may not be suitable for children.<br />
Programming contains themes or content which may not be suitable for viewers un<strong>de</strong>r the age of 14. Parents are<br />
14+<br />
strongly cautioned to exercise discretion in permitting viewing by pre-teens and early teens.<br />
18+ 18+ years old. Programming restricted to adults. Contains constant violence or scenes of extreme violence.<br />
■ CANADIAN FRENCH RATINGS (C. F. L. R)<br />
E Exempt - Exempt programming.<br />
General - Programming inten<strong>de</strong>d for audience of all ages. Contains no violence, or the violence content is minimal<br />
G<br />
or is <strong>de</strong>picted appropriately.<br />
8+ General - Not recommen<strong>de</strong>d for young children. Programming inten<strong>de</strong>d for a broad audience but contains light<br />
8 ans+<br />
or occasional violence. Adult supervision recommen<strong>de</strong>d.<br />
Programming may not be suitable for children un<strong>de</strong>r the age of 13 - Contains either a few violent scenes or one or<br />
13 ans+<br />
more sufficiently violent scenes to affect them. Adult supervision strongly suggested.<br />
Programming may not be suitable for children un<strong>de</strong>r the age of 16 - Contains frequent scenes of violence or intense<br />
16 ans+<br />
violence.<br />
18 ans+ Programming restricted to adults. Contains constant violence or scenes of extreme violence.<br />
Ratings List for Channel Lock<br />
Remote Control Operation/Co<strong>de</strong> List<br />
FAQs, etc.<br />
39
40<br />
Technical Information<br />
Closed Caption (CC)<br />
For viewing Closed Caption of digital broadcasting, set the aspect ratio to FULL.<br />
• (If viewing with H-FILL, JUST, ZOOM or 4:3, characters will be cut off.)<br />
The closed caption is not displayed when you use HDMI connection.<br />
• If analog connected equipment is used for displaying or recording, closed caption (CC) should be set On/Off on the<br />
• connected equipment.<br />
The CC mo<strong>de</strong> setting of the TV will not affect the analog input.<br />
If a digital program is being output in analog format, the CC data will also be output in analog format.<br />
If digital connected equipment is used for input, CC should be set On on either the connected equipment or the TV.<br />
If CC is set On on both the connected equipment and the TV, captions from each unit will overlap.<br />
Aspect Ratio<br />
Let you choose the aspect <strong>de</strong>pending on the format of the received signal and your preference. (p. 11) (e.g.: in case<br />
of 4:3 image)<br />
• FULL • JUST<br />
Enlarges the 4:3 image horizontally to the screen’s si<strong>de</strong> edges.<br />
(Recommen<strong>de</strong>d for anamorphic picture)<br />
• H-FILL • 4:3<br />
FULL JUST<br />
H-FILL<br />
Enlarges the 4:3 image horizontally to the screen’s si<strong>de</strong> edges.<br />
The si<strong>de</strong> edges of the image are cut off.<br />
• ZOOM<br />
ZOOM<br />
Enlarges the 4:3 image to the entire screen.<br />
(Recommen<strong>de</strong>d for Letter Box)<br />
Stretches to justify the 4:3 image to the four corners of the<br />
screen.<br />
(Recommen<strong>de</strong>d for normal TV broadcast)<br />
Standard<br />
(Note that “after image” of the si<strong>de</strong> bar may occur from<br />
displaying it for a long time.)<br />
Note<br />
480i (4:3), 480i (16:9), 480p (4:3), 480p (16:9) : FULL, JUST,<br />
• 4:3 or ZOOM<br />
1080i / 720p : FULL, H-FILL, JUST or 4:3<br />
Zoom adjust • Vertical image position and size can be adjusted in “ZOOM.”<br />
Select “Zoom adjust” on the “Picture” menu. (p. 14-15)<br />
V-Position: Vertical position adjustment Size: Vertical size adjustment<br />
■ To reset the aspect ratio (OK)<br />
•<br />
Si<strong>de</strong> bar
DIGITAL AUDIO OUT terminals<br />
You can enjoy your home theater by connecting a Dolby Digital (5.1 channel) <strong>de</strong>co<strong>de</strong>r and “Multi Channel” amplifier<br />
to the DIGITAL AUDIO OUT terminals.<br />
Caution<br />
Depending on your DVD player and DVD-Audio software the copyright protection function may operate and disable<br />
• optical output.<br />
External speakers cannot be connected directly to OUTPUT terminals.<br />
• When ATSC channel is selected, the output from the DIGITAL AUDIO OUT jack will be Dolby Digital. When NTSC<br />
• channel is selected, the output will be PCM.<br />
•<br />
HDMI connection<br />
HDMI (high-<strong>de</strong>finition multimedia interface) allows you to enjoy high-<strong>de</strong>finition digital images and high-quality sound by connecting<br />
the TV unit and the equipments.<br />
HDMI-compatible equipment (*1) with an HDMI or DVI output terminal, such as a set-top box or a DVD player, can be connected<br />
to the HDMI connector using an HDMI compliant (fully wired) cable.<br />
HDMI is the world’s first complete digital consumer AV interface complying with a non-compression standard.<br />
• If the external equipment has only a DVI output, connect to the HDMI terminal via a DVI to HDMI adapter cable (*2).<br />
• When the DVI to HDMI adapter cable is used, connect the audio cable to the audio input terminal.<br />
• Audio settings can be ma<strong>de</strong> on the “HDMI1 in” or “HDMI2 in” menu screen. (p. 14-15)<br />
•<br />
•<br />
•<br />
•<br />
Applicable audio signal sampling frequencies (L.PCM):<br />
48 kHz, 44.1 kHz, 32 kHz<br />
(*1): The HDMI logo is displayed on an HDMI-compliant equipment.<br />
(*2): Enquire at your local digital equipment retailer shop.<br />
Caution<br />
Use with a PC is not assumed.<br />
All signal is reformatted before being displayed on the screen.<br />
If the connected equipment has an aspect adjustment function, set the aspect ratio to “16:9”.<br />
This HDMI connector is “type A”.<br />
An equipment having no digital output terminal may be connected to the input terminal of either “COMPONENT”, “S-VIDEO”, or<br />
“VIDEO” to receive analog signals.<br />
The HDMI input terminal can be used with only the following image signals: 480i, 480p, 720p and 1080i<br />
Match the output setting of the digital equipment.<br />
For <strong>de</strong>tails of the applicable HDMI signals, see below.<br />
* Mark: Applicable input signal for Component (Y, PB, PR) and HDMI<br />
horizontal<br />
frequency (kHz)<br />
vertical<br />
frequency (Hz)<br />
COMPONENT HDMI<br />
525 (480) / 60i<br />
525 (480) /60p<br />
750 (720) /60p<br />
1,125 (1,080) /60i<br />
15.73<br />
31.47<br />
45.00<br />
33.75<br />
59.94<br />
59.94<br />
59.94<br />
59.94<br />
*<br />
*<br />
*<br />
*<br />
*<br />
*<br />
*<br />
*<br />
•<br />
Control with HDMI “HDAVI Control”<br />
HDMI connections to some <strong>Panasonic</strong> equipments allow you to enjoy easy playback.<br />
Setup the equipment to enable this function. Read the manual of the equipment.<br />
Switch the TV unit on again with the equipment on when connection or setup is changed.<br />
• This function may not work normally <strong>de</strong>pending on the equipment condition.<br />
• The equipment can be operated by TV’s remote control with this function on even if TV is in Standby mo<strong>de</strong>.<br />
• Image or sound may not be available for the first few seconds when the playback starts.<br />
• Image or sound may not be available for the first few seconds when Input mo<strong>de</strong> is switched.<br />
• Volume function will be displayed when adjusting the volume of the equipment.<br />
• Easy playback is also available by using the remote control for Amplifier. Read the manuals of Amplifier.<br />
•<br />
Input signals that can be displayed<br />
Note<br />
Signals other than above may not be displayed properly.<br />
The above signals are reformatted for optimal viewing on your display.<br />
Technical Information<br />
FAQs, etc.<br />
41
42<br />
Maintenance<br />
First, unplug the Power cord plug from the wall outlet.<br />
FAQ<br />
Display panel<br />
The front of the display panel has been specially treated. Wipe the panel surface gently using only a cleaning cloth or<br />
a soft, lint-free cloth.<br />
If the surface is particularly dirty, soak a soft, lint-free cloth in a weak <strong>de</strong>tergent solution and then wring the cloth to<br />
• remove excess liquid. Use this cloth to wipe the surface of the display panel, then wipe it evenly with a dry cloth, of<br />
the same type, until the surface is dry.<br />
Do not scratch or hit the surface of the panel with fingernails or other hard objects. Furthermore, avoid contact<br />
• with volatile substances such as insect sprays, solvents and thinner; otherwise, the quality of the surface may be<br />
adversely affected.<br />
•<br />
Cabinet<br />
If the cabinet becomes dirty, wipe it with a soft, dry cloth.<br />
If the cabinet is particularly dirty, soak the cloth in a weak <strong>de</strong>tergent solution and then wring the cloth dry.<br />
Use this cloth to wipe the cabinet, and then wipe it dry with a dry cloth.<br />
Do not allow any <strong>de</strong>tergent to come into direct contact with the surface of the <strong>LCD</strong> TV.<br />
• If water droplets get insi<strong>de</strong> the unit, operating problems may result.<br />
Avoid contact with volatile substances such as insect sprays, solvents and thinner; otherwise, the quality of the<br />
• cabinet surface may be adversely affected or the coating may peel off. Furthermore, do not leave it for long periods<br />
in contact with articles ma<strong>de</strong> from rubber or PVC.<br />
Power cord plug<br />
Wipe the plug with a dry cloth at regular intervals. (Moisture and dust can lead to fire or electrical shock.)<br />
Before requesting service or assistance, please follow these simple gui<strong>de</strong>s to resolve the problem.<br />
If problem still persists, please contact your local <strong>Panasonic</strong> <strong>de</strong>aler or <strong>Panasonic</strong> Servicenter for assistance. For<br />
<strong>de</strong>tails (p. 46, 48)<br />
For additional assistance, please contact us via the website at:<br />
www.panasonic.com/contactinfo<br />
White spots or<br />
shadow images<br />
(noise)<br />
Check the position, direction,<br />
• and connection of the aerial.<br />
Interference or<br />
frozen digital channels<br />
(intermittent sound)<br />
Change the direction of antenna<br />
• for digital channels.<br />
Check “Signal meter” (p. 19).<br />
•<br />
If the signal is weak, check the<br />
antenna and consult your local<br />
<strong>de</strong>aler.<br />
Pictures from a equipment are<br />
unusual when the equipment is<br />
connected via HDMI<br />
Is the HDMI cable connected properly?<br />
• (p. 22-23, 41)<br />
•<br />
Turn Off the TV unit and equipment, then turn<br />
them On again.<br />
Check an input signal from the equipment.<br />
(p. 41)<br />
Use a equipment compliant with<br />
EIA/CEA-861/861B.<br />
The remote control does not work<br />
•<br />
Are the batteries installed correctly? (p. 6)<br />
Has the battery run down?<br />
To operate external equipment of other<br />
manufacturers, register the<br />
remote control co<strong>de</strong>s. (p. 20, 37-38)
If there is a problem with your TV please refer to the table below to <strong>de</strong>termine the symptoms, then carry out the<br />
suggested check. If this does not solve the problem, please contact your local <strong>Panasonic</strong> <strong>de</strong>aler, quoting the mo<strong>de</strong>l<br />
number and serial number (both found on the rear of the TV).<br />
Snowy Picture<br />
Multiple Images<br />
Interference<br />
Normal Picture<br />
No Picture<br />
No color<br />
Poor or Distorted Picture<br />
Normal Picture<br />
Noisy Sound<br />
Normal Sound<br />
Noisy Sound<br />
No Sound<br />
No Sound<br />
Normal Sound<br />
Weak or No Sound<br />
Weak,Wrong or No Sound<br />
Cannot operate with the remote control.<br />
The main unit is hot.<br />
Symptoms<br />
Picture Sound<br />
There may be red spots, blue spots,<br />
green spots and black spots on the<br />
screen.<br />
Checks<br />
Antenna location, direction or connection.<br />
•<br />
Antenna location, direction or connection.<br />
•<br />
Electrical appliances. • Cars / Motorcycles.<br />
Fluorescent lights.<br />
Volume level. • Sound mute switched on.<br />
STEREO/SAP/MONO<br />
TV set to AV mo<strong>de</strong>. • Not plugged into wall outlet.<br />
Not switched on.<br />
Picture / Sound controls set at minimum levels.<br />
Color controls set at minimum levels.<br />
• Weak signal.<br />
Retune Channel (s). •<br />
Sound reception may have <strong>de</strong>teriorated.<br />
• Set STEREO/SAP/MONO setting to SAP or MONO until reception improved.<br />
The battery/ies is/are exhausted.<br />
• The batteries’ polarity is wrong.<br />
The remote control sensor is exposed to strong light from a fluorescent<br />
lamp, etc.<br />
• The main unit radiates heat and some of the parts may become hot. This is<br />
not a problem for performance or quality.<br />
Set up in a location with good ventilation.<br />
Do not cover the ventilation holes of the TV with a tablecloth, etc., and do<br />
not place on top of other equipment.<br />
This is a characteristic of liquid crystal panels and is not a problem. The<br />
• liquid crystal panel is built with very high precision technology giving you<br />
fine picture <strong>de</strong>tails. Occasionally, a few non-active pixels may appear on the<br />
screen as fixed points of red, blue, green, or black.<br />
Please note this does not affect the performance of your <strong>LCD</strong>.<br />
Frequently Asked Questions<br />
Maintenance<br />
FAQs, etc.<br />
43
44<br />
Specifications<br />
20.7 ” (525 mm)<br />
Power Source AC 120 V, 60 Hz<br />
Power Consumption<br />
18.6 ” (473 mm)<br />
Average use<br />
Maximum Current<br />
Standby condition<br />
113 W<br />
2.2 A<br />
0.6 W<br />
Aspect Ratio 16:9<br />
Visible screen size<br />
(W × H × Diagonal)<br />
TC-26LX600 TC-32LX600<br />
[TC-26LX600] [TC-32LX600]<br />
25.9 ” (657 mm)<br />
4.6 ” (117 mm)<br />
31.1 ” (791 mm)<br />
19.8 ” (504 mm) 19.8 ” (504 mm)<br />
11.8 ” (300 mm)<br />
24.2 ” (615 mm)<br />
22.2 ” (563 mm)<br />
126 W<br />
2.4 A<br />
0.6 W<br />
26.0 ” DIAGONAL (66.1 cm DIAGONAL) 31.5 ” DIAGONAL (80.0 cm DIAGONAL)<br />
22.7 ” × 12.8 ” × 26.0 ”<br />
(576 mm × 324 mm × 661 mm)<br />
(No. of pixels)<br />
1,049,088 (1,366 (W) × 768(H)) [4,098 × 768 dots]<br />
Speaker 2.36 ” × 4.7 ” (60 mm × 120 mm) Full-range × 2 pcs<br />
Audio Output 20 W [ 10 W + 10 W ] ( 10 % THD )<br />
Headphones M3 (3.5mm) Jack × 1<br />
Channel Capability-<br />
Digital/Analog<br />
VHF/ UHF : 2-69, CATV:1-135<br />
•<br />
Sound<br />
<strong>Operating</strong> Conditions<br />
Connection Terminals<br />
INPUT 1-2<br />
INPUT 3<br />
COMPONENT<br />
VIDEO INPUT<br />
HDMI 1-2<br />
AUDIO IN<br />
Temperature : 41 °F -95 °F (5 °C – 35°C)<br />
Humidity : 5 % - 90 % RH (non-con<strong>de</strong>nsing)<br />
27.5 ” × 15.4 ” × 31.5 ”<br />
(698 mm × 392 mm × 800 mm)<br />
VIDEO : RCA PIN Type × 1 1.0 V[p-p] (75 Ω)<br />
S-VIDEO : Mini DIN 4-pin Y:1.0 V[p-p] (75 Ω) C:0.286 V [p-p] (75 Ω)<br />
AUDIO L - R : RCA PIN Type × 2 0.5 V [rms]<br />
VIDEO : RCA PIN Type × 1 1.0 V [p-p] (75 Ω)<br />
AUDIO L - R : RCA PIN Type × 2 0.5 V [rms]<br />
Y : 1.0 V [p-p] (including synchronization)<br />
PB, PR : ±0.35 V [p-p]<br />
AUDIO L-R : RCA PIN Type × 2 0.5 V [rms]<br />
TYPE A Connector × 2<br />
AUDIO L - R : RCA PIN Type × 2 0.5 V [rms]<br />
OUTPUT<br />
VIDEO<br />
AUDIO L - R<br />
: RCA PIN Type × 1 1.0 V [p-p] (75 Ω)<br />
: RCA PIN Type × 2 0.5 V [rms]<br />
DIGITAL AUDIO OUT PCM / Dolby Digital, Fiber Optic<br />
FEATURES<br />
Dimensions<br />
(W × H × D)<br />
Including TV stand<br />
TV Set only<br />
3D Y/C Digital Comb Filter, CLOSED CAPTION, V-Chip<br />
HDMI<br />
Vesa compatible<br />
25.9 ” × 20.7 ” × 11.8 ”<br />
(657 mm × 525 mm × 300 mm)<br />
25.9 ” × 18.6 ” × 4.6 ”<br />
(657 mm × 473 mm × 117 mm)<br />
31.1 ” × 24.2 ” × 11.8 ”<br />
(791 mm × 615 mm × 300 mm)<br />
31.1 ” × 22.2 ” × 4.6 ”<br />
(791 mm × 563 mm × 117 mm)<br />
Weight 36.4 lb. (16.5 ) NET 43.0 lb. (19.5 ) NET<br />
4.6 ” (117 mm)<br />
11.8 ” (300 mm)<br />
Note<br />
Design and Specifications are subject to change without notice. Weight and Dimensions shown are approximate.
Limited Warranty (for U.S.A.)<br />
PANASONIC CONSUMER ELECTRONICS COMPANY,<br />
DIVISION OF:<br />
PANASONIC CORPORATION OF NORTH AMERICA<br />
One <strong>Panasonic</strong> Way<br />
Secaucus, New Jersey 07094<br />
<strong>Panasonic</strong> <strong>LCD</strong> <strong>Television</strong>s<br />
Limited Warranty<br />
PANASONIC SALES COMPANY,<br />
DIVISION OF:<br />
PANASONIC PUERTO RICO, INC.<br />
Ave. 65 <strong>de</strong> Infanteria, Km. 9.5<br />
San Gabriel Industrial Park<br />
Carolina, Puerto Rico 00985<br />
Limited Warranty Coverage<br />
If your product does not work properly because of a <strong>de</strong>fect in materials or workmanship, <strong>Panasonic</strong> Consumer<br />
Electronics Company or <strong>Panasonic</strong> Sales Company (collectively referred to as “the warrantor”) will, for the length<br />
of the period indicated on the chart below, which starts with the date of original purchase (“warranty period”), at<br />
its option either (a) repair your product with new or refurbished parts, or (b) replace it with a new or a refurbished<br />
product. The <strong>de</strong>cision to repair or replace will be ma<strong>de</strong> by the warrantor.<br />
<strong>LCD</strong> TV CATEGORIES PARTS LABOR SERVICE<br />
Up to 20’ (diagonal)<br />
21” (diagonal) and larger<br />
1 (ONE) YEAR 1 (ONE) YEAR<br />
Carry-In or Mail-in<br />
In Home or Carry-in / Mail in<br />
During the “Labor” warranty period there will be no charge for labor. During the “Parts” warranty period, there will<br />
be no charge for parts. You must carry-in or mail-in your product during the warranty period. If non-rechargeable<br />
batteries are inclu<strong>de</strong>d, they are not warranted. This warranty only applies to products purchased and serviced in the<br />
United States or Puerto Rico. This warranty is exten<strong>de</strong>d only to the original purchaser of a new product which was<br />
not sold “as is”. A purchase receipt or other proof of the original purchase date is required for warranty service.<br />
In-Home or Carry-in Service<br />
For In-Home or Carry-In Service in the United States call 1-800-211-PANA(7262) or visit the <strong>Panasonic</strong> web Site:<br />
http://www.panasonic.com.<br />
For assistance in Puerto Rico call <strong>Panasonic</strong> Sales Company (787)-750-4300 or fax (787)-768- 2910.<br />
In-Home service requires clear, complete and easy access to the product by the authorized servicer and does<br />
not inclu<strong>de</strong> removal or re-installation of an installed product. It is possible that certain in-home repairs will not be<br />
completed in-home, but will require that the product, or parts of the product, be removed for shop diagnosis and/or<br />
repair and then returned.<br />
Limited Warranty Limits And Exclusions<br />
This warranty ONLY COVERS failures due to <strong>de</strong>fects in materials or workmanship, and DOES NOT COVER normal<br />
wear and tear or cosmetic damage, nor does it cover markings or retained images on the <strong>LCD</strong> panel resulting<br />
from viewing fixed images (including, among other things, letterbox pictures on standard 4:3 screen TV’s, or nonexpan<strong>de</strong>d<br />
standard 4:3 pictures on wi<strong>de</strong> screen TV’s, or onscreen data in a stationary and fixed location). The<br />
warranty ALSO DOES NOT COVER damages which occurred in shipment, or failures which are caused by products<br />
not supplied by the warrantor, or failures which result from acci<strong>de</strong>nts, misuse, abuse, neglect, bug infestation,<br />
mishandling, misapplication, alteration, faulty installation, set-up adjustments, misadjustment of consumer controls,<br />
improper maintenance, power line surge, lightning damage, modification, or commercial use (such as in a hotel,<br />
office, restaurant, or other business), rental use of the product, service by anyone other than a Factory Servicenter or<br />
other Authorized Servicer, or damage that is attributable to acts of God.<br />
THERE ARE NO EXPRESS WARRANTIES EXCEPT AS LISTED UNDER “LIMITED WARRANTY COVERAGE”.<br />
THE WARRANTOR IS NOT LIABLE FOR INCIDENTAL OR CONSEQUENTIAL DAMAGES RESULTING FROM<br />
THE USE OF THIS PRODUCT, OR ARISING OUT OF ANY BREACH OF THIS WARRANTY. (As examples, this<br />
exclu<strong>de</strong>s damages for lost time, cost of having someone remove or re-install an installed unit if applicable, or travel to<br />
and from the servicer. The items listed are not exclusive, but are for illustration only.) ALL EXPRESS AND IMPLIED<br />
WARRANTIES, INCLUDING THE WARRANTY OF MERCHANTABILITY, ARE LIMITED TO THE PERIOD OF THE<br />
LIMITED WARRANTY.<br />
Some states do not allow the exclusion or limitation of inci<strong>de</strong>ntal or consequential damages, or limitations on how<br />
long an implied warranty lasts, so the exclusions may not apply to you.<br />
This warranty gives you specific legal rights and you may also have others rights which vary from state to state. If a<br />
problem with this product <strong>de</strong>velops during or after the warranty period, you may contact your <strong>de</strong>aler or Servicenter.<br />
If the problem is not handled to your satisfaction, then write to the warrantor’s Consumer Affairs Department at the<br />
addresses listed for the warrantor.<br />
PARTS AND SERVICE (INCLUDING COST OF AN IN-HOME SERVICE CALL, WHERE APPLICABLE) WHICH<br />
ARE NOT COVERED BY THIS LIMITED WARRANTY ARE YOUR RESPONSIBILITY.<br />
Limited Warranty (for U.S.A.)<br />
Specifications<br />
FAQs, etc.<br />
45
46<br />
Customer Services Directory (for U.S.A.)<br />
Customer Services Directory<br />
Obtain Product Information and <strong>Operating</strong> Assistance; locate your nearest Dealer or Servicenter; purchase<br />
Parts and Accessories; or make Customer Service and Literature requests by visiting our Web Site at:<br />
http://www.panasonic.com/consumersupport<br />
or, contact us via the web at:<br />
http://www.panasonic.com/contactinfo<br />
You may also contact us directly at:<br />
1-800-211-PANA (7262)<br />
Monday-Friday 9 am-9 pm; Saturday-Sunday 10 am-7 pm, EST.<br />
■ For hearing or speech impaired TTY users, TTY : 1-877-833-8855<br />
Accessory Purchases<br />
Purchase Parts, Accessories and Instruction Books on line for all <strong>Panasonic</strong> Products by visiting our Web<br />
Site at:<br />
http://www.pasc.panasonic.com<br />
or, send your request by E-mail to:<br />
npcparts@us.panasonic.com<br />
You may also contact us directly at:<br />
1-800-332-5368 (Phone) 1-800-237-9080 (Fax Only) (Monday - Friday 9 am to 8 pm, EST.)<br />
<strong>Panasonic</strong> Services Company<br />
20421 84th Avenue South,<br />
Kent, WA 98032<br />
(We Accept Visa, MasterCard, Discover Card, American Express, and Personal Checks)<br />
■ For hearing or speech impaired TTY users, TTY : 1-866-605-1277<br />
Service in Puerto Rico<br />
<strong>Panasonic</strong> Puerto Rico, Inc.<br />
Ave. 65 <strong>de</strong> Infantería, Km. 9.5, San Gabriel Industrial Park,<br />
Carolina, Puerto Rico 00985<br />
Phone (787)750-4300, Fax (787)768-2910
Limited Warranty (for Canada)<br />
<strong>Panasonic</strong> Canada Inc.<br />
PANASONIC PRODUCT - LIMITED WARRANTY<br />
<strong>Panasonic</strong> Canada Inc. warrants this product to be free from <strong>de</strong>fects in material and workmanship and agrees to<br />
remedy any such <strong>de</strong>fect for a period as stated below from the date of original purchase.<br />
Plasma TV / Monitor In-home service One (1) year, parts (including Plasma Panel) and labour.<br />
<strong>LCD</strong> TV (26 in & over) In-home service One (1) year, parts (including <strong>LCD</strong> Panel) and labour.<br />
<strong>LCD</strong> TV (25 in & un<strong>de</strong>r) Carry-in service only One (1) year, parts (including <strong>LCD</strong> Panel) and labour.<br />
<strong>LCD</strong> Projector Carry-in service only One (1) year, parts (lamp ninety (90) days) and labour.<br />
Accessories Ninety (90) days (parts only)<br />
In-home Service will be carried out only to locations accessible by roads and within 50 km of an authorized<br />
<strong>Panasonic</strong> service facility.<br />
LIMITATIONS AND EXCLUSIONS<br />
This warranty does not apply to products purchased outsi<strong>de</strong> Canada or to any product which has been improperly<br />
installed, subjected to usage for which the product was not <strong>de</strong>signed, misused or abused, damaged during shipping,<br />
or which has been altered or repaired in any way that affects the reliability or <strong>de</strong>tracts from the performance, nor<br />
does it cover any product which is used commercially. Dry cell batteries are also exclu<strong>de</strong>d from coverage un<strong>de</strong>r this<br />
warranty.<br />
This warranty is exten<strong>de</strong>d to the original end user purchaser only. A purchase receipt or other proof of date of original<br />
purchase is required before warranty service is performed.<br />
THIS EXPRESS, LIMITED WARRANTY IS IN LIEU OF ALL OTHER WARRANTIES, EXPRESS OR IMPLIED,<br />
INCLUDING ANY IMPLIED WARRANTIES OF MERCHANTABILITY AND FITNESS FOR A PARTICULAR<br />
PURPOSE. IN NO EVENT WILL PANASONIC CANADA INC. BE LIABLE FOR ANY SPECIAL, INDIRECT OR<br />
CONSEQUENTIAL DAMAGES.<br />
In certain instances, some jurisdictions do not allow the exclusion or limitation of inci<strong>de</strong>ntal or consequential<br />
damages, or the exclusion of implied warranties, so the above limitations and exclusions may not be applicable.<br />
WARRANTY SERVICE<br />
For product operation and information assistance, please contact:<br />
Our Customer Care Centre: Telephone #: (905) 624-5505<br />
1-800 #: 1-800-561-5505<br />
Fax #: (905) 238-2360<br />
Email link: “Contact Us” on www.panasonic.ca<br />
FOR PRODUCT REPAIRS, please locate your nearest Authorized Servicentre at www.panasonic.ca :<br />
Link: “Servicentres locator” un<strong>de</strong>r “Customer support”<br />
<strong>Panasonic</strong> Factory Service:<br />
Vancouver, British Columbia<br />
<strong>Panasonic</strong> Canada Inc.<br />
12111 Riversi<strong>de</strong> Way<br />
Richmond, BC V6W 1K8<br />
Tel: (604) 278-4211<br />
Fax: (604) 278-5627<br />
Mississauga, Ontario<br />
<strong>Panasonic</strong> Canada Inc.<br />
5770 Ambler Dr.<br />
Mississauga, ON L4W 2T3<br />
Tel: (905) 624-8447<br />
Fax: (905) 238-2418<br />
IF YOU SHIP THE PRODUCT TO A SERVICENTRE<br />
Carefully pack and send prepaid, a<strong>de</strong>quately insured and preferably in the original carton.<br />
Inclu<strong>de</strong> <strong>de</strong>tails of the <strong>de</strong>fect claimed, and proof of date of original purchase.<br />
Limited Warranty (for Canada)<br />
Customer Services Directory (for U.S.A.)<br />
FAQs, etc.<br />
47
48<br />
Customer Services Directory (for Canada)<br />
British Columbia Canada<br />
Sylvan Electronic Services Inc. Bus Fax: (905) 731-8034<br />
Quebec<br />
a<br />
Audio Vi<strong>de</strong>o Electronics<br />
4450 Juneau Street<br />
Burnaby, BC V5C 4C8<br />
Canada<br />
Bus: (604) 299-6969<br />
Bus Fax: (604) 299-8464<br />
E-mail:<br />
audio_vi<strong>de</strong>o_electronics@yahoo.com<br />
A-Z Tech Electronics<br />
3356 Tennyson Avenue<br />
Victoria, BC V8Z 3P6<br />
Canada<br />
Bus: (250) 475-3341<br />
Bus Fax: (250) 475-3315<br />
E-mail: a-ztech@islandnet.com<br />
g<br />
GS Audio Services Ltd.<br />
10511 King George Hwy<br />
Surrey, BC V3T 2X1<br />
Canada<br />
Bus: (604) 582-4833<br />
Bus Fax: (604) 951-9183<br />
E-mail: gs-audioservices@shaw.ca<br />
G TV Electronics Ltd.<br />
1590 Commercial Drive<br />
Vancouver, BC V5L 3Y2<br />
Canada<br />
Bus: (604) 253-0033<br />
Bus Fax: (604) 253-0007<br />
E-mail: nwms@telus.net<br />
Gid<strong>de</strong>ns Services Ltd.<br />
1613 Valleyview Drive<br />
Kamloops, BC V2C 4B4<br />
Canada<br />
Bus: (250) 372-8842<br />
Bus Fax: (250) 372-0603<br />
E-mail: gid<strong>de</strong>nsservices@shaw.ca<br />
i<br />
IT Electronics<br />
5690 Imperial Street<br />
Burnaby, BC V5J 1G2<br />
Canada<br />
Bus: (604) 430-4228<br />
Bus Fax: (604) 433-3619<br />
E-mail: parts@itelectronics.com<br />
k<br />
Kelowna Teltronics TV & Audio<br />
1695 Burtch Road<br />
Kelowna, BC V1Y 4A9<br />
Canada<br />
Bus: (250) 860-9888<br />
Bus Fax: (250) 860-0766<br />
E-mail: teltronics@telus.net<br />
n<br />
NESA<br />
102 1636 West 2nd Avenue<br />
Vancouver, BC V6J 1H4<br />
Canada<br />
Bus: (604) 734-7606<br />
Bus Fax: (604) 734-9783<br />
E-mail: nesa@telus.net<br />
Nippon Vi<strong>de</strong>o & Sound<br />
180 3771 Jacombs Road<br />
Richmond, BC V6V 2L9<br />
Canada<br />
Bus: (604) 270-2820<br />
Bus Fax: (604) 270-3359<br />
Bus: (250) 545-2266<br />
Bus Fax: (250) 545-4065<br />
E-mail: ves@shaw.ca<br />
Alberta<br />
a<br />
Autek Lab Ltd.<br />
488 A St Annes Road<br />
Winnipeg, MB R2M 3E1<br />
Canada<br />
Bus: (204) 256-4048<br />
Bus Fax: (204) 257-6556<br />
E-mail: all81@escape.ca<br />
c<br />
Consumer Electronics Servicentre<br />
2305 7th Avenue<br />
Regina, SK S4R 1C6<br />
Canada<br />
Bus: (306) 781-8033<br />
Bus Fax: (306) 569-2177<br />
E-mail: ces@accesscomm.ca<br />
e<br />
Electronic Analyst (51st Ave only)<br />
9006 51st Avenue<br />
Edmonton, AB T6E 5X4<br />
Canada<br />
Bus: (780) 468-2575<br />
Bus Fax: (780) 466-1337<br />
E-mail: service@elan.ab.ca<br />
i<br />
Image Electronics (1992) Inc.<br />
643 Park Street<br />
Regina, SK S4N 5N1<br />
Canada<br />
Bus: (306) 522-6655<br />
Bus Fax: (306) 569-9660<br />
E-mail: image@accesscomm.ca<br />
j<br />
Japan Audio Vi<strong>de</strong>o<br />
1037 Erin Street<br />
Winnipeg, MB R3G 2X1<br />
Canada<br />
Bus: (204) 775-0494<br />
Bus Fax: (204) 774-2747<br />
E-mail: kanomax@pcs.mb.ca<br />
m<br />
MSJ Electronic Services Ltd.<br />
10558 114th Street<br />
Edmonton, AB T5H 3J7<br />
Canada<br />
Bus: (780) 426-1560<br />
Bus Fax: (780) 425-9595<br />
E-mail: msj@telusplanet.net<br />
s<br />
S & R Electronics<br />
805 West Fre<strong>de</strong>rica Street<br />
Thun<strong>de</strong>r Bay, ON P7E 3X4<br />
Canada<br />
Bus: (807) 475-4956<br />
Bus Fax: (807) 475-7252<br />
E-mail: srelect@shaw.ca<br />
Sonnx Service Inc.<br />
Unit L 675 Berry Street<br />
Winnipeg, MB R3H 1A7<br />
Canada<br />
Bus: (204) 953-0110<br />
Bus Fax: (204) 953-0119<br />
E-mail: rfrechette@sonnx.mb.ca<br />
Bay #12 7619 50th Avenue<br />
Red Deer, AB T4P 1M6<br />
Canada<br />
Bus: (403) 358-3540<br />
Bus Fax: (403) 358-3540<br />
E-mail: marinof@telusplanet.net<br />
t<br />
T.H.E Service Department<br />
Bay 6 1247 36 Ave NE<br />
Calgary, AB T2E 6N6<br />
Canada<br />
Bus: (403) 291-3717<br />
Bus Fax: (403) 250-1322<br />
E-mail: theservice@shaw.ca<br />
Tricom Electronics Ltd.<br />
#4-1622 Ontario Avenue<br />
Saskatoon, SK S7K 1S8<br />
Canada<br />
Bus: (306) 653-3913<br />
Bus Fax: (306) 665-1445<br />
E-mail:<br />
rlanglands.tricom@sasktel.net<br />
E-mail 2:<br />
kschnei<strong>de</strong>r.tricom@sasktel.net<br />
Nouveau-Brunswick<br />
b<br />
BJW Electronics Ltd.<br />
90 Millennium Drive<br />
Moncton, NB E1E 2G7<br />
Canada<br />
Bus: (506) 857-2118<br />
Bus Fax: (506) 857-8763<br />
E-mail: gil@bjwe.net<br />
o<br />
Ohmega Electronics Ltd.<br />
165 Whitting Rd, Unit2, Industr.<br />
Park<br />
Fre<strong>de</strong>ricton, NB E3B 5Y5<br />
Canada<br />
Bus: (506) 450-6020<br />
Bus Fax: (506) 452-7053<br />
E-mail: mobile@ohmega.ca<br />
E-mail 2: accounting@ohmega.ca<br />
s<br />
Servicetek Electronics<br />
164 Albert Street<br />
Moncton, NB E1C 1B2<br />
Canada<br />
Bus: (506) 387-4373<br />
Bus Fax: (506) 387-4332<br />
E-mail: servicetek@nb.aibn.com<br />
Ontario<br />
a<br />
A & N Electronics<br />
196 Joseph Zatzman Drive, Unit 8<br />
Dartmouth, NS B3B 1N4<br />
Canada<br />
Bus: (902) 468-7205<br />
Bus Fax: (902) 468-1047<br />
E-mail:<br />
anelectronics@ns.sympatico.ca<br />
Advanced Audio & Vi<strong>de</strong>o<br />
60 Meg Drive (Unit 14)<br />
London, ON N6E 3T6<br />
Canada<br />
Bus: (519) 686-4334<br />
Bus Fax: (519) 686-9515<br />
E-mail: advaud@ody.ca<br />
E-mail: bce@accessv.com<br />
c<br />
C Agusta TV Sales & Service<br />
25 Fisherman Drive 13<br />
Brampton, ON L7A 1C9<br />
Canada<br />
Bus: (905) 846-4739<br />
Bus Fax: (905) 846-9289<br />
E-mail: agustatv@on.aibn.com<br />
Coltech Electronics<br />
306 Kenora Avenue N<br />
Hamilton, ON L8E 2W2<br />
Canada<br />
Bus: (905) 561-5506<br />
Bus Fax: (905) 578-1001<br />
E-mail: coltech@cogeco.net<br />
Crescent TV<br />
3033 Marentette Avenue<br />
Windsor, ON N8X 4G1<br />
Canada<br />
Bus: (519) 969-1622<br />
Bus Fax: (519) 969-6772<br />
E-mail:<br />
ctv@crescentelectronics.com<br />
d<br />
Downtown Dupont Electronics<br />
1137 Dupont Street<br />
Toronto, ON M6H 2A3<br />
Canada<br />
Bus: (416) 532-2888<br />
Bus Fax: (416) 535-5720<br />
E-mail:<br />
downtowndupont@sympatico.ca<br />
h<br />
Hagopian <strong>Television</strong> Centre Ltd.<br />
864 Merivale Road<br />
Ottawa, ON K1Z 5Z6<br />
Canada<br />
Bus: (613) 728-2894<br />
Bus Fax: (613) 728-2926<br />
E-mail: hagopian@hagopian.ca<br />
Hextech Consumer Electronics<br />
110 Pony Drive, Unit 16<br />
Newmarket, ON L3Y 7B6<br />
Canada<br />
Bus: (905) 830-6797<br />
Bus Fax: (905) 830-6799<br />
E-mail: hextech@rogers.com<br />
n<br />
Northern Electronic Services<br />
660 Bayview Drive, Unit 10 & 11<br />
Barrie, ON L4N 9P5<br />
Canada<br />
Bus: (705) 733-2195<br />
Bus Fax: (705) 725-7686<br />
E-mail: northern@mcw.net<br />
r<br />
Regional Factory Parts & Service<br />
22 Antares Drive, Unit “J”<br />
Ottawa, ON K2E 7Z6<br />
Canada<br />
Bus: (613) 820-8606<br />
Bus Fax: (613) 820-3145<br />
E-mail: j.tunnell@sysu.com<br />
E-mail 2: j.long@bellnet.ca<br />
s<br />
Service Depot<br />
252 Lasalle Blvd<br />
a<br />
Acadien Electronique<br />
5215 De La Savane<br />
Montreal, QC H4P 1V4<br />
Canada<br />
Bus: (514) 270-1105<br />
Bus Fax: (514) 738-4229<br />
E-mail: support@amtservice.com<br />
Audio Beaudoin TV Inc.<br />
945 Rte <strong>de</strong> L‘Eglise<br />
Ste.Foy, QC G1V 3V2<br />
Canada<br />
Bus: (418) 653-8951<br />
Bus Fax: (418) 653-8964<br />
E-mail:<br />
beaudoinelectro@biz.vi<strong>de</strong>otron.ca<br />
c<br />
Capri Electronique<br />
7903 20E Avenue St Michel<br />
Montreal, QC H1Z 3S6<br />
Canada<br />
Bus: (514) 376-4990<br />
Bus Fax: (514) 376-4305<br />
E-mail:<br />
capri.electronique@vi<strong>de</strong>otron.ca<br />
Clinic Electronique Enr.<br />
4230 King Ouset<br />
Sherbrooke, QC J1L 1W6<br />
Canada<br />
Bus: (819) 823-1097<br />
Bus Fax: (819) 821-3701<br />
E-mail: clinic@vi<strong>de</strong>otron.ca<br />
h<br />
Hecotron International Inc.<br />
1370 rue Poncet (coin Hamon)<br />
Montreal, QC H3M 3A4<br />
Canada<br />
Bus: (514) 736-1313<br />
Bus Fax: (514) 736-1254<br />
E-mail: service@hecotron.net<br />
l<br />
Labtronic<br />
5115 Boul Jean XXIII<br />
Trois Riveres, QC G8Z 4A5<br />
Canada<br />
Bus: (819) 373-0066<br />
Bus Fax: (819) 373-4317<br />
E-mail: labtronic@cgocable.ca<br />
Leblond Electronique<br />
162 rue Fraser<br />
Riviere-du-Loop, QC G5R 1C8<br />
Canada<br />
Bus: (418) 862-9062<br />
Bus Fax: (418) 862-6392<br />
E-mail: lebelec@hotmail.com<br />
v<br />
V. G. S. Electronique Inc.<br />
25 Rue Neron Suite #3<br />
Chicoutimi, QC G7H 8B7<br />
Canada<br />
Bus: (418) 696-3292<br />
Bus Fax: (418) 696-2457<br />
E-mail:<br />
vgs.electronique@qc.aira.com<br />
E-mail:<br />
nippon@nipponvi<strong>de</strong>oandsound.ca<br />
v<br />
Vernon Electronics Service<br />
2705 45th Avenue<br />
Vernon, BC V1T 3N5<br />
Southland Crossing TV Ltd.<br />
Bay 5-7, 5708-1st Street SE<br />
Calgary, AB T2H 2W9<br />
Canada<br />
Bus: (403) 255-9647<br />
Bus Fax: (403) 259-4034<br />
E-mail: southtv@shaw.ca<br />
b<br />
Beaver Creek Electronics<br />
155 East Beaver Creek Road, 17<br />
Richmond Hill, ON L4B 2N1<br />
Canada<br />
Bus: (905) 731-1872<br />
Sudbury, ON P3A 1W6<br />
Canada<br />
Bus: (705) 566-3557<br />
Bus Fax: (705) 566-3455<br />
E-mail: service.<strong>de</strong>pot@on.aibn.com
NOTE
NOTE
NOTE
NOTE
NOTE
NOTE
NOTE
Customer’s Record<br />
The mo<strong>de</strong>l number and serial number of this product can be found on its back cover. You should note this serial<br />
number in the space provi<strong>de</strong>d below and retain this book, plus your purchase receipt, as a permanent record of your<br />
purchase to aid in i<strong>de</strong>ntification in the event of theft or loss, and for Warranty Service purposes.<br />
Mo<strong>de</strong>l Number Serial Number<br />
Anotación <strong>de</strong>l cliente<br />
El mo<strong>de</strong>lo y el número <strong>de</strong> serie <strong>de</strong> este producto se encuentran en su panel posterior. Deberá anotarlos en el<br />
espacio provisto a continuación y guardar este manual, más el recibo <strong>de</strong> su compra, como prueba permanente <strong>de</strong><br />
su adquisición, para que le sirva <strong>de</strong> ayuda al i<strong>de</strong>ntificarlo en el caso <strong>de</strong> que le sea sustraído o lo pierda, y también<br />
para disponer <strong>de</strong> los servicios que le ofrece la garantía.<br />
Mo<strong>de</strong>lo Número <strong>de</strong> serie<br />
<strong>Panasonic</strong> Consumer Electronics<br />
Company,<br />
Division of <strong>Panasonic</strong> Corporation<br />
of North America<br />
One <strong>Panasonic</strong> Way, Secaucus<br />
New Jersey 07094 U.S.A.<br />
<strong>Panasonic</strong> Puerto Rico Inc.<br />
(“PSC”)<br />
Ave. 65 <strong>de</strong> Infanteria, Km 9.5<br />
San Gabriel Industrial Park,<br />
Carolina, Puerto Rico 00985<br />
<strong>Panasonic</strong> Canada Inc.<br />
5770 Ambler Drive<br />
Mississauga, Ontario<br />
L4W 2T3 CANADA<br />
© 2006 <strong>Panasonic</strong> Corporation of North America. All Rights Reserved.<br />
© 2006 <strong>Panasonic</strong> Corporation of North America. Todos los Derechos Reservados. Printed in U.S.A.<br />
Impreso en EE.UU.