AN-151 Printing Barcode Labels Using MS Word with DH ...
AN-151 Printing Barcode Labels Using MS Word with DH ...
AN-151 Printing Barcode Labels Using MS Word with DH ...

You also want an ePaper? Increase the reach of your titles
YUMPU automatically turns print PDFs into web optimized ePapers that Google loves.
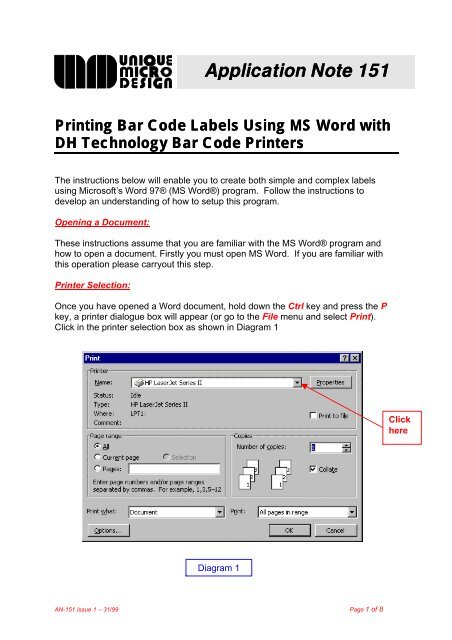
Application Note <strong>151</strong><strong>Printing</strong> Bar Code <strong>Labels</strong> <strong>Using</strong> <strong>MS</strong> <strong>Word</strong> <strong>with</strong><strong>DH</strong> Technology Bar Code PrintersThe instructions below will enable you to create both simple and complex labelsusing Microsoft’s <strong>Word</strong> 97® (<strong>MS</strong> <strong>Word</strong>®) program. Follow the instructions todevelop an understanding of how to setup this program.Opening a Document:These instructions assume that you are familiar <strong>with</strong> the <strong>MS</strong> <strong>Word</strong>® program andhow to open a document. Firstly you must open <strong>MS</strong> <strong>Word</strong>. If you are familiar <strong>with</strong>this operation please carryout this step.Printer Selection:Once you have opened a <strong>Word</strong> document, hold down the Ctrl key and press the Pkey, a printer dialogue box will appear (or go to the File menu and select Print).Click in the printer selection box as shown in Diagram 1ClickhereDiagram 1<strong>AN</strong>-<strong>151</strong> Issue 1 – 31/99 Page 1 of 8
Select the correct <strong>DH</strong> Technology barcoding printer that you will use, as illustrated inDiagram 2.Diagram2SelectPrinterOnce you have selected the correct printer, simply click on the Close button.(You will notice that the Cancel button will change to read Close.)Label Size Setup:We need to select the size of the labels that will be used. This is done by clicking onthe File command at the top left-hand corner of your screen. The File command isfound to the left of the Edit command on your toolbar. A menu will appear. Click onthe Page Setup command. Diagram 3 below will appear.Diagram 3<strong>AN</strong>-<strong>151</strong> Issue 1 – 31/99 Page 2 of 8
Now we will need to zero out all the margin settings as detailed in Diagram 4.Please insert 0 (zero) intothese fields so that ALLthe margins are set tozero. This can be doneby highlighting the currentsetting and typing in thezero.Diagram 4Once you have done this, your Page Setup dialogue box should look like Diagram 5below.Diagram 5The next item we will need to select is the paper size. Please click on the PaperSize tab.Once you have done this, a dialogue box as seen in Diagram 6 will appear.<strong>AN</strong>-<strong>151</strong> Issue 1 – 31/99 Page 3 of 8
Diagram 6Please select thelabel size thatyou will be using<strong>with</strong> your <strong>DH</strong>Technologybarcode printer.Now that you have selected the label size, the dialogue box must look like Diagram 7below.Diagram 7We have selectedthe 4” x 3” label forthis example. Youwill need to selectthe label that youwill be using.Please note the change inthe preview windowcompared to the one inDiagram 6Now that you have selected the label size please click OK.<strong>AN</strong>-<strong>151</strong> Issue 1 – 31/99 Page 4 of 8
Once you have clicked OK the dialogue box below will appear. At this point pleaseclick Fix.Once you have clicked on the Fix button, Click on the OK button. Your documentshould look like the one in Diagram 8 below.Creating a Label:Diagram 8Now just enter your text as you would in any<strong>Word</strong> document.Font selection is the same as in an ordinary <strong>Word</strong> document. If you would like toprint a barcode simply click the Font Drop Down menu (See Diagram below). Allthe barcodes that are supported by the printer are selectable as fonts. Simply scroll<strong>AN</strong>-<strong>151</strong> Issue 1 – 31/99 Page 5 of 8
down to the barcode that you would like to use. We will use Code 128A for thisexample.Once you have selected the barcode simply type in the numbers of the barcode thatyou would like to have printed. See the diagram below.You will notice that there is no barcode on the screen, only the barcode numbers.When you print this label the barcode will print as normal.<strong>AN</strong>-<strong>151</strong> Issue 1 – 31/99 Page 6 of 8
As you can see from the above diagram you can also box a barcode so that when itis printed the barcode will have a box around it.Setting Bar Code Height:You can change the height of the bar code by increasing the Font size. This can bedone by clicking on the Font Drop Down box. Select the size of the font that yourequire. Once this has been done the barcode size will be increased. Equally thebar code size can also be decreased using the same process. See diagram 9.<strong>AN</strong>-<strong>151</strong> Issue 1 – 31/99 Page 7 of 8
Diagram 9Select the Font size thatyou require.To Print a Label:Once your label is complete simply hold down the Ctrl key on your keyboard andpress the P key. The print dialogue box will appear. Click OK and the label will beprinted on your printer.© copywright: <strong>DH</strong> Technology 1999Unique Micro Design Pty Ltd (A.C.N. 007-419-490) Tel: +61-3-9764-816616 Nyadale Drive, Scoresby, Victoria 3176, Australia Fax: +61-3-9764-8177http://www.umd.com.auE-mail: sales@umd.com.au<strong>AN</strong>-<strong>151</strong> Issue 1 – 31/99 Page 8 of 8