Owner's Manual - Casablanca Fan
Owner's Manual - Casablanca Fan
Owner's Manual - Casablanca Fan

You also want an ePaper? Increase the reach of your titles
YUMPU automatically turns print PDFs into web optimized ePapers that Google loves.
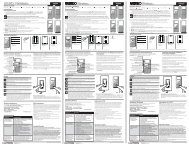
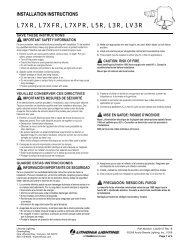
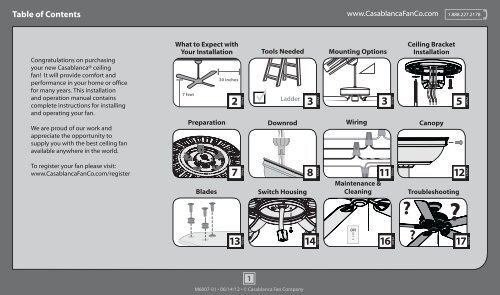
What to Expect with Your Installationwww.<strong>Casablanca</strong><strong>Fan</strong>Co.com 1.888.227.2178Read and Save These InstructionsIf you are unfamiliarwith wiring, use aqualified electrician.This product conforms to UL Standard 507.WARNINGSMust be able tosecure the fan tobuilding structure orfan-rated outlet boxKnow your wiring30 inchesfrom blade tip tonearest wall orobstructionAssess location7 feetFrom bottomedge of bladeto the floorw.1 - To reduce the risk of fire, electrical shock, orpersonal injury, mount fan directly from buildingstructure and/or an outlet box marked acceptable forfan support of 70 lbs (31.8 kg) and use the mountingscrews provided with the outlet box.w.2 - To avoid possible electrical shock, before installingor servicing your fan, disconnect the power by turningoff the circuit breakers to the outlet box and associatedwall switch location. If you cannot lock the circuitbreakers in the off position, securely fasten a prominentwarning device, such as a tag, to the service panel.You may need afriend to help you.Check box to seefan weightCeilings that are morethan 34° will require anangled mounting kit.See page 3 for details.Assess ceiling angle123Standard Downrodfor ceilings 8-10 feet highShorter Downrodfor fans installed close to ceilingLonger Downrodfor ceilings 10 feet or higherSelect a downrod lengthw.3 - To reduce the risk of fire, electrical shock, or motordamage, use only <strong>Casablanca</strong> Solid State Speed Controls.w.4 - To reduce the risk of personal injury, do not bend theblade brackets when installing the blade brackets, balancingthe blades, or cleaning the fan. Do not insert foreign objectsin between rotating fan blades.w.5 - Suitable for use in wet locations when installed ina GFCI protected branch circuit. If unsure, contact anelectrician.CAUTIONSc.1 - All wiring must be in accordance with national andlocal electrical codes ANSI/NFPA 70. If you are unfamiliarwith wiring, use a qualified electrician.c.2 - Use only <strong>Casablanca</strong> replacement parts.2M6007-01 • 06/14/12 • © <strong>Casablanca</strong> <strong>Fan</strong> Company
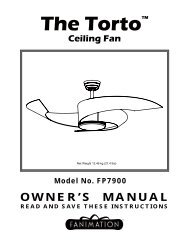
Mounting Options (continued)www.<strong>Casablanca</strong><strong>Fan</strong>Co.com 1.888.227.2178Support BraceSupportBraceCeilingOutlet Box(required)8StandardMountingStyleCeilingOutlet Box(required)AngledMountingStyle12Use Standard or Low-Profile Mountingto hang the fan from a flat ceiling by astandard downrod (included).Use Angled Mounting to hang thefan from a vaulted or angled ceiling(see previous page).4M6007-01 • 06/14/12 • © <strong>Casablanca</strong> <strong>Fan</strong> Company
Ceiling Bracket Installationwww.<strong>Casablanca</strong><strong>Fan</strong>Co.com1.888.227.2178MountingIsolatorTaperedMountingHolesCeiling PlateScrewsCeilingPlateCeilingPlateGasketPostTurn PowerOFFTo avoid possible electrical shock, beforeinstalling your fan, disconnect the power byturning off the circuit breakers to the outletbox associated with the wall switch location.Remove all four (4) mountingisolators.Align the tapered mounting holes in theceiling plate with the holes in the ceilingbracket. Install the four (4) ceiling platescrews and secure with the flange nutsusing an 11/32” wrench. Hold the ceilingbracket assembly up to the outlet box andmark the screw locations. To mount tosupport structure, also mark the ceiling fordrilling pilot holes.5M6007-01 • 06/14/12 • © <strong>Casablanca</strong> <strong>Fan</strong> CompanyFlangeNutsCeilingBracketCeilingPlateInstall the ceiling plate gasket onto theceiling plate. The four (4) holes in theceiling plate should lineup with the four (4)posts in the gasket.Refer to warning w.1 on pg. 2
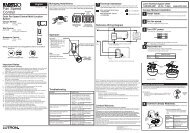
Ceiling Bracket Installation (continued)www.<strong>Casablanca</strong><strong>Fan</strong>Co.com 1.888.227.2178For angled ceilings, pointopening toward peak.Using the wood screw to poke holesthrough the rubber gasket in order toinstall the ceiling bracket assembly toeither the support structure or the ceilingfan-rated outlet box.Use wood screws (included)and washers when securingto support structure withapproved electrical outletbox. Drill 9/64” pilot holes insupport structure to aid insecuring ceiling bracketwith hardware found inthe hardware bag.Use machine screws(provided with outletbox) and washers whensecuring to existing ceilingfan-rated outlet box. Makesure it is securely installedand is acceptable for fansupport of 31.8 kg (70 lbs)or less.If you are unable to do this,call Technical Support at1-888-227-2178.6M6007-01 • 06/14/12 • © <strong>Casablanca</strong> <strong>Fan</strong> Company
Ceiling Bracket Installation (continued)Preparationwww.<strong>Casablanca</strong><strong>Fan</strong>Co.com 1.888.227.2178KEEP!DISCARDRemove the shipping blocks fromthe motor. Save the five screws.They will be needed for blade ironinstallation.Time Saver Tip: Get a helperto insert grommets, found inthe hardware bag, into theblades while you’re doing thenext couple of steps.7M6007-01 • 06/14/12 • © <strong>Casablanca</strong> <strong>Fan</strong> Company
Downrodwww.<strong>Casablanca</strong><strong>Fan</strong>Co.com 1.888.227.2178Option 1StandardDownrodfor ceilings 8-10’ highIf you need a different downrod length follow these steps:skip to next pageIncluded(pre-assembled)Option 3LongerDownrodfor angledceilings orceilings 10’ orhigherSteps 1-5 to remove standard downrod pipe1 2 3 4 5Option 2ShorterDownrodfor fans installedclose to ceilingSlideSlideIncludedSold Separately109Steps 6-10 to reassemble with new pipe8768M6007-01 • 06/14/12 • © <strong>Casablanca</strong> <strong>Fan</strong> Company
Downrod (continued)www.<strong>Casablanca</strong><strong>Fan</strong>Co.com 1.888.227.21783/8”CUT& STRIPKEEP!8”(not to scale)KEEP!Remove the pre-installedsetscrew so that the downrodcan be inserted.Hand tighten the downrod (atleast 4-5 full turns) until it stops.The wires can be cut, butleave at least 8” extendingfrom the top of the downrod.Tighten the setscrewwith pliers. DO NOTHAND TIGHTEN.8” 3/8”9M6007-01 • 06/14/12 • © <strong>Casablanca</strong> <strong>Fan</strong> CompanyIf the setscrew is not tightenedsecurely, the fan may fall.
Downrod (continued) www.<strong>Casablanca</strong><strong>Fan</strong>Co.com1.888.227.2178Put the wires and downrod through thecanopy. Let the canopy sit loosely on topof the fan.DO NOT PICK THE FAN UP BY THECANOPY OR WIRES. Place the downrodball into the slot in the ceiling bracket.10M6007-01 • 06/14/12 • © <strong>Casablanca</strong> <strong>Fan</strong> Company
Wiringwww.<strong>Casablanca</strong><strong>Fan</strong>Co.com 1.888.227.2178FROM CEILINGNote: To connect the wires,hold the bare metal leadstogether and place a wireconnector over them, then twistclockwise until tight.FROM CEILINGFROM FANGreen/Yellow Stripe(grounding)Green/Yellow StripeGreen/Yellow StripeUsing an orange wireconnector fromthe hardware bag,connect the 3 groundingwires (green, green/yellow stripe, or barecopper) coming from theceiling, downrod, andhanging bracket.Black (ungrounded)BlackBlueWhite (grounded) WhiteUsing orange wireconnectors fromthe hardware bag,connect the black wire(ungrounded) from theceiling to the black andthe blue wires from thefan. Connect the whitewire (grounded) fromthe ceiling to the whitewire from the fan.FROM CEILING BRACKETF RO M FA NRefer to CAUTION c.1 and WARNING w.5 on pg. 211M6007-01 • 06/14/12 • © <strong>Casablanca</strong> <strong>Fan</strong> CompanyTurn the splices upward and push them carefully back through the hanger bracketinto the outlet box. Spread the wires apart, with the grounded wires on one side ofthe outlet box and the ungrounded wires on the other side of the outlet box.
Canopywww.<strong>Casablanca</strong><strong>Fan</strong>Co.com 1.888.227.2178ScrewHolesPosition the canopy so that, whenlifted into place, the canopy fits intothe hanging bracket as shown.Lift the canopy into place so thatthe screw holes are aligned.Insert the two canopy screwsfound in the hardware bag.12M6007-01 • 06/14/12 • © <strong>Casablanca</strong> <strong>Fan</strong> CompanyNote: <strong>Fan</strong> style may vary.
Bladeswww.<strong>Casablanca</strong><strong>Fan</strong>Co.com 1.888.227.2178Remember the screws thatyou kept after removing theshipping blocks (page 7)? Youneed them plus five more fromhardware bag for this step.Blades sold separatelyInsert grommets found in the hardwarebag into the holes in the blades, thensecure each blade to a blade iron withscrews found in the hardware bag.Lightly attach the blade irons to themotor with screws found inthe hardware bag, then securelytighten after both screws are attached.13M6007-01 • 06/14/12 • © <strong>Casablanca</strong> <strong>Fan</strong> CompanySuitable for use in wet locatons wheninstalled in a GFCI portected branchcircuit. If unsure, contact an electrician.
Switch Housingwww.<strong>Casablanca</strong><strong>Fan</strong>Co.com 1.888.227.2178Screw two (2) housing assembly screwsfrom the hardware bag halfway intothe motor housing. It does not matterwhich two screw holes you choose.Feed the wire plug through the centerhole of the upper switch housing, thenwrap keyhole slots around the screws andtwist counterclockwise.theInsert the third screw, found inhardware bag, into place and thentighten all three (3) screws.14M6007-01 • 06/14/12 • © <strong>Casablanca</strong> <strong>Fan</strong> CompanyMake sure the upper switch housing is securelyattached to the mounting plate. Failure to properlysecure all 3 assembly screws could result in the switchhousing fixture falling.
Switch Housing (continued)www.<strong>Casablanca</strong><strong>Fan</strong>Co.com 1.888.227.2178Connect the plugs from the upper and lowerswitch housings. Make sure to line up thecolored markings on the connectors.Lift the lower switch housing up until theholes line up with the screw holes in theupper switch housing. Install the three (3)switch housing screws, found inthe hardware bag.15M6007-01 • 06/14/12 • © <strong>Casablanca</strong> <strong>Fan</strong> CompanyConnect the fandangle to the short chaincoming from the switch housing.Make sure the lower switch housing is securely attached to theupper switch housing. Failure to properly secure all 3 assemblyscrews could result in the switch housing fixture falling.
Switch Housing (continued)Maintenance & Cleaningwww.<strong>Casablanca</strong><strong>Fan</strong>Co.com 1.888.227.2178ONTurn PowerCONGRATULATIONS!YOU’RE DONE!The pull chain controls the fan:high, medium, low, extra low,and off.To switch the direction of air flow,move the reverse switch to theopposite position.Cleaning the fan - use softbrushes or cloths to preventscratching. Cleaning productsmay damage the finishes.16M6007-01 • 06/14/12 • © <strong>Casablanca</strong> <strong>Fan</strong> Company
Troubleshootingwww.<strong>Casablanca</strong><strong>Fan</strong>Co.com 1.888.227.2178<strong>Fan</strong> doesn’t work• Make sure electrical switch is on.• Pull the pull chain to make sureit is on.• Push the motor reversing switchfirmly left or right to ensure thatit is engaged.• Check the circuit breaker toensure the power is turned on.• Make sure the blades spin freely.• Turn off power from the circuitbreaker, then loosen the canopyand check all the connectionsaccording to the wiring diagramon page 11.• Check the plug connection inthe switch housing.Excessive wobbling• Tighten all of the blade andblade iron screws until theyare snug.• Turn the power off, supportthe fan carefully, and checkthat the hanger ball isproperly seated.• Use the provided balancingkit and instructions tobalance the fan.Noisy Operation• Tighten the blade and bladeiron screws until they are snug.• Check to see if any of the bladesare cracked. If so, replace all ofthe blades.17M6007-01 • 06/14/12 • © <strong>Casablanca</strong> <strong>Fan</strong> CompanyAUTHORIZED SERVICE CENTERSFor the most updated listing of <strong>Casablanca</strong> AuthorizedService Centers, visit www.<strong>Casablanca</strong><strong>Fan</strong>Co.com orcall toll free 1-888-227-2178.