dbs-1200 manual banding tool for 1/8" mini-band - Daniels ...
dbs-1200 manual banding tool for 1/8" mini-band - Daniels ...
dbs-1200 manual banding tool for 1/8" mini-band - Daniels ...

Create successful ePaper yourself
Turn your PDF publications into a flip-book with our unique Google optimized e-Paper software.
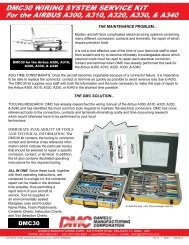
DBS-<strong>1200</strong> MANUAL BANDING TOOLFOR 1/8" MINI-BANDDATASHEETSEE PAGE 6 FOR IMPORTANT INFORMATION CONCERNING LIMITEDWARRANTY, AND LIMITATION OF LIABILITYINTRODUCTIONThe <strong>Daniels</strong> DBS-<strong>1200</strong> ( M81306/2-02B) ManualBanding Tool is primarily designed <strong>for</strong> termination of EMI/RFI Mini-Band shielding materials.1.0 OPERATION1.1 Insert the mechanical <strong>band</strong> into the DBS-<strong>1200</strong><strong><strong>band</strong>ing</strong> <strong>tool</strong> at least 1.75 inches, the <strong>band</strong> loopshall be orientated on the upper side of the <strong>tool</strong>'snose (see Figure 1). Actuate the movablehandle of the <strong>tool</strong> one complete stroke to insurethat the <strong>band</strong> has been captured by thegripping mechanism.FIGURE 11.2 Position the connector and the shield assemblythrough the <strong>band</strong>.1.3 Orientate the shield terminations under the <strong>band</strong>while actuating the movable handle of the <strong>tool</strong>.Continue <strong>tool</strong> actuation until the <strong>band</strong> is snugand <strong>tool</strong> resistance is felt, whereupon, releasethe movable handle and actuate the handle onefull stroke thus locking the movable handle(locking occurs at the predetermined poundage).DO NOT ATTEMPT TO PULL THEHANDLE OF THE TOOL OPEN. WHENTHE BAND IS CUT, THE MOVABLEHANDLE WILL OPEN AUTOMATI-CALLY.FIGURE 21.4 At any point in the operation prior to the lockingof the movable handle, the <strong>band</strong> may beloosened or removed by disengaging the retentionpawl as shown in Figure 2. When actuatingthe retention pawl apply a <strong>for</strong>ce on the<strong>band</strong> away from the <strong>tool</strong> to remove or loosenthe <strong>band</strong>. FIGURE 3DANIELS MANUFACTURING CORP., 526 THORPE ROAD, ORLANDO, FL 32824, USAPHONE (407) 855-6161 • FAX (407) 855-6884 • WWW.DMCTOOLS.COM • E-MAIL: DMC@DMCTOOLS.COMCOPYRIGHT © 2014 ALL RIGHTS RESERVED REV. H 03/14 FILE #: DS0015 DOC. #: DBS-<strong>1200</strong>-DS1
1.5 To complete the termination, the <strong>band</strong> must bebent 90° by lifting the cutter lever upwards (seeFigure 3), and cut by depressing the cutter leverdownwards (see Figure 4). WHEN THE CUT-TING OPERATION HAS STARTED, ITMUST BE COMPLETED PRIOR TO ANYFURTHER MOVEMENT OF THE BAND INTHE TOOL.Note:Sometimes the movable handle will openFIGURE 4during the bend or cut operation. This isnormal.Warning: Worn cutter blade requires additional pressure to operate and may damage the <strong>tool</strong>, ormay result in accident or injury. Replace cutter blade periodically.1.6 Remove excess <strong>band</strong> material from the <strong>tool</strong> by pulling out toward rear of <strong>tool</strong>.1.7 The cutoff tab (see Figure 5) must be rolled over 180° in a manner which will prevent slippage (seeFigure 6). Use the DBS-R05 to per<strong>for</strong>m the rollover. NOTE: Slippage may occur if rollover exceeds180° (see Figure 7).2.0 TOOL CALIBRATION2.1 CHECKING TOOL CALIBRATION2.1.1 Place the calibration inspection fixture (DBS-CG3) and the <strong>manual</strong> <strong><strong>band</strong>ing</strong> <strong>tool</strong> (DBS-<strong>1200</strong>) so thatthey may be oriented as shown in Figure 8.2.1.2 Insert a flat <strong>band</strong> through the <strong>band</strong> insertion slot of calibration inspection fixture until it extends completelythrough the fixture and the <strong>band</strong> buckle is resting against the backstop.2.1.3 Insert the <strong>band</strong> into the nose of the <strong><strong>band</strong>ing</strong> <strong>tool</strong> as described in section 1.1.2.1.4 Repeatedly actuate the movable handle. As you approach the fixture, use short strokes until the <strong>band</strong> issnug. Then use one full stroke and the movable handle will lock.DANIELS MANUFACTURING CORP., 526 THORPE ROAD, ORLANDO, FL 32824, USAPHONE (407) 855-6161 • FAX (407) 855-6884 • WWW.DMCTOOLS.COM • E-MAIL: DMC@DMCTOOLS.COMCOPYRIGHT © 2014 ALL RIGHTS RESERVED REV.H 03/14 FILE #: DS0015 DOC. #: DBS-<strong>1200</strong>-DS2
BAND INSERTIONSLOTBAND BUCKLEDBS-CG3 (M81306/2-02F)CALIBRATIONINSPECTIONFIXTUREBANDING TOOLNOSEMINI-BANDBACK STOPCUTTER LEVERGAGEVERIFICATIONSLOTDBS-<strong>1200</strong>MANUALBANDING TOOLGREENMOVABLEHANDLE"GO/NO-GO" GAGERED"GO"GAGE P/N: G752(M81306/2-02F)FIGURE 8"NO-GO"2.1.5 Insert the "Go" member of the "Go/No-Go" gage into the gage verification slot of the calibration inspectionfixture. If the "Go" member does not insert freely, the <strong>tool</strong> is exerting excessive <strong>for</strong>ce. Likewise, ifthe "No-Go" member freely enters the gage verification slot, the <strong>tool</strong> is below the <strong>mini</strong>mum <strong>for</strong>ce limit. Ifcalibration is required, see section 2.2.2.1.6 To separate, actuate the cutter lever.2.1.7 Remove spent <strong>band</strong> pieces from both thecalibration inspection fixture and the <strong><strong>band</strong>ing</strong><strong>tool</strong>.2.2 ADJUSTING TOOL CALIBRATION2.2.1 Remove adjustment cover screws and adjustmentcover with a 3/32" hex wrench(see Figure 9).ADJUSTMENT COVERSCREWADJUSTMENTCOVER2.2.2 Adjust <strong>tool</strong> calibration with adjustmentwrench (p/n DBS-1100-32). To increasetension, turn adjustment screw clockwise.To decrease tension, turn adjustmentscrew counterclockwise (see Figure10). Tension should be set to 72±10lbs.FIGURE 9DANIELS MANUFACTURING CORP., 526 THORPE ROAD, ORLANDO, FL 32824, USAPHONE (407) 855-6161 • FAX (407) 855-6884 • WWW.DMCTOOLS.COM • E-MAIL: DMC@DMCTOOLS.COMCOPYRIGHT © 2014 ALL RIGHTS RESERVED REV. H 03/14 FILE #: DS0015 DOC. #: DBS-<strong>1200</strong>-DS3
2.2.3 Check adjusted calibration as describedin section 2.1.ADJUSTMENT WRENCH(P/N DBS-1100-32)2.2.4 If adjustment did not bring the <strong>tool</strong> withinproper calibration, repeat steps 2 and 3until calibration is corrected.2.2.5 Replace adjustment cover and adjustmentcover screws.ADJUSTMENTSCREWCONSULT DMC FOR INFORMATION ONOTHER CALIBRATION EQUIPMENT.FIGURE 103.0 BLADE CHANGE PROCEDURE1. Loosen lock screw, located as shown in Figure 12.2. Raise cutter lever to complete upright position.3. At this point blade will be free to fall from <strong>tool</strong> nose. If blade does not fall, use a probe to free blade.4. With blade removed, inspect blade cavity <strong>for</strong> any debris. Remove debris. Lubricate blade with a lightcoat of machine oil.5. To reinstall blade, raise cutter lever again to complete upright position, insert blade as shown in Figures11 and 12, lower cutter lever and tighten lock screw.CUTTER LEVERLOCK SCREWIMPORTANTINSERT BLADEAS SHOWNFIGURE 11FIGURE 12DANIELS MANUFACTURING CORP., 526 THORPE ROAD, ORLANDO, FL 32824, USAPHONE (407) 855-6161 • FAX (407) 855-6884 • WWW.DMCTOOLS.COM • E-MAIL: DMC@DMCTOOLS.COMCOPYRIGHT © 2014 ALL RIGHTS RESERVED REV.H 03/14 FILE #: DS0015 DOC. #: DBS-<strong>1200</strong>-DS4
4.0 FIELD REPLACEABLE COMPONENTSFIELD REPLACEABLE COMPONENTSILLUSTRATED PARTS BREAK DOWN14FIGURE 13TABLE 1PART LISTITEM1234567891011121314PART NUMBER1-1143DBS-1100-3DBS-1100-12SA1-12448-1131DBS-<strong>1200</strong>-6SA1-1131DBS-1100-71-15921-1032DBS-1100-158-11298-11638-1143QTY41111111111111DESCRIPTIONADJUSTMENT COVER SCREWADJUSTMENT COVERCUTTER LEVER SUBASSYCOVER LEVER SCREWTORSION SPRINGNOSE SUBASSYSTOP SCREWCUTTER BLADESHOULDER SCREWFLAT HEAD SCREWRETENTION PAWLCOMPRESSION SPRINGSPRING, STOPHANDLE SPRINGConsult DMC <strong>for</strong> in<strong>for</strong>mation on parts listed in this table.DANIELS MANUFACTURING CORP., 526 THORPE ROAD, ORLANDO, FL 32824, USAPHONE (407) 855-6161 • FAX (407) 855-6884 • WWW.DMCTOOLS.COM • E-MAIL: DMC@DMCTOOLS.COMCOPYRIGHT © 2014 ALL RIGHTS RESERVED REV. H 03/14 FILE #: DS0015 DOC. #: DBS-<strong>1200</strong>-DS5
<strong>Daniels</strong> Manufacturing Corporation offers complete refurbishing and recalibration services.DMC specially engineers and manufactures complete <strong>tool</strong> kits to satisfy individual customer requirements,such as total aircraft support, general shop maintenance or production, on board ship and vehicle service, etc.LIMITATION OF LIABILITY<strong>Daniels</strong> Manufacturing corporation is not liable <strong>for</strong> consequential or special damages of any nature or kindresulting from the use, or misuse, of any of its products. Owners and users of DMC products assume fullresponsibility <strong>for</strong> instructing their employees in the proper and safe use of such products.LIMITED WARRANTYDMC (<strong>Daniels</strong> Manufacturing Corporation) warrants each new product sold by it to be free from defectsin material and workmanship under normal use and service. DMC's obligation under this warranty islimited to the free correction or, at DMC's option, the refund of the purchase price of any such productwhich proves defective in normal service within ninety (90) days after delivery to the first user, providedthat the product is returned to DMC with transportation charges prepaid and which shall appear to DMC'ssatisfaction, it being understood that DMC products are not consumer products. This warranty shall notcover any damage to any product which, in the opinion of DMC, was caused by normal wear, misuse,improper operation, tampering, neglect or accident. This warranty is in lieu of all other warranties expressor implied. No warranty, express or implied, is made or authorized to be made or assumed with respect toproducts of <strong>Daniels</strong> Manufacturing Corporation other than those herein set <strong>for</strong>th.DANIELS MANUFACTURING CORP., 526 THORPE ROAD, ORLANDO, FL 32824, USAPHONE (407) 855-6161 • FAX (407) 855-6884 • WWW.DMCTOOLS.COM • E-MAIL: DMC@DMCTOOLS.COMCOPYRIGHT © 2014 ALL RIGHTS RESERVED REV.H 03/14 FILE #: DS0015 DOC. #: DBS-<strong>1200</strong>-DS6