JM60-433 - Sparesmaster
JM60-433 - Sparesmaster
JM60-433 - Sparesmaster
- No tags were found...

You also want an ePaper? Increase the reach of your titles
YUMPU automatically turns print PDFs into web optimized ePapers that Google loves.
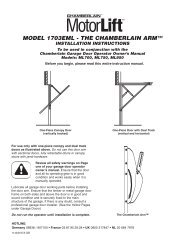
4ASSEMBLY SECTION5Assemble RailPlace Rail pieces (1) on a flat surface for assembly. Take specialnote of the raised line on the Rail pieces (4) these lines MUST lineup in order for the Rail to fit together properly. All three Railsections are interchangeable. Slide Rail Braces (2) into slots on thesides of Rail. Make sure small tabs on Rail Braces (3) are upagainst top lip of Rail. Connect Rail by sliding other end of bracesinto next Rail. Be sure the raised lines that run down Rail sections(4) line up. Tap Rail assembly (5) on a piece of wood (6) until Railsections are flush. Repeat for final Rail section.Vibration Reduction Kit:Pads are to be placed inside the rail close to the operator powerhead. Two pads on each side. Two half pads at the bottom of therail. Clean rail where pads will be placed. WORK CLEAN! Removegrease or any dirt from rail otherwise pads won’t stick.6Assemble Cable Pulley BracketInsert Carriage Bolt (1) though square hole in Cable Pulley Bracket(4). Remove Chain/Cable assembly (3) from carton. Wrap Cablearound Cable Pulley (2) and insert Pulley into Bracket (NOTE:Make sure the Bracket is assembled in position shown). Slide pin(5) through holes in Cable Pulley Bracket and Cable Pulley. NOTE:Trolley with Magnet (6) MUST be installed in the position shown.7Insert Chain/Cable into RailSlide Cable Pulley Bracket (1) into Rail assembly (3), be sure toinsert Cable Pulley Bracket as shown. Push Cable Pulley Brackettoward front of Rail and slide Inner Trolley (2) into Rail assembly.Magnet (4) MUST be installed in position shown or unit will notfunction properly.8Attach Trolley to RailTurn Rail assembly over. Slide Outer Trolley (1) into Rail assembly(2), be sure the end with Door Arm Hole (3) is heading in directionof door (4). Slide Outer Trolley down Rail until it engages with InnerTrolley.9Attach Rail to UnitTurn Rail assembly over. Wrap Chain around Drive Sprocket (1).Slide Rail assembly (2) toward unit and into slots on top of unit.Attach C-Bracket (3) on rail and secure with screws (4) as shown.Push Cable Pulley Bracket forward making Chain tight on sprocket.Chain MUST engage teeth on Drive Sprocket.10Completed InstallationAs you proceed with the assembly, installation andadjustment procedures in this manual, you may find it helpfulto refer back to this illustration of a completed installation.(1) Cable Pulley Bracket(2) Trolley(3) Chain/Cable Assembly(4) Rail(5) Hanging Bracket(6) Power Cord(7) Opener(8) Light Lens(9) Manual ReleaseRope & Handle(10) Door Arm(11) Door Bracket(12) Header BracketAttach Header BracketTurn Rail and Unit assembly over. Slide Cable Pulley Bracket (2)toward front end of Rail (3). Be careful Chain does not come offDrive Sprocket on unit or become twisted. Slide Carriage Bolt (5)into Header Bracket (1). Secure with Lock Nut (4). Tighten Nut untilChain does not droop below rail. Do NOT over tighten.ASSEMBLY OF YOUR OPENER IS NOW COMPLETE.INSTALLATION SECTIONWear protective goggles when working overhead to protect youreyes from injury. Disengage all existing garage door locks to avoiddamage to garage door. To avoid serious personal injury fromentanglement, remove all ropes connected to garage door beforeinstalling opener. Installation of this product shall comply withZH1/494, VDE 0700 Part 238, and VDE 0700 Part 1. It isrecommended that the opener be installed 2.1m (7 feet) or moreabove the floor where space permits.11Find Center of GarageMark center of door (1). Extend line onto ceiling (2).121314Mount Header BracketClose door providing a support for header bracket.A. Preferred:Locate the vertical center line (4) and the point that was markedin step 13. Place bottom of Header bracket (1) over this point.Mark holes for Header Bracket (5) that meet the wall. Forconcrete walls drill 8mm pilot holes. Insert Concrete Anchors (2)and secure Header Bracket to Header Wall with Lag Screws (3).For wood walls, drill 4mm pilot holes and secure header bracketwith Lag Screws.B. If Necessary:Locate center line on ceiling (4) center Header Bracket overcenter line. Mark and drill pilot holes for concrete or woodceilings as in A above. Tighten all nuts and bolts securely.15Fasten Door BracketA. Place Door Bracket (2) on the top of the door (3) and centerover Vertical Center Line (1). Mark the two rear top holes. Drill4mm holes.B. Mark the two top front holes. Drill 4mm holes. Fasten DoorBracket (2) to the top of the door (3) using Screws (4)NOTE: If you have a Hörmann Door and for some other doors it isrecommended to place two screws (5) in the front bottom holes(Not Provided).16Position OpenerOpen Door (3) to its highest point of travel (1) measure 20mmabove this point and mark on Header Wall (2) the bottom of theRail (4) should be no more than 20mm above highest point oftravel of the door (1). NOTE: If door spring is in the way install unitdirectly above spring. Clearance between highest point of traveland Rail should not exceed 50mm and can be zero whenclearance between door and ceiling is only 30mm.Hang OpenerBend Hanging Brackets (1) so they are flat against ceiling.Measure distance from Header Bracket to Ceiling MountingBracket Bolts. Mark length on ceiling starting at the Header Wall,along this point is where the unit will be mounted. Lift door to fullopen position, rest opener on door. Insert Square Head Screws (A)into Rail assembly (B) approximately 120mm from end of Rail nearmotor unit. Slide Hanging Brackets on to Square Head Screws andsecure Brackets with Nuts (5). In this process the Square HeadScrews hook into slots on the sides of rail. (C)For concrete ceilings, drill 8mm pilot holes into ceiling and insertConcrete Anchors (2). Secure Hanging Brackets to ceiling with LagScrews (3). For wood ceilings, drill 4mm pilot holes and securewith Lag Screws (3).Optional: A second set of hanging brackets is recommended whendoor is very heavy. The hanging brackets should be located in thefirst third to the center of the rail from the front or at the locationthe garage door opener lifts the rail upwards the most during thetravel.Connect Door Arm to TrolleyA. Preferred Installation:Disconnect Trolley by pulling on the red handle and slidetowards door. With door closed connect Straight Door Arm (5) toTrolley (4) with Bolt (3), secure with Nut (1). Connect CurvedDoor Arm (2) to Door Bracket with Bolt (3) Secure with Nut (1).Align Straight and Curved Door Arms with a 2 hole overlapconnect with Bolt (3), secure with Nut (1), If Straight Door Arm(5) is too long, cut the end of the Door Arm.B. Where extra travel distance is required:With door closed connect Curved Door Arm (2) to Door Bracketwith Bolt (3), secure with Nut (1). Lift Curved Door Arm (2) tomeet Trolley, connect door arm to Trolley with Bolt (3), securewith Nut (1).Connect Electric PowerTo avoid installation difficulties, do not run the garage dooropener until instructed to do so.Plug the opener into electric outlets as specified by local wiringcodes. The opener light will turn on when power is connected andremain on for 2-1/2 minutes.2-GB