HardiePanel® Vertical Siding Product Description - James Hardie
HardiePanel® Vertical Siding Product Description - James Hardie
HardiePanel® Vertical Siding Product Description - James Hardie

You also want an ePaper? Increase the reach of your titles
YUMPU automatically turns print PDFs into web optimized ePapers that Google loves.
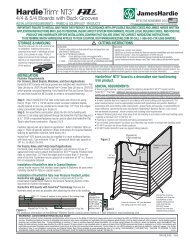
General<strong>Product</strong>Informationhorizontal joint treatmentIn some applications such asmulti-story structures or at gableends, it may be necessary to stack<strong>Hardie</strong>Panel ® siding. The horizontaljoints created between panels must12.71 Simple horizontal jointWater-resistivebarrierUpper panelWater-resistive barrierUpper panelWorkingSafelyTools forCutting andFasteningbe flashed properly to minimizewater penetration. Treat horizontalpanel joints by using one of thefollowing methods:6mm (¼in.) GapFlashingGeneralInstallationRequirements1) After installing the lower courseof panel siding, install vinyl orcoated aluminum “Z” flashing atthe top edge of the panel. Makesure that the flashing is slopedaway from the wall and does notrest flat on the top edge of thepanel. Install the second levelor gable panels leaving a 1 /4-in.minimum gap between thebottom of the panel and the Zflashing. This gap should neverbe caulked.2) As an alternative, if a horizontalband board is used at thehorizontal joint, flashing mustextend over the panel edge andtrim attachment. Flashing forboth treatments must slip behindthe water-resistive barrier.!WARNING12.8Do not bridge floors with panel siding. A horizontaljoint should always be created between floors.TIP: For the most symmetrical looking wall,plan the installation so that a full panel iscentered on the wall or gable with equal-sizepanels cut for each end. As an alternative,plan the installation so that a full panel islocated on either side of the wall center,again leaving equal-size panels on eachend. These strategies might entail a centeredframing layout. Choose the strategy thatlooks the best and uses material most efficiently.2 Band-board jointLower panelLower panelWater-resistivebarrierUpper panel6mm (¼in.) GapFlashingDecorativeband boardWater-resistive barrierDon’t caulkgap betweenflashing andupper panel.Lower panelDon’t caulk gapbetween flashingand upper panel.Upper panelDecorativeband boardTIP: For best looking installation of <strong>Hardie</strong>Panel Select Sierra 8siding, carefully align vertical panel grooves at 1st to 2nd story orgable junctures.GeneralFastenerRequirementsFinishing andMaintenance<strong>Hardie</strong>Wrap® <strong>Hardie</strong>Trim ®Weather Barrier Boards/Battens<strong>Hardie</strong>Soffit ®Panels<strong>Hardie</strong>Plank ®Lap <strong>Siding</strong><strong>Hardie</strong>Shingle ®<strong>Siding</strong><strong>Hardie</strong>Panel®<strong>Vertical</strong> <strong>Siding</strong>Appendix/GlossaryESR-1844 &2290 Report109