HardiePanel® Vertical Siding Product Description - James Hardie
HardiePanel® Vertical Siding Product Description - James Hardie
HardiePanel® Vertical Siding Product Description - James Hardie

You also want an ePaper? Increase the reach of your titles
YUMPU automatically turns print PDFs into web optimized ePapers that Google loves.
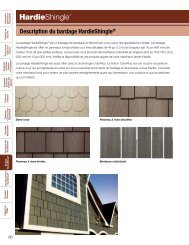
WorkingSafelyTools forCutting andFasteningGeneralInstallationRequirements<strong>Hardie</strong>Panel ® <strong>Vertical</strong> <strong>Siding</strong> <strong>Product</strong> <strong>Description</strong><strong>Hardie</strong>Panel ® vertical siding is factory-primed fiber-cement vertical siding available in a variety of sizes and textures.Examples of these are shown below. Textures include smooth, stucco, Cedarmill © and Sierra 8. <strong>Hardie</strong>Panel verticalsiding is 5 /16-in. thick and is available in 4x8, 4x9 and 4x10 sizes. Please see your local <strong>James</strong> <strong>Hardie</strong> dealer for textureand size availability.<strong>Hardie</strong>Panel vertical siding is available as a prefinished <strong>James</strong> <strong>Hardie</strong> ® product with ColorPlus ® Technology. TheColorPlus coating is a factory applied, oven baked finish available on a variety of <strong>James</strong> <strong>Hardie</strong> siding and trimproducts. See your local dealer for availability of products, color and accessories.<strong>Hardie</strong>Wrap®Weather BarrierStucco Cedarmill ©Sierra 8SmoothESR-1844 &2290 ReportAppendix/Glossary<strong>Hardie</strong>Panel®<strong>Vertical</strong> <strong>Siding</strong><strong>Hardie</strong>Shingle ®<strong>Siding</strong><strong>Hardie</strong>Soffit ®Panels<strong>Hardie</strong>Trim ®Boards/Battens<strong>Hardie</strong>Plank ®Lap <strong>Siding</strong>Finishing andMaintenanceGeneralFastenerRequirementsGeneral<strong>Product</strong>Information106
Installation of <strong>Hardie</strong>Panel ®<strong>Vertical</strong> <strong>Siding</strong>Note: <strong>James</strong> <strong>Hardie</strong> has a capillary break requirement when installing <strong>Hardie</strong>Panel on a Multi-Family/Commercial project. Please visit www.jameshardiecommercial.com for further information.getting startedGeneral<strong>Product</strong>InformationWorkingSafelyFirst locate the lowest point of thesheathing or sill plate, and begininstallation on that wall.12.1Water resistivebarrierTools forCutting andFastening1) Measure up from the sill platethe height of the panels at eitherend of the wall and snap aGeneralInstallationRequirementsstraight, level chalk line betweenthe marks as a reference line.That line is for guidance inGeneralFastenerRequirementspositioning the top edge of thepanels. Check the reference linewith a 4-ft. level.Finishing andMaintenance2) Starting on one end and workingacross the wall, measure andtrim the first panel making surethat the edge falls in the middle<strong>Hardie</strong>Wrap®Weather Barrierof a stud.3) Using the chalk line as a guidealong the panel’s top edge,<strong>Hardie</strong>Trim ®Boards/Battenscarefully position the panel andsecure it with suitable fastenersand fastener spacing for the<strong>Hardie</strong>Soffit ®Panelsparticular application as noted inthe ESR-1844 Report.4) As installation continues, checkthe vertical edge of each panelwith a 4-ft. level.Check each panelwith a 4-ft. levelPanel edges land in themiddle of a stud.TIP: It is common practice to markpanels for cutting with a chalkline. Blue chalk is recommendedbecause it washes off. Red chalkis considered permanent andmay bleed through lighter colored<strong>Hardie</strong>Plank ®Lap <strong>Siding</strong><strong>Hardie</strong>Shingle ®<strong>Siding</strong>12.2paints.<strong>Hardie</strong>Panel®<strong>Vertical</strong> <strong>Siding</strong>TIP: Install flashing overthe footing/foundationand extend the panelover the flashing justbelow the sill plate.Do not extend sidingbeyond the requiredgrade clearances.TIP: For Sierra 8panels, doublestuds at eachpanel jointallows fastenersto be placedoutside ofpanel grooves.Appendix/GlossaryESR-1844 &2290 Report107
General<strong>Product</strong>InformationInstallation of <strong>Hardie</strong>Panel ® <strong>Vertical</strong> <strong>Siding</strong> (continued)vertical joint treatmentWorkingSafelyTreat vertical joints in <strong>Hardie</strong>Panel ®vertical siding by using one of thefollowing four methods:12.3 12.41 Moderate contact jointPanels are butted together lightly.2 Caulked joint1/8-in. gap left betweenpanels is filled with caulk.(not applicable with ColorPlus)Tools forCutting andFastening1) Install the panels in moderatecontact with joint flashing.GeneralInstallationRequirementsGeneralFastenerRequirementsFinishing andMaintenance<strong>Hardie</strong>Wrap®Weather Barrier<strong>Hardie</strong>Trim ®Boards/Battens<strong>Hardie</strong>Soffit ®Panels<strong>Hardie</strong>Plank ®Lap <strong>Siding</strong><strong>Hardie</strong>Shingle ®<strong>Siding</strong><strong>Hardie</strong>Panel®<strong>Vertical</strong> <strong>Siding</strong>Appendix/GlossaryESR-1844 &2290 Report1082) Leave an appropriate gapbetween panels ( 1 /8 in. is themost common), and caulk usinga high-quality paintable caulk,that meets ASTM C-834 or C-920requirements. (Not recommendedfor ColorPlus)Panels may be installed firstwith caulk applied in the joints afterinstallation; or as an option, after thefirst panel is installed, apply a bead ofcaulk along the panel edge. When thenext panel is installed against the first,the edge embeds in the applied caulkcreating a thorough seal between theedges of the panels.!WARNINGThe caulk joint method is notrecommended for theColorPlus® productsDO NOT caulk nail head wheninstalling ColorPlus products3) <strong>Vertical</strong> joints may be covered withwood or fiber-cement batten strips.If <strong>James</strong> <strong>Hardie</strong> ® siding or trimproducts are ripped and used asbatten strips, paint or prime the cutedges. Batten strips should spanthe vertical joint by at least 3 /4 in. oneach side.4 Metal or PVC “H” moldings canbe used to join two sections of<strong>Hardie</strong>Panel siding.TIP: Stainless steel fasteners arerecommended when installing<strong>James</strong> <strong>Hardie</strong> products.Note: The following outlines the recommended applications for ColorPlus andPrimed panels. Not all designs will be suitable for every application:• Exposed fasteners or battens is the recommended application for ColorPlus products• Do not use touch-up over fastener heads for smooth ColorPlus products - primed panelrecommended• For ColorPlus panel applications that require fasteners in the field, it is acceptable touse touch-up over fasteners for Cedarmill and Stucco panel only, but correct touch-upapplication is important. Some colors may show touch-up when applied over fasteners.Trim is recommended to cover joints when appropriate.12.53 Battened joint 12.6 4 H-Channel joint<strong>Hardie</strong>Trim ® batten board coversA manufactured H-channel capturesthe joint between panels.the vertical edges of the panels.<strong>Hardie</strong>panel siding fastener specificationsThe Fastener Specifications table shows fastener options for a variety of different nailing substrates. Pleaserefer to the applicable ESR report online (see back page) to determine which fastener meets your wind loadFasteningSubstratewoodstudssteelstuds16 in.o.c.24” o.c.16 in. o.cor24 in. o.c.Approved Fastener1 2 5 91 2 97 1312597Fastening Types.113 in. x .267 in. x 1.5 in..113 in. x .267 in. x 2 in..091 in. x .225 in. x 1.5 in.No. 11ga 1.25 in. long13[AKN100-0150NA].100 in. x .25 in. x 1.5 in.4dcommon6dcommonring shanksiding nailroofing nailscrewRibbed Bugle-Head No. 8 (.323 in. x 1 in.)ET&F
General<strong>Product</strong>Informationhorizontal joint treatmentIn some applications such asmulti-story structures or at gableends, it may be necessary to stack<strong>Hardie</strong>Panel ® siding. The horizontaljoints created between panels must12.71 Simple horizontal jointWater-resistivebarrierUpper panelWater-resistive barrierUpper panelWorkingSafelyTools forCutting andFasteningbe flashed properly to minimizewater penetration. Treat horizontalpanel joints by using one of thefollowing methods:6mm (¼in.) GapFlashingGeneralInstallationRequirements1) After installing the lower courseof panel siding, install vinyl orcoated aluminum “Z” flashing atthe top edge of the panel. Makesure that the flashing is slopedaway from the wall and does notrest flat on the top edge of thepanel. Install the second levelor gable panels leaving a 1 /4-in.minimum gap between thebottom of the panel and the Zflashing. This gap should neverbe caulked.2) As an alternative, if a horizontalband board is used at thehorizontal joint, flashing mustextend over the panel edge andtrim attachment. Flashing forboth treatments must slip behindthe water-resistive barrier.!WARNING12.8Do not bridge floors with panel siding. A horizontaljoint should always be created between floors.TIP: For the most symmetrical looking wall,plan the installation so that a full panel iscentered on the wall or gable with equal-sizepanels cut for each end. As an alternative,plan the installation so that a full panel islocated on either side of the wall center,again leaving equal-size panels on eachend. These strategies might entail a centeredframing layout. Choose the strategy thatlooks the best and uses material most efficiently.2 Band-board jointLower panelLower panelWater-resistivebarrierUpper panel6mm (¼in.) GapFlashingDecorativeband boardWater-resistive barrierDon’t caulkgap betweenflashing andupper panel.Lower panelDon’t caulk gapbetween flashingand upper panel.Upper panelDecorativeband boardTIP: For best looking installation of <strong>Hardie</strong>Panel Select Sierra 8siding, carefully align vertical panel grooves at 1st to 2nd story orgable junctures.GeneralFastenerRequirementsFinishing andMaintenance<strong>Hardie</strong>Wrap® <strong>Hardie</strong>Trim ®Weather Barrier Boards/Battens<strong>Hardie</strong>Soffit ®Panels<strong>Hardie</strong>Plank ®Lap <strong>Siding</strong><strong>Hardie</strong>Shingle ®<strong>Siding</strong><strong>Hardie</strong>Panel®<strong>Vertical</strong> <strong>Siding</strong>Appendix/GlossaryESR-1844 &2290 Report109
General<strong>Product</strong>InformationInstallation of <strong>Hardie</strong>Panel ® <strong>Vertical</strong> <strong>Siding</strong> (continued)WorkingSafelyTools forCutting andFasteningGeneralInstallationRequirementsGeneralFastenerRequirementsFinishing andMaintenance<strong>Hardie</strong>Wrap®Weather Barrier<strong>Hardie</strong>Trim ®Boards/Battens<strong>Hardie</strong>Soffit ®Panelswindows, doors, and other wall penetrationsIn panel installations, trim is typicallyoverlaid on top of the panel. Specialattention needsto be paid to trim flashing at the topsof openings. Below is one methodfor properly flashing trim in a panelapplication:1) After installing the window, cut andinstall a 1 /4-in. thick shim above thewindow. The shim should be thesame width as the trim, and it shouldbe as long as width of the window.2) Over the shim install flashing wideenough to cover thickness of thetrim and long enough to cover thetrim head piece.3) Install the panel to the window andaround the shim taking care not todamage the flashing and leaving a1/4-in. gap between the panel andthe horizontal part of the flashing.4) Install the trim around the window,slipping the head piece under theinstalled flashing.12.91 Install 1 /4-in. thick shimover the window.2 Install flashing over theshim and under the waterresistivebarrier.<strong>Hardie</strong>Plank ®Lap <strong>Siding</strong><strong>Hardie</strong>Shingle ®<strong>Siding</strong>12.103 Cut and fit panel around the shim and12.11flashing, Leave 1 /4-in. gap between theflashing and the upper panel.4 Install window trimunder the flashing.ESR-1844 &2290 ReportAppendix/Glossary<strong>Hardie</strong>Panel®<strong>Vertical</strong> <strong>Siding</strong>110
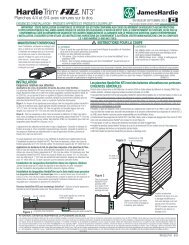
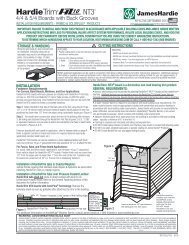
water-resistivebarriersheathingkeep nails3/8" min.from paneledgesplateFigure 13/8"stud<strong>Hardie</strong>Panelvertical siding<strong>Vertical</strong> <strong>Siding</strong>EFFECTIVE MAY 2014INSTALLATION REQUIREMENTS SINGLE FAMILY ONLY - PRIMED & COLORPLUS ® PRODUCTS Visit www.jameshardie.com for the most recent version.S M OOT H ■ CEDARMI L L © ■ S E L ECT S I ERRA 8 ■ S TUCCOIMPORTANT: FAILURE TO INSTALL AND FINISH THIS PRODUCT IN ACCORDANCE WITH APPLICABLE BUILDING CODES AND JAMES HARDIEWRITTEN APPLICATION INSTRUCTIONS MAY LEAD TO PERSONAL INJURY, AFFECT SYSTEM PERFORMANCE, VIOLATE LOCAL BUILDING CODES,AND VOID THE PRODUCT ONLY WARRANTY. BEFORE INSTALLATION, CONFIRM THAT YOU ARE USING THE CORRECT HARDIEZONE INSTRUCTIONS.TO DETERMINE WHICH HARDIEZONE APPLIES TO YOUR LOCATION, VISIT WWW.HARDIEZONE.COM OR CALL 1-866-942-7343 (866 9HARDIE)STORAGE & HANDLING:CUTTING INSTRUCTIONSStore flat and keep dry andcovered prior to installation. Installingsiding wet or saturated may result inshrinkage at butt joints. Carry plankson edge. Protect edges and cornersfrom breakage. <strong>James</strong> <strong>Hardie</strong> is notresponsible for damage causedby improper storage and handling ofthe product.GENERAL REQUIREMENTS:• These instructions to be used for single family installations only. **For Commercial / Multi-Family installation requirements go to www.<strong>James</strong><strong>Hardie</strong>Commercial.com• <strong>Hardie</strong>Panel ® vertical siding can be installed over braced wood or steel studs spaced a maximum of 24" o.c. See general fastening requirements. Irregularities in framingand sheathing can mirror through the finished application.• Information on installing <strong>James</strong> <strong>Hardie</strong> products over foam can be located in JH Tech Bulletin 19 at www. jamehardie.com• A water-resistive barrier is required in accordance with local building code requirements. The water-resistive barrier must be appropriately installed with penetrationand junction flashing in accordance with local building code requirements. <strong>James</strong> <strong>Hardie</strong> will assume no responsibility for water infiltration. <strong>James</strong> <strong>Hardie</strong> doesmanufacture <strong>Hardie</strong>Wrap Weather Barrier, a non-woven non-perforated housewrap¹, which complies with building code requirements.• When installing <strong>James</strong> <strong>Hardie</strong> products all clearance details in figs. 3,5,6,7,8,9,10 &11 must be followed.• Adjacent finished grade must slope away from the building in accordance with local building codes - typically a minimum of 6" in the first 10'.• Do not install <strong>James</strong> <strong>Hardie</strong> products, such that they may remain in contact with standing water.• <strong>Hardie</strong>Panel vertical siding may be installed on vertical wall applications only.• DO NOT use <strong>Hardie</strong>Panel vertical siding in Fascia or Trim applications.• Some application are not suitable for ColorPlus. Refer to ColorPlus section page 3.• DO NOT use stain, oil/alkyd base paint, or powder coating on <strong>James</strong> <strong>Hardie</strong> ® <strong>Product</strong>s.• For larger projects, including commercial and multi-family projects, where the span of the wall is significant in length, the designer and/or architect should take intoconsideration the coefficient of thermal expansion and moisture movement of the product in their design. These values can be found in the Technical Bulletin #8“Expansion Characteristics” at www.<strong>James</strong><strong>Hardie</strong>.com.INSTALLATION:Fastener RequirementsPosition fasteners 3/8" from panel edges and no closer than 2" away fromcorners. Do not nail into corners. <strong>Hardie</strong>Panel <strong>Vertical</strong> <strong>Siding</strong> Installation• Framing must be provided at horizontal and vertical edges for nailing.• <strong>Hardie</strong>Panel vertical siding must be joined on stud.• Double stud may be required to maintain minimum edgenailing distances.OUTDOORSINDOORS1. Position cutting station so that wind will blow dust away from userand others in working area.2. Use one of the following methods:a. Best: i. Score and snapii. Shears (manual, electric or pneumatic)b. Better: i. Dust reducing circular saw equipped with a<strong>Hardie</strong>Blade ® saw blade and HEPA vacuum extractionc. Good: i. Dust reducing circular saw with a <strong>Hardie</strong>Blade saw blade(only use for low to moderate cutting)Figure 2water-resistive barrier2 x 4 studBatten JointJoint Treatment• <strong>Vertical</strong> Joints - Install panels in moderate contact (fig. 1), alternatively jointsmay also be covered with battens, PVC or metal jointers or caulked(Not applicable to ColorPlus ® Finish) (fig. 2).• Horizontal Joints - Provide Z-flashing at all horizontal joints (fig. 3).water-resistive barrierwater-resistive barrier“H” Joint2 x 4 stud1. Cut only using score and snap, or shears (manual, electric or pneumatic).2. Position cutting station in well-ventilated area- NEVER use a power saw indoors- NEVER use a circular saw blade that does not carry the <strong>Hardie</strong>Blade saw blade trademark- NEVER dry sweep – Use wet suppression or HEPA VacuumImportant Note: For maximum protection (lowest respirable dust production), <strong>James</strong> <strong>Hardie</strong> recommends always using “Best”-level cutting methods where feasible.NIOSH-approved respirators can be used in conjunction with above cutting practices to further reduce dust exposures. Additional exposure information is availableat www.jameshardie.com to help you determine the most appropriate cutting method for your job requirements. If concern still exists about exposure levels or youdo not comply with the above practices, you should always consult a qualified industrial hygienist or contact <strong>James</strong> <strong>Hardie</strong> for further information.SD0831052 x 4 studFigure 3water-resistivebarrierupper panelDo not 1/4" gapCaulkZ-flashinglowerpanelwater-resistivebarrierupper panelDo not 1/4" gapCaulkZ-flashingdecorativeband boardlowerpanelmoderate contactFigure 4leave appropriate gap betweenkeep fasteners 2"panels, then caulk*Recommendation: Whenaway from cornersCaulk Jointinstalling Sierra 8, provide(Not applicable to ColorPlus ® Finish)*Apply caulk in accordance with caulk manufacturer’s written application instructions.a double stud at paneljoints to avoid nailing**<strong>James</strong> <strong>Hardie</strong> recommends installing a rainscreen (an air gap) between the <strong>Hardie</strong>Panel siding and the water-resistive barrier as a best practice.through grooves.<strong>James</strong> <strong>Hardie</strong> recommends that you consult your design professional if you have questions regarding the use of rainscreen on your single family project.¹For additional information on <strong>Hardie</strong>Wrap Weather Barrier, consult <strong>James</strong> <strong>Hardie</strong> at 1-866-4<strong>Hardie</strong> or www.hardiewrap.comWARNING: AVOID BREATHING SILICA DUST<strong>James</strong> <strong>Hardie</strong> ® products contain respirable crystalline silica, which is known to the State of California to cause cancer and is considered by IARC and NIOSH to be a cause of cancer from some occupationalsources. Breathing excessive amounts of respirable silica dust can also cause a disabling and potentially fatal lung disease called silicosis, and has been linked with other diseases. Some studies suggestsmoking may increase these risks. During installation or handling: (1) work in outdoor areas with ample ventilation; (2) use fiber cement shears for cutting or, where not feasible, use a <strong>Hardie</strong>Blade ® saw bladeand dust-reducing circular saw attached to a HEPA vacuum; (3) warn others in the immediate area; (4) wear a properly-fitted, NIOSH-approved dust mask or respirator (e.g. N-95) in accordance with applicablegovernment regulations and manufacturer instructions to further limit respirable silica exposures. During clean-up, use HEPA vacuums or wet cleanup methods - never dry sweep. For further information, referto our installation instructions and Material Safety Data Sheet available at www.jameshardie.com or by calling 1-800-9HARDIE (1-800-942-7343). FAILURE TO ADHERE TO OUR WARNINGS, MSDS, ANDINSTALLATION INSTRUCTIONS MAY LEAD TO SERIOUS PERSONAL INJURY OR DEATH.SD050905HS1237-P1/3 1/13111
CLEARANCESInstall siding and trim products incompliance with local building coderequirements for clearance betweenthe bottom edge of the siding andthe adjacent finished grade.Figure 5sidingstudMaintain a minimum 2"clearance between<strong>James</strong> <strong>Hardie</strong> ®products and paths,steps and driveways.Figure 62" min.Maintain a minimum 2" clearancebetween <strong>James</strong> <strong>Hardie</strong> productsand decking material.Figure 7deck materialsidingwaterresistivebarrier2" min.At the juncture of the roof and verticalsurfaces, flashing and counterflashingshall be installed per the roofingmanufacturer’s instructions. Provide aminimum 2" clearance between theroofing and the bottom edge of thesiding and trim.Figure 82" min.Maintain a 1/4"clearance betweenthe bottom of <strong>James</strong><strong>Hardie</strong> products andhorizontal flashing.Do not caulk gap.Refer to fig. 3 onpage 1.bottomplatejoistflashingledger6" min.concretefoundationMaintain a minimum 1" gapbetween gutter end caps andsiding & trim.Figure 9Do not bridge floors with <strong>Hardie</strong>Panel ® siding. Horizontaljoints should always be created between floors (fig. 10).Figure 10Water-ResistiveBarrierHorizontalTrimFramingFlooringKICKOUT FLASHINGBecause of the volume of water that can pour down a slopedroof, one of the most critical flashing details occurs where aroof intersects a sidewall. The roof must be flashed with stepflashing. Where the roof terminates, install a kickout to deflectwater away from the siding. It is best to install a self-adheringmembrane on the wall before the subfascia and trim boardsare nailed in place, and then come back to install the kickout.siding1"gutter and end capfasciaSheathingR<strong>Hardie</strong>PanelBLOCKED PENETRATIONSPenetrations such as hose bibs and holes 1 ½” or larger such as dryer ventsshall have a block of trim around point of penetration.GENERAL FASTENING REQUIREMENTSFasteners must be corrosion resistant, galvanized, or stainless steel. Electro-galvanized areacceptable but may exhibit premature corrosion. <strong>James</strong> <strong>Hardie</strong> recommends the use of quality,hot-dipped galvanized nails. <strong>James</strong> <strong>Hardie</strong> is not responsible for the corrosion resistance offasteners. Stainless steel fasteners are recommended when installing <strong>James</strong> <strong>Hardie</strong> products nearthe ocean, large bodies of water, or in very humid climates.Figure 11, Kickout Flashing To prevent water fromdumping behind the siding and the end of the roofintersection, install a "kickout" as required by IRC codeR905.2.8.3 : “…flashing shall be a min. of 4” high and 4”wide.” <strong>James</strong> <strong>Hardie</strong> recommends the kickout be angledbetween 100° - 110° to maximize water deflectionFigure 11Step flashingSelf-adheringmembraneHousewrapSelf-adheringeaves membraneKickoutflashingDrip edge• Consult applicable product evaluation or listing for correct fastener type and placement to achievespecific design wind loads.• NOTE: Published wind loads may not be applicable to all areas where Local Building Codes havespecific jurisdiction. Consult <strong>James</strong> <strong>Hardie</strong> Technical Services if you are unsure of applicablecompliance documentation.• Drive fasteners perpendicular to siding and framing.• Fastener heads should fit snug against siding (no air space). (fig. A)• Do not over-drive nail heads or drive nails at an angle.• If nail is countersunk, fill nail hole and add a nail. (fig. B)• For wood framing, under driven nails should be hit flush to the plank with a hammer (for steelframing, remove and replace nail).• NOTE: Whenever a structural member is present, <strong>Hardie</strong>Plank should be fastened with evenspacing to the structural member. The tables allowing direct to OSB orplywood should only beused when traditional framing is not available.• Do not use aluminum fasteners, staples, or clipped head nails.PNEUMATIC FASTENING<strong>James</strong> <strong>Hardie</strong> products can be hand nailed or fastened with apneumatic tool. Pneumatic fastening is highly recommended.Set air pressure so that the fastener is driven snug with thesurface of the siding. A flush mount attachment on thepneumatic tool is recommended. This will help control thedepth the nail is driven. If setting the nail depth proves difficult,choose a setting that under drives the nail. (Drive under drivennails snug with a smooth faced hammer - Does not apply forinstallation to steel framing).Countersunk,fill & add nailFigure AFigure B112HS1237-P2/3 8/13
CAULKINGFor best results use an Elastomeric Joint Sealant complying with ASTM C920 Grade NS, Class 25 or higher or a Latex Joint Sealant complying with ASTM C834.Caulking/Sealant must be applied in accordance with the caulking/sealant manufacturer’s written instructions. Note: OSI Quad as well as some other caulkingmanufacturers do not allow tooling.DO NOT caulk nail heads when using ColorPlus products, refer to the ColorPlus touch-up sectionCUT EDGE TREATMENTCaulk, paint or prime all field cut edges.<strong>James</strong> <strong>Hardie</strong> touch-up kits are requiredto touch-up ColorPlus products.PAINTINGDO NOT use stain, oil/alkyd base paint, or powder coating on <strong>James</strong> <strong>Hardie</strong> ® <strong>Product</strong>s. <strong>James</strong> <strong>Hardie</strong> products mustbe painted within 180 days for primed product and 90 days for unprimed. 100% acrylic topcoats arerecommended. Do not paint when wet. For application rates refer to paint manufacturers specifications. Back-rollingis recommended if the siding is sprayed.COLORPLUS ® TECHNOLOGY CAULKING, TOUCH-UP & LAMINATE• Care should be taken when handling and cutting <strong>James</strong> <strong>Hardie</strong>® ColorPlus® products. During installation use a wet soft cloth or soft brush togently wipe off any residue or construction dust left on the product, then rinse with a garden hose.• Touch up nicks, scrapes and nail heads using the ColorPlus ® Technology touch-up applicator. Touch-up should be used sparingly. If large areasrequire touch-up, replace the damaged area with new <strong>Hardie</strong>Panel ® siding with ColorPlus Technology.• Laminate sheet must be removed immediately after installation of each course.• Terminate non-factory cut edges into trim where possible, and caulk. Color matched caulks are available from your ColorPlus ® product dealer.• Treat all other non-factory cut edges using the ColorPlus Technology edge coaters, available from your ColorPlus product dealer.Note: <strong>James</strong> <strong>Hardie</strong> does not warrant the usage of third party touch-up or paints used as touch-up on <strong>James</strong> <strong>Hardie</strong> ColorPlus products.Problems with appearance or performance arising from use of third party touch-up paints or paints used as touch-up that are not <strong>James</strong> <strong>Hardie</strong>touch-up, will not be covered under the <strong>James</strong> <strong>Hardie</strong> ColorPlus Limited Finish Warranty.The following outlines the recommended applications for ColorPlus and Primed panels. Not all designs will be suitable forevery application:• Exposed fasteners or battens is the recommended application for ColorPlus panel products• Do not use touch-up over fastener heads for smooth ColorPlus products - primed panel recommended• For ColorPlus panel applications that require fasteners in the field, it is acceptable to use touch-up over fasteners for Cedarmill and Stucco panelonly, but correct touch-up application is important. Some colors may show touch-up when applied over fasteners. Trim is recommended to coverjoints when appropriate.PAINTING JAMES HARDIE ® SIDING AND TRIM PRODUCTS WITH COLORPLUS ® TECHNOLOGYWhen repainting ColorPlus products, <strong>James</strong> <strong>Hardie</strong> recommends the following regarding surface preparation and topcoat application:• Ensure the surface is clean, dry, and free of any dust, dirt, or mildew• Repriming is normally not necessary• 100% acrylic topcoats are recommended• DO NOT use stain, oil/alkyd base paint, or powder coating on <strong>James</strong> <strong>Hardie</strong> ® <strong>Product</strong>s.• Apply finish coat in accordance with paint manufacturers written instructions regarding coverage, application methods, and applicationtemperatureRECOGNITION: In accordance with ICC-ES Evaluation Report ESR-1844, <strong>Hardie</strong>Panel® vertical siding is recognized as a suitable alternate to that specified in: the 2006.2009, & 2012 International Residential Code for One-andTwo-Family Dwellings and the 2006, 2009, & 2012 International Building Code. <strong>Hardie</strong>Panel vertical siding is also recognized for application in the following: City of Los Angeles Research Report No. 24862, State of Floridalisting FL#889, Dade County, Florida NOA No. 02-0729.02, U.S. Dept. of HUD Materials Release 1263c, Texas Department of Insurance <strong>Product</strong> Evaluation EC-23, City of New York MEA 223-93-M, and California DSA PA-019.These documents should also be consulted for additional information concerning the suitability of this product for specific applications.© 2013 <strong>James</strong> <strong>Hardie</strong> Building <strong>Product</strong>s. All rights reserved.TM, SM, and ® denote trademarks or registered trademarks of<strong>James</strong> <strong>Hardie</strong> Technology Limited is a registeredtrademark of <strong>James</strong> <strong>Hardie</strong> Technology Limited.Additional Installation Information,Warranties, and Warnings are available atwww.jameshardie.comHS1237-P3/3 6/13113