3DQuickPress Training Manual - 3D CAD/CAM Design Software
3DQuickPress Training Manual - 3D CAD/CAM Design Software
3DQuickPress Training Manual - 3D CAD/CAM Design Software

Create successful ePaper yourself
Turn your PDF publications into a flip-book with our unique Google optimized e-Paper software.
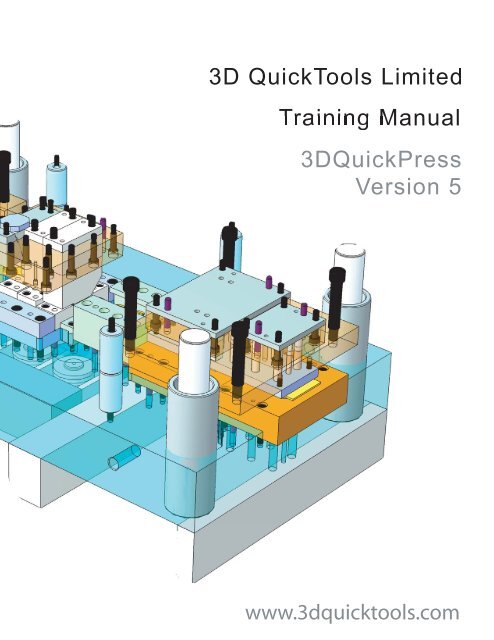
<strong>3D</strong> QuickTools Limited<strong>Training</strong> <strong>Manual</strong><strong><strong>3D</strong>QuickPress</strong>Version 5www.3dquicktools.com
<strong><strong>3D</strong>QuickPress</strong> Version 5.2.1<strong>3D</strong>QuickTools<strong>3D</strong> QuickTools Ltd.,Strategic Technology Solutions, Inc.,and Computer Aided Technology, Inc.165 Arlington Heights RoadSuite 101Buffalo Grove, IL 60089www.cati.comwww.callsts.comwww.3dquicktools.com
2003-2012, <strong>3D</strong> QuickTools Ltd.Unit 1711, 17/F, Grand City Plaza,No. 1-17 Sai Lau Kok Road, Tsuen Wan,Hong KongAll Rights ReservedThe information and the software discussed inthis document are subject to change withoutnotice and should not be consideredcommitments by Strategic TechnologySolutions, Inc.STS is a registered trademark of StrategicTechnology Solutions, Inc.SolidWorks is a registered trademark of DSSolidWorks.<strong><strong>3D</strong>QuickPress</strong> is a registered trademark of <strong>3D</strong>QuickTools Limited<strong>3D</strong>QuickForm is a registered trademark of <strong>3D</strong>QuickTools LimitedFeatureManager is a jointly owned registeredtrademark of DS SolidWorks.Other brands or product names are trademarksof their respective holders.All Rights Reserve
Table of ContentsClass Introduction ........................................................................... 1Introduction to <strong><strong>3D</strong>QuickPress</strong> ......................................................... 5<strong>Design</strong> Environment ............................................................. 6Data Flow ............................................................................. 9<strong>Design</strong> Trees ...................................................................... 10Basic Work Flow ................................................................ 12Alternate Workflow ............................................................. 14Unfold Parts .................................................................................. 17Chapter Introduction........................................................... 18Automatic Unfold of Parts .................................................. 19Semi-Automatic unfold of a part ......................................... 35Advanced Unfold Methods ................................................. 39Advanced Fixed Face Options ........................................... 51Advanced Unfolding: User Defined Feature ....................... 55Advanced Unfolding Using <strong>3D</strong>QuickForm .......................... 62<strong><strong>3D</strong>QuickPress</strong> Deep Draw Calculator ................................ 65Unfolding Imported STEP model ........................................ 67Strip Layout <strong>Design</strong> ...................................................................... 70<strong><strong>3D</strong>QuickPress</strong> Strip Layout introduction............................. 71Punch <strong>Design</strong> ............................................................................... 94<strong><strong>3D</strong>QuickPress</strong> Punch <strong>Design</strong> Introduction ......................... 95Manage Part File Properties Quickly with <strong><strong>3D</strong>QuickPress</strong> . 116Create A Die Set ......................................................................... 119<strong><strong>3D</strong>QuickPress</strong> Die Set <strong>Design</strong> Introduction ...................... 120Die Set Creation ............................................................... 121Detail Parts ................................................................................. 136<strong><strong>3D</strong>QuickPress</strong> Detail Functions ....................................... 137<strong>Design</strong> Change ........................................................................... 147ChangE Operations in the Strip layout ............................. 148My Blank Method ............................................................. 153Modify Original <strong>3D</strong> Part and update <strong><strong>3D</strong>QuickPress</strong> Data . 155Changeover Tooling ................................................................... 158Changeover Tooling ......................................................... 159Concurrent <strong>Design</strong> Environment ................................................. 175Concurrent <strong>Design</strong> Environment ...................................... 176Administration and Customization .............................................. 181Configure <strong><strong>3D</strong>QuickPress</strong> .................................................. 182Set up Color Information for unfold features .................... 187Set up Paint Manufacturing Information ........................... 189Introduction to Production Ready Libraries - PRL ............ 197Creating PRLs .................................................................. 200Cut Punch PRLs .............................................................. 211ii
iii
CLASS INTRODUCTION About this class Prerequisites Conventions1
About This CourseThe goal of this course is to teach the user how to use<strong><strong>3D</strong>QuickPress</strong> in conjunction with the SolidWorks® software inorder to effectively and efficiently design and model stampedcomponents and the progressive die sets that are used tomanufacture the stamped components.PrerequisitesStudents attending this course are expected to have the following:Course LengthExperience designing progressive dies.Experience with Windows operating system.Completed the online tutorials that are integrated in theSolidWorks software. You can access the online tutorials byclicking Help, Online Tutorial.SolidWorks EssentialsSolidWorks Assembly ModelingSolidWorks DrawingsSolidWorks Surface ModelingThe recommended minimum length of this course is 4 days.Course <strong>Design</strong> PhilosophyThis course is designed around a process or task-based approachto training. A process-based training course emphasizes theprocesses and procedures you follow to complete a particular task.By utilizing case studies to illustrate these processes, you learn thenecessary commands, options and menus in the context ofcompleting a task.Using this BookThis training manual is intended to be used in a classroomenvironment under the guidance of an experienced <strong>3D</strong>QuickToolsinstructor. After classroom training the manual can be used as areference. It is not intended to be a self-paced tutorial. Theexamples and case studies are designed to be demonstrated “live”by the instructor.About the <strong>Training</strong> FilesA complete set of the various files used throughout this course canbe obtained from the instructor either by copying them directly fromthe training workstation in class or the instructor sending the filesvia ftp or other transfer means.2
Conventions Used in this BookThis manual uses the following typographic conventions:Windows 7The screen shots in this manual were made using the<strong><strong>3D</strong>QuickPress</strong> software and SolidWorks software running onWindows XP. You may notice differences in the appearance of themenus and windows. These differences do not affect theperformance of the software.Use of ColorThe <strong><strong>3D</strong>QuickPress</strong> and SolidWorks user interfaces make extensiveuse of color to highlight selected geometry and to provide visualfeedback. This greatly increases the intuitiveness and ease of useof the software. To take maximum advantage of this, the trainingmanuals are printed in full color.Also, in many cases, we have used additional color in theillustrations to communicate concepts, identify features, and tootherwise convey important information.Color SchemesOut of the box, SolidWorks software provides several predefinedcolor schemes that control, among other things, the colors used forhighlighted items, selected items, sketch relation symbols, andshaded previews of features.The color schemes for various case studies vary because somecolors are more visible and clear than others when used withdifferent colored parts.In addition, the viewport background has been changed to plainwhite so that the illustrations are more clearly visible on the whitepaper of the manual.As a result, the images you see on your screen may not exactlymatch those in the book.3
Chapter 1INTRODUCTION TO<strong>3D</strong>QUICKPRESS Introduction Data Flow <strong>Design</strong> Trees Basic Workflow Alternative Workflow5
DESIGN ENVIRONMENT<strong><strong>3D</strong>QuickPress</strong> can create a SolidWorks Assembly with HorizontalStyle <strong>Design</strong> has five design stages. The documents of each stageare linked together according to the design work flow.These documents are:Unfold (part document)Strip layout design (part document)Punch design (assembly document)Die set design (assembly document)Die component drawings for detailing (part and assemblydocuments)<strong>Design</strong> process and changes for Horizontal made during the diedesign stage will propagate according to the design workflowbelow:<strong>3D</strong> PartUnfoldStrip layoutPunch designDie set design (Re-export and insert updated strip layout)For design changes performed after the Horizontal die isfabricated, the design change workflow is different. For fastturnaround, it is recommended to change the effected die setcomponent directly instead of driving the change from the groundup. If you choose to make the change from the ground up thenfollow the workflow below:Make design changes to <strong>3D</strong> PartRebuild the Unfolded partOpen The Strip Layout and rebuildOpen Punch design and rebuildOpen Die set design re-export and insert updated striplayout, and rebuild6
Horizontal design continued:*Depending on the change of the <strong>3D</strong> part you may experiencesome errors in each stage of the design process, so for the bestresults you may want to consider making a backup before makingchanges.Vertical design<strong><strong>3D</strong>QuickPress</strong> can create a SolidWorks Assembly with VerticalStyle <strong>Design</strong> has four design stages. The documents of each stageare linked together according to the design work flow.These documents are:Unfold (part document)Strip layout design (part document)Punch design (assembly document)Die component drawings for detailing (part and assemblydocuments)<strong>Design</strong> process and changes for Vertical made during the diedesign stage will propagate according to the design workflowbelow:<strong>3D</strong> PartUnfoldStrip layoutPunch design*After the design is completed an exported strip will be inserted fora non SolidWorks user to view.7
For design changes performed after the Vertical die is fabricated,the design change workflow is different. For fast turnaround, it isrecommended to change the effected die set component directlyinstead of driving the change from the ground up. If you choose tomake the change from the ground up then follow the workflowbelow:Make design changes to <strong>3D</strong> PartRebuild the Unfolded partOpen The Strip Layout and rebuildOpen Punch design and rebuildRe-export and insert updated strip layout into Punch design*Depending on the change of the <strong>3D</strong> part you may experiencesome errors in each stage of the design process, so for the bestresults you may want to consider making a backup before makingchanges.8
DATA FLOW<strong><strong>3D</strong>QuickPress</strong> adds to the SolidWorks Data set by creating aparallel set of data in the unfold part file. This <strong><strong>3D</strong>QuickPress</strong> datais used to create the strip layout part. This <strong><strong>3D</strong>QuickPress</strong> strip datais used in the punch design assembly and then converted back toSolidWorks geometry when creating the die set assemblyautomatically. The final assembly and drawings are created fromSolidWorks Models.9
DESIGN TREES<strong><strong>3D</strong>QuickPress</strong> follows the SolidWorks user interface standard. TheProperty Manager and toolbars are employed extensivelythroughout the application. The Unfold Manager, <strong>Design</strong> Tree, andStrip Layout <strong>Design</strong> Tree are all similar to the SolidWorksFeatureManager design tree®.The Unfold Manager <strong>Design</strong> Tree is made available after the Unfoldpart icon , in the <strong><strong>3D</strong>QuickPress</strong> toolbar, is used to unfold thesheet metal part. This design tree lists all the recognized andunrecognized features of the sheet metal part regarding themanufacturing processes or steps. All of the objects in the treehave a shortcut menu to edit the feature’s properties and change itsstate to folded or unfolded state.10
The Strip Layout <strong>Design</strong> Tree is the core of the stamping designprocess with <strong><strong>3D</strong>QuickPress</strong>. This design tree provides an outlineview of the active strip layout making it easy to see how the part isprocessed in each station.Shortcuts are available for each object in the Strip Layout <strong>Design</strong>Tree to provide an easy-to-use system to manipulate sheet metalprocess operations (features).11
BASIC WORK FLOW<strong><strong>3D</strong>QuickPress</strong> allows progressive dies to be designed in <strong>3D</strong> insideSolidWorks once you have the sheet metal part.The normal process for progressive die design with <strong><strong>3D</strong>QuickPress</strong>is:1. Unfold the sheet metal part2. Prepare station layout3. Set up strip layout parameters4. Process design5. Punch design6. Die set design *(This step is skipped for Vertical design)7. DetailingWorkflow for <strong><strong>3D</strong>QuickPress</strong>1. Unfold the sheetmetal part2. Prepare station layoutUnfolded part is inserted instrip layout document andall processes are activatedaccording to the stampingprocess3. Set up strip layoutparameters4. Process design12
5. Punch designAdd punch design inassembly document tocreate <strong>3D</strong> punch and die.6. Die set design *(Thisstep is skipped forVertical Assembly)7. Detailing13
ALTERNATE WORKFLOWFor some tooling, designers may want to utilize <strong><strong>3D</strong>QuickPress</strong>punch and die set tools while avoiding <strong><strong>3D</strong>QuickPress</strong> Unfold andStrip layout. <strong><strong>3D</strong>QuickPress</strong> allows users to start punch designsbased on an active SolidWorks Part or Assembly document. Thisworkflow is especially useful for stage tooling, transfer dies or reworkdies.Use SolidWorks to model the part at different stages ofdevelopment from blank to final. One part per station isdesigned manually (it can be single station or completestrip)Strip Layout <strong>Design</strong>Punch <strong>Design</strong>Die set designDetail drawings of die components.14
Swap part methodFor the unfold and strip layout of complex formed parts, it issuggested that a simple blank be used instead of relying on the<strong><strong>3D</strong>QuickPress</strong> feature recognition unfolding method to extractsheet metal features and create the blank. A simple blank can beused as the input to strip layout design. Each station is modeledmanually with SolidWorks techniques then inserted to the striplayout using the swap part function.An example of an alternate workflow: Swap partmethodA very simple partrepresenting the blankis used in unfolding.The blank is a resultfrom a <strong>3D</strong>QuickFormProfessional or a blankcan be designedmanually with traditionalblank calculationmethods.One or more intermediate steps arecreated in another SolidWorks partdocument and <strong><strong>3D</strong>QuickPress</strong> Swap Partis used to insert it into the strip layout.15
STAGE TOOLING: This process is used to create adesign for the part below.1. Punch <strong>Design</strong>AssemblyThis is done without the<strong><strong>3D</strong>QuickPress</strong> unfoldingfeature recognitionmethod. Instead, usethe strip layout with theswap part method.2. Use User DefinedComponent (UDC)to insert ProductionReady Library(PRL) for the dieblock3. Model the formpunchUse SolidWorks &<strong>3D</strong>QuickTools to createthe die face.4. Die set <strong>Design</strong>Use <strong>3D</strong>QuickToolsAssembly Utilities tofinish.16
Chapter 2UNFOLD PARTS Automatic Unfolding Semi-Automatic Unfolding Advanced Unfolding Methods Unfolding Alike Features Unfolding Non-Uniform Thickness Parts Advanced Fixed Face <strong>3D</strong>QuickForm <strong>3D</strong>QuickForm Pro Deep Draw Cups Importing STEP models17
CHAPTER INTRODUCTIONOne critical aspect of die design is the creation of an accurate flatof the part to be manufactured by the die. While SolidWorks offersseveral ways of flattening geometry, its tools are focused solely onuniform thickness sheet metal geometry. <strong><strong>3D</strong>QuickPress</strong> offers awide variety of powerful tools to flatten both simple sheet metalparts and complex stamped geometry as well.18
AUTOMATIC UNFOLD OF PARTSWhen appropriate, the easiest way to unfold a stamped part in<strong><strong>3D</strong>QuickPress</strong> is to utilize the automatic unfolding option. Thegeometry must be simple and/or fall into one of the categories listedbelow.The colors of unfolding models features can be set to easier identifyin the unfolded and strip layout, go to Administration andCustomization/Setup Color Information for unfolded features in thismanual.These sheet metal features can be unfolded automatically if thefeatures are properly modeled.Linear BendLancingRound ExtrusionCompound BendEmbossing19
Using UAR featuresThere are two situations User Assist Recognition features are usedin <strong><strong>3D</strong>QuickPress</strong>. UAR features can be used to handle unknownfeatures that cannot be identified by automatic recognition. Theycan also be used to modify the behavior of the feature if theautomatically recognized feature is not suitable for the process.There are seven different UAR feature types that can be used in<strong><strong>3D</strong>QuickPress</strong>.1. UAR Bend2. Gusset3. User Defined Feature4. UAR Form5. UAR Round Extrude6. UAR Hole Cluster7. 2 Axis BendBelow are examples showing how to use each type of UAR featureto gain specific behavior of the unfolded part.20
Case Study 2 – 1: Unfolding with UAR Featuresrecognitions.1. Open the part UAR_Features. File LocationDesktop\<strong>Training</strong>\Unfolding\UAR Features\UAR_Features.sldprt.2. Select Unfold Part from the <strong>3D</strong>QP Unfolding toolbar.3. Select the highlighted face as fixed face and click tounfold the part. The sheet thickness 1mm is detectedautomatically. The material and the common bend allowancecan both be adjusted.4. Right-click on the Sheet Metal Object and selectUnfold All.21
Grouping a series of bends with UAR BendA UAR Bend feature can be used to group the series bendfeatures into one single feature. The series of bend features canfold and unfold bends as a single feature.1. Right-click on Sheet Metal Object and select UserAssist Recognition.2. Click Add to a UAR feature as shown in the picture to theleft.Set Features Type as UAR Bend.Select all of the Bend Features or highlighted facestop and bottom.Click Estimate Parameters, you should see updatedradius and angle data to obtain the correct bendparameters. For non-uniform material offset in a radius, see item #4 thru # 7 to complete unfolding for those material illregularconditions.3. Click to finish the command.22
4. Non-uniform material offset in a radius, if you notice thiswhen the model is completely unfolded and the flanges arenot lying flat. Then you will need to add a sketch thatrepresents the inside profile as shown below, straightleading into the radius, the radius, and a flat leading out ofthe radius is required. SolidWorks Tools\SketchTools\Intersection Curve works well for this process,you may need to add a sketch plane that intersects theflanged leg as needed.5. The user can change the radius size in this sketch if needed,by adding this sketch will make it the driving information forthe inside radius without re-modeling. If there are multipleradiuses that are non-uniformed in the same part, a sketchwill be required for each radius.6. Add a UAR Bend feature for the non-uniform material bendfeature or simply re-edit the UAR Bend already created,select the window noted by the icon, then select thenewly to created sketch for bend as needed as shown in theexample on the left. Repeat this process if the model hasmultiple Non-uniform material offset in a radius, BendAllowance can also be updated as needed.Grouping patterned hole with UAR Hole ClusterA UAR Hole Cluster feature can be used to group a pattern ofpiercing holes. The grouped holes will become a filled flat surfacewhen the part is unfolded.1. Right-click on Sheet Metal Object and select UserAssist Recognition.2. Click Add to add a UAR feature.Set Feature Type as UAR Hole Cluster.Select the highlighted faces.23
3. Click to finish the command.4. A UAR Hole Cluster feature is created to represent thepatterned holes.Grouping top and bottom coin together with UAR FormA coin feature will form the chamfer on the top and bottom side ofthe part using a UAR Form feature.1. Right-click on Sheet Metal Object and select UserAssist Recognition.2. Click Add to add a UAR feature.Set Feature Type as UAR Form, select the highlighted faces.The auto selected coins will be change to a UAR feature.3. Click to finish the command.24
UAR Round Extrude - Fixing pre-cut hole for round extrudeWhen unfolding the Round Extrude 1 and Round Extrude 2features, the pre-cut hole is closed. This is because there is noinner radius for the round extrude feature. By using the UARRound Extrude feature can estimate parameters of the pre-cut hole.1. Right-click on Sheet Metal Object and select UserAssist Recognition.2. Click Add to add a UAR feature.Set Feature Type as UAR Round Extrude.Select the highlighted faces.Click Estimate Parameters to obtain the pre-cut hole sizeand other parameters.Click Extract Identical to obtain the UAR Round Extrude 4feature which has the same parameters.3. Click to finish the command.25
Identifying Gusset featuresGusset features enhancement allows across bends identification ofa bend feature. By identifying the gusset feature with UAR thebend feature can be recognized.1. Right-click on Sheet Metal Object and select UserAssist Recognition, as shown in the picture on the left.2. Click Add to add a UAR feature.Set Feature Type as Gusset.Select the indicated Feature Faces.Select the indicated Gusset Base Faces.Click Auto Retrieve to collect all faces of gusset.Click Extract Identical to obtain the second gussetgeometry.3. Click Add to complete the previous gusset recognitionfunction and begin recognizing another gusset feature.Set Feature Type as Gusset.Select the indicated Feature Faces.Select the indicated Gusset Base Faces.Click Auto Retrieve to collect all faces of gusset.4. Click to finish the command.26
Customizing blank profile of a Compound Form feature usingUser Defined FeatureThe Compound Form 6 feature does not add any consideration ofstretch-strain of material needed for the forming of the area. TheCompound Form 6 simply unfolds without development. By usingthe User Defined Feature, we can add develop sketch profile tocreate surfaces for the develop shape. The surfaces that is requiredfor the User Defined for the development has been previouslycreated for this exercise using <strong>3D</strong>QuickForm.1. Right-click on Sheet Metal Object and select UserAssist Recognition.2. Click Add to add a UAR feature, set Feature Type as UserDefined Feature.3. Select the highlighted faces.4. Click to finish the command.Note: The User Defined Feature is created with aquestion mark, this denotes that surface or blank faces of theUser Defined Feature have not been set yet.5. From the SolidWorks feature tree, Show the two surfacebodies in the part.27
6. From the <strong><strong>3D</strong>QuickPress</strong> feature tree, Right-click on Step 0under the User Defined 1 feature, and select Set Active.7. Right-click on Step 0 under the User Defined 1 feature,and select Set Faces.8. Select Surface-Offset1 as the top face and Surface-Plane19 as the bottom face.9. Click to finish the command.10. Right-click on Sheet Metal Object and select UnfoldAll.Note: By adding a check for Extract Gussets options thegussets unfold automatically if modeled correctly.28
Part Position and OrientationFrequently, imported parts arrive in the system oriented poorly.They can be oriented poorly relative to the global coordinatesystem or placed very far from the global origin. In these situations,it is often a requirement to reposition the imported geometry to thepart origin and/or reorient the geometry so that the press punchdirection is parallel with the Z-axis of the global coordinate system.It is preferred that a part is positioned as close to the part file’sglobal coordinate system (0, 0, 0).Bad OrientationGood OrientationCase Study 2 – 2 : Automatic Unfolding of a PartIn this exercise, we will reorient the imported body and unfold thepart using <strong><strong>3D</strong>QuickPress</strong> tools.Check Orientation and Origin Location of the Part1. Open part file BadOrientation. File location:Desktop\<strong>Training</strong>\Unfolding\Unfold1\BadOrientation.x_t by clicking File, Open, select Parasolid (x_t) asFile Type.2. Run Import Diagnostics to heal any bad faces. Do notproceed with feature recognition if prompted.3. Turn on the <strong><strong>3D</strong>QuickPress</strong> Standard View toolbar.4. Switch between the Front, Right and Top views usingSolidWorks viewing tools.5. Switch between the Front, Right and Top views using the<strong><strong>3D</strong>QuickPress</strong> Standard View toolbar. This alternate tool barprovides a better feel for how a part is oriented to the die set.29
6. From the Feature Manager design tree, hold Crtl and selectboth the Origin of the part and Imported 1.7. Right-click one of the selected items and select Zoom ToSelection . Notice how far away from the part is locatedto the origin.8. Zoom in on the part to fill the screen.9. Create a sketch on Face A and orient that face normal to thescreen.Create Construction Geometry to Orient Part1. Draw a line from the center point to A and from the centerpoint to B as shown in the picture below.2. Add a Parallel relation between line A and edge C.3. Add a Perpendicular relation between line B and edge C.Exit the sketch .30
4. Add a coordinate system. The origin, X axis, and Y axis areshown on the picture below.5. Add a coordinate system. The origin, X axis, and Y axis areshown on the picture below.6. Save as Fixed Geometry1.sldprt in thedesktop\<strong>Training</strong>\Unfolding\unfold1 folder.Translate and Orient the Part to the World Coordinate System1. Right-click on Sketch1 and select Hide .2. Click Transform to World CSYS on the <strong><strong>3D</strong>QuickPress</strong>Sketch Tools toolbar.3. In the Transform to WCSYS Property Manager, selectImported1 for Bodies and Coordinate System1 for ReferenceCSYS. Click .4. Select F on your keyboard (zoom to fit). Check theorientation with the tools on the <strong><strong>3D</strong>QuickPress</strong> StandardView toolbar to insure that the Top, Front and Left Viewshave been established properly.5. Save part as GoodOrientation in theDesktop\<strong>Training</strong>\Unfolding\unfold1 folder.31
Unfolding the Part1. Click the Unfold Part icon on the <strong><strong>3D</strong>QuickPress</strong>toolbar to unfold the part.2. Select the fixed face as shown (Blue Face). Note that thefixed face is the same as the die face (the bottom of the stripmaterial).3. Click to accept the default values. Click OK on the BendAllowance Parameters table.4. Save the part.Modifying the Diameter of the Round Extrude Pre-PiercingSince <strong><strong>3D</strong>QuickPress</strong> automatically calculated the unfolding of theround extrude feature you may want to change the assumptionsthat were made. In this case, you can modify the pre-piercingdiameter.1. Right-click Round Extrude 1 from the <strong><strong>3D</strong>QuickPress</strong>Feature Manager and select Edit parameters, change theFlatten Hole Diameter to 2mm. Press to complete thecommand.2. Right-click Sheet Metal Object at the top of the Unfold<strong>Design</strong> Tree and select Unfold All.Options for Calculating Bends in <strong><strong>3D</strong>QuickPress</strong>Direct Specification:The user directly inputs the BA or K factor value that is desired.32
System BA or System K factor:<strong><strong>3D</strong>QuickPress</strong> evaluates the R/T ratio (i.e. the ratio of bend radius/ thickness) of a bend, and uses this ratio to query the BA or Kfactor value from the System Bend Parameters table. If the queryis unsuccessful and no data exists in the table that exactly matchesthe R/T ratio, the following linear interpolation (or extrapolation)method will be used to calculate the BA or K factor.( ) ( )( )Where:BP is the bend parameter BA or K factor,RT is the R/T ratio of a bend,Example Case 1:RT is greater than the maximum R/T ratio in the records of the table.RT1 is the second maximum R/T ratio in the records of the table.RT2 is the maximum R/T ratio in the records of the table.BP1 is the bend parameter in the record corresponding to RT1.BP2 is the bend parameter in the record corresponding to RT2.Example Case 2:RT is less than the maximum and greater than the minimum of theR/T ratio in the records of the table.RT1 is the maximum R/T ratio value in the records of the table thatis smaller than RT.RT2 is the minimum R/T ratio value in the records of the table thatis greater than RT.BP1 is the bend parameter in the record corresponding to RT1.BP2 is the bend parameter in the record corresponding to RT2.Example Case 3:RT is smaller than the minimum R/T ratio in the records of the table.RT1 is the second minimum R/T ratio in the records of the table.RT2 is the minimum R/T ratio in the records of the table.BP1 is the bend parameter in the record corresponding to RT1.BP2 is the bend parameter in the record corresponding to RT2.33
Database BA or Database K factor<strong><strong>3D</strong>QuickPress</strong> queries the Specific Bend Parameters table for theBA or K factor value of a bend with the parameters Material Code,Bend Code, Thickness, Bend Radius and Bend Angle. If the queryis unsuccessful, the System BA or System K factor will be used.Macro BA or Macro K factor<strong><strong>3D</strong>QuickPress</strong> can call a SolidWorks macro for the BA or K factorvalue with the parameters of the Material Code, Thickness, BendRadius and Bend Angle. If no such macro exists or the macroreturns an invalid bend parameter value, the System BA or SystemK factor will be used. The Macro is user defined.Bend Parameter CalculationsBend Allowance CalculationsThe following equation is used to determine the total flat lengthwhen bend allowance values are used:Where:L t is the total flat lengthA and B are shown in theillustrationBA is the bend allowance valueK-FactorK-Factor is a ratio that represents the location of the neutral sheetwith respect to the thickness of the sheet metal part.Bend allowance with a K-Factor is calculated as follows:Where:( )BA = bend allowanceR = inside bend radiusK = K-Factor, which is t/ TT = material thicknesst = distance from inside face to neutralsheet, or a percentage of thickness.A = bend angle in degrees (the angle through which the material isbent)34
SEMI-AUTOMATIC UNFOLD OF A PARTSome part features will not unfold automatically for severalreasons. One of these reasons is due to non-uniform materialthickness. Users have to manually select the faces of features thatcreate non-uniform material thickness to help the system identify,group, and unfold these features.<strong><strong>3D</strong>QuickPress</strong> uses a Semi-Automatic tool to aid in the unfolding ofthese features.Semi-Automatic unfold features examplesOpen EndEmbossGussetsCase Study 2 – 3 : Semi-Automatic Unfolding of a PartThe part for this tutorial has five features to unfold. Two of thesefeatures cannot be unfolded automatically-the Gusset and OpenEnd Emboss. Open End Embossments, Gussets and someChamfers (Coins) need to be unfolded with assistance by usingsemi-automatic recognition tools to handle these sheet metalfeatures. The bends will be automatically recognized eitherimmediately or once the other features are recognized.35
Perform the Automatic Unfold1. Open part file Semi-Automatic.sldprt File Location:Desktop\ <strong>Training</strong>\Unfolding\Unfold2\2. Select the fixed face as shown.3. Click Unfold Part from the <strong><strong>3D</strong>QuickPress</strong> toolbar.Use the default settings and press to unfold the part.Select OK to accept the default bend allowance settings.4. Right-click Sheet Metal Object at the top of the Unfold<strong>Design</strong> Tree and select Unfold All.<strong>Manual</strong>ly Recognize Features with User Assisted Recognition(UAR)<strong><strong>3D</strong>QuickPress</strong> only calculates the top and bottom faces of a part. Itnormally will automatically recognize these groups of faces.However, in certain cases, it will not be able to recognize the facesaccurately. In these cases the user needs to check and modify theTop and Bottom groups of faces to assist the software.Note: The material thickness (side faces of the part) is not used forseveral reasons. First, these faces are not necessary for theunfolding calculations. Second, it would slow down theperformance of the software. Third, <strong><strong>3D</strong>QuickPress</strong> canunfold Solid and Surface type parts.36
6. Click Add button again and select Gusset for Feature type.Select the faces shown below.7. Click to accept all default values.8. Right-click Sheet Metal Object at the top of the featuretree and select Unfold All. All features will now unfold.9. Save and Close the part.38
ADVANCED UNFOLD METHODS<strong><strong>3D</strong>QuickPress</strong> has the ability to unfold extremely complex geometrybeyond standard SolidWorks capabilities. This section exploressome of the tools and methods required to tackle the advancedgeometry that is found in the progressive die industry.Case Study 2 – 4 : Unfolding Alike FeaturesIt is very common to have repeated instances of geometry in a partthat require the exact same steps to unfold. In these cases, theuser can save tremendous amounts of time by patterning theunfolded feature while maintaining order independence in the striplayout.Find the Identical Instances1. Open the part file Extract AlikeFeatures UDF.sldprt File location:Desktop\<strong>Training</strong>\Unfolding\Like Features\2. Right-click on Sheet Metal Object at the top of thefeature tree and select User Assisted Recognition.3. Select User Defined 1 from the Selected Feature boxand click the Extract Identical button.A list of identical user defined features is createdautomatically.39
4. Click to finish the command and rebuild the unfoldedpart.Note: The rebuild command inside <strong><strong>3D</strong>QuickPress</strong> is differentfrom the rebuild tool inside of SolidWorks. This commandcan be located by right-clicking on Sheet Metal Objectat the top of the <strong><strong>3D</strong>QuickPress</strong> feature tree and selectingRebuild Unfolding Model.Patterning the UnfoldWhen the same User Defined Feature (UDF) is usedmultiple times in an unfolded part the setup of steps and theset faces can be copied from one UDF to all of the identicalinstances of the UDF.The steps to copy the settings of User Defined 1 to all otheruser defined features are as follows:1. Select the completed user defined feature User Defined 1.2. Activate Show Unfolding Model on the <strong><strong>3D</strong>QuickPress</strong>Unfolding toolbar.3. In the feature tree, Right-click on User Defined 1 andselect Set Faces to Identical User Defined Features.When all question marks have disappeared from the UserDefined items in the tree, the function has completed. Thesteps and the set faces are then copied to other identicalfeatures.40
4. Save and Close the part.Case Study 2 – 5 : Handling Non-Uniform ThicknessUnfolding Parts with Non-Uniform ThicknessNon-Uniform thickness parts are very difficult for <strong>3D</strong> <strong>CAD</strong> systemsto unfold. Most <strong>CAD</strong> systems will only handle specific situations.<strong><strong>3D</strong>QuickPress</strong> has tools designed to accommodate these complexfeatures.Defining the Regions10. Open the part file Multiple Thickness. File Location:Desktop\<strong>Training</strong>\Unfolding\MultipleThickness\Multiple Thickness.sldprt.Before starting <strong><strong>3D</strong>QuickPress</strong> Unfolding, regions or featuresof different thicknesses must be separated by using the SplitFace function of SolidWorks.11. Insert a sketch on Face A .41
12. Flip the part over to select Edge E on the other side of thepart. Use Convert Entities on Edge E .13. Add a split line. Select the active sketch for Sketch to Project.Select Face A for Faces to Split. Click to split Face A into2 faces.14. Save the part.Unfold the Part15. Click Unfold Part from the <strong><strong>3D</strong>QuickPress</strong> toolbar.16. Select the face shown below for the fixed face. Click tofinish the command. Select OK to accept the default bendallowance settings.17. Right-click Sheet Metal Object at the top of the featuretree and click User Assisted Recognition.42
18. Click Back to set Top and Bottom Faces properly (seebelow for proper coloring of faces).Tip:Right-click on a face and choose Select Tangency from themenu to select all tangent faces to the selected face.19. Click Next and Add a User Define Feature which willconnect the thick and thin regions.20. Click Next and click Add to define the thin region.21. For Region Faces, select the blue faces as shown in theimages below.43
22. For Fixed Face, select the purple face indicated below.Note: The Fixed Face is also selected as a Region Face.23. Click to exit User Assisted Recognition mode.<strong><strong>3D</strong>QuickPress</strong> now recognizes the bends in this non-uniformpart.24. Right-click Sheet Metal Object at the top of the featuretree and click Unfold All.25. When geometry is adjacent to more than one feature, anambiguous condition may occur. The Set Root function willsolve this problem. Right-click Face A, select Set Root,check User Defined Root, click Face B.26. Click to exit the command.27. Expand User Define 1 feature and right-click on step 0.28. Select Set Face.44
29. Select the top and bottom faces as shown and click .30. Right-click on step 0 again and select Set Branch FeatureXfrom …31. Check the option Suppress Branch and click .32. Save & Close the part.33. Save and Close the part.45
Case Study 2 – 6: Using a Branch FeatureShown below is a part with analytic (simple) geometry on bothends. User Defined Features will act as a “bridge” when unfoldingparts with non-planar geometry that lies between other features thathave unfolded successfully with other methods.This lesson is a simple example of how to control geometry utilizinga Branch feature with a Vector to Vector or Point to Point method.This lesson will demonstrate how the branch should behave when aUser Defined Feature (normally forming feature) is used as the“bridge”.Perform the Automatic Unfold1. Open the part UDF Branch.sldprt. File Location:Desktop\<strong>Training</strong>\Unfolding\Unfold4\2. Select Unfold Part from the <strong><strong>3D</strong>QuickPress</strong> toolbar.3. Select the highlighted face as shown below as the fixed face.4. Leave the default setting and click to finish the command.5. Click OK on the Bend Allowance Parameters window.6. Right-click on Sheet Metal Object at the top of the<strong><strong>3D</strong>QuickPress</strong> Feature Tree and select User AssistedRecognition.7. Under Selected Feature press the Add button. Set theFeature Type to User Defined Feature.46
8. Select the two faces shown for Feature Faces9. Press to finish the command.10. Right-click on Sheet Metal Object and select UnfoldAll.Create Surfaces for Twisted AreaThe next steps will create the blank faces for the twisted areautilizing standard SolidWorks sketching and surfacing techniques.These surfaces will then be connected to the UDF.1. Select Show Original Solid and toggle off ShowUnfolding Model with the <strong><strong>3D</strong>QuickPress</strong> Unfoldingtoolbar icons.2. Insert a sketch on the face as shown .47
3. Sketch a Rectangle of approximately 8mm length. Twocorners are coincident to the vertices of the sketch face.4. Create a Planar Surface from the current sketch.5. Rotate the part view 180° and insert a sketch on the faceshown below.48
6. Use Convert Entities to convert the sketch of Surface-Plane1 onto the current sketch.7. Create a Planar Surface from the current sketch.8. Toggle on Show Unfolding Model from the<strong><strong>3D</strong>QuickPress</strong> Unfolding toolbar. Toggle off Show OriginalSolid .9. Right-click on Sheet Metal Object and select Fold All.10. From the <strong><strong>3D</strong>QuickPress</strong> Feature Tree, expand UserDefined 1 and Single State. Right-click on Step 0and select Set Active.11. Right-click on Step 0 again and select Set Faces. Thefirst box in the dialog window is for the Top Surfaces, andthe bottom box is for the Bottom surfaces. Press to finishthe command.49
12. Right-click on Step 0 of User Defined 1 and select SetBranch Feature Xform. Select the vertices as indicatedbelow.13. Click to finish the command.14. Right-click on Sheet Metal Object at the top of thefeature tree and select Unfold All to see the final flattenedpart.15. Save and Close the part.50
ADVANCED FIXED FACE OPTIONS<strong>3D</strong>Quickpress unfolding offers three methods of selecting a fixedface (die face = bottom of strip material). The planar face optionhas already been explored in the previous case study. The tangentedge and construction options will be described in this section. Thisapproach is driven by how the part will be formed in the die and bysetting the die plane tangent to the arcs on the part. In otherwords, the tangent of the bottom of the cylindrical part is collinearwith the bottom of the stock material when unfolding occurs. Thetangent face edge is the only geometry that stays fixed.Case Study 2 – 7 : Unfold with Tangent EdgeIn this case study, we need to unfold to a vertex on the cylindricalfixed face that intersects the tangent arcs on the formed part. Inother words, the tangent of the bottom of the cylindrical part iscollinear with the bottom of the stock material when unfoldingoccurs. The tangent face edge is the only geometry that staysfixed.1. Open part file cylindrical.sldprt. File LocationDesktop\<strong>Training</strong>\Unfolding\Unfold5\2. Pre-select the curved face as shown below, and then fromthe <strong><strong>3D</strong>QuickPress</strong> toolbar select Unfold Part . Amessage appears stating that the fixed face can only be aplanar face in normal mode.51
3. Click OK to close the warning message.4. Select the Advance check box under the Fixed Faceselection box. Select the same curved face you tried earlier.A new selection box appears in the feature tree.5. Make this box the active window by clicking in the box andselect the vertex on the cylindrical fixed face indicated by thearrow below. Press to finish the command.Note: A red arrow will appear pointing normal to the bottomfixed face.6. Select OK for Bend Allowance Parameters to accept thedefault settings.7. Right-click on Sheet Metal Object at the top of thefeature tree and select Unfold All.8. Save the part.52
Case Study 2 – 8 : MY BLANK functionSometimes designers want to simplify the unfolded results in theblank state (2D editing). My Blank can also address “design formanufacturing” requirements such as simplification of a conicprofile to an arc profile in the blank profile without changing the <strong>3D</strong>part model. This may be required to reduce machining time andcost. Therefore, My Blank allows the designer to make changes inthe blank 2D sketch easily when the <strong>3D</strong> part modification would bevery difficult.When creating the Strip Layout with this part the My Blank sketchwill be used for Piercing and Notching creation by suppressing theoriginal unfolded part data. The original <strong>3D</strong> Model is not changed.If the change can be made to the original <strong>3D</strong> part, the change willupdate the unfolded blank and MY BLANK is not required.Create a MY BLANK Feature1. Right-click on My Blanks in the feature manager andselect Add My Blank.Note: A My Blank Sketch is now available to modify theunfolding results.2. Right-click My Blank 1 in the feature tree under MyBlanks. Select Edit Sketch .Note: The hole in this part is actually made up of 2 splines notarcs since the hole is circular before the unfold was calculated.3. Orient the part normal to the sketch. Hold the cursor overthe edge of the hole and the spline symbol will appearnext to the cursor.4. Click Bounding Box on the <strong><strong>3D</strong>QuickPress</strong> SketchTools toolbar. Select the two splines that make up theholes.53
5. Under Geometry select circle and underEnlarge/Shrink select By Offset Distance and set thedistance to 0.00 mm.6. Click to finish the command.7. Select the converted circle that makes up the original hole.In the feature tree, check the box For Construction.8. Exit Sketch in the confirmation corner.9. Right-click on My Blank 1 and select Hide ReferenceSurface. If the reference plane is still shown, right-click theplane in the graphics area and select Hide .10. Select Toggle Unfolding Display from the<strong><strong>3D</strong>QuickPress</strong> Unfolding toolbar to hide the unfoldedmodel and show the original solid.11. Save and Close the part.54
ADVANCED UNFOLDING: USER DEFINED FEATUREUser Defined Feature is a very powerful feature in <strong><strong>3D</strong>QuickPress</strong>.This feature is used to handle intricate and or set by set processthe manufacturing areas of a part related to forming. Throughthese tutorials you will learn techniques to handle the followingprocesses:Forming undevelopable shapes like emboss formsMultiple step formingForm shapes with linear bends and piercingsCase Study 2 – 9: Using UDFs for UnfoldingNote: Shown in the left picture is the standard User Defined (UDF)automatically created by <strong>3D</strong>QPress with 2 standard States (Blank,Fully Folded) inside both States there is a Step 0, also included is aFinal Step within the Fully Folded State.? On the User Define 1, indicates that no surfaces have beenset.RED Arrows – Arrows indicates the position of the model, if themodel is folded to another State then the arrows will disappearindicating that another State will need to be created to continue.Step – A step is added to an already created State when the shapesurrounding UDF doesn’t change, but the shape inside the UDFfeature does.State – A state is added when the shape surrounding UDFchanges.1. Open the part UAR_Features.sldprt. File LocationDesktop\<strong>Training</strong>\Unfolding\UAR Features\55
2. Select User Assist Recognition, select Gusset 3 and changethe feature type to a User Definedthen Unfold All.3. Start by creating the surfaces for the Blank State\Step04. The area that surfaces are requires are within the modelbounders, selectUnfolding menu.Patch Hole from the <strong>3D</strong>QPressNote: The block SWX selection will keep you from picking anon-exposed SolidWorks Surface.5. Select the surrounding surface of the opening, and thenselect any 1 edge for the Reference Edge. <strong>3D</strong>QPress willcreate the surface for you in this instance.6. Repeat this process for the bottom of the unfolded model.Note: If the model is bad then there are times you will needto revert to SolidWorks to create these surfaces.7. From the <strong>3D</strong>QPress Feature Manger Tree scroll down to theUser Define 1\Blank State\Step0 and set faces asshown in the picture on the left.8. Right click on Blank State of the UDF 1 and add a newStep.9. <strong>3D</strong>QPress will add a Step 1 to the already created Step 0.10. All the faces will disappear, use SolidWorks to create thenext operation.11. Toggle to show Solid Model, by using SolidWorks you cancopy faces of the emboss face to help create the next Stepof the gusset.12. Copy the surfaces Top and Bottom and offset by .000, sinceyou will need 2 copies of this emboss area then repeat theprocess. Note: These surfaces have previously beencreated.13. Go to the SolidWorks Feature Manger Tree and expand thesurfaces folder and rename the surfaces to later identifythem.14. Toggle back to the <strong>3D</strong>QPress unfolded part, right click onthe surrounding faces, right click and export selected faces.56
15. Toggle off both the SolidWorks and <strong>3D</strong>QPress UnfoldedModels.16. This will expose the surfaces, use SolidWorks\Copy/Move tomove the bottom form surfaces into position.17. Then Loft the surfaces between the forms emboss faces Topand Bottom, toggle the <strong>3D</strong>QPress Unfolded surface on.Note: These surfaces have previously been created.18. Go to the <strong>3D</strong>QPress Feature Manger Tree, UDF 1\BlankState\Step 1 right click to set faces Top and Bottom.19. Currently the arrows are set to UDF 1\BlankState\Step1, as we fold the outside radius the State of themodel has change, and arrows has disappear.20. Right click on the UDF 1 and create a new State.21. Repeat steps 9 thru 15. Note: These surfaces havepreviously been created.22. Expand UDF1\State 1\Step 0, right click and set faces.23. Save and Close part.Case Study 2 – 10: UDFs using Split Line for Unfolding1. Open the part Split Line.sldprt. File LocationDesktop\<strong>Training</strong>\Unfolding\Unfold3\Note: Steps 2 and 3 are already completed and are listedfor reference.2. Select Sketch 1 from SolidWorks Feature Managerand click Insert, Curve, Split Line.57
3. Select the highlighted faces as shown and click to finishthe command.4. Click Unfold Part from the <strong>3D</strong>QP Unfolding toolbar.5. Select the indicated face as the fixed face.6. Accept all default values and click to finish the command.7. Click OK on the Bend Allowance Parameters window.View unrecognized bend geometry:1. Right-click on Sheet Metal Object at the top of thefeature tree and select Unfold All.2. Right-click on Sheet Metal Object and select UserAssisted Recognition.3. Click the Add button to add a new UAR Feature. Thenchange the Feature types to User Defined Feature andselect the faces as shown in green.4. Click to finish the command.5. Right-click on Sheet Metal Object and select UnfoldAll. The part should be unfolded as show below.58
Import the blank surface for the free form region1. Select Imported Geometry from Insert, Featuresmenu, and select Blank.x_t. File LocationDesktop\<strong>Training</strong>\Unfolding\Unfold3\Blank.x_t2. Click Offset Surface from Surfaces toolbar and offsetthe imported blank to a distance of 1mm.Note: Check the direction so that it is consistent withmaterial direction.3. From the <strong>3D</strong>QPress Feature Manager, right-click Step 0and select Set Faces.4. Select the imported face and the offset surface as the blank.Click to finish the command.5. Right-click User Defined 1 in the feature tree and selectFold.59
Create an intermediate step for forming – there is no limitationon the number of steps:1. Select Imported Geometry from Insert, Features menu,and select Multi-Step.x_t. File LocationDesktop\<strong>Training</strong>\Unfolding\Unfold3\Multi-Step.x_t.2. Click Offset Surface from Surfaces toolbar and offset theimported blank to a distance of 1mm.3. Click to finish the command.4. From the <strong>3D</strong>QPress Feature Manager, right-click FinalStep and select Insert Step.5. Right-click on Step 1 and select Set Faces.6. Select the faces as indicated, then click to finish thecommand.60
7. Right-click on User Defined 1 and select Fold. You canfold and unfold each step to see the entire formingsequence.61
ADVANCED UNFOLDING USING <strong>3D</strong>QUICKFORM<strong>3D</strong>QuickForm is a finite element program to solve metal formingproblems. Like all finite element software, the main steps are preprocessing;solving and post-processing. Pre-processing includesall the procedures to define the problem; the solver uses the preprocessdata as input and generates a solution; and postprocessingdisplays the interpretation of the results from the solver.In <strong>3D</strong>QuickForm, we further refine the major step as following:Geometry preparationOffsetting surfacesFixing invalid surfacesCreating mid surfacesPre-processingInputting boundary conditionsDefining initial blankMeshingSolvingPost-processingBlank outputThinning reportStress and strain reportCase Study 2 – 11 : Using <strong>3D</strong>QuickForm form UnfoldingDefine a coordinate system1. Open the part Tutorial-1. File LocationDesktop\<strong>Training</strong>\Unfolding\<strong>3D</strong>QuickForm\Tutorial-1.x_t.2. Click Insert, Reference Geometry, Coordinate system .Click the Z axis box to make this field active, and then clickReverse Axis Direction to reverse the Z axis direction.3. Click to finish the command.4. Save the file as Tutorial-1.SLDPRT.62
Start a new project <strong>3D</strong>QUICKForm1. Turn on the <strong>3D</strong>QuickForm add-in from the Tools, Add-insmenu. <strong>3D</strong>QuickForm will appear as a new tab at the top ofthe FeatureManager.2. Right-click Tutorial-1 in the <strong>3D</strong>QuickForm FeatureManager and select New Project.3. Under Coordinate System choose Coordinate System14. Under Output Options choose Fit Bi-arc.Note: Fit Bi-arc will remove all splines created by the unfolding andreplace them with arcs and lines per the fitting tolerance.Define punch part1. Right click Project1 and select Set Punch Part.2. Select the faces of the body.Tip: Select one face on the part and use Select Body Faces toautomatically collect the rest of the faces.3. Input 1.2mm for the material thickness.4. Click to finish the command.63
Create mesh and solve the problemThe mesh size is determined by 2 factors:Global mesh sizeMinimum mesh size1. Right-click Project 1 and select Create Mesh.2. Select Run Solver after Meshing and use the defaultvalues.3. When the solver is running Processing… will be shown onthe Lower right corner of SolidWorks4. The blank is created as a sketch in the SolidWorks FeatureTree.5. Right-click on Project1 and select Show Thinning to see theamount of material thinning when the part is formed.64
<strong>3D</strong>QUICKPRESS DEEP DRAW CALCULATORThe Deep Draw Calculator is designed to estimate deep drawnresults for five types of cup. It estimates the minimum number ofdeep drawing stages, and calculates all dimensions of the cup ineach stage, by generating a table of numeric results and SWP(Macro) files. The SWP files generated from the calculator canautomatically create cups in SolidWorks of each stage. With<strong><strong>3D</strong>QuickPress</strong>, users can easily insert them into a strip layout andrapidly proceed to punch designs and die sets.Case Study 2 – 12 : Using the Deep Draw Calculator1. Launch the Deep Draw Calculator from Start, AllPrograms, <strong><strong>3D</strong>QuickPress</strong>, Deep Draw Calculator.2. Choose a Cup Type, using the > buttons. Thereare 5 different types of round cup to choose from: StraightCup, Sloped Cup, Straight Cup (Flank), Sloped Cup (Flank),or Bi-Step Straight Cup (Flank).3. Choose Straight Cup (Flank) for this example.4. Set Convert Units to SI (MMKS).5. Set the Material Properties. The Deep DrawCalculator provides 5 material types: Steel, Stainless Steel,Aluminum, Copper, or Bronze. All properties arecustomizable.6. Choose Steel for this example65
7. Cup dimensions can be entered under the Primary,Secondary, and Miscellaneous fields.Note: Use the default values for Straight cup for thisexample.8. Adjusting the Deep drawing suitability increases ordecreases the steps required to create a drawn cup.9. Browse to the Deep Draw template location: C:\ProgramFiles\<strong><strong>3D</strong>QuickPress</strong>\Deep Drawing\template.Note: There are 3 folders of templates: Punch, StretchWebs template, and template (No Stretch Web).10. Choose Stretch Web Templates for this example.11. Set a location to save the file.12. Enter a SWB file name.13. Select Estimate and Show Results.14. Check to see if the results Pass.Select Generate *.SWB Files.15. Inside SolidWorks select Tools, Macro, Run.16. Browse to C:\Temp and select Demo-All Steps.swb.17. The profile of the Stretch Web can be customized by editingSketch1 of Surface-Plane1.66
UNFOLDING IMPORTED STEP MODELCase Study 2 – 13: Importing and Unfolding a Step FileImporting STEP file1. Open part file FP12.1_1. File location:Desktop\<strong>Training</strong>\Unfolding\STEP Model\FP12.1_1.STEP by clicking File, Open, select STEPAP203/214 (*.step,*.stp) as File Type.2. Click Yes when asked to perform Import Diagnostics.3. Select Attempt to Heal All.4. Save and Close the part FP12_1_1.SLDPRT.5. Start a new part.6. Select Insert, Part.7. Select FP12_1_1.SLDPRT.8. Select Solid bodies for the insert part options and click .9. Right-click on FP12_1_1 in the feature tree and select ListExternal Refs.10. Click Lock All to temporary breaking the link between theimported part and the unfold part. When engineeringchanges are necessary, the link can be resumed and updatethe unfold part.11. Save the part as FP12_1_1_Unfold.SLDPRT.67
Unfold the inserted part1. Click the Unfold Part icon on the <strong>3D</strong>QP Unfoldingtoolbar to unfold the part.2. Select the highlighted face as fixed face and click OK tounfold. The sheet thickness 0.1524mm is detectedautomatically. The material and the common bend allowancecan both be adjusted.3. Change the K-Factor to 0.5 for 90deg bends with bendradius equal to 0.25mm and click OK.4. As there is an unknown feature on the feature list, thatfeature has to be unfolded with User Assist Recognition(UAR). Right-click on Sheet Metal Object and selectUser Assist Recognition.5. Click Left Arrow to modify the top and bottom facesetting.6. Select the highlighted surface and click Unset Selected.7. Click to finish the command.8. Right-click on Sheet Metal Object and select Unfold All.68
Chapter 3STRIP LAYOUT DESIGN Strip Layout Introduction Feature Based Method Swap Part Method Station Layout Strip Layout Parameters Rearrange Strip Operations Add and Modify Strip Operations70
<strong>3D</strong>QUICKPRESS STRIP LAYOUT INTRODUCTIONCreating a strip layout can be done with two methods: FeatureBase and Swap Part methods. Both of these methods require anunfolded part or multiple unfolded parts to start the strip layout.The strip layout file is not an Assembly. It is a part file that willcontain the unfolded part(s) data. The strip layout part is primarilyused to represent the metal forming operations. The result is anaccurate representation of the operations of each station that willoccur while running the die. Both 2D and <strong>3D</strong> features are createdto represent the metal forming operations. Changes to theseoperations are quick, easy, and logical to the die designer.Overview of Steps:o Station Layouto Strip Parameterso Progressiono Stock widtho Optimization material utilizationo Manipulate the strip layouto Assign operationso Modifying existing operationso Adding Operations<strong><strong>3D</strong>QuickPress</strong> Cutting FeaturesThere are four types of cutting features in <strong><strong>3D</strong>QuickPress</strong>: piercing,internal notching, notching and in-place cutting.Piercing – a 2D cutting profile defined by the <strong><strong>3D</strong>QuickPress</strong>system. The piercing feature is commonly used to create internalholes on a blank.Internal Notching – a 2D cutting profile defined by user. Thecutting feature is created from a piercing feature.Notching – a 2D cutting profile defined by user on the Z-datum.The cutting feature is created from the unprocessed feature.In-place Cutting – a 2D or <strong>3D</strong> cutting profile defined by user at anylevel in the die set. The cutting feature is created from theunprocessed feature.Each cutting feature supports several operations. Depending onthe type of cutting feature, the operations supported will bedifferent. Below is a list of operations that can be used with cuttingfeatures.Create – Creates a cutting feature by defining a 2D cutting profile ina sketch. The <strong><strong>3D</strong>QuickPress</strong> QuickSketch function can be used tohelp create the cutting profile. For in-place cutting features, createuses a user defined surface instead of a sketch.71
Set – Creates a cutting feature referencing a user created planarsurface. The cutting profile will follow the outside profile of theplanar surface.Split – Splits up a cutting feature referencing user defined splitlines in a sketch. The <strong><strong>3D</strong>QuickPress</strong> QuickSketch function cannotbe used with split operation.EditSketch – Changes the cutting profile by changing the cuttingprofile sketch inside the split line sketch.Edit – Changes the cutting profile by changing the user definedsurface in the set operation or create operation (for in-place cuttingfeature).Update – Updates the cutting profile if the user defined surface inthe set operation or create operation (for in-place cutting features)is changed.Operations supported by each type of cutting feature.Case Study 3 – 1 : Feature Based MethodIn this case study, a simple part is unfolded and a 2-up strip layoutis created. After the initial layout is completed, several types ofcutting punches will be created using 2D features to representthese operations. These operations will then be manipulated inseveral ways including operation order, activation state, andmirroring operations. The result is a representation of the metalforming process in a single SolidWorks part file. Speed of creationand manipulation are the key elements to using the <strong><strong>3D</strong>QuickPress</strong>approach.72
Initial Station Layout1. Open the file named Tutorial-Align.sldprt location:Desktop\<strong>Training</strong>\Strip Creation\.2. Click Unfold Part on the <strong>3D</strong>Quick Press toolbar. Selectthe back face as the fixed face. Leave the default settingand click to finish the command. Click OK on the BendAllowance Parameters window.3. Save the file.4. Click Strip Layout <strong>Design</strong> on the <strong><strong>3D</strong>QuickPress</strong> toolbar.Type T5-1 Strip Layout for File name andDesktop\<strong>Training</strong>\Strip Creation\ for location andclick Save.73
Note: Click No to prevent the existing part to be insertedautomatically to the new strip layout. It will be inserted manuallyfor this case study.5. Add an unfolded part to the strip. Right-click Blank Layoutfrom the Strip Layout <strong>Design</strong> Tree and select Insert SheetMetal Object.6. From the Open Dialog Box, select Tutorial-Align filelocation: Desktop\<strong>Training</strong>\Strip Creation\. Nowthe part appears in the strip layout but needs to be properlyoriented.7. The Edit Blank Layout mode is active upon inserting the part.To orientate differently than the default location: Select theline indicated below and change the line angle from 150 to180 degrees.8. Click to finish the command.Adding a 2 nd Part to the Strip LayoutIn many cases, a right-hand or left-hand version of a part isrequired. When this occurs, a mirrored version of the partcan be inserted rather than creating a second unfolded part.<strong><strong>3D</strong>QuickPress</strong> has an option to do this for you automaticallyfrom the original part.74
1. To add a mirrored version of the original part., right-clickBlank Layout from Strip Layout <strong>Design</strong> Tree and selectInsert Mirrored Sheet Metal Object.2. From the File Open Dialog Box, select Tutorial-Align Filelocation: Desktop\<strong>Training</strong>\Strip Creation\.3. Now align the 2 nd blank. Select the line indicated below andchange the line angle from 30 to 0 degrees.4. Drag the mirrored layout to a position directly above the firstpart.Note: By selecting the upper profile, you can drag it to theapproximate location. The next steps will allow you toposition it precisely.Additional AlignmentAdditional alignment is required to position the blanks relative toeach other and to the origin of the strip layout. <strong><strong>3D</strong>QuickPress</strong> canassist in the alignment of the parts by selecting reference pointsfrom each individual blank profile and manipulating the X, Ydistances between these points.75
1. Zoom in close to the area shown below. Under the Entitiessection in the Property Manager, click Clear selection.Select Point 1 and Point 2, change delta X to 0, delta Yto -15mm.2. Next, make sure the blank layout is positioned properlyrelative to the origin of the Strip (0, 0, 0). Under BlankPositioning, click Center to Origin.3. Click to finish the command.Editing the Strip Layout ParametersNow that the initial station layout is complete, the Strip Parameterscan now be edited. This includes many options such asProgression Direction, Progression Distance, and Number ofStations to name a few. These options may be changed at anytimeand the strip will update appropriately.1. Right-click Strip Layout from the tree and select EditStrip Parameters.2. To quickly set material utilization (Yield), the Optimizationtools are used. Under Optimization, select Fix Widthfrom the drop down, type 0mm for Width Margin andStation Clearance, then click Optimize.76
Note: This will provide a preview of the results while allowing youto continue to edit the parameters. The Yield is listed above theOptimization Box. For instance: (.64) is reporting that 64% ofmaterial is currently utilized or 36 % is wasted material. TheYield amount updates immediately as the Parameters of theStrip are changed.3. Update the parameters of the strip. Set the following valuesfor the Parameters and the Stations properties.Parameters: Progression Direction Left to Right Strip Y-Reference Strip Middle Width of the strip 120mm Blank orientation with respect to strip 0deg Inter-station pitch value 38mm Start margin for the strip 38mm End margin for the strip 1mm Strip Y position 0mmNote: Start margin is the extra material representation beforestation 1. End margin is the extra material representation afterlast station.Stations: Number of stations of the strip 5 Number of piercing stations of the strip 4 Number of bending stations of the strip 04. Click to finish the command.77
5. Save the part.The first time the number of stations is set for Piecingand Bending operations and the Finish button is hit;existing operations in the unfolded part will beautomatically distributed and activated throughout thestations listed. This is done for convenience. All otherprocesses, such as Form Features, are NOT distributed.This only happens the first time Edit Strip Parameters isedited. Going forward, all operations can be activatedand inactivated using standard right-click selections inthe Feature Manager or by right-clicking on the stripoperation.For instance, since “Number of Piercing Stations” is setto 4; all piercing operations that exist in the unfolded partwill be automatically activated and distributed into thefirst 4 stations. Operations can then be rearranged asrequired. Since “Number of Bend Stations” is set to 0,all bends, if there were any, would stay inactive orunprocessed until activated in a station of choice.Rearranging Strip OperationsAfter the initial strip is created, the piercing operations can bereordered.1. Click Filter Features from <strong><strong>3D</strong>QuickPress</strong> Display Optionstoolbar.Note: With this option enabled, the user can only select the<strong><strong>3D</strong>QuickPress</strong> features. The Filter Features option is employedto make it easier to select <strong><strong>3D</strong>QuickPress</strong> features while avoidinginadvertent selection of SolidWorks geometry. This optionalcommand may be helpful when selecting features while themodel is zoomed out and the feature you are trying to select isdifficult to pick from that zoom scale.2. Right-click a feature from the graphic window, use ActivateHere or Inactivate to modify the strip layout to the one asshow below.78
3. Save the file.4. Click Filter Features from <strong><strong>3D</strong>QuickPress</strong> Display Optionstoolbar to deactivate the filtering option.Adding Strip OperationsSeveral types of operations can be created to manipulate the striplayout. Notching punches are created to remove material from theoutside of the blank profiles. Internal Notching features are createdto remove material internal to a part profile that was not alreadyrecognized as a piercing. They can also be created when aseparate process is needed to remove material that is not partprofile specific. An example of this is splitting a punch into twopunches.Create a Notching Punch1. Right-click Unprocessed Features from the Strip Layout<strong>Design</strong> Tree and select Create Notching Feature.Note: All punches are created as 2D representations forsimplicity and manipulation speed. The basis for these featuresis 2D sketches. All the standard sketching tools plus manyadditional <strong><strong>3D</strong>QuickPress</strong> sketching tools are available. Areference station is shown with the blanks for design reference(Station 0, which only exists while in punch creation or editingmode).2. Click Rectangle and sketch a rectangle as shown belowon the left. Click QuickSketch on the <strong><strong>3D</strong>QuickPress</strong>Sketch Tools toolbar. QuickSketch will automatically adjustthe rectangle sketch to match the contour of the part.79
3. Detail the sketch.4. Exit the sketch to create the punch.5. Now activate the punch in Station 2. Right-click Notching1 in the feature tree and select Apply to Station 2.6. Create another Notching punch that is a rectangular shaped.Right-click Unprocessed feature from the Strip Layout<strong>Design</strong> Tree and select Create Notching Feature.7. In order to reference (add relationships and dimension to)other punch sketches to create new punches, you can turnthem on and off when necessary. Right-click in the emptyspace of the Graphic Window and select Show AllNotching Sketches.8. Click Rectangle and create a rectangle as shown anddetail the sketch.80
Note: When creating several notching punches many steps canbe saved by proceeding directly to the next notch creation andthen activating the punches later in the process. This function iscalled Create Notch Batch Mode.9. With the Select tool active, Right-click in the empty space ofthe Graphic Window and select Create Notch Batch Mode.10. Exit Sketch and click Yes to continue the design of nextnotching feature11. Create another punch for cutting off the part. ClickRectangle and create a rectangle as shown in the detailbelow. Click QuickSketch on the <strong><strong>3D</strong>QuickPress</strong> SketchTools toolbar and detail it as shown.12. After adding Centerlines as shown, make the left end lineCoincident to the vertical centerline, then add aSymmetrical relational ship to the horizontal centerline.13. Exit sketch . No additional notching punches are neededat this time so click No to exit the notching punch design.81
Splitting an Operation into Multiple OperationsThere are many cases when an existing punch needs to bemodified or divided into many operations. For this we can use theSplit Punch approach in lieu of creating individual punches fromscratch.Create a Split Punch1. Right-click Notching 3 in the feature tree and selectCreate Split Punch.2. Click Circle and sketch a 9mm diameter circle in thecenter of Notching 3.Tip: It may be helpful to show the sketch of Notching 3 to drawa centerline from top to bottom. The midpoint of thecenterline will be the center of the Splitting Punch.3. Exit Sketch and click on the Split Punch PropertyManager.4. Save the part.Mirroring an OperationMirroring a <strong><strong>3D</strong>QuickPress</strong> punch requires the SolidWorks surfacegeometry of the punch to be mirrored first. Inside <strong><strong>3D</strong>QuickPress</strong>,the surface geometry is defined as a punch, allowing themanipulation of station location and active state independent of theoriginal geometry.For every <strong><strong>3D</strong>QuickPress</strong> feature (operation) there is a SolidWorksassociated equivalent surface (also known as Faces). However,since <strong><strong>3D</strong>QuickPress</strong> manages this operation, displaying thesesurfaces is not often necessary. Occasionally it is appropriate toaccess these associated hidden surfaces.82
This case study focuses on using native SolidWorks functions (I.e.Pattern/Mirror) to edit or manipulate <strong><strong>3D</strong>QuickPress</strong> createdfeatures. The ability to use SolidWorks functions to edit andmanipulate <strong><strong>3D</strong>QuickPress</strong> features leverages the power ofSolidWorks and avoids a need to duplicate existing SolidWorkscommands in the <strong><strong>3D</strong>QuickPress</strong> environment.1. Show all <strong><strong>3D</strong>QuickPress</strong> features in the SolidWorks FeatureManager. Right-click T5-1 Strip Layout at the top of theSolidWorks FeatureManager design tree and select ShowAll <strong>3D</strong>QP features.2. Mirror the surfaces. Select Top Plane, Surface – <strong>3D</strong>QPNotching 1, and <strong>3D</strong>QP Notching 2 using the Ctrl key.Click Insert, Pattern/Mirror, Mirror and click .3. To display the <strong><strong>3D</strong>QuickPress</strong> punch surfaces: clickNotching Punch <strong>Design</strong> Mode on the <strong><strong>3D</strong>QuickPress</strong>Display Options toolbar to show the notching design faces.4. Set the SolidWorks Surface to become a <strong><strong>3D</strong>QuickPress</strong>Punch. Right-click Unprocessed Features from the<strong><strong>3D</strong>QuickPress</strong> feature tree and select Set Notching Feature.5. Select the mirrored faces from the Surface Bodies folder ofthe fly out FeatureManager design tree and click .6. To hide the <strong><strong>3D</strong>QuickPress</strong> punch surfaces: click NotchingPunch <strong>Design</strong> Mode on the <strong><strong>3D</strong>QuickPress</strong> DisplayOptions toolbar to toggle back to the display of strip layout.7. Station assignment of the Punches: Right-click on thenotching features in the feature tree and using Apply Tomove the punches to the positions indicated below.83
8. Right-click on all the features indicated in red and selectActivate Here if it not already invoked.9. Save the part.Note: This part will be used later in the manual for the <strong>Design</strong>Change chapter case studies.Case Study 3 – 2 : Strip Layout Swap Part MethodFor highly formed parts where feature recognition does not apply,the swap part feature can assist with strip layout creation. For thiscase study, in-place cutting features will be applied for trimmingand piercing operations that are not in the original blank station orthat occurs after forming operations. Xform part function will beused to rotate the part planar to the cut opening. All forming stepshas been created for the user with <strong>3D</strong>Quickform Pro softwareincluding blank development for this case study.Saving the Flat Blank Solid1. Open part file swap part forming. File location:Desktop\<strong>Training</strong>\Strip-Swappart\.2. Right-click on the Extrude 1 body from the solid bodyfolder and select Insert into New Part. Save the part in theStrip-Swappart folder, and name it swap part formingblank.SLDPRT.84
Create Unfold and Strip Layout1. Select Unfold Part from the <strong><strong>3D</strong>QuickPress</strong> toolbar.Select the fixed face as shown.2. Click to finish the command. Click OK to close the BendAllowance Parameters window.3. Select Strip Layout <strong>Design</strong> from the <strong><strong>3D</strong>QuickPress</strong>toolbar. Save the part in the Strip-Swappart folder andname it swap part forming-strip layout.SLDPRT.4. Select Yes on the warning. Insert the active unfolding partinto the blank layout?5. Select the edge indicated below. Under EntitiesPositioning enter -180 deg for the angle. Select Centerto Origin. Click to finish the command.6. Right-click on Strip Layout at the top of the<strong><strong>3D</strong>QuickPress</strong> feature tree and select Edit StripParameters.85
Parameters Strip Y-Reference – Strip Middle Input the width of the strip – 130.00mm Input the blank orientation with respect to the strip– 0.00deg Input the inter-station pitch value – 70.00mm Input the start margin for the strip – 70.00mm Input the end margin for the strip – 70.00mm Input the strip y position – -10.00mmOptimizationSelect the optimization option – Fix Width & Orient.Input the clearance of the components in adjacentstations – 10.00mmStations Input the number of stations in the strip – 8 Input the number of piercing stations in the strip –0 Input the number of bending stations in the strip –07. Click to finish the command.8. Save the part.Modify Stations with Swap Part1. Return to the swap part forming.sldprt part.86
2. Hide solid bodies Final Part and Extrude 1, and showsurface bodies 1 st Draw Top and 1 st Draw Bottom.3. Return to the swap part forming-striplayout.sldprt part.4. Right-click Unprocessed Features in the <strong><strong>3D</strong>QuickPress</strong>feature tree and select Swap Part.5. Select the swap part forming.sldprt from the stripswappartfolder.6. Check the box next to Face Groups in the feature tree.Set the color of the Top Surfaces to light green. Setthe color of the Bottom Surfaces to dark green.Note: All surfaces can be turned on and inserted at one time, butit is often easier to control if this is done one step at a time.87
7. Click to finish the command.8. Drag and drop the swap part forming [1] from theUnprocessed Features folder to Station 4.Swap Part for Next Form Station1. Return to the swap part forming.sldprt part.2. Hide surface bodies 1st Draw Top and 1st DrawBottom, and show surface bodies 2nd Draw Top and 2ndDraw Bottom.3. Return to the swap part forming-striplayout.sldprt part.4. Right-click Unprocessed Features in the <strong><strong>3D</strong>QuickPress</strong>feature tree and select Swap Part.88
5. Select the swap part forming.sldprt from the stripswappartfolder.6. Check the box next to Face Groups in the feature tree.Set the color of the Top Surfaces to light purple. Setthe color of the Bottom Surfaces to dark purple.7. Click to finish the command.8. Drag and drop the swap part forming [2] from theUnprocessed Features folder to Station 5Swap Part for Third Form Station1. Return to the swap part forming part.2. Hide surface bodies 2 nd Draw Top and 2 nd DrawBottom, and show surface bodies 3 rd Pierce Top and3 rd Pierce Bottom.3. Return to the swap part forming-strip layout part.4. Right-click Unprocessed Features in the <strong><strong>3D</strong>QuickPress</strong>feature tree and select Swap Part.89
5. Select the swap part forming.sldprt from the stripswappartfolder.6. Check the box next to Face Groups in the feature tree.Set the color of the Top Surfaces to light blue. Set thecolor of the Bottom Surfaces to dark blue7. Click to finish the command.8. Drag and drop the swap part forming [3] from theUnprocessed Features folder to Station 6.9. Save the part.Editing the Swap Part StationsThe part will need to be rotated to allow a cut of the squareopening. The part will then be pierced with an in-place cut.1. Using the SolidWorks tools, insert a sketch on the Frontplane .2. Sketch a horizontal construction line beneath the part instation 6 and exit the sketch .3. Rename the sketch to Rotation.90
4. From the <strong><strong>3D</strong>QuickPress</strong> feature tree, right-clickUnprocessed Features and select Xform Part.5. Under Associated Blank check the box for CreateInverse Xform, under the Rotation parameter select thecenterline previously sketched and enter 7 deg for therotation angle.6. Click to finish the command.Creating an In-Place Cut Operation1. Drag and drop the Xform Part 1 from the UnprocessedFeatures folder to Station 6, and Reverse of XformPart 2 to Station 8.2. Click Bottom View using the <strong><strong>3D</strong>QuickPress</strong>Standard View toolbar.91
3. Establish the pierce opening in station 7. Right-click on theface indicated below and select Export Selected Faces.4. Click Hide All on the <strong><strong>3D</strong>QuickPress</strong> Display Optionstoolbar.5. Insert a sketch on the surface.6. Convert the entities of the hole in the center of thesurface.7. Create a Planar Surface bounded by the converted entities.8. Right-click Bottom Face 1 from the FeatureManagerdesign tree and Hide .9. Click Show All on the <strong><strong>3D</strong>QuickPress</strong> Display Optionstoolbar.92
10. Right-click Unprocessed Features from the<strong><strong>3D</strong>QuickPress</strong> feature tree and select Create In-PlaceCutting.11. Under Cutting Faces, select the newly created squaresurface. Under Show Start From input 6.Note: By selecting the face of station 6 it will fill the opening forthe pierce in station 6 up to the end of the strip.12. Click to finish the command.Activate the In-Place Cutting Operation1. Drag and drop the In-Place Cutting 1 from theUnprocessed Features folder to Station 7.2. Save and Close all open parts.93
Chapter 4PUNCH DESIGN Create a New Punch <strong>Design</strong> Create Cutting Punches Create Lancing Create L-Bend Create Pilots Create Stock Guides Translate Components Separate Components Use <strong><strong>3D</strong>QuickPress</strong> File Properties94
<strong>3D</strong>QUICKPRESS PUNCH DESIGN INTRODUCTIONPunch design is the third step in the process of creating a diedesign with <strong><strong>3D</strong>QuickPress</strong>. Unfolding and Strip Layout were thefirst two steps. With the Strip created you are now going toproceed to add <strong>3D</strong> components that will represent the tooling thatwill make contact with the strip layout design operations. Inessence, you are designing around the strip, “wrapping it” withtooling to define the components that form and or guide the strip.The next step will be to “wrap” the Punch <strong>Design</strong> with the die set tocomplete the <strong>3D</strong> design portion of the Tool.Punch <strong>Design</strong> assists you with the creation and organization ofSolidWorks Assemblies and Parts. The process is highly automatedto maintain standards while allowing for custom input for jobspecific parameters, Many new tools are introduced to assist youwith creating and editing these components and die settings.The ProcessCreate the punch design assemblies.Create punches automatically and semi-automatically.Modify punches.Apply and modify User Defined Components (UDCs) forlancing, embossing and forming operations.Apply UDCs to add stock guides and pilot punchesTranslate and Separate components.Check for interference and modify for clearance.Add non-graphical data (Properties) to components ingroups to automate organization, selection, detailing and Billor Materials.Case Study 4 – 1 : Punch <strong>Design</strong>In this case study you will take an existing strip layout part andcreate 2 Punch <strong>Design</strong> assembly, Horizontal and Vertical. Youwill define the die set parameters for the tool so that the die setitself will be automatically created in the following design steps.You will use automatic punch design and semi-automatic punchdesign tools to accomplish placing pilots, lancing, piecing, notching,and bending operations. You will also be introduced to someproductivity tools to move, copy, and edit components. Finally youwill add addition intelligence by applying SolidWorks Properties in agroup selection technique.95
You will find that creating a Horizontal or a Vertical <strong>Design</strong> are verysimilar process. <strong><strong>3D</strong>QuickPress</strong> will create (UC/MC/LC) subassembliesin the Horizontal <strong>Design</strong> were as the Vertical <strong>Design</strong>has no assemblies created.This tutorial will be based on the following strip layout:Pilot HoleLancingNotchingPiercingBendingPiercing;CutoffStarting a New Punch <strong>Design</strong> Project (Horizontal <strong>Design</strong>)Starting a new punch design is an automated process with theability to adjust the parameters of the project. The process startswith an existing strip layout design and the software will lead theuser through a series of questions requesting project specificinformation. Then <strong><strong>3D</strong>QuickPress</strong> will create the new files (partsand assemblies). The user will continue the design process byadding custom components for each die operation.1. Open the file named P1 Strip Layout.sldprt. FileLocation: Desktop\<strong>Training</strong>\Punch <strong>Design</strong>Creation\96
2. To create the Horizontal <strong>Design</strong> the user should turn on theAuto Reorganizer from the Special Commands menuunder <strong><strong>3D</strong>QuickPress</strong>\Punch <strong>Design</strong>\Auto Reorganizer, thisfunction is a toggle On or Off.3. Create Punch <strong>Design</strong> Assembly from the <strong><strong>3D</strong>QuickPress</strong>Command Manager tab.4. Input the project information in the Edit Project Info.Property Manager. Project Name: QPTD_H Project No.: 1 Naming Convention: *1-*3 Die Set: L1 Punch Template: Default Round Punch (Straight): Misumi Straight Round Punch (Step): Misumi Round Step5. Leave all other settings at the default values and click tofinish the command.6. The Component Clearance Property Manager shouldautomatically open. Punch plates and Stripper plates andDie plates under the Notching & Piercing parameter. Leaveall settings at the default values and click to finish thecommand.97
Note: By un-checking any of these three items, clearancebodies will not be created for punches in the Punch holder(Upper) plates, Stripper (Middle) plates and Die (Lower) plateseven though there is a clearance value greater than 0.000entered. This is a shop practices decision that should be knownbefore punch design continues otherwise the clearance holes forthese punches through these plates will need to be manuallycreated and or the punches will need to be recreated with<strong><strong>3D</strong>QuickPress</strong> commands. After the die set is created and dieset holes are run, the clearance will be 0.000 to the punch forthese plates. Manufacturing process can then use the nominalopening and add clearance compensation during the <strong>CAM</strong>programming stage for the true clearances.7. From the SolidWorks FeatureManager design tree, expandQPTD-(DSS), right-click Die set size sketch and selectEdit Sketch . Change the die set dimensions according tothe image below. This is editing the actual die set eventhough it has not been created in <strong>3D</strong> yet. The DSS (die setstructure) part contains the 2D driving sketches that willeventually be used to create the <strong>3D</strong> die set parts andassemblies.8. Exit the Sketch and Edit Component Mode.9. Reorder the components in the FeatureManager design treeso that P1 Strip Layout is located below QPTD_H-(DSS). This is a best practice since you will be accessingthe DSS file often. Therefore, having P1 Strip Layout atthe top of the FeatureManager design tree makes it is easyto find and select.98
Note: UC/MC/ LC are (Horizontal <strong>Design</strong>) naming conventionused by <strong><strong>3D</strong>QuickPress</strong>. The sub-assemblies serve ascomponent holding assemblies that represent the Upper (Punch)set, Middle (Stripper) set, and Lower (Die) set respectively.Starting a New Punch <strong>Design</strong> Project (Vertical <strong>Design</strong>)Starting a new punch design is an automated process with theability to adjust the parameters of the project. The process startswith an existing strip layout design and the software will lead theuser through a series of questions requesting project specificinformation. Then <strong><strong>3D</strong>QuickPress</strong> will create the new files (partsand assemblies). The user will continue the design process byadding custom components for each die operation.10. Open the file named P1 Strip Layout.sldprt. FileLocation: Desktop\<strong>Training</strong>\Punch <strong>Design</strong>Creation\11. To create the Vertical <strong>Design</strong> the user should turn off theAuto Reorganizer from the special commands menu under<strong><strong>3D</strong>QuickPress</strong>\Punch <strong>Design</strong>\Auto Reorganizer, this functionis a toggle On or Off.12. Create Punch <strong>Design</strong> Assembly from the <strong><strong>3D</strong>QuickPress</strong>Command Manager tab.99
13. This time we will need to Un-Check the selection by DieSet.14. Input the project information in the Edit Project Info.Property Manager. Project Name: QPTD_V Project No.: 1 Naming Convention: *1-*3 Die Set: V_1 (Metric) Punch Template: Default Round Punch (Straight): Misumi Straight Round Punch (Step): Misumi Round Step15. Leave all other settings at the default values and click tofinish the command.16. The Component Clearance Property Manager shouldautomatically open. Punch plates and Stripper plates andDie plates under the Notching & Piercing parameter. Leaveall settings at the default values and click to finish thecommand.Note: By un-checking any of these three items, clearancebodies will not be created for punches in the Punch holder(Upper) plates, Stripper (Middle) plates and Die (Lower) plateseven though there is a clearance value greater than 0.000entered. This is a shop practices decision that should be known100
efore punch design continues otherwise the clearance holes forthese punches through these plates will need to be manuallycreated and or the punches will need to be recreated with<strong><strong>3D</strong>QuickPress</strong> commands. After the die set is created and dieset holes are run, the clearance will be 0.000 to the punch forthese plates. Manufacturing process can then use the nominalopening and add clearance compensation during the <strong>CAM</strong>programming stage for the true clearances.Adjust Die Set Center (Horizontal <strong>Design</strong>)1. From the Command Manager select <strong><strong>3D</strong>QuickPress</strong>QTools tab\ Modify DSS.2. Select the Die set center tab at the top of the newwindow.3. Change X to 50mm and Y to 0mm under the DS Centersection. Select Update DSS to confirm the change. Exitthe window.Adjust die set Center (Vertical <strong>Design</strong>)1. Select Translate Component from the <strong>3D</strong>QP QToolstoolbar.2. Select the strip layout in the graphic window.3. Change X to 25mm. Click OK to confirm the change.101
Note: Just a reminder on Punch <strong>Design</strong> Selection, to create theHorizontal <strong>Design</strong> the user should turn on the Auto Reorganizerfrom the Special Commands menu. To create the Vertical<strong>Design</strong> the user should turn Off the Auto Reorganizer from theSpecial Commands menu under <strong><strong>3D</strong>QuickPress</strong>\Punch <strong>Design</strong>\.Create Cutting Punches1. Define the Punches, click Punch Definition Table fromthe <strong><strong>3D</strong>QuickPress</strong> PRL toolbar.2. Under Selection click All and update the PunchTemplate column according to the image below. Click OK tofinish.102
The option Show created is added to the Punch Definition Table toshow those cutting features for which punches have beenpreviously created.Cutting features of the primary strip layout will be shown in a darkcolor while cutting features of other strip layout will be shown ingrey.Default cutting punch components will be named using the format“project number-cutting feature name.x.1”, where “.x.1” representsthe strip layout to which the cutting features belongs.When there is a patterned cutting feature, a bracket with theinstance number of the cutting feature is added to the stationnumber.Create the Cutting Punches Automatically1. Click Create Cutting Punch from the <strong><strong>3D</strong>QuickPress</strong>PRL toolbar.2. Select All under the Selection parameter. Click tofinish the command. <strong><strong>3D</strong>QuickPress</strong> will automatically createthe punches.Create Lancing Punch Semi-AutomaticallyIn this section we will create a punch with a User-DefinedComponent (UDC) that already exists. This will get usstarted very quickly yet further design changes will need tobe made to this punch to complete.1. Go to a Front View .2. Zoom in to the upper third of station 1.103
3. Click Create User-Defined Component from the<strong><strong>3D</strong>QuickPress</strong> PRL toolbar.4. Under the Definition parameters select Rect. BlankPunch and select RECT01, select the 2 faces indicatedbelow, and select Rectangular Type.Note: The 2 faces selected drive the punch size automatically.5. Click to finish the command.6. Right-click on QPTD-UDC 1P (found under the QPTD-UCsubassembly) and click Hide Component .7. Transfer the Lancing Faces from the Strip part to the Punchpart for ease of design and performance. Click ExportFaces the <strong><strong>3D</strong>QuickPress</strong> PRL toolbar.8. Check the Selection parameter and pick Top Faces.9. Select the 2 faces below, and then click SL Features.104
10. Under Components, Click QPTD_( )-UDC 1P from the flyout tree.11. Click to finish the command.12. Click Hide/Show Top from the <strong><strong>3D</strong>QuickPress</strong> DisplayOptions toolbar.13. Right-click on QPTD-UDC 1D (found under the QPTD-LCsubassembly) and click Hide Component .14. Click Export Faces from the <strong><strong>3D</strong>QuickPress</strong> PRL toolbar.15. Check the Selection parameter and pick Bottom Faces.16. Select the 2 faces below, and then click SL Features.105
17. Under Components, click QPTD_ ( )-UDC 1D from the flyout tree.18. Click to finish the command.There are two reasons why this is important.a. With the faces in the punch part, the user can open thepunch on its own to further design in the part mode in lieuof working in the assembly to do part design. The typicaluser will design more efficiently in SolidWorks’ Part Modesince it is easiest.b. Avoid IN-CONTEXT ASSEMBLY relationships whenappropriate. In-Context relationship features are verypowerful. However, they complicate the design andreduce performance greatly.106
19. Now you will design in the part mode to further design theLance forming faces. Right-click QPTD-UDC 1P (foundunder the QPTD-UC subassembly) and click Open Part .20. If necessary, reorder Exported Sheet Metal ObjectTop face 1 so that it is before Extrude 1 in theFeatureManager design tree.21. Edit Sketch 1 of Extrude 1 and change dimensions to3mm and 10 mm. Then exit the sketch .22. Right-click Extrude1 and click Edit Feature .23. Change the end condition to Up To Vertex, and select thevertex of the exported surface.24. Click to finish the command.25. Right-click on the end face of Extrude 1, Insert Sketch26. Sketch a Rectangle , coincident to the corners of theexported surface.107
27. Click Boss Extrude , set the end condition as Up toSurface, and select Exported Sheet Metal ObjectTop Face 1 as the surface.28. Click to finish the command.29. Save and Close the part.30. From the QPTD-Tutorial-Part FeatureManager designtree, right-click on QPTD-UDC 1D (found under the QPTD-LC subassembly) and click Open Part .31. Edit Sketch 2 of Extrude 1 and change dimensions to6mm and 12 mm. Then exit the sketch .32. Change to an Isometric View , and insert a sketch on thetop end face of Extrude1.33. Change the display style to Wireframe . Sketch aRectangle , coincident to the corners of the exportedsurface.108
34. Click Extrude Cut , set the end condition as Up toSurface, and select Exported Sheet Metal ObjectBottom Face 1 as the surface.35. Click to finish the command.36. Save and close the part. This will return you to the punchdesign assembly.37. Right click on QPTD_( )-UDC 1P part (found under theQPTD-UC subassembly) and click Show38. Save the assembly.Create L-Bend Assembly automatically1. Select Create L-Bend from the <strong><strong>3D</strong>QuickPress</strong> PRLtoolbar.2. Click the face shown in the image below to select the bend.Also click on Compound Bending 2 inside BendingFeatures selection box of PropertyManager and selecttemplate LD-01.3. Click to finish the command.109
Checking for Interference with <strong><strong>3D</strong>QuickPress</strong> tools<strong><strong>3D</strong>QuickPress</strong> Interference is a separate command from thestandard SolidWorks command. It adds the ability to check forinterference between solids and surfaces. Also, it gives you theability to automatically transfer the interfering faces and or bodies tothe part level. This allows the user to see and design at the partmode around the actual interferences. The interferences are listedin the FeatureManager design tree and are time stamped. Theycan be deleted, hidden, and are not associated with the originalpart that from which they were transferred to avoid complexrelationships. This is done for reasons similar to those for ExportFaces.1. Click Interference Detection on the <strong><strong>3D</strong>QuickPress</strong> Misc.Tools toolbar.2. From the fly out feature tree, select QPTD_( )-CompoundBending 2.1 (found under the QPTD-LC subassembly)under the Targets selection box, and select P1 StripLayout under the Tools selection box.3. Click to finish the command.4. Click YES to the warning message. This will open WindowsExplorer. The folder will contain links for parts that haveinterference.5. Double-click the QPTD-Compound Bending 2.1(L00).SLDPRT link to open the document.6. Change to an Isometric View .110
7. Right-click the top face and Insert Sketch . Change thedisplay style to wireframe .8. Click Normal To to set the view to the sketch plane.Sketch a Center Line and from A to B.9. Sketch a Rectangle from point A to point B.10. Add a Symmetric relationship between lines A and Cabout line B.11. Detail the sketch as shown below.12. Click Extrude Cut , change the end condition to ThroughAll. Click to finish the command.111
13. Change the Display Style back to Shaded with Edges .14. Right-click the Surface Bodies folder, select Hide .15. Save and close QPTD_( ) assembly file.16. Save P1 Strip Layout part and the QPTD_( )-Tutorial-Part assembly.Create a Pilot with a UDC1. On the QPTD-Tutorial-Part assembly, change to aFront View .2. Click Create User-Defined Component from the<strong><strong>3D</strong>QuickPress</strong> PRL toolbar.3. Under the Definition parameter, select Pilots for PRLtype, select Pilot-01 for the Pilot type, select the RoundType radio button, and select the face indicated below.4. Click Next , Set the pilot hole clearance to 0.015mm andthe Instance to 3.5. Click to finish to finish the command.112
Create Stock Guides with a UDC1. Change to a Front View .2. Click Create User-Defined Component from the<strong><strong>3D</strong>QuickPress</strong> PRL toolbar.3. Under the Definition parameter, select Stock Guides forPRL type, select GuideLifter for the Stock Guide type,select the Rectangular Type radio button, and select theface indicated below. Under the Size parameter set X to15mm and Y to 8mm.4. Click to finish the command.Translating Components1. Click Assembly Utilities from the <strong><strong>3D</strong>QuickPress</strong> Misc.Tools toolbar. This is a collection of tools designed to makein-context assembly design easier.2. Select one of the GuideLifter parts from the graphicswindow. In the Assembly Utilities window select theGuideLifter assembly. Close the Assembly Utilities window.3. Click Translate Component from the <strong><strong>3D</strong>QuickPress</strong>Misc. Tools toolbar.113
4. The GuideLifter assembly is automatically brought in as thecomponent to translate. Under the From/To parametersselect the vertex of the GuideLifter as the From point andselect the vertex of the punch as the To point. Change onlyin the X direction and set the delta X value to -20mm.5. Click to finish the command.Separate Component with Assembly UtilitiesThe insert stock guides come from the same file QPTD-UDC1.SLDPRT. The upper guide will need to be cut for clearancepurposes while the lower guide remains the same. This will requirea standard part to be slightly customized and documentedappropriately without changing the original instance(s) in thisdesign and the library component for all designs. <strong><strong>3D</strong>QuickPress</strong>has an automated tool to achieve this called Separate Component.1. Select upper guide and click Assembly Utilities from the<strong><strong>3D</strong>QuickPress</strong> Misc. Tools toolbar.114
2. Click Separate Component and input the file nameQPTD-UDC 1A.SLDPRT. Click Save.3. Right-click the upper guide and select Edit Part .4. Cut the corner with the 4mm x 2.5 mm shape shown below.5. Exit edit part mode.6. Save and Close the part.Note: The original part is not modified even though the part in theassembly is modified.115
MANAGE PART FILE PROPERTIES QUICKLY WITH<strong>3D</strong>QUICKPRESSEditing file properties in the context of assembly is not easilyachieved with SolidWorks basic capabilities. Therefore<strong><strong>3D</strong>QuickPress</strong> has enhanced the ability to add properties to Partswhile in the Assembly design mode with group methods. Fileproperties are very important to the design process for manyreasons, such as, advanced selection and change, detail drafting,and Bill of Materials automation just to name a few. The<strong><strong>3D</strong>QuickPress</strong> Edit File Properties tool can also be customized topredefine your standards and avoid manual entry of text.EnquiryModeGroupingEditPropertiesApplyExitLegendsWhen the Enquiry Mode button is depressed theProperties of selected components are shown in thedialog box table immediately.Grouping Filters allows the user to organize andsimplify the file properties by a name. This namedgroup can help the user see only the propertiesrelevant to a function or need (a group is userdefined) – Display all existing fileproperties in the selected component – Display an editing pagecontaining all groups Title Block, Material properties, and so onare examples of a user defined groups.When this is selected, only the propertiesconnected to the title block of a drawing areshown.See Chapter 10, Administration and CustomizationEdit configuration specific properties or Fileproperties.Apply the table content to select components andkeep editing.Exit the function.The color of the dialog property item number actsas a key. It tells the user how the current group116
compares to the selected part file(s) existingproperties. For instance, if the number is red, thatfile property does not currently exist in the selectedpart. If the number is gray then the property existsin the selected part and the current value isdisplayed.If you choose to Apply (add) the group propertiesthat currently do not exist in the currently selectedpart file(s) the field will update to green to indicatethat the Apply was successful.Assigning Material Properties to multiple parts with<strong><strong>3D</strong>QuickPress</strong>1. Click File Properties from the <strong><strong>3D</strong>QuickPress</strong> Misc.Tools toolbar to launch File Properties Editor.2. Set the Grouping to Title block.3. Fill in the Values using the existing pull down options or typein some example information like listed above.4. Select the components to apply the properties to.Tip: Use window select to pick groups of components.5. Click Apply.117
How to Check File Properties of Component1. Click File Properties from the <strong><strong>3D</strong>QuickPress</strong> Misc.Tools toolbar to launch the File Properties Editor.2. Click the Enquiry Mode button (depressed) and click onany component. The selected component will display itsexisting File Properties.118
Chapter 5CREATE A DIE SET Introduction Create Die Set <strong>Design</strong> with Layout Sketches Add Standard Components Interference and Clearance <strong>Design</strong> File Property Automation Cut Die Set Holes119
<strong>3D</strong>QUICKPRESS DIE SET DESIGN INTRODUCTIONDie set design is the fourth step in the process of creating a diedesign with <strong><strong>3D</strong>QuickPress</strong>. Unfolding, Strip Layout and Punch<strong>Design</strong> were the first three steps. With a Punch <strong>Design</strong> assemblystarted you are now ready to create a new die set design assemblythat will incorporate the snap shot of the current strip layout and allpunch design assemblies.Die set creation assists you with the creation and organization ofSolidWorks assemblies and parts. The process is highlyautomated to maintain standards while allowing for modifications.Many new tools and techniques are introduced to assist you withcreating and editing the die set, standard components, andclearance holes.The die set assembly is not the simple addition of all parts andassemblies created thus far. It is a unique combination of existingpart/assemblies and new parts/assemblies and can also includedrawings.The die set creation is a special combination of some of the punchdesign assemblies. Not all assemblies are inserted to the die setAssembly. Only the UC/MC/LC sub-assemblies are inserted to thedie set design from the punch design. The top level punch designassembly is not inserted into the die set design. In addition, themaster or “Operation-Based” Strip Layout part is not inserted intothe die set assembly.The “Operation Based” Strip Layout Part is converted to a new,associated (linked), simplified part file that represents the strip forperformance and visualization purposes. The strip is representedby the upper and lower material surfaces. Performance is alsoenhanced since it is not actively associative (checking for updateson every rebuild) but, passively associated to the original striplayout part. Passive associativity is controlled by <strong><strong>3D</strong>QuickPress</strong> toallow the user to choose when a rebuild and/or revision of the striplayout part is to be checked for, and introduced to, the die setdesign.After the creation of the die set the addition of standardcomponents is automated with layout techniques and tools for easeof insertion and modification.Finally, die set holes and clearances can be manually andautomatically calculated for the user for both standard and projectspecific components. These clearances are calculated and createdwith intelligence (File Properties) in an active and passive timingdepending on the tools used. These tools aid the user in ensuringaccuracy which in turn reduces days of tedious design tasks tominutes. This allows the designer to focus on fine-tuning andchecking the design.120
DIE SET CREATIONStarting with an existing punch design, this case study will take youthrough the process of creating a die set. The steps of creatinglayout sketches, adding standard components, checking for andresolving interference, adding file properties for estimating, andcreating the die set holes and clearances will all be coveredthrough these case studies.Case Study 5 – 1: Initiate Die Set Creation (Horizontal<strong>Design</strong>).1. Open the file named T5 Strip Layout-T5Part.sldasm. File Location:Desktop\<strong>Training</strong>\Dieset Creation\T5 StripLayout-T5 Part\2. Click Create Dieset from the <strong><strong>3D</strong>QuickPress</strong> toolbar tocreate the die set assembly.3. Set the die set Templates to 00.4. Click to finish the command.a. Note: <strong><strong>3D</strong>QuickPress</strong> will automatically insert the componentsof the die based on the PRL template.5. Input T5 Strip Layout-01 for the filename and click Save.Case Study 5 – 2: Initiate die set Creation (Vertical <strong>Design</strong>)1. Open the file named T5 Strip Layout-T5Part.sldasm. File Location:Desktop\<strong>Training</strong>\Dieset Creation\ T5 StripLayout-T5 Part_Vertical\121
2. Click Insert UDC from the <strong>3D</strong>QP Punch <strong>Design</strong>CommandManager tab to insert the die set assembly.3. Select the Die Sets group and 00 die set template.4. Set the link type to None and select the center point of thedie set size sketch in DSS.Click to finish the command. <strong><strong>3D</strong>QuickPress</strong> willautomatically insert the components of the die based on thePRL template.122
Adding standard components can be done using many techniqueswith SolidWorks and <strong><strong>3D</strong>QuickPress</strong>. This technique is a<strong><strong>3D</strong>QuickPress</strong> method known as a Layout Sketch method. TheSketch is created in any way you would like. However,<strong><strong>3D</strong>QuickPress</strong> offers many options to automate common designlayouts. The sketch is a series of point entities along withdimensions and relationships. These points are used to pattern thecomponents. This Layout sketch can also be reused for othercomponents that will need to be added later. It is recommended toname the sketch for ease of modification. If change is needed, theuser simply edits a point in the sketch to add or remove instancesof the related part(s).Insert Socket Head Cap Screws to the Upper SubassemblyInsert a new sketch in the UPPER die set assembly to locate newscrews.1. Right-click U-T5 Strip Layout-01.sldasm and selectOpen Assembly .2. Select the Front Plane from the feature tree. From the<strong><strong>3D</strong>QuickPress</strong> Sketch Toolstoolbarsselect Layout sketch.3. Select the Legacy Layout Sketch Function .4. Input X-Size 150mm and Y-Size 120mm.5. Click to finish the command.6. Rename sketch1 to Socket Head and close the PointTools dialog box.7. Click Component Layout from the <strong><strong>3D</strong>QuickPress</strong> toolbar.8. Under Part Select select Catalog as the Library Source.Press the Select button and browse to C:\ProgramFiles\<strong><strong>3D</strong>QuickPress</strong>\StandardComponents\Misumi\Socket Head Screw. SelectCBxx-xxx.sldprt.9. Under Part Configuration select CB10-070.10. Under Location Reference select the face indicatedbelow and set the distance from referencelocation to 2mm.123
Note: You may need to click the FLIP button if the screw is notgoing into the plate.11. Under Layout Sketch select the Socket Head sketchfrom the feature tree.12. Set the distance from reference location to 2mm.(Note: You may need to click the Flip button if the screwpreview shows the screws coming out of the plate instead ofgoing into it.)13. Click to finish the command and the socket head screwswill be added to the assembly.Insert Guide Pins to the Upper Subassembly1. Hide the top plates. Right-click UDS-T5 Strip Layout-01& PS-T5 Strip Layout-01 and select Hide .2. Right-click T5Strip Layout-(DSS) and select Open Part.3. Create a Layout Sketch in the DSS part. Select the FrontPlane from the feature tree. Select Layout sketch on the<strong><strong>3D</strong>QuickPress</strong> Sketch Tools toolbar.4. Select the Legacy Layout Sketch Function .124
5. Input X-Size 120mm and Y-Size 100mm.6. Click to finish the command.7. Rename sketch1 to Guide Pins and close Point Tools dialogbox.8. Save and Close the T5Strip Layout-(DSS)part.9. Click Component Layout from <strong><strong>3D</strong>QuickPress</strong> Misc.Tools tool bar.10. Under Part Select select Catalog as the Library Source.Press the Select button and browse to C:\ProgramFiles\<strong><strong>3D</strong>QuickPress</strong>\StandardComponents\Misumi\Guide Pin. Select SGPHxxxxx.sldprt.11. Under Part Configuration select SGPH 13-080.12. Under Location Reference select the face indicatedbelow.13. Under Layout Sketch select the Guide Pins sketch fromthe feature tree under T5Strip Layout-(DSS).sldprt.14. Set the distance from reference location to 0mm.15. Press to finish the command.16. Save and Close the U-T5 Strip Layout-01 assemblywindow.Insert Guide Pins to the Middle SubassemblyIn this scenario you will reuse an existing layout sketch from thecommon DSS part. Organization and reuse are the benefits to thisapproach. Remember, all layout sketches can be found quickly bygoing to the common part to create and edit sketches even thoughthe parts are located in different sub-assemblies. This allows theuser to work in smaller assemblies versus working at the masterassembly which will always be the largest and most complicated.1. Open M-T5 Strip Layout-01 subassembly from the T5Strip Layout -01 assembly.2. Right-click SB-T5 Strip Layout-01 and select Hide .3. Click Component Layout from <strong><strong>3D</strong>QuickPress</strong> toolbar.4. Under Part Selection select Catalog as the LibrarySource. Press the Select button and browse toC:\Program Files\<strong><strong>3D</strong>QuickPress</strong>\StandardComponents\Misumi\Guide Pin Bush. SelectSGBDxx-xx.sldprt.125
5. Under Part Configuration select SGBD 13-20.6. Under Location Reference select the face indicatedbelow.7. Under Layout Sketch select the Guide Pins sketch fromthe feature tree under T5Strip Layout-(DSS).8. Set the distance from reference location to 0mm.9. Press to finish the command. The guide pins are addedto the assembly.10. Save and Close the M-T5 Strip Layout-01 assemblywindow.Insert Guide Pins to the Lower Subassembly1. Open L-T5 Strip Layout-01 subassembly from the T5Strip Layout -01 assembly.2. Right-click DS-T5 Strip Layout-01 & LDS-T5 StripLayout-01 and select Hide .3. Click Component Layout from <strong><strong>3D</strong>QuickPress</strong> toolbar.4. Under Part Select select Catalog as the Library Source.Press the Select button and browse to C:\ProgramFiles\<strong><strong>3D</strong>QuickPress</strong>\StandardComponents\Misumi\Guide Pin Bush. SelectSGBDxx-xx.sldprt.5. Under Part Configuration select SGBD 13-20.6. Under Location Reference select the face indicatedbelow.126
7. Under Layout Sketch select the Guide Pins sketch fromthe feature tree under T5Strip Layout-(DSS).8. Set the distance from reference location to 0mm9. Click to finish the command.10. Save and Close the L-T5 Strip Layout-01 assemblywindow.127
Case Study 5 – 3 : Interference and Clearance designInterference and clearance design is crucial for a tool to functionthe first time it is manufactured. Therefore, <strong><strong>3D</strong>QuickPress</strong> hasenhanced the interference detection capabilities for the diedesigner to quickly find and resolve these areas of collision. Theadded capabilities of <strong><strong>3D</strong>QuickPress</strong> interference detection include:Solid to surface interferenceInterference file short cuts to track and resolve whichcomponents have the interferenceInsertion of interference bodies into the component with atime stamped folder per interference situationSelective targets and tools to control the scope and rebuildtime per calculationCheck for Interference between the Strip and the Stripper Plateand the Die Plate.1. In the T5 Strip Layout-01 assembly, click InterferenceDetection from the <strong><strong>3D</strong>QuickPress</strong> Misc. Tools toolbar.2. Select the die plate (M-T5 Strip Layout) and thestripper plate (L-T5 Strip Layout) so they are listed inthe Targets selection box. Select from the fly-out FeatureManager design tree the Strip Layout part called SL-T5Strip Layout-01 while the Tools selection box isactive.3. Click to finish the command.128
4. Select Yes to the warning message to open the folder.5. Double-click on the links in the folder to open the interferingparts then set display to wireframe.Note: These are Windows shortcuts to the files that haveinterference in them (the Targets), to keep track and easilylocate the files with interferences. It commonly occurs that manyparts interfere and each must be edited to design properclearance.6. Go to the DP-T5 Strip Layout-01 part file. Theinterference bodies (surfaces and or solids) are located inthe part as reference and are also listed in FeatureManagerdesign tree with a time stamped folder name. To makeclearance for these interferences, use the Clearance Toolsin the DieSet <strong>Design</strong> Toolbar.7. In the T5 Strip Layout-01 assembly, Clearance Toolsin the DieSet <strong>Design</strong> CommandManager tab.8. Select the top face of the DS-T5 Strip Layout-01 partfile.9. Select the interference bodies into the Clearance entities.10. Set the Geometry to Rectangular.11. Set the Fillet Radius to 3mm.12. Set the W to 200mm and L to 3mm, and Depth to 10mm.13. Click to finish the command.Tip: After the clearances are created, you can hide theinterference bodies by right-clicking them in the FeatureManagerdesign tree and select Hide .129
Note: If preferred, the interference bodies can also be suppressedor deleted. However, standard relationship dependenciesapply since you potentially could have created a sketchrelation to edges of the interfering body. This is easilyresolved by editing the sketches that have dangling relationsafter the bodies have been deleted or suppressed.Suppression of these bodies is recommended since they willremain in the file for reference without affecting theperformance of the software.130
Adding and Updating File Properties for Current Die SetUsers often require information about the custom (nonstandard)components in a die design. This information isnecessary for estimating material and other reasons. Sincethe design is changing at a rapid pace the user shouldrequest these properties be created and updated regularly ifchanges are occurring. This can be laborious to docomponent by component so <strong><strong>3D</strong>QuickPress</strong> has anautomation tool to calculate and manage these fileproperties.These include:Part X & Y, location from top of die from selected pointX, Y, Z envelopes (horizontal rectangle volume androtated rectangle volume)Part selected for Datum pointProject NameProject Number1. In the T5 Strip Layout-01 assembly, click<strong><strong>3D</strong>QuickPress</strong>, <strong>3D</strong> QuickTools, Die setComponents Properties Update. Change to the topview of the Die and select the lower left corner for the Datumpoint.Tip:2. Click to finish the command.To view the results of this command, open any non-standardcomponent and select File, Properties. Select the Customtab and review XMin_DS (X dimension), Ymin_DS (Ydimension), AMin_DS (Rotation Angle) for the minimumStock Material. Other properties added are highlightedbelow.131
Note: These file properties will not update automatically if a part(s)changes in any way. The Component Properties Update functionneeds to be re-run again to update all parts. XPos_DS – X coordinate of the part centroid of theshown body relative to selected datum YPos_DS – Y coordinate of the part centroid of theshown body relative to selected datum X_DS – Width of minimum bounding box parallel to X-axis Y_DS – Height of minimum bounding box parallel to Y-axis Z_DS – Length of minimum bounding box parallel to Z-axis XMin_DS – Width of Actual bounding boxYMin_DS – Length of actual bounding boxAMin_DS – Orientation of actual bounding box relativeto X-axis132
Create Die Set Holes (Clearance Body Automation)Some holes and clearances are created for certain components.Upon insertion, these components are not automatically clearanceto save time and improve performance. Since the true clearancebodies are not known until the full assembly is created, individuallycreating the clearances is not a recommended design strategy.The recommended design strategy is to combine all of the dieassemblies and components as fast and easy as possible; thenallow <strong><strong>3D</strong>QuickPress</strong> to determine which components needclearance, components that do not need clearance, and whichcomponents need to get clearance externally and internally. This isprimarily based on a part’s File Properties, file location, and subassemblylocation.This is a very powerful cavity (a.k.a. subtraction and or cutting)function. It is executed in a batch mode to maximize effectivenessand save time. The function calculates the many scenarios thatexist since the combinations and logic must be considered for manydifferent component types in one calculation.Currently the only automatic globe function to create all cavities isthe following; the enhancement for the Cut Extrude is almostcomplete for batch mode1. Select <strong><strong>3D</strong>QuickPress</strong>, Dieset <strong>Design</strong>, Create Die SetHoles.2. Check options PD holes and Cut by Inserts. Ensure thatthe Feature Scope option is set to Auto-select3. Click to finish the command. The die set Holes will becut automatically.133
Note: All options available for using die set holes are describedbelow:PD holes – All components (and hidden hole bodies) fromthe Punch <strong>Design</strong> assemblies are computed to create theholes in die set plates and inserts.No ext. ref. – Breaks associativity between the cavities’features cutting bodies. The performance of the system willbenefit if this is checked. However, if a change occurs, thedie set holes will not update. They will need to be deletedand recreated unless manual clearances are created.Typically this is unchecked.Cut by Std. Comp. – Standard components (typicallypurchased components) will be cut by any cavities that runthru them. Typically this is unchecked.Cut by Inserts – Allows inserts to be cut in the punch and/ordie set design. Typically this is checked.DS holes – In rare instances the user may need to selectthe DS for cutting. Typically this is unchecked.Through all – SHCS Automatic hole creation for SocketHead Cap Screws when intersecting any die set plate(s).This is a legacy (discontinued) option from version 1 and isno longer functioning unless the user has version 1 data. Onnewer files, the Component Opening command should beused to create standard components holes going forward.Drill through only – SHCS Automatic hole creation forSocket Head Cap Screws when intersecting any die setplate(s). This is a legacy (discontinued) option from version1 and is no longer functioning unless the user has version 1data. On newer files, the Component Opening commandshould be used to create standard components holes goingforward.134
Propagate color – Transfers the manufacturing information(coloring of individual faces) to all holes that are cut with theCreate Die Set Holes command. The coloring of faces isuseful to a MFG group for the automation of <strong>CAM</strong>programming. The color of the face implies a tolerance andor type of machining for that face or surface. The <strong>CAM</strong>system must offer a Select By Color option whenprogramming the part for this to be utilized. Note: The setupof the color key, naming, and definitions for themanufacturing functions of <strong><strong>3D</strong>QuickPress</strong> are covered in theAdministrative Setup and Customization chapter later in thistraining manual.135
Chapter 6DETAIL PARTS Smart Hole Table Section Line Tools Smart Hole Callout Edge Annotation Advanced Ordinate Dimension Apply Manufacturing Information to Components Sort Balloons136
<strong>3D</strong>QUICKPRESS DETAIL FUNCTIONSCase Study 6 – 1 : <strong><strong>3D</strong>QuickPress</strong> DetailingThis case study will cover the detailing functions provided by<strong><strong>3D</strong>QuickPress</strong>, customization of the manufacturing color database,and setting up components with manufacturing color information.Create <strong><strong>3D</strong>QuickPress</strong> Smart Hole Table1. Open the drawing file DP-0052-01.slddrw. File location:Desktop\<strong>Training</strong>\Detailing\Hole Table\DP-0052-01.slddrw.2. Select Smart Hole Table from the <strong><strong>3D</strong>QuickPress</strong>Drawing and Machining toolbar.3. Select a vertex as the origin.4. Under the Format parameter select <strong><strong>3D</strong>QuickPress</strong> Format.5. Click to finish the command.The <strong><strong>3D</strong>QuickPress</strong> Smart Hole Table will identify and countdifferent types of holes. The hole data is displayed in the featuretree for review and modification before completing the table.Selecting one of the identified holetypes in the top selection box under theHole Type parameter will display thetag prefix, size callout, and startingitem number. These parameters canbe changed for each hole. Holes canalso be removed from the table byselecting the hole from the Hole Typelist and pressing the Delete Typebutton.137
6. Click to finish the hole table dialog. A text based holetable will be generated. The tag of each hole will be placednext to the hole in the drawing view.7. Drag a window around the first half of the hole table andmove it onto the drawing paper using the arrow keys on thekeyboard. Repeat this process for the second half of thetable.8. Below shows some of the result of the hole table created.138
Add EDM Sketch Holes to the Hole Table1. Select Smart Hole Table from the <strong><strong>3D</strong>QuickPress</strong> Drawingand Machining toolbar.2. Select the lower left corner of the die plate as the origin.3. Under the Format parameter select <strong><strong>3D</strong>QuickPress</strong> Format.4. Enable the Sketches and Edges option, and selectSketch44 from the graphics area.5. Select the EDM hole sketch “Sketch 44” into the Sketchesand Edges area.6. Click to proceed.7. Change the Tag Prefix to P.8. Click to finish the command.9. Move the new table onto the drawing.10. Save the drawing.139
Create <strong><strong>3D</strong>QuickPress</strong> Section Line1. Select <strong><strong>3D</strong>QuickPress</strong> Section Line from the<strong><strong>3D</strong>QuickPress</strong> Drawing toolbar.2. Select entities to be sectioned through. A red line will beshow for the preview of the section line.3. Click to finish the command.4. Click and drag vertical edges of this sketch to make anyadjustments.5. Select the section line (right click on any segment and pickSelect Chain), and click Section View from the viewlayout toolbar.6. Place the section view below the current drawing view.140
Create <strong><strong>3D</strong>QuickPress</strong> Smart Hole Callout1. Select Smart Hole Callout from the <strong><strong>3D</strong>QuickPress</strong>Drawing toolbar.2. Select the two edges indicated below.3. Click to finish the command. The hole callout with thesize and depth information will be created automatically.Create Edge Annotation1. Select <strong><strong>3D</strong>QuickPress</strong> Mark Edge from the <strong><strong>3D</strong>QuickPress</strong>Drawing toolbar.2. Select the highlighted edges.141
3. Enter Wire Cut for Text, 0.5 for Font Height, and 0 for TextOffset.4. Click to finish the command.Create <strong><strong>3D</strong>QuickPress</strong> Ordinate Dimension1. Select <strong><strong>3D</strong>QuickPress</strong> Ordinate Dimension from the<strong><strong>3D</strong>QuickPress</strong> Drawing toolbar.2. Select the vertical and horizontal side edges as theDimension References.3. For Selected Entities, pick in the Select edges to insertordinate dimensions box to make it active. Select edgesfrom some features.Note: The face of this part could have been selected gatherordinate dimensions for all of the edges. However, this createsnumerous dimensions that require cleanup. For the timerestraints in this class, just a few edges are chosen instead.4. Select Four Side for Dimension Placement.5. Enable Use Mfg. Info.6. Click to finish the command.7. Save and Close the drawing.142
Apply Manufacturing Color Information to Components andDrawingsApplying manufacturing color is a pre-processing function to addmanufacturing information to geometry by applying specific colorsto model faces. Setting up the Mfg Colors is covered in Chapter 11Setup and Administration of <strong><strong>3D</strong>QuickPress</strong>.1. Open the drawing DP-0052-01_Color.slddrw. Filelocation: Desktop\<strong>Training</strong>\Detailing\Hole Table\2. Right-click Drawing View 1 and select Open Part .3. Click Mfg. Color Tool from the <strong><strong>3D</strong>QuickPress</strong> Misc.Tools toolbar.4. Pick in the orange square next to WEDM1 to make it active.5. Select the indicated face below to select the cavity feature.Click Set color for selected feature to assign color forthe cavity feature.6. The mfg. code “WEDM1” will be added to the front of thecavity feature and all faces of the cavity feature will becolored. This may require you to rebuild the part.143
7. Hold control and select the 4 outside faces of the plate, andselect Mill1 as the manufacturing information.8. Click Set color for selected face to assign color for sidefaces.Continue applying manufacturing methods to the part asindicated below. Use Set color for selected face for Mill1and JG1. Use Set color for selected feature for WEDM1,CB, and Drill1.9. Select Sketch44 on feature tree, and select Drill1 as theMfg. information. Click Set color for selected sketchassign color for the sketch.10. Save and close the part.to144
Sort BOM Balloons for Assembly DrawingThe Sort Balloons command is used to modify BOM balloons thatSolidWorks creates. It is an editing function to sort the balloon in alogical order for ease of blue print reading. The balloon number isa new file property which is created and substituted once the sortcommand is utilized. The new file property is added to the part filesthat are unique to the current project.To sort SolidWorks BOM balloons:1. To get started Open the drawing U-T5 Strip Layout-01.SLDDRW File location:Desktop\<strong>Training</strong>\Detailing\Balloons\2. Pre-select all balloons by box selecting over the entire area.3. Click <strong><strong>3D</strong>QuickPress</strong>, Drawing & Machining, SortBalloons.4. Select the BOM template, browse to ProgramFiles\<strong><strong>3D</strong>QuickPress</strong>\<strong><strong>3D</strong>QuickPress</strong>Templates\BOM Template & Click OK.5. Click Yes to create and place the BOM.145
6. The balloons are now in a Clockwise sequence after the sortis executed.Note: The standard components are identified as “S#”; S forStandard, then the number callout. Since these are shared filesamongst many projects <strong><strong>3D</strong>QuickPress</strong> does not add a unique fileproperty to the part itself. Standard components are tracked witha text file database per project noting the quantity and thedescription of these components. The definition of a standardcomponent is any component with a FILE PATH located outsidethe current working directory and or Project Folder.7. Save and Close the drawing.146
Chapter 7DESIGN CHANGE Change Operations in a Strip Layout My Blank Method for Easy 2D Changes Modify the Original <strong>3D</strong> Part and Update <strong><strong>3D</strong>QuickPress</strong>data147
CHANGE OPERATIONS IN THE STRIP LAYOUTEngineering changes happen in every aspect of die design. Theability to easily and rapidly make changes to a tool design is a keycapability of the SolidWorks/<strong>3D</strong>Quicktools software. Whether youare changing the original <strong>3D</strong> part model or if you are modifying thedie set drawings, the associative nature of the software wasdesigned with the change process in mind. In this chapter, you willstudy several different case studies to illustrate these techniques.There are many ways to make changes to designs and with that inmind the user should understand that there are differentapproaches depending on the status of the release process.Another consideration to making changes is the time available.Some changes could be made at the product design stage or thepart level. Other changes may be more practical if they are madeat the flat blank tooling level, while others can be made at the detaildrawing level. <strong><strong>3D</strong>QuickPress</strong> offers many tools and techniques toapproach change with the design and manufacturing processes.Case Study 7 – 1 : Blanking Punch ProcessIn this scenario, an engineering change has been issued to make achange to the type of operations to develop the strip layout. Hiding,deleting, reordering, and creating new operations are covered inthis case study.Creating the New Punching Operation1. Open strip layout part named T5-1 StripLayout.sldprt location: Desktop\<strong>Training</strong>\<strong>Design</strong>Changes\2. Click File, Save as and save the part as Blankoff.3. Delete all notching punches except Notching 1 and SplitNotching 1. To delete a notching feature, right-click thenotching feature in the feature tree and select Delete.148
5. Rebuild the file. The part now has rebuild errors due todeleting items that were referenced in other features. SelectStop and Repair on the message box to fix the error.6. A dialog box pops up to show us that the Mirror1 feature hasthe error. Close this box.7. Using the SolidWorks Feature Manager design tree, rightclickon Mirror1 and select Edit Feature . The mirrorfeature was looking for the notching feature that wepreviously deleted. Select to finish the command andconfirm that the notching body is no longer needed in themirror.8. Right-click Notching 1 from Strip Layout <strong>Design</strong> Tree andclick Edit Sketch.9. Delete all the sketch entities.10. Establish cutting clearance for the blanking punch. Selectthe upper blank and Offset Sketch Entities a distance of0.07mm to the inside.11. Click to finish the offset command.12. Exit Sketch .149
13. Rebuild the file to ensure no errors were caused by thechange.14. Right-click Unprocessed Features from the StripLayout <strong>Design</strong> Tree and select Create Notching Feature.15. Create a blanking punch for the lower blank. Select thelower blank and Offset Sketch Entities a distance of0.07mm to the inside.16. Click to finish offset command. Exit Sketch .17. Rename Notching 1 to Blank1 and Notching 4 toBlank2.18. Right-click Blank 1, select Apply To, set to station 5.Repeat for Blank 2.19. Right-click Unprocessed Features from the Strip Layout<strong>Design</strong> Tree and select X-Form Part. Select theTutorial-Align [1] component in the Associated Blankwindow of the feature tree and set the Z distance to -10mmunder Translation.20. Click to finish the command.21. Right-click Unprocessed Features from the Strip Layout<strong>Design</strong> Tree and select X-Form Part. Select theTutorial-Align [2] component in the Associated Blankwindow of the feature tree and set the Z distance to -10mmunder Translation.22. Click to finish the command.150
23. Right-click Xform Part 1, select Apply To, set the stationto 5. Repeat for Xform Part 2.24. Save the part.Changing the Original Solid Part GeometryPart designs change constantly. Therefore, <strong><strong>3D</strong>QuickPress</strong> takesadvantage of the parametric nature of SolidWorks to allow thesechanges to update the strip layouts automatically.1. Open the original part named Tutorial-Align.sldprtlocation: Desktop\<strong>Training</strong>\<strong>Design</strong> Changes\. Ifthe part is already open, use Ctrl + Tab to activate thatwindow.2. Modify the original part. Sketch an 8mm diameter circle onthe midpoint of the rectangular opening in the part. Extrudecut , Through All.3. Right-click Sheet Metal Object from the <strong><strong>3D</strong>QuickPress</strong>feature tree, and select Rebuild Unfolding Model.151
4. Switch to the Strip Layout window (Blankoff.sldprt).Right-click on Strip Layout at the top of the<strong><strong>3D</strong>QuickPress</strong> feature tree and select Rebuild StripLayoutModel.5. Activate any piercing geometry that may have changed,using right-click, Activate Here.6. Save the part.152
MY BLANK METHODThe <strong><strong>3D</strong>QuickPress</strong> My Blank option is used for two reasons: first iteliminates the task of fixing bad models that have been imported,and second it allows for quick editing of part data to aid design formanufacturing. When making a design change using the My Blankoption, changes can be made to the My Blank Layout sketch. Ifchanges must be made to the part model, then those changes alsoneed to be made to the My Blank sketch for the updates to show inthe Strip Layout, Punch <strong>Design</strong>, or Die Set <strong>Design</strong>.Case Study 7 – 2 : My Blank ProcessCreating a My Blank1. Open the part file cylindrical fix face.sldprt. FileLocation: Desktop\<strong>Training</strong>\My Blank\ Cylindricalfix face.sldprt.2. Right-click My Blanks from the <strong><strong>3D</strong>QuickPress</strong> feature treeand select Add My Blank. This creates a new blank sketchto modify unfolding results listed beneath the My Blanksfeature.3. Hide the <strong><strong>3D</strong>QuickPress</strong> model by toggling off ShowUnfolding Modeltoolbar.from the <strong><strong>3D</strong>QuickPress</strong> Unfoldinga. Modifying the My Blankb. In this example two areas of the My Blank will be modified.4. First, the inside hole was created when the part was in thefolded position. For manufacturing purposes the hole will bepierced in the flat blank layout.5. Second, fillets will be added to the corners of the tabs.6. Right-click My Blank 2 and select Edit Sketch.7. Hold control and select both segments of the circle.153
9. Select Bounding Box from the <strong><strong>3D</strong>QuickPress</strong> SketchTools toolbar. Under Geometry select Circle, and underEnlarge\Shrink select By Offset Distance and set thevalue to 0.00mm. Click to finish the command.10. Select the original spline segments (look for cursor feedbackto ensure you are selecting the spline), and check thebox For Construction in the feature tree.11. Select the new sketch circle and add a Fixed relationshipto lock it in place.12. Add a Sketch Fillet with radius of 1mm to the insidecorners of the blank. The addition of the fillet will update thepunches in the Punch <strong>Design</strong>.13. Click to finish the command.14. Close the sketch from the confirmation corner.15. Show the <strong><strong>3D</strong>QuickPress</strong> model by selecting Show UnfoldedModel from the <strong><strong>3D</strong>QuickPress</strong> Unfolding toolbar to seethe updates made to the My Blank surface.16. Right-click My Blank 2 from the <strong><strong>3D</strong>QuickPress</strong> feature treeand select Hide Reference Surface.17. Save and close the part.154
MODIFY ORIGINAL <strong>3D</strong> PART AND UPDATE <strong>3D</strong>QUICKPRESSDATAMaking changes to the original <strong>3D</strong> part is a common task. In thiscase study, the unfolded part, strip layout design, and punch designassembly are already completed. A design change from theproduct designers calls for the tooling to be updated to reflect thesepart changes. Using sketching tools, the user will make somemodifications to the original solid model part. Following thechange, the <strong><strong>3D</strong>QuickPress</strong> data needs to be updated for theunfolded part, strip layout part and the punch design assemblies.Case Study 7 – 3 : <strong>Design</strong> ChangesMaking Changes to the <strong>3D</strong> Product <strong>Design</strong> Model1. Open punch design assembly 0108-Front_Plate.sldasm. File location:Desktop\<strong>Training</strong>\<strong>Design</strong> Changes\0108-Front_Plate\2. Switch to the Front_Plate.SLDPRT window using Ctrl +Tab.3. Click Toggle Unfolding Display from the <strong><strong>3D</strong>QuickPress</strong>Unfolding toolbar to display the solid model of the part.4. Right-click on the face below and Insert Sketch .5. Complete the sketch as shown below.155
6. Click Insert, Cut, Extrude and set the end condition toThrough All. Click to finish the command.7.8. Click Toggle Unfolding Display from the <strong><strong>3D</strong>QuickPress</strong>Unfolding toolbar to display the sheet metal part.9. Right-click Sheet Metal Object from the <strong><strong>3D</strong>QuickPress</strong>feature tree and select Rebuild Unfolded Model.10. Switch to the Front_Plate Strip Layout.SLDPRTwindow using Ctrl + Tab.11. Right click Strip Layout from the <strong><strong>3D</strong>QuickPress</strong> feature treeand select Rebuild Strip Layout Model.12. Drag and drop Piercing 27 and Piercing 28 fromUnprocessed Features to Station 2 to activate thesefeatures.13. Switch to 0108-Front_Plate.SLDASM.14. Click Yes when asked to rebuild the punch design.156
16. Right-click 0108-Piercing 24.1 (found under the0108-UC assembly) in the FeatureManager design tree andselect Hide . Then, right-click the red cutting punchsurface for Piercing 27 and select Create Punch.17. Right-click the red cutting punch surface for Piercing 28and select Create Punch.18. Save and close the assembly.157
Chapter 8CHANGEOVER TOOLING Changeover Tooling Manager (COT) Add Multiple Strips in Punch <strong>Design</strong> Share Multiple Operations within the <strong>Design</strong> Copy / Rename for Multiple StripsStill In Development158
CHANGEOVER TOOLINGChangeover tooling is a common practice in the industry to producesimilar parts using the same tooling through proper tool setup.<strong><strong>3D</strong>QuickPress</strong> simplifies the design of changeover tooling andproduces tooling setups automatically by adding die componentsnames to the PRL’s or on the fly in a current design by using anXML file to customize.What is a XML Notepad fileXML (Extensible Markup Language) data file that uses tags todefine objects and object attributes, formatted much like an HTMLdocument, but uses custom tags to define objects and the datawithin each object; can be thought of as a text-based database.The software can be downloaded to a machine by following thepathhttp://www.microsoft.com/downloads/en/details.aspx?FamilyID=72d6aa49-787d-4118-ba5f-4f30fe913628&displaylang=enCustomize the XML Notepad fileTo add new or change process names XMT NotePadDie set structure and component naming is controlled by an xmlfile. The XML file has 4 sections set up Naming Convention,Process, Part and Assembly document type. For each section,<strong>3D</strong>QP reserved some IDs which must not be changed.159
Launching XML NotePad file for Customizing1. Launch XML NotePad and open <strong>3D</strong>QP.XML. File location:Program files\<strong>3D</strong>QP\Database\<strong>3D</strong>QP.xml2. Expand DSS folder3. The files in the DSS are restricted ID’s.4. Expand the Component folder.Inside of the Components folder you will find 4 sub-folders calledPlates, Inserts, Strip, and Standard parts.5. Expand the plates folder160
The this folder you will find descriptions of plates that are in the diedesign, any or all of these names can be changed to meet yourdesign standards, but keep in mind that current PRL’s may alreadybeen set with the current names. The plate group is already setuptop to bottom similar to a cross-section of a die design, so whenadding a new plate place it in its correct location.Add a New Plate to the Group.6. Right click on the folder above or below the location youwould like to add a plate and select Copy.7. Right click again at the same location and Paste.8. Once you have pasted the new folder at the same location,drag it to the correct tree location and drop it as shown bythe arrow below.9. Then rename both the ID and the My_Name comments asneeded.10. The groups called “Plates” are set for all the plates insertinginto the Die Set <strong>Design</strong>.11. Inserts are all Items inserted into the Punch <strong>Design</strong> with theGuide Rails being the exception.161
12. The Strip folder will have the Strip Layout and the UnfoldedModel.13. Standard Components are all features that are insertedfrom the standards folder, SHCS, Guide Pins, ect.14. Relationship between <strong>3D</strong>QP.xml and the COT Manager162
Launching the COT Manager1. Change over Tooling Manager COT is launched by selectingthe menu <strong>3D</strong>QPress\<strong>3D</strong>QTools\Macro.2. Select Lab 2 Tool Display Tab.163
3. The COT tab will automatically create on the SolidWorksTask Manager Pane.164
Main User Interface165
The Simplified Tree Manager1. By selecting the tree manager Icon this will allow the userto control how many levels you will see in the SolidWorksFeature Manager Tree from the COT Manager.2. Selecting the 1 st pull down tab allows you to decide howmany Levels Deep you will see in the feature manager tree.3. Selecting the “Show” pull down this will allow you to chooseto see Assemblies, Part or all files.4. The Refresh Button simply refreshes the tree displayed.166
Search for Detail Number1. The Find Tab allows the user to search for a multiple detailsafter a design has been completed, the detail number will beentered into the box, if searching for multiple details add acomma between them, by selecting search, <strong>3D</strong>QPress willisolate the detail.Utilities Tool Bar1. The <strong>3D</strong>QP Tools pull down tab.2. Assign – Setting details as Module Number or StationNumbers.3. Reset Display – Show all top level components in theassembly except those suppresses in the graphics window.4. <strong>Design</strong> Replication – Reuse current or older design for aNew Strip Layout or New Punch <strong>Design</strong> Assembly.3 different processes are handleda) New Strip Layout for an old or new Punch <strong>Design</strong>.b) New Strip Layout for an old or new Die Set <strong>Design</strong>.c) New Punch design for an old or new Die Set <strong>Design</strong>.167
Refresh Tab - After a new property has been assigned tothe assembly, by pressing the Refresh Tab the tree in theCOT Manager will update.Explode Tab – After an assembly is made from multipledesigns then the explode tab can be used to separate thedesigns for viewing.Share Component Tab – This will allow you to share acomponent from current design to a new design.Compare Tap – Allows you to compare components to eachother to see if they are identical.+ (Add) – (Subtract) i (Check) Will adding theproperties to the Die Set Structure, a Process, or aComponent Name. By selecting the SolidWorks part orassembly then selecting one of these Icons you can Add aproperty, Subtract a property or Check to see what propertyhas already been added if any.PRL Customization Check ListDie Set PRLAll die set PRL’s must have the file property “<strong>3D</strong>QPDocType” assigned to U,M and L assemblies with values85U, 77M and 76L respectively.Note: In order to use the Copy Die Set function of the COTmanager the above properties must be set, otherwise the U,M and L will retain the old name. If this happens the user canuse the <strong>3D</strong>QP utilities to separate them and continue todesign, although the die set template should be updatedbefore it is used again.168
1. Open the die set template and select the “U” assembly fromthe feature manager tree of SolidWorks, open the COTManager select the Setup Tab.2. 1 st test to see if the assembly has a property set already byclicking on the Check Tab . If a property has beenalready set, features will high light inside the SetComponent Information.3. If nothing high lights then continue by selecting the Add Tab. By selecting the Add icon will add the property ofDocType – 85U.4. To finish setting up the die set template continues with the“M” and “L” with the appropriate selection to complete thesettings.Setting of other PRL’sAll other PRL’s must be set with properties that describe aComponent Name or an operation, some PRL’s may haveboth setting inside them.Setting a Process1. A Process is described as a main assembly of multipleassemblies or part files of a PRL file.2. A Process can be added on the fly in a design setting afterthe PRL has been inserted.3. The PRL should be marked and updated appropriatelybefore using again.4. By setting the main assembly this will allow the user to show/ hide the full assembly in the design.169
Setting a Component Name1. A Component is described as a sub-assembly or a part fileinside of a main assembly, by setting them as componentnames the user will be able to show / hide individualcomponents from the U, M, L.2. This Component Name can also be added on the fly in adesign after the PRL has been inserted.3. The PRL should be marked and updated appropriatelybefore using again.Creating a <strong>Design</strong> Replication1. New Strip Layout for an old or new Punch <strong>Design</strong>.2. New Strip Layout for an old or new Die Set <strong>Design</strong>.3. New Punch design for an old or new Die Set <strong>Design</strong>.2 nd Option – New Strip Layout1. Open a completed Die Set <strong>Design</strong>.2. Select the <strong>Design</strong> Replication Tab.170
3. Select option 2 (I have a new strip layout for existing die set).4. Insert the new Project Name, Project Number, Strip LayoutLocation, and the target path where the files will be save at.5. The COT Manager continues re-naming the UC, MC and LCassemblies inside the new design. Keep in mind the partsand assemblies that it is coping are still sharing.171
6. The COT Manager continues re-naming the U, M and Lassemblies inside the new design. Keep in mind the partsand assemblies that it is coping are still sharing.7. After the copy is complete the user must open the Punch<strong>Design</strong> and find the New Strip Layout8. Go to the feature manager tree and un-suppress the StripLayout, SolidWorks will ask you to locate the new strip,browse to the location of the new strip layout and select.9. Go to the main die set design and insert the new strip layout.Create Change Over Tooling Master1. While you are in the current Die Set <strong>Design</strong>, open anew Assembly template and save it as the MainAssembly.172
2. Select the setup tab of the COT manager, select thenew main assembly in the feature manager tree andthe Change Over Tooling Master, then set theproperty.3. Insert the 2 nd die set design into the new MainAssembly.4. Select the refresh icon on the COT Utilities bar.5. After refreshing the 2 nd die assembly will be setup inthe COT Manager.173
174
Chapter 9CONCURRENT DESIGNENVIRONMENT Set up a Concurrent <strong>Design</strong> Understand the Concurrent <strong>Design</strong> Add <strong>Design</strong>ers to a project Remove <strong>Design</strong>ers from a project Combine <strong>Design</strong>ers175
CONCURRENT DESIGN ENVIRONMENTThe <strong><strong>3D</strong>QuickPress</strong> Concurrent <strong>Design</strong> Environment is used to aidtool designers who are working collaboratively on the same project.This allows designers and engineers to work continuously throughthe duration of the project without the threat of interference fromothers working on the same project.A master punch assembly is created along with sub-punchassemblies which are distributed to different designers. Anychanges on the sub-punch assemblies will update the masterpunch design assembly. Sub-punch assemblies have their ownstrip layout display which can be controlled independently of othersub-punch assemblies and the master punch assembly. Thismechanism is what allows multiple designers to work concurrentlybut safely on the same project.Case Study 9 – 1 : Punch <strong>Design</strong> with Multiple UsersSetting Up The EnvironmentThis case study sets up and manages a concurrent design process.The project is starting with two users on one tool design.1. Open the file named Concurrent.sldprt. File location:Desktop\<strong>Training</strong>\Concurrent <strong>Design</strong>\2. Click Create Punch <strong>Design</strong> from the <strong><strong>3D</strong>QuickPress</strong>toolbar. Enable the Multi-User option.Info:Project Name – ConcurrentProject No. – 1Naming Convention – *1-*3Check Changeover ToolingDie Set – 00LibraryRound Punch (Straight) – Misumi StraightRound Punch (Step) – Misumi Round StepMulti-UserNaming Convention – **-*#1No. of Users – 23. Click to finish the command.4. Click to close the Component Clearance dialog acceptingthe default values.176
Understanding the Concurrent <strong>Design</strong> File StructureSub-folders are created inside the project folder for each of theassigned designers. Engineers will store their work in theirassigned folder. The master assembly will reflect the combinedresults of all sub-punch designs. Only one individual will have therights to modify the master strip layout.Each individual sub-punch design will be limited to a range ofstations. The display of the strip layout for each sub-punch designcan be controlled by the individual user.177
Components that are inserted in a sub-punch design assembly canonly be seen inside that sub-punch design assembly and themaster punch design assembly.178
Case Study 9 – 2: Managing UsersThe concurrent design environment supports the addition, deletion,and combining of multiple users’ work at any stage of the designprocess. This can be done by going to <strong><strong>3D</strong>QuickPress</strong>, Punch<strong>Design</strong>, Multi-User.Adding Users1. Click <strong><strong>3D</strong>QuickPress</strong>, Punch <strong>Design</strong>, Multi-User, Add.AddNo. of Users – number of users to beadded to current master punch designStations – define stations to becontrolled by each new user2. Click to go to the next screen.Die Set StructureUse existing – use the existing die setstructure of the punch designDerived from existing – use a new dieset structure that is derived from theexisting oneDie Set – set the die set structure touse in the list3. Click to go to the next screen.Die Set Center Use existing – use the existing die set center of thepunch design Derived from existing – use a new die set center thatis derived from the existing one Die Set – set the die set center to use in the list4. Click to finish the command.Deleting Users1. Click <strong><strong>3D</strong>QuickPress</strong>, Punch <strong>Design</strong>, Multi-User, Delete2. Select the sub-punch design that will be deleted.3. Click to finish the command.Combining Users (Sub <strong>Design</strong>s)1. Click <strong><strong>3D</strong>QuickPress</strong>, Punch<strong>Design</strong>, Multi-User, Combine.2. Select the two sub-punch designsthat will be combined.3. Click to finish the command.179
180
Chapter 10ADMINISTRATION ANDCUSTOMIZATION Adjust File Behaviors General Environment Setup Introduction to PRLs Create PRLs Create Die Sets PRLs181
CONFIGURE <strong>3D</strong>QUICKPRESSThe proper setup and configuration of <strong><strong>3D</strong>QuickPress</strong> is essential toeffective progressive die design. File behavior, custom properties,and manufacturing information are all specific areas of<strong><strong>3D</strong>QuickPress</strong> that are configurable to the needs of anorganization.Adjusting File BehaviorsThe Special Command option within the <strong><strong>3D</strong>QuickPress</strong> pull-downmenu offers several options that allow the user to file behavior asthey are loaded into the working environment.Open File without <strong><strong>3D</strong>QuickPress</strong> DataWith this option turned on, any file opened will be loaded withoutany <strong><strong>3D</strong>QuickPress</strong> data, such as unfold and strip layoutinformation.This function is very helpful when troubleshooting a technicalproblem between SolidWorks software and the <strong><strong>3D</strong>QuickPress</strong> Addin.By disabling the <strong><strong>3D</strong>QuickPress</strong> data from a technical supportscenario, the software can identify where and why a problem maybe occurring.Disable Automatic Strip Layout (SL) OpeningWith this option turned on, a punch design assembly opens withoutthe strip layout. Only the assembly document is loaded. This optionwill allow users to save system resources if needed on largeassemblies.Beginner ModeWith this option turned off, SolidWorks will allow the creation ofexternal references. An external reference is created when onedocument is dependent on another document for its solution. If thereferenced document changes, the dependent document changesalso. Upon installation this option is turned on by default.182
Refresh Testing FlagsFrom time to time, <strong><strong>3D</strong>QuickPress</strong> developers will allow users topreview and use “soon-to-be-released” enhancements. Thesefunctions are not officially released, so the user may choose todisable or enable these commands or options. This functionallows the user to turn these functions on or off. A Testing Flag isa registry entry that enables or disables a function or capability ofthe <strong><strong>3D</strong>QuickPress</strong> software. This function eliminates the need forregistry modification by the user. See Release Notes for furtherdescription of enhancements and fixes to the software locatedunder the Help menu.<strong><strong>3D</strong>QuickPress</strong> Custom Properties ManagerThe <strong><strong>3D</strong>QuickPress</strong> Custom Properties tab is found on SolidWorkscommand manager under the <strong><strong>3D</strong>QuickPress</strong> Misc. Tools tab calledFile properties. By enabling this function, <strong><strong>3D</strong>QuickPress</strong>automates entries of properties such as company standards,reducing tedious repetitive data entry. All properties are added toSolidWorks custom properties. Below is the process to set the fileup.These properties are configured using the AFP-Group text filelocated in: C:\ProgramFiles\<strong><strong>3D</strong>QuickPress</strong>\DataBase\AFP_Group.txt. This filecan also be accessed inside of SolidWorks on the <strong><strong>3D</strong>QuickPress</strong>Misc. Tools toolbar. From the File Properties command, select editto access the text file.183
As shown above these properties are organized in groups. The #symbol indicates a group. The description of the group directlyfollows the # symbol. The user can create as many groups asneeded to effectively organize the data.Each property line following a group callout specifies a propertyname found in the company's SolidWorks title block. The syntax forthese callouts is as follows:[SolidWorks Property Name], text, The < > symbols around the options are only necessary if there aremultiple options entered. Otherwise, they may be excluded.Shown below is a sample of the custom information in the titleblock. This is the information that will propagate from theSolidWorks Custom Properties of each detail. Please consult theSolidWorks Drawing <strong>Training</strong> manual on "How to setup."184
<strong><strong>3D</strong>QuickPress</strong> File Properties EditingThis command is meant for the customization and setup of the fileproperties group data.Note: In a large implementation of <strong><strong>3D</strong>QuickPress</strong> this only shouldbe modified by the administrator of the system.Editing the group configuration file which is located in/AFP_Group.txtThis is a text file with simple definition and should be used tocustomize the group name and the content of the group. Theparameters that make up this content are:Properties that are listed in the groupThe default value per propertyPull-down list valuesThese values are available for the user to quickly changewith a mouse pick versus manually typing text values helpingto avoid typos and assure acceptable company bestpractices (standard tables) are utilized185
Case Study 10 – 1: How to customize SolidWorks FileProperties inside <strong><strong>3D</strong>QuickPress</strong>Add a Group for Specific Customer Related Properties1. Click New and start a new part file using any template.2. Click File Properties from the <strong><strong>3D</strong>QuickPress</strong> Misc.Tools toolbar to launch File Properties Editor.3. Click Edit button4. Add the following lines in Note Pad.#Customer Info.Customer Part No., text,Customer name, text,Description, text,5. Save and exit notepad.6. Click Exit button to exit File Properties Editor.7. Click File Properties from the <strong><strong>3D</strong>QuickPress</strong> Misc.Tools toolbar to launch File Properties Editor re-initializingthe group file.8. Click the dropdown under Grouping and Customer Info willnow be listed.186
SET UP COLOR INFORMATION FOR UNFOLD FEATURESFeature Color Information<strong><strong>3D</strong>QuickPress</strong> can color code the features inside the model whenthe unfolding process begins. These can be customized to yourspecifications, the color coding of part faces is extremely helpfulwhen the un-folded part is used inside the strip layout.Where to find it: <strong><strong>3D</strong>QuickPress</strong>, Options, Color SettingOpen the Color Info command, and select Edit Color Setting.Colors of unfolding sheet metal object top and bottom faces shouldnot be change because it follows the same color as setting top andbottom faces inside user define.187
Matching the colors of the unfolded and the strip layout will helpwith consistency.188
SET UP PAINT MANUFACTURING INFORMATIONManufacturing Information<strong><strong>3D</strong>QuickPress</strong> can color code the model based on manufacturingmethods, providing direct visual cues as to the manner of thesemanufacturing methods. These can be customized to yourspecifications under the Paint Mfg. Info menu. The color coding ofpart faces is extremely helpful when the part is transferred to <strong>CAM</strong>systems. Masking is used for selections during programming.Note: Not all translators support color, nor do all <strong>CAM</strong> systemssupport selection by color.Where to find it: <strong><strong>3D</strong>QuickPress</strong>, Paint Mfg. InfoOpen the Paint Mfg. Info command, and select Edit Color Setting.In the Edit Color setting window you can add/delete manufacturinginformation. The “name” should be a shortened description of theoperation. The color can be set by double clicking inside the cellfor each method. The precision will control the number of decimalplaces in the hole chart when using the <strong><strong>3D</strong>QuickPress</strong> hole chartfunction.189
Tip:For the best results, plan the machining operations beforeadding information. This will keep operations in order. Seethe example above.Note: For the manufacturing color information to be propagated toall part walls automatically, this information must be added toall current and new Production Ready Libraries prior toworking in <strong><strong>3D</strong>QuickPress</strong>.The manufacturing information must be added to hardware filesinside of <strong><strong>3D</strong>QuickPress</strong> located C:\ProgramFiles\<strong><strong>3D</strong>QuickPress</strong>\Standard components\allfasteners. Manufacturing information need not be applied to allhardware files, only the files you will use.The Mfg. Color Info database fileSetting up manufacturing color information is a pre-processingfunction to add manufacturing information to geometry by changingface color. The color code map to machining code is set up in atext file located in C:\ProgramFiles\<strong><strong>3D</strong>QuickPress</strong>\DataBase\<strong><strong>3D</strong>QuickPress</strong>_AHT_MfgInfo.txt.The format of the data file is shown below. The precision for metricand inch unit can be defined for each manufacturing process. Asingle RGB color code is assigned to each manufacturing process.#128 128 255 Drill1 Pecking Drill 1 3#255 128 255 CB CounterBore 1 3#128 64 64 Mill1 Pocket Mill 1 3#255 128 0 WEDM1 WireEDM 2 cut 2 4#255 255 255 JG1 Jig Grind 3 5#228 168 27 EDM EDM 2 4#235 219 163 Reaming Ream 2 4#0 255 255 Grinding Grinding 2 4#255 43 43 Tapping Tapping 1 3190
Case Study 10 – 2 : Setting up Mfg. Color Info.Customize Color Codes1. Click <strong><strong>3D</strong>QuickPress</strong>, Drawing & Machining, Paint Mfg.Info.2. Click Edit Color Setting to launch the Color Settingswindow.3. Click Add to insert a new line and input EDM1 for Name andBurn Clearance for Description. Select Red color.4. Click OK and then Yes to confirm the modification of setupfile.5. Click to finish the command.Applying to Standard Components with Pre-Defined HolesManufacturing information can be automatically inserted whenusing the <strong><strong>3D</strong>QuickPress</strong> standard hardware library. This has to besetup for each fastener supplier that will be used. This informationis setup using predefined hole information.Defining manufacturing information is also supported on predefinedholes of standard components. The manufacturing color and datawill be applied when the hole is inserted into the part if thedefinitions were set up prior to the insertion.191
Where to find it: <strong><strong>3D</strong>QuickPress</strong>, Component Layout, Pre-Defined HoleIn the Pre-Defined Hole menu, there are 3 positions that youneed to set; the start, middle and end.As an example:Select the start position.Then select the drop down menu next to the wrench.Set this to Counterbore.Repeat this process for the middle and end positions usingdrill and tap respectively.For Socket Head Cap Screws (SHCS) you will need to setthe clearance for the head . Select drill from the wrenchdropdown menu located above the position field.192
REPEAT this with all hardware in <strong><strong>3D</strong>QuickPress</strong> to set up theappropriate shop practices (standards) for your company.When setting Mfg information to a sketch, follow the below processWhen setting Mfg information to a body, follow the below processApplying to Standard Components with Hole SketchesPocketing holes for cylindrical components can be defined with asketch that is a cross section of the hole and is used to create arevolved cut feature by <strong><strong>3D</strong>QuickPress</strong>. The revolved cut featurewill be painted with the predefined manufacturing color information.193
1. Open the part file GPost (5-XXXX-5).sldprt. Filelocation: C:\Program Files\<strong><strong>3D</strong>QuickPress</strong>\StandardComponents\Danly\Guide Posts\GPost2. Click Mfg Color Tool from the <strong><strong>3D</strong>QuickPress</strong> Misc. Toolstoolbar.3. Select Hole sketch in the FeatureManager design tree, andselect WEDM1 in the Mfg Information dialog box. ClickSet color for selected sketch to assign color for thesketch.4. Save and Close the file.Applying to PRL Components with Hole BodiesPocketing holes for PRL components are defined with hole bodies.The cavity feature will be painted with the predefined manufacturingcolor information.1. Open the part file INS1.sldprt File location:C:\ProgramFiles\<strong><strong>3D</strong>QuickPress</strong>\PRL\Punch<strong>Design</strong>Template\Metric\User Defined\Inserts\INS1\2. Click Mfg. Color Tool from the <strong><strong>3D</strong>QuickPress</strong> Misc.Tools toolbar.3. Select the Hole Body in the feature tree and select WEDM1in the Mfg Information dialog box. Click Set color forselected body to assign color for the body.194
Using Mfg. Color Info when Creating Cutting PocketsIn both the Create Die Set Hole and Component Opening functionsof <strong><strong>3D</strong>QuickPress</strong>, there is a propagate color option to carry themanufacturing color information from the standard component orPRL component to the pocketing holes. Once the propagate coloroption is turned on, pocketing hole created will have the same mfg.color as the color defined in the standard component or the PRLcomponent.Using Manufacturing Information to Define Features <strong>Manual</strong>ly<strong><strong>3D</strong>QuickPress</strong> also gives us the ability to manually define themanufacturing information for features created in the model. Thisoption is located on the <strong><strong>3D</strong>QuickPress</strong> PRL toolbar, QPMisc. Tools, Mfg Color Tool.Example: If you open a cutting punch and go into theManufacturing Info selection menu, you can select themanufacturing method and apply it using the selection filters at thetop of the window. The colors on your model will update after youselect your manufacturing type.195
Setting up SolidWorks File Locations for <strong><strong>3D</strong>QuickPress</strong> data<strong><strong>3D</strong>QuickPress</strong> utilizes Library Features and <strong><strong>3D</strong>QuickPress</strong> Templatesto facilitate automated operations inside of <strong><strong>3D</strong>QuickPress</strong>. LibraryFeatures is the location of files that are created for <strong><strong>3D</strong>QuickPress</strong> touse for the Insert Hole Series tool; it mimics the SolidWorks holeseries. The <strong><strong>3D</strong>QuickPress</strong> hole series has the advantage of assigningLibrary Features to each plate and has better performance when theassembly is edited. It is also able to identify common sketches toeliminate die set top level assembly context.The <strong><strong>3D</strong>QuickPress</strong> Templates are set up to create quick drawingfiles with views and station by station information. Some defaulttemplates are provided, but all templates can be customized tomeet a company’s need.File locations for the Library Features and Templates need to beset inside SolidWorks by setting Tools, Options, SystemOptions, File Locations. Each of the following locations shouldbe added to the existing lists.Click Tools, Options, System Options, File Locations. Add thefollow paths:Show folders for:<strong>Design</strong> LibraryDocument TemplatesFolders:C:\Program Files\<strong><strong>3D</strong>QuickPress</strong>\PRL\LibraryFeaturesC:\ProgramFiles\<strong><strong>3D</strong>QuickPress</strong>\<strong><strong>3D</strong>QuickPress</strong> Templates196
INTRODUCTION TO PRODUCTION READY LIBRARIES - PRLProduction Ready Libraries (PRLs) are the cornerstone capabilityavailable in the <strong><strong>3D</strong>QuickPress</strong> environment. The PRL technologyis a toolbox of concepts and techniques used to automate andleverage SolidWorks and <strong><strong>3D</strong>QuickPress</strong> data in order to speed upthe creation and editing of parts, assemblies, and drawing filesaccording to a designer’s and or a companies’ standard bestpractices.PRLs are designed to capture design intelligence for specific 2D &<strong>3D</strong> tasks while automatically adapting to the specific and currentdie design parameters of the job at hand. Many redundant andtedious tasks are automated so that the designer can concentrateon the more difficult design decisions and tasks.PRLs are not standard components libraries although canincorporate standard components such as purchased items. PRL’sare unique in many ways and are an advanced topic to author andmaintain properly. No API or programming knowledge is required.However, extensive SolidWorks knowledge (parametrics, solid andsurface modeling, etc) along with die design knowledge andcompany shop practices are very important in order to truly graspand implement the capabilities of PRLs.PRLs are primarily used in the <strong>3D</strong> Punch and die set Assemblysteps of <strong>3D</strong>Quickpress design flow. PRLs can automatically createdrawings related to the <strong>3D</strong> parts and assemblies being incorporatedin to unique die designs. Some additional benefits includemaintaining standard naming conventions and file locations forstandard parts (i.e. purchased components). In addition, jobspecific (custom) parts and assemblies can be uniquely named andstored in the proper locations with company specific conventions.File properties and manufacturing information can also beincorporated into a PRL so that the BOM is accurately filled in andupdated.Once a set of PRLs are created the basic <strong><strong>3D</strong>QuickPress</strong> user canquickly create dies. Keep in mind, PRLs can always be edited onthe fly and or modified in the master library for long term reuse. Weadvise the beginner to get started, use them and or have designersuse them, take feedback then refine and enhance. If you needenhancements and or technique advice, do not hesitate to contactyour support team.197
Properties for PRL’sThere are several properties that control the behavior of PRLs. Theproperties can be set outside of SolidWorks by using the followingprocess. You can find this under Programs, <strong><strong>3D</strong>QuickPress</strong>,<strong>3D</strong>QuickTools, Utilities, File PropertiesUC/MC/LC - You can control where Punch PRLs will be insertedusing this property if using a Horizontal assembly. This property isonly valid in Punch <strong>Design</strong>. The possible values are:LC - Lower Container (assembly)MC - Middle Container (assembly)UC - Upper Container (assembly)F-SH (Yes|No)– This property is for extra small PRL’s with aretaining heel.Update Flag (Yes|No) – This enables or disables the PRLparameters to be updated is a <strong><strong>3D</strong>QuickPress</strong> specific parameter ischanged and the die is told to update.DP (Yes|No) – Die Plate. This property is ONLY for details that willreside in die set design, such as stripper and punch holder platesthat will be cut by EVERYTHING in the punch design. If set toYES, these parts will automatically be cut when Create die setHoles is executed. They will be cut by ANY component from theUC, MC, LC assemblies that interfere with them.Note: Create Die Set Holes is a powerful timesaving automatedcapability.INS (Yes|No) – inserts in the lower die block.XSL (Yes|No) – This property is usually set to a PRL that will formor coin material, when the PRL is inserted this property willautomatically export the selected current snap shot of surface facesof the strip layout to part bodies in the PRL. This functionalityminimizes unnecessary assembly associativity to reduce rebuildtimes in SolidWorks.<strong><strong>3D</strong>QuickPress</strong> COT SET – With TEXT as the type and set thevalue P1 to the strip layout P1 Strip Layout, P2 for P2 Strip Layout.This is only an example of what you will get if you check.198
Dimension’s Names Used by PRL’sAny dimension can be rename to follow information leveraged by<strong><strong>3D</strong>QuickPress</strong>, a list of those names are as follows.1. Strip Layout Progression Stock Width2. Cutting Punch Sketch Name PH HoleSketch – C6 of the DSS SBP HoleSketch – C5 of the DSS SP HoleSketch – C4 of the DSS DP HoleSketch – C3 of the DSS DS HoleSketch – C2 of the DSS LDS HoleSketch – C1 of the DSS3. Adding as shown to the end of any sketch supportsupdating land and taper angle of the Modify DSS.4. Adding as shown to the end of any sketch supportsTaper that will not update to the Modify DSS.5. PRL’s Dimensions. OverallX OverallY ShankDia Lifter Level Stripper Stroke Lower Parallel Custom dimensions using Param.def6. Die Set Dimensions. OverallX-X OverallY-Y199
CREATING PRLSCase Study 10 – 3 : Create Rectangular PRL PunchIn this case study we will create a new PRL for a rectangularpunch. The process will create a SolidWorks part that representsthe punch and we will configure it as a PRL. When completed, thiscustom punch can be inserted into a punch design assembly.Establish the New PRL1. Use the PRL Wizard. Click from the top menu bar<strong><strong>3D</strong>QuickPress</strong>,<strong>3D</strong>QuickTools,Utilities,PRL Wizard.2. Select Create New PRL and then click >> button.3. Select User Defined, set the unit to mm, and input PRLName as R01 and then click >> Button. This will create afolder and a SolidWorks part with this name.4. DieSet Structure allows the user to select specific DieSet Structure for the PRL that is supported to be inserted.200
5. Specify the Functional Group for this PRL. Select Existingand select Rect. Blank Punch and then click >> Button.6. You will now specify where the part used to create this PRLcomes from. Select New Part and check Open for Edit toopen the file in SolidWorks. Click the >> button to continue.201
7. Click the Insert Die Set Structure (DSS) icon , then clickexit to finish.Note: The DSS is a standard part that is inserted into the currentpart and is extremely important to the <strong><strong>3D</strong>QuickPress</strong> automation.By inserting the DSS it will allow the new rectangular punch tohave intelligence to automatically adjust to any die design. Forinstance, different plate thicknesses, shut heights and otherstandard variables that change from job to job are updated in thePRL while inserting it with <strong><strong>3D</strong>QuickPress</strong> commands.A new part is automatically created in SolidWorks named R01with all the required reference geometry. This file is located in:C:\Programfiles\<strong><strong>3D</strong>QuickPress</strong>\PRL\Punch<strong>Design</strong>Template\Metric\User Defined\Rect.Blank Punch\.Create the Initial Geometry1. Select the reference plane named: Punch Length-DieSetStructure.2. From the SolidWorks Menu, select: Insert, ReferenceGeometry, Plane. Check the Offset distance option.3. Check the direction of the offset to assure it is in thedirection of the punch.4. Set the distance of the offset to 0.00mm and click tofinish the command.5. Rename the datum plane to HL.202
6. Right-click HL plane and Insert Sketch .7. From the Sketch toolbar, select Rectangle . Create a10mm x 8mm rectangle centered on the origin. Rename thesketch to Base Sketch.8. Extrude the sketch. Set the end condition to Blindand set the depth to 50mm. The extrusion occurs in thesame direction of a punch.203
Creating the Retaining Geometry1. Show Base Sketch in the feature tree by expanding thefeature Boss-Extrude1.Note: You may also want to hide the extruded body andwork with the sketch. Open the PRL Wizard for ease ofsetting Sketch Planes to suit.2. Right-click Base Sketch, and select the eye glass icon.3. Pre-right-click HL plane, and Insert Sketch .4. Sketch a Rectangle with a 1mm width and end pointscoincident with the 10mm x 8mm rectangle sketch, Extrudethe new sketch to make a foot on the punch 5 mm thick asshown below.Tip: Be sure to merge the main body with the foot.5. Click <strong><strong>3D</strong>QuickPress</strong>, Punch <strong>Design</strong>, Define PRL to definethe punch as a PRL.6. Check Show all dimensions.7. Select dimension 10 and clickOverallX.8. Select dimension 8 and click OverallY.9. Under the Container property, selectUC from the drop-down menu and clickthe Set button.10. Under the Update Flag property, selectYes from the dropdown menu and clickthe Set button.11. Click the Report button to check thatall parameters have been set. ClickOK.204
12. Click the to finish this operation.13. Add a description for the PRL Preview Window by going toFile, Properties and select summary tab. Add the followingto the Comments field: Rectangle Punch with Shoulder.14. Click <strong><strong>3D</strong>QuickPress</strong>, <strong>3D</strong>QuickTools, Utilities, PRLWizard.15. Select Edit Current Model and then click the >> button.205
16. Select Insert PRL Param.def file , and click Exit to finish.Add the information as follows, and save to the R01 folder.These parameters will be available the next time you define aPRL.17. Save and close the text file, and Exit the PRL Wizard.18. Select <strong><strong>3D</strong>QuickPress</strong>, Punch <strong>Design</strong>, Define PRL, repeatsteps 5 thru 11 to connect the two new parameters (sldthk &sldprt) to the proper dimensions related to Boss-Extrude2.This renames the dimension to link them to the PRLinterface. When the PRL is inserted into a die, the user canenter new values for these dimensions with the PRL insertcommand.Note: Do not select the same dimensions as step 7 & 8 but thenewly added dimensions.19. Click File, New, Drawing Template and then select the A4-Portrait sheet size. Press the ESC key if Model ViewPropertyManager opens up.20. Right-click on the drawing and go to Properties. Set theprojection to Third Angle and 1:1 scale.206
On the View Layout toolbar, select Model Views , selectR01 from the open documents window, then click the Nextbutton. Check the option Create multiple views, thenselect both the Right and the Bottom views.21. Click Insert, Block and insert the XYPos. File location:C:\training\annotations\XYPos.sldblk block tothe drawing.22. Save the drawing as R01.sldrw under the same folder asthe part.23. Return to the R01 part, set the part configuration back toDefault.24. Save all files.207
Case Study 10 – 4 : Create Rectangular PRL AssemblyIn the previous case study a part PRL for a punch was created. Inorder to make a PRL for both the punch and die side to be inserted,we will create another PRL and use the existing punch to quicklycreate the die side part. Then create an assembly PRL thatcombines the punch and die into a new PRL.Duplicate the Punch and Use it as a Starting Point for the Die1. Start the PRL Wizard using <strong><strong>3D</strong>QuickPress</strong>, <strong>3D</strong>QuickTools,Utilities, PRL Wizard.2. Click Create New PRL and then click >>.3. Click User Defined, mm, Input PRL Name = R02 and thenclick >> Button.4. Click Existing and select Rect. Blank Punch and then click>> Button.5. Click Copy From, Rect. Blank Punch and select R01.Check Open for Edit and then click >>.6. Click Exit Button.7. Current document should be the R02 part, Save asR02D.sldprt. All file operations are inside newly createdfolder called R02.8. Right-click on plane HL, select Edit Feature . Change thereference plane to Die Plate–DieSetStructure. Thiswill move the start plane to the correct position for a die.9. Right-click on feature Boss-Extrude1, select Edit Feature, change End condition to Up To Surface and selectZ-Datum-DieSetStructure of the DieSetStructure part.Press to finish the command. This will cause the die toextend to the correct position.208
10. The direction of the features used to create the Shoulder andthe Hole Slot may need to be reversed (please reverse ifneeded).11. Switch to the drawing configuration.12. Save the file.13. Create a drawing for R02D.SLDPRT and Save the drawing.14. Switch to R02D part, switch configuration to default, andhide the Hole bodies.The directory R02 now contains Part PRLs for the punch and diecalled R02 (punch) and R02D (Die).Create the Assembly PRL1. Create a new assembly in Folder R02 and save theassembly as R02.SLDASM2. Insert R02.SLDPRT and R02D.SLDPRT to this assembly atthe origin of the assembly-this is very important for locatingat the same origin!Tip: Use Insert Component, select your part to insert, and gostraight to the green checkmark. SolidWorks will automaticallyalign the part origin to the assembly origin.209
3. Select <strong><strong>3D</strong>QuickPress</strong>, <strong>3D</strong>QuickTools, Utilities, PRLWizard.4. Make sure that your current window is R02.SLDASM, clickEdit Current Model and then click >>.5. Select R02 in the feature tree and click UC Button on thePRL Wizard, select R02D in the feature tree and click LCButtonon the PRL Wizard. Then Exit the PRL Wizard.6. Go to File, Properties, Summary tab. Add “Simple Punch &Die” to comments field.7. Save the assembly.210
CUT PUNCH PRLSCutting Punch CustomizationTopics covered:Understanding cutting punch PRL structureFine tune cutting punch parametersCustomize a cutting punch by creating a variationAdd ejectorPunch with shearCreate preview bitmapCutting punch locationThe data for Cutting PRLs is located under Program Files,<strong><strong>3D</strong>QuickPress</strong>, PRL, Punch <strong>Design</strong> Template,Inch/Metric, Cutting Punch.Tip:You should always customize PRLs in one unit type folder.Then copy your work to the alternate unit folder and thenchange the units in those files with SolidWorks.Each folder under CuttingPunch represents a different cuttingpunch type.Guidelines for cutting punch files:The folder name and top level component name must be the same;this applies to all <strong><strong>3D</strong>QuickPress</strong> PRLs.Tip:For cutting punches, a goodpractice is to name the mainpunch part document the sameas the folder name.Folders should contain a bitmap file for apreview of the cutting punch duringinsertion. If this file does not exist,<strong><strong>3D</strong>QuickPress</strong> will use the SolidWorksfile preview bitmap.211
Cutting Punch DetailsReference planesCutting punches are driven by reference planes.Datum planes are importedfrom DieSetStructure and used todetermine the default size and holdinglevel of cutting punchesLength of cutting punch is the distancebetween (3) & (2)Penetration depth is the distancebetween die face and punch tipPunch is retained by punch holder plateDatum planes created inside the cuttingpunch document are used to handlevariations.HL(15) is used to control holding levelvariationDie face shift (13) is used tocontrol cutting level which depends onthe partgeometry.212
Clearance Hole BodiesHole bodies in a cutting punch are used to automatically cut the dieplates when using Create Die Set Holes. These bodies will beused to cut the proper clearance for the components.Retaining Methods and Step Punch Standards in<strong><strong>3D</strong>QuickPress</strong>ressThe Chart below depicts the standard Cutting Punch Retainingoptions that <strong><strong>3D</strong>QuickPress</strong> allows for custom punches. The foldername is also the name of retainer type.Folder DescriptionPreview Controlled byC0 Straight NothingC1 Single Flange KRC2 Keeper Slot type KRC3 Keeper Slot style with Key KRC4 Full Flange type Double KR213
C5 SHCS NothingC6 Shoulder Mount SHCS XYC7 Offset with Flange Keeper KRC8 Offset with Keeper Slot KRThe Controlled By column displays which sketch is used to controlthe retainer.The retaining location and holding profile is controlled by sketchesKR (Key Retainer) & XY respectively. Sketches and relationshipsare created on top of these 2 sketches to model retaining featureslike grooves and shoulders. The holding profile is controlled by XYsketch and is a rectangle by default. For example, if you want tocreate a round shank, you can create a circle with diameter drivenby X.Case Study 10 – 5 : Creating a Cutting PunchCreate a New Style Cutting Punch C2 Square Keeper1. From the examples above select the cutting punch that is theclosest to the new style. For this example we are going touse C2.2. Start the PRL wizard using <strong><strong>3D</strong>QuickPress</strong>, <strong>3D</strong>QuickTools,Utilities, PRL Wizard.3. Click Create New PRL and then click >>.4. Click Piercing Punch, Inch, Input PRL name = C2Square then click >>.5. Select Cutting Punch and then click >>.6. Click Copy From select C2 and check Open for Edit andthen click >>.7. Click the Exit button.214
Shown below (Left) are the features that will be adjusted to yourstandards.Shown below (Right) is the open punch in its own window andedit the Cut Extrude19. Right-click Cut-Extrude1 found under the C2 part andselect Edit Sketch . Change the sketch to match thepicture below. Change the slot height .065in, slot depth to.035in, and then add 2 radii .03in radius at the bottom.008in at the top of the slot as shown below. Exit the sketch.10. Right-click Key Layout sketch and select Edit Sketch .Delete the Midpoint11 relation as show in the picturebelow.This will allow the sketch to be adjusted to new slot mounting asshown in the 2 nd and 3 rd screen shot. Add a Collinear relation tosketch and slot as shown in the 3 rd screenshot.215
11. Exit Edit Component mode.12. Right-click on the feature Extrude1 feature in the FKeycomponent, select Edit Feature . Change the Depth ofthe extrude to be 0.05mm. Exit Edit Component mode.13. Rebuild the file and then save and close.216
Note: In this assembly they will be similar to standard components,therefore they will NOT be renamed as they are inserted andwill act as instances. They are located in the following pathC:\Program Files\<strong><strong>3D</strong>QuickPress</strong>\StandardComponents\Accessories.Create a New Style Cutting Punch C2 Round Keeper1. Select the cutting punch that is the closest to the new style.For this case study we will use C2 Square.2. Start the PRL wizard using <strong><strong>3D</strong>QuickPress</strong>, <strong>3D</strong>QuickTools,Utilities, PRL Wizard.3. Click Create New PRL and then click >>.4. Click Piercing Punch, Inch, Input PRL name = C2Round then click >> button.5. Select Cutting Punch and then click >>.6. Click Copy From select C2 Square andcheck Open for Edit and then click >>.7. Click Exit.8. Because the slot is already updated, we only have to replacethe keeper with a round one. Delete the FKey component,and the mates that have errors.9. Create new round keeper. Start a New Part and insert asketch as illustrated below.10. Extrude the sketch, Blind, .05 in.11. Save the new round keeper as RKey to C:\ProgramFiles\<strong><strong>3D</strong>QuickPress</strong>\Standard Components\Accessories.217
12. Insert the RKey file into the C2Round assembly. Mate theC2 Round part sketch to the RKey Keeper sketch.13. Save and Close.Enhance an Existing Punch PRLModify the C3 Punch PRL to allow for a variable amount offasteners after insertion:Modifying the hole body to cover the thread holePattern the hole bodyDelete the first instance of the pattern as it overlapswith the original bodyPattern the Socket Head Cap Screw1. Open the C3.sldasm assembly file. File location:C:\Program Files\<strong><strong>3D</strong>QuickPress</strong>\PRL\Punch<strong>Design</strong>Template\Metric\CuttingPunch\C3.2. Click Insert, Component Pattern, Feature Driven.3. Select CBxx-xxx and M4x0.7 Tapped Hole for Componentto Pattern and Driving Feature respectively, clickto finish.218
4. Expand the C3 part in the FeatureManager design tree.5. Right -click on Sketch3 of the M4x0.7 Tapped Hole andclick Edit Sketch .6. Insert a Point at A and click to confirm and close thesketch.7. Exit Edit Component mode.8. Switch back to the C3.SLDASM. The number of screwsshould be updated to 2.9. Switch back to the C3.SLDPRT10. Right-click on Sketch3 of the M4x0.7 Tapped Hole andclick Edit Sketch .11. Select Point A and press Delete. Exit Edit Componentmode.12. Save and Close all files.Create a New Cutting PunchCreate a new cutting punch from existing cutting punch by:Use Solid Works Explorer to duplicate and rename C1Add XY sketchModify die plate hole bodyModify Lower die set hole body1. Click <strong><strong>3D</strong>QuickPress</strong>, <strong>3D</strong>QuickTools, Utilities, PRLWizard.2. Click Create New PRL and then click >>.3. Click Piercing Punch, mm, Input PRL name = C9 andthen click >>.4. Click Cutting Punch and then click >>.219
5. Click Copy From and select C1, click Open for Edit andthen click >> Button. C9 is open in SolidWorks and ready toadd a XY sketch. Leave the PRL Wizard open.6. Right click on Folder PH in the feature tree and clickRollback .7. Right-click on plane HL and click Insert Sketch8. Click Tools, Sketch Entities, Parallelogram , click on A ,B and then C to create a parallelogram..9. Click Exit Sketch from the confirmation corner.220
10. Rename the sketch to XY or select the sketch in the featuretree and click the XY button11. Close the PRL Wizard.on PRL Wizard.The default die plate hole is tapered and we are going to changeit to stepped punch.12. Drag the roll back bar just after folder DP13. Right-click DP Hole and click Edit Feature .14. Uncheck Direction 2 and click to finish thecommand.15. Expand Solid Bodies folder, Right-click on Punch and selectHide. Right-click on DP Hole and select Show.16. Right-click on DP RefPlane and click Insert Sketch .17. Select Face A and click Offset Entities . Input 0.3mm forthe offset distance, and make sure the offset is to theoutside.221
18. Click to finish the command.19. Click Insert, Boss/Base, Extrude . Select Up toSurface for the end condition, and select the Die Plate-DieSetStructure reference plane. Check SelectedBodies, and select the DP Hole body.20. Click to finish the command.Now modify the hole body of Lower die set. The original designis an offset of the cutting profile and now we will make use of theXY sketch to create a rectangular opening.21. Right-click the rollback bar and select Roll to End.22. Expand the LDS folder, expand the LDS Hole feature andright-click LDS HoleSketch and select Edit Sketch .23. Delete all entities by window selection at A, B andpress Delete on the keyboard.24. Select the line entity from the XY sketch at C andclick Offset Entity . Input 2mm for the offset distance.222
25. Check Select chain to offset the whole profile to the outside.26. Click to finish the offset command.27. Add a sketch fillet of 1.5mm to all 4 corners.28. Exit the sketch.Modify the Punch with Shear to Reduce Cutting Force29. Click Insert, Reference Geometry, Plane and select theline entity from sketch XY for First Reference and theendpoint of the line for Second Reference.223
30. Click to finish the command.31. Rename the plane to Shear.32. Click on plane Shear and click Insert Sketch .33. Set the view normal to the Shear plane by clicking NormalTo .34. Select Line and click on A, B, C to create 2 lines.35. Select Point and click on D to create a sketch point.36. Click Add Relation ,Select endpoints A & C and click verticalSelect point D and endpoint B and click HorizontalSelect the vertical line in Sketch XY and point D andclick MidpointSelect endpoint A & F and click HorizontalSelect endpoint C & G and click Horizontal37. Click Smart Dimension , add a 1mm dimension betweenendpoint B and the Die face shift plane. Also addan angle dimension between line AB and the Die faceshift plane.38. Click Insert, Cut, Extrude . Flip the side to cut.39. Click to finish the command.40. Save and Close the file.224
Case Study 10 – 6: Creating a Cutting PunchCreating the Cut Extrude Geometry inside PRL’sFor ease of setup open the PRL wizard and edit Current Model, thePRL wizard will open. Slide it out of the way until needed. Theoffsets that are added is only a reference, as the Prl is inserted theoffsets will follow the DSS inside the PD, and DS.1. Right-click and select the HL plane, and Insert Sketch .2. Select the Base Sketch of the model and offset by .005mmfor a Slip Fit Punch offset and exit sketch.3. Rename Sketch to PH HoleSketch so as the DSS isupdated the offset will follow.4. From your Keyboard hold the CRTL KEY and select both thePH HoleSketch and the Punch Holder Plane of the DSS.5. By selecting the on the PRL Wizard, <strong><strong>3D</strong>QuickPress</strong> willadd a reference plane at the location of the plane selectedfrom the DSS offset .000 The new plane added adds theSketch Name to the plane as shown below.Note: The Sketch name on the plane MUST match for the CutExtrude to operate properly.6. Continue adding new Sketches by selecting the PunchHolder DSS plane.7. Right-click Insert Sketch , select the Base Sketch of themodel and offset by .05mm and exit sketch.8. Rename Sketch to SBP HoleSketch so as the DSS isupdated the offset will follow.9. From your Keyboard hold the CRTL KEY and select both theSBP HoleSketch and the Stripper Plane of the DSS.225
10. By selecting the on the PRL Wizard, <strong><strong>3D</strong>QuickPress</strong> willadd a reference plane at the location of the plane selectedfrom the DSS offset .000 The new plane added adds theSketch Name to the plane as shown below.11. Continue adding new Sketches by selecting the StripperDSS plane.12. Right-click Insert Sketch , select the Base Sketch of themodel and offset by .010mm and exit sketch.13. Rename Sketch to SP HoleSketch so as the DSS isupdated the offset will follow.14. From your Keyboard hold the CRTL KEY and select both theSP HoleSketch and the Mat’l Thickness Plane of theDSS.15. By selecting the on the PRL Wizard, <strong><strong>3D</strong>QuickPress</strong> willadd a reference plane at the location of the plane selectedfrom the DSS offset .000 The new plane added adds theSketch Name to the plane as shown below.16. Continue adding new Sketches by selecting the Z-DatumDSS plane.17. Right-click Insert Sketch , select the Base Sketch of themodel and offset by .005mm and exit sketch.226
18. Rename Sketch to DP HoleSketch so as theDSS is updated the offset will follow.19. The Added information to the DP Sketch Name willmanage the Taper of the DSS for the Die Yoke.20. From your Keyboard hold the CRTL KEY and select both theDP HoleSketch and the Die Plate Plane of theDSS.21. By selecting the on the PRL Wizard, <strong><strong>3D</strong>QuickPress</strong> willadd a reference plane at the location of the plane selectedfrom the DSS offset .000 The new plane added adds theSketch Name to the plane as shown below.22. Continue adding new Sketches by selecting the Die PlateDSS plane.23. Right-click Insert Sketch , select the Base Sketch of themodel and offset by .010mm and exit sketch.24. Rename Sketch to DS HoleSketch so as the DSS isupdated the offset will follow.25. From your Keyboard hold the CRTL KEY and select both theDS HoleSketch and the Die Backup Plane of the DSS.26. By selecting the on the PRL Wizard, <strong><strong>3D</strong>QuickPress</strong> willadd a reference plane at the location of the plane selectedfrom the DSS offset .000 The new plane added adds theSketch Name to the plane as shown below.227
27. Continue adding new Sketches by selecting the Die BackupDSS plane.28. Right-click Insert Sketch , select the Base Sketch of themodel and offset by .015mm and exit sketch.29. Rename Sketch to LDS HoleSketch so as the DSS isupdated the offset will follow.30. From your Keyboard hold the CRTL KEY and select both theLDS HoleSketch and the Lower Die Set Plane of theDSS.31. By selecting the on the PRL Wizard, <strong><strong>3D</strong>QuickPress</strong> willadd a reference plane at the location of the plane selectedfrom the DSS offset .000 The new plane added adds theSketch Name to the plane as shown below.32. Hide all Sketches and Sketch Planes, best practice is to adda folder to contain all Sketches and Planes. Rename toClearance Sketches.Case Study 10 – 7: Create Die Set PRLTopics covered:Create Hole featuresCreate Hole groupsCreate your own die set library based on system dieset assembly.228
Create a SolidWorks Part document to hold all theLayout Sketches for the positioning hole series topass through multiple plates.Insert component to the die set structure based on thehole series.Create Hole Features for Guide Pin SGOH 16mm with BushingFirst we need to copy the C:\ProgramFile\<strong><strong>3D</strong>QuickPress</strong>\PRL\Library Features\HoleSeries folder contents to your current PRL directory. Thisdirectory should be located under C:\ProgramFiles\<strong><strong>3D</strong>QuickPress</strong>\<strong>Training</strong>\MyPRL\Libraryfeatures\Hole Series. If there are duplicates, copy overthem.1. Click File, New to create a new part document. Use ametric template.2. Select Front Plane and Insert Sketch .229
3. Click Corner Rectangle and create a 40mm x 40mmrectangle. The lower left corner of the rectangle should becoincident to the origin.4. Click Insert, Feature, Boss/Base, Extrude and extrude itin Reverse direction with a blind depth of 30mm.5. Click to finish the command.6. Select the face below and click Insert, Feature,Hole Wizard …7. Go to Legacy Hole8. Hole Type = Counterbored9. End Condition Type = Through All10. Diameter = 16mm11. C-Bore Diameter = 19mm12. C-Bore Depth = 5mm13. Rename the hole feature to GPCB.14. Select GPCB and click File, Save as, set the Save asType to Lib Feat Part and Input SGOH-CB for file name.Save in the hole series directory under the current PRLdirectory, Library features, Holes series.15. Rename the configuration to GP16mm.230
16. Save the part.17. Click File, Save As, set the Save as Type to Lib FeatPart and input file name SGBH-CB.18. Rename feature GPCB to Bush CB.19. Right-click Bush CB and select Edit Feature . Changethe dimension to:20. Diameter = 20mm21. C-Bore Diameter = 22.5mm22. C-Bore Depth = 5mm23. Rename the configuration to Bush16mm.24.25. Save the part.26. Click File, Save As, set the Save as Type to Lib FeatPart and input file name SGOH-H.27. Rename Bush CB to GP Hole28. Right-click GP Hole and select Edit Feature . ChangeType to Simple, Diameter = 17mm.29. Rename the configuration to GP16mm.30.31. Save the part.32. Close all open files.231
Case Study 10 – 9: Creating a Die Set from SystemTemplate1. Click <strong><strong>3D</strong>QuickPress</strong>, <strong>3D</strong>QuickTools, Utilities, PRLWizard.2. Click Create New PRL and then click >>.3. Click Die Set, mm, Input PRL name = DS06 and thenclick >>.4. Click Copy From, from the existing die sets select 00, thenclick >>.5. Exit the PRL Wizard.Case Study 10 – 10: Create a Layout Sketch Part for HolesSeriesLayout sketch parts (common parts) should be used to maintain thehole-position for components that pass through different subassemblies.A typical example is a guide pin which passes throughthe U, M, L assemblies. By using this technique, guide pin layoutsketches are modified by changing point locations, or adding andremoving points to adjust quantities. The associated holes andcomponents will be updated. The following steps are used tocreate 2 layout sketches, Guide Pins, and Stripper bolts in acommon part.When developing a sketch for layout purposes, it is helpful to knowwhich location is the parent location. By placing a circle at thislocation in lieu of a point it is easier to locate this parent location.The circle has 2 purposes:1. To have an idea of the hole size.2. It is used to mate the 1st component which is going to bepatterned.Note: There is no need to insert a point at the center of the circle.This extra point will create problems when using FeatureDriven Component pattern.232
Create and add the Common Sketch Part to All MainSubassemblies1. Click File, New select the metric part template.2. Save the part as Sketches and save in the C:\ProgramFiles\<strong><strong>3D</strong>QuickPress</strong>\PRL\DieSetAssemblyTemplate\DS06folder.3. Minimize the part window and return to the main DS06assembly window.4. Right-click the U assembly and select Edit Assembly .5. Select Insert, Component, Existing Part andselect Sketches form the list and select to place at originand fix the part in place.6. Reorder the Sketches part below the DieSetStructurepart.7. Exit edit component mode .8. Right-click the M assembly and select Edit Assembly .9. Select Insert, Component, Existing Part andselect Sketches form the list and select to place at originand fix the part in place.10. Reorder the Sketches part below the DieSetStructurepart.11. Exit edit component mode .12. Right-click the L assembly and select Edit Assembly .13. Select Insert, Component, Existing Part andselect Sketches form the list and select to place at originand fix part inplace.14. Reorder the Sketches part below the DieSetStructurepart.15. Exit edit component mode .16. Save the assembly.Derive the “Die Set size” Sketch into the “Sketches” Part forLocalized Reference1. From the DS06 assembly, expand the FeatureManagerdesign tree for the U assembly.2. In the U assembly, expand the FeatureManager design treefor the DieSetStructure.233
3. From the U assembly, expand the FeatureManager designtree for the Sketches part.4. Right-click on the Sketches part and select Edit Part .5. Hold down Ctrl, and select the Front Plane inthe Sketches part and Die Set size sketch of theDieSetStructure part. Release the CTRL key and selectInsert, Derived sketch. Close the sketch .6. Exit Edit Assembly .7. Save the assembly.8. Right-click on Sketches and Open part.9. Rename Sketch1->derived to Die set size. This sketchwill update anytime the parent sketch is modified in theDieSetStructure part.10. Right-click Front Plane, select Insert Sketch .11. Add vertical and horizontal centerlines at Origin. See VLand HL below.12. Sketch a Circle at A.234
13. Create a Point at B.14. Add a symmetric relationship. Select line VL, the CircleCenter point (not circumference) & Point B and add therelationship.15. Mirror Point B about line HL to create Point C.16. Mirror Point C about line VL to create Point D.17. Show sketch Die Set Size and dimension the holecenter as shown below.18. Exit Sketch , and rename the sketch to Guide Pins.19. Select sketch Guide Pins, click Ctrl-C (copy), selectFront Plane and click Ctrl-V (paste).20. Rename the new sketch to Stripper bolt.21. Right-click the Stripper Bolt sketch and select EditSketch . Constrain Point A to the Part Origin bydragging Point A away from the origin and then back to theorigin until it picks up a coincident constraint.22. Dimension the circle in this sketch to the same leftcorner of the Die Set size sketch.23. Exit Sketch .24. Hide all the sketches in the feature manager.25. Save and Close the part.235
Adding Guide Pin Holes to a Die Set PRL1. Open the DS06 assembly.2. Click Insert Hole Series from the <strong><strong>3D</strong>QuickPress</strong> Misc.Tools toolbar. Select the Guide Pins sketch under the Uassembly, Sketches part.3. Click Next , and select die plates by clicking on the platesin the graphic screen.4. Select the Die Plate from the Hole Series parameter, andselect the Library Feature and Configuration under HoleDetails. Repeat for each plate.U-1/PH-1, SGOH-CB, GP16mm, TopM-1/SB-1, SGOH-H, GP16mm, TopM-1/ST-1, SGBH-CB, Bush 16mm, TopL-1/DP-1, SGBH-CB, Bush 16mm, BottomL-1/DS-1, SGOH-H, GP16mm, TopL-1/LDS-1, SGOH-H, GP16mm, Top236
Tip:These settings can be saved for future use. The file islocated in C:/Program Files/<strong><strong>3D</strong>QuickPress</strong>/PRL/Library features/HoleSeries/*.dat. Multiplegroup files can be saved.Save the Currently Used Hole Group for Reuse:5. Enter Group File Name as MyHoleGroup and GroupDescription as Guide Pin 16mm. Then click Add.6. Click Click to finish the command.The MyHoleGroup.dat can be viewed by opening the file in excel.The file is located in My PRL, Library Features,HoleSeries, MyHoleGroup.dat. This file can be editedmanually and saved as different variations.Add a Guide Pin and Automatically Pattern to Holes1. Open the U assembly.2. Right-click Guide Pins sketch in the Sketches part andselect show .3. Select Insert, Component, Existing Part/Assembly.237
4. Browse for the part in C:\ProgramFiles\<strong>3D</strong>quickPress\StandardComponents\Misumi\Guide Pin\SGOHxxxxx.SLDPRT,select configuration SGPN 16-080.5. Drag the Guide Pin close to the first hole (Indicated by thesketch circle in Guide Pin sketch). Click to place the part.6. Hold CTRL and select UDS and PS parts in the feature tree.Right click and select Hide Component .7. Click Insert, Mate to add Concentric and Coincident matesto position the Guide Pin to the first hole.8. Click Insert, Component Pattern, Feature Driven,select SGOHxx-xxx as the Component to Pattern andselect Sketch-Pattern1 from the PH part for the DrivingFeature.9. Click to finish the command.10. Repeat this process to add Guide Bushings to theStripper and Die plates in L and M subassemblies. Refer tothe diagram below for part number and configurationinformation.238
Create Fasteners for Die SetIf the components only have common holes in the subassembly,the layout sketch can be created in the assembly instead.1. Open the L assembly.2. Select the Guide Pins sketch from Sketches part andpress Ctrl-C (Copy).3. Select Front plane of the L assembly and press CTRL-V(Paste).4. Rename the sketch to SHCS.5. Right-click the SHCS sketch and select Edit Sketch .6. Add a coincident relation between Origin and the centerpoint of the sketch by dragging the point away from theorigin and dropping it on to the origin.7. Dimension the sketch as shown below.8. Exit the sketch.9. Select Insert Hole Series from the <strong><strong>3D</strong>QuickPress</strong>Misc. Tools toolbar, select the SHCS sketch from featuretree.10. Click Next and select the three plates under the HoleSeries parameter.239
11. Select Group File 3P-Metric-CB-H-THD, GroupDescription , and click Assign.12. Click to finish the command.13. Insert a Socket Head screw into to the first hole (Indicatedby the sketch circle in the SHCS sketch). Select CBxx-xxxfrom file location C:\ <strong>3D</strong>quickPress\StandardComponents\Misumi\Socket head Screw\CBxxxxx.SLDPRT,select configuration CB10-050.14. Mate the pin to the 1st hole using a coincident and aconcentric mate.15. Click Insert, Component Pattern, Feature Driven, selectCBxx-xxx as the Component to Pattern and selectSketch-Pattern2 from the DP part for the DrivingFeature.16. Save and Close the part.240
V5www.3dquicktools.comUnit 1711, Grand City Plaza, No. 1-17 Sai Lau Kok Road, Tsuen Wan, N.T., Hong KongTel: +852 2788 2832 | Fax: +852 2777 6676 | Web: www.3dquicktools.comAll Rights Reserved © 2012 <strong>3D</strong> QuickTools Limited