Mojave Dry Vacuum System Manual - Air Techniques, Inc.
Mojave Dry Vacuum System Manual - Air Techniques, Inc.
Mojave Dry Vacuum System Manual - Air Techniques, Inc.

You also want an ePaper? Increase the reach of your titles
YUMPU automatically turns print PDFs into web optimized ePapers that Google loves.
LIST OF ILLUSTRATIONS..Figure Description Page1 Main <strong>System</strong> Components . . . . . . . . . . . . . . . . . . . . . . . . .82 Typical MOJAVE Functional Flow Diagram. . . . . . . . . . . . . . . . . 93 MOJAVE <strong>System</strong> Component Dimensions . . . . . . . . . . . . . . . . . 114 V3, 2V3, 2V3CT, V5, 2V5, 2V5CT, 3V5 and 4V5 <strong>System</strong> Floor Plan . . . . 135 MOJAVE <strong>System</strong> Configuration Layouts . . . . . . . . . . . . . . . . . . 146 Stacking the MT10 Tank on Top of a MOJAVE Pump Hardware Detail . . . 157 Stacking Two MOJAVE Pumps Hardware Detail . . . . . . . . . . . . . . 158 MOJAVE V3/V5 Pump and MT10 Tank Connection Diagram, Sheet 1 . . . 178 MOJAVE V3/V5 Pump and MT10 Tank Connection Diagram, Sheet 2 . . . 189 MOJAVE Master Controller Assembly and Washout Solenoid Mounting . . 1910 MOJAVE Dual Pump and Tank Connection Diagram, Sheet 1 . . . . . . . 2110 MOJAVE Dual Pump and Tank Connection Diagram, Sheet 2 . . . . . . . 2211 Pump/Tank Connection Manifold Using Accessory Kit . . . . . . . . . . . 2512 3V5 <strong>System</strong> Connection Detail Using Accessory Kit . . . . . . . . . . . . 2513 4V5 <strong>System</strong> Connection Detail Using Accessory Kit . . . . . . . . . . . . 2514 MOJAVE Pump Power Connection . . . . . . . . . . . . . . . . . . . . 2615 Master Controller Wiring Diagram . . . . . . . . . . . . . . . . . . . . 2616 Master Controller Assembly Controls and Indicators . . . . . . . . . . . . 2817 Clean Stream Dispenser Cap Adaptor Locations . . . . . . . . . . . . . 363
CONGRATULATIONSCongratulations on the purchase of your new MOJAVE <strong>Dry</strong> <strong>Vacuum</strong> <strong>System</strong> that provides thestate of the art in vacuum technology. This vacuum system is designed for reliable operation inthe modern dental facility. The system uses a 100% oil-less <strong>Vacuum</strong> Pump to produce the highvolumeair flow required for multiple simultaneous users while the Separator tank ensures that noliquids enter the pump.In addition, MOJAVE incorporates an efficient energy management system. This is accomplishedby adding a Variable Frequency Drive (VFD) to the <strong>Vacuum</strong> Pump, which is controlled by a MasterController. This controller automatically adjusts the frequency of the pump to maintain the requiredvacuum level depending on the needs of your dental facility. With this balanced system, each useralways has the flow rate necessary to do the job while conserving electricity and prolonging the lifeof your pumps.SAFETY SUMMARYUse of MOJAVE not in conformance with the instructions specified in this manual may result inpermanent failure of the unit.WARNING: To prevent fire or electrical shock, do not expose this applianceto rain or moisture.All user serviceable items are described in the maintenance section.ATTENTION USERS:Markings. The following terms or symbols are used on the equipment or in this manual todenote information of special importance:Alerts users to important Operatingand Maintenance instructions. Readcarefully to avoid any problems.Warns users of hot surfaces. There is a dangerof burns. Work near these surfaces only afterthey have cooled down.Warns users that uninsulated voltagewithin the unit may be of sufficientmagnitude to cause electric shock.Identifies the name of themanufacturer.Indicates date of manufactureI ONO OFFIndicates the ON and OFF position forthe Equipment power switch.Indicates protective Earth Ground for theEquipment power switch.CLASSIFIEDMEDICAL ELECTRICAL EQUIPMENTWITH RESPECT TO ELECTRICAL SHOCK, FIRE, MECHANICALAND OTHER SPECIFIED HAZARDS ONLYIN ACCORDANCE WITH UL-60601-1, CAN/CSA C22.2 NO.601.166CA4
PURPOSE OF THIS MANUALThis manual provides installation, operation and maintenance instructions for the support of the eightavailable MOJAVE <strong>Dry</strong> <strong>Vacuum</strong> <strong>System</strong> configurations listed below. Although not listed, each systemalso includes a Master Controller. Review and follow the guidelines included in this User <strong>Manual</strong> toensure that the system provides the highest level of service.<strong>System</strong>DescriptionMaximumUsersV3 One V3 <strong>Dry</strong> <strong>Vacuum</strong> Pump and an MT10 Tank 3V5 One V5 <strong>Dry</strong> <strong>Vacuum</strong> Pump and an MT10 Tank 52V3 Two V3 <strong>Dry</strong> <strong>Vacuum</strong> Pumps and an MT10 Tank 62V3CT Two V3 <strong>Dry</strong> <strong>Vacuum</strong> Pumps and a CT20 Tank 62V5 Two V5 <strong>Dry</strong> <strong>Vacuum</strong> Pumps and an MT10 Tank 102V5CT Two V5 <strong>Dry</strong> <strong>Vacuum</strong> Pumps and a CT20 Tank 103V5 Three V5 <strong>Dry</strong> <strong>Vacuum</strong> Pumps and a CT20 Tank 154V5 Four V5 <strong>Dry</strong> <strong>Vacuum</strong> Pumps and a CT20 Tank 20SIZING GUIDEChoosing the right configuration of MOJAVE for your practice depends on the number of vacuumusers and the anticipated demand. To ensure optimum operation, the demands should not exceedthe number of vacuum users shown below. The chart lists the number of simultaneous High VolumeEvacuators (HVEs) and Saliva Ejectors (SEs) that can be used in specific MOJAVE system configurations.V3 <strong>System</strong>Recommended Number of Simultaneous HVE/SE UsersV5 <strong>System</strong>2V3 or 2V3CT<strong>System</strong>2V5 or 2V5CT<strong>System</strong>3V5 <strong>System</strong>4V5 <strong>System</strong>HVE SE HVE SE HVE SE HVE SE HVE SE HVE SE3 + 0 5 + 0 6 + 0 10 + 0 15 + 0 20 + 02 + 2 4 + 2 5 + 2 9 + 2 14 + 2 18 + 40 + 6 2 + 6 3 + 6 7 + 6 12 + 6 13 + 140 + 10 1 + 10 5 + 10 9 + 12 10 + 20Note: 1 HVE = 2 SE’s / 1 HVE = 2 Nitrous Scavengers0 + 12 3 + 14 6 + 18 8 + 241 + 18 2 + 26 5 + 300 + 20 0 + 30 0 + 405
SPECIFICATIONSMaster Controller Electrical SpecificationsVoltage (Volts AC)120 (± 10%) Single PhaseFull Load Current (Amps AC) 5Input Frequency (Hz) 60Pump Electrical Specifications V3 V52V3 &2V3CT2V5 &2V5CT3V54V5Voltage (Volts AC) 205 - 240 205 - 240 205 - 240 205 - 240 205 - 240 205 - 240Full Load Current (Amps AC) 12 15 24 30 45 60Input Frequency (Hz) 60 60 60 60 60 60Preset <strong>Vacuum</strong> Level (InHg) 8 8 8 8 8 8Horsepower (each V3 or V5 pump )1.1 kW or 1.5 HPTank Specifications V3, V5, 2V3 & 2V5 2V3CT, 2V5CT, 3V5 & 4V5Working Liquid CapacityMT10 Tank10 gallon maximum capacityCT20 Continuum Tankinfinite volume capacityTank Material (All systems) Rotomolded Plastic Rotomolded PlasticWater usage in Gallons Per Minute (GPM) at different facility water pressures.Water Pressure(PSI)MT10Gallons Per Minute (GPM)CT2020 3.7 7.430 4.5 9.040 5.2 10.450 5.8 11.660 6.4 12.780 7.4 14.7100 8.2 16.4<strong>System</strong> Environmental Conditions (All <strong>System</strong>s)Operating Temperature 40 to 104°F or 10 to 40°CStorage Temperature 0 to 150°F or -18 to 66°CRelative Humidity90%, no condensationUL60601-1 CLASSIFICATIONProtection against electrical shock (5.1, 5.2) Class I, Transportable, Continuous Operation. No applied parts.Protection against ingress of liquids-Ordinary Equipment not suitable for use in the presence of flammable anaestheticmixture with air or with oxygen or nitrous oxide.All MOJAVE vacuum pumps comply with NFPA 99C level 3 requirements.6
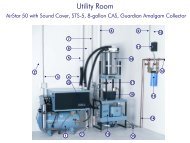
As shown by Figure 1, the MOJAVE <strong>Dry</strong> <strong>Vacuum</strong> <strong>System</strong> consists of the major components listed below.<strong>Vacuum</strong> Pump Assemblies V3 or V5.PRODUCT DESCRIPTION A single-stage pump, where all of the wetted metal parts are nickel plated or stainless steel. A metal electrical enclosure that houses a VFD (Variable Frequency Drive), circuit breaker, andan interface PCB. An aluminum heat exchanger to cool the exhaust air from the pump before it travels throughthe exhaust vent. A metal chassis for mounting components.10 Gallon Separation Tank Assembly MT10. A molded plastic tank that is capable of holding 10 gallons of liquid. An internal float switch that signals the Master Controller to turn the vacuum pump OFF ifthe liquid level exceeds the preset level. A washout port with internal nozzle that is used to rinse the interior of the tank during theautomatic Washout Cycle. A metal chassis for mounting components.Continuum Separation Tank Assembly CT20. The continuum tank combines two molded plastic tanks connected via a check valve andtwo solenoid valves. This tank is capable of handling an infinite volume of liquid becauseone tank section drains as the other tank section fills, while maintaining a preset vacuumlevel. Each tank has an internal float switch that signals the Master Controller to toggle the stateof each tank solenoid. Solenoids keep the liquid moving through the tanks by controlling the venting and pressurizationof each tank. Each tank has a washout port with internal nozzle that is used to rinse the interior of the tankduring the automatic Washout Cycle. A metal chassis for mounting components.Master Controller. A Main PCB, Front Panel PCB and an LCD Display PCB mounted in a metalEnclosure that: Provides the operational user interface for the MOJAVE system. Monitors and displays the frequency, vacuum level and temperature. Records the run time, in hours, of up to 4 connected pumps. Balances the vacuum load equally across all running pumps. Displays any error/fault codes. Controls the Washout function.7
PRODUCT DESCRIPTIONAny time the power to the MOJAVE is turnedOFF the tanks will automatically drain.<strong>Vacuum</strong> <strong>System</strong> Operation.<strong>Air</strong>, water, and solids from the operatory are pulled into the separator tank. <strong>Air</strong> is expelled out throughthe pump exhaust while liquids and solids fall to the bottom of the tank. The vacuum in the tank keepsthe check valve to the drain closed and the tank gradually fills.In single tank (MT10) configurations, if the rising fluid level actuates the float switch, the Master Controllerstops the operation of all connected pumps and an optional drain pump (sold separately) is turned on forone minute. With pump operation idle, the vacuum is no longer being maintained and the check valveof the tank drain opens allowing liquids and solids to drain from the separator tank. Once the tankdrains, the Master Controller automatically restarts the primary pump.<strong>System</strong>s using the continuum tank (CT20), which is capable of handling infinite liquid volume capacities,operate differently. Each tank has an internal float switch. The tanks also use two 2-way solenoids.The float switches control the state of the two solenoids to allow the filling and draining of eachtank, keeping the liquid moving through the tanks. When the top tank is filling, the bottom tankis draining and when a bottom tank is filling, the top tank is draining. The preset vacuum level ismaintained in either state. If the top float switch is active, the Master Controller stops the operation of allconnected pumps. Additionally, whenever the bottom tank float switch is activated, an optional drain pump(sold separately) is turned on for one minute. Once the tank drains, the Master Controller automaticallyrestarts the primary pump.When an instrument (suction tip) has been opened, the Master Controller senses an increase in vacuumdemand and will instruct the VFD to speed up the motor.Conversely, when an instrument (suction tip) has been closed, the Master Controller will instruct the VFDto slow motor operation down due to decrease vacuum demand. The Master Controller can also turnon and off up to 4 connected pumps to regulate the vacuum level.Additionally, the Master Controller initiates a 2-minute tank washout cycle when the system has been inStandby for 5 minutes.FromTreatmentRoomGas/Liquids/SolidsGasExhaust toOutside VentMT10or CT20SeparatorTankLiquids/SolidsHeatExchangerSewerDrainCheckValveGateValveV3 or V5<strong>Vacuum</strong>Pump<strong>Air</strong> Inlet PortFilterFigure 2. Typical MOJAVE Functional Flow Diagram9
INSTALLATION INFORMATIONSite RequirementsElectrical V3 V52V3 &2V3CT2V5 &2V5CT3V54V5MasterControllerVoltage Rating Volts AC 220 220 220 220 220 220 120Voltage Minimum/MaximumWire Size AWG MinimumGaugeMinimum Circuit BreakerRating205/240 205/240 205/240 205/240 205/240 205/240 108/132 Volts AC#12 AWG(Qty 1)#12 AWG(Qty 1)#12 AWG(Qty 2)#12 AWG(Qty 2)#12 AWG(Qty 3)#12 AWG(Qty 4)#14 AWG20A 20A 20A (Qty 2) 20A (Qty 2) 20A (Qty 3) 20A (Qty 4) 15A<strong>Inc</strong>oming PowerHard wire Connection(Each pump is supplied a 4 foot BX cable)NEMA 5-15R(Supplied 10-ft. line cord)Remote 24V(Low Voltage Wiring)#18 AWG (Qty 4) Wire Connection between the MMC and the Remote Switch Panel .(See Figure 15, page 26.)Plumbing V3 V52V3 &2V3CT2V5 &2V5CT3V54V5Exhaust Vent Pipe UsingHeat Exchanger2” PVCSch. 402” PVCSch. 40One 3” or two2” PVC Sch. 40One 3” or two2” PVC Sch. 40One 4” or three2” PVC Sch. 40Two 3” or four2” PVC Sch. 40Exhaust Vent Pipe NotUsing Heat Exchanger(See note 1)2” MetalPipe2” MetalPipeOne 3” or two 2”Metal PipeOne 3” or two2” Metal PipeOne 4” or three2” Metal PipeTwo 3” or four2” Metal PipeMinimum Suction Line Pipe1” PVCSch. 401 ½” PVCSch. 401 ½” PVCSch. 402” PVCSch. 403” PVCSch. 403” PVCSch. 40Maximum Suction Line Pipe(See note 2)1 ½” PVCSch. 402” PVCSch. 402” PVCSch. 402 ½” PVCSch. 404” PVCSch. 404” PVCSch. 40Riser Pipe½” PVCSch. 40½” PVCSch. 40½” PVCSch. 40½” PVCSch. 40½” PVCSch. 40½” PVCSch. 40<strong>Vacuum</strong> Line Termination 1 ½” FNPT 2” FNPT 2” FNPT 2” FNPT 2” FNPT 2” FNPTBranch Line PipeSize requirement of Branch piping differs by the number of operatories being serviced.Up to two operatories use 1" PVC Schedule 40.Three to six operatories use 1 ½” PVC Schedule 40.More that six operatories use 2" PVC Schedule 40Drain Line Pipe 1 ½” PVC Schedule 40Wash-Out Water Line½” FNPT Shut-off ValveNOTES1. Recommended for all new installations.2. Use maximum internal diameter for the main line when preparing any new installation.12
INSTALLATIONMT10TANK1/4-20 X 1/2" HEXBolt (Quantity 4)1/4" Lock Washer(Quantity 4)MOJAVEPUMP(V3 or V5)Note: See MOJAVE V3 and V5 Pump Accessory Pack, P/N H5170,for required fastener hardware.Remove leveling feet from pump or tank to be stacked.Figure 6. Stacking the MT10 Tank on Top of a MOJAVE Pump Hardware Detail1/4-20 X 1/2" HEXBolt (Quantity 4)1/4" Lock Washer(Quantity 4)TWOV3 or V5MOJAVEPUMPSNote: See MOJAVE V3 and V5 Pump Accessory Pack, P/N H5170,for required fastener hardware.Remove leveling feet from pump or tank to be stacked.Figure 7. Stacking Two MOJAVE Pumps Hardware Detail15
INSTALLATIONV3 and V5 <strong>System</strong> Installation.Note: Each kit provides the required hoses, clamps and adapters.No schedule 40 PVC pipe is included.Installation Accessory Packs. Figure 8, sheets 1 and 2, shows the hose connections required forall V3 and V5 MOJAVE <strong>System</strong> configuration installations using accessory packs that provide therequired hoses, clamps and adapters as follows: MOJAVE V3 and V5 Pump Accessory Pack, P/N H5170 - supplied with each pump andis used as follows.Secure the MT10 Tank on top of the associated MOJAVE pump as shown by Figure 6.Connect the pump to the facility vent line, connection item (3) on Figure 8, sheet 2. MT10 Tank Accessory Pack, P/N H5210 - used to make the following connections:Between the suction line and tank inlet. Item (1) on Figure 8, sheet 1.Between the tank air outlet and pump inlet. Item (2) on Figure 8, sheet 1.Install a drip leg to the facility vent line, connection item (4) on Figure 8, sheet 2.The tank outlet drain to the facility sewer drain. Item (5) on Figure 8, sheet 2.The washout port to the water shutoff valve. Item (6) on Figure 8, sheet 2.Accessory Pack Supplied Components. The supplied components of accessory packs (P/Ns H5170& H5210) are listed below. Verify that all listed items were received. If any item is missing, notify yourdealer.V3 and V5 Pump Accessory Pack, P/N H5170Part No. Description Qty56057 Vent Hose, 2-1/4" ID X 17" Long 1" W Cuff 189324 Hose Clamp 1-9/16"- 2-1/2" Maximum 257169 Hose Clamp 1.31 - 2.25 Diameter 2419342 10 Foot CAT5e Network Cable 130914 Bolt 1/4-20 X 1/2, HEX Head,18-8 430958 1/4" Flat Washer 430920 1/4" Split Lock Washer 4MT10 Tank Accessory Pack, P/N H5210Part No. Description Qty54521 1 ½" ID, Clear Hose with Blue Helix 10 FT 157253S Connector Adapter, 1 ½" MNPT X 1 ½" Barb 357169 Hose Clamp 1.31 - 2.25 Diameter 3H5206 Tank Outlet Assembly; Single Pump 151453 Urethane Tubing, 1/4 OD 15 FT 154434 Connector Adapter, 1 ½" SPG X 1 ½" FNPT 1H5207 Drip Leg Assembly 1H5159 2” Flexible Coupling Connector 1Installation Setup. Installation of a V3 and V5 MOJAVE <strong>System</strong> configuration consists of placingthe equipment in the proper installation space and making connections between a MT10 tank anda V3 or V5 pump.1. Refer to Figures 4 and 5 and determine the installation footprint dimensions and connectionrequirements. Place the tank and pump in position as shown by Figure 4.2. If installing side-by-side configuration, proceed to step 4. If stacking, perform step 3.3. When stacking the MT10 tank on top of a pump, refer to Figure 6 and secure the tankto pump using hardware supplied by the Pump Accessory Pack, P/N H5170. Whenstacking any MOJAVE system component, make sure to secure installation with the wallmount bracket kit available from your dealer.Note: If more than 10 feet of the 1 ½" ID, Clear Hose hose is needed,order P/N 54521 (order by the foot)4. Measure and record distance between each connection point. Cut the supplied hose tothe length required for each connection.16
INSTALLATIONV3 and V5 Connection Procedure. Using industry standard techniques, make the connectionsbetween the tank and pump with supplied components of accessory packs (P/Ns H5170 & H5210).Refer to Figure 8, sheets 1 and 2 for the connection diagram and perform the following procedure.1. Suction Line to Tank Inlet Connection. Refer to Figure 8, item (1) .a. Install one connector adapter (P/N 57253S) to the pipe from the operatory.b. Install the connector adapter (P/N 54434) into the flexible coupling connector on the tank.Screw the barb side of the adapter (P/N 57253S) into the FNPT side.c. Install the 1½" ID, clear hose (P/N 54521) cut for installation between the operatory suctionline and tank inlet and secure with two hose clamps (P/N 57169).Note: If more than 15 feet of the 1/4 inch OD Urethane Tubing is needed,order P/N 51453 for additional 15 foot lengths.2. Tank <strong>Air</strong> Outlet to Pump Inlet Connection. Refer to Figure 8, item (2) .a. Install the Single Pump Tank Outlet Assembly (P/N H5206) onto the tank outlet portand secure with the two hose clamps. The outlet assembly is provided with MT10 TankAccessory Pack (P/N H5210).b. Connect 1 ½" ID, clear hose (P/N 54521) cut for installation between the barb connectorsof the Single Pump Tank Outlet Assembly and pump air inlet filter. Secure with two hoseclamps (P/N 57169).c. Install a length of 1/4 inch OD Urethane Tubing (P/N 51453) between the vacuum sampleport and the vacuum inlet port of the Master Controller. See Figure 8, item (2a.)Single PumpTank OutletAssemblyDetail2a1/4-inch <strong>Vacuum</strong>Sample Port toMaster Controller1Facility Piping fromOperatoryTank <strong>Air</strong> Outletto Pump InletConnectionV3 or V5Pump 2Tank InletDetailMT10 TankTank InletFlexible CouplingConnectorPump InletConnection DetailImportant: Make sure to efficiently use space by making connectionsas short and direct as possible to meetyour particular site requirements.Make sure that all hose connections are straightand secure without any sharp bends or kinks.Since the vacuum hose is rigid, make sure not tostress connections especially at the pump inlet.Figure 8. MOJAVE V3/V5 Pump and MT10 Tank Connection Diagram, Sheet 117
INSTALLATION3. Heat Exhaust Vent Connection. Refer to Figure 8, item (3) and connect the vent hose(P/N 56057) between the pump heat exchanger and the facility vent line. Secure with twohose clamps (P/N 89324).4. Drip Leg Assembly Installation. Using the 2 inch flexible coupling connector (P/N H5159)supplied, install the Drip Leg Assembly (P/N H5207) to the bottom end of the facility vent line.Install a length of 1/4 inch OD Urethane Tubing (P/N 51453) between the drip leg and facilitysewer drain. See Figure 8, item (4).5. Tank Drain to Facility Sewer Connection. Install the last connector adapter (P/N 57253S)to the tank outlet drain. Connect the last section of 1 ½" ID, clear hose cut for installation tothe adapter. Secure with one 1-9/16"- 2-1/2" diameter hose clamp (P/N 57169). Connectunconnected hose end to the facility sewer drain as necessary. See Figure 8, item (5).6. Tank Washout Port to Facility Water Connection. Refer to Figure 8, item (6) and installa length of 3/8 inch tubing (P/N 19271) between the washout port and the water shutoff valve.The tubing is provided with MOJAVE Master Controller Accessory Kit (P/N H5131).7. Master Controller Installation. Refer to the installation procedure on the next page andmount the Master Controller to the equipment room wall.8. <strong>System</strong> Electrical Connections. Refer to the Electrical Connections section and connect thepump and Master Controller to facility power.2 <strong>Inc</strong>h45° Y2” Pipe forAddition of DripLeg. See Note b.Facility Exhaust Vent Pipe (See Note a.)2” Exhaust forOne PumpConnection3Heat ExhaustConnection DetailNotes:a See Installation Note K page 13for required pipe material.b Pipe required for the installationof a Drip Leg kit supplied witheach pump.43/8-inchWashout Port toWater ShutoffValve Connection1/4-inch VentCondensationDrain PortExhaust VentPipe Drip Leg6Open DrainPipeOR5To FacilitySewer DrainClosed VentedDrainMT10 TankTankDrainAssemblyFigure 8. MOJAVE V3/V5 Pump and MT10 Tank Connection Diagram, Sheet 218
MOJAVE Master Controller Accessory Kit, P/N H5131Part No. Description Qty77243 Line Cord 10 FT, 18 GA., IEC X North America, Hospital Grade 1H5130 Tank Washout Solenoid Assembly; 1/2" NPT, 115VAC 119271 Poly Tubing, 3/8" OD 10 FT 130936 Plastic Screw Anchor, #10-12 X 1" , RAWL#7579 430295 #10 X 3/4, Type A, Plated Slot Pan Head Screw 430711 10-24 X 1/2, T- Form, Plated HEX Wash Head Screw 256194 Connector Adapter,1/2 MNPT X 3/8 PUSH: SMC# KQ2H11-37S 153202-1 Switch Assembly; Push Button, Panel Mount, GRN/YEL, 6V LED 1INSTALLATIONAccessory Pack Supplied Components. The supplied components of accessory pack (P/N H5131)is listed below. Verify that all listed items were received. If any item is missing, notify your dealer.Master Controller Installation. The Master Controller is mounted on the equipment room wallbetween the facility water supply and the associated tank (MT10 or CT20). The water connectionat the washout solenoid, electrical and vacuum connections must also be made at the unit. Reviewthe important considerations listed below and install the Master Controller using two Plastic ScrewAnchors, P/N 30936 and Plated Slot Pan Head Screws, P/N 30295.1. Locate the Master Controller near the pump and allow a space around the Master Controller ofat least 4 inches for the connection of wiring and the line cord during installation and servicing.2. To avoid electrical shorting from dripping water, always make sure to install the Master Controllerabove the facility water supply line.3. The pump is turned ON from either the Primary Pump Local ON/OFF Switch located on theMaster Controller or from a remote location with the optional Remote Control Panel Switch.4. Use standard industry guidelines for working with electrical circuits, plumbing and on electronicequipment as necessary.5. Make sure to efficiently use space by making connections as short and direct as possible to meetyour particular site requirements.6. Each CAT 5 Cable used to connect the Master Controller and associated Pump is 10 feet long.Washout Solenoid Mounting. The Washout Solenoid is typically mounted on the rear of eitherthe MT10 tank or the bottom CT20 tank using two Washer Head Screws, P/N 30711. The solenoidcan also be installed on the equipment room wall between the facility water supply and the MasterController using two Plastic Screw Anchors, P/N 30936 and Plated Slot Pan Head Screws, P/N30295 provided by kit, P/N H5131.Note:Recommended installation is to mount the solenoidon the rear of the associated MT10 or CT20 tank.MountingKeyholesMountingKeyholesIN5-FootFlexible CableWashout SolenoidWiring Connection toMMC Connector J6.(See page 26.)OUTFlow DirectionMaster ControllerWashout SolenoidFigure 9. MOJAVE Master Controller and Washout Solenoid Mounting19
INSTALLATION2V3, 2V3CT, 2V5 and 2V5CT <strong>System</strong> Installations.Important: 2V3CT and 2V5CT configurations use the CT20 tank, which must be assembled using InstructionSheet P/N H5245 included with the tank.Note: Each kit provides the required hoses, clamps and adapters. No schedule 40 PVC pipe is included.Installation Accessory Packs. Figure 10 shows the hose connections required for all dual MOJAVE<strong>System</strong> configuration installations using accessory packs that provide the required hoses, clamps andadapters as follows: MOJAVE V3 and V5 Pump Accessory Pack, P/N H5170 - supplied with each pump andis used as follows.Stack the associated MOJAVE pumps as shown by Figure 7.Connect each pump to the facility vent line, connection item (3) on Figure 10, sheet 2. MT10 Tank Accessory Pack, P/N H5210 - used to make the following connections:Between the suction line and tank inlet. Item (1) on Figure 10, sheet 1.Install a drip leg to the facility vent line, connection item (4) on Figure 10, sheet 2.The tank outlet drain to the facility sewer drain. Item (5) on Figure 10, sheet 2.The washout port to the water shutoff valve. Item (6) on Figure 10, sheet 2. MOJAVE Dual <strong>System</strong> Installation Kit, MIK2 - used to make the following connections:Between the tank air outlet and each pump inlet. Item (2) on Figure 10, sheet 1.Supplied Components. The supplied components of the Dual <strong>System</strong> Installation Kit (P/N MIK2)are listed below. The supplied components of accessory packs( P/Ns H5170 & H5210) are provided onpage 16. Verify that all listed items were received. If any item is missing, notify your dealer.MOJAVE Dual <strong>System</strong> Installation Kit, MIK2Part No. Description QtyH5176 Tank Outlet Assembly; Dual Pump Installation 154521 1 ½" ID, Clear Hose with Blue Helix 6 FT 154512 2" ID, Clear Hose with Blue Helix 4 FT 154219 Check Valve Assembly; Tank into Pump 2H5234 2” Flexible Coupling Connector 2Installation Setup. Installation of a dual pump MOJAVE <strong>System</strong> configurations consist of placingthe equipment in the proper installation space and making connections between a tank and pump.1. Proceed to step 2 if installing 2V3 and 2V5 systems. When installing 2V3CT and 2V5CTsystem configurations, refer to Instruction Sheet P/N H5245 included with the CT20 DualTank to assemble the tank.2. Refer to Figures 4 and 5 and determine the installation footprint dimensions and connectionrequirements. Place the tank and pumps in position as shown by Figure 4.3. If installing side-by-side configuration, proceed to step 4. If stacking, perform step 3.4. When stacking pumps, refer to Figure 6 and secure the pumps using hardware suppliedby the Pump Accessory Pack, P/N H5170. When stacking any system component, makesure to secure installation with the wall mount bracket kit available from your dealer.Note: If more than 10 feet of the 1 ½" ID, Clear Hose hose is needed,order P/N 54521 (order by the foot)5. Measure and record distance between each connection point. Cut the supplied hose tothe length required for each connection.20
INSTALLATION2V3, 2V3CT, 2V5 and 2V5CT Connection Procedure. Using industry standard techniques, makethe connections between the tank and pumps with supplied components of accessory packs (P/NsH5170 & H5210) and Dual <strong>System</strong> Installation Kit (P/N MIK2). Refer to Figure 10, sheets 1 and 2, forthe connection diagram and perform the following procedure.1. Suction Line to Tank Inlet Connection. Refer to Figure 10, item (1) .a. Install 2" flexible coupling connector (P/N H5159) to the pipe from the operatory.b. Replace the reducing flexible coupling connector on the tank with 2" flexible couplingconnector (P/N H5159) provided in the Dual <strong>System</strong> Installation Kit.c. Install the 2" ID, clear hose (P/N 54512) between the operatory suction line and tank inletand secure with 2" flexible coupling connector (P/N H5159)Note: If more than 15 feet of the 1/4 inch OD Urethane Tubing is needed,order P/N 51453 for additional 15 foot lengths.2. Tank <strong>Air</strong> Outlet to Pump Inlets Connection. Refer to Figure 10, item (2) .a. Install the Dual Pump Tank Outlet Assembly (P/N H5176) onto the tank outlet port andsecure with the two hose clamps. The outlet assembly is provided with Dual <strong>System</strong>Installation Kit (P/N MIK2).b. Connect 1 ½" ID, clear hose (P/N 54521) cut for installation between the barb connectorsof the Dual Pump Tank Outlet Assembly and the air inlet filter of each pump. Secure withtwo hose lamps (P/N 57169).c. Install a length of 1/4 inch OD Urethane Tubing (P/N 51453) between the vacuum sampleport and the vacuum inlet port of the Master Controller. See Figure 10, item (2a.)Dual Pump TankOutlet AssemblyDetail2aStacked V3 orV5 Pumps21/4-inch <strong>Vacuum</strong>Sample Port toMaster ControllerTank <strong>Air</strong>Outletto DualPumps InletConnections1Tank InletDetailFacility Piping fromOperatoryImportantMT10 TankReplace the 2 to 1½" reducing flexiblecoupling connector on the tank with a2-inch flexible coupling connector.Pump 2 InletConnection DetailImportant:2V3CT and 2V5CT configurations use the CT20 tank, which must beassembled using Instruction Sheet P/N H5245 included with the tank.Make sure to efficiently use space by making connections as shortand direct as possible to meet your particular site requirements.Pump 1 InletConnection DetailMake sure that all hose connections are straight and secure withoutany sharp bends or kinks.Since the vacuum hose is rigid, make sure not to stress connectionsespecially at the pump inlet.Figure 10. MOJAVE Dual Pump and Tank Connection Diagram, Sheet 121
INSTALLATION3. Heat Exhaust Vent Connection. Refer to Figure 9, item (3) and connect the vent hose(P/N 56057) between the pump heat exchanger and the facility vent line. Secure with twohose clamps (P/N 89324).4. Drip Leg Assembly Installation. Using the 2 inch flexible coupling connector (P/N H5159)supplied, install the Drip Leg Assembly (P/N H5207) to the bottom end of the facility vent line.Install a length of 1/4 inch OD Urethane Tubing (P/N 51453) between the drip leg and facilitysewer drain. See Figure 10, sheet 2, item (4).5. Tank Drain to Facility Sewer Connection. Install the last connector adapter (P/N 57253S)to the tank outlet drain. Connect the last section of 1 ½" ID, clear hose cut for installation tothe adapter. Secure with one 1-9/16"- 2-1/2" diameter hose clamp (P/N 57169). Connectunconnected hose end to the facility sewer drain as necessary. See Figure 9, item (5).6. Tank Washout Port to Facility Water Connection. Refer to Figure 9, item (6) and installa length of 3/8 inch tubing (P/N 19271) between the washout port and the water shutoff valve.The tubing is provided with MOJAVE Master Controller Accessory Kit (P/N H5131).7. Master Controller Assembly Installation. Refer to the installation procedure on the nextpage and mount the Master Controller assembly to the equipment room wall.8. <strong>System</strong> Electrical Connections. Refer to the Electrical Connections section and connect eachpump and Master Controller to facility power.Top 3 <strong>Inc</strong>h45° YBottom3 <strong>Inc</strong>h45° YFacility Exhaust Vent Pipe (See Note a.)2” Exhaust for TopPump Connection2” Exhaustfor BottomPump3Notes:a See Installation Note K page 13 for required pipe material.A third 45° Y fitting may be added when preparing thesite for a 3-pump system. All piping and fittings must be4-inch instead of 3-inch on dual systems.bDual Heat ExhaustConnectionDetailsPipe required for the installation of a Drip Leg kit suppliedwith each pump.3/8-inchWashout Port toWater ShutoffValve Connection1/4-inch VentCondensationDrain Port4Exhaust VentPipe Drip Leg6Open DrainPipe5To FacilitySewer DrainORClosed VentedDrainMT10 TankTankDrainAssemblyFigure 10. MOJAVE Dual Pump and Tank Connection Diagram, Sheet 222
3V5 and 4V5 <strong>System</strong> Installations.INSTALLATIONImportant: 3V5 and 4V5 configurations use the CT20 tank, which must be assembled using InstructionSheet P/N H5245 included with the tank.Note: Each kit provides the required hoses, clamps and adapters. No schedule 40 PVC pipe is included.Installation Accessory Packs. Figures 11 through 13 shows the hose connections required for 3V5and 4V5 MOJAVE <strong>System</strong> configuration installations using accessory packs that provide the requiredhoses, clamps and adapters as follows: MOJAVE V3 and V5 Pump Accessory Pack, P/N H5170 - use as follows.• Stack the associated MOJAVE pumps as shown by Figure 7.• Connect each pump to the facility vent line, connection item (3) on Figure 10, sheet 2. MT10 Tank Accessory Pack, P/N H5210 - used to make the following connections:• Between the suction line and tank inlet. Item (1) on Figure 10, sheet 1.• Install a drip leg to the facility vent line, connection item (4) on Figure 10, sheet 2.• The tank outlet drain to the facility sewer drain. Item (5) on Figure 10, sheet 2.• The washout port to the water shutoff valve. Item (6) on Figure 10, sheet 2. MOJAVE Triple & Quad <strong>System</strong> Installation Kit, P/N MIK4 - used to fabricate a manifoldto make the connections between a CT20 tank and three or four V5 pumps. CT20 Dual Tank Solenoid Valve and Mounting Bracket Kit, P/N H5244 - used to installthe tank and air solenoids on the rear of a CT20 top tank. CT20 Dual Tank Accessory Pack, P/N H5243 - used to mount and connect the CT20 topand bottom tanks. Part of the Master Controller Accessory Kit, P/N H5131; Tank Washout SolenoidAssembly, P/N H5130, with 2 securing screws, P/N 30711 and 10 feet of 3/8 <strong>Inc</strong>h Poly Tubing,P/N 19271 - used to install the washout solenoid on the rear of a CT20 bottom tank.Supplied Components. The supplied components of kits P/N MIK4, H5243 and H5244) are listedbelow. The supplied components of accessory packs( P/Ns H5170 & H5210) are provided on page 16while the components of the Master Controller Accessory Kit, P/N H5131, provided with the MasterController, P/N MMC ,are listed on page 19. Verify that all listed items were received. If any item ismissing, notify your dealer.MOJAVE Triple & Quad <strong>System</strong> Installation Kit,(P/N MIK4), ContentsPart No. Description Qty54219 Check Valve Assembly 454512 2" ID, Clear Hose with Blue Helix 4 FT 1H5234 2” Flexible Coupling Connector 254521 1 ½" ID, Clear Hose with Blue Helix 20 FT 1CT20 Dual Tank Solenoid Valve and MountingBracket Kit (P/N H5244), ContentsPart No. Description QtyH5169 Solenoid & Bracket Assembly 119271 3/8 <strong>Inc</strong>h Poly Tubing 2.5 feet30711 10-24 X 1/2 Hex Wash Head Screw 2CT20 Dual Tank Accessory Pack(P/N H5243), ContentsPart No. Description QtyH5156M Check Valve 156333 3/8 <strong>Inc</strong>h Union Tee Push Connector 130914 1/4-20 X 1/2 <strong>Inc</strong>h HEX Head Bolt 430920 1/4 <strong>Inc</strong>h Split Lock Washer 430958 1/4 <strong>Inc</strong>h Flat Washer,18-8 SS 4H5234 2 <strong>Inc</strong>h Flexible Coupling Connector 3Note: CT20 Dual Tank Accessory Pack, P/N H5243, ispackaged with the bottom tank section.Note: CT20 Dual Tank Solenoid Valve and Mounting BracketKit, P/N H5244, is packaged with the top tank section.23
INSTALLATIONInstallation Setup. Installation of a Triple and Quad MOJAVE <strong>System</strong> configurations consist ofassembling the CT20 tank, placing the equipment in the proper installation space, fabricating aPump/Tank Connection Manifold and making connections between a tank and pump.1. Refer to Instruction Sheet P/N H5245 included with the CT20 Dual Tank to assemble the tank.2. Refer to Figures 4 and 5 and determine the installation footprint dimensions and connectionrequirements. Place the tank and pumps in position as shown by Figure 4.3. Fabricate a Pump/Tank Connection Manifold (as shown by Figure 11) using check valvessupplied in the MOJAVE Triple & Quad <strong>System</strong> Installation Kit, MIK4.4. If installing side-by-side configuration, proceed to step 4. If stacking, perform step 3.5. When stacking pumps, refer to Figure 7 and secure the pumps using hardware suppliedby the Pump Accessory Pack, P/N H5170. When stacking any system component, makesure to secure installation with the wall mount bracket kit available from your dealer.Note: If more than 20 feet of the 1 ½" ID, Clear Hose hose is needed,order P/N 54521 (order by the foot)6. Measure and record distance between each connection point. Cut the supplied hose tothe length required for each connection.Connection Procedure. Installation of the triple and quad MOJAVE model configurationsconsist of making connections between a CT20 tank and three or four V5 pumps. In any case,the hose connections between the suction line and tank, the tank and drain line and pump tothe facility vent line are identical as shown by Figures 6. Use the 4V5 MOJAVE Accessory Kit toconnect the V5 pumps together for connection to the tank as shown by Figures 12 and 13. Referto Figures 4 through 13 and perform the following procedure.1. Fabricate a Pump/Tank Connection Manifold (as shown by Figure 11) using check valvessupplied in associated accessory Kit2. Refer to Figures 4 and 5 and determine the installation footprint dimension and connectionrequirements. Place the CT20 tank and V5 pumps in position.3. Using Figure 7 as a guide, stack and secure the pumps together using supplied hardware.4. Measure and record distance between each connection point as shown in the correspondingconnection detail diagram (Figures 12 and 13).5. Cut the supplied hose to the length required for each connection.6. Using industry standard techniques, install pipe to hose adapters as shown in the correspondingconnection detail diagram (Figures 12 and 13).7. Install hoses and secure with associated clamps.8. Use a reducing Y or tee adapter to connect each pump vent tube to the common 4-inchexhaust vent line.24
ELECTRICAL CONNECTIONSRemove all power to the system prior to workingwithin the electrical box. Contacting high voltagecan cause serious injury or even death.All systems must be wired directly froman electrical box that complies withlocal electrical codes.MOJAVE Pump Direct Handy Box Power Connection.Each pump is wired directly to an dedicated 230V, 20 AMP singlephase 60 Hz circuit via a disconnect box with approved ground.Disconnect boxes should be mounted nomore than 3 feet of each other and 3 feet ofinstallation centerline.Figure 14 shows the wiring of the electrical BXcable used to connect each pump directly tofacility input power.Supplied 4-Foot BX Cablefrom Electrical Box of PumpGREEN YELLOWSTRIPEFigure 14. MOJAVE Pump Power ConnectionMaster Controller Connections. The Master Controller is connected to a dedicated 120V, hospitalgrade grounded receptacle using a supplied Hospital Grade line cord. Refer to Figure 15 with associatedconnection list and make the necessary connections required for your specific MOJAVE system.BLACKWHITE10-footCAT 5CABLE TOPUMPSPUMP 1PUMP 2PUMP 3PUMP 4J15J16J17J18J2J4J6J7J8YELBRNORNYELBRNORNREDREDBLACKBLACKBLACKBLACKMaster Control Panel SwitchInstalled in Remote Switch PanelBI COLOR SWITCH 6VDCJ13 J12 J10 J11J14WHITEBLACKSPDTYELD2GRND2YELBRNREDORNTo MMCJ12 & J13Connectby wire colorORNYELREDBRNTo Bi Color SwitchConnect by wire colorBLACKWHITEBLACKWHITENote: The 10-foot Line Cord is the Mains disconnectdevice for the Master Controller.Connector Function Connector FunctionJ2 Main Water Panel Switch (optional) J10 Float Switch Bottom of CT20 TankJ4 Main Water Solenoid (optional) J11 Float Switch Top MT10 TankJ6 Washout Solenoid& CT20 TankJ7 Tank Solenoid (CT20 only) J12 Remote PanelJ8 <strong>Air</strong> Solenoid (CT20 only) J13 Switch #53202-1J14 Drain Pump (optional) J15 Thru J18 10-foot CAT 5 Cable to each PumpFigure 15. Master Controller Wiring Diagram26
OPERATING INFORMATIONGeneral. The vacuum level is factory preset at 8 InHg. <strong>System</strong> operation is automatically controlled via the Master Controller and the VariableFrequency Drive (VFD) of each pump. The system is capable of running continuously and may be turned OFF when not in use. Designation of the Primary Pump is cycled through all pumps in the system to evenly distributerun time across all pumps in the system. The system may be turned ON or OFF from a single, convenient location within the dentaloffice using an optional Remote Control Panel switch. The default setting for the number of tanks is set at the factory as a Single Tank. Each tank has been designed to collect the fluids evacuated during a normal operating day. An internal float switch interrupts the pump operation and automatically drains the tank whenan excessive amount of fluids are collected in the tank. All liquids drain from the separation tank when the power is turned OFF.Pump Power On/Off Switch with Circuit Breaker.As the Mains power disconnect of the associated pump, this combinationswitch and circuit breaker controls application of the connected inputpower and protects the pump from overloads and short circuits.When set to the up (1) position, it applies input power to the internal VFDelectronics and the associated pump and must be set in the up (1) positionto allow the pump to operate via the Master Controller.Pump Power On/OffSwitch and CircuitBreakerActivation. Whenever the Master Controller starts running, a system pump will start operation. TheMaster Controller state (Standby or Running) is controlled by either the local Pump ON/OFF switchlocated on the front panel or the Master Controller Remote Panel switch located on the optionalremote panel. This first operating pump is designated the Primary Pump for the system. The selectionof the Primary Pump changes among the available pumps each time the Master Controller is activated(Running). This cycling of the primary pump designation is designed to distribute the wear across allpumps of the system. The pump’s VFD control the frequency of the active (primary) pump to maintain8 inHg. If the system vacuum level falls below 7 inHg for 30 seconds the next pump in the seriesis automatically activated. Additional pumps are automatically turned on as necessary to maintain thevacuum level required for the dental office. Using this balanced system approach, each user has thevacuum level necessary to do the job while conserving electricity and prolonging the life of the pumps.De-Activation. When the frequency of the Primary Pump is below 60 Hz for 30 seconds, the lastpump turned ON shuts down. If this condition remains, then each additional pump in the system alsois automatically turned OFF in the reverse order of their activation until only the Primary Pump is leftoperating.Washout Cycle. A Washout Cycle is initiated 5 minutes after the system transitions into Standby.The Facility Main Water and the Washout Solenoid are then activated. The Washout Cycle willrun for 2 minutes as long as the system remains in Standby. The Washout and Water Solenoids will beturned OFF, and not allowed to be turned ON again until after the system comes out of the Standbycondition.27
OPERATING INFORMATIONMaster Controller Controls and Indicators. Figure 16 shows the front panel view of the MasterController while the table on the next page lists the nomenclature and function of each front panelcontrol, indicator and connector of the Master Controller.4532167Figure 16. Master Controller Assembly Controls and Indicators28
OPERATING INFORMATIONMaster Controller Controls and IndicatorsItem Control/Indicator Function1 Pump Status Indicators(1 for each pump)NoneQuick Flashing GreenSolid GreenFlashing YellowFour bi-color Green/Yellow LED indicators that display the current status ofeach connected vacuum pump as follows:Pump cable is not connectedPump cable is connected on both endsCorresponding pump is operating (spinning) and no Error is PresentCorresponding pump is not operating (not spinning) and an Error is Present2 PUMP ON/OFF Button A momentary tactile switch that toggles the Master Controller between Standbyand Running. When the Master Controller is Running at least the primary pumpis operating. (See Master Controller Status Indicator.)3 Master Controller StatusIndicatorNoneQuick Flashing GreenSolid GreenSolid YellowFlashing YellowAlternating Green/YellowBi-color Green/Yellow LED indicator that displays the current status of theMaster Controller as follows:Module Has No PowerMaster Controller is in Standby (idle)Master Controller is Running (at least one Pump is operating)A Washout Cycle is RunningA Washout Cycle is Running and an Error is PresentMaster Controller is Running and an Error is Present4 LCD Display Panel A 2 line by 16 Character LCD display with a white LED backlight that displayssystem operating and programming information as follows:Normal Display Mode Top left section shows temperature.Top right section displays vacuum pressure (InHg).The bottom line displays the currently selected sub-menu itemMenu Display Mode Top LCD line displays the top level menu item and the bottom LCD line willdisplay the sub-menu item. (See MENU, SCROLL and SELECT buttons.)5 Menu Navigation Buttons When pressed, the MENU, SCROLL and SELECT membrane buttons allowthe navigation of the system menu displayed via the LCD Display.No activity for 5 seconds will put the display back into its Normal Display mode.MENU ButtonPlaces system in Menu Display mode as described above. Also, whenpressed further, advances to the next top level menu item with associatedsub-menu items. Refer to the Menu Display Mode description provided onthe next page.SCROLL ButtonSELECT ButtonScrolls thru the sub-menu items of the currently selected top level menu item.Selects the sub-menu item and then reverts back to the Normal Display mode.6 Circuit Breakers Two 5 Amp circuit breakers that protect the Master Controller from overloadsand short circuits.7 AC Power IEC Receptacle Accepts supplied AC Line Cord connector to apply 120 VAC input power foroperation of the Master Controller. The Line Cord is the Mains disconnectdevice for the Master Controller.29
OPERATING INFORMATIONNormal Display Mode. The Normal Display Mode is the default view of the LCD Display Panelwhere the top line shows the PCB temperature on the left and system vacuum level on the right side.The the bottom line displays the currently selected sub-menu item.Menu Display Mode. In Menu Display Mode, the top line shows the top level menu item while thebottom line displays the sub-menu item. See the table below for top and sub menu items. Navigationof the menu is accomplished as follows:1. Pressing the MENU button advances to the next top level menu item and associated sub-menuitems.2. Pressing the SCROLL button scrolls thru the sub-menu items associated with the selectedtop level menu item.3. Pressing the SELECT button Selects the sub-menu item and then reverts back to the NormalDisplay mode.Menu Display ModeTop-Menu Item Sub-Menu Item DescriptionPump Frequency Cycle Cycles through all connected pump frequenciesevery 2 seconds.Pump #1 Shows the frequency of Pump #1Pump #2 Shows the frequency of Pump #2Pump #3 Shows the frequency of Pump #3Pump #4 Shows the frequency of Pump #4Pump Run Time Cycle Cycles through all connected pump run timesevery 2 seconds.Pump #1 Shows the total Run Time of Pump #1Pump #2 Shows the total Run Time of Pump #2Pump #3 Shows the total Run Time of Pump #3Pump #4 Shows the total Run Time of Pump #4Tank ConfigSingle TankDual TankMT10 Tank configurationCT20 Tank configurationReset All Errors Hold Down Select Hold Select button for 10 seconds to Reset all errors.30
OPERATIONInitial <strong>System</strong> Startup. Start the MOJAVE system for the first time by referring to the OperatingInformation section and performing the following procedure.Important: Make sure that each facility electrical disconnect box controlling the 230V, 20 AMPsingle phase 60 Hz circuit to the corresponding pump is set to the ON position.1. Apply facility operating power to each pump by placing the Pump Power Switch withCircuit Breaker in the up (1) position.2. Connect CAT5 cable between all pumps an Master Controller.3. Connect the supplied line cord between the Mains (120 VAC) outlet and the AC PowerIEC Receptacle of the Master Controller. The Master Controller is now in the Standbymode. Observe the following:a. Master Controller Status Indicator Quick Flashes Green designating that the MasterController is in Standby (idle).b. LCD Display Panel is illuminated showing the default Normal Display Mode view.c. Pump Status Indicator corresponding to the connected pump or pumps Quick FlashGreen designating that the pumps are connected but not operating. Pump StatusIndicators associated with no connected pump will be extinguished.4. Start system operation by pressing the PUMP ON/OFF button located on the MasterController. This places the Master Controller in the Running mode where at least one Pumpis operating. Observe the following.a. Master Controller Status Indicator illuminates Solid Green designating that the MasterController is Running (at least one pump is operating in multi pump systems).b. Pump Status Indicator associated with the operating pump illuminates Solid Greendesignating that a pump is operating (spinning) and no error is present.5. Press the PUMP ON/OFF button to stop the pump operation and return the Master Controllerto the Standby mode (idle). If operating a system with only one pump, proceed to step 6.When operating a multi pump system, repeat steps 3 and 4 for each pump and observe thatthe next pump in the system starts operation each time the PUMP ON/OFF button is pressed.Important: The system default tank configuration setting is Single Tank, which must be changedto Dual Tank when using 2V3CT, 2V5CT, 3V5 or 4V5 systems requiring a CT20 tank.6. Proceed to step 6 if the system has a MT10 tank. When using systems with a CT20 tankchange the Tank Config as follows:a. Navigate to the Tank Config top menu item by pressing the MENU button 3 times.b. Press the SCROLL button to navigate to the Dual Tanks sub menu item.c. Press the SELECT button to change the Tank Config to Dual Tanks.Note: The optional Remote Control Panel switch may be used instead of thePUMP ON/OFF button.Normal Operation. The MOJAVE system is normally operated by simply pressing the PUMP ON/OFF button located on the front panel of the Master Controller. This places the Master Controllerin the Running mode to control system operation via the Variable Frequency Drive (VFD) electronics ofeach pump. During operation the controller automatically starts pump operation, adjusts the frequencyof the pumps to maintain the required vacuum level as needed. Additionally the Master Controllerconstantly monitors the system operation status, performs self diagnostics and reports errors.31
TROUBLESHOOTINGAutomated Self Diagnostic Feature. Every 4 hours each pump in the system that is not ON will beturned ON for 6 seconds and then turned OFF, one at a time. By constantly checking the status ofall pumps in the system this feature makes sure that each is ready for operation and may be helpfulin preventing locked rotors.Error Reporting. The Master Controller constantly monitors the system operation and immediatelyrecords and reports any errors found. Some errors clear automatically as soon as the operating issuesare resolved; other errors have to be manually reset. The table below lists the types of errors reportedalong with their causes, affects on the system, and details on how the error can be reset.ReportedErrorType Cause Observable Result Reset MethodsFeedbackErrorPumpFeedback from a runningPump indicates a Frequencyof
TROUBLESHOOTINGProblem Possible Cause Possible Solutions1. Tanks doesnot drain.a. Gate Valve in closed position.b. Drain check valve clogged.c. Clogged drain.d. Separator tank is full and willnot drain.a. Open Gate Valve fully.b. Call your authorized dealer for repair service.c. Call your local plumber.d. Tank must be hooked up to an open drain. If hookedto an open drain and tank won't drain call yourauthorized dealer for repair service.2. No suction. a. Master Controller not turned on.b. Pump not turned on.c. Pump not running.d. Kinked or collapsed suctionhose.a. Turn Master Controller on.b. Turn pump main power switch to ON.c. See problem 5 below.d. Make sure all hoses are properly connected.Check the suction line from the unit to the separationtank and the separation tank to the operatory line.If clogged, collapsed or kinked call your authorizeddealer for repair service.3. Poor or lowsuctiona. Restricted air exhaust.b. Restricted air suction.a. Check air exhaust pipe to make sure it conforms tospecifications. Check and clear possible restrictionsin exhaust line.b. Check the suction line from the unit to the separationtank and the separation tank to the operatory line.If clogged , collapsed or kinked call your authorizeddealer for repair service.4. Excessivesuctiona. Clogged or restricted vacuuminlet line to Master Controller.b. Malfunctioning Master Controller.a. Check and clear any clogs or restrictions, and/orfluid from vacuum inlet line.b. Call your authorized dealer for repair service.5. Pump doesnot run.a. Site circuit breaker is “OFF”.b. Pump circuit breaker is “OFF”.c. Master Controller circuitbreaker is tripped.d. Low voltage Remote ControlPanel Switch turned “OFF”, ornot connected properly.e. Electrical problem.a. Turn “ON” the site circuit breaker.b. Turn “ON” the pump circuit breaker.c. If the white section of the circuit breaker is visible, itis tripped. Flip this section back in to reset breaker.d. Make sure remote switch is turned “ON” and wiredproperly.e. Call your authorized dealer for repair service.33
MAINTENANCEWarning:Cleaning agents that contain bleach or foam should not to be used in this system. Thesecleaners will leech mercury from amalgam and pollute our environment. Please use nonfoaming,non leaching, and biodegradable Clean Stream (PN 57850) for proper cleaning.Initial Maintenance.After installation, clean the vacuum lines with Clean Stream Cleaner. This is especially necessarywhen a new system is being installed into existing dental system piping. Using Clean Stream Cleanerhelps the MOJAVE system to remove any built up deposits in the piping system. Perform the initialcleaning by performing the daily maintenance procedure provided below.Maintenance-Free MOJAVE Pumps.All MOJAVE pumps are designed for maintenance-free operation. The pump features a powerful3-phase motor. The motor is completely water and oil-free and provides a dependable operationrequiring no scheduled maintenance.Preventive Maintenance.Whenever a service technician fulfills a repair call at the customer site routine checks should alsobe performed to detect general overall wear, and replacement of parts should be made if necessarybefore a failure causes a prolonged shut-down. This preventive maintenance program will aid independable equipment operation and help reduce breakdown.Scheduled Maintenance.Since a well-organized maintenance program aids dependable equipment operation and reducesbreakdown to a minimum, it is essential that the maintenance instructions be followed completely.The routine cleaning will remove any built up deposits in the piping system and the tank inspectionwill verify proper drainage before a failure causes a prolonged shut-down.Daily 1. Clean drain lines from the operatory to the separator tanks with Clean Stream Cleaner byperforming the procedure provided on the next page.2. A Washout Cycle is automatically initiated when the system has been in Standby for 5 minutes.During this cycle the Facility Main Water and the Washout Solenoids are activated and the tankis rinsed with water for 2 minutes via the wash-out fitting on the top of the tank. The WashoutCycle runs for 2 minutes as long as the system remains in Standby and will not be startedagain until after the system comes out of the Standby.Weekly 1. Check for noise and leaks.2. Clean exterior surfaces3. Make sure that no flammable, corrosive, or combustible materials are stored in the equipmentroom (especially in the area around the equipment).Monthly 1. Check tubing for kinks or cracks.2. Check drip leg for liquids on exhaust line.Important:Evidence of buildup at the base drain or liquids reaching the float assembly mostlikely means that a stricter adherence to the daily maintenance procedure is required.If problems are found during tank inspection, perform the daily maintenance Tank Washout procedure asnecessary to remove buildup at the base drain. Reinspect to verify proper tank drainage.Semi-Annually1. Check the inlet filter on each pump assembly for buildup. The filter should be dry and clean.The presence of any liquid or debris means that the installation or the tank is incorrect.2. Check for buildup at the base of the tank entering the drain to verify proper drainage.3. On CT20 Continuum tanks, check for buildup at the check valve connecting the two tanksections to verify proper liquid flow.34
MAINTENANCEWarning:Caution:The following steps must be performed while wearing skin and eye protection designedfor handling typical Haz-Mat material. Use care at all times to prevent spillage.Use only Clean Stream Cleaner to maintain the system vacuum lines. Do not use chlorinebleach or solutions of sodium hypochlorite to disinfect the MOJAVE system. These materialsmay result in damage or destruction of equipment or loss of system performance.Daily Maintenance - Clean <strong>Vacuum</strong> LinesClean all vacuum lines in the vacuum system with Clean Stream Cleaner daily as part of the overallpreventive maintenance program. This helps to maintain the cleanliness of the tank as well as thevacuum lines and tubing throughout the system. Using the 2.5 liter bottle of Clean Stream Cleaner,PN 57850 and the Clean Stream dispenser system, PN 57665.Required - Not SuppliedPart No. Description57850 2.5 Liter Bottle Clean Stream Cleaner (125 applications)57665 Clean Stream Dispenser <strong>System</strong>1 Bottle with o-rings and caps1 Saliver Ejector Adapter1 High-Volume Actuator Adapter1 Small Suction Hose Adapter1 Large Suction Hose AdapterPart No. 57850Clean Stream Dispenser <strong>System</strong>,Part No. 57665Procedure. Prepare the cleaning solution and clean the system daily by performing the followingsteps.Note: The Clean Stream Dispenser can hold a maximum of 2 liters of solution for cleaningup to 2 operatories. Mix solution quantity as necessary.1. Fill the Clean Stream dispenser with tap water as applicable;a. to the line marked 1 L for 1 operatoryb. to the line marked 2 L for 2 operatories2. Using the 20ml measuring line in the Clean Stream Cleaner bottle cap, add the Clean StreamCleaner concentrate to the dispenser as applicable;a. for 1 operatory, add 20ml of Clean Stream concentrate to the 1 liter of waterb. for 2 operatories, add 40ml of Clean Stream concentrate to the 2 liters of water3. As shown by Figure 16, the interior of the Clean Stream dispenser bottle cap is configured withthree holes for the insertion of HVEs and SEs via provided adapters as follows.a. attach saliva ejector to smallest atomizing adapterb. attach 1 or 2 high volume ejectors to respective adapter(s)4. Refer to Figure 17 and place dispenser in the 2-liter vertical position or the 1-liter horizontalposition as necessary.5. With the vacuum pump on and handpiece valves open, aspirate the Clean Stream solution fromdispenser.6. After each cleansing procedure, disconnect the hand pieces and rinse the dispenser.35
MAINTENANCEPN 57644 PN ED598 High Volume Evacuator (HVE)PN ED597PN ED597 SmallAdapters PN 57644 andPN ED598 stay togetheronce attached as shown.Note:Saliva EjectorPosition adapters into insertionhole connectors located on thedispenser bottle cap as shown.2 LiterDispenserPosition1 LiterDispenserPositionFigure 17. Clean Stream Dispenser Cap Adaptor LocationsACCESSORIES/OPTIONSAccessories/Equipment Options. The following lists the ordering number and description foraccessory components available to maintain the MOJAVE product family. Contact an authorized<strong>Air</strong> <strong>Techniques</strong>’ dealer for information.Part No.H5231DescriptionDrain Pump Assembly53020T, 53021T,53170T & 53173TRemote Water Control Valve <strong>System</strong>sH5217V3 / V5 Replacement Bowl, Screen andGasket for Inlet Filter56650 XL Utility Stack Rack36
WARRANTYThe MOJAVE is warranted to be free from defects in material and workmanship from the date ofinstallation for a period as follows Standard Warranty: 2 years (24 months) for the complete unit. Extended Warranty: Additional 3 years (36 months) for all pumps, motors and housings.Any item returned to our factory through an authorized distributor, will be repaired or replaced atour option at no charge provided that our inspection shall indicate it to have been defective. Dealerlabor, shipping and handling charges are not covered by this warranty.This warranty does not apply to damage due to shipping, misuse, careless handling or repairs byother than authorized service personnel. Warranty is void if equipment is installed or serviced byother than dealer service personnel authorized by <strong>Air</strong> <strong>Techniques</strong>. <strong>Air</strong> <strong>Techniques</strong>, <strong>Inc</strong>. is not liablefor indirect or consequential damages or loss of any nature in connection with this equipment.This warranty is in lieu of all other warranties expressed or implied. No representative or person isauthorized to assume for us any liability in connection with the sale of our equipment.ONLINE WARRANTY REGISTRATIONQuickly and easily register your new MOJAVE online. Just have your product model and serialnumbers available. Then go to the <strong>Air</strong> <strong>Techniques</strong> web site, www.airtechniques.com/dental,click the warranty registration link and complete the registration form. This on-line registrationensures a record for the warranty period and helps <strong>Air</strong> <strong>Techniques</strong> keep you informed of productupdates and other valuable information.37
NOTES38
39NOTES
For over 50 years, <strong>Air</strong> <strong>Techniques</strong> has been a leading innovator and manufacturer of dentalproducts. Our priority is ensuring complete satisfaction by manufacturing reliable productsand providing excellent customer and technical support. Whether the need is digital imaging,utility room equipment or merchandise, <strong>Air</strong> <strong>Techniques</strong> can provide the solution via our networkof authorized professional dealers. Proudly designed, tested and manufactured in the U.S., ourproducts are helping dental professionals take their practices to the next level.<strong>Air</strong> <strong>Techniques</strong>’ family of quality products for the dental professional include:Digital Imaging• Digital Radiography• Intraoral Camera• Caries Detection Aid• Intraoral X-ray• Film ProcessorsUtility Room• <strong>Dry</strong> <strong>Vacuum</strong>s• Wet <strong>Vacuum</strong>s• <strong>Air</strong> Compressors• Amalgam Separator• Utility Accessories• Utility PackagesMerchandise• Evacuation <strong>System</strong> Cleaner• Imaging Accessories• Chemistry• Processor AccessoriesCorporate Headquarters1295 Walt Whitman Road | Melville, New York 11747- 3062 | Phone: 800-247-8324 | Fax: 888-247-8481Western Facility291 Bonnie Lane, Suite 101 | Corona, CA 92880 - 2804 | Phone: 800-247-8324 | Fax: 951-898-7646www.airtechniques.com© <strong>Air</strong> <strong>Techniques</strong>, <strong>Inc</strong> Copyright 2012 • P/N H5153 Rev. C, January 2013