Monsoon Blaster manual 2.cdr - Aussie Pumps
Monsoon Blaster manual 2.cdr - Aussie Pumps
Monsoon Blaster manual 2.cdr - Aussie Pumps
- No tags were found...

You also want an ePaper? Increase the reach of your titles
YUMPU automatically turns print PDFs into web optimized ePapers that Google loves.
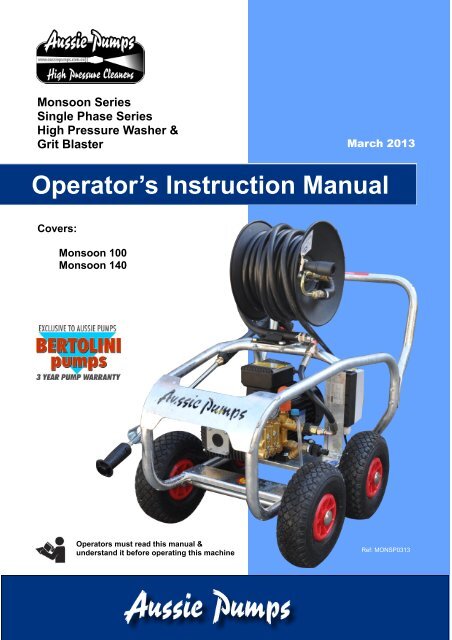
<strong>Aussie</strong> <strong>Pumps</strong> March 2013Instructions for use of grit blast kitWARNING: To reduce the risk of injury, always protect eyesand face with goggles and mask, and hands and arms withheavy work gloves when spraying abrasive materials.1. Connect lance of grit blast kit in to gun in place of the variolance.2. Place the sand probe in the sand container.How To Sandblast :1. Connect and open the water supply line before starting thepressure washer.2. Squeeze the gun trigger to release air in the equipment.3. Turn on the pressure washer.4. Squeeze the gun trigger to activate the spray.Sand probeConnect to gun5. CAUTION: Always test spray on a scrap of similar material first! The high pressure spray could damagethe surface if the grit blaster is held too close.To determine best distance for grit blasting, start with the spray nozzle a metre away from the surface andgradually move closer, frequently checking the surface for damage.6. Always point the nozzle downward when not spraying. This prevents water from entering the sand supply.If water does get into the sand supply hose, remove the probe from the sand, hold the gun trigger open,and let the hose air dry. Always be sure the sand hose is dry before using.7. Keep the sand covered to prevent the overspray from wetting the sand. Do not allow small pieces of thesand bag to fall into the sand supply. A smaller piece could prevent the flow of sand.Recommended sandNo SandTask Sand Mesh Sand Type Blasting AnglePaint from Metal 20/40 Round Silica i.e river sand 0-30Paint from Masonry 20/40 Round Silica 0-20Rubber Base Paint from Masonry 10/35 Angular i.e. crushed rock 0-15Paint from Wood (coarse, rough cut effect) 40/60 Round 1-10Paint from Wood (smoother, driftwood effect) 20/40 Round 1-10Metal Scale 20/40 Round 0-15Rust 16/50 Angular 0-25TroubleshootingBlocked sand probe.Blocked nozzle.Wet sandLow vacuumClear obstruction and make sure air vents insand probe are openRemove mixing nozzle and cleanDry or replace sandNot enough sand Incorrect water nozzle Change spray angleCollapsed hosePartial obstruction to sand probeLow sand levelLow water pressure &/or flow rateValve open; air leaks in system. Tighten hoseclamps.Replace hose or remove restrictionClear obstruction from sand probe inletChange probe to new bag of sandSee machine troubleshooting chart6<strong>Aussie</strong> <strong>Monsoon</strong> Single Phase <strong>Blaster</strong>s … Operation & Maintenance Manual
March 2013<strong>Aussie</strong> <strong>Pumps</strong>UNLOADER SETTINGThe high pressure unloader on the machine is factory set to operate the pump at it’s rated pressure.DO NOT ADJUST. Tampering with the unloader will void warranty and can be dangerous.CARE AND MAINTENANCE:AFTER EACH USEIf cleaning agents have been mixed with the incoming water, it is essential to flush the machine with clean waterafter use.If there is a danger of freezing anti-freeze should be mixed with the flush water or the machine must becompletely drained.After the final flush stop the machine. DO NOT allow the machine to idle for more than 15 seconds. This isparticularly important when there is a danger of freezing. Do not run for longer without water supply.STORAGEStore the washer in an upright position, preferably drained of water if there is a danger of freezing (or fill withanti-freeze).PUMP CRANKCASE LUBRICATIONProper pressure washer pump crankcase lubrication will help extend the working life of the machine. Followthese important guidelines. We recommend keeping a simple service log book.Change oil in pump after initial 50 hour run-in period. (SAE 75W-90)Change pump oil every 3 months, use high quality oil. (SAE 75W-90)Pump oil level can be checked with the dip stick under the breather cap or by viewing the oil sight gaugewhere fitted. The oil level is correct if level is in the centre of the gauge. If oil level is low, fill to correctlevel with recommended oil (SAE 75W-90). DO NOT OVERFILL CRANKCASE!PREVENTATIVE MAINTENANCEKeep filter in supply hose connection clean, rinse regularly.Drain water from pressure hoses, gun/lance assembly and accessories after use.Protect pump from freezing. Failure to remove water from the pump in freezing temperatures will result indamaged pump manifold.Use ONLY injector of the size and type designed for this model.DO NOT tamper with unloader valve adjustment.DO NOT siphon chemicals through the pump, it is designed for water only.Incoming water supply must not exceed 60ºC, otherwise pumps seal damage could result.<strong>Aussie</strong> <strong>Monsoon</strong> Single Phase <strong>Blaster</strong>s … Operation & Maintenance Manual 7
<strong>Aussie</strong> <strong>Pumps</strong> March 2013TROUBLE SHOOTING GUIDEFAULT CAUSE REMEDYPump running normally butpressure low on installationFluctuating PressurePressure low after period ofnormal usePump NoisyPresence of water in oilWater dripping below pumpOil DrippingUnloader switches repeatedlywhen gun is offPump sucking airValves stickingUnloader valve seat faultyNozzle incorrectly sizedWorn piston packingValves wornValves blockedPump sucking airWorn piston packingNozzle wornCheck valves wornCheck valves blockedUnloader valve seat wornWorn piston packingCracked pistons as a result of dryrunningAir in suctionBroken or weak suction or delivery valvespringForeign matter in valvesWorn bearingExcessive temperature of liquidOil seal wornHigh humidity in airPiston packing wornPiston packing wornO.R plunger retainer wornTravel plug in use on pumpOil seal wornLeaking gun and/or pressure pipe.Leaky sleeveWorn out kick-back valve bodyLeaky sealsCheck water supply and possibility of airingress.Check and clean or replace if necessaryCheck and replaceCheck and replaceCheck and replaceCheck and replaceCheck and replaceCheck water supply and air ingress at jointsin suction lineCheck and replaceCheck and replaceCheck and replaceCheck and cleanCheck and replaceCheck and replaceReplace pistonsCheck water supply and connections onsuction lineCheck and replaceCheck and cleanCheck and replaceReduce temperatureCheck and replaceCheck and change oil twice as oftenCheck and replaceCheck and replaceCheck and replaceReplace with breather plugCheck and replace if necessaryRenew gun, seal pressure pipeRenew sleeveCheck and renew as necessary kick-backvalve plate and seatRenew sealsLeaky piston rod Defective O-Ring/Support Ring Renew piston rod seals and examinesurfaces in guide caseLeaky by-pass at nominalpressurePressure gauge shows highpressure fluctuations whenshutting off gunMotor hums when switched onbut does not startNozzle too small, too much water.Worn out by-pass valveValve set too high above operatingpressureDirty valveMains voltage too lowSpray gun not activatedCross section of extension lead toosmallInstall larger nozzleExamine and renew as necessary, poppet(16 for APR-11 for VD valves - 10 for ADV-8 for Unifit valves), valve set (14 or APR-12for VD valves - 11for AVD valves - 7 forUnifit) and by-pass valve body.Adjust the unloader at the operatingpressure.Clean valve (removing lime deposits etc).Grease parts before installing.Check electrical connectionActivate spray gun when switching onUse correct dimension extension lead8<strong>Aussie</strong> <strong>Monsoon</strong> Single Phase <strong>Blaster</strong>s … Operation & Maintenance Manual
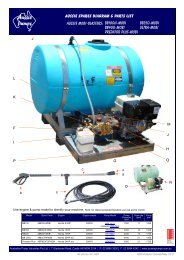
March 2013<strong>Aussie</strong> <strong>Pumps</strong>PARTS IDENTIFICATIONABCHIJKShown with optional hose reel fittedGDEUse motor size & pump model to identify your machine:Model Stock Code Motor Pump Model Pump Pressure(psi)EWPFlow rate(lpm)Pump rpm<strong>Monsoon</strong> 100 ABMONSOON100TR 3HP 2.2kW, IP56 WBL1114 1600 2800 11 1450<strong>Monsoon</strong> 140 ABMONSOON140TR 3HP 2.2kW, IP56 WBL917 2000 3400 9 1450<strong>Aussie</strong> <strong>Monsoon</strong> Single Phase <strong>Blaster</strong>s … Operation & Maintenance Manual 9
<strong>Aussie</strong> <strong>Pumps</strong> March 2013REPLACEMENT PARTS<strong>Monsoon</strong>Position Part No Description 100 140Lance & GunA C4723.45.115 T10 VARIO LANCE x xB M200019050 AL12 GUN WITH MELTED HANDLE& QC x xHoseC R105K2214FB6X8 8 MTR HP HOSE (R1, 3000 PSI) x xUnloaderD APRI20 ADJ UNLOADER VALVE (2000 PSI) x xThermal Dump ValvesE MPA60063050 THERMAL DUMP VALVE 3/8” x xGaugeG AGCDR0102 6,000 PSI PRESSURE GAUGE x xSwitchH ASWITCH16AMP ON/OFF SWITCH (16 AMP) x xI<strong>Pumps</strong>BWBL1114 BIG BERTY PUMP (1600 PSI, 11 LPM) xBWBL917 BIG BERTY PUMP (2000 PSI, 9 LPM) xElectric MotorJ A140060M001 3HP MOTOR 2.2KW x xWheelK A400015 10" WHEEL (EACH) x xOrder the right part first time …specify the pump model number when ordering parts.Full parts breakdown available online … www.aussiepumps.com.auFREE <strong>Aussie</strong> <strong>Blaster</strong>s Service Guidelines available online or call for ahard copy … includes details on servicing Bertolini triplex pumps and a fulltrouble shooting guide.10<strong>Aussie</strong> <strong>Monsoon</strong> Single Phase <strong>Blaster</strong>s … Operation & Maintenance Manual
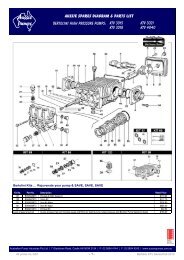
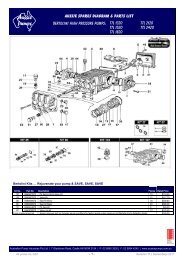
March 2013<strong>Aussie</strong> <strong>Pumps</strong>PUMP PARTS WBL 917, 1114Kit/Position No. Part No. DescriptionKit 141 B019826973 Valve Kit (12 pieces)Kit 12 B049813973 Seal Kit Minor (15 pieces)Kit 70 B049841973 Seal Kit Major (21 pieces)Kit 83 B049847973 Oil Seal Kit (8 pieces)Position 25 B040120322 Oil sight glassPosition 29 B049832973 Oil breather plugPosition 39 B050010182 18mm ceramic piston (3 needed)<strong>Aussie</strong> pressure test set includes gauge and fitting for testing pump output<strong>Aussie</strong> pressure test setpressure and Bertolini Pump Selection GuideOrder the right part first time …specify the pump model number when ordering parts.Full parts breakdowns available online … www.aussiepumps.com.au<strong>Aussie</strong> <strong>Monsoon</strong> Single Phase <strong>Blaster</strong>s … Operation & Maintenance Manual 11
OVERSPEEDINGWARNINGDo not operate machine at over 3200rpm (motor speed). Over speeding can cause serious pumpdamage.EXCESSIVE BYPASSDo not run on excessive by-pass. Switch machine off within two minutes of ceasing operation asexcessive by-pass can cause heat build up in pump and subsequent damage. Excessive bypass runningvoids warranty.HIGH PRESSURE SETTINGThe high pressure pump is factory set to operate at its rated pressure. DO NOT ADJUST. Tamperingwith the pressure regulator will void warranty and can be DANGEROUS.PRESSURE CLEANER DAILY CHECK LISTCheck pump oil levelCheck all high pressure components for leaks: gun/lance HP hose all fittingsCheck water filter and clean if necessaryCheck unloader and thermal dump for leaksTHREE MONTHLY REGULAR SERVICEAll professional machines need to be thoroughly serviced every three months. The service involved shouldinclude the engine manufacturer's recommendations (see separate Engine Manual) and the following;Change pump oilCheck filter for foreign debrisCheck unloader and thermal dump for leaksCheck all HP components for leaks: Gun/lance, HP hose and all fittingsSIX MONTHLY REGULAR SERVICETo maintain the Bertolini pump warranty (three years from date of purchase), the pump must be serviced by anauthorised service agent every six months. Contact <strong>Aussie</strong> for your nearest agent.LOOK AFTER YOUR MACHINE AND IT WILL LOOK AFTER YOU!<strong>Aussie</strong> HP Accessories … making light work of cleaning choresWEAR PROTECTIVE GOGGLES & CLOTHING!Australian Pump Industries Pty Ltd7 Gladstone Road, Castle Hill NSW 2154Ph: (02) 8865 3500 Fax: (02) 9894 4240www.aussiepumps.com.au info@aussiepumps.com.au

![diesel fire fighting pumps PDF [261KB] - Aussie Pumps](https://img.yumpu.com/48798897/1/184x260/diesel-fire-fighting-pumps-pdf-261kb-aussie-pumps.jpg?quality=85)
![view spec sheet [pdf - 32KB] - Aussie Pumps](https://img.yumpu.com/48771802/1/184x260/view-spec-sheet-pdf-32kb-aussie-pumps.jpg?quality=85)