Owner's manual - Electric bikes & folding bikes
Owner's manual - Electric bikes & folding bikes
Owner's manual - Electric bikes & folding bikes

You also want an ePaper? Increase the reach of your titles
YUMPU automatically turns print PDFs into web optimized ePapers that Google loves.
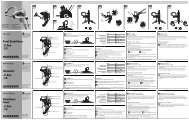
owner's <strong>manual</strong>4.4 Installing the pedals1. Lightly coat the threads of the pedal axle with lightgrease. This will make screwing the pedal into the crankarm easier, and will help prevent corrosion in the future.2. Two pedals (a left pedal and a right pedal) are supplied.Each pedal is DIFFERENT. There is an 'R' stamped on thespindle of the right-hand pedal, and there is an 'L' stampedon the spindle of the left-hand pedal.3. Install the right pedal on the right-hand side, and the leftpedal on the left-hand side. It is very important that eachpedal is installed on the correct side.7. Using a 15 mm open end spanner, securely tightenthe pedals.8. Ensure the pedals are installed with a torque valueof 30 Nm.An improperly installed pedal may fall off your A2Bwhilst in use. This may cause an accident resulting in seriousinjury or death and property damage. Ensure that yourpedals are properly installed and tight before each ride.CAUTION: Attempting to screw the left pedal into the rightcrank arm (or vice versa) will damage the internal threadsof the crank arm. This damage is not ‘fixable’ and thecrank arm will have to be replaced.4. When installing the right pedal, screw the threadedsection of the pedal spindle into the crank arm turning thespindle in a CLOCKWISE direction.5. When installing the left pedal, screw the threadedsection of the pedal spindle into the crank arm turning thespindle in a ANTI-CLOCKWISE direction.6. Screw each pedal as far as you can into the crank armwith your fingers.9