DP4824A- Prospekt - Martens Elektronik GmbH
DP4824A- Prospekt - Martens Elektronik GmbH
DP4824A- Prospekt - Martens Elektronik GmbH

Create successful ePaper yourself
Turn your PDF publications into a flip-book with our unique Google optimized e-Paper software.
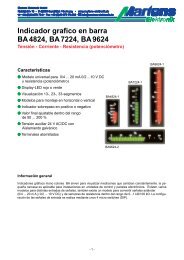
Digital Panelmeter DP 4824AVoltage - current - resistance or RTD, Pt100 - Pt1000FeaturesM Multipurpose input0/4 ... 20 mA, 0/2 ... 10 V DCand potentiometerM Measuring input for RTD sensorsPt100 -100.0 ... 199.9/-100 ... 600 °Cswitch selectable Pt1000 -50.0 ... 100.0 °CM Adjustable display range ( standard signal device only)-1999 ... +1999(no extern signal source necessary !)M Decimal point switch selectableM Display LED red or green 7.6mmM 20-turn adjustable trimmer for initial value and spanM Supply voltage 10.8 ... 30 V DC and 17 ... 30 V ACwith isolation.M Front protection IP54 (IP65 optional)M Plug-in screw terminalGeneral informationDigital panelmeter <strong>DP4824A</strong> can be used for measurement applications in process technology and automation.The small cases are suitable for installation in control units and panel boards. The universal conception ofthe multipurpose input allows indication of all physical dimensions, which can be converted to 0/4...20 mA,0/2...10 V DC. The display range can be adjusted without an external signal source. Other models of the<strong>DP4824A</strong> are for temperature measurement with Pt100 and Pt1000 sensors. The input-configuration is switchselectable from the side, without opening the case.Input and supply voltage are isolated.- 1 -
Connection diagramStandard signal devicePt100/Pt1000 deviceVoltage;CurrentResistance(Potentiometre)min 1 kΩ max 100 kΩSupply voltage10.8 ... 30 V DC17 ... 30 V ACPt100/Pt1000 2-wireline compensation necassary.Adjust clamp (not necassary foradjustment with internal trimpot)Pt100/Pt1000 3-wireUp to 10 Ω line resistance noadjustment necassary.Supply voltage10.8 ... 30 V DC17 ... 30 V ACSide viewFunction of the DIP-sitches S4 ... S6S4 ON ö 3 decimals (display )S5 ON ö 2 decimals (display )S6 ON ö 1 decimals (display )DIP-switchP2 Adjust end valueP1 Adjust start valueInput configuration (standard signal device)Eingang0 ... 2,5 V DC2 ... 10 V DC0 ... 10 V DC4 ... 20 mA0 ... 20 mA0 ... 1/100kΩS1OFFONONOFFOFFOFFS2OFFOFFOFFONONOFFS3OFFONOFFONOFFOFF◄ delivery configurationInput configuration (Pt100)Measr. range [°C] S1-100,0 ... 199,9-100 ... 600ONOFFDIP-switch S3, S4, S5 always OFFS2OFFONS6ONOFFAdjustment rangeStart valueEnd valueStandard signals-1999 ... 1999 Digit0 ... 3999 DigitTemperature (Pt100/Pt1000)± 10/5°C90 ... 110%A special adjust instruction for the standard signal device device is a part of delivery.- 3 -
Ordering code<strong>DP4824A</strong> -1.-2.-3.-4.With unit, please state in cleartext1. Display123 ½-digit3 ½-digitLED redLED green7.6 mm7.6 mm2. Input10205055Industry standard signalCustom input (on request)Pt100Pt10003. Protection1 IP542 IP654. Unit (appears on the face plate)- 4 -04/00-00
<strong>Martens</strong> <strong>Elektronik</strong> <strong>GmbH</strong>Kiebitzhörn 18 • D-22885 Barsbüttel/Germany • www.martens-elektronik.deF+49-(0)40-670 73-0 • Fax +49-(0)40-670 73-288 • J info@martens-elektronik.deAdjustment instructions Digital Panelmeter DP 4824AMulti purpose device<strong>Elektronik</strong>To adjust the <strong>DP4824A</strong> you dońt need any measuring instrument or simulator. Only a 2mm-screwdriver is necessary.There are two kinds of measurement ranges to adjust:1. Display initial value = 0 Y please proceed to the item A).2. Display initial value ≠ 0 Y please proceed to the item B).Point A Display initial value = 0 Disconnect signal wiring from terminal 1... 3.Connect supply voltage and Power up. Dispaly zero adjustInput configurationS1 S2 S3ON OFF OFFAdjust display with P1 to Display zero adjust Display final value adjust (span)Input configurationS1 S2 S3OFF OFF OFFLink between terminal 1 and 3.Display adjust with P2 to the final value.Dispaly span adjust Configurate with DIP-switches S1 ... S3 to the wanted input signal (see table).Activate decimal point with DIP-switch S4 ... S6 (if necessary).Connect the signal at terminals 1 ... 3.Input S1 S2 S3 Function of DIP-switches S4-S60 ... 2.5V DC2 ... 10V DCOFFONOFFOFFOFFONS4=ON ⇒ display S5=ON ⇒ display 0 ... 10V DC4 ... 20mA0 ... 20mA0 ... 1/100kΩONOFFOFFOFFOFFONONOFFOFFONOFFOFFS6=ON ⇒ display End of adjustment- 1 -
<strong>Martens</strong> <strong>Elektronik</strong> <strong>GmbH</strong>Kiebitzhörn 18 • D-22885 Barsbüttel/Germany • www.martens-elektronik.deF+49-(0)40-670 73-0 • Fax +49-(0)40-670 73-288 • J info@martens-elektronik.dePoint B Display initial value … 0<strong>Elektronik</strong> see page 1 see page 1 Adjust display rangeEingangskonfigurationS1 S2 S3ON OFF OFFLink between terminal 1 and 3.Ajust display with P2 to 1/4 of the span(see example).Adjust 1/4 of the spanExample: display range -120.0 ... +180.0 → span = 3000 digit →adjust 1/4 of the span = 3000/4 = 750 digit Ajust initial valueInput configuration as point 3.Remove link from terminal 1 to 3.Adjust display with P1 to the initial value(in the example -1200 Digit).Display zero adjust Check display final valueEingangskonfigurationS1 S2 S3OFF OFF OFFLink between terminal 1 and 3.Check final value (in the example 1800 Digit)and if necessary, fine adjust with P2.Dispaly span adjust Repeat step and until no more correction is necessary. Configurate input with DIP-switch S1 ... S3 to the wanted input signal (see chart page 1).Activate decimal point with DIP-switch S4 ... S6 (if needed).Connect the wires to terminal 1... 3. End of adjustment.07/05-00- 2 -