horizontal/vertical metal cutting bandsaw - Harbor Freight Tools
horizontal/vertical metal cutting bandsaw - Harbor Freight Tools
horizontal/vertical metal cutting bandsaw - Harbor Freight Tools
- No tags were found...

Create successful ePaper yourself
Turn your PDF publications into a flip-book with our unique Google optimized e-Paper software.
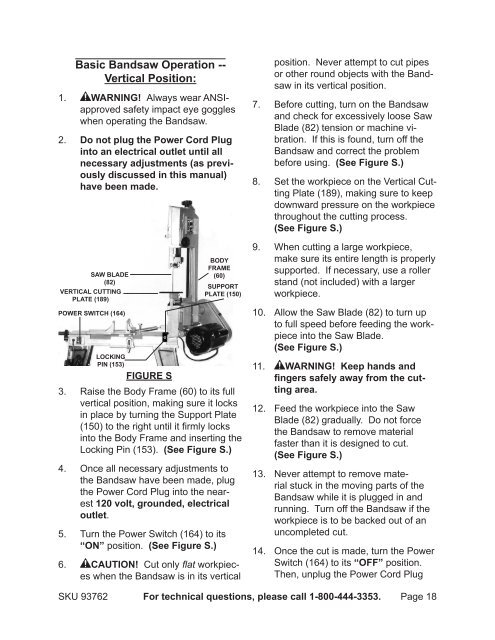
Basic Bandsaw Operation --Vertical Position:1. WARNING! Always wear ANSIapprovedsafety impact eye goggleswhen operating the Bandsaw.2.Do not plug the Power Cord Pluginto an electrical outlet until allnecessary adjustments (as previouslydiscussed in this manual)have been made.7.8.position. Never attempt to cut pipesor other round objects with the Bandsawin its <strong>vertical</strong> position.Before <strong>cutting</strong>, turn on the Bandsawand check for excessively loose SawBlade (82) tension or machine vibration.If this is found, turn off theBandsaw and correct the problembefore using. (See Figure S.)Set the workpiece on the Vertical CuttingPlate (189), making sure to keepdownward pressure on the workpiecethroughout the <strong>cutting</strong> process.(See Figure S.)SAW BLADE(82)VERTICAL CUTTINGPLATE (189)POWER SWITCH (164)LOCKINGPIN (153)FIGURE SBODYFRAME(60)SUPPORTPLATE (150)3. Raise the Body Frame (60) to its full<strong>vertical</strong> position, making sure it locksin place by turning the Support Plate(150) to the right until it firmly locksinto the Body Frame and inserting theLocking Pin (153). (See Figure S.)4.5.Once all necessary adjustments tothe Bandsaw have been made, plugthe Power Cord Plug into the nearest120 volt, grounded, electricaloutlet.Turn the Power Switch (164) to its“ON” position. (See Figure S.)6. CAUTION! Cut only flat workpieceswhen the Bandsaw is in its <strong>vertical</strong>9.10.When <strong>cutting</strong> a large workpiece,make sure its entire length is properlysupported. If necessary, use a rollerstand (not included) with a largerworkpiece.Allow the Saw Blade (82) to turn upto full speed before feeding the workpieceinto the Saw Blade.(See Figure S.)11. WARNING! Keep hands andfingers safely away from the <strong>cutting</strong>area.12.13.14.Feed the workpiece into the SawBlade (82) gradually. Do not forcethe Bandsaw to remove materialfaster than it is designed to cut.(See Figure S.)Never attempt to remove materialstuck in the moving parts of theBandsaw while it is plugged in andrunning. Turn off the Bandsaw if theworkpiece is to be backed out of anuncompleted cut.Once the cut is made, turn the PowerSwitch (164) to its “OFF” position.Then, unplug the Power Cord PlugSKU 93762 For technical questions, please call 1-800-444-3353. Page 18