pH 1000 manual - Oakton Instruments
pH 1000 manual - Oakton Instruments
pH 1000 manual - Oakton Instruments

You also want an ePaper? Increase the reach of your titles
YUMPU automatically turns print PDFs into web optimized ePapers that Google loves.
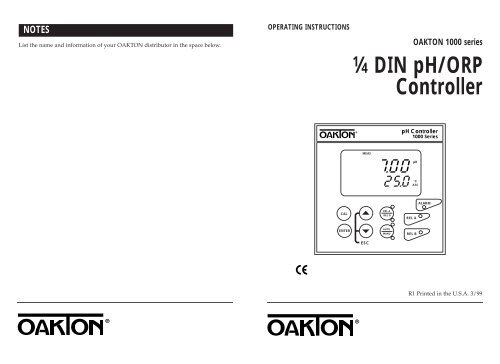
NOTESList the name and information of your OAKTON distributor in the space below.OPERATING INSTRUCTIONSOAKTON <strong>1000</strong> series1⁄4 DIN <strong>pH</strong>/ORPController<strong>pH</strong> Controller<strong>1000</strong> SeriesMEAS<strong>pH</strong>°CATCALARMCALREL AREL BREL AREL AENTERAUTOMANUREL BESCXXXXX-XXR1 Printed in the U.S.A. 3/99
2. Assembly and Installation2.1Typical Measurement and Control SystemA typical measurement system consists of:• power source• the OAKTON <strong>1000</strong>-series controller• a <strong>pH</strong> (or ORP) combinationelectrode with integrated or separatetemperature sensor (Pt 100 or <strong>1000</strong>)• installation hardware for electrode• an appropriate <strong>pH</strong> or ORPmeasurement cable• a final control element such as a pumpor valve• a recorder (optional)• a visual and/or audible alarm(optional)2.2Unit dimensionsThe field-tested control panel housing is 3.78" x 3.78" (96 x 96 mm).The front panel meets protection class IP 54.,Flat Gasket: 1 mm thick(Installed by customertaperedcorners on top)96 mmSide View (with mounting brackets)Panel Thickness: 45 mm maximum,y56 mm92 mm32 mm110/220VAC6 A max4-20 mA or 0-20 mAinput signalchart recorder,9 mmmaximum9 mm thick175 mmmaximumMEAS<strong>pH</strong> Controller<strong>1000</strong> Series<strong>pH</strong>160 mmMounting Bracket (2 included),y14 mm°CATCCALENTERESCREL AREL BAUTOMANUREL AREL AREL BALARMAlarm orIndicatorTop View (with mounting brackets), y, y<strong>pH</strong> electrode110 mminstallationhardwarefor electrode(i.e tee fitting)Pump/Valve/OtherPump/Valve/Other184 mmmaximum,y
2.3Back panelThe back panel consists of two different connectors: the 17-way PCB edge connectorand the 5-way screw terminal connector.2.4Electrical ConnectionsCAUTION: Electrical shock hazard! Make sure to remove AC power tothe controller before wiring input and output connections, and beforeopening the controller housing.PowerMainsRelay1Relay2AlarmHoldInputSignalOutput<strong>pH</strong>/mV1 2 3mA– +4 5 6 7 8 9 10 11 12 13 14 15 16 17Pt100/Pt<strong>1000</strong>0V/PAL S/AC: L N PEFUSE250VAC100mA (F)LNPERELAY11819 20 21 22RELAY2ALARMHOLD1 2 3 4 5 6 7 8 9 10 11 12 13 14 15 1617NC-+1. VAC live wire2. VAC neutral wire3. VAC protective ground wireNOTE: Power is selectable for 110 or 220 VAC via an internal jumper.Factory setting is indicated on the label on top of the controller.See Appendix 3 on page 66 for directions on switching the power type.4. Low set relay resting position5. Low set relay common6. Low set relay working position7. High set relay resting position8. High set relay common9. High set relay working position10. Alarm relay resting position11. Alarm relay common12. Alarm relay working position13. Hold function switch terminal 114. Hold function switch terminal 215. No connection16. 0/4 - 20 mA for – current connection17. 0/4 - 20 mA for + current connection
Electrode/temperature sensor connections2.5 2.6<strong>pH</strong>/mVBNC connectorHOLD functionThe HOLD function lets you force the relays to their resting position by applying acontact closure across terminals 13 and 14.When the HOLD function is activated, the HOLD indicator will appear in the upperleft corner of the display (see page 13 for a diagram of display characters).Typical applications:Pt100/ 0V/Pt<strong>1000</strong> PAL S/18 19 20 21 22Float or level switch: Connect to a float switch in your reagent feed tank to shutdown pumps or tanks when out of reagent.Flow switch: Connect to a flow switch to shut down pumps or valves when theprocess stream is shut down.Dual <strong>pH</strong>/ORP control: Connect relay of <strong>pH</strong> controller to hold input of the ORPcontroller to ensure that Reducing/Oxidizing agent is only added when at aspecified level.Typical level switch wiring<strong>pH</strong>/ORP controller18. Pt100/Pt<strong>1000</strong> lead 1 terminal (compensating)19. Pt100/Pt<strong>1000</strong> sense lead terminal (three-wire RTD)20. Pt100/Pt<strong>1000</strong> sense lead 2 terminalNOTE: If using a two-wire RTD, short terminal 19 to terminal 18.NOTE: Pt100/Pt<strong>1000</strong> is selectable via an internal jumper. Factory default isPt100. See Appendix 3 on page 66 for directions on switching theRTD type.21. <strong>pH</strong>/ORP lead 1 (solution ground, or potential matching pin)22. <strong>pH</strong>/ORP lead 2 (shield)Connect any <strong>pH</strong> or ORP electrode with a BNC connector to the BNC connectorlocated the upper right side of the controller back panel.PowerMains1 2 3AC: L N PERelay1Relay2mA– +4 5 6 7 8 9 10 11 12 13 14 15 16 17Level switchAlarmHoldInputTypical dual controller wiringSignalOutputIMPORTANT: when using controller in symmetrical mode, be sure to connectsolution ground (potential matching pin) to terminal 21. Failure to connect potentialmatching pin will result in unstable, erroneous readings. See Appendix 2 on page 65for more information on symmetrical mode.PowerMains1 2 3Relay1<strong>pH</strong> controllerRelay2AlarmHoldInputSignalOutputmA– +4 5 6 7 8 9 10 11 12 13 14 15 16 17PowerMains1 2 3Relay1ORP controllerRelay2AlarmHoldInputSignalOutputmA– +4 5 6 7 8 9 10 11 12 13 14 15 16 17AC: L N PEAC: L N PE
3. Overview: Keypad and display3.1KeypadCalibration keyLets you:1. Perform rapid 1- or 2-point calibration (password required).CAL3.2DisplayThe LCD display features two numerical displays that show measured values andstatus messages for easy, quick reference. The display provides short-text informationfor configuration and for setting parameters.• The upper (primary) display shows <strong>pH</strong> or ORP readings• The lower (secondary) display shows temperature readingsSETUP MEAS CALCONEnter keyLets you:1. Select individual parameters within the parameter group.2. Store input data in the Set-up mode.3. Start calibration in the Calibration mode.ENTERHOLDERR<strong>pH</strong>mV<strong>pH</strong>°CATC▲ and ▼ keysLet you:1. Select various parameter groups.2. Set parameters and numerical values in the Set-up mode.If you continuously hold the button, the setting speed increases.3. Control the relays in the Manual mode.4. Return to the Measurement mode when both keys are pressed at once.Relay control keyLets you:1. Switch between Auto and Manual relay operation(password required).Relay Selection keyLets you:1. Display momentarily set-point values for the relaycontacts in Auto relay operation mode.2. Switch between Relay 1 and Relay 2 inManual relay operation mode.▲▼AUTOMANUREL AREL BThe LCD display area includes the following indicators:HOLD: HOLD indicatorSETUP: Advanced Set-up modeMEAS: Measurement modeCAL: Calibration modeCON: Confirmation indicatorERR: error/alarm indicator°C: temperature unitsATC: indicates automatic temperature compensation: buffer indicator: electrode indicator
3.3LED IndicatorsThe LED indicators provide a quick way to check controller status. They showwhether a parameter within its set limits (green light) or outside its set limits(red light).Relay AGREEN — Measured value is within limit entered for Set-point 1.RED — Measured value is outside limit entered for Set-point 1.Relay BGREEN — Measured value is within limit entered for Set-point 2.RED — Measured value is outside limit entered for Set-point 2.AlarmNONE — No alarm condition exists.RED — Alarm condition exists. Measured value has beenoutside of set-point 1, set-point 2, or both for longerthan set alarm delay time value. This indicator alsowill light if the temperature sensor fails. The errorindicator will also appear on the display.REL AREL AREL BALARM4. Starting upWhen you initially connect power to the controller, it will automatically enterMeasurement mode. This controller features a large dual display.• The upper display will show the present <strong>pH</strong> (ORP) value• The lower display will show the temperature valueAnnunciators along the right side of the display will indicate whether the controller isset for <strong>pH</strong> or ORP measurement.4.1Security codesTo access calibration and set up functions, you need to enter a security code.This controller features two levels of security codes to protect the numerical values,calibration data and unit parameters from unintentional alteration.The two security codes are as follows:—<strong>pH</strong> (ORP) calibration mode security code = 11.— Setup mode security code = 22.You cannot change calibration and set up parameters unless you first enter thesecurity code. You can, however, view all parameters without knowing the securitycode.• Refer to Section 5 on page 19 for more information on the Calibration mode• Refer to Section 6 on page 23 for more information on the Advanced Set-up mode.Security code notesIf you are viewing the parameters only, the controller automatically reverts toMeasurement mode if you do not press a button for 1 minute. If you are changingparameters, the controller automatically reverts to Measurement mode if you do notpress a button for 15 minutes.
4.2Viewing operating parametersYou can view operating parameters without entering the security code.However, you must enter the security code to change parameters.Viewing relay set point values:1. Press the Relay Selection (Rel A/Rel B) key. The upper display will show yourset-point value for Relay A; the lower display will show “SP1”.2. After two seconds the upper display will show your set-point value for Relay B;the lower display will show “SP2”.3. After an additional two seconds the controller will return to Measurement mode.Viewing electrode slope and offset:1. Press the CAL key. The display will cue you to enter a security code (C.Cd).2. Leave the security code at “000”.3. Press the ENTER key. The upper display will show electrode slope. The lowerdisplay will show the <strong>pH</strong> reading at 0 mV.4. Press the ENTER key again to return to measurement mode.Viewing set up parameters:1. Press the ENTER key. The display will cue you to enter a security code (S.Cd).2. Leave the security code at “000”.3. Press the ENTER key again. This lets you view (not change) sub groups.4. Press the ▲ and ▼ keys to scroll through the groups.5. Press the ENTER key to view a sub group you wish to see in more detail.6. Press the ENTER key repeatedly to scroll through the parameters of the subgroup you selected.7. Press the ▲ and ▼ keys when you return to the sub group head to selectanother subgroup.8. Repeat steps 4 to 7 as needed.9. Press the ▲ and ▼ keys together (escape) at any time to return toMeasurement mode.4.3Entering <strong>pH</strong> (ORP) Calibration modeTo change calibration data, follow thesesteps:1. Press the CAL key. The upper displaywill show “000” and the lower displaywill show “C.Cd”.See figure A2. Press the ▲ key to scroll the upper displayto Calibration security code “11”.See figure B3. Press the ENTER key.NOTE: Pressing ENTER at a securitycode other than “11” will causethe controller to revert to theMeasurement mode.4. Press ENTER again . This lets youbegin calibration.Press the ▲ and ▼ keys simultaneously(escape) to return to Measurement mode.See pages 19-22 for <strong>pH</strong> and ORPcalibration instructions.Clearing the Calibration security code from the displayThe Calibration security code automatically resets from “11’ to “000” after youreturn to Measurement mode, so you do not need to clear the security code fromthe display.NotesWhen you enter the Calibration mode with code “11”, the unit will automaticallyenter into the HOLD mode until you program further instructions (HOLDannunciator appears in upper left corner of display). While on HOLD, thecurrent output and relay positions are frozen.AB
4.4Entering Advanced Set-up mode5. Calibration1. Press the ENTER key. The upperdisplay will show “000” and the lowerdisplay will show “S.Cd”.See figure A2. Press the ▲ key to scroll the upperdisplay to Set-up security code “22”.See figure B3. Press the ENTER key.NOTE: Pressing ENTER at a value otherthan “22” will cause the controllerto revert to the Measurement mode.4. You are now in the Advanced set-upmode.Press the ▲ and ▼ keys simultaneously(escape) to return to Measurement mode.See pages 23-57 for AdvancedSet Up mode instructions.Clearing the Advanced Set-up security code from the displayAfter you have entered the security code and returned to Measurement mode,whenever you press the ENTER key the security code “22” will appear on thedisplay. To conceal the security code, you must <strong>manual</strong>ly reset the code.To clear the Advanced Set-up security code from the display:1. Press the ENTER key in the Measurement mode.2. Press the ▲ and ▼ keys to set display to any security code except 11 or 22.3. Press the ENTER. key.NotesWhen you enter the Advanced Set-up mode with security code “22”, the unit willautomatically enter into the HOLD mode until you program further instructions(HOLD annunciator appears in upper left corner of display). While on HOLD, thecurrent output and relay positions are frozen.ABYou can reach the Calibration mode in two ways:• From calibration mode. From measurement mode, press the CAL key. Press the ▲and ▼ keys to enter Security code “11”. Press the ENTER key.• From advanced set up mode. From measurement mode, press the ENTER key. Pressthe ▲ and ▼ keys to enter Security code “22”. Press the ENTER key. Press the ▲ and▼ keys to scroll to set up mode “CAL PH”.SETUPHOLDHOLDCAL<strong>pH</strong><strong>pH</strong>AB5.1<strong>pH</strong> CalibrationThis unit features five preset buffer values(1.00, 4.00, 7.00, 9.00 and 10.00) forfast auto calibration. When you calibratethis instrument, you need a standard <strong>pH</strong>buffer solution that matches one of thesevalues.1. Enter Calibration mode. From measurementmode, press the CAL key.Press the ▲ key to enter Security code“11”. Press the ENTER key.See figure ANOTE: The upper and lower displayshould read CAL <strong>pH</strong>. If they read CALOrP, see section 6.7.1 on page 49 fordirections on how to switch from ORP to<strong>pH</strong> readings.2. Press the ENTER key to begin calibration.The “CAL” and buffer indicatorappear on the display.The upper display shows your presentuncalibrated reading. The lowerdisplay indicates one of the preset<strong>pH</strong> buffer values.3. Press the ▲ and ▼ keys to scroll thelower display to the buffer value thatmatches your standard solution.See figure Bcontinued on next page
4. Make sure the electrode is in yourbuffer solution. In ATC mode, you mustalso immerse the temperature sensor inthe buffer solution. In the symmetricallyhigh-resistance measurement mode, youmust also immerse the solution ground(potential equalization pin) in the buffer.5. Press the ENTER key to confirm thebuffer value. The electrode indicator andCAL indicator will both flash.6. Allow the electrode to stabilize. Youcan press the ENTER key to enter the calibrationvalue. If you do not press theENTER key, the controller will automaticallyenter the calibration value when theelectrode reading is stable.7. If you want to calibrate the controller at asecond point, repeat steps 4 through 6with a second buffer.See figure C8. After calibrating to a second buffer value,this controller automatically displaysslope in the upper display and offset inthe lower display.See figure D9. If you entered the Calibration modeusing the CAL key, the controller willautomatically return to the measurementmode. Or, press ▲ and ▼ (escape)together to return to measurement mode.HOLDREADYHOLDCALCAL<strong>pH</strong><strong>pH</strong>mV<strong>pH</strong>CD5.2ORP CalibrationSETUPHOLDCALHOLDmVAB5.2.1 ORP mV calibration1. Enter Calibration mode. Frommeasurement mode, press the CAL key.Press the ▲ key to enter Security code“11”. Press the ENTER key. The displayreads CAL ORP.See figureNOTE: If the upper and lower display readCAL PH, see section 6.7.1 on page 49 fordirections on how to switch from <strong>pH</strong> toORP mV readings.2. Place sensor in the calibration solution.3. Press the ENTER key to begin calibration.The “CAL” indicator will appearon the display. The upper display showsthe current mV output of the electrodewithout any offset adjustment.See figure4. Determine the mV value of your solutionwith a meter known to be accurate.5. Press the ▲ and ▼ keys to offset themV value on the controller display tomatch the value of the solution you aremeasuring.6. To return to Measurement mode,press the ENTER key again.NotesIf there is a calibration error, the controller displays “ERR”. If this happens, push both▲ and ▼ (escape) to restart the calibration beginning from step 1.When calibrating with <strong>manual</strong> temperature compensation, the controller automaticallychanges from the preset process temperature to the preset calibration temperature.After leaving the Calibration mode, the controller switches back to the process temperature.To set the calibration temperature and the process temperature, see section 6.3.4on page 31.You can view the values for electrode slope and offset without calibration—seesection 4.1 on page 16 for instructions. The slope and offset are re-determined aftereach calibration.
SETUPHOLDHOLDHOLD5.2.2 ORP % CalibrationThe ORP % mode lets you calibrate at twopoints: a low concentration sample (20%)and a high concentration sample (80%).To calibrate your controller for ORP:1. Enter Calibration mode. Frommeasurement mode, press the CAL key.Press the ▲ key to enter Security code“11”. Press the ENTER key. The displayreads CAL ORP.See figure ANOTE: If the upper and lower display readCAL PH, see section 6.7.1 on page 49 fordirections on how to switch from <strong>pH</strong> to ORP%readings.2. Press the ENTER key to begincalibration. The “CAL” indicator willappear on the display. The upper displaywill show 80. The lower display willshow C1 (= calibrated value 80%).See figure B3. Place sensor in the high concentrationsample (relative value of 80%).4. Press the ENTER key to confirm the value. The electrode indicator andCAL indicator will flash. The unit automatically adjusts its reading to matchthe solution value.5. Press the ENTER key to calibrate at 20% (low concentration value). The upperdisplay will show 20. The lower display will show C2 (= calibrated value 20%).See figure C6. Place sensor in the low concentration sample (relative value of 20%).7. Press the ENTER key to confirm the value. The electrode indicator andCAL indicator will flash. The unit automatically adjusts its reading to match thesolution value.8. If you entered the Calibration mode using the CAL key, the controller willautomatically return to the Measurement mode upon completion.NotesCALCALABCIf there is a calibration error, the controller displays “ERR,” and does not automaticallyreturn to Measurement mode. If this happens, push ▲ and ▼ at the same time(escape) to restart the calibration beginning from step 1.If you stop calibration after entering the first value, or if calibration is defective, thecontroller will use its original calibration data.6. Advanced set up modeThe OAKTON <strong>1000</strong>-series <strong>pH</strong>/ORP controllerfeatures eight sub groups that organize all set-upparameters. These parameters let you customizeyour controller for your exact process.The sub groups are:1. Offset adjustment (OFS)2. Temperature settings (SEt °C)3. Control Relay 1 configuration (SP1)4. Control Relay 2 configuration (SP2)5. Control type (Cntr)6. Current output (rng)7. Controller configuration (ConF)8. <strong>pH</strong> (or ORP) calibration (CAL <strong>pH</strong> or CAL ORP)To view set-up parameters without accessto change them:From measurement mode:• Push the ENTER key.• Leave the security code at “000”.• Push the ENTER key again.To change set-up parameters:From measurement mode:• Push the ENTER key.• Press the ▲ key to scroll to security code “22”.• Push the ENTER key again.See pages xx-xx for detailed information on eachset up parameter.NotesTo simplify operations, the controller will notdisplay set up parameters that are not relevantto the set up of the controller. For example: Ifyou set the controller for On/Off control, it willnot display pulse length settings.SETUPHOLDSETUPHOLDSETUPHOLDSETUPHOLDSETUPHOLDSETUPHOLDSETUPHOLDSETUPHOLD
6.1SETUPHOLDAdvanced set-up mode sub group overviewSee pages 26-27 for complete offset mode setup instructionsOFS: Offset modeAvailable during <strong>pH</strong> operation only:• Set probe offset valueSETUPHOLDSee pages 39-43 for complete controller typeset up instructionsCNTR: Control type•Select control type (on/off, pulsefrequency, pulse length, or controller off)On/off, pulse frequency, pulse length modes only:• Select break contact (de-energized) ormake contact (energized) relay typePulse frequency or pulse length modes only:• Set proportional band• Select relay period duration (or selectmaximum frequency)SETUPSET °C: Temperature settingsHOLDAvailable during <strong>pH</strong> operation only:• Toggle automatic temperaturecompensation (ATC) on or offIf ATC selected on:• Temperature sensor calibrationSETUPHOLDrng: Current output• Choose 0-20 or 4-20 mA output• Select value equivalent to 0 (4) mA• Select value equivalent to 20 mASee pages 28-32 for complete temperaturesettings set up instructionsIf ATC selected off:• Set process temperature• Set calibration temperatureSee pagess 44-47 for complete current outputset up instructionsSETUPHOLDSee pages 33-38 for complete Control Relay 1set up instructionsSP1: Set up for relay 1• Select value for relay 1• Select relay as low or high set point• Set hysteresis (dead band)• Set time delay for when relay switches on• Set time delay for when relay switches offSETUPHOLDSee pages 48-53 for complete controllerconfiguration set up instructionsConF: Controller configuration• select <strong>pH</strong>, ORP mV, or ORP %measurement, plus symmetrical orasymmetrical mode• Select alarm relay delay in seconds• Select steady or pulse alarm contact• Select electrode type: glass or antimony• Reset to controller default settingsSETUPCAL <strong>pH</strong> (ORP): <strong>pH</strong> (ORP) CalibrationSETUPHOLDSee pages 33-38 or complete Control Relay 2SP2: Set up for relay 2• Select value for relay 2• Select relay as low or high set point• Set hysteresis (dead band)• Set time delay for when relay switches on• Set time delay for when relay switches offHOLDSee pages 54-57 for complete calibration setup instructions• Calibrate first value• Calibrate second value• Automatic display of slope and offset aftersecond calibration point
OFS: Offset sub group6.2 6.2.1 Calculating the <strong>pH</strong> electrode offset valueOFS: Offset subgroup overviewThe Offset sub group lets you:1 Set <strong>pH</strong> probe offset valueThis sub group is available during <strong>pH</strong> operation only.SETUPHOLDNOTE: you can only perform electrode offset in the <strong>pH</strong> mode.The offset sub group lets you change the <strong>pH</strong> probe offset without removing the probefrom your system. You can make adjustments of up to ±120 mV of the displayed value.The controller will add or subtract the offset value from the measured <strong>pH</strong> and displaythe correct value. However, if you need to offset the value beyond the average offsetyou would expect in your application type, consider a full calibration or even electrodereplacement. To determine your <strong>pH</strong> offset value:1. Pull a grab sample from your system. Record the controller’s <strong>pH</strong> reading at thetime you take the sample.2. Measure the <strong>pH</strong> of your grab sample using a calibrated <strong>pH</strong> meter.Record the correct <strong>pH</strong> value.3. Subtract the correct <strong>pH</strong> value from the controller’s reading in step 1.This value is your offset.6.2.2. Entering the <strong>pH</strong> offset value:1SETUPHOLD<strong>pH</strong><strong>pH</strong>From measurement mode:1. Enter Advanced set-up mode.Push the ENTER key. Press the▲ key to scroll to security code “22”.Push the ENTER key again.2. Press the ▲ and ▼ keys to scrolluntil the upper display shows OFS.3. Press the ENTER key. The lowerdisplay shows the current measured<strong>pH</strong> value. The upper display showsthe current offset value.See bold figure at right.4. Press the ▲ and ▼ keys to adjust theoffset value until the upper displayshows the offset value calculated asexplained in directions above. As youadjust the offset value, the lower displaywill update to match the currentreading plus the electrode offset.5. Press the ENTER key to enter the offset value.SETUP6. Proceed to step 3 of section 6.2.1, or press the ▲ and ▼ keys together to return tomeasurement mode.NotesThe offset value is reset during full calibration. See Section 5.1 starting on page 19 for<strong>pH</strong> calibration instructions.HOLDSETUPHOLD<strong>pH</strong><strong>pH</strong>
6.3SET °C: Temperature settings6.3.1 Selecting automatic or <strong>manual</strong> temperature compensationSET °C: Temperature settingsThe temperature settings sub group lets you:1 Toggle automatic temperaturecompensation (ATC) on or offIf ATC selected on:2 Temperature sensor calibrationIf ATC selected off:3 Set process temperature4 Set calibration temperatureThis sub group is available during <strong>pH</strong> operation only.SETUPHOLDFrom measurement mode:1. Enter Advanced set-up mode.Push the ENTER key. Press the▲ key to scroll to security code “22”.Push the ENTER key again.2. Press the ▲ and ▼ keys to scrolluntil the upper display showsSEt °C.3. Press the ENTER key. The lowerdisplay will show “Atc”; the upperdisplay will show “on” or “oFF”.See figures at right4. Press the ▲ and ▼ keys to togglebetween ATC on and off.5. Press the ENTER key to confirmselection.6. • If you selected ATC on:Proceed to step 3 of section 6.3.2• If you selected ATC off:Proceed to step 3 of section 6.3.3• To return to Measurement mode:Press the ▲ and ▼ keys togetherSETUPHOLDSETUPHOLDSETUPSETUPHOLDHOLD1 1SETUPSETUPHOLDHOLD2 3SETUPHOLD4This set up group has two different sub paths. The screens you seedepend on if you select ATC on or off.
6.3.2 Temperature sensor calibration (ATC mode only)6.3.3 Manual temperature compensationNOTE: This parameter is blanked out whenthe controller is set for ATC off.Manual temperature compensation lets you ignore your temperature probe input oruse a probe without a built-in temperature sensor. The controller will compensate fortemperature at the values you enter.This mode lets you offset the controllerto compensate for small inaccuracies inyour temperature sensor. You can offsetthe temperature sensor up to ±5°C.1. Select “ATC on” as described inSection 6.3.1.2. Press the ENTER key. The upperdisplay shows the temperature offset.The lower display shows the currentmeasured temperature.See bold figure at right3. Compare the current measuredtemperature on the controllerdisplay to a thermometer knownto be accurate.4. Press the ▲ and ▼ keys to scroll thelower display to match the knowntemperature. The upper displayshows the amount of offset. You canoffset temperature up to ±5°C.5. Press the ENTER key to confirmselection and return to advanced setup mode.Return to Measurement mode bypressing the ▲ and ▼ keys (escape)simultaneously.SETUPHOLDSETUPHOLDSETUPHOLDFor <strong>manual</strong> temperature compensation, you can set two different temperatures:• process temperature• calibration temperatureThis allows calibration at a temperature other than your process temperature.Example: setting a calibration temperature of 25°C lets you calibrate using standardbuffer solutions at 25°C, even if your process temperature is a different temperature.You can set process and calibration temperatures between –9.9 to 125°C.Default temperature is 25°C.6.3.4 Setting <strong>pH</strong> Process TemperatureNOTE: This parameter is blanked out when the controller is set for ATC on.1. Select “ATC off” as described inSection 6.3.1.2. Press the ENTER key. The upperdisplay shows the current processtemperature and the lower displayshows P. O C (process temperature).See bold figure at right3. Press the ▲ and ▼ keys to adjust theprocess temperature value. You canadjust the value from –9.9 to 125°C.4. Press the ENTER key to confirmselection.5. Proceed to step 3 of section 6.3.5, orpress the ▲ and ▼ keys together toreturn to measurement mode.SETUPHOLDSETUPHOLDSETUPHOLDSETUPHOLD
6.3.5 Setting <strong>pH</strong> Calibration TemperatureNOTE: This parameter is blanked out whenthe controller is set for ATC on.6.4SP1 (SP2): Set up for Relay 1 (2) sub groupSP1 (SP2): Set up for relay SP1 (SP2) overview:From measurement mode:1. Select “ATC off” as described inSection 6.3.12. Press the ENTER key twice. Theupper display shows the currentcalibration temperature and thelower display shows C. O C(calibration temperature).See bold figure at right3. Press the ▲ and ▼ keys to adjustthe calibration temperature value.You can adjust the value from–9.9 to 125°C.SETUPHOLDSETUPHOLDSETUPHOLDRelay set up 1 and relay set up 2sub groups let you:1 Select value for relay SP1(SP2)2 Select relay as low or highset pointThese modes appear only ifon/off control type is selected(select control type in Controllersub group—see page 40):3 Set hysteresis (dead band)SETUPHOLD1HOLDSETUP<strong>pH</strong>°C4. Press the ENTER key to confirmselection and return to advanced setup mode.Return to Measurement mode bypressing the ▲ and ▼ keys (escape)simultaneously.SETUPHOLD45Set time delay for when relayswitches onSet time delay for when relayswitches off23SETUPHOLDSETUPHOLDThe SP1 option sets the operatingparameters for relay 1; the SP2option sets the operating parametersfor relay 2. Since these two groupsoffer the same set-up parameters,they are described together.4SETUPHOLD5SETUPHOLD
6.4.1 Selecting the relay set point values6.4.2 Selecting relay as high or low set pointThis lets you choose the <strong>pH</strong> (or ORP)value that will cause your controller toactivate.If this value is crossed, and the alarmrelay is selected ON, the alarm willtrigger. Additionally, the set point relayLED will turn from green to red.HOLDSETUPSETUPHOLD<strong>pH</strong>Select a low set point to activatecontroller when your value undershootsthe set point; select a high set point toactivate controller when your valueovershoots the set point.Using both SP1 and SP2, you can selectlo/lo, lo/hi, hi/lo, or hi/hi set points.SETUPHOLDHOLDSETUP<strong>pH</strong>From measurement mode:1. Enter Advanced set-up mode.Push the ENTER key. Press the▲ key to scroll to security code“22”. Push the ENTER key again.2. Press the ▲ and ▼ keys to scrolluntil the upper display shows SP1(SP2).3. Press the ENTER key. The upperdisplay shows the current set pointvalue and the lower display showsSP1 (SP2).See bold figure at right.4. Press the ▲ and ▼ keys to enteryour value for Set Point 1 (Set Point2). Your controller will activate at thevalue you select.5. Press the ENTER key to confirmyour selection.6. Proceed to step 3 of section 6.4.2, orpress the ▲ and ▼ keys together toreturn to measurement mode.SETUPHOLDSETUPHOLDSETUPHOLDSETUPHOLDFrom measurement mode:1. Enter Advanced set-up mode.Push the ENTER key. Press the▲ key to scroll to security code“22”. Push the ENTER key again.2. Press the ▲ and ▼ keys to scrolluntil the upper display shows SP1(SP2).3. Press the ENTER key until theupper display shows Lo or Hi (forlow or high set point) and the lowerdisplay shows SP1 (SP2).See bold figure at right.4. Press the ▲ and ▼ keys to togglebetween low (lo) or high (hi) setpoint for SP1 (SP2).5. Press the ENTER key to confirmyour selection.6. Proceed to step 3 of section 6.4.3, orpress the ▲ and ▼ keys together toreturn to measurement mode.SETUPHOLDSETUPHOLDSETUPHOLDSETUPHOLDNotesIf controller is set for proportionalcontrol, you will return to AdvancedSet up mode after pressing ENTER.See page 40 for information on changingyour controller type.
6.4.3 Selecting a hysteresis (dead band) value6.4.4 Setting an on-delay time lagNOTE: this parameter appears only if on/off control type is selected.NOTE: this parameter appears only if on/off control type is selected.Hysteresis prevents rapid contactswitching if your value is fluctuatingnear the set point. It allows the set pointvalue to overshoot by the specified hysteresisvalue. You can set the hysteresisvalue from:• <strong>pH</strong> mode: 0.1 to 1.0 <strong>pH</strong>• ORP mV mode: 10 to 100 mV• ORP % mode: 1 to 10.0%From measurement mode:1. Enter Advanced set-up mode.Push the ENTER key. Press the▲ key to scroll to security code“22”. Push the ENTER key again.2. Press the ▲ and ▼ keys to scrolluntil the upper display shows SP1(SP2).3. Press the ENTER key until theupper display shows the hysteresis(dead band) value and the lowerdisplay shows HYS.See bold figure at right.4. Press the ▲ and ▼ keys to enteryour hysteresis value for SP 1 (SP 2).Your controller will activate at thevalue you select.5. Press the ENTER key to confirmyour selection.6. Proceed to step 3 of section 6.4.4, orpress the ▲ and ▼ keys together toreturn to measurement mode.SETUPHOLDSETUPHOLDHOLDSETUPSETUPHOLDSETUPHOLDSETUPHOLD<strong>pH</strong>You can set a time delay for each relay,which stops the relay from switching ontoo soon. This helps prevent prematurerelay action and false alarms. This controllerlets you set a 0 to 2000 secondtime delay before your relay activates.From measurement mode:1. Enter Advanced set-up mode.Push the ENTER key. Press the▲ key to scroll to security code“22”. Push the ENTER key again.2. Press the ▲ and ▼ keys to scrolluntil the upper display shows SP1(SP2).3. Press the ENTER key until theupper display shows the “on delay”time and the lower display showsOn.d.See bold figure at right.4. Press the ▲ and ▼ keys to enteron delay time for Set Point 1(Set Point 2). Your controller willdelay activation for the number ofseconds (0 to 2000) you select.5. Press the ENTER key to confirmyour selection.6. Proceed to step 3 of section 6.4.5, orpress the ▲ and ▼ keys together toreturn to measurement mode.SETUPHOLDSETUPHOLDHOLDSETUPSETUPHOLDSETUPHOLDSETUPHOLD<strong>pH</strong>
6.4.5 Setting an off-delay time lagNOTE: this parameter appears only if on/off control type is selected.You can set a time lag for each relay,which helps to prevent your relayfrom switching off too soon. This helpsprevent premature relay action and falsealarms. This controller lets you set a0 to 2000 second time delay before yourrelay deactivates.From measurement mode:1. Enter Advanced set-up mode.Push the ENTER key. Press the▲ key to scroll to security code“22”. Push the ENTER key again.2. Press the ▲ and ▼ keys to scrolluntil the upper display shows SP1(SP2).3. Press the ENTER key until theupper display shows “off delay”time and the lower display showsOF.d.See bold figure at right.4. Press the ▲ and ▼ keys to enteroff delay time for Set Point 1(Set Point 2). Your controller willdelay activation for the number ofseconds (0 to 2000) you select.5. Press the ENTER key to confirmyour selection and return toadvanced set up mode.Press the ▲ and ▼ keys together toreturn to measurement mode.SETUPHOLDSETUPHOLDHOLDSETUPSETUPHOLDSETUPHOLDSETUPHOLD<strong>pH</strong>6.5SETUPHOLDSETUPHOLDCntr: Control type sub groupCNTR: Control type sub group overview1 Select control type:[on/off, proportional (pulse frequency or pulse length), or controller off]On/off, pulse frequency, and pulse length modes only:2 Select break contact (de-energized) or make contact (energized) relay typePulse frequency and pulse length modes only:3 Set proportional band4 Select relay period duration (or maximum frequency)SETUPHOLDSETUPHOLD1 1 1 1SETUP2 2 2HOLDSETUPHOLD3 3SETUPHOLDSETUPHOLDSETUPHOLDSETUPHOLDSETUPSETUPHOLDHOLD4 4
6.5.1 Selecting control type6.5.2 Selecting break/make contact relay typeThis mode lets you choose one of fourcontroller types:NOTE: If the controller type “oFF” is set,this parameter is blanked out.—L.Ct On/off control: use with pumpsor valves for fast response.SETUPThis mode lets you determine whichrelay state will trigger the alarm state:—PFC Pulse frequency proportionalcontrol: use for smooth operationof frequency-dependentpumps.—PLC Pulse length proportionalcontrol: use for smooth, precisecontrol of valves.HOLDOn/off control• de-energized (break contact): relay isde-energized in no alarm condition• energized (make contact): relay isenergized in no alarm conditionController default is de-energized (breakcontact).SETUPHOLD—oFF Controller off: use to operatecontroller as a monitor onlyor to keep relays fromswitching when changingset-up parameters.SETUPHOLDFrom measurement mode:1. Enter Advanced set-up mode. Pushthe ENTER key. Press the ▲ key toscroll to security code “22”. Push theENTER key again.De-energized relayFrom measurement mode:1. Enter Advanced set-up mode.Push the ENTER key. Press the ▲key to scroll to security code “22”.Push the ENTER key again.2. Press the ▲ and ▼ keys to scrolluntil the upper display shows Cntr.3. Press the ENTER key until theupper display shows the currentcontroller type and the lowerdisplay shows tyP.4. Press the ▲ and ▼ keys to selectyour controller type.See bold figures at right.5. Press the ENTER key to confirmyour selection.6. Proceed to step 3 of section 6.5.2, orpress the ▲ and ▼ keys together toreturn to measurement mode.SETUPHOLDSETUPHOLDPulse frequency proportional controlPulse length proportional control2. Press the ▲ and ▼ keys to scrolluntil the upper display shows Cntr.3. Press the ENTER key until thelower display shows rEL and theupper display shows the currentrelay selection (de-energized =dEEN or energized = EN).See bold figures at right.4. Press the ▲ and ▼ keys to choosede-energized (break contact) orenergized (make contact) relays.5. Press the ENTER key to confirmyour selection.6. Proceed to step 3 of section 6.5.3, orpress the ▲ and ▼ keys together toreturn to measurement mode.SETUPHOLDEnergized relayController off
6.5.3 Selecting proportional bandNOTE: If you set controller “oFF” or “L.Ct”, the parameter listed below is blanked out.This lets you determine the proportional band. The proportional band is the deviationfrom your set point at which the relays pulse at their maximum frequency (or at whichthe pulse length is at its maximum length). You can select this range from 10 to 200% offull-scale.From measurement mode:1. Enter Advanced set-up mode.Push the ENTER key. Press the ▲key to scroll to security code “22”.Push the ENTER key again.2. Press the ▲ and ▼ keys to scrolluntil the upper display shows Cntr.3. Press the ENTER key untilthe upper display shows theproportional range (a numberfrom 10 to 200%), and the lowerdisplay shows PrP.See bold figure at right.4. Press the ▲ and ▼ keys to choosethe proportional band value.5. Press the ENTER key to confirmyour selection.6. Proceed to step 3 of section 6.5.4, orpress the ▲ and ▼ keys together toreturn to measurement mode.SETUPHOLDProportional band6.5.4 Selecting period duration / maximum frequencyNOTE: If you set controller type “oFF” or “L.Ct”, the parameter listed below is blanked out.This mode lets you:• in pulse length (PLC) mode: set the period duration (seconds)• in pulse frequency (PFC) mode: set the maximum frequency (in 1 ⁄min)From measurement mode:1. Enter Advanced set-up mode.Push the ENTER key. Press the ▲key to scroll to security code “22”.Push the ENTER key again.2. Press the ▲ and ▼ keys to scrolluntil the upper display shows Cntr.3. Press the ENTER key until the lowerdisplay shows t.PL or F.PF—In PLC (pulse length) mode: Thelower display will show t.PL toindicate pulse length. The upperdisplay will show your currentpulse length. You can select anyvalue from 0.5 to 20 seconds.—In PFC (pulse frequency) mode:The lower display will show F.PFto indicate pulse frequency. Theupper display will show your currentmaximum pulse rate. You canselect any value from 60 to 120pulses per minute.See bold figures at right.4. Press the ▲ and ▼ keys to choosethe period duration or maximumfrequency, depending on your mode.5. Press the ENTER key to confirm yourselection and return to advanced setup mode.Press the ▲ and ▼ keys together toreturn to measurement mode.SETUPHOLDSETUPHOLDmaximum frequency (pulse frequency)Period duration (pulse length)NotesIn pulse frequency mode, when the measured value exceeds the deviation from theset-point, the controller will pulse the relay at this rate.
6.6rng: Current output sub grouprng: Current output subgroup overviewCurrent output sub group lets you:1 Choose 0-20 or 4-20 mA output2 Select <strong>pH</strong> (or ORP) value equivalent to 0 (4) mA3 Select <strong>pH</strong> (or ORP) value equivalent to 20 mA6.6.1 Choosing output range (4-20 or 0-20 mA)This parameter lets you select anoutput range of 4-20 or 0-20 mA. If youselect 4-20 mA, the minimum currentsupplied by terminal 17 and 16 of the17-way terminal block corresponds to4 mA. If you select 0-20 mA, the minimumcurrent corresponds to 0.SETUPHOLDSETUPHOLD123SETUPHOLDSETUPHOLDSETUPHOLDFrom measurement mode:1. Enter Advanced set-up mode.Push the ENTER key. Press the ▲key to scroll to security code “22”.Push the ENTER key again.2. Press the ▲ and ▼ keys to scrolluntil the upper display shows“rng”.3. Press the ENTER key until theupper display shows the output type(0-20 or 4-20) and the lower displayshows “out”.See bold figures at right.4. Press the ▲ and ▼ keys to selectyour output range: 0-20 or 4-20 mA.5. Press the ENTER key to confirmyour selection.6. Proceed to step 3 of section 6.6.2,or press the ▲ and ▼ keys togetherto return to measurement mode.SETUPHOLDSETUPHOLDSETUPHOLD
6.6.2 Selecting <strong>pH</strong> (ORP) value at 0 (4) mAThis parameter lets you choose a<strong>pH</strong> (ORP) value to be equivalent to0 (4) mA. Select the lowest value ofthe <strong>pH</strong> (ORP) range that you want arecorder or transmitter to detect.6.6.3 Selecting <strong>pH</strong> (ORP) value at 20 mAThis parameter lets you choose a<strong>pH</strong> (ORP) value to be equivalent to20 mA. Select the highest value of the<strong>pH</strong> (ORP) range that you want arecorder or transmitter to detect.From measurement mode:1. Enter Advanced set-up mode.Push the ENTER key. Press the ▲key to scroll to security code “22”.Push the ENTER key again.2. Press the ▲ and ▼ keys to scrolluntil the upper display shows“rng”.3. Press the ENTER key until theupper display shows a <strong>pH</strong> valueand the lower display shows“r.0” or “r.4”See bold figures at right.4. Press the ▲ and ▼ keys to selectthe <strong>pH</strong> (ORP) value equivalent to0 (4) mA.5. Press the ENTER key to confirmyour selection.6. Proceed to step 3 of section 6.6.3,or press the ▲ and ▼ keys togetherto return to measurement mode.SETUPHOLDSETUPHOLDSETUPHOLDSETUPHOLDFrom measurement mode:1. Enter Advanced set-up mode.Push the ENTER key. Press the ▲key to scroll to security code “22”.Push the ENTER key again.2. Press the ▲ and ▼ keys to scrolluntil the upper display shows“rng”.3. Press the ENTER key until theupper display shows a <strong>pH</strong> (ORP)value and the lower display shows“r.20”.See bold figures at right.4. Press the ▲ and ▼ keys to selectthe <strong>pH</strong> (ORP) value equivalent to20 mA.5. Press the ENTER key to confirmyour selection and return toadvanced set up mode.Press the ▲ and ▼ keys together toreturn to measurement mode.SETUPHOLDSETUPHOLDSETUPHOLDSETUPHOLDNotesThe measurement range correspondingto the current output must be at least1 <strong>pH</strong> unit or ±50 mV.
SETUP6.7ConF: Configuration sub groupConF: Configuration subgroup overviewConfiguration sub group lets you:1 Select <strong>pH</strong>, ORP mV, or ORP % measurement units2 Select alarm delay in seconds3 Select steady or pulse alarm contact4 Select electrode type (glass or antimony)5 Reset to default settingsSETUPHOLD12345SETUPHOLDHOLDSETUPHOLDSETUPHOLDSETUPHOLD6.7.1 Selecting measurement units (<strong>pH</strong>, ORP mV, or ORP %)This parameter group lets you select <strong>pH</strong>, ORP mV, or ORP % readings, andinput type symmetrical or asymmetrical. Use asymmetrical mode under normaloperating conditions. Use symmetrical mode when the measuring environmentis electrically noisy (i.e. in electroplating environments). Default setting is <strong>pH</strong>measurement in asymmetrical mode.See Appendix 2 on page 65 for more details on operation in symmetrical andasymmetrical modes.From measurement mode:1. Enter Advanced set-up mode.Push the ENTER key. Press the ▲key to scroll to security code “22”.Push the ENTER key again.2. Press the ▲ and ▼ keys to scrolluntil the upper display showsConF.3. Press the ENTER key until theupper upper display shows thecontrol type (<strong>pH</strong>, ORP mV or ORP%) and the lower display showssymmetrical (SY) or asymmetrical(ASY) input type. Choose ORPwithout the mV indicator for ORP %readings.See bold figure at right.4. Press the ▲ and ▼ keys to selectthe measurement units you require.5. Press the ENTER key to confirmyour selection.6. Proceed to step 3 of section 6.7.2, orpress the ▲ and ▼ keys together toreturn to measurement mode.NotesIMPORTANT: when using controllerin symmetrical mode, be sure toconnect solution ground (potentialmatching pin) to terminal 21. Failureto connect solution ground will resultin unstable, erroneous readings.SETUPHOLDSETUPHOLDSETUPHOLDSETUPHOLDSETUPHOLDSETUPHOLD
6.7.2 Selecting the alarm time lag6.7.3 Selecting steady or pulse contact for the alarm relayThis parameter group lets you select aperiod of time before the alarm relayactivates when your set point has beenovershot. You can select from 0 to 2000seconds.SETUPHOLDThis parameter group lets you select whether the alarm contact will operate as a steadycontact or a fleeting (single pulse) contact. Pulse contact closing time is 1 second.From measurement mode:From measurement mode:1. Enter Advanced set-up mode.Push the ENTER key. Press the ▲key to scroll to security code “22”.Push the ENTER key again.2. Press the ▲ and ▼ keys to scrolluntil the upper display shows ConF.3. Press the ENTER key until theupper display shows a numericalvalue (in seconds) and the lowershows AL.d.See bold figure at right.4. Press the ▲ and ▼ keys to selectthe length of the alarm delay(0 to 2000 seconds) you want.SETUPHOLDSETUPHOLDSETUPHOLD1. Enter Advanced set-up mode.Push the ENTER key. Press the ▲key to scroll to security code “22”.Push the ENTER key again.2. Press the ▲ and ▼ keys to scrolluntil the upper display showsConF.3. Press the ENTER key until theupper display shows StdY or FLEtand the lower shows AL.C.—AL.C = alarm contact—StdY = steady contact—FLEt = fleeting (single pulse)contactSee bold figure at right.4. Press the ▲ and ▼ keys to selectsteady or pulse contact.SETUPHOLDSETUPHOLDSETUPHOLDSETUPHOLD5. Press the ENTER key to confirmyour selection.SETUPHOLD5. Press the ENTER key to confirmyour selection.6. Proceed to step 3 of section 6.7.3, orpress the ▲ and ▼ keys together toreturn to measurement mode.SETUPHOLD6. Proceed to step 3 of section 6.7.4, orpress the ▲ and ▼ keys together toreturn to measurement mode.SETUPHOLDSETUPHOLD
6.7.4 Selecting <strong>pH</strong> sensor typeNOTE: This parameter is blocked out in ORP mode.This parameter group lets you configure the controller for glass or antimonyelectrodes. Use an antimony electrode for systems with hydrofluoric acid content.Default is glass.6.7.5 Reverting to factory default settingsUse this parameter to reset all settings to factory default. Changing from “no”to “YES” and pressing the ENTER key resets all settings to factory default.See Appendix 1 on page 64 for a listing of default settings.WARNING: If you select yes, all settings you have made are overwritten as a result!From measurement mode:From measurement mode:1. Enter Advanced set-up mode.Push the ENTER key. Press the ▲key to scroll to security code “22”.Push the ENTER key again.SETUPHOLD1. Enter Advanced set-up mode.Push the ENTER key. Press the ▲key to scroll to security code “22”.Push the ENTER key again.SETUPHOLD2. Press the ▲ and ▼ keys to scrolluntil the upper display shows ConF.3. Press the ENTER key until theupper display shows GLAS orAnTY and the lower shows EL.—EL = electrode—GLAS = glass—AnTY = antimonySee bold figure at right.4. Press the ▲ and ▼ keys to selectglass or antimony electrode type.5. Press the ENTER key to confirmyour selection.6. Proceed to step 3 of section 6.7.5, orpress the ▲ and ▼ keys together toreturn to measurement mode.NotesAfter each changeover, the factorycalibration data for slope and offsetare overwritten. Be sure to recalibrate(see Section 5.1 beginning on page 19).SETUPHOLDSETUPHOLDSETUPHOLDSETUPHOLDSETUPHOLD2. Press the ▲ and ▼ keys to scrolluntil the upper display shows ConF.3. Press the ENTER key until theupper display shows no and thelower shows dEF (default).See bold figure at right.4. Press the ▲ and ▼ keys to selectyes or no.5. Press the ENTER key to confirmyour selection.• If you selected “YES”, pressingthe ENTER key will overwriteall settings you have made andautomatically return you toMeasurement mode.• If you selected “NO”, pressingthe ENTER key confirms yourselection and returns you toadvanced set up mode. Press the▲ and ▼ keys together to returnto measurement mode.NotesSee Appendix 1 on page 64 for a chartof all factory default settings.SETUPHOLDSETUPHOLDSETUPHOLDSETUPHOLDSETUPHOLD
6.8Calibration sub groupThe calibration procedure in Advanced Set-up mode is identical to the procedure inCalibration mode. The only difference is that the controller will revert back to Set-UpMode (instead of Measurement mode) after calibration is complete.To reach Calibration mode, perform one of the following:• From calibration mode. From measurement mode, press the CAL key. Press the ▲and ▼ keys to enter Security code “11”. Press the ENTER key.• From advanced set up mode. From measurement mode, press the ENTER key. Pressthe ▲ and ▼ keys to enter Security code “22”. Press the ENTER key. Press the ▲ and▼ keys to scroll to set up mode “CAL PH”.SETUPHOLDHOLDCAL<strong>pH</strong><strong>pH</strong>AB6.8.1 <strong>pH</strong> CalibrationThis unit features five preset buffer values(1.00, 4.00, 7.00, 9.00 and 10.00) forfast auto calibration. When you calibratethis instrument, you need a standard <strong>pH</strong>buffer solution that matches one of thesevalues.1. Enter Calibration mode. From measurementmode, press the ENTERkey. Press the ▲ and ▼ keys to enterSecurity code “22”. Press the ENTERkey. Press the ▲ and ▼ keys to scrollto set up mode “CAL PH”.See figure ANOTE: The upper and lower displayshould read CAL <strong>pH</strong>. If they read CALOrP, see section 6.7.1 on page 49 fordirections on how to switch from ORP to<strong>pH</strong> readings.2. Press the ENTER key to begin calibration.The “CAL” and buffer indicatorappear on the display.The upper display shows your presentuncalibrated reading. The lowerdisplay indicates one of the preset<strong>pH</strong> buffer values.3. Press the ▲ and ▼ keys to scroll thelower display to the buffer value thatmatches your standard solution.See figure B4. Make sure the electrode is in yourbuffer solution. In ATC mode, you mustalso immerse the temperature sensor inthe buffer solution. In the symmetricallyhigh-resistance measurement mode, youmust also immerse the solution ground(potential equalization pin) in the buffer.5. Press the ENTER key to confirm thebuffer value. The electrode indicator andCAL indicator will both flash.6. Allow the electrode to stabilize. Youcan press the ENTER key to enter the calibrationvalue. If you do not press theENTER key, the controller will automaticallyenter the calibration value when theelectrode reading is stable.7. If you want to calibrate the controller at asecond point, repeat steps 4 through 6with a second buffer.See figure C8. After calibrating to a second buffer value,this controller automatically displaysslope in the upper display and offset inthe lower display.See figure D9. If you entered the Calibration modeusing the CAL key, the controller willautomatically return to the measurementmode. Or, press ▲ and ▼ (escape) togetherto return to measurement mode.NotesHOLDREADYIf there is a calibration error, the controller displays “ERR”. If this happens, push both▲ and ▼ (escape) to restart the calibration beginning from step 1.When calibrating with <strong>manual</strong> temperature compensation, the controller automaticallychanges from the preset process temperature to the preset calibration temperature.After leaving the Calibration mode, the controller switches back to the processtemperature. To set the calibration temperature and the process temperature, seesection 6.3.4 on page 31.You can view the values for electrode slope and offset without calibration—seesection 4.1on page 16 for instructions. The slope and offset are re-determined aftereach calibration.HOLDCALCAL<strong>pH</strong><strong>pH</strong>mV<strong>pH</strong>CD
6.8.2 ORP CalibrationSETUPB. ORP % CalibrationSETUPHOLDCALHOLDmVAA. ORP mV calibration1. Enter Calibration mode. From measurementmode, press the ENTER key. Pressthe ▲ key to enter Security code “22”.Press the ENTER key. Press the ▲ and ▼keys to scroll to set up mode “CALORP”.See figure ANOTE: If the upper and lower display readCAL PH, see section 6.7.1 on page 49 fordirections on how to switch from <strong>pH</strong> toORP mV readings.2. Place sensor in the calibration solution.3. Press the ENTER key to begin calibration.The “CAL” indicator will appear onthe display. The upper display shows thecurrent mV output of the electrode withoutany offset adjustment.See figure B4. Determine the mV value of your solutionwith a meter known to be accurate.5. Press the ▲ and ▼ keys to offset themV value on the controller display tomatch the value of the solution you aremeasuring.6. To confirm your selection and return toAdvanced Set Up mode, press theENTER key again.HOLDHOLDCALABThe ORP % mode lets you calibrate at twopoints: a low concentration sample (20%)and a high concentration sample (80%).To calibrate your controller for ORP:1. Enter Calibration mode. From measurementmode, press the CAL key. Press the▲ key to enter Security code “11”. Pressthe ENTER key. The display reads CALORP.See figureNOTE: If the upper and lower display readCAL PH, see section 6.7.1 on page 49 fordirections on how to switch from <strong>pH</strong> to ORP%readings.2. Press the ENTER key to begincalibration. The “CAL” indicator willappear on the display. The upper displaywill show 80. The lower display willshow C1 (= calibrated value 80%).See figure3. Place sensor in the high concentrationsample (relative value of 80%).BHOLDCALC4. Press the ENTER key to confirm the value. The electrode indicator andCAL indicator will flash. The unit automatically adjusts its reading to matchthe solution value.5. Press the ENTER key to calibrate at 20% (low concentration value). The upperdisplay will show 20. The lower display will show C2 (= calibrated value 20%).See figure6. Place sensor in the low concentration sample (relative value of 20%).7. Press the ENTER key to confirm the value. The electrode indicator and CALindicator will flash. The unit automatically adjusts its reading to match thesolution value. The controller returns to Advanced Set Up mode.NotesIf there is a calibration error, the controller displays “ERR,” and does notautomatically return to Measurement mode. If this happens, push ▲ and ▼ atthe same time (escape) to restart the calibration beginning from step 1.If you stop calibration after entering the first value, or if calibration is defective,the controller will use its original calibration data.
7. Alarm relay8. Taking measurementsThis controller features a separate alarm relay. When the alarm is activated, the redalarm LED will light on the controller and the ERR indicator will appear on the controllerdisplay. The ATC and ERR indicators will blink if the error is due to temperaturemeasurement. Additionally, you can hook a separate visual or audible alarm tothis relay.Delaying alarm relay actionDelay relay activation by 0 to 2000 seconds (factory default is 0 seconds). See section6.7.2 on page 51 for information on how to set an alarm delay.PowerMainsRelay1Relay2AlarmHoldInputSignalOutputIn normal measurement mode, thedisplay will appear as shown in thefigure at right. The readings will be in<strong>pH</strong>, ORP mV, or ORP%, depending onset up mode selection—see page 49 formore information. In ORP % mode,neither the <strong>pH</strong> nor the mV indicatorsdisplay.If ATC is selected on, the ATCindicator should be lit. If <strong>manual</strong>temperature selection is chosen, theATC annunciator will be off. Whenthe controller is in ATC mode, and thetemperature sensor wire is broken ordisconnected, an error message willbe displayed, plus the alarm LEDindicator and relay will be activated.MEAS<strong>pH</strong>°CATC1 2 3mA– +4 5 6 7 8 9 10 11 12 13 14 15 16 17AC: L N PE10. Alarm relay resting position11. Alarm relay common12. Alarm relay working position
9. Manual control modeYou can control devices connected to Relay A or Relay B from the front panel of thiscontroller. Automatic mode is the mode that the controller normally enters whenyou switch it on. In Automatic mode, the controller’s set-point values actuate therelays.In Manual mode, you have <strong>manual</strong> control of your relays so you can prime yourpump or check pump status without operating the entire system.To enter <strong>manual</strong> mode:1. Press the Relay Control (auto/manu) key. The upper display will show “000”;the lower display will show “S.Cd” to prompt you to enter the Advanced Set-upCode.2. Press the ▲ and ▼ keys to scroll the upper display until it reads “22”.3. Press the ENTER key. The Manual indicator by the Relay Control key will light.NOTE: Pressing ENTER at a value other than “22” will cause the controller to revertto the Measurement mode, and the relays will remain in automatic mode.4. Press the Relay Selection key to select either Relay A or Relay B. The LED nextto the currently selected relay (A or B) will light.The <strong>manual</strong> control options now available will depend on the control type (on/off,pulse length, or pulse frequency) you selected set in Section 6.5.1 (see page 40).—If you selected On/Off control: The upper display will read the current measuredvalue. The lower display will show “oFF” or “on” depending on the relay statusof the currently selected relay.—If you selected Pulse Length control: The upper display will read the currentmeasured value. The lower display will show the current pulse duration.—If you selected Pulse Frequency control: The upper display will read the currentmeasured value. The lower display will show the current pulse frequency.5. Press the ▲ and ▼ keys to change the Relay on/off status, pulse length, or pulsefrequency. The LED indicators at the right of the controller will also changebetween Red and Green to indicate Relay status.NOTE: If you wish to <strong>manual</strong>ly change the status of both relays, press the RELAYSELECTION key at this point and repeat step 5 for the second relay. Thisfirst relay will remain under <strong>manual</strong> control while you are setting the secondrelay.6. Press the RELAY CONTROL key to return to Measurement mode. The relays arenow back under automatic control.10. Specifications<strong>pH</strong> ORP mV ORP % Temp.Range 0.00 to 14.00 ±<strong>1000</strong> mV 0 to 100% –9.9 to 125.0°CResolution 0.01 <strong>pH</strong> 1 mV 0.1% 0.1°CAccuracy ±0.01 <strong>pH</strong> ±1 mV ±1 mV ±0.5°CNumber of control typesNumber of inputsNumber of set pointsOutputthree: proportional pulse length, proportionalpulse frequency and on/offonetwo: high and lowControl: 2 SPDT relays; 6A @ 110 VAC, 250 VAC maxAlarm: 1 SPDT relay; 6A @ 110 VAC, 250 VAC maxPulse: pulse length (0.5 to 20 pulses per second) orpulse frequency (60 to 120 pulses per minute)Current: galvanic 0-20/4-20 mA, 600 Ω max load,programmable boundariesHysteresis (dead band) 0.1 to 1.0 <strong>pH</strong>, 10 to 100 mV, or 1 to 10%Relay delay0 to 2000 secondsInput impedance 10 6 MΩElectrical isolation yes, galvanicallyElectrode useselectable glass or antimony (use antimony electrodesfor systems with hydrofluoric acid content)<strong>pH</strong> calibration1 or 2 points (<strong>pH</strong> 1.00, 4.01, 7.00, 9.00 or 10.00) via keypadTemperature sensor 100 Ω or <strong>1000</strong> Ω Platinum RTD, terminal stripPassword protection two level protection with up to 2/3-digit passwordlockout; first level gives calibration access, secondlevel allows parameter changesDisplaydual-line LCD; 4-digit upper and 3 1 ⁄2-digit lowerHousingIP54 front; 1 ⁄4 DIN sizeDimensions3 13 ⁄16"W x 3 13 ⁄16"H x 6 15 ⁄16"D (9.6 x 9.6 x 17.5 cm)Panel cut-out3 3 ⁄8"W x 3 3 ⁄8"H (9.2 x 9.2 cm)Operating temperature 14 to 140°F (–10 to 60°C)Weight1.5 lbs (0.7 kg) unit only; 2.5 lbs (1.2 kg) boxed
11. AccessoriesExtra controllersWD-35200-00WD-35200-05WD-35100-90Semi-domed electrodes<strong>1000</strong> series <strong>pH</strong>/ORP controller, 120 VAC<strong>1000</strong> series <strong>pH</strong>/ORP controller, 220 VACPower cord; 3 ft with bare leads, 3 prong U.S. plug, 110 VACThese double-junction electrodes feature a unique surface design that providesprotection from particulates while increasing flow across the junction to providecleaning. Ceramic junction provides toughness along with steady electrolyte flow.The graphite body probes act as a solution ground and take advantage of thecontroller’s symmetrical mode (see page 65 for more information). SealedKCl/AgCl reference. Have 10-ft cable, BNC connector, and stripped ends for ATCelement.WD-35807-00 Semi-domed bulb electrode, epoxy body, 3 ⁄4" NPT threadWD-35807-05 Semi-domed bulb electrode, epoxy body, 1" NPT threadWD-35807-10 Semi-domed bulb electrode, graphite body, 3 ⁄4" NPT threadWD-35807-15 Semi-domed bulb electrode, graphite body, 1" NPT thread11. Accessories, continued<strong>pH</strong> Buffer solutionsThese buffer solutions are standardized to ±0.01 <strong>pH</strong> at 25°C. They are labeled with<strong>pH</strong> vs. Temperature tables to adjust readings for accurate calibration. They are alsolabeled with the name and CAS number for all ingredients to conform to “Right-to-Know” requirements, and are supplied with an MSDS (Material Safety Data Sheet).WD-00654-00 <strong>pH</strong> 4.01, 1 pint bottleWD-00654-04 <strong>pH</strong> 7.00, 1 pint bottleWD-00654-08 <strong>pH</strong> 10.00, 1 pint bottleIn-line/submersible electrodesThese permanently encapsulated combination electrodes have a CPVC body and 3 ⁄4"NPT threads on both ends. Install in a tee fitting or on a submersion pipe for tankmounting. Sealed KCl/AgCl reference. Have 10-ft cable, BNC connector, andstripped ends for ATC element.WD-35801-02 In-line/submersible <strong>pH</strong> electrode; single junctionWD-35801-08 In-line/submersible <strong>pH</strong> electrode; double junctionWD-35801-21 In-line/submersible ORP electrode; double junction,Pt band sensorSubmersible electrodesThese combination electrodes are permanently encapsulated in a 3-ft L x 1"OD ABSpipe—install in a tank. Sealed KCl/AgCl reference. Have 10-ft cable, BNC connector,and stripped ends for ATC element.WD-35806-00 Submersible <strong>pH</strong> electrode; single junctionWD-35806-01 Submersible <strong>pH</strong> electrode; double junctionWD-35806-02 Submersible ORP electrode; double junction, Pt band sensor
12. Appendix 1: Advanced set up mode default settings 13. Appendix 2: Symmetrical modeType Parameter Value RemarksOFS <strong>pH</strong> offset 0.00 <strong>pH</strong> Zero offset valueSET C ATC ATC = ON Automatic Temperature CompensationTemp. offset 0.0°C Zero temperature offsetSP1 SP1 4.00 <strong>pH</strong> set point 1LO/HI trigger LO LO trigger modeHysteresis 0.50 <strong>pH</strong> —On delay time 0 seconds —Off delay time 0 seconds —SP2 SP2 10.00 <strong>pH</strong> set point 2LO/HI trigger HI HI trigger modeHysteresis 0.50 <strong>pH</strong> —On delay time 0 seconds —Off delay time 0 seconds —Cntr Control type LCt/tyP On/off controlRelay type dEEn Relay de-energized in no alarm conditionrng mA output 4-20 mA —4 mA value 2 <strong>pH</strong> 4 mA corresponds to 2 <strong>pH</strong>20 mA value 12 <strong>pH</strong> 20 mA corresponds to 4 <strong>pH</strong>ConF <strong>pH</strong>/ORP units <strong>pH</strong>/ASY Asymmetrical <strong>pH</strong> modeAlarm delay 0 seconds ALd = alarm delay = 0 secondsRelay mode StdY Relay activated mode: steadyProbe type GLAS Glass electrodeFactory default no Do not reset to factory defaultCAL Calibration 59.2 mV default setting assumes 0 mV offset at7 <strong>pH</strong> with 59.2 mV slopeYour controller can operate in asymmetrical or symmetrical mode. See Set Upprogram 6.7.1 on page 49 for information on selecting the appropriate mode.Asymmetrical mode works well in environments with where there is little or noelectrical noise. When there is electrical noise, the noise acts as a common signal andis picked up by both the <strong>pH</strong> and the reference electrodes. However, since the referenceelectrode is grounded to the ground potential of the amplifier, electrical noisewill be present only on the <strong>pH</strong> electrode. This noise is amplified along with the<strong>pH</strong> signal, which causes reading fluctuations in an electrically noisy atmosphere.Electrical noise from a DC source (as in an electroplating tank) will typically resultin stable but incorrect values.Symmetrical mode. For noisy electrical environments, the <strong>1000</strong> series controllersoffer Symmetrical Mode operation. To take advantage of Symmetrical operation,you must have an electrode with a solution ground (potential matching) pin.If your electrode does not have a solution ground, be sure to set the controller toAsymmetrical mode.Symmetrical mode avoids grounding the reference electrode by reconfiguring theinput to a floating differential mode (see diagram below right). The electrical noiseappears equally on the <strong>pH</strong> and reference electrodes, and is therefore rejected by theoperational amplifier.<strong>pH</strong> electrode wireAsymmetrical mode<strong>pH</strong>18 19 20 21 22reference electrode wire Pt100/ 0V/Pt<strong>1000</strong> PAL S/end view of electrodewithout built-insolution groundSymmetrical mode<strong>pH</strong> electrode wiresolution ground wire<strong>pH</strong>reference electrode wireend view of electrodewith built-in solutionground<strong>pH</strong> electrode bulb<strong>pH</strong> electrodebulbsolutionground
14. Appendix 3: Jumper positionsNote that there is a fuse internal to the controller. Before opening the unit, ENSUREthat the power cable is physically separated from the mains supply. Replace the fusewith the recommended part specified by the manufacturer.Jumper Positions - Internal to the controllerJP 1 Selects the input voltage 220 VAC. To switch to 110 VAC, use tweezers orneedle nose pliers to remove jumper from JP1 pins to JP2 pins.JP 2 Selects the input voltage 110 VAC. To switch to 220 VAC, use tweezers orneedle nose pliers to remove jumper from JP2 pins to JP1 pins.JP 3 Selects between Pt100 and Pt<strong>1000</strong>. To switch between Pt 100 and Pt <strong>1000</strong>,desolder jumper and resolder jumper in new position as indicated insidecontroller housing. If you are not equipped to do this, please contact yourOAKTON distributor for further information.15. WarrantyOAKTON warrants this meter to be free from significant deviations in materialand workmanship for a period of one year from date of purchase. OAKTONwarrants this probe to be free from significant deviations in material andworkmanship for a period of six months from date of purchase. If repair oradjustment is necessary and has not been the result of abuse or misuse withinthe warrantied time period, please return—freight prepaid—and correction willbe made without charge. OAKTON alone will determine if the product problem isdue to deviations or customer misuse.Out-of-warranty products will be repaired on a charge basis.16. Return of itemsRearFUSEJP2 JP1110 VAC220 VACFrontAuthorization must be obtained from our Customer Service Department beforereturning items for any reason. When applying for authorization, please includedata regarding the reason the items are to be returned. For your protection, itemsmust be carefully packed to prevent damage in shipment and insured against possibledamage or loss. We will not be responsible for damage resulting from careless orinsufficient packing. A restocking charge will be made on all unauthorized returns.NOTE: We reserve the right to make improvements in design, construction, andappearance of products without notice.Pt100/Pt<strong>1000</strong>JP3View from the top
17. IndexAAccessories ........................................62-63Advanced Set up mode ..................23-57Entering advanced set up mode......18Overview ......................................24-25Viewing advanced set up modeparameters ......................................16Alarm relay ............................................58Setting alarm time lag ......................50Setting steady or pulse contact........51Assembly, controller ..........................6-10Asymmetrical mode ..............................65ATC on or off, selection ........................29BBack panel ................................................8Break/make contact relay type,selecting ..............................................41CCalibration, ORPEntering calibration mode................17ORP mV calibration ..........................21ORP % calibration..............................22Viewing calibration parameters ......16Calibration, <strong>pH</strong>Entering calibration mode................17<strong>pH</strong> calibration ..............................19-20Viewing calibration parameters ......16Calibration subgroup, <strong>pH</strong> ..............54-57Calibration subgroup, ORP ............54-57Calibration, temperature ......................30Configuration subgroup..................48-53Control diagram, sample setup ............6Controller off (monitor only) ..............40Controller wiring ....................................9Control, <strong>manual</strong> ....................................60Control relays....................................33-38Control type, selecting on/offor proportional ..................................40Control type subgroup ....................39-43Current output sub group ..............44-47DDead band ..............................................36Default settingsDefault settings chart ........................64Reverting to default settings............53Dimensions ..............................................7Display ....................................................13EElectrical connections..............................9ElectrodeDetermining offset value ..................27Selecting sensor type ........................52Setting offset value ............................27Wiring ..................................................10FFactory default settingsDefault settings chart ........................64Reverting to default settings............53Frequency, setting ..................................43HHigh relay set point ..............................35Hysteresis................................................36IInstallation, controller........................6-10Introduction ..........................................4-5KKeypad ....................................................12LLED indicators........................................14Low relay set point................................35MManual temperature compensation....31Calibration temperature ..................32Process temperature ..........................31Manual control mode............................60mA output ........................................44-47Selecting 0-20 or 4-20 mA ................45Value at 0 (4) mA ..............................46Value at 20 mA ..................................47Maximum frequency, setting ..............43Measurement, <strong>pH</strong> (ORP) ......................59Measurement units(<strong>pH</strong> or ORP), setting..........................49Monitor only, controller as ..................40OOff-delay time lag..................................38Offset sub group (OFS)....................26-27OffsetElectrode..............................................27Temperature........................................30On-delay time lag ..................................37On/off control ........................................40ORPORP mV calibration ..........................21ORP % calibration..............................22ORP units, selecting ..........................49Output range (4-20/0-20 mA)..............45Overview of advancedset up mode ..................................24-25PPasswords ..............................................15Period duration, setting ........................43<strong>pH</strong><strong>pH</strong> calibration ..............................19-20<strong>pH</strong> units, selecting ............................49Probe wiring ..........................................10Proportional band, setting....................42Proportional control ..............................40Pulse contact for alarm relay, setting..55Pulse frequency control ........................40Pulse length control ..............................40RRecorder output................................44-47Selecting 0-20 or 4-20 mA ................45Value at 0 (4) mA ..............................46Value at 20 mA ..................................47Relay 1 & 2 subgroup ......................33-38RelaysAlarm ..................................................58Setting alarm time lag ..................50Setting steady or pulse contact....51Control ..........................................33-38Selecting set point values ............34Setting high or low set point........35Viewing relay set point values ....16Resetting controller to defaultsettings ................................................53Return of items ......................................67SSecurity codes ........................................15Specifications..........................................61Starting up ........................................15-18Steady contact for alarm relay, setting..55Symmetrical mode ................................65TTemperature calibration........................30Temperature, <strong>manual</strong> or automatic ....29Temperature offset ................................30Temperature settings (SET °C) ......28-32UUnits, selecting <strong>pH</strong> or ORP ..................49VViewing operating parameters ............16WWarranty..................................................67Wiring ..................................................9-10
NOTES