Using the Hollins Information System for ... - Hollins University
Using the Hollins Information System for ... - Hollins University
Using the Hollins Information System for ... - Hollins University

You also want an ePaper? Increase the reach of your titles
YUMPU automatically turns print PDFs into web optimized ePapers that Google loves.
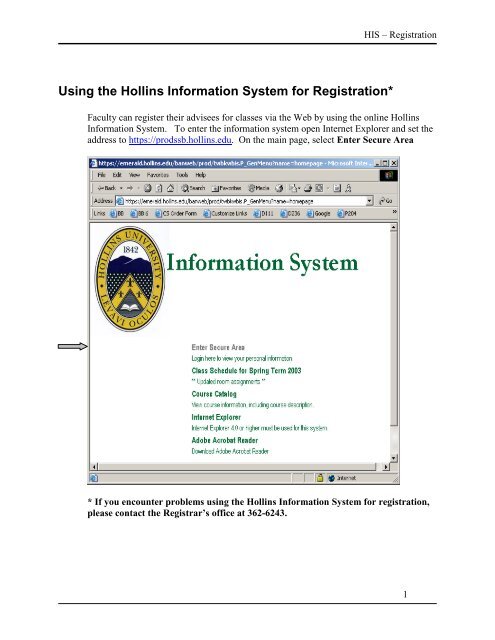
HIS – RegistrationLog in using your <strong>Hollins</strong> <strong>University</strong> ID <strong>for</strong> <strong>the</strong> User ID. Enter your 6 digit PIN. This is<strong>the</strong> PIN that was initially set to your birth date and which you should have changed <strong>the</strong>first time you used <strong>the</strong> <strong>Hollins</strong> <strong>In<strong>for</strong>mation</strong> <strong>System</strong>. Click on Login. If you <strong>for</strong>get yourPIN number, you can enter your User ID and <strong>the</strong>n click on <strong>the</strong> Forgot PIN? button. TheSecurity Answer screen will appear. You will see <strong>the</strong> security question that youpreviously selected. You may answer <strong>the</strong> security question and select <strong>the</strong> SubmitAnswer button. This brings up a screen where you may reset your PIN. Enter a new Pin.Reenter <strong>the</strong> new PIN. Click on Reset PIN. If you still cannot login, call <strong>the</strong> Registrar’soffice (x6243).After you login, from <strong>the</strong> Main Menu, select Faculty & Advisors.2
HIS – RegistrationFrom <strong>the</strong> Faculty & Advisors menu, select Registration Drop/Add.4
HIS – RegistrationTo select <strong>the</strong> term, click on <strong>the</strong> ▼ to <strong>the</strong> right of <strong>the</strong> Select a Term: dialog box. A list of termswill appear. Click on <strong>the</strong> term <strong>for</strong> which you want to register a studnet. It will becomehighlighted. Click <strong>the</strong> Submit button.5
HIS – RegistrationNext enter <strong>the</strong> Id of <strong>the</strong> student/advisee who you want to register and press Submit..6
HIS – RegistrationClick Submit to verify that <strong>the</strong> correct student was selected.If <strong>the</strong> person selected is not correct, click on ID Selection to reenter <strong>the</strong> student ID7
HIS – RegistrationThe screen that appears will show any courses <strong>for</strong> which <strong>the</strong> student is already registered,provide a place to enter new CRNs and have a link to <strong>the</strong> Class Search page <strong>for</strong> findingadditional course in<strong>for</strong>mation.If <strong>the</strong> student knows <strong>the</strong> CRNs <strong>for</strong> courses <strong>the</strong>y want to add, you can enter <strong>the</strong>m on thisscreen and click Submit Changes. If <strong>the</strong>y want to locate possible courses to add, click<strong>the</strong> Class Search button.9
HIS – RegistrationClick in <strong>the</strong> check box in first column to select each course that your advisee wants. Acheck mark will appear in <strong>the</strong> box. A C in <strong>the</strong> first column (and no check box) indicatesthat <strong>the</strong> course is closed. Dance 130 in <strong>the</strong> figure above is selected (checked). Dance125 is closed.12
HIS – RegistrationOn <strong>the</strong> Registration Add/Drop screen, you can see <strong>the</strong> courses <strong>for</strong> which <strong>the</strong> student is alreadyregistered (under Current Schedule) plus <strong>the</strong> course numbers <strong>for</strong> any courses he or she hasselected to add to <strong>the</strong> schedule. Click <strong>the</strong> Submit Changes button if you are satisfied with <strong>the</strong> selected courses and wantto register <strong>for</strong> <strong>the</strong>m.Click on Class Search if you want to select additional courses.Click on Reset to clear a CRN number you have typed on this screen. Reset will not clearcourse numbers entered by <strong>the</strong> system when you selected a course on <strong>the</strong> Look-Up Classto Add page. To delete one of <strong>the</strong>se CRN numbers, you should highlight <strong>the</strong> number andpress Delete.14
HIS – RegistrationHow to Get on <strong>the</strong> Wait List <strong>for</strong> a CourseIf you want to add a student’s name to <strong>the</strong> wait list <strong>for</strong> a course, do <strong>the</strong> following. On <strong>the</strong>screen where <strong>the</strong> class is listed as closed, note <strong>the</strong> CRN number <strong>for</strong> <strong>the</strong> course. Click on<strong>the</strong> Register button.15
HIS – RegistrationOn <strong>the</strong> Registration Add/Drop page, type in <strong>the</strong> CRN number under Add Classes.Click on Submit Changes.This will again bring up <strong>the</strong> Add/Drop Classes page, this time with a registration error.Click on <strong>the</strong> ▼under <strong>the</strong> Action column beside <strong>the</strong> course and select Wait ListedClick on Submit Changes.16
HIS – RegistrationThe student will be added to <strong>the</strong> Wait list. (see <strong>the</strong> Status column).17
HIS – RegistrationRegistration ErrorsAttempts to register <strong>for</strong> a class may cause errors. If an error occurs, it will be listed on<strong>the</strong> Registration Add/Drop page.Look in <strong>the</strong> Status column on <strong>the</strong> right to see <strong>the</strong> error message. In <strong>the</strong> figure above, <strong>the</strong>error occurred because <strong>the</strong> student attempted to register <strong>for</strong> 2 courses <strong>for</strong> which she didnot have <strong>the</strong> prerequisites.18
HIS – RegistrationThe following list shows a number of <strong>the</strong> errors that might occur along with <strong>the</strong> cause of <strong>the</strong>error.Registration Error Status MessagesError StatusCLOSED SECTIONCORQ_XXX REQ (where XXXis <strong>the</strong> course name)DUPLICATE CRNINSTRUCTOR PERMISSIONMAXIMUM HOURSEXCEEDEDPre-Requisite in ProgressPREQ AND TESTSCORE_ERRORREPEAT COUNT EXCEEDS XTIME CONFLICT WITH CRN #YOU CAN NOT ADD/DROPCLASSES DUE TO HOLDS ONYOUR RECORDThe section is full.Explanation of ErrorYou are trying to register <strong>for</strong> a class that also has arequired lab. You must also register <strong>for</strong> <strong>the</strong> lab.You attempted to register <strong>for</strong> a course <strong>for</strong> whichyou are already enrolled.The instructor must sign a DROP/ADD <strong>for</strong>m andyou should take it to <strong>the</strong> Registrar’s office.Undergraduates may register <strong>for</strong> no more that 18hours on <strong>the</strong> web. See <strong>the</strong> Academic Dean <strong>for</strong>permission to take additional hours.You must complete <strong>the</strong> pre-requisite be<strong>for</strong>e takingthis class.You do not have <strong>the</strong> necessary prerequisite <strong>for</strong> thiscourse.You have previously taken this course and may nottake it again.The class meets at <strong>the</strong> same time as a class <strong>for</strong>which you are already registered.There are holds on your account. You must clearup HOLDS be<strong>for</strong>e you are allowed to register19
HIS – RegistrationDropping a ClassYou can access <strong>the</strong> Registration Add/Drop page from <strong>the</strong> Registration menu to drop aclass from a student’s schedule. Click on <strong>the</strong> ▼in <strong>the</strong> Action column beside <strong>the</strong> courseCRN (in <strong>the</strong> Current Schedule section of <strong>the</strong> page). Select DROP from <strong>the</strong> drop downlist. Click on <strong>the</strong> Submit Changes button.20
HIS – RegistrationWorking with a New StudentWhen you are finished working with one student and want to work with ano<strong>the</strong>r one,select Return to Menu from <strong>the</strong> top of <strong>the</strong> Registration Add/Drop page or Look Up Classto Add page. On <strong>the</strong> Student <strong>In<strong>for</strong>mation</strong> page click ID Selection and enter <strong>the</strong> newstudent’s ID.Ending a SessionWhen you are finished registering students, click on <strong>the</strong> Exit button at <strong>the</strong> top of <strong>the</strong> pageand close your browser.21