How to build a cat enclosure - City of Tea Tree Gully
How to build a cat enclosure - City of Tea Tree Gully How to build a cat enclosure - City of Tea Tree Gully
If however you do not have access to a welder, either have the frame made for you at alocal engineering shop, or alternatively you can use prefabricated fittings, which areavailable from specialist welding and engineering workshops. They can also supply andcut square steel tubing to suit the fittings. The fittings come in a range of configurations,such as tee joint, corner joint, and right angle that will be used in your design. The squaretubing slips neatly into the joint and is fixed with a self-tapping Tec screw or pop rivet(Figure 1).Tools required– Cordless Drill and bits – F clamps with plastic feet– Tec screw driver bit – Angle grinder with cut off and grindingwheels– Pop rivet gun – Safety goggles– Roofing square – Leather gloves– Tape measure – Welder, (note that welding is optional)– Tin snips – Welding magnets– Handsaw – Welding hammer– Pliers – Welding mask– 8mm masonry bit∑– Bolt cutters (450mm minimum length)Material Checklist– 25 x 25 mm square tubing, primed – Hinges– 25 x 25 mm galvanised mesh – Latch– Scrap steel offcuts – Tie wire– 50 x 50 mm galvanised mesh – Primer and paint– Trimdec capping – 8mm Dyna-bolt– Tec screws and washers– Zincalume or Colourbond fence sheetingConstructionStep 1 - DesignFirst read through the step-by-step instructions to familiarise yourself with thecomponent units and the construction techniques and then establish the numberand type of units that you require.Go outside and decide on your preferred layout, marking it out with pegs, paint ortape. See “Cat enclosure attached to an existing structure” section, ConstructionStep 1, for an example of a stringline set out. It is a good idea to leave this set outovernight, and return the next day with fresh eyes and ideas. Once you have decidedon your layout, draw a simple plan to work from on 1cm x 1cm square graph paper togive you a 1:100 scale drawing. Use the plan to make up a materials and cutting listand set to work, following the simple step-by-step instructions.
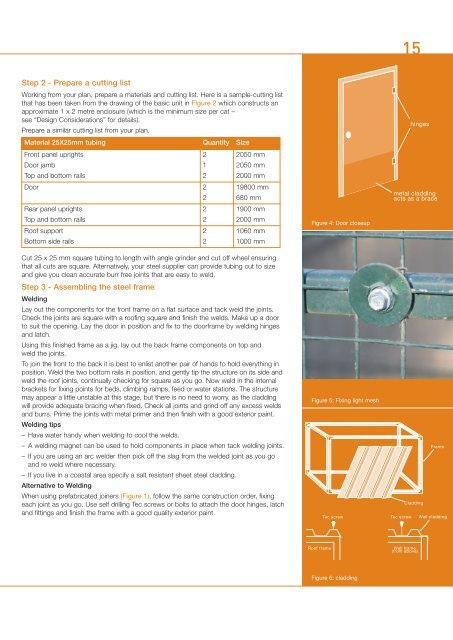
15Step 2 - Prepare a cutting listWorking from your plan, prepare a materials and cutting list. Here is a sample-cutting listthat has been taken from the drawing of the basic unit in Figure 2 which constructs anapproximate 1 x 2 metre enclosure (which is the minimum size per cat –see “Design Considerations” for details).Prepare a similar cutting list from your plan.Material 25X25mm tubing Quantity SizeFront panel uprightsDoor jambTop and bottom rails2122050 mm2050 mm2000 mmDoor 2219800 mm680 mmRear panel uprightsTop and bottom rails221900 mm2000 mmRoof supportBottom side rails221060 mm1000 mmFigure 4: Door closeuphingesmetal claddingacts as a braceCut 25 x 25 mm square tubing to length with angle grinder and cut off wheel ensuringthat all cuts are square. Alternatively, your steel supplier can provide tubing cut to sizeand give you clean accurate burr free joints that are easy to weld.Step 3 - Assembling the steel frameWeldingLay out the components for the front frame on a flat surface and tack weld the joints.Check the joints are square with a roofing square and finish the welds. Make up a doorto suit the opening. Lay the door in position and fix to the doorframe by welding hingesand latch.Using this finished frame as a jig, lay out the back frame components on top andweld the joints.To join the front to the back it is best to enlist another pair of hands to hold everything inposition. Weld the two bottom rails in position, and gently tip the structure on its side andweld the roof joints, continually checking for square as you go. Now weld in the internalbrackets for fixing points for beds, climbing ramps, feed or water stations. The structuremay appear a little unstable at this stage, but there is no need to worry, as the claddingwill provide adequate bracing when fixed. Check all joints and grind off any excess weldsand burrs. Prime the joints with metal primer and then finish with a good exterior paint.Welding tips– Have water handy when welding to cool the welds.– A welding magnet can be used to hold components in place when tack welding joints.– If you are using an arc welder then pick off the slag from the welded joint as you goand re weld where necessary.– If you live in a coastal area specify a salt resistant sheet steel cladding.Alternative to WeldingWhen using prefabricated joiners (Figure 1), follow the same construction order, fixingeach joint as you go. Use self drilling Tec screws or bolts to attach the door hinges, latchand fittings and finish the frame with a good quality exterior paint.Figure 5: Fixing light meshTec screwFrameCladdingTec screw Wall claddingRoof frameWall frame(from above)Figure 6: cladding
- Page 1 and 2: How tobuildcatprooffencingcat enclo
- Page 3: IntroductionContrary to popular bel
- Page 6 and 7: Cat Proof FencingHave you considere
- Page 8 and 9: Step 1 Measure and plan the project
- Page 10 and 11: Cat enclosureattached to anexisting
- Page 12 and 13: Material ChecklistFirstly, draw up
- Page 14 and 15: Figure 6: Fixing light meshSewnin d
- Page 16 and 17: Free standingcat enclosureCats love
- Page 20 and 21: Step 4 - InstallationIf fixing on a
- Page 22 and 23: THIS PUBLICATION ISFUNDED BY YOUR C
15Step 2 - Prepare a cutting listWorking from your plan, prepare a materials and cutting list. Here is a sample-cutting listthat has been taken from the drawing <strong>of</strong> the basic unit in Figure 2 which constructs anapproximate 1 x 2 metre <strong>enclosure</strong> (which is the minimum size per <strong>cat</strong> –see “Design Considerations” for details).Prepare a similar cutting list from your plan.Material 25X25mm tubing Quantity SizeFront panel uprightsDoor jambTop and bot<strong>to</strong>m rails2122050 mm2050 mm2000 mmDoor 2219800 mm680 mmRear panel uprightsTop and bot<strong>to</strong>m rails221900 mm2000 mmRo<strong>of</strong> supportBot<strong>to</strong>m side rails221060 mm1000 mmFigure 4: Door closeuphingesmetal claddingacts as a braceCut 25 x 25 mm square tubing <strong>to</strong> length with angle grinder and cut <strong>of</strong>f wheel ensuringthat all cuts are square. Alternatively, your steel supplier can provide tubing cut <strong>to</strong> sizeand give you clean accurate burr free joints that are easy <strong>to</strong> weld.Step 3 - Assembling the steel frameWeldingLay out the components for the front frame on a flat surface and tack weld the joints.Check the joints are square with a ro<strong>of</strong>ing square and finish the welds. Make up a door<strong>to</strong> suit the opening. Lay the door in position and fix <strong>to</strong> the doorframe by welding hingesand latch.Using this finished frame as a jig, lay out the back frame components on <strong>to</strong>p andweld the joints.To join the front <strong>to</strong> the back it is best <strong>to</strong> enlist another pair <strong>of</strong> hands <strong>to</strong> hold everything inposition. Weld the two bot<strong>to</strong>m rails in position, and gently tip the structure on its side andweld the ro<strong>of</strong> joints, continually checking for square as you go. Now weld in the internalbrackets for fixing points for beds, climbing ramps, feed or water stations. The structuremay appear a little unstable at this stage, but there is no need <strong>to</strong> worry, as the claddingwill provide adequate bracing when fixed. Check all joints and grind <strong>of</strong>f any excess weldsand burrs. Prime the joints with metal primer and then finish with a good exterior paint.Welding tips– Have water handy when welding <strong>to</strong> cool the welds.– A welding magnet can be used <strong>to</strong> hold components in place when tack welding joints.– If you are using an arc welder then pick <strong>of</strong>f the slag from the welded joint as you goand re weld where necessary.– If you live in a coastal area specify a salt resistant sheet steel cladding.Alternative <strong>to</strong> WeldingWhen using prefabri<strong>cat</strong>ed joiners (Figure 1), follow the same construction order, fixingeach joint as you go. Use self drilling Tec screws or bolts <strong>to</strong> attach the door hinges, latchand fittings and finish the frame with a good quality exterior paint.Figure 5: Fixing light meshTec screwFrameCladdingTec screw Wall claddingRo<strong>of</strong> frameWall frame(from above)Figure 6: cladding


