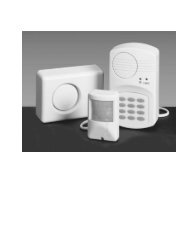
Mini-alarm MA 604
Mini-alarm MA 604
Mini-alarm MA 604
- No tags were found...

Create successful ePaper yourself
Turn your PDF publications into a flip-book with our unique Google optimized e-Paper software.
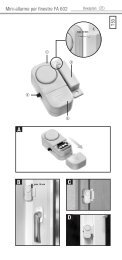
<strong>Mini</strong>-<strong>alarm</strong> <strong>MA</strong> <strong>604</strong>DexaplanATQWREUYBOIP{}CD10 m100°2°6 m10 m100°T 62A<strong>604</strong>_GB.indd 112.09.2006 11:32:33 U
Technical dataInfrared sensor with Fresnel lens: passive infrared movement detector (PIR)PIR sensing range (max.): - horizontal: approx. 10 m x 100° (at 20° C)- vertical: approx. 6 m x 2°Power supply:9 volt block-battery (9 V block 6LR61, alkaline)(not included in the delivery scope)Current consumption: max. 60 mA, or 9 volt DC mains adapter,min. 200 mA (internal pole of plug positive)(not included)Current consumption:max. 100 mAFunctions: , 0, and bell push contactAcoustic signal:1 x two-tone chime30 sec long siren of approx. 90 dB(A)Bell push contact:2 x two-tone chimeON delay:approx. 15 secDimensions: 7.7 x 4.2 x 7.0 cm (h x w x l)Weight:86 g (without batteries)Protection class:IIISafety instructionsThe following instructions are for your own safety and satisfaction when operating thedevice. Please note that non-compliance with these safety instructions can lead to aserious risk of accident.Explanation of the symbols and terms used:c Danger! failure to observe this instruction endangers life and health.m Caution! failure to observe this instruction poses a risk to property.Tip! - following this advice will help you to achieve optimal results.c Danger• Do not leave small children unsupervised with the packaging material. Danger ofsuffocation.• Do not leave children unsupervised with the device. Danger to life and risk of injury.• Do not use the device in the presence of sick or disabled people and animals.Shock caused by the <strong>alarm</strong> signal can endanger life and poses a risk of injury.• Do not damage any gas, electricity or telecommunication lines when fitting thedevice. Danger to life and risk of injury and damage.• Do not allow leaky or damaged batteries to come into contact with the skin oreyes. Use suitable protective gloves and clothing. Danger to life and risk of injuryfrom corrosive acid.• Never expose the device to fire, heat or to temperatures of over 50° C for anylength of time. Danger to life from explosion.• Do not short-circuit the batteries or recharge them. Danger to life from explosion.• Make sure that your hearing is not exposed to the loud <strong>alarm</strong> signal for anylength of time. This can cause serious damage to the hearing.A<strong>604</strong>_GB.indd 312.09.2006 11:32:34 U
• Make sure that the <strong>alarm</strong> signal is not triggered close to the ears. This can causeserious damage to the hearing.• Please handle the connecting cable with care. Install it so that it cannot get damagedand does not create a stumbling hazard. Otherwise there is danger to lifeand a risk of injury and fire.• Do not connect any other energy source to the socket of the bell push contactcable. There is otherwise danger to life.m Caution• Operate the device with a 9 V compound battery or a 9 volt mains adapter only.• Make sure that the battery is inserted with the correct polarity.• Remove the battery from the device for long periods of non-use.• Use new batteries only and under no circumstances used ones.• Make sure before connecting a 9 volt mains adapter to the mains power supplythat the mains current is 230 V ~ 50 Hz and has a max. 16 ampere fuse in accordancewith regulations.• Do not cover the device with any objects. This could diminish the function of theinfrared sensor with Fresnel lens or the loudspeaker.• Make sure that the device does not come into contact with moisture.• Protect the device from strong magnetic or electric fields.• Protect the device from high mechanical strain and shocks.• Only use the device with the supplied original parts or parts suitable for it.• Check before initial operation that all components are assembled in accordancewith the operating instructions.• Before assembly and initial operation of the device, check that the delivery iscomplete and undamaged.• The device must only be repaired by authorized and skilled specialists.Failure to observe this instruction poses a risk of damage resulting from improperuse and a loss of the warranty.• Install the device so that no heat sources such as radiators or air ducts are situatedin the range of the sensor. When activated, the mini-<strong>alarm</strong> could register thetemperature emitted by these objects as movements by heat-emitting bodies.• Use the device at normal room temperatures only. Higher or lower temperaturescan impair its function.Initial operationTip: the mini-<strong>alarm</strong> reacts sensitively and quickly to movements crossing itssensing range. It reacts less sensitively to movements directly towards the sensingrange (see Fig. C).You can use the mini-<strong>alarm</strong> to indicate movements of welcome (e.g. family members)and unwelcome visitors (e.g. intruders) with an audible signal. You can choose betweena two-tone chime and an approx. 30 sec. long siren. The device can be usedhorizontally for an area and vertically for a point of entry (“curtain effect”) in the monitoredroom (see Fig. D).The mini-<strong>alarm</strong> can be used as a door bell by connecting it to a bell push or otherclosing contact contact with the bell push contact cable.A<strong>604</strong>_GB.indd 412.09.2006 11:32:34 U
Preparation and material requiredThe stated materials are not included in the delivery scope. The information providedhere is non-binding and intended as a guide. The quality of the material depends onindividual local requirements.You will need:o Either a 9 volt block-battery 6LR61, alkaline, or a 9 volt mains adapter, min. 200 mA(positive internal pole of the plug) for power supply (not included in the delivery scope).o A pen to mark the installation position.o A crosstip screwdriver for installation with the fastening screws.Power supplym Caution!o Operate the device with a 9 V block-battery (6LR61, alkaline) or a 9 volt mainsadapter only.o Make sure that the battery is inserted with the correct polarity.o Remove the battery from the device for long periods of non-use.o Use new batteries only and under no circumstances used ones.o Make sure before connecting a 9 volt mains adapter to the mains power supplythat the mains current is 230 V ~ 50 Hz and has a max. 16 ampere fuse in accordancewith regulations.9 volt block-batteryo Set the function switch R to position 0.o Remove the battery compartment cover } completely from the reverse side ofthe mini-<strong>alarm</strong> casing Q (see Fig. B).o Connect a new 9 volt compound battery to the battery clip {.o Fasten the battery compartment cover properly on the reverse side of the mini-<strong>alarm</strong>casing.9 volt mains adaptero Before connecting, make sure that the polarity is correct.o Set the function switch R to position 0.o Connect the 9 volt mains adapter to the 9 volt DC mains adapter socket I.o Connect the 9 volt mains adapter to the mains supply.Setting up / installationo Estimate the supposed area of movement of heat-emitting bodies and choose theposition for the mini-<strong>alarm</strong>. From the mini-<strong>alarm</strong>, the sensing range extends to 10 mat approx. 100° for an area and 6 m at 2° for points of entry (see Fig. C and D).Monitoring an area in a roomo Position the mini-<strong>alarm</strong> at a height of approx. 1.0 – 1.5 m. Adjust theFresnel - lens E horizontally to the area to be monitored.Monitoring a doorwayo Position the mini-<strong>alarm</strong> above the object to be monitored. Adjust theFresnel - lens E vertically to the sensing range.A<strong>604</strong>_GB.indd 512.09.2006 11:32:35 U
Installationc Danger: Take care not to damage any gas, electricity or telecommunication lineswhen fitting the device. Danger to life and risk of injury and damage.Tip: to cut costs, connect the device for continuous operation to a 9 volt mainsadapter for the power supply.The mini-<strong>alarm</strong> can be installed to monitor an area permanently – this is recommendedfor continuous operation, e.g. at the entrance to your home. You can position themini-<strong>alarm</strong> by adjusting its angle on the mounting bracket.o Remove the mounting bracket carefully from the mini-<strong>alarm</strong>.o Hold the mounting bracket in the position you wish to install it and mark theholes in the rectangular surface of the mounting bracket W with the pen.o Screw the mounting bracket carefully in position with the fastening screws Y.o Mount the mini-<strong>alarm</strong> carefully on the mounting bracket and check that it isproperly positioned.Tip: you can also set up the mini-<strong>alarm</strong> to monitor an area for a short period oftime – this is recommended for travel use, e.g. in your hotel room.o Place the mini-<strong>alarm</strong> on e.g. a piece of furniture and check that it is properlypositioned.Activating / deactivating <strong>alarm</strong> functionsm Dangero Do not use the device in the presence of sick or disabled people and animals.Shock caused by the siren can endanger life and poses a risk of injury.o Make sure that your hearing is not exposed to the loud siren for any length oftime. This can cause serious damage to the hearing.o Make sure that the <strong>alarm</strong> is not triggered close to the ears. This can cause seriousdamage to the hearing.FunctionsYou can control the function of the mini-<strong>alarm</strong> with the function switch and by connectingit to a bell push or other type of make contact.- Activating the chime functiono Set the function switch to positionThe mini-<strong>alarm</strong> registers movement of a heat-emitting body with a two-tone chime.oo- Activating the <strong>alarm</strong> functionSet the function switch to positionLeave the sensing range of the mini-<strong>alarm</strong> within the ON delay of approx.15 seconds. The mini-<strong>alarm</strong> subsequently registers movement by a heat-emittingbody with a siren lasting approx. 30 sec.0 - Deactivating the <strong>alarm</strong> / chime functiono Set the function switch to position 0.o Monitoring of the sensing range is deacctivated.A<strong>604</strong>_GB.indd 612.09.2006 11:32:35 U
Connecting an external bell push or other closing contact.m Dangero Do not connect any other energy source to the socket of the bell push contactcable. Otherwise there is danger to life and a risk of fire.o Handle the cable with care. Install it so that it cannot get damaged and does not createa stumbling hazard. Otherwise there is danger to life and a risk of injury and fire.o Connect the mini-<strong>alarm</strong> to a bell push or other type of closing contact with thebell push contact cable U. When the connected bell push or closing contact isactivated, a two-tone chime rings twice. This function is active irrespective of thechosen position of the function switch ( , or 0 ).TroubleshootingFault Cause RemedyThe mini-<strong>alarm</strong> is notworking or is notworking properly.The battery has run out.The mains adapter is notconnected with the rightpolarity.Replace the battery.Correct the polarity ofthe mains adapter.The acoustic signal ofthe mini-<strong>alarm</strong> isweak.Slow reaction or shortrangeAlarm activation withno human movementThe battery has run out.Direction of movement isdirectly towards the mini<strong>alarm</strong>.Sensing range is temperaturedependent.Other heat source: heater,sunshine, air movement,animalsReplace the battery.Change the position ofthe mini-<strong>alarm</strong>Change the position ofthe mini-<strong>alarm</strong>.Stop the heat source orchange the position ofthe mini-<strong>alarm</strong>Maintenance and cleaningo Disconnect the mini-<strong>alarm</strong> from the power supply before maintenance and cleaning.o Check the technical safety and function of the device regularly.o Remove the 9 volt block-battery during long periods of non-use.o Use a fluff-free cloth and a mild detergent (no solvents) to clean the plastic andmetal surfaces.A<strong>604</strong>_GB.indd 712.09.2006 11:32:36 U
DisposalPlease take all packaging materials to a disposal facility in your city or district. Therecyclable packaging materials are selected for their ecologically compatible and disposalrelatedproperties. In accordance with European Directive 2002 / 96 / EC on used electricaland electronic appliances and its implementation in national law, used electricaldevices must be collected separately and recycled in an ecologically compatible manner.o Remove the batteries before disposing of the device.o Take the device to a disposal facility in your city or district after its useful life.As the consumer you are required by law (Battery Ordinance) to return all used batteries.Batteries containing harmful substances are identified with the symbols shown, indicatingthat their disposal in household waste is prohibited. The abbreviations for the criticalheavy metals are: Cd = Cadmium, Hg = Mercury, Pb = Lead.Please take all used batteries to a disposal facility in your city or district, or returnthem to the dealer.By following these requirements you are meeting your legal obligations and makingan important contribution to protecting the environment.WarrantyThis device has a warranty of 3 years from the date of purchase. The device wasmanufactured with care and inspected thoroughly before delivery. Please keep yourreceipt as proof of purchase. If you have a claim under the warranty, please contactthe service office for your country. This is the only way to ensure that your device canbe sent in free of charge.This warranty is only valid for the first purchaser and is not transferable.The warranty furthermore covers material or manufacturing defects only. It does notapply to wear parts or damage to fragile parts, e.g. switches or batteries. The productis solely intended for private use and not for commercial use. No claim for damagesmay be made in the event of a burglary. An <strong>alarm</strong> is no substitute for insurance coverand does not replace your duty of care.In the event of incorrect and / or improper handling, the use of force or any work onthe device that is not performed by the service office, the warranty shall expire. Thiswarranty does not restrict your statutory rights.ServiceInformation on dealing with problems can be found under www.dexaplan.com.If you have any questions, please contact our service office by email (service@dexaplan.de)or by telephone ( T 0870 241 3029) ( T1890 851 851). Here you will find allnecessary information on service questions such as returns, etc.Dexaplan GmbHPaul-Böhringer-Str. 3 · D - 74229 OedheimLast Information Update 07/2006 · Ident.-No.: 07-2006-<strong>MA</strong> <strong>604</strong>-GB / IEA<strong>604</strong>_GB.indd 812.09.2006 11:32:36 U