Distillation and Gas Chromatography
Distillation and Gas Chromatography
Distillation and Gas Chromatography

You also want an ePaper? Increase the reach of your titles
YUMPU automatically turns print PDFs into web optimized ePapers that Google loves.
<strong>Distillation</strong> <strong>and</strong> <strong>Gas</strong> <strong>Chromatography</strong>_______________________________________________________Be sure to read the sections in the Zubrick text about distillation <strong>and</strong> gas chromatographybefore coming to lab. Pay particular attention to the setup of the distillation apparatus <strong>and</strong>the correct position of the thermometer. The chapter on gas chromatography usesterminology developed in an earlier chapter on chromatography, so you will need toreference that chapter as well to underst<strong>and</strong> these terms.In today’s experiment, you will separate a mixture of two unknown liquids by fractionaldistillation. You will then analyze the mixture <strong>and</strong> identify the two unknowns using gaschromatography, a technique that separates liquids based on their boiling points.You may need to check out special glassware from the stockroom. Your instructor willlet you know.Experimental ProcedureYou will work in partners for the distillation, but both of you must turn in a complete setof data for the experiment, including temperature vs. volume plot <strong>and</strong> gaschromatograms. (See “Discussion <strong>and</strong> Conclusions” below for details.)Obtain a mixture of two unknown liquids from the stockroom. Record the number of theunknown in your notebook.The possible unknown liquids are:HexaneCyclohexaneHeptaneTolueneEthylbenzeneBe sure to have the boiling points for these five liquids in your pre-lab.Assemble the fractional distillation apparatus using the diagram on the next page as aguide. Prepare the fractionating column by inserting some steel wool into an aircondenser using a wooden applicator stick to gently push the steel wool into thecondenser. Fill the condenser loosely with the steel wool. (More tightly packed columnscan result in “flooding”, where pools of liquid accumulate in the column.) Secure allpieces of glassware together using the black washers <strong>and</strong> blue screw clamps provided inyour glassware kit. Clamp the condenser to a ring st<strong>and</strong>. Connect the lower port of thecondenser to the water line using a yellow hose (found in the common drawers). Attachanother hose to the upper port of the condenser <strong>and</strong> run it to the drain.
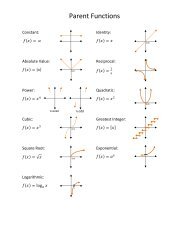
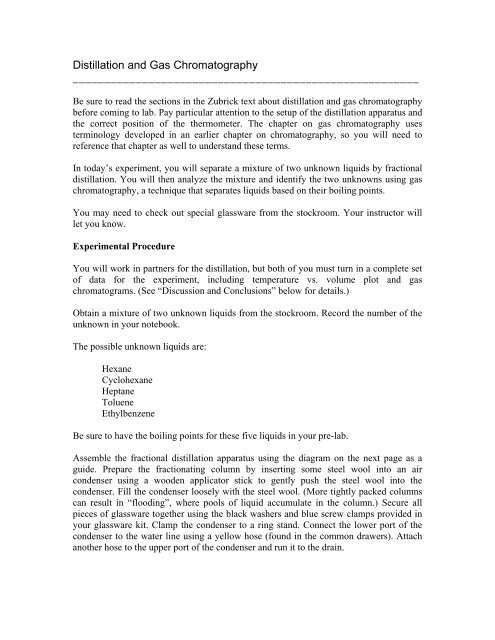
Thermometeradaptor shouldgo on top ofY-adaptorY-adaptorfractionatingcolumn(packed withsteel wool)**water hose out to drain*Heat source will be ahot plate equipped withan aluminum blockcondenserdistillation pot(should includeboiling stones!)water hose in from tap*vacuum adaptor* indicates a place where youshould have a plastic screw clamp.You should also clamp the entireapparatus to a ring st<strong>and</strong> usingthree-pronged clamps.vacuum port notused for thisexperimentdistillate will becollected here ingraduated cylinderUse a funnel to add your mixture to the distillation pot until the pot is between one-half<strong>and</strong> two-thirds full. To the cold mixture, add one or two boiling stones. Note that youmust add the boiling stones before you begin to heat the liquid. Adding boiling stones toheated liquid could cause sudden, violent boiling.Turn on the water line very slowly <strong>and</strong> carefully so that water slowly fills the condenserjacket. If you turn the water on too high, the water pressure may cause the hoses to popoff, creating a wet mess. The water coming out of the “out” hose should be a trickle.Finally, place a thermometer in the distillation apparatus. Do this last so that thethermometer does not break while you are assembling the apparatus. Be sure it is in theproper position to record the temperature of the vapors rising into the Y adaptor.For the heat source, use a hot plate <strong>and</strong> an aluminum block. Place the hot plate on a ringclamped to the ring st<strong>and</strong> so that at the end of the distillation, you can loosen this clamp<strong>and</strong> lower the heat source away from the distillation apparatus. The distillation pot shouldsit firmly in one of the holes in the aluminum block. Turn on the heat source <strong>and</strong> bringthe liquid to a smooth boil. This may take a while (20 minutes or more). As the mixturebegins distilling, the distillate should drip into the receiving container at about 10 drops
per minute. Be patient! Heating too quickly can result in violent, sudden splashing calledbumping.Place a 10-mL graduated cylinder under the vacuum adaptor to collect distillate. This willenable you to monitor the volume of distillate collected. Once the liquid begins to distill,begin to record the vapor temperature at every 0.5 mL of distillate collected. At 1.0 mL,quickly remove the cylinder <strong>and</strong> collect several drops of distillate in a labeled vial. Whenyou have collected the drops, remove the vial <strong>and</strong> cap it immediately. Return the cylinderto its position under the vacuum adaptor <strong>and</strong> continue collecting distillate <strong>and</strong> recordingthe temperature every 0.5 mL. One partner should take this sample to the gaschromatograph for analysis (see below for instructions).When you have collected a total of 5.0 mL of distillate, collect another sample (severaldrops) in another vial. The other partner should take this sample to the gaschromatograph for analysis.Continue collecting distillate <strong>and</strong> recording the temperature every 0.5 mL until a verysmall amount of liquid remains in the distillation pot. Do not distill to dryness. If youcollect more than 10 mL, you can pour the contents of the cylinder into a waste beaker<strong>and</strong> continue collecting.To discontinue the distillation, remove the heat source by loosening the ring clamp <strong>and</strong>lowering the heat source away from the distillation apparatus.<strong>Gas</strong> <strong>Chromatography</strong>Your liquid samples have very small volumes <strong>and</strong> may have boiling points well undernormal body temperature (unless you are a lizard). You should therefore keep the samplevials capped <strong>and</strong> avoid holding them tightly or warming them; in fact, it’s a good idea tokeep them on ice until you are ready to inject your sample into the gas chromatograph sothat your sample does not evaporate. If your sample evaporates completely, you’re out ofluck, as there will not be time to restart the experiment. If only part of your sampleevaporates, your data may be skewed, because your sample will now be artificiallyenriched in the higher-boiling component.You will inject a small amount (probably 1 or 2 µL) of your sample into the instrumentusing an analytical syringe. Note that the needle on the analytical syringe is delicate <strong>and</strong>easily bent. Treat the syringe gently <strong>and</strong> carefully. Rinse the syringe with the solventprovided before using it. Do this by carefully pulling up solvent into the syringe, thenexpelling it into a waste container. Repeat this rinse two or three times. Then draw asmall volume of your sample into the syringe <strong>and</strong> insert the needle into the injection porton the GC as directed by your instructor. Push the plunger to inject the sample into theinstrument. At the same time, your instructor or another student will mark the injectionon the chart recorder.
Within several seconds, an injection peak may appear on the chart recorder. Over the nextfew minutes, one or more additional peaks should appear. While you are waiting for thepeaks to appear, write down in your notebook the injection port temperature, the columntemperature <strong>and</strong> the detector temperature. Your instructor will show you where to findthese readings on the instrument.Your instructor will let you know when the run is complete. Tear off the trace from thechart recorder. This is the chromatogram for this sample. On the chromatogram, write thefollowing information:Chart speed (this will be a setting on the chart recorder)Sample (1.0 mL or 5.0mL)Obtain a st<strong>and</strong>ard for the same instrument you used to run your sample. The st<strong>and</strong>ardis a chromatogram with all the possible unknown compounds on it. We have taken amixture of the compounds <strong>and</strong> injected it into the instrument. The relative peak heights<strong>and</strong> sizes do not matter, but the retention times do. The st<strong>and</strong>ard should have the chartspeed written on it. We will most likely have photocopies of the st<strong>and</strong>ard near theinstrument for you to take. It’s a good idea to make a note on the st<strong>and</strong>ard as to whichsample it corresponds to, since you <strong>and</strong> your partner will be exchanging data.Use the chart speed <strong>and</strong> the top of the peak to calculate the retention times for all peakson the st<strong>and</strong>ard except the injection peak. (See the last page of the h<strong>and</strong>out forinstructions.) Use the list of unknowns to assign the identity of each peak using theboiling points. Remember that the compounds will elute in order of boiling point, fromlowest to highest, <strong>and</strong> that you read the chromatogram from right to left.Calculate the retention times for all peaks on your chromatogram except for the injectionpeak.Waste DisposalDispose of all wastes in the waste carboy in the main fume hood.Used steel wool from the fractionating column should be carefullyremoved from the column <strong>and</strong> thrown in the trash after it isallowed to dry.Used boiling stones can be thrown in the trash.Small sample vials may be discarded in the glass disposal. Youmay also rinse them with acetone <strong>and</strong> keep them in your drawer.Please clean your fume hood <strong>and</strong> bench areas. Throw away allused paper towels <strong>and</strong> put away all equipment. Don’t leave a messfor your fellow students!
Hints- Be sure to add boiling stones before you begin the distillation.- Be sure the thermometer is correctly positioned in the Y-adaptor.- Be sure the glassware is joined properly <strong>and</strong> snugly, that all joints are clamped<strong>and</strong> that the apparatus is clamped properly to ring st<strong>and</strong>(s).- Do not heat the mixture too quickly. Trying to rush through the experiment willlikely result in lost time <strong>and</strong>/or points, as you’ll have to repeat it <strong>and</strong> there may not betime in the lab period.- Don’t turn the condenser water up too high. Use the yellow tubing to run water,not black vacuum hoses. Both types are available in the common drawers.- Fractionating columns are susceptible to drafts, which cause fluctuations in thetemperature of the vapors in the column <strong>and</strong> thus unsuccessful distillation. Insulate thefractionating column by wrapping it in aluminum foil.Discussion <strong>and</strong> ConclusionsUse your data to construct a plot of temperature vs. volume of distillate collected.Use this plot to determine the approximate boiling points of the two liquids in yourmixture.As noted above, calculate the retention times for the peaks in the st<strong>and</strong>ard <strong>and</strong> forthe peaks in your chromatogram.Calculate the approximate relative areas of each peak using the method describedon the last page of this h<strong>and</strong>out. Don’t worry too much about precision, but rather focuson relative areas. Report these areas as percentages. For example, if the area of Peak A is19 cm 2 <strong>and</strong> the area of Peak B is 5 cm 2 , then Peak A represents 79% of the mixture <strong>and</strong>Peak B represents 21% of the mixture.Use all the data discussed above to identify the two compounds in your mixture.Your lab report should include:- Complete temperature vs. volume of distillate data- Plot of temperature vs. volume of distillate data
- Copies of chromatograms <strong>and</strong> st<strong>and</strong>ards for both your sample <strong>and</strong> yourpartner’s. If you are good with a computer <strong>and</strong> scanner, you can scan all four of thesedocuments <strong>and</strong> put them on one or two pages.- A table with the relative amounts of each compound in each chromatogram.- The identities of your two unknown liquids.As your conclusion, comment on the efficiency of fractional distillation as aseparation technique – that is, how well did the distillation separate the two componentsof the mixture?Post-lab QuestionRead in the Zubrick text about simple distillation <strong>and</strong> compare this techniquebriefly to fractional distillation. What is the main difference in the glassware setupbetween simple <strong>and</strong> fractional distillations? Which approach is a more efficientseparation method, <strong>and</strong> why?
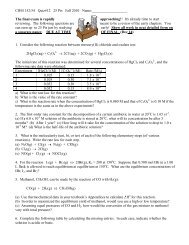
Analyzing a Typical <strong>Gas</strong> ChromatogramThe chromatogram you obtain today will resemble something like the diagram shownbelow. The injection peak will be at the far right, <strong>and</strong> the peaks will elute from right toleft. Thus, since the peaks elute in order of boiling point, Peak 1 corresponds to thelower-boiling compound in the mixture, <strong>and</strong> Peak 2 corresponds to the higher-boilingcompound.Distance from injection to Peak2Distance from injection to Peak 1injectionpeakPeak2Peak1read chromatogram in this directionCalculating the retention time. The retention time is characteristic for a givencompound under a specified set of conditions (e.g., temperatures, column type, chartspeed). To calculate the retention time, you will need the speed of the chart recorder, orthe “chart speed.” Measure the distance from the injection peak to the top of the peak ofinterest as shown in the diagram. Then use the chart speed to convert this distance to atime – the retention time. For example, if the chart speed in the above example is 4cm/min <strong>and</strong> the distance to Peak 1 is 24 cm, then the retention time is 6 min.Calculating the approximate area of the peak. Measure theheight of the peak from its high point to the baseline.Estimate half the height of the peak, <strong>and</strong> measure its widthat this point. The approximate area is given byhh × w 1/2w 1/2