Installation Guide.pdf - Lumber Liquidators
Installation Guide.pdf - Lumber Liquidators
Installation Guide.pdf - Lumber Liquidators

You also want an ePaper? Increase the reach of your titles
YUMPU automatically turns print PDFs into web optimized ePapers that Google loves.
Page 1 of 13Thank you for choosing VIRGINIA MILL WORKSENGINEERED Handscraped and Distressed floors!ENGINEERED INSTRUCTIONS<strong>Installation</strong> methods; Staple-down, Nail-down, Glue-down or Edge-glue and floatInstall our wood flooring according to the general installation guidelines as set forth by the (NWFA) The NATIONAL WOOD FLOORINGASSOCIATION WWW.NWFA.ORG. However, because of various vendor and product requirements the Virginia Millworks instructionstakes precedence. Virginia Millworks denies any responsibility for problems beyond its control such as but not limited to; job-site andsubfloor conditions, improper storage, environmental or moisture related issues, installation and tool usage. Where applicable complywith local or International Residential Codes (IRC)CONTENTPage 2APPLICATIONSOWNER/INSTALLER RESPONSIBILITIESJOB SITE INSPECTIONHANDLE WITH CAREVENTILATED CRAWL SPACESPage 3ACCLIMATION/CONDITIONING OF THE FLOORINGGENERAL INFORMATIONTOOL LISTPage 4NAILDOWN OVERVIEWMOISTURE TESTINGWOOD SUBFLOOR PREPARATIONPage 5FASTENER SELECTIONFASTENER SPACINGNAILDOWN INSTRUCTIONSPage 6NAILDOWN INSTRUCTIONS CONTINUEDPage 7GLUE DOWN OVERVIEWCONCRETE SUBFLOOR PREPARATIONPage 8RECOMMENDED AHESIVESGLUE DOWN INSTRUCTIONSPage 9GLUE DOWN INSTRUCTIONS CONTINUEDDOUBLE STICK INSTRUCTIONSFLOATING FLOOR INSTRUCTIONSPage 10FLOATING FLOOR INSTRUCTIONS CONTINUEDPage 11MOLDINGSSEASONAL CHANGESRADIANT HEATPage 12ROUTINE MAINTAINANCEPage 13APPROVED UNDERLAYMENTSForm: INSTALL – Virginia Mill Works Engineered Issued: 05/14/2013
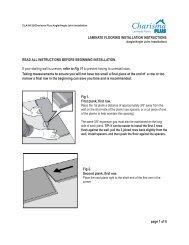
Page 2 of 13APPLICATIONS Staple-down, Nail-down, Glue-down or Edge-glue and float.Virginia Millworks engineered flooring is our most versatile flooring and can be applied on every level of the home. When nailing,engineered flooring is typically installed using specially designed pneumatic wood flooring staplers or cleat nailers, both types workwell. Ensure the use of correct sized fasteners and adaptors.Virginia Millworks can be fully-glued to wood subfloors and concrete. Follow the glue manufactures labeling instructions regardingcorrect trowel size, removal of surface sealers or contaminates and use of moisture barriers.Virginia Millworks can also be edge-glued and floated over a dense pad underlayment or applied over in-floor radiant heat. Specificdetails are outlined in this document; installations outside these guidelines are viewed as experimental.OWNER/INSTALLER RESPONSIBILITIESEngineered wood flooring is a product characterized by distinctive variations in grain, pattern and color. These natural variations areneither flaws or defects, but rather the natural beauty and uniqueness of hardwood, and should be expected. Only stained products willhave the most uniformity in color or shade. Before beginning the installation first determine if the job site and subfloor conditions areacceptable. The in-home environment, weather fluctuations and product storage can adversely affect all organic materials includingwood flooring (see acclimation). The customer/installer is responsible for final inspection of quality, and for the moisture testing ofthe subfloor and wood flooring. During installation use reasonable selectivity and judgment, any board deemed unacceptable inappearance can be placed in closets, near walls or simply not be used. Pieces with glaring defects that can be seen from a standingposition should be cut off or not be used, as use constitutes acceptance. Our floors are manufactured in accordance with acceptedindustry standards that allow a defect tolerance not to exceed 5% of a manufacturing or natural type. If more than 5% of the materialis unusable contact your local store or call CUSTOMER CARE 800-366-4204 immediately. When flooring is ordered depending onlayout or species, about 5% to 10% extra material should be added to the actual order needed for board selection and cutting.Diagonal layouts or custom installations usually require an additional 15%. During installation boards having similar widths should beplaced together in the same row to minimize gaps between boards. The use of putty, stains, filler sticks or markers to touch-upprefinished wood during installation is considered normal practice.JOB SITE INSPECTIONTo prevent moisture related issues such as buckling or cupping, all wet trades involving water or moisture (plumbing, ceramic tiles,drywall finishes, painting, etc.) should be finished with ample time allowed for complete drying prior to wood floor installation. For bestperformance, wood flooring should be one of the last items installed. (HVAC) Heating, Ventilation and or Air conditioning systemsshould be fully operating and running at least 7 days before delivery. New concrete must be cured and at least 60 to 90 days old.HANDLE WITH CAREOnce you pick up your new flooring store it inside your home. It is important to keep wood flooring dry. Protect the flooring from rainor snow during transportation. Lay the flooring flat in a dry level place. Provide air flow under and around cartons. Remove any plasticor cellophane that may be in or around the boxes. Open up the ends of the boxes, to help prepare the flooring for acclimation. Do notstore in unclimatized buildings, garages, sheds, directly on bare concrete or next to outside walls. Cartons should be placed close tothe center of the installation area as possible. Keep out of direct sunlight and away from heat/air vents. To prevent board warping,twisting or bowing do not cut the plastic support packaged bindings or remove product from the packaging until ready to install.VENTILATED CRAWL SPACES Per; (IRC) International Residential Code, Section R408.1Completely cover 100% the surface of the crawl space soil to guard against ground moisture. Inspect the under-floor crawl space itmust have vents for proper cross-ventilation (fig a). Venting allows damp areas to dry-out and to minimize moisture build-up underhomes. (Exception R408.2; "Where warranted by climatic conditions, ventilation openings to the outdoors are not required if ventilationopenings to the interior are provided.") Do provide year-round air circulation with multiple vents, a minimum of 1 square foot for each150 square feet of under-floor space area. One ventilating opening shall be within 3 feet of each corner. Ventilation fans can be used inthe crawl space area to circulate the air, promote drying and reduce dead air spaces. Ground cover; under the home in thecrawlspace, use black 6-mil polyethylene sheet plastic as a moisture vapor barrier. Overlap plastic seams 6” and duct tape seamscompletely.(fig a)Form: INSTALL – Virginia Mill Works Engineered Issued: 05/14/2013
Page 4 of 13NAILDOWN OVERVIEWMOISTURE TESTING subfloor and new floor[CAUTION] Most wood flooring failures result from jobsite moisture. Do not unpack or deliver flooring to the jobsite until moistureproblems are corrected. The goal of moisture testing is three-fold. (1) to determine when the installation can begin,(2) to verify theplacement of dry flooring on dry subfloors and (3) to verify a moisture balance between the new floor boards and that of the existingsubfloor. Note there should be no more than 4% difference in moisture content between properly acclimated engineered wood flooringand wood subflooring materials. Verify by using a moisture meter (pic1) that will have individual species such as; (Tramex, Ligno-Mat,or Delmhorst) to name a few.(pic1)Meters that have adjustable species settings are most accurate. Contact the meter manufacturer for alternate or substitute settings.Begin by testing the subfloor. Set the meter to the type of subfloor (obtain an average by testing 20 locations per 1000sqft) testaround exterior doorways, near foundation walls and in the center of the room. On average, the subfloor moisture range must notexceed 12%. Next, test the new flooring. Set the meter to test the plywood core (Obtain an average reading by testing about 3% ofthe new flooring). Our flooring can have acceptable moisture range between 5% minimum and 9% maximum with no more than 5%variance. If high moisture readings are found in either the new floor or subfloor identify the moisture source and correct, extendacclimation time, increase ventilation. Postpone the installation until the proper conditions have been met. Should future questionsarise, it is recommended in the process of installation to document moisture test results with notes, for example; a record of thecustomer’s name, the order number and digital pictures that shows the meter that was used including the time and date.SUBFLOOR PREPARATIONWood subfloorsDo not install flooring directly over floor joist without subflooring.All structural panels/underlayment must be installed sealed-side down, and provide minimum ¾” perimeter spacing. Square-edged ornon tongue and grooved panels used as a subfloor will require a minimum 1/8˝ (3 mm) expansion space placed between all plywoodseams. Panels must meet minimum CDX grade Exposure 1 and US Voluntary Product Standard PS1-95, PS2-04 or Canadianperformance standard CAN/CSA 0325-0-92 for construction sheathing. Check panel for codes.• Solid-boards used for subflooring should be ¾” x 5 1/2” (1” x 6” nominal), Group 1 dense softwoods, No. 2 Common, kiln-dried toless than 12% percent moisture content.• Particleboard, Luan or Masonite: Only floating installation method is recommended. If using the nail or glue install method, cover theParticleboard, Luan, or Masonite with minimum 3/8” plywood.• Minimum of 3/8˝CDX panel thickness is recommended when used as an underlayment over an existing subfloor.• Avoid pressure treated plywood for interior use. These can have elevated moisture or latent with rot resistant chemicals.Note that joist spacing determines minimum subfloor thickness.• Joist spacing 16” on center (OC)Plywood: Minimum of (5/8˝) Oriented Strand Board (OSB): Minimum (3/4˝, 23/32”) Advantech Minimum (3/4˝, 23/32”)• Joist spacing 16” up to 19.2” (OC)Plywood: Minimum of (3/4˝, 23/32”) Oriented Strand Board (OSB): Minimum of (3/4˝, 23/32”)• Joist spacing over 19.2”up to maximum 24” (OC)Plywood: Minimum of (7/8”) Oriented Strand Board (OSB): Minimum of (1”)Flatness• To minimize squeaks and gaps, the base surface must be flat to within 1/8" in 6 feet or within 3/16” in 10 feet. Subfloor must besecurely nailed or screwed down to joists to minimize movement or squeaks. Thoroughly inspect and replace existing floor or subfloorthat shows evidence of water damage or structural weakness. Check for and repair any sagging or loose sections of a wood subfloor.Squeaky or loose boards should be re-nailed. An uneven or cupped subfloor can be an indication of excess moisture or rot, identify andcorrect. High spots/joist may be sanded down. Low spots should be cut out and repaired or may be filled with old pieces of firm vinyl orbuild up with 30 lb. black roofing paper. Do not fill-in low areas under nail down flooring with cement patching materials, it may breakdown over time.Form: INSTALL – Virginia Mill Works Engineered Issued: 05/14/2013
Page 5 of 13New construction; It is the builder’s or general contractor’s responsibility to provide the wood flooring contractor with a subfloor that iswithin the tolerances listed above. Postpone the installation until corrections have been completed.[NAILING TIPS]:Test nailing a couple of planks in a well lit area, near a window.If the staples do not go in far enough raise the air pressure on the compressor up slightly and re-test until staples sit flushinto the wood above the tongue.If the staples go in too deep lower air pressure until staples sit flush above the tongue. Some floor staplers have the ability toadjust the depth of the fastener. This may need to be adjusted for the staples to seat correctly.Tongue fractures can be reduced by lowering the compressor’s PSI and using the recommended floor stapler.Dimples can be reduced by seating the floor staplers correctly on the board. Make sure the staples are sitting flush in thewood or dimples can occur. Adjusting the depth of the stapler to seat fasteners a bit deeper can help minimize dimples.Check for squeaks after nailing. Squeaks can occur due to tongue fracture, uneven subfloor, improper fasteners, or improperfastener spacing. Squeaks can be corrected or minimized by adding a PVA floating floor wood glue to the tongue and groove ofthe plank before nailing.If stapler will not shoot staples, check for air leaks, jammed staples, staple size, and compressor air pressure.Its best to pre-drill and hand nail the first row using a 3/32” drill bit and 6d finish nail. This will help prevent finish chippingdue to pneumatic finish or brad nailers.If dimpling still occurs a switch to a floating or glue down installation. Never use water base adhesives when fully gluing theENGINEERED WOOD FASTENER SELECTION½” – 9/16” Norge 4 n 1 floor stapler 18 gauge staples ¼” crown 1 -1/2”3/8” Norge 4 n 1 floor stapler 18 gauge staples ¼” crown 1-1/4”5/16” Norge 4 n 1 floor stapler 18 gauge staples ¼” crown 1-1/4”**A floating or glue down installation may be the best choice for the thinner 5/16” flooring, to help prevent tongue fracture anddimpling during that may occur when fastening the thinner floors. **FASTENER SPACINGPlace fasteners 3”- 4”apart (for staples) within 1- 2″ from each end with at least two fastenersImportant: Set air compressor to 70-80 PSI. Test and adjust air pressure to ensure proper setting of fasteners. Make sure that thefastening machine is fully adjustable, is in good working condition, is at the appropriate angle and seats properly against the tongue ofthe board to prevent top edge and surface dimple damage.Note: Only use flooring stapler that are fully adjustable and that engage the top profile over the tongue at theappropriate angle. Make sure that the flooring stapler is in good working condition and seats properly against the boardto prevent top edge and surface dimple damage. Any damage caused by fasteners or nailers is not covered by thewarranty.NAILDOWN INSTRUCTIONS[CAUTION]: Nail flooring in good lighting. After nailing 100 sq ft, stop and inspect the installed floor for any defects or damages. Stopat 20 sqft for installation under 100sqft. Make adjustments as needed. If satisfied, continue with the installation. When top nailing prefinishedflooring (the first and last rows, stair treads, and risers) it is recommended to pre-drill and hand nail using a 3/32” drill bit and6d finish nails. Although pneumatic finish nailers are faster, improper use can easily damage the board or finishes. When installing overcrawl spaces or rooms over basements use 15 lb. black roofing felt or white Silicon Vapor Shield® to provide protection againstmoisture vapors. (See list of approved underlayments). Install underlayment parallel to the new flooring. When installing over woodsubfloors, install the new flooring perpendicular to the floor joist. Nailing parallel to the floor joist is only an option over 1” thickplywood subfloors, or ¾” plywood subfloors that have been reinforced to prevent sagging. Do not nail down or glue down engineeredflooring over existing nailed down solid hardwood flooring.INSTALLATION PREPUse a manual or electric jamb saw to undercut all door jambs/casing to allow enough clearance for the wood flooring to easily slideunderneath. A credit card thick gap between the top of the wood flooring and bottom of the door jamb is acceptable. Sand down highForm: INSTALL – Virginia Mill Works Engineered Issued: 05/14/2013
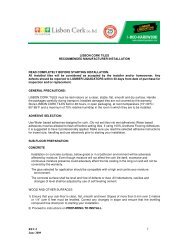
Page 6 of 13spots, and subfloor seams where needed. Correct low spots (See subfloor prep). Sweep or vacuum the subfloor clean off dust anddebris. Install moisture retardant underlayment, and staple it down to prevent movement/sliding. (See underlayments)STEP 1: THE FIRST THREE ROWSDetermine the starting wall, usually the longest or outside foundation wall. At the two opposite ends of this wall, measure outthe width of the board, plus the expansion space, and place a mark. (Do not include the tongue of the board whenmeasuring). An Expansion gap or space must be left around the perimeter and at all vertical obstructions. This space isnormally the same as the thickness of the new flooring, for example; 1/2” flooring requires 1/2” expansion.Snap a chalk line connecting the two marks. Align the tongue side of the first row of boards on the chalk line with the grooveside towards the starting wall, maintain the expansion space.Install the flooring with the tongue side facing away from the starting wall(Use long straight planks for first two rows). Alwaysnail on the tongue side of the flooring.Pre-drill and top nail the first row of boards using a 3/32” drill bit and 6d finishing nails about an 1” from the back edge.Countersink the finish nail using a nail punch and fill with close matching wood filler. Blind nail the 2 nd and 3 rd rows using theflooring stapler.STEP 2: LOOSE LAY (Rack) THE FLOORINGAfter installation of the first three rows, loose lay about 100sqft of flooring. Start racking about 4” or 5” away from the lasted securedrow. Pull from several boxes while racking. Mix board color and sizes to create a random look. Keep a minimum seam stagger of 6”apart. Avoid seams lining up and H-joints. Proper rack out is shown in (Pic 1). Visually inspect flooring for defects while racking.(pic1) Install randomlySTEP 3: INSTALLATION CONTINUED(pic2) do not “line up” board ends(pic 3) H-jointsAfter racking out 100sqft of flooring begin nailing the floor using a engineered floor stapler. (See fastener recommendations).Visually inspect boards for defects while nailing. Use proper fastener spacing (See fastener spacing). Continue nailing untilyou get to the last one or two rows. The lasts one or two rows will have to be top nailed. Again pre-drill using a 3/32” drill bitand 6d finishing nails.The last rows can be pulled tightly together using a floor Jack or pry bar. Protect base boards before using these tools.The last row may have to be ripped down in width to fit. If the last row is less than 1” in width use a PVA carpenters woodglue to join the last piece to the previous row.STEP 4: FINISHING UPFill in nail holes and minor gaps with close matching wood filler.Install any base board molding and shoe moldingInstall transition moldingsSweep the floorClean floor with approved cleaner (contact you’re flooring retailer for approved cleaner).Use felt pads under furniture legs. Protect floor before moving appliances and heavy furniture.Form: INSTALL – Virginia Mill Works Engineered Issued: 05/14/2013
Page 8 of 13• A flat cement surface is very important when gluing down engineered wood. To minimize squeaks and gaps the final surface must beflat to within 1/8" in 6’ radius or within 3/16” in 10’ radius. Sand or grind down high spots. Fill valleys or low areas with cementbased leveling compounds compatible with the flooring adhesives. Allow extra drying time for the leveling compounds. Concrete that isnot properly leveled can cause improper adhesive transfer, hollow spots, and squeaks.Check Concrete for SealersAll paint, adhesives, dust, debris, and sealers must be removed from the concrete prior to gluing down engineered woodflooring. To check for a concrete sealer spill a small cup size amount of water onto the concrete surface. If the water beadsup, and does not soak into the concrete, a sealer is present. The sealer will have to be removed before continuing with theglue down installation. Check with adhesive manufacture for recommendations on sealer removal.RECOMMENDED ADHESIVESwww.mapei.comMorning Star 2-in-1 adhesive and Moisture Vapor ProtectionLimits: Up to 15 lbs. of elevated concrete moisture or 95% relative humidityMapei ECO 995 2-in-1 urethane adhesive and Moisture Vapor ProtectionLimits; Up to 15lbs of elevated concrete moisture or 85% relative humidityMapei ECO 980 adhesiveTechnical Services 1-800- 992-6273, 1-800-876-2734 (USA) 1-800-361- 9309 (Canada)__________________________________________________________________________________________________________www.bostik-us.comBostiks Seal-n-Grip 2-in-1 urethane adhesive and Moisture Vapor ProtectionLimits; Up to 15lbs of elevated concrete moisture or 85% relative humidityBostiks DuraGrip adhesiveBostiks BBABostiks MVPadhesiveMoisture Vapor ProtectionLimits: the concrete must be dry to the touch to properly bondTechnical Services 1-800-523-6530 1-800-726-7845 1-888-592-8558[CAUTION]: Cured adhesive may cloud, chemically damage or etch the floor’s finish.Clean wet adhesive from the surface of the floor frequently using the manufacturers recommended remover. Use clean towels,changing frequently to prevent haze and adhesive residue. Contact the adhesive manufacturer for dried adhesive removal remediesINSTALLATION PREPUse a manual or electric jamb saw to undercut all wood door jambs/casing to allow enough clearance for the wood flooring to easilyslide underneath. A credit card thick gap between the top of the wood flooring and bottom of the door jamb is acceptable. Sand orgrind down high spots. Correct low spots (See subfloor prep). Sweep or vacuum the subfloor clean off dust and debris.STEP 1: GLUE DOWN INSTRUCTIONSInstall in good lighting. Inspect the flooring often. Make adjustments as needed. If satisfied, continue with the installation. 100sqft ofinstalled flooring is enough to verify quality or 20sqft for areas under 100sqft.Determine the starting wall, usually the longest wall. At the two opposite ends of this wall, measure out the width of 5 planks,add the expansion space to that measurement, and place a mark on the subfloor. (do not include the tongue and groove whenmeasuring the width of the planks.)Next, use a chalk line to connect the two marks. Tack down furring wood strips along the straight chalk line. You can also usecarpet tack strips. This will give you support to push your first row of flooring against. Use concrete nails when attaching thefurring strips to concrete subfloors.Measure out from your first chalk line the width of 5 planks on each side, and pop another chalk line. This chalk line will runparallel to the first chalk line.Form: INSTALL – Virginia Mill Works Engineered Issued: 05/14/2013
Page 9 of 13Rack out 5 rows of flooring starting at the second chalk line. Be sure to pull from several flooring boxes at a time to mix color,while keeping proper seam stagger. (See loose lay/rack flooring Pic 1 install randomly)Using an approved trowel and wood flooring adhesive, spread the glue between the furring wood strips and second chalk line.Start placing the racked out flooring into the adhesive. If you’re facing the starting wall, install the flooring left to right. Thegroove side of the planks should be facing away from the starting wall. Push the first row up tight against the furring woodstrips.Progressively lay-in the next rows by inserting the tongue into the groove of the previous row at a 30 degree angle, then dropboard into adhesive. Avoid dragging or sliding boards together as this can trap or squeeze glue up in between the boardscreating gaps. Continue working 5 rows together. The last board in each row will need to be cut to fit.The balance of a board cut may be used to start a new row, discard lengths under 6”. Avoid clustering of end joints. Staggerthe ends of the boards correctly. A tapping block can be used to gently tap the boards into proper position. During installation,end gaps between board ends can be minimized by temporarily locking a completed row in place by using spacers placedbetween the first and the last board of each row, remove when glue has dried.Apply #2080 blue painters tape to the plank surface perpendicular to the installed floor. This is used to hold the plankstogether.Continue adding new chalk lines using the previous techniques. Spread adhesive and continue installing 5 rows at a time untiljob is complete. Tape planks together as needed to keep them from separating.Remove any wet adhesive that gets on the floor finish right away using mineral spirits or adhesive manufacturesadhesive remover product.STEP 2: INSTALLING THE LAST ROWSMost often, the entire length of the last row will need to be trimmed so that it is narrow enough to fit the remaining space. Itshould be glued and wedged with wood shims into place. Leave all spacers/shims in the expansion space until the adhesivehas cured, then remove. Keep the floor free from foot traffic, until adhesive has cured.Go back to the starting wall and pull up the furring wood strip or carpet tack strip. Spread adhesive onto the subfloor, andinstall the last boards needed to finish the job. Install these boards right to left. Use wood shims between the wall and floor tokeep the last few boards tight together. Blue painter’s tape #2080 can also be used.Do not to spread adhesive too far ahead of your work area. If the adhesive skins over and fails to transfer, remove and spreadnew adhesive to achieve proper bonding to the subfloor.Occasionally lift a board and check for adhesive transfer. Adequate adhesive transfer is necessary to ensure sufficient holdingstrength. Engineered wood flooring planks must have 85% adhesive transfer to the back of the flooring planks.When not in use, keep the adhesive container tightly closed to prevent drying and difficulty in spreading the adhesive. Properventilation within the room should be provided. Follow the recommendations on the adhesive container.Post-installationRemove blue painters tape after 8 to 10 hours being on the flooring.• After installation, allow glue to fully cure for 24 hrs before replacing furniture and heavy foot traffic.• Protect flooring before moving any heavy furniture or appliances. (damages from furniture and appliances are not covered)• Fill in minor gaps with close matching wood filler• Check for adhesive on floor finish and remove with appropriate adhesive manufacture remover.• For best matching of sheen or milling save a box of flooring for future repairs.• Clean floor with approved cleaner (see floor retailer for proper cleaner)DOUBLE STICK INSTALLATION – Flooring glued over an approved underlayment that is also glued to the subfloorApproved underlayments - Bellawood Premium, Eco Silent Sound, Insulayment, CorkAllow the underlayment to fully cure before gluing wood flooring to the underlaymentFLOATING FLOOR INSTRUCTIONSDuring installation, Carpenters PVA Floating Floor Wood adhesive should be applied to each groove on the short and longsides of the planks to ensure bond with the other planks. Two separate continuous beads of glue should be applied: onecontinuous bead applied inside the groove, and one continuous bead applied to the top part of the tongue at all seams to ensure asecure bond with the top and bottom of the tongue. This double-gluing helps to minimize squeaks, board gaps, or separation. Notethat seasonal gapping is normal in wood flooring and does not constitute a product failure. Seasonal gapping can be minimized bythe acclimation recommendations provided on page 1.Floating floor expansionPerimeter expansion space for room areas 30’x30’ and under is ½”. Room areas exceeding 30’x30’ expansion space is ¾”Form: INSTALL – Virginia Mill Works Engineered Issued: 05/14/2013
Page 10 of 13No spans or connected flooring can be greater than 40’ in any direction without an expansion break. A connected area is defined asall room areas using the same flooring, connected. Expansion breaks can be placed in doorways, between rooms or hallways.Expansion breaks can be hidden using T- type expansion moldings.Complete floor preparation as earlier outlined, next install a moisture barrier (6-8mm sheet plastic) over cement, kitchen vinyl andceramic tiles. Omit plastic moisture barrier when installing directly over bare wood subflooring.FLOATING INSTALLATION(1) Make sure subfloor is clean, dry, free of squeaks, and flat to within 1/8” over 6’ or 3/16” over 10’.(2) Install recommended underlayment such as: Bellawood Premium underlayment, Eco Silent Sound HD, Quiet Walk,Insulayment or Cork. Install underlayment parallel to the direction of the flooring. Install the underlayment according to theunderlayment manufactures installation instructions.(3) Determine the starting wall, usually the longest or outside foundation wall. At the two opposite ends of this wall, measure outthe width of the board, and place a mark. (Do not include the tongue of the board when measuring). An Expansion gap or spacemust be left around the perimeter and at all vertical obstructions. This space is normally the same as the thickness of the newflooring, for example; 1/2” flooring requires 1/2” expansion.(4) Snap a chalk line connecting the two marks. Tack down fern strips or carpet tack strips along the chalk line.(5) Install the first row of flooring against the tacked wood strips.(6) The flooring should be installed from left to right, tongue side towards the wall, with the groove sides facing out from the wall.(7) Install the first row end to end until the entire row is complete. Be sure to use PVA carpenters wood glue on all plank butt ends(8) When edge-gluing, ensure that the glue is still wet when the planks are joined. Special attention should be paid to ensure thatthere is no excess glue dripping to the subfloor as this could bond the plank to the underlayment and hamper floor movement.Keep the surface clean using a damp clean rag. A lightly water dampened rag can also be used to remove any PVA glue thatgets on the floor finish.(9) Next, install the second row of planks, installing left to right. Each plank should be installed long side first into the previous row.Make sure carpenters PVA wood glue is applied to all tongue and groove seams. Insert a spacer at the wall, then install the longside of the plank into the previous row. Once the tongue is inserted into the groove fold the plank down onto the subfloor. Thebutt ends will be lightly tapped over from right to left to close the end seams. Be sure to keep a minimum stagger of 6” betweenend seams from row to row. Use a pry bar to close the end seam of the last plank installed in each row.(10) After installing 4 or 5 rows apply #2080 blue painters tape to the plank surface perpendicular to the installed floor. This is usedto hold the planks together until the glue cures. (incorrect tape can damage the finish)(11) Continue installing the flooring until you reach the opposite wall in the room. The last row of flooring by the wall may need to beripped down to fit. Make sure you have proper expansion space between the last installed row and the wall.(12) Go back to the first row of flooring, remove the fern strip or tack strip and insert the final row of flooring to complete the roominstallation. Make sure proper expansion is left between the floor and wall.(13) Remove the blue painters tape after 8 to 10hrs.(14) To pass obstacles through the floor covering (pipes, radiator mounts), use a pencil to trace the center position for drilling. Use abig enough drill bit to leave a ½” expansion around the pipe. A jig saw may be needed for bigger rounded cuts. Next, cut thestrip in two so that the saw mark goes through the center of the drilled hole, so that the strip can be glued and reassembledaround the pipe.Form: INSTALL – Virginia Mill Works Engineered Issued: 05/14/2013
Post-installationPage 11 of 13• After installation, allow glue to fully cure for 24 hrs before replacing furniture and heavy foot traffic.• Protect flooring before moving any heavy furniture or appliances. (damages from furniture and appliances are not covered)• Fill in minor gaps with close matching wood filler• Check for adhesive on floor finish and remove with appropriate adhesive manufacture remover.• For best matching of sheen or milling save a box of flooring for future repairs.• Clean floor with approved cleaner (see floor retailer for proper cleaner)MOLDINGS & TRANSITIONS:<strong>Installation</strong> Tips:• Install transition moldings directly to the subflooring. Pre-drill and hand nail transitions moldings to wood subfloors using 6dfinishing nails. Use a wood urethane tube adhesive to bond wood transitions to concrete subfloors.• Acclimate wood moldings for best results• The tool of choice for cutting hardwood moldings is a 10” or 12” motorized miter saw with pre-set adjustments for the basicmiter cuts at 22.5°, 45°, and 90°.• A 60 tooth or 80 tooth carbide tipped blade makes the best cuts. Be sure the saw blade rotation is positioned to cut into thefinished face.• Attach wall base or quarter round moldings to the wall, never into the floor.• Mitered cuts hide better when joining moldings.1) Base Board – for hiding imperfections and adding a custom finish along any wall.2) Quarter-Round - for covering the expansion left at walls and other fixed surfaces.3 & 6) Reducer Moldings - used to transition to lower floors.4) Stair Nosing - for finishing the exposed edges of stairs and landings.5) T-Expansion - for joining two areas of flooring of similar heights.7) End Cap - for finishing the space at sliding glass doors, at bath tubs or transitioning to carpet.HARDWOOD REPAIRS (Scratches, nicks, dents)•Minor white scratches can be repaired with a wood stain marker. Nicks and dents can be filled with a wood blend stick or color woodepoxy. Major damage may require individual board replacements up to 10% of the total floor and is best accomplished by professionalflooring installers.SEASONAL CHANGES - What to Expect (all installation methods)Seasonal gapping should be expected in all wood flooring and does not constitute a product failure.It is normal that wood floors will be affected by fluctuating levels of humidity within the building. Care should be taken to controlhumidity levels to within the 30-50% range. To protect your investment and to assure that your floors provide lasting satisfaction, noterecommendations below:• (Dry) Heating Season - A humidifier may be needed to prevent excessive shrinkage in wood floors due to low humidity levels. Woodstoves, radiant floor heat and electric heat will create dryer conditions.• (Humid, Wet) Non-Heating Season - Proper humidity levels can be maintained by use of an air conditioner or dehumidifier. Avoidexcessive exposure to water during periods of inclement weather. Do not obstruct expansion joints around the perimeter of your floor.Radiant Heat Systems (all installation methods)Squeaks, gaps, cupping, delaminating, splits, and checks created due to radiant heat systems over drying the wood arenot covered under the warranty. It is very important to maintain proper indoor humidity levels.General Precautions and Recommendations Always use moisture barriers.Engineered flooring can be successfully applied over in-floor radiant heat. Know the species you intend to use and how it may interactwith radiant heat. Not all species are recommended for this installation; choose species highest in stability ratings for this application.Brazilian Cherry flooring is not recommended for this application.Form: INSTALL – Virginia Mill Works Engineered Issued: 05/14/2013
Page 12 of 13Because of the wide array of systems on the market, each with its own features, please consult with your radiant flooring provider forrecommended installation methods. Hydronic systems must include in-floor temperature sensors and an outdoor thermostat that allowsthe system to adjust the water temperature according to anticipated heat loss. Radiant heat contributes to the drying out of all woods.Use of a humidification system may be required to maintain the proper humidity level. The indoor relative humidity must be maintainedbetween 30-50% year round. Failure to do so can result in edge cupping, squeaking delamination, splintering, or face checking.Avoid shock to the floor. Before installation, run new radiant systems to dissipate hidden or trapped moisture. During installation,reduce thermostat to 65°F. 48 hours after installation, slowly raise the temperature of the heating system to its preferred operatinglevel over a period of 5 days. The surface temperature of the subfloor must never exceed 85°F in any location. The temperaturesetting must always remain within 15°F of normal operating level, and should never be turned completely off. Excessive heat, rapidheating, and/or failure to maintain humidity levels between 30% and 50% is likely to result in cracking, cupping, squeaking andother forms of floor issues. Slight surface splits (checking), particularly at the ends of planks, should be expected with installations overradiant heat and does not constitute a product failure.Test for moisture, This procedure must be followed regardless of the time of year.Prior to installation over radiant heat, moisture testing must be conducted and documented. The moisture content for concretesubstrates must not exceed 3.0 lbs. per 1000 square feet in 24 hrs per ASTM 1669-89 (Calcium Chloride Test). Wood subfloors shouldnot exceed 12% using a pin type meter. Do not install the flooring until excess moisture is corrected.RADIANT INSTALLATIONS Related information can be found on our website “Flooring 101”(1) When edge-gluing together planks over radiant heat, two separate continuous beads of glue should be applied: one continuousbead applied inside the groove and one continuous bead applied to the top part of the tongue and at all seams to ensure a secure bondwith the top and bottom of the tongue. This double-gluing helps to minimize board gaps or separation. Humidity related gapping shouldbe expected and does not constitute a product failure.(2) When nailing planks over radiant heat ensure that fasteners are holding the flooring without damage to the radiant system.(3) When fully gluing planks over radiant heat ensure that the adhesives are recommended for this application.ROUTINE MAINTENANCE1. Use a damp cloth to blot up spills as soon as they happen. Never allow liquids to stand on your floor.2. For tough spots, such as oil, paint, markers, lipstick, ink, or tar, apply mineral spirits on a clean white cloth, then wipe the area witha damp cloth to remove any remaining residue.3. Sweep, dust, or vacuum the floor regularly with a recommended hard floor attachment (not a beater bar) to prevent accumulationof dirt and grit that can scratch or dull the floor finish.4. Periodically clean the floor with cleaning products made specifically for urethane finishes.5. Do not use hot wet steamers or wet mop the floor with soap, water, oil-soap detergent, or any other liquid cleaning material. Thiscould cause swelling, warping, delamination, joint-line separation and void the warranty.6. Do not use steel wool, abrasive cleaners, or strong ammoniated or chlorinated type cleaners.7. Do not use buffing or polishing machines, these can generate heat or hot spots.8. For spots such as candle wax or chewing gum, harden the spot with ice and then gently scrape with a plastic scraper, such as acredit card. Be careful not to scratch the flooring surface. Wipe clean with a damp cloth.9. A more frequent dust-mopping or vacuuming schedule may be required in very sandy areas such as a beach home.Protection1. Entry mats will help collect the dirt, sand, grit, and other substances such as oil, asphalt, or driveway sealer that might otherwise betracked onto your floor.2. Do not use rubber or foam backed plastic mats as they may discolor the flooring finish. To prevent slippage, use an approved vinylrug underlayment approved for urethane finishes.3. Use floor protectors and wide-load bearing leg bases/ rollers to minimize indentations and scratches from heavy objects. As a rule,the heavier the object, the wider the floor protector.4. Maintain a normal indoor relative humidity level between 30%-50% throughout the year to minimize the natural expansion andcontraction of the wood.5. Avoid excessive exposure to water during periods of inclement weather.6. Do not walk on your floor with stiletto heels, shoes with sports cleats or exposed metal parts.7. Do not allow sharp, pointed, or rough textured objects to be exposed to the hardwood flooring.8. Keep your pet’s nails trimmed to prevent them from scratching your floor.9. UV sunlight will enhance –lighten or darken- the tone of different species of hardwood to varying degrees. Periodically rearrangingyour area rugs and furniture will allow the floor to antique or age evenly.10. Use a dolly when moving heavy furniture or appliances; but first, put down a piece of quarter inch plywood or Masonite to protectthe floor. Never try to slide or roll heavy objects across the floor.11. A protective mat should be used for furniture or chairs with castors.12. Use cleaning products safe for urethane finishes; never use oil soaps, wax, liquid or other household products to clean your floor.13. We do not endorse the use of hot steam cleaning machines on hard wood products, use at your own risk.14. Toys and tools can scratch the finishes, scratches and dents are jobsite related, not warrantable.15. If using the glue-down installation method, do not allow foot traffic or heavy furniture on floor for 24 hours.Form: INSTALL – Virginia Mill Works Engineered Issued: 05/14/2013
Page 13 of 13APPROVED UNDERLAYMENTS FOR ENGINEERED WOODDepending on the application, our flooring can be installed (nailed, glued, or floated) over an approved underlayment to meet theneeds of customers, building specifiers and condominium associations desiring greater thermal insulation and sound isolation qualities.Note that when using an approved underlayment, pad or cushion there can always be slight movement, deflection or friction, squeaksor floor noise with any application. Floor noise is normal, to be expected and will vary from one installation type to the next or relatedto sub-floor type, flatness, deflection, and or related to the type of flooring material, species, the fasteners, relative humidity and theamount of topside pressure applied to the flooring. Therefore for these reasons floor noise is not considered a product or manufacturerdefect.UNDERLAYMENTS(Nail down)15 lb felt paper do not overlap seemsWhite Silicon Vapor Shield®,Bellawood Premium, install (film side up) Flooring minimum (>3/8”thickness)Eco Silent Sound, install (film side down) Flooring minimum (>3/8”thickness)Dream Home Insulayment, install (smooth side up) Flooring minimum (>3/8”thickness)Dream Home Cork (3/8”thickness)Do not use plastic poly-sheeting over wood subfloors(Glue down)Bellawood Premium, install (film side up)Eco Silent Sound install (film side down)Dream Home Insulayment, install (smooth side up)Dream Home Cork (