Story And Photos By Jeremy Pearse - FineScale Modeler
Story And Photos By Jeremy Pearse - FineScale Modeler
Story And Photos By Jeremy Pearse - FineScale Modeler

You also want an ePaper? Increase the reach of your titles
YUMPU automatically turns print PDFs into web optimized ePapers that Google loves.
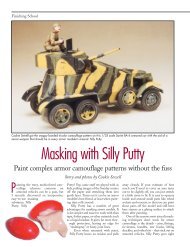
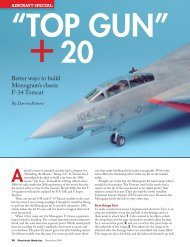
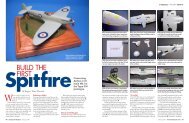
TechniqueCreating realistic weld seamsFar from “unseemly,” they’ll addauthenticity to your models <strong>Story</strong> and photos by <strong>Jeremy</strong> <strong>Pearse</strong>One thing is certain in modeling:details equal realism, and moredetails equal more realism. Whilesome modelers enjoy the most painstaking,tedious detailing tasks, others haveless time or patience. However, detailingyour models with weld seams is one wayto add a new dimension of realism withoutbreaking the bank or costing anundue toll in blood, sweat, or tears.There are several common methodsfor creating seams – plus two new ones Idiscovered by accident.First, let’s look at the different types ofweld seams you might have to replicate.Back when I used to prepare, tune andrace motorcycles, I often had to join two60 <strong>FineScale</strong> <strong>Modeler</strong> July 2002pieces of metal, so I learned to use an arcwelder. It creates an electrical arc betweenthe welding rod and the materials you’rewelding. The very high temperature fusesthe metal of the welding rod with themetal parts and forms a strong bond. Theresulting weld looks like a raised semicircularbead of metal with a distinct texture– once the hardened flux has beenknocked off, 1. Most ships and armoredvehicles are constructed using this weldingmethod.I also used an oxy-acetylene gas weldingset, which creates a very hot flame toheat the metal. Usually created with ahand-held welding rod, the weld bead issmaller and flatter, 2. Gas welds vary inCarefully replicated weld seams areamong the many details that impart extrarealism to <strong>Jeremy</strong> <strong>Pearse</strong>’s 1/12 scaleTamiya YZF-R1. <strong>Jeremy</strong> explains fivemethods you can use to do the same foryour models.size and shape, and on some larger armorvehicles they are wide and flat, 3. Themethod you choose for adding weldseams to your models will be determinedpartly by the type of weld you are replicating.Putty method. Putty is easy to useand gives good results, especially on theinside of 90-degree seams. Epoxy puttyworks best since it has a longer drying
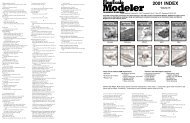
time, but I have also used ordinary modelputty or wood filler. However, modelputty usually dries too quickly to use onlong seams, and wood filler is quite grainyand crumbles if it gets too dry.I usually mix a little epoxy putty androll it into a thin strip, then lay it where Iwant the weld seam to be. After gentlypressing the putty into place, I remove theexcess and go back over it with a curvedinstrument (the head of a small nail willdo) to lightly press in the texture, 4. Ifyou are using putty to create an insideseam, dip a piece of sprue in water anddrag it along the seam after applying theputty. This will remove most of the excessand also shape the seam – you can carefullyscrape off the rest. Go back over theseam to carefully indent ridges into theputty.This method can be harder to use on aflat surface where the weld seam standsout from the surrounding material. It canalso be tricky to roll a thin, even bead ofputty to get a realistic result, but otherfillers are even more difficult to roll out.Motor tool method. The motortool method requires a steady hand andgood eyesight. Using a motor tool fittedwith a small grinding disk, I carefully runthe tip of the disk in an up-and-downmotion along the line where I want theseam to be, 5. This creates a texturedindentation representing the weld seam,but it’s easy to slip because the disk tendsto wander on the plastic’s smooth surface.One way around this is to run the shaft ofthe grinding bit (not the tip) along theedge of a metal straight edge for an even,straight line. I usually finish by lightlybrushing liquid cement onto the weldseam to smooth the plastic a little.It is easy to grind off too much material,and getting the grinding bit intosmall places can be difficult. Also, theresulting seam is carved into the plastic –no good if you want the weld bead tostand out from the surface. For thateffect, first scribe a groove into the plasticwhere you want the weld bead to be.Then glue in a piece of stretched spruewith plastic cement – it should standslightly above the surface. Now, using asmall round bit in your motor tool, gentlygrind a weld-like texture into the sprue.This can produce good results, but thegrinder is difficult to control.Pyrogravure method. The pyrogravuremethod uses a small solderingiron-like tool for engraving plastics.Genuine pyrogravures are hard to find,4 <strong>Jeremy</strong> created this weld seam usingthe putty method, which works best inside90-degree seams.6 With the pyrogravure method, you melta seam into the surface of the plastic.Using different tips on the tool lets youcreate seams with different textures.<strong>Jeremy</strong> <strong>Pearse</strong> was bornin Devon, England in1959. He came to theUnited States in 1992, and works as aprofessional artist specializing in birdsand landscapes. He lives in Marylandwith his wife, Monica.Like many modelers, <strong>Jeremy</strong> beganMeet <strong>Jeremy</strong> <strong>Pearse</strong>1 A weld seam created by an arcwelder is semicircular and stands outfrom the surface.2 The oxy-acetylene gas welder makesnarrower, flatter welds.3 Welds on large armored vehiclesmay be quite wide and flat.5 The motor tool method carves a seaminto the plastic rather than creating onethat stands above the surface. It requires asteady hand and good eyesight.7 <strong>Jeremy</strong> developed the paint method inorder to create weld seams on this TamiyaYamaha motorcycle frame and swing armassembly without damaging the chromeplating on the parts.building as a kid, mainly Airfix 1/72scale World War I airplanes. He leftmodeling in his early teens, butreturned to the hobby a few years ago.He concentrates on motorcycles and1/24 scale racing cars, but also builds1/35 scale armored vehicles and aircraftin all scales.July 2002 www.finescale.com 61
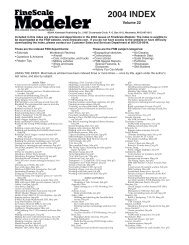
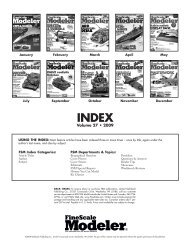
8 The first paint method was just the ticket for the welds on the expansion pipes forTamiya’s 1/12 scale Honda NSR500 motorcycle (left), as well as the frame on Protar’s1/9 scale Honda NS500.Weld seam9 The second paint method requires layingdown a bead of paint along the seam.When it has partially dried, gently pressin the texture with a curved object.Weld seam11 The weld seams on this Jagdpantherat Aberdeen Proving Ground are clearlyflush with the surrounding plates.but a wood-burning tool or a hot knifewill work (Dremel’s VersaTip tool, No.1550, would serve well). I use a 220-voltsoldering iron from overseas that gets justhot enough to melt plastic when pluggedinto a 110-volt outlet. The tip of the toolcan be shaped with a file and will effectivelycreate textures resembling weldseams when pressed into plastic, 6. For aweld seam on an inside corner, it is best tofirst glue in a piece of stretched sprue andthen use the pyrogravure to texture it.This method requires caution becausethe tip will melt anything it touches. Aswith the motor tool method, you can usea metal straight edge to act as a guide, butbe careful that it doesn’t get too hot!Paint method #1. I developed my10 Careful masking helped produce acrisp painted weld seam on the fronthull of <strong>Jeremy</strong>’s 1/35 scale DMLPanzer IV/70(A).12 <strong>Jeremy</strong> used the paint method to createthe spectacular – and accurate – weldseams on his Tamiya Jagdpanther model.first paint method when I ran into problemsbuilding Tamiya’s 1/12 scale YamahaYZF-R1 motorcycle. I realized therewould be some weld seams on the realbike. The parts had a semi-chromed finish,and since I didn’t want to repaint theframe, I had to use something that waschrome-colored to start with.Instead, I put a blob of Testor ModelMaster silver chrome trim enamel on apiece of card. After waiting about 10minutes for the paint to thicken, I appliedit to the seam drop by drop using the endof a straightened paper clip. This slowlybuilt up a weld bead, and the result waswonderful – it looked just like the realthing, 7. I could create weld seams whereverI wanted them, 8.Paint method #2. The second paintmethod is similar, but instead of creatingthe texture of the weld bead with the wireapplicator, first put down a thin bead ofpaint along the seam. After the bead hasdried a little, apply another thin layer ofpaint (an inside seam may need a thirdlayer). When this layer begins to harden,gently press in the weld seam textureusing a small curved instrument, 9. I usethe curved end of a pair of tweezers, apaper clip, or a specially shaped piece ofsprue. Just remember: be subtle and don’tpush too hard.If you want a narrower bead, use thinnerwire; for a wider bead, use thickerwire or just spread the paint from side toside a little. You can use masking tape tokeep things looking neat. Carefully burnishthe edges of the tape so the paintdoesn’t seep underneath, and remove thetape before the paint dries, 10.For beads on sharp outside seams, trysanding off the corner slightly so there issomething flat for the paint to sit on.Scrape mistakes away with a knife bladeafter the paint has hardened slightly. I useonly silver chrome paint because theshiny surface makes it easier to see theresults, but other kinds of enamel paintmay work, too.The paint methods often produce better-lookingseams than the ones moldedinto kits. For instance, when I startedbuilding Tamiya’s 1/35 scale Sd.Kfz.173Jagdpanther, I found the weld seamsaround the main hull were represented bydeep grooves. On the real vehicle, they areflush, 11. I created a simple tool – a thinpiece of wire pushed into a pencil eraser –and used it to fill in the grooves withpaint. It took two applications, but theresults were spectacular, 12.Before you try these methods, studyweld seams on full-size vehicles for thecorrect shapes and textures. With a littlepractice you will soon be creating weldseams of your choice and adding that specialfinishing touch to your models. FSMSOURCESEpoxy putty Tamiya, 2 Orion, AlisoViejo, CA 92656-4200, 949-362-2240, www.tamiyausa.comMotor tool, pyrogravure Dremel,4915 21st St., Racine, WI 53406,262-554-1390, www.dremel.comSilver chrome paint Testor, 620Buckbee St., Rockford, IL 61104-4891, 815-962-6654,www.testors.com62 <strong>FineScale</strong> <strong>Modeler</strong> July 2002