Balancing Natural Edge Bowls Questions and Answere The Pen ...
Balancing Natural Edge Bowls Questions and Answere The Pen ...
Balancing Natural Edge Bowls Questions and Answere The Pen ...

Create successful ePaper yourself
Turn your PDF publications into a flip-book with our unique Google optimized e-Paper software.
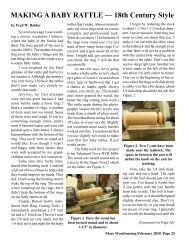
Continued from Previous Page.tendency would become all the more obvious once thepiece was mounted on the lathe.<strong>The</strong> softer woods would naturally cut faster <strong>and</strong>occasionally there would be an obstinate harder pieces<strong>and</strong>wiched between softer pieces. <strong>The</strong> natural tendencywould be for the gouge, scraper, <strong>and</strong> even s<strong>and</strong>paperto act more aggressively when encountering thesesofter woods, so to avoid craters, it was necessary to becognizant of this tendency <strong>and</strong> to struggle to maintainall tools steadily on the plane surface to be worked.Figure 1. Side View of finished bowl.In the end, I was pleased with the overall shapeachieved, which amazingly was pretty much what Ihad intended. This isn’t always the case with free-formitems like dishes <strong>and</strong> spindles where sometimes thewood itself seems to want to do something different thanwhat I have pre-conceived. Usually I assume the woodknows better than I do what it wants to become <strong>and</strong> I letit guide me. Perhaps because this was a conglomerationof small pieces there was no longer a guiding principle<strong>and</strong> my desire was adequate.Most of the shaping of the bowl was achieved withsome basic tools, namely a roughing gouge <strong>and</strong> a heavy1” round nosed scraper. To put a small lip on the inside,a hollowing tool with moveable <strong>and</strong> replaceable carbidebit was helpful, but I suppose people strongly adeptwith the bowl gouge could achieve the same result. Iwas most pleased with the flat bottom <strong>and</strong> 90 degreeangle sides achieved with the flat nosed scraper. I justhad to be careful since it cuts much more aggressivelythan I had anticipated.<strong>The</strong>re were to be gaps <strong>and</strong> voids but surprisinglynot as many as I had feared. I quickly learned to discountthe initial voids that appeared in the early stages ofturning since most, if not all, of those would disappearin the general turning process anyway. Instead, I onlychose to fill those voids that remained as I was performingthe s<strong>and</strong>ing stage. S<strong>and</strong>ing powder mixed on eitherwax paper or on the mounted dish itself with mediumconsistency cyanoacrylate (CA) worked perfectly <strong>and</strong>blended remarkably well with the epoxy sections, theonly places void fill would prove necessary. I havefound through trial <strong>and</strong> effort that blending the requireddust with a medium or thick CA on wax paper <strong>and</strong> thenapplying with applicator sticks available at the craftstore gives me greater control over the placement ofvoid fill than attempting the maneuver on the rounded<strong>and</strong> mounted piece. Using a thicker consistency, <strong>and</strong>therefore longer set time, gives one the time neededto blend <strong>and</strong> fill prior to CA set up. Some patience isthen required to allow time for the CA to set. Usingaccelerator will only result in hideous opaque whiteresidue while turning the lathe on too soon results in CAsprayed at high velocity on to your lathe <strong>and</strong> anythingwithin the centrifugal throw range as well. Typicallythis will include you, yet another reason to have old,but well fitted, clothes along with safety glasses <strong>and</strong> arespirator mask as well.Figure 2. View of bottom of bowl.I decided to try a new finish idea on this piece soI used, for the first time, some Minwax wipe on polyurethanein a satin finish with the piece off the lathe. Ifound that the wood soaked up more of the finish thanI had anticipated, although this wasn’t a problem, <strong>and</strong>that at least a good 15 ml could be poured into the 4-5”diameter bowl of 2-3” height <strong>and</strong> easily absorbed asit was rubbed into the wood. I assume that the epoxyPage 22 More Woodturning June 2010