Balancing Natural Edge Bowls Questions and Answere The Pen ...
Balancing Natural Edge Bowls Questions and Answere The Pen ...
Balancing Natural Edge Bowls Questions and Answere The Pen ...

You also want an ePaper? Increase the reach of your titles
YUMPU automatically turns print PDFs into web optimized ePapers that Google loves.
Contents<strong>Balancing</strong> <strong>Natural</strong> <strong>Edge</strong> <strong>Bowls</strong>..4<strong>Questions</strong> <strong>and</strong> Answers from the Internet.............................................6Center Finder...............................6Circular Cutters...........................6Wolverine Vari Grind...................6Increasing the Swing on Older Lathes................................................7Mobility Wheels <strong>and</strong> other Add-Ons for Nova DVR Lathe............9Letter to the Editor.....................10<strong>The</strong> <strong>Pen</strong>turner’s Corner.............1124th AAW Annual Symposium..14Proper Chain Saw File H<strong>and</strong>les, &a Neat Tip...................................15OVALROUND: an oval- <strong>and</strong>round-turned dish Coaster........18Segmented Bowl Blank..............21Grip-All Jaws System Update....23Geiger’s Re-Centering Solution24Vicmarc - Escoulen EccentricChuck #3....................................26Tormek BGM-100 Bench GrinderMount.........................................27Coming Events..........................28More on Colt <strong>Pen</strong> Drills............29Don McNutt Demonstration.....30Making a Sphere in a Cube......33New Water Trough for Tormek.39<strong>The</strong> Market Place......................39About the Cover:All of the photos on the coverthis issue are from storiesin the issue. I have providedcaptions for the photos to giveyou an idea of which story theycame from.EDITORIALAs I write this, we are preparingto head out for Utah to attend the UtahWoodturning Symposium. Hopefully,we will meet some of our subscriberseither at the symposium or at theCraft Supplies Super Wednesdayevent the day before.Our subscription base forthe printed magazine continues toshrink, so please urge your friends<strong>and</strong> fellow woodturners to considerbecoming a subscriber to ourmagazine. We have a growing baseof electronic subscribers; however,many of our subscribers don’t owncomputers or don’t want to read themagazine on the computer. Hopefully,we can continue to publish aprinted version indefinately. Pleasehelp us get additional subscribers.Fred HolderEditor <strong>and</strong> PublisherTo Subscribe to More Woodturning:Check the Print Subscription Period Below:United States Canada Other Countries__One Year/$35 __One Year/$48 __One Year/$68__Two Years/$70 __Two Years/$100 __Two Years/$105__Three Years/$105 __Three Years/$145 __Three Years/$205All amounts in US Dollars! We Accept Visa/MC.Electronic Version (PDF): For People receiving Electronic issues,new priceby year only: $25.00/One year. We need an e-mail for the electronic version.Because of the significant postage increase for outside the United States,recommend the Electronic Version for all Foreign Subscribers.Thank You!!Please Enter Your Name <strong>and</strong> Address Below:Name: _________________________________________________Address: _______________________________________________City: ______________________ State: ______ ZIP: ____________E-Mail for Electronic Subscribers: ____________________________Clip <strong>and</strong> Mail with Your Check, Cash, or Charge Card Information to:More Woodturning, PO Box 2168, Snohomish, WA 98291More Woodturning June 2010 Page 3
Figure 3. <strong>The</strong> new tool mounted to a faceplate.I can now turn the spigot <strong>and</strong> rough out the outsideof the bowl. I take the faceplate off the lathe <strong>and</strong>the blank; <strong>and</strong> mount the blank on a 4 jaw chuck. Inless than 5 minutes I can have the blank balanced <strong>and</strong>a spigot turned. I usually run 4 to 6 bowls through theprocess at one pass. Working with multiples, makes thecentering process even faster.Figure 4. <strong>The</strong> blank with the faceplate <strong>and</strong> newtool setting on the surface. <strong>The</strong> square can be usedto help center the faceplate to the blank <strong>and</strong> alsomove the faceplate around to level the faceplate tothe flat surface of the blank. Shims can be addedunder the faceplate to level it before applyingscrews to secure the faceplate to the blank.Intelligent sensing of turningconditions adjusts latheperformance to meet turningdem<strong>and</strong>s, senses chisel digins <strong>and</strong> adjusts instantlyNOVA DVR XPNEW! 5 Favourite Speedfunction for even easierspeed selection.Download thepamphlet,view videos atwww.teknatool.com<strong>The</strong> world’s most intelligent lathe combined with the power, capacity & capability of astationary lathe - the DVR XP is revolutionaryNEW! Higher torque motor.Delivering even morepower over the old model.Extendable Bedsadds 20” capacityper section - takeyour lathe as longas you wantDirect Drive (no belts, nopulleys) means ultrasmooth cutting conditionsAvailable in the USA fromWoodcraft Supply Corpwww.woodcraft.comCraft Supplies USAwww.woodturnerscatalog.comWoodworkers Supplywww.woodworker.comPackard Woodworkswww.packardwoodworks.comSwivel Headstocklocks at any positionmakes your turningmore comfortable,saves spaceCapacity, power & capability of amuch larger lathe in a compactfootprint - 1.75HP motor, 16” inboard,29” outboard with easy to useoutrigger accessoryNEW! Updated designsolid cast iron componentsmeans rock solidperformanceMore Woodturning June 2010 Page 5
<strong>Questions</strong> <strong>and</strong>Answers from theInternetCenter FinderQuestion: Do you have a favorite one? Recommendations?— ScottFred’s Response: I have had the Veritas CenterMarker since it first became available <strong>and</strong> use it regularlyto mark the centers on square or round stock thatwill fit in it. I also have the Gauge Master by Vicmarc.It is aluminum <strong>and</strong> very stable. I use both on a regularbasis.—Fred HolderLyle’s Response: I don’t do spindle work much<strong>and</strong> when I do I just cross mark the corners. I do not usea center finder because I don’t start most of my work onthe geographical center point. I always start betweencenters but on the balance point so I can get the lathespeed up. Fast is better <strong>and</strong> easier. After I get it roughedout I can put it on the axis I want by repositioning thedrive <strong>and</strong>/or live centers.—Lyle JamiesonCircular CuttersQuestion: I’m planning to make some balls, <strong>and</strong>I’ve purchased a pipe to grind. I’m also interested inworking on a bowl with a spherical bottom. Yes, I knowI can just learn to cut it, but I like the idea in the latestissue of American Woodturner that uses a ground-downhole saw. My question is, when using the circular cutter,does one use only the bottom part right off the tool rest,or is it safe to apply the full circumference of the cutterto the wood. I’m a little nervous about full contact untilI hear that it’s safe.—GaryFred’s Response: I’ve been using a one inch holesaw with the teeth ground off <strong>and</strong> mounted on a threadedrod mounted in a h<strong>and</strong>le to help in the rounding of aspherical object (i.e., a ball). Today, I normally use aswinging jig to round balls, but often use the tool tohelp round off the ends of the ball after turning awaythe tenons.One of my swinging jigs came from Engl<strong>and</strong>’sCraft Supplies, one from Vermec in Australia, <strong>and</strong> onefrom Fred Lindsay, using a Lindsay/Hunter Tool Assembly,from Hendersonville, North Carolina.<strong>The</strong> hole saw needs a sharp cutting edge inside.I sharpen mine by thrusting it against a rotating disks<strong>and</strong>er. I generally rotate the tool to make sure I have agood sharp edge inside. <strong>The</strong> full face of the cutter needsto be applied to the surface of the spherical surface.—Fred HolderLyle’s Response: Yes, keep the whole cuttingsurface against the ball. If you tilt it away it will dig inor cut a divot out of the surface. Another thing to stayaway from is using it on the tailstock side of the ball. Ifyou are holding the ball in a jam chuck to have accessto the entire surface on the tailstock side, be careful notto put the cutter exactly in the middle. Always workfrom the front of the ball <strong>and</strong> sneak up to the center.If you try to cut right at the middle the cutter will cuta nice little knife cut line around the end <strong>and</strong> you willhave to start all over to make a smaller ball.I don’t have either the cutter or the ball jigs Fredhas. I have used the Christian Bourchard methodof tilting the ball between centers, held by a cup oneach end, on all three axis’s <strong>and</strong> slowly removing the“ghost”. Makes a perfectly round ball but takes sometime to master.—Lyle JamiesonWolverine Vari GrindQuestion: If I were to get one should I get theoriginal with the updated clamp or the vari-grind 2?—ScottFred’s Response: I’ve been using the WolverineVari-grind system since 1989 <strong>and</strong> recently got the Varigrindupgrade kit. I find it an excellent system. I dorecommend that you also get the Raptor Set up Toolsfrom Craft Supplies in all five angles.—Fred HolderPage 6 More Woodturning June 2010
Mobility Wheels Continued from Page 9h<strong>and</strong>les so you pick up without flexing your biceps.Look at the placement on the sides of the lathe (figure4) to determine the spacing for two 13/32” holes for themounting bolts. I drilled oversize to allow for slight misalignment.Drill the appropriate holes in each h<strong>and</strong>lethen use this to mark the hole locations on the legs. Inmy case the section of the leg had enough “meat” toallow for tapped holes. Drill <strong>and</strong> tap (if appropriate)the holes in the legs <strong>and</strong> mount the h<strong>and</strong>les. I left theplastic end caps <strong>and</strong> price tags on the iron pipe. Thismakes the ends more visible to minimize the chance ofwacking your legs on the h<strong>and</strong>les as you mover aroundthe shop.rest support <strong>and</strong> the use of a dust hood such as Rocklerpart 26412 <strong>and</strong> a Rockler dust port bracket part number31767 would make for a cleaner installation.Figure 4 H<strong>and</strong>le MountingShelvingAgain due to a small shop I need storage spacewherever I can get it. <strong>The</strong> cast iron leg set have twoflanges that allowed me to place two box type shelvesacross from one leg to the other. I use the upper, smallershelf to hold some of the lathe tools such as the knockout bar, a chuck, faceplate, etc. <strong>The</strong> lower shelf is deepenough to hold peppermill blanks cross-wise <strong>and</strong> otherwood blanks as well. If the need arises I can removethese wood blanks <strong>and</strong> place bags of s<strong>and</strong> on this lowershelf for more stability. <strong>The</strong> shelves are covered in Figure1 with a drape of heavy cloth. This keeps shavingfrom falling in the shelves, making clean up easier.Dust collection<strong>The</strong> key to the dust collection is that I have installedthe outrigger tool rest. <strong>The</strong> tool rest has a 1 inchdiameter hole to accommodate the st<strong>and</strong>ard Nova toolrests. <strong>The</strong> outrigger can be oriented such that the toolrest mount is to the rear of the headstock as shown inFigure 5.I made the dust collector hood supports from bits<strong>and</strong> pieces of various st<strong>and</strong>s that were no longer useful.If one were starting from scratch a selection of appropriatesized pipe to fit the inside diameter of the toolPage 10 More Woodturning June 2010Figure 5.Just a bit of personal info: I have been turningfor only a few years, <strong>and</strong> am a member of AAW <strong>and</strong>Carolina Mountain Woodturners. I have done a fewbowls, some pens, some bottle stoppers etc. I wouldconsider myself a beginner. RussLetter to the EditorHi Fred:I was astonished to read the negative commentabout Lyle Jamieson in the newest More Woodturning.Yes, Lyle can be aggravating, self-serving, <strong>and</strong> evenoccasionally wrong (in my opinion) - but he’s mainlyeducational <strong>and</strong> certainly never boring! I think thecombination of your comments <strong>and</strong> his is one of thestrongest aspects of M. W. Keep him going!—Don LindsleyHello Don,I try to publish letters, even if they criticize me.<strong>The</strong>re maybe a number of people who disagree withLyle <strong>and</strong> his comments, but like you I feel he addsconsiderable to the Q&A section of this magazine.—Fred Holder
<strong>The</strong> <strong>Pen</strong>turner’s Cornerby Don WardAs I write this article the Utah WoodturningSymposium is just a little over two weeks away. I amfrantically getting things ready for my demos. <strong>The</strong>rewill be 10 pen turning rotations. We will be in Area 3.Demonstrations will be presented by Fairfield, KurtHertzog, <strong>and</strong> myself.Russ Fairfield’s demos are entitled (1) Hidden orRecessed <strong>Pen</strong> Clips, (2) Finishing Secrets for <strong>Pen</strong>s,<strong>and</strong> (3) Making a One Piece Point <strong>Pen</strong>. I would highlysuggest checking out Russ Fairfield’s website <strong>and</strong> especiallyspend some time on his finishing <strong>and</strong> pen pages.Russ also has some excellent DVD’s for sale <strong>and</strong> I canhighly recommend all of them. His pen finishing DVDis a great resource. Russ is a member of the <strong>Pen</strong> MakersGuild <strong>and</strong> his website can be found at http://www.woodturnerruss.comKurt Hertzog is one of the AAW directors, anexcellent turner <strong>and</strong> teacher, as well as a proficient <strong>and</strong>innovative pen maker. Kurt is also one of the councilmembers of the pen makers guild. Kurt’s demo is entitledExtreme <strong>Pen</strong>s <strong>and</strong> will be presented twice. KurtHertzog’s work can be seen on his website at http://www.kerthertzog.comI will be doing four demonstrations <strong>and</strong> presentingtwo titles twice each. <strong>The</strong> titles are Modified Slimlines<strong>and</strong> Casting Acrylic <strong>Pen</strong> Blanks. <strong>The</strong> modified slimlinedemo will include most of the modified slimlines I’vewritten about in More Woodturning. <strong>The</strong> casting penblanks demonstration will include basic casting of penblanks using polyester resin. Both colored blanks <strong>and</strong>clear casting using materials such as snake skins <strong>and</strong>computer printed labels will be presented. I am alsoa member of the <strong>Pen</strong> Makers Guild <strong>and</strong> my websiteis http://www.RedRiver<strong>Pen</strong>s.com Readers of <strong>The</strong><strong>Pen</strong>turners Corner will already have seem most of theslimline modification demo since previous articles includewhat I will present at the demo. <strong>The</strong> casting demoinformation may be good information for a future articleor two. I just don’t know how many readers would wantto learn how to start casting their own pen blanks. Iwould welcome any emails with suggestions on futurearticles covering acrylic blank casting.A full report on the symposium’s penturningactivities will be included in the next article. We willbe doing demonstrations at the Craft Supplies Openhouse on Wednesday prior to the start of the symposium.Wednesday night we will have the 8th annual<strong>Pen</strong>turners Rendezvous. Look for reports on these twomeetings also.Relatively New KitsCircuit Board <strong>Pen</strong> Kits: <strong>The</strong> sierra circuit boardpen kit has been available for about a year now. It is areal circuit board embedded in clear acrylic. <strong>The</strong> kitsmake eye catching pens that are unique as well as quiteh<strong>and</strong>some. <strong>The</strong> circuit board kits are available for theSierra Vista, which is a bit larger diameter version ofthe sierra. A different set of bushings are required ifyou rely on bushings for sizing. I actually turn the SierraVista using sierra bushings <strong>and</strong> a set of calipers totake measurements. I actually use calipers to measurethe blank diameters for each pen I make. Bushingsare used to just get me close. <strong>The</strong>se circuit board kitscome complete with the Sierra Vista kit parts alongwith the circuit board blanks. Blanks are not availableas a separate item.Two new colors of circuit boards have recentlybecome available. <strong>The</strong> new colors are blue <strong>and</strong> orange.<strong>The</strong> kits are Berea Hardwoods kits <strong>and</strong> can be found onthe Berea website at http//www.bereahardwoods.comor any of the Berea resellers: Woodcraft (http://www.woodcraft.com), Rockler (http://www.Rockler.com),Arizona Silhouette (http://www.arizonasilhouette.com),<strong>and</strong> Bear Tooth Woods (http://www.bearttoothwoods.com). Other outlets may be available but I’m not awareof them. Take a look at these relatively new offerings.You may just like them.Another new circuit board kit is available for thecigar pen. Both barrels of this pen are embedded circuitboards. <strong>The</strong> circuit board cigar comes only in green <strong>and</strong>is also a Berea kit <strong>and</strong> can be found at the Berea websiteor Bear Tooth Woods. I looked for it at other places buthad no luck. See Figure 1 which shows both the cigar<strong>and</strong> sierra circuit board pens.[Continued on Next Page]More Woodturning June 2010 Page 11
Continued from Previous PageFigure 1. This photo shows both the cigar <strong>and</strong>sierra circuit board pens.Rifle Shell <strong>Pen</strong> Kit: <strong>Pen</strong>s made from rifle casesare still popular. Some penturners enjoy making theirown from spent rifle shells <strong>and</strong> others are happy buyingthe parts pre-made. I have shared several sources of premaderifle parts. But, I saw a new kit while looking forthe circuit board information. <strong>The</strong> new kit is a rifle shellpen using cigar <strong>and</strong> flat top parts as well as slimline.<strong>The</strong> cigar <strong>and</strong> flat top parts are intriguing since thosetwo pens use the Parker style refill <strong>and</strong> gel refills areavailable. So, if you like rifle shell pens but would rathernot make your own shell parts then check out these kits.<strong>The</strong>y are available from Bear Tooth Woods <strong>and</strong> here isa link to the rifle shell kits: http://www.beartoothwoods.com/catalog/index.php?cPath=21_89 .Also, while browsing the Bear Tooth Woods websiteI found another new kit...at least it is the first timeI’ve seen them. <strong>The</strong> website info does identify the kitas a Beartooth Woods original <strong>and</strong> available only fromthem. <strong>The</strong> kit appears to be a baron-jr Gent hybrid. Ilike the style of the front section. It looks more pleasingto me that either the baron or the Jr gent front section.I will have to give these pens a closer look. <strong>The</strong> nameof the kit is the Vail <strong>and</strong> I’ve not seen it anywhere else.Here is a link to the Vail kit:http://www.beartoothwoods.com/catalog/index.php?cPath=21_94 . Give these kits a try next time youwant to try something new. Bear Tooth Woods hasgreat customer service, quick delivery <strong>and</strong> are a greatcompany for all of your penturning needs. Figures 2,3, <strong>and</strong> 4 shows the cigar, flat top <strong>and</strong> slimline rifle shellkits respectively. Figure 5 shows the new vail kit.Acrylics Revisited:Have you put off turning acrylics because you’veheard they are difficult to turn. Or, maybe you’ve heardthey are difficult to finish. Both are true, somewhat.But both are not true about all acrylics. I’ll not go intodetail here about which acrylics are better. That willFigure 2. Cigar Rifle Shell kit.Figure 3. Flat Top Rifle Shell kit.Figure 4. Slimline Rifle Shell kit.Page 12 More Woodturning June 2010
Figure 5. <strong>The</strong> new vail kit.be another column. Most all of them turn nicely <strong>and</strong>finish easily. Instructions abound on how to work withacrylics. Check you-tube for videos <strong>and</strong> you will findseveral. While mentioning you-tube let me also saythat you-tube has become a treasure of woodturningvideos....penturning also.....CA finishes...turning acrylics...Check out you-tube.Now, back to the subject of turning acrylics. I’vejust watched, several times, a new DVD about workingwith acrylics. <strong>The</strong> name of the DVD is Turning AcrylicMaterials: A Complete Guide to Working with Acrylicsby Barry Gross. On this DVD, master pen maker BarryGross reveals the fun of turning acrylics. He carefullyguides you through each step in creating an elegantcigar ball point pen from an acrylic blank. His uniquestep-by-step method of demonstrating the pen makingprocess will instill confidence so that you will besuccessful when creating your own unique pen. Barrycontinually stresses the Acrylic Golden Rule: “SharpTools-Light Cuts”.Barry discusses drilling techniques for acrylics,tool sharpening skills <strong>and</strong> techniques, keeping in mindthe golden rule of acrylics. He exhibits how to createyour own pen blank <strong>and</strong> then cast it in acrylic usinga pen casting kit. Buffing <strong>and</strong> polishing skills shownwhile demonstrating his own version of a CA finish.When you are finished creating your pen, he discusseshow to best market your one-of-a-kind fine writing instrument.This DVD is a must for everyone who wantsto turn <strong>and</strong> cast their own acrylic pen blank. I thinkthis DVD contains the most comprehensive informationabout turning acrylics on your lathe. Barry is anexcellent teacher. <strong>The</strong> quality of the DVD is excellent.Running time is 118 minutes. This DVD needs to be onyour birthday, father’s day or Christmas gift list. Or, justtreat yourself if you want to learn how to make a penfrom acrylics. Check Barry’s website for availability:http://www.bgartfprms.comGoing right along with turning acrylics is finishingacrylics. Barry Gross also has a new acrylic finishingkit available. <strong>The</strong> kit contains six (6) different colorcoded reusable aluminum oxide pads. <strong>The</strong> pads workgreat on stabilized wood <strong>and</strong> all acrylic materials. <strong>The</strong>pads range from 600 to 12000 grit. I have about 20homemade acrylic blanks. I’ve been chucking them up<strong>and</strong> turning one end round, s<strong>and</strong>ing <strong>and</strong> polishing, toshow what the acrylic will look like. I’m taking themto show during my casting demo in Utah. After half ofthem were completed I started wet s<strong>and</strong>ing them withthese pads from Barry’s finishing kit. I had never beena fan of wet s<strong>and</strong>ing but now I will always wet s<strong>and</strong>acrylics. <strong>The</strong> blanks I s<strong>and</strong>ed with these pads look a lotbetter than the ones I dry s<strong>and</strong>ed with micro mesh.I also buffed the last ones I turned with Barry’sAcrylic <strong>Pen</strong> Buffing System. This buffing system hastwo wheels...one is cotton <strong>and</strong> the other is flannel. <strong>The</strong>cotton wheel is used with a buffing compound thatcomes with the buffing system. <strong>The</strong> flannel wheel isused with no buffing compound. <strong>The</strong> 4 inch wheelsare mounted on an 8mm m<strong>and</strong>rel <strong>and</strong> separated bywhite plastic bushings <strong>and</strong> spacers. It has a #2MT foreasy mounting <strong>and</strong> removal from the lathe. <strong>The</strong> buffingsystem fits nicely <strong>and</strong> comfortably on my Jet mini lathe.<strong>The</strong> last 10 or so blanks I wet s<strong>and</strong>ed <strong>and</strong> buffed withBarry’s s<strong>and</strong>ing kit <strong>and</strong> buffing system looks much betterthan the first ones I made. Wet s<strong>and</strong>ing <strong>and</strong> buffingwill become a regular part of my acrylic pen finishingregiment. Once again, information of these two productsis available on Barry Gross’ website.If I don’t see you in Utah, maybe I’ll get the chancein Chicago in August at Turn on Chicago 2010 or inWaco, TX later in August at the SWAT Symposium. Iwill be doing pen demonstrations at both.As always, comments <strong>and</strong> emails welcome. Do agood turn daily!Page 13 More Woodturning June 2010
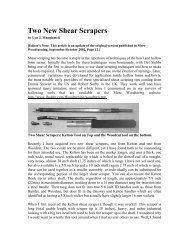
Proper Chain Saw File H<strong>and</strong>les, & a Neat Tipby Bob Heltman CMW, AAW Copyright 4 – 2010Woodturners get their wood in two basic ways.One is to go to a store <strong>and</strong> buy wood blocks of varioussizes <strong>and</strong> exotic natures, kiln dried, often wax coated,<strong>and</strong> a bit pricey. I’ve done some of that.<strong>The</strong> other way is to come by portions of trees,newly fallen, cut into turning blanks, with ends quicklypainted to prevent early end grain splitting. I’ve donea lot of that! Living in the woods has led to my using alot of my own trees, but from time to time friends willoffer me a fallen cherry tree, or bring a distant woodlike Osage Orange. Living in the woods I prefer to haveknown the actual tree from which my woodturningsare made.This situation, along with clearing l<strong>and</strong> to build ourhome in the mid 1990s, led to the purchase of severalchain saws, all of which died until I got my Husqvarna272 in 1997. Even after partly running it over with the5 foot diameter rubber tire on my Ford 555B tractorbackhoe,this saw has held up very well. I’m on my thirdor fourth chain bar <strong>and</strong> I don’t know how many chainsI’ve worn out. However, it makes a lot of noise, <strong>and</strong>up near the house, <strong>and</strong> on a quiet morning, that noiseis not appreciated.So, I next ran through two electric chain sawswhich burned out, again leading me to an electricHusqvarna which has stood the test of time. It is vitalfor sizing bowl blanks!THEN, as trees needed pruned <strong>and</strong> bending overbecame more difficult, I procured a long reach RyobiPruner. It has held up admirably <strong>and</strong> is also excellent forclearing bushes <strong>and</strong> segmenting larger fallen branches.In turn, this led to the realization that there are differentsized chains on the different saws, <strong>and</strong> to do touch upsharpening between professional sharpenings, doggonebut what different files sizes were needed! Whenin a hurry, or without glasses on, I would reach for thewrong file <strong>and</strong> have to go back. Over the years theselittle bothersome experiences added up.<strong>The</strong>n, in February 2010, expert woodturner WarrenCarpenter demonstrated before our club (www.carolinamountainwoodturners.org /members/newsletters/2010/February/Warren_Carpenter.pdf). Warren is apast President of CMW <strong>and</strong> is now on the AAW Boardof Directors. He also got me back into woodturning in2002 after a geographical move <strong>and</strong> lapse of 15 years - (Istill have his roughed out bowl from Wood Day at theFolk Art Center, August 2002). One of the “tricks of thetrade” he mentioned was to put a flat on the undersideof one’s turning gouge h<strong>and</strong>le, so that when set downon the lathe’s bed the gouge would not roll off.That trick stuck in my mind, <strong>and</strong> reminded me oftimes my chainsaw sharpening file would roll off thebench. Putting all this together I decided to make upsome file h<strong>and</strong>les, put a flat side on each AND woodburnin the name of the saw <strong>and</strong> the file size. That way Icould certainly grab the right file for the chain saw beingsharpened, <strong>and</strong> accurately change to a new file whenthe old wore out. In fact, I could take the file h<strong>and</strong>le tothe store with me <strong>and</strong> make sure I got the right sizedfile for MY particular saw.Fig 1 shows the 3 saws.Figure 2 shows files when they come in a blisterpack showing file size. I decided, as a goodreminder, to felt tip mark on the blister pack toWHICH saw those files belonged. Insurance; likebelt <strong>and</strong> suspenders[Continued on Page 16.]More Woodturning June 2010 Page 15
Proper Chain Saw File H<strong>and</strong>les Continuedfrom Previous PageWhen making the h<strong>and</strong>les I used such chunks ofwood as were h<strong>and</strong>y. In fact, one could cut a h<strong>and</strong>lesized branch, work it up a bit with a pocket knife, <strong>and</strong>jamb the tang of the file into the center pitch...but thatwould not be woodturning. Instead I used some blanksabout 5” long <strong>and</strong> about 1 1/2” squarish (some were abit more rectangular). AND I wanted a ferrule to assurelong h<strong>and</strong>le life <strong>and</strong> to avoid unsafe splitting outwhen filing.Figure 3. <strong>The</strong> ferrules were cut from old electricalaluminum conduit.<strong>The</strong> ferrules were cut from old electrical aluminumconduit. Figure 3 shows the result. I turned the tenonwith a slight taper, <strong>and</strong> longer than the ferrule, doingtrial fitting <strong>and</strong> carefully reducing tenon diameter untilachieving a snug fit. <strong>The</strong>n I put the file into the top ofmy bench vice, opened just the two opposite edges ofthe ferrule on opposite vice jaws. <strong>The</strong>n I hammeredthe h<strong>and</strong>le into the ferrule for a press fit. At that pointI remounted the h<strong>and</strong>le in the lathe, finished the woodturning,<strong>and</strong> used a parting tool to cut the tenon flushwith the ferrule. A few drops of superglue were addedat both ends of the ferrule where it contacted wood,“just to make sure” of a tight fit.Next came drilling the hole for the tang of thefile. As Figure 4 shows, I chose a drill just under thesize of the widest measure of the tang at 3/4 of the wayfrom the pointed end. In this case a 7/64” drill bit wasappropriate for a 5/32” diameter file. I drilled to a bitover the length of the tang, inserted the tang of the file,stood the file on my workbench, <strong>and</strong> tapped the woodh<strong>and</strong>le with a mallet until a solid “thud” was heard,firmly seating the file.Figure 4. This photo shows the details.I made different numbers of grooves <strong>and</strong> alteredeach h<strong>and</strong>le to be distinct. That way, over time, thefeel of the right file would match up with the correctchain saw.Initially I planned to just woodburn in the nameof the saw <strong>and</strong> the file size. However, I later decided toadd the model number of the saw. That way, when in arush <strong>and</strong> dashing off to the store for a replacement file,that h<strong>and</strong>le would have all the information right there!Figure 5 shows 4 files. I made an extra for the big Husqysince it seems to be used sometimes from the garage,<strong>and</strong> sometimes out of my basement studio.Figure 5. Four files with different h<strong>and</strong>les.Figure 6 is a close-up showing model numbers on2 of the h<strong>and</strong>les. Two of the files, for the Gas Husqy <strong>and</strong>the Ryobi Pruner, are hung on the garage wall so as tobe h<strong>and</strong>y for sharpening. <strong>The</strong> second Gas Husqy file,<strong>and</strong> the Husqy Electric files are in the maintenance boxfor chain saws, kept in my basement studio.When the file h<strong>and</strong>les were all done (<strong>and</strong> I decidedto not bother applying any finish) I turned to my twobowls gouges to apply the “Warren Carpenter AntirollingFlats.” First I set a gouge on the lathe’s bed <strong>and</strong>moved it about to find the balancing point. This turnedMore Woodturning June 2010 Page 16
out to be up near the ferrule. <strong>The</strong>n turning the gougeover so the flat would be on the side opposite the flute,I used my belt s<strong>and</strong>er <strong>and</strong> s<strong>and</strong>ed a flat area about 4inches long <strong>and</strong> about 3/4” wide.Now I feel safe <strong>and</strong> smug about both my chainsaw filing situation, <strong>and</strong> my non-rolling woodturninggouges.Look out bowl blanks, I’m fully ready now!Figure 6. Two h<strong>and</strong>les marked for a particularchain saw.That worked quite well <strong>and</strong> kept the sharpenededges skyward. One gouge had been used a lot morethan the other of the same type, so the metal part wasshorter. Yet, the second <strong>and</strong> longer gouge displayed essentiallythe same balance point, so I put a similar flatarea on it in the same place.Figure 7. Flattened area on gouge h<strong>and</strong>le.More Woodturning June 2010 Page 17
Axes lengths of the ellipse: 250mm x 200mm.Thickness of the Padouk blank: 36mm. <strong>The</strong> outer diameterof the circular groove is 72mm, fitting the jawsSC67 of the VICMARC-four-jaw-chucks VM90 <strong>and</strong>VM100. <strong>The</strong> drill is made of 2,5mm tool steel sheeting,sawn <strong>and</strong> filedFigure 7 Holding the workpiece with its top inthe VICMARC chuck VM100 on my KREHER-Lathe (see www.cw-kreher.de) <strong>and</strong> round-turningof the bottom, to a thickness of about 30mm, witha parabolic transition from round to oval, theresulting rim is of unequal thickness.Figure 5. Volmer-Ovalturning-Lathe(Ovaldrehmaschine) ODM30 with VICMARCfour-jaw-chuckVM100 <strong>and</strong> jaws SC 67, adjustedfor 50mm axis-difference <strong>and</strong> for 2.2kg mass ofthe chuck <strong>and</strong> blank. Safety cover dismantled.<strong>The</strong> turning could also be done using theSteinert?picOval, the VICMARC-OvalchuckVOD300 or a classical oval chuck.Figure 8. Turning of a recess of 75mm diameter<strong>and</strong> 5mm depth, then s<strong>and</strong>ing of the bottom.Figure 6. Turning the flat oval upper side witha small bead along the edge <strong>and</strong> a cylindricalrim. Axes lengths of the border ellipse: 235mm x185mm.[Continued on Page 20.]More Woodturning June 2010 Page 19
Continued from Previous Page.tendency would become all the more obvious once thepiece was mounted on the lathe.<strong>The</strong> softer woods would naturally cut faster <strong>and</strong>occasionally there would be an obstinate harder pieces<strong>and</strong>wiched between softer pieces. <strong>The</strong> natural tendencywould be for the gouge, scraper, <strong>and</strong> even s<strong>and</strong>paperto act more aggressively when encountering thesesofter woods, so to avoid craters, it was necessary to becognizant of this tendency <strong>and</strong> to struggle to maintainall tools steadily on the plane surface to be worked.Figure 1. Side View of finished bowl.In the end, I was pleased with the overall shapeachieved, which amazingly was pretty much what Ihad intended. This isn’t always the case with free-formitems like dishes <strong>and</strong> spindles where sometimes thewood itself seems to want to do something different thanwhat I have pre-conceived. Usually I assume the woodknows better than I do what it wants to become <strong>and</strong> I letit guide me. Perhaps because this was a conglomerationof small pieces there was no longer a guiding principle<strong>and</strong> my desire was adequate.Most of the shaping of the bowl was achieved withsome basic tools, namely a roughing gouge <strong>and</strong> a heavy1” round nosed scraper. To put a small lip on the inside,a hollowing tool with moveable <strong>and</strong> replaceable carbidebit was helpful, but I suppose people strongly adeptwith the bowl gouge could achieve the same result. Iwas most pleased with the flat bottom <strong>and</strong> 90 degreeangle sides achieved with the flat nosed scraper. I justhad to be careful since it cuts much more aggressivelythan I had anticipated.<strong>The</strong>re were to be gaps <strong>and</strong> voids but surprisinglynot as many as I had feared. I quickly learned to discountthe initial voids that appeared in the early stages ofturning since most, if not all, of those would disappearin the general turning process anyway. Instead, I onlychose to fill those voids that remained as I was performingthe s<strong>and</strong>ing stage. S<strong>and</strong>ing powder mixed on eitherwax paper or on the mounted dish itself with mediumconsistency cyanoacrylate (CA) worked perfectly <strong>and</strong>blended remarkably well with the epoxy sections, theonly places void fill would prove necessary. I havefound through trial <strong>and</strong> effort that blending the requireddust with a medium or thick CA on wax paper <strong>and</strong> thenapplying with applicator sticks available at the craftstore gives me greater control over the placement ofvoid fill than attempting the maneuver on the rounded<strong>and</strong> mounted piece. Using a thicker consistency, <strong>and</strong>therefore longer set time, gives one the time neededto blend <strong>and</strong> fill prior to CA set up. Some patience isthen required to allow time for the CA to set. Usingaccelerator will only result in hideous opaque whiteresidue while turning the lathe on too soon results in CAsprayed at high velocity on to your lathe <strong>and</strong> anythingwithin the centrifugal throw range as well. Typicallythis will include you, yet another reason to have old,but well fitted, clothes along with safety glasses <strong>and</strong> arespirator mask as well.Figure 2. View of bottom of bowl.I decided to try a new finish idea on this piece soI used, for the first time, some Minwax wipe on polyurethanein a satin finish with the piece off the lathe. Ifound that the wood soaked up more of the finish thanI had anticipated, although this wasn’t a problem, <strong>and</strong>that at least a good 15 ml could be poured into the 4-5”diameter bowl of 2-3” height <strong>and</strong> easily absorbed asit was rubbed into the wood. I assume that the epoxyPage 22 More Woodturning June 2010
sections did not absorb the finish, but I could be wrongabout this. <strong>The</strong> wood was thoroughly dry <strong>and</strong> I believethat the bulk of the absorbed finish went into the wood.<strong>The</strong> instructions call for an overnight drying time <strong>and</strong>then a rubbing with 000 steel wool <strong>and</strong> a reapplicationof the finish, a process which can be repeated presumablyindefinitely, but which I felt was adequate for mypurposes with three applications. I wanted the dish tobe useable, although not for food, as opposed to strictlydecorative <strong>and</strong> I felt that the strength of the polyurethanewould provide the protection I wanted with a look Icould live with.Grip-All Jaws System Updateby Fred HolderIn the November 2009 issue of More Woodturning,I reported on the Grip-All Jaws System that we hadobtained at the September 2009 meeting of the NorthwestWashington Woodturners. While this issue wasunder preparation, we attended the Quilceda CarversAnnual Show <strong>and</strong> met Stuart Dittbrenner, who is not apartner in the company making these jaws. Stuart wasselling a Tilt-Top Work Station for the Grip-All JawsSystem. I had built a work station for our set, but hadnot thought of making it tiltable. Anyway, I decidedto purchase one of the units including the vise for oursystem. When we get it <strong>and</strong> have a chance to check itout I’ll report more extensively on this new addition.Basically, the Grip-All Jaws System Tilt-TopWork Station can be clamped to most flat, solid <strong>and</strong>stable work surfaces. <strong>The</strong> Grip-All Jaws System wasinvented to fit most woodworker’s vises, but even[Continued on Page 38]Figure 3. View of top of bowl.Overall I was actually pleased with the end resultif a bit surprised at the effect the differing densities <strong>and</strong>hardness of the various woods. It was a good learning<strong>and</strong> reinforcing experience about the individual natureof the woods <strong>and</strong> that what works with one species maywell not work at all with another. I was also pleasedwith the outcome <strong>and</strong> refinements of the dust/CA fillingprocess <strong>and</strong> ultimately was also pleased with theresults of the polyurethane finish. I don’t know that theresults necessarily justify the expense of purchasingthese blanks given how many beautiful <strong>and</strong> workablepieces of single species wood are available, but theymight be just the thing for someone who really enjoysthe variability of multiple species in one piece. WhatI would like to try someday is to mock up <strong>and</strong> glue myown multi-piece blank using the seemingly limitless offcutsassociated with pen making! I haven’t done that yetbut once I do I will be sure to report on the results.More Woodturning June 2010 Page 23
Geiger’s Re-Centering Solution<strong>The</strong> components supplied with the systemGeiger’s Re-Centering Solution is a system thatenables wood turners to drill a shallow hole that is absolutelycentered on the waste stock of a work piece.<strong>The</strong> hole will subsequently be used to re-center theblank when jamb chucking or vacuum chucking. A recenteringpin is supplied to replace the center point of aOne Way or Jet live center. This pin is used to establish<strong>and</strong> maintain the position of the blank when jamb orvacuum chucking. It’s a quick, easy <strong>and</strong> very accurateway to re-center your work. You’ll use it every timeyou turn!Pick one of the following three sizes:Left to right: M33 3.5, 1-1/4” X 8 <strong>and</strong> 1” X 8Total system price: $64.95 (FL residents add $4.38tax) + $8.00 shipping<strong>The</strong>y accept Visa, MasterCard, Discover <strong>and</strong>checks. All orders may be placed via telephone, at352-472-5035. If you have any questions, please callDon Geiger at: 352-472-5035 or E-mail: dongeiger@cox.net.Web Site: http://www.geigerssolutions.com/Note: Don Geiger posted on the WoodCentral MessageBoard concerning his Re-Centering Solution. I don’tuse faceplates very often, but for those who do this recenteringsolution may well be worth adding to yourtool inventory. I’ve often thought something like thiswould be helpful when remounting a bowl blank thatwas originally mounted to the lathe on a faceplate.Where Turners Turn FirstINFORMATION AND RESOURCES FORWOODTURNERS WORLDWIDEFind articles, projects, new products, vendors, club listings,turner websites, courses <strong>and</strong> schools, discussion forum,books <strong>and</strong> videos <strong>and</strong> much more!WWW.WOODTURNINGONLINE.COMPage 24 More Woodturning June 2010
Mike MahoneyNew Video“THE ELIMINATOR”Hollowing ToolELIMINATES:CATCHES,TEAR OUT,SHARPENINGAvailable in three sizes: 1/4, 3/8, 1/2 inch cutters. Tool shafts aremilled with flats for both right <strong>and</strong> left h<strong>and</strong> cutting.Available from: Packard Woodworks <strong>and</strong> Craft Supplies USAwww.jewelwood.comTo Orderwww.bowlmakerinc.comWOODWORKERS’SEMPORIUMVICMARC5461 Arville StreetLas Vegas, NV, 89118Toll Free 800-779-7458Fax 702-871-0991Stuart Batty-Trent Bosch-Cindy DrozdaKeith Gotshall-Mike Mahoney-David Nittman-Richard RaffanAll reputed woodturners using Vicmarc lathes.....shouldn't you?www.woodworkersemporium.comMore Woodturning June 2010 Page 25
Vicmarc - Escoulen Eccentric Chuck #3by Fred HolderThis chuck is one of the few eccentric chucks thatI do not own. When we were at the Vicmarc factory in2006, they were working on the design of this chuck<strong>and</strong> asked me not to mention it at the time. I have notyet had an opportunity to see one of these in action, butit looks like the best solution currently available.This illustration shows the various adjustmentsprovided on the chuck to give you some idea ofwhat it can do.<strong>The</strong> Vicmarc Escoulen Chuck originally designedby Jean Francois Escoulen <strong>and</strong> manufactured by Vicmarcexp<strong>and</strong>s the possibilities for off centre turning.<strong>The</strong> accessories also allow eccentric turning. <strong>The</strong> mainfeature of the chuck is its infintely variable axis settingcapacity. With the range of 0 to 30mm each setting givesa different turning axis.In addition to this the rotating cup chuck allowsyou to create an even wider variety of shapes, dependingon the chosen axis. <strong>The</strong> optional ball chuck allows theworkpiece to be swivelled up to 15° off the z-axis foreven more flexible turning. (see diagram above)<strong>The</strong> combination of several shapes on a singlepiece, without having to remove the workpiece, enablesthe creative turner to make very personal <strong>and</strong> originalpieces.<strong>The</strong> chuck is manufactured from K1045 (mediumtensile steel) the chucks have a higher durability ensuringa longer life <strong>and</strong> a very high quality finish which isless susceptible to rust. Vicmarc chucks are guaranteedfor 12 months <strong>and</strong> a large variety of accessories areavailable to suit them.Chuck thread sizes available: M33 x 3.5 - V00295-2 (direct thread), 1 1/4 x 8 - V00295-3 (direct thread),<strong>and</strong> M45 x 2 - V00295-5St<strong>and</strong>ard Chuck Includes:1 - Tommy bar 7.9mm; 1 - 5mm Allen T-Bar;1 - 4mm Allen T-Bar; 1 - 4mm Allen L-Bar; 1 - #3Gauge; 1 - 10mm Spanner; 1 - 40mm Cup Chuck; <strong>and</strong>1 - Owners Manual (see photo on left)<strong>The</strong> chuck <strong>and</strong> accessories.Example of what this chuck can do.For more examples visit www.escoulen.comFor further details contact Vicmarc at vicmarc@vicmarc.comPage 26 More Woodturning June 2010
Tormek BGM-100 Bench Grinder Mountby Fred HolderI set my dry grinder up with the Tormek BGM-100so that I could use the Tormek jigs to grind my tools toshape. This them makes it fairly easy to take the toolto the Tormek for final grinding to a very sharp edge.Recently, I received some information from Tormek onthis addition to their tool list <strong>and</strong> thought I would sharetheir comments with you in this issue.While nothing on the planet beats the Tormek atmaintaining a perfect edge on turning tools, establishingthe shape on a tool can push a turner’s patience <strong>and</strong>take the fun out of the process. Shaping on a dry grindercomes with its own set of trials <strong>and</strong> tribulations, too.<strong>The</strong> steel is coming off the tool very quickly, which asall of us who have been there know, can be as muchof a curse as a blessing. If you’re trying to control thatprocess freeh<strong>and</strong> -- good luck. Those who can do itwell are few <strong>and</strong> far between <strong>and</strong> the list does NOTinclude my name.Jig systems are nothing new to dry grinders, butwhat we have now, with the BGM-100, is the controlthat has made Tormek jigs world famous combined withthe shaping speed of a dry grinder. Even better, if youuse the TTS-100 Turning Tool Setter, the match of theprofile to the grindstone when moving from shaping onthe dry grinder to sharpening on the Tormek is nothingshort of amazing.<strong>The</strong>re have been critics who have been quick topoint out that Tormek has been beating the watercooleddrum for so many years, <strong>and</strong> now there they are sellingstuff for dry grinders. Well, the critics aren’t listening tothe message. Tormek still contends (<strong>and</strong> I agree) that theTormek system is the best way to sharpen your turningtools. <strong>The</strong>y’re now accepting that dry grinding is a reasonablealternative for initial shaping, if done carefully<strong>and</strong> under the same control used on the Tormek.Setting up a BGM-100 is very easy. You justlaminate a block from scrap plywood that is 2 inchesless in height than the measurement from the base tothe centerline of your grinder (2-½ inches if using a 6inch grinder). Screw the horizontal base to that, positionit in front of your grinder according to the detailedinstructions, <strong>and</strong> you’re good to go.<strong>The</strong> Tormek BGM-100 Bench Grinder Mountenables one to use the Tormek jigs to grind toolson the bench grinder.If you’re unsure that the Tormek is right for you,but you really want to see what everyone is talking aboutwith their jigs, this might be just the right way to takethe first step into the program. It is as easy or easierto construct than any of the competitive systems. It’spriced competitively with anything out there. And, itdoesn’t have the huge footprint in your shop that someother systems take up. If you later decide that you wantto take the next step <strong>and</strong> put the perfect edge on yourturning tools, everything you buy for a BGM-100 setup will be fully functional with your new Tormek.I have my grinder set up like this with a TormekBGM-100 one each wheel. Now, I have diamondwheels on the grinder <strong>and</strong> they work very well.More Woodturning June 2010 Page 27
Coming Events<strong>The</strong> AAW 2010 Symposium will be held in Hartford,Connecticut on June 18 - 20, 2010. ScheduledDemonstrators are: Nick Agar, Engl<strong>and</strong>; Michael Allison,CT; David Belser, NH; Peter Bloch, NH;Trent Bosch,CO; Bruce Campbell, Canada; Marilyn Campbell, Canada; Jimmy Clewes, UK; Nick Cook, GA; BarbaraCrockett, OH; Christian Delhon, France;DonaldDerry, WA; Sharon Doughtie, HI ; Cindy Drozda, CO;David Ellsworth, PA; Peter Exton, NY; J. Paul Fennell,AZ; Douglas J Fisher, Canada; Tucker Garrison,NC;Stephen Gleasner, ME: Keith Gotschall, CO; BarryGross, PA; Al Hockenbery, FL; Richard Hogue, SC;Keith Holt, MD; John Jordan, TN; Michael Kehs, PA;Ed Kelle, NY; Jerry Kermode, CA; Bonnie Klein, WA;Alan Lacer, WI; Joe Larese, NY; Art Liestman, Canada;David Lindow, PA; Glenn Lucas, Irel<strong>and</strong>; John Lucas,TN; Bill Luce, WA; Mike Mahoney, UT; David Marks,CA; Terry Martin, Australia; David Nittmann, CO; PascalOudet, France; Binh Pho , IL; Graeme Priddle, NewZeal<strong>and</strong>; Tania Radda, AZ; Joey Richardson, UK; JoeRuminski, NC; Avelino Samuel, VI; Jon Sauer, CA;Betty Scarpino, IN; Jon Siegel, NH; Dick Sing, IL;Mark St. Leger, VA; Curt <strong>The</strong>obald, WY; Keith Tompkins,NY;Jacques Vesery , ME; Kevin Wallace, CA;Hans Weissflog, Germany; Andi Wolfe, OH; MalcolmZ<strong>and</strong>er, Canada.For more information, AAW membersshould contact the office in St. Paul, MN - phone 651-484-9094, email: inquiries@woodturner.org or checkout the website at www.woodturner.org* * *<strong>The</strong> Woodturners of Olympia presents its 2010Creativity in Woodturning Symposium which will beheld at the Komachin Middle School, 3650 College StSE, Lacey, WA 98503 on July 24, 2010, from 7:45a.m.to 5:15p.m. Featured demonstrators include: AlanLacer, David Schweitzer <strong>and</strong> Bill Luce. Registration feeis $80.00 until May 31, 2010 after which it increases to$90.00. Youth under the age of 18 when accompaniedby a paying adult is $10. No Refunds after July 1, 2010.Registration includes lunch <strong>and</strong> door prizes. For moreinformation or to register on line visit:http://www.woodturnersofolympia.org/Alan Lacer will also conduct three day long h<strong>and</strong>sonworkshops limited to 8 participants each. Cost perwork shop is $130 including all materials. <strong>The</strong> workshops<strong>and</strong> dates are:• WS1: July 25, Making & Using a Hook Tool;• WS2: July 26, Mastering the Skew;• WS3: July 27, Creating a Flared Rim Vessel, Design& Form.Contact Al Price to register on phone: 360-791-0396 or e-mail: aprice44@aol.com* * *Turn-On! Chicago 2010, the 2nd Midwest woodturningsymposium presented by the Chicago Woodturners.will be held August 20-22, 2010 in Mundelein, IL,just north of Chicago. Demonstrators include: JimmyClewes, Don Derry, Cindy Drozda, David Nittman,Binh Pho, Dick Sing, <strong>and</strong> Malcolm Tibbetts, with moreto be announced. Events include h<strong>and</strong>s-on pen turningfor the troops <strong>and</strong> special evening demonstrations plustrade show <strong>and</strong> banquet. For more information go totheir web site at: www.chicagowoodturners.com* * *<strong>The</strong> 2010 SWAT Turners Symposium will bepresented by the SouthWest Association of Turners onAugust 27 to 29, 2010 in Waco, Texas. Demonstratorsinclude: Eli Avisera, Clay Foster, Jennifer Shirley, AlanLel<strong>and</strong>, Molly Winton, Mike Jackofsky <strong>and</strong> a numberof local demonstrators. For more information, go to:www.swaturners.org.* * *<strong>The</strong> West Coast Round-up 2010, presented by<strong>The</strong> Greater Vancouver Woodturners Guild will be heldon September 10 through 12, 2010 inVancouver, BritishColumbia. <strong>The</strong> featured demonstrators are: AlainMaill<strong>and</strong>, Art Liestman, Nick Cook, Michael Hosaluk,Graeme Priddle, Marilyn Campbell, Jason Marlow, <strong>and</strong>Dale Larson. For more information on this event, go to:www.gvwg.ca/symposium/home.html. For a copy of theregistration brochure, e-mail: mervgraham@shaw.ca.* * *<strong>The</strong> 2010 Virginia Symposium, presented by theVA Woodturners Inc. will be held on October 23 <strong>and</strong>24, 2010 at the Augusta Exposition <strong>and</strong> EntertainmentCenter (Expol<strong>and</strong>) in Fishersville, Virginia. <strong>The</strong> symposiumprovides an environment of networking, education,<strong>and</strong> collaboration for members of the regionalwoodturning community. It promotes the art <strong>and</strong> craftof woodturning. For more information, go to their website: http://www.virginiawoodtuners.com.Page 28 More Woodturning June 2010
More on Colt <strong>Pen</strong> DrillsGeoff Brown wrote: Hi FredI have just caught up with my reading <strong>and</strong> wasnaturally very pleased to see the positive reaction byDon Ward to the Colt <strong>Pen</strong>Blank Drill Bits.<strong>The</strong> range of sizes is much wider than Don Wardrealizes as you can see from the attached list. Many ofyour readers may be looking for some of these sizes,which are all used for the different mechanisms whichare available on the market.—GeoffEditor’s Response: I’m not sure anyone here inthe US is carrying all of those sizes. Mildred purchasedme the five or six sizes in a set that Woodcraft sells forChristmas along with most of the Forstner bits thatWoodcraft had on h<strong>and</strong>. <strong>The</strong> Colt drills are wonderful,in my opinion.—Fred HolderNote: Geoff sent me a table of sizes of pen drill available.I’ve reproduced it below for what it is worth tomy readers.More Woodturning June 2010 Page 29
Don McNutt Demonstrationby Fred HolderAt the January 10. 2010 meeting of the SeattleChapter of AAW, Don McNutt the newly elected presidentof the club gave a demonstration <strong>and</strong> talk on makingchairs like the one shown in Figure 1.Figure 2. Don McNutt holding up the tool that henormally uses to make the small spindles for thechairs.Don noted that these thin spindles can be turned ona lathe <strong>and</strong> then prepared to demonstrate this process asshown in Figure 3. This is a fairly long <strong>and</strong> thin spindlethat is better made by some other method.Figure 1. One of Don McNutt’s chairs.Don noted that very little of the pieces in the chairare turned on the lathe; for example, the thin spindles,which are fairly difficult to turn on a lathe are normallymade with a h<strong>and</strong> held tool which sizes them to theparticular size. As the tool which Don is holding in hish<strong>and</strong> in Figure 2 is rotated it sizes the spindle to theproper size. This is normally done off of the lathe.Figure 3. Don McNutt beginning to turn a longthin spindle.Don then showed us a number of tools used in themaking of the chairs. <strong>The</strong> tool shown in Figure 4 is atool to make the tapered hole in the seat of the chair toaccept a tapered tenon on the small spindles used in thearms <strong>and</strong> back of the chair.Page 30 More Woodturning June 2010
Figure 4. Tool to make a tapered hole to accept thetapered portion of a thin spindle.Figure 7. This is the tool used to shape the seat ofthe chair.Figure 5. <strong>The</strong> tool used to make the tapered tenonon the thin spindles.Figure 8. Don showing how he stabilizes the thinspindle with a gloved h<strong>and</strong> as he nears the finalshape <strong>and</strong> size.This is the first demonstration I had seen on themaking of these chairs. Don showed us a great manytools he uses in making of these chairs <strong>and</strong> I’ve onlyshowed a few of them in this article. It appears that onewishing to take up the making of these beautiful rockerswould find a need to purchase many new tools notnormally used in turning wood. A good demonstratinDon, thanks for sharing this with us.Figure 6. A planing tool for rounding spindles.Page 31 More Woodturning June 2010
Editor’s Books for SaleBooks Written by the Editor of More WoodturningMaking the ChineseBallRevised 2008, by FredHolder.This revised booklet outlines Fred’strials <strong>and</strong> tribulations in conqueringthis project. Tells how to makethe tools needed to use the CrownChinese Ball Tools. Booklet nowcontains 64 pages of information.Price is $10.00 including shipping.Order from: Fred Holder, PO Box2168, Snohomish, WA 98291.Telephone 360-668-0976.Price: $28.00, plus $5.00s/hPrice: $27.00, plus $5.00 s/hI have purchased 25 copies of<strong>The</strong> Woodturner’s FAQ Book <strong>and</strong>have them available as signedcopies for $19.95 plus $5.00for shipping by Priority Mail(Washington State residentsplease add 8% for sales tax.)We accept cash, check, orMasterCard <strong>and</strong> Visa creditbook, which is “required readingfor all new turners” directlyfrom the author:Fred HolderMore WoodturningPO Box 2168Snohomish, WA 98296 USA“Two Books in One”a CD-ROMThis CD-ROM contains Fred’snewest book, “<strong>The</strong> Turning Process”<strong>and</strong> the above book “Makingthe Chinese Ball” on one CD-ROM.Both books are in PDF format <strong>and</strong>require Adobe Acrobat Reader toread them on your computer. <strong>The</strong>Turning Process is a 105 pagebooklet designed for beginner tointermediate woodturners. It mighteven have something worthwhile forexperienced woodturners.Available by 9/10/2008Price for this CD-ROMis just $14.95 including postagewithin the United States.Order from: Fred Holder, PO Box2168, Snohomish, WA 98291.Telephone: 360-668-0976<strong>The</strong>se books seemedto be missing from most USSources. So I have purchased25 of each book for resale. Ifyou haven’t had an opportunityto purchase one, this isan opportunity to get a signedcopy. Books will be shippedby Priority Mail.Fred HolderMore WoodturningPO Box 2168Snohomish, WA 98291 USATEL: 360-668-0976Back Issues of More WoodturningAvailable on CD-ROMAnyone who owns a computer <strong>and</strong> likes to read More Woodturningon their computer or to archive it onto their computer, willbe pleased to learn that we now have all issues of More Woodturningever published in PDF format. While we offer individual yearson a CD-ROM for $25.00, we have come up with a special pricewhich includes all issues published from October 1996 to the datethat the order is placed on a single CD-ROM for just $95.00. ThisMore Woodturning, PO Box 2168, Snohomish, WA 98291 USA.Page 32 More Woodturning June 2010
Making a Sphere in a Cubeby Fred HolderWhen we visited the Vicmarc factory in September2006, we were introduced to two Australian Woodworkingmagazines, which we subscribed to upon returninghome. In issue Number 65 of Australian Wood Reviewthere was a photo of two cubes with spheres inside thatwere made by John McBrinn from camphor laurel <strong>and</strong>redgum. Mildred said, “You can make me one of those.”I thought it sounded interesting, but didn’t have anyidea how to make it.<strong>The</strong> ball was much rounder, but my s<strong>and</strong>ing was notacceptable.Figure 1. Photo of the two cubes with sphereinside made by John McBrinn <strong>and</strong> published inIssue #65 of Australian Wood Review.My first attempt was a total failure. I thoughtmaybe I could start with a sphere <strong>and</strong> use the ChineseBall tools to cut a loose sphere inside a sphere. I wouldthen convert the sphere into a cube. That didn’t work,so I cast aside that idea.<strong>The</strong> next attempt, I made a tool from an old woodchisel, I think it was a 1-1/2” wide inexpensive chiselfrom Harbor Freight. I decided the sphere should be inthe neighborhood of 2-1/2” in diameter for the 3-5/8”cubes of maple that I could come up with from a verydry board. I decided to hold the block in my Nova TitanChuck, which has 5 inch jaws. I had previously madesome wooden inserts to assist in holding a cube. Thisone was not a complete failure, but the ball was not veryround <strong>and</strong> the wood had some cracks in it. I gave it toMildred <strong>and</strong> she said that is a good start.My third attempt was a bit better, but I was stillnot very happy with it. My fourth attempt was quite abit better <strong>and</strong> was made on my Vicmarc VL-100 evslathe. My finish on that one turned out to be a disaster.Figure 2. This photo shows my fifth attempt thatthis story is about. Is it perfect, no, but it is thebest that I’ve come up with to date.I finally decided to make at least one more <strong>and</strong> photographthe process. <strong>The</strong> following set of photographsillustrate the process <strong>and</strong> the captions describe what Iwas doing. I’m not sure I’ll attempt to make anotherone of these, but I challenge my readers to give this atry <strong>and</strong> perhaps document what they did differently thatwould make this project a bit easier to accomplish.Figure 3. This photo shows the basic items used tomake this project.[Continued on Next Page]Page 33 More Woodturning June 2010
Sphere in a Cube Continued from PreviousPage.As shown in Figure 3 the items are: a woodencube of good dry hard wood, a center punch, a scribe, acenter marking device of some type (this is the Vicmarcunit), <strong>and</strong> an undercutting tool to cut the ball loose fromthe cube. <strong>The</strong> undercutting tool was made from a 1-1/2inch wide carpenter chisel that was ground to a shape tosupposedly cut the top of a 2-1/2 inch ball. <strong>The</strong> h<strong>and</strong>leis one of the h<strong>and</strong>les from a Crown Chinese Ball tool.Figure 6. I then drilled three of the sides of thecube, leaving the opposite side from each holeblank for drilling on the lathe.Figure 4. Here I am using the Vicmarc centermarker <strong>and</strong> the scribe to mark the center onall six sides of the cube. Once the centers weremarked, I used a spring loaded center punch tomark the point for the drill to center on.Figure 7. At this point, I moved to the VicmarcVL-100 lathe with my Vicmarc chuck with thesmall jaws. <strong>The</strong> jaws will open wide enough togrip the inside of a 2 inch diameter hole. <strong>The</strong> faceof the jaws were placed against the bottom of the2” diameter hole.Figure 5. I then went to the drill press <strong>and</strong> using a2- inch Colt Forstner Bit, I drilled a hole ½” deep<strong>and</strong> then marked the drill with a Sharpe Ink <strong>Pen</strong>so that all holes could be drilled approximately thesame depth.Page 34 More Woodturning June 2010
Figure 10. I’m not ready to make a cut. <strong>The</strong>undercutting tool is shown on top of the tool rest<strong>and</strong> with the cube in the background.Figure 8. With the cube mounted on the Vicmarcchuck, I mounted the Colt Forstner bit in thetailstock Morse Taper using the Morse Taperadapter for the drill. I then proceeded to drillthe three additional holes using the oppositepredrilled hole to hold the block.Figure 11. This photo shows the way that I heldthe tool while doing the undercutting. <strong>The</strong> toolrest <strong>and</strong> the secondary support that the h<strong>and</strong>le isriding on were designed for making the ChineseBall.Figure 9. With all six holes drilled to a depth of ½inch, I was ready to start undercutting the surfaceof the sphere. I used my Chinese Ball Tool rest,which would give me better control of the tool <strong>and</strong>protection for my h<strong>and</strong>. It also would keep thetool from rotating when a catch occurred, if it did.Figure 12. This photo shows where theundercutting tool had cut into an adjoining hole.[Continued on Page 36.]Page 35 More Woodturning June 2010
Sphere in a Cube Continued from PreviousPage.<strong>The</strong> tool had cut into all four holes on adjacent flatsurfaces.Figure 13. Once I had undercut on two oppositesurfaces, I installed a 2 inch diameter by ½ inchthick piece of Styrofoam that was cut from somescrap I had on h<strong>and</strong>. I used a 2-inch hole saw tomake the foam inserts.Figure 15. At this point, I used an air tool with acarbide cutter to grind away the really high placesto make the ball a bit more round.Figure 14. This photo shows that the piece cutloose inside the cube is not really spherical inshape. I’m contemplating that if I should decideto make another one of these that I’ll design aswinging jig that would perhaps allow the cuttingof a more perfect sphere.Figure 16. I then remounted the ball betweencenters on the Vicmarc VL-100 with a block underthe cube to allow the ball to rotate freely insidethe cube. Now as shown, I used a 3/8 inch spindlegouge to turn the high spots off <strong>and</strong> make the ballmore round. This required mounting each of thesurfaces of the ball between centers <strong>and</strong> turning itas round as possible.Page 36 More Woodturning June 2010
Figure 17. At this point, I mounted a one inchdiameter s<strong>and</strong>ing disk holder in my drill <strong>and</strong>using 80 grit s<strong>and</strong>paper, I was able to smooth theball much more. This had to be done on all threemountings of the ball. Unfortunately, the VicmarcChuck could not adequately hold the cube afterone of the surfaces had been concaved, <strong>and</strong> I hadto move to the Nova DVR with my Nova TitanChuck to hold the sphere when concaving thesurfaces.Figure 19. Shows me turning one of the surfacesof the cube into a concave shape. I used a ½-inchbowl gouge with the Ellsworth grind on it to makethese cuts.Figure 20. I s<strong>and</strong>ed each surface with 80 grits<strong>and</strong>paper on a 3”-diameter s<strong>and</strong>ing disk holder<strong>and</strong> finished with 220 grit as shown here.Figure 18. This photo shows the cube mounted inthe Nova Titan Chuck with the surface concaved.This chuck did an excellent job of holding thecube. I finally wound up using only two of thewooden inserts the hold the cube.[Contued on Page 38]Page 37 More Woodturning June 2010
Sphere in a Cube Continued from PreviousPage.Grip-All Jaws System Continued from Page23though it increased the versatility of the bench vise,it still had the limitation of requiring a person to leanover the work piece.Figure 21. This photo shows me using my OnewayDrilling jig to drill the hole for the tenon on thefinial.. I drilled this hole <strong>and</strong> tapped it for ¼”-20tpi threads <strong>and</strong> then threaded the finial to screwinto the hole. <strong>The</strong> wood I was using for the finialdid not hold a good thread, so I screwed it intoplace with Medium CA glue. As shown in Figure2, it seemed to hold ok.I hope this article has caused some of my readersto give this a try <strong>and</strong> then perhaps report on theirmuch greater success. I may be inspired to try to makea swinging jig that will enable me to create a roundball much easier.<strong>The</strong> Tilt-Top Work Station.<strong>The</strong> new Tilt-Top Work Station can be adjustedfrom horizontal to nearly vertical, allowing for safer<strong>and</strong> more accurate work along with greater comfort.<strong>The</strong> Finished Piece.<strong>The</strong> Tilt-Top Work Station tilted to 50 degrees.Contact Information:RP Myers DesignsPO Box 55McCleary, WA 98557TEL: 360-708-4677Web Site: www.gripalljaws.comE-Mail: gripalljaw@gmail.comPage 38 More Woodturning June 2010
New Water Trough for Tormekby Jeff Farris, SharpToolsUSAAnswering an often mentioned customer issue,Tormek has done an excellent job of designing a newwater trough that keeps your shop cleaner <strong>and</strong> drier,while not being in the way most of the time.First, the lip of the trough is nearly twice the sizeof the old water trough. This catches much more of thewater from sharpening “normal” tools. For those toolsthat seem to slop water everywhere, like large knives<strong>and</strong> planer blades, there is an auxiliary “water chute”that hooks into the lip of the trough <strong>and</strong> catches the dripsfrom even the longest tools (see the picture below).When you need the water chute, you’ll probablyalso want to install the “Tilt Shoes”. Place these niftylittle rubber shoes on the feet on the honing wheel sideof the machine <strong>and</strong> the top of the frame now leansslightly toward the water trough, so drips that l<strong>and</strong> ontop of the frame just roll back into the water trough.When you don’t need them, the shoes have a magnetin them, so they store conveniently right next to thefeet.For years I’ve suggested using a magnet in or onthe water trough to keep the majority of the ground steelfrom fouling the grindstone. Now the magnet has beenincorporated into the water trough from the factory...nomore duct tape or super glue!<strong>The</strong> new water trough is st<strong>and</strong>ard on T-7 systemsshipped from Sweden from October 2009 forward. Itfits any 10” Tormek system (T-7 or 2000) <strong>and</strong> is availableas an upgrade at a price of $22.99.<strong>The</strong> Market Place<strong>The</strong> first 10 words of classified advertisements are free tosubscribers, additional words are 20-cents per word, no minimum.On non-subscriber advertisements, price is 20-cents per word witha minimum billing of $4.00.Beginning <strong>and</strong> advanced woodturning classes. Call Ted Bartholomew253-927-6855, Tacoma, WA.Teaching beginning to advanced classes in all aspects of woodturning.Call: Ed Szakonyi, Roselle, IL (800) 894-8123.Make pens using your drill press with a Vertilathe. http://vertilathe.freeyellow.comWoodturning on a VB36 Lathe, at Higher Manaton Farm. SW Engl<strong>and</strong>.Web Site: www.turning-wood.comFaceplates: Straight from manufacture, heavy duty aluminum, brightlycolored anodize, most common sizes. Visit our website: www.minkcrafts.com or call toll free (866) 956-2200.<strong>The</strong> Burl Source. Large supply of Australian Burl Caps, turning blanks,pen blanks, <strong>and</strong> large jarrah burl slabs. Check us out at www.theburlsource.comor call 801-942-2616.Emory’s Woodturning E-Books www.asthewoodturns.com/books.html.Free Wet Grind/Hone Instant Change Sharpening System Plans: http://www.DavidReedSmith.com.M a p l e T u r n i n g B l a n k sPRICE $6-8 PBF+S&H cut to size, call 360-942-3468 ore-mail: john@hamptonwoodcraft.com.<strong>Pen</strong> Finishing Kit: A must for all pen turners! Obtain a scratch free remarkaleshine on all surfaces including stabilized woods, acrylics <strong>and</strong> solidsurface materials using the new 2”x2” double sided foam backed s<strong>and</strong>ingpads. Kit contains instructions for use <strong>and</strong> seven color coded pads rangingfrom 300 to 12,000 grit. $13.95. BG Artforms. TEL: 888-717-4202.Easier, Faster Segmented Vessel Design,W e b S i t e : w w w . s e g m e n t e d t u r n i n g . c o m .TEL: (805) 489-5309.Woodturning classes – Satisfaction guaranteed. Call Larry Miller 360-412-1583, Olympia, Washington”Cabochons for woodturners at www.yoyospin.com/cabWoodturning Instruction: Now that I have insurance through the AAWCraft Workers Insurance Program, I can again offer training in my shop.If interested in basic woodturning instruction or specialized training suchas the Chinese Ball, contact me at: 360-668-0976. Fred Holder.New Video--”Relief carved Embellishments for Wood Projects”.DVD--$30.00 plus $3.00 S/H. VHS $20.00 plus $3.00 S/H. Contact: TonyCortese, 20850 NW 13th Street, Dunnellon, FL 34431. Ph 352-489-5652.E-mail: romeowoodturner@msn.com.NEW REDUCED PRICE: Simplified Fluting with Al Caton. Video-$20.00plus S&H $3.00. DVD-$30.00 plus S&H $3.00. Insturction<strong>and</strong> inexpensive jigs for fluted works of art. Order from: Al Caton, POBox 2360, Dunnellon, FL 34430. TEL: 352-465-0562. E-Mail: alcat@bellsouth.net.Making the Chinese Ball, Revised 2008, by Fred Holder. <strong>The</strong> revisedbooklet outlines Fred’s trials <strong>and</strong> tribulations in attempting to conquer thisproject. Tells how to make the tools needed to use the Crown Chinese BallTools. Booklet now contains 64 pages of information. Order from FredHolder, PO Box 2168, Snohomish, WA 98291. Price is $10.00 includingshipping. Telephone 360-668-0976.Turn Nested <strong>Bowls</strong> from 6” or 8” bowl blanks with a $39.95 h<strong>and</strong>-heldcoring tool I call the BowlSaw. Check bowlsaw.com for details or e-mail me at Steuss@aol.com. For questions call 415-897-1457. SteussyCreations.Page 39 More Woodturning June 2010
MANUFACTURER OF QUALITY WOODTURNING LATHES, CHUCKS AND ACCESSORIESMade in Australia<strong>The</strong> VL200 Sit Down St<strong>and</strong> has beendesigned to suit people who havetrouble st<strong>and</strong>ing for a long period oftime or people in wheelchairs.<strong>The</strong> lathe comes with electronicvariable speed unit, a 1.5kW motor,remote switch box <strong>and</strong> has all thest<strong>and</strong>ard features of a VL200 Short BedLathe.Lathe Complete, Part No. V00757<strong>The</strong> st<strong>and</strong> can also be purchasedseparately to suit a VL200 Short.St<strong>and</strong> Only, Part No. V01083<strong>The</strong> angle of the bed can be adjusted every 7.5 degreesfrom 0 to 45 degrees.<strong>The</strong> st<strong>and</strong>’s center height (C.H.)from the floor to the spindle isadjustable every 25mmC.H. from 750mm to900mm at 45˚C.H. from 950mm to1100mm at 0˚Check our website for the full range ofLathes, Chucks <strong>and</strong> AccessoriesFor your nearest Vicmarc ® dealer please contact us:Phone: + 61 7 3284 3103 Fax: + 61 7 3283 4656Web: www.vicmarc.comEmail: vicmarc@vicmarc.comPage 40 More Woodturning June 2010