HEGNER ZFG Fingerjoint Machine Manual
HEGNER ZFG Fingerjoint Machine Manual
HEGNER ZFG Fingerjoint Machine Manual

Create successful ePaper yourself
Turn your PDF publications into a flip-book with our unique Google optimized e-Paper software.
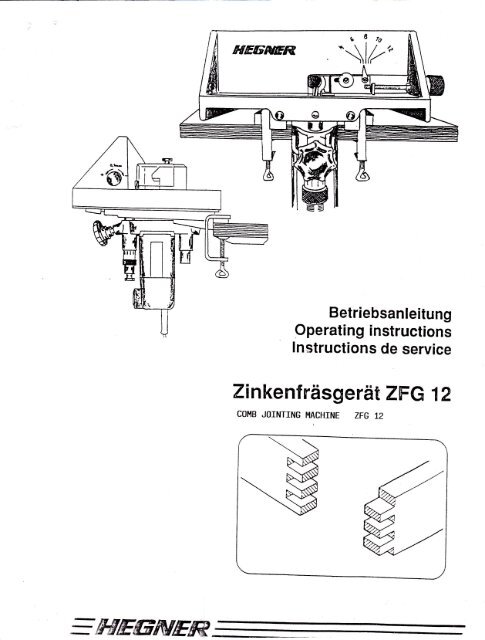
6llfut-\12"BetriebsanleitungOperating instructionslnstructions de serviceTinkenfrdsgeret <strong>ZFG</strong> 12COHB JOINTING MACHINE <strong>ZFG</strong> L2
Introduction. t-;----T\-\12'l|Di-a . 1The HEG|IER <strong>ZFG</strong> 12 Comb Jointing Macnrne opens up a world of possibilitiesfor cabinetmakers and those wh6 love to u,,!rt--urir-h wood.Beautiful finger joints carr be eas:._l,, nade rn widths from 4 _ lznn.There are no limits on the lenqth arrcj r,ridth of the timber used and onlythe thickness has an upper limit of 25mm.The machine is fj-tted with a dust co,;rel r.ihich is easil-y fitted to a dustextractor.The work slide-table is precision guiciecl on two round steel bar guj-dingmechanisms. Mai-ntenance free sl-ide bearings in the main body-tlaranteea long, accurate, 1ife.The <strong>ZFG</strong> 12 is an extremely stable machine manufactured in a combinationof durable synthetics, steel and aluminium.Easy operation is a hallmark of this machine: The depth of the cut andthe width of the tenons is adjusted by means of two micrometer screws.The width of the tenons is def,endent on the milling cutter used, and asetting scal_e.Jlt""9-gpgrating instructions are restricted to the setting up and use ofthe <strong>ZFG</strong> 72 and do not extend to the development of projects.Safetyr' When not in use or adjustments are being carried oub to the machineor milling cutter, disconnect machine fiom the mains "rppiv.2. Use only sharp milling cutters.I\3. Never attempt to adjust cutter while the motor is running.4- Keep the guard covering the cutter and workpiece at all timesduring operation.5. Use only <strong>HEGNER</strong> spare parbsguarantee is invalid and r*eand accessories otherwise thecan accept no li_ability.
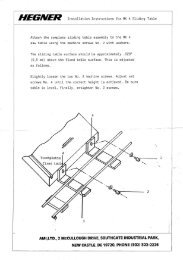
Mains SupplyThe Comb Jointing <strong>Machine</strong> <strong>ZFG</strong> t2 operates on single phase alternatingcurrent. It is double insulated to class II VDE 0740 resp. CEE 20 andhas interference suppression to VDE 0875. Before connecting to themains ensure the operating voltage indicated on the label approximatesto the mains supply voltage.Caution! This machine should only be used for cutting comb joints inall types of wood, except chip and fibre boards. Do not use when thereare knots in the j ointing area.Usage not in accordance with the above can lead to damage.When performing any adjustments to thethe mains."machine always disconnect fromMachi-ne MountingFix the machine to a workbench using the two "C", clamps (1) provided,locating them in the two channeLs on the machine baseplate. Make surethe machine is securely fastenedCaution! Only operate the machine in dry environments and where i-t isstable under load!
Dimension designationsdescriptionsused in the following i-nstructions and0n the combjointed timberDia .30n the machine and millingcutter-I cDia .4EI=width between fingers, corresponds to the diameter of themilling cutterb- width of finger tenons, 0,4 tomilling cutter diametercutting depth (length of fingerthan the thickness of the board1mm narrower than thetenons), slightly deePer(machining allowance) .
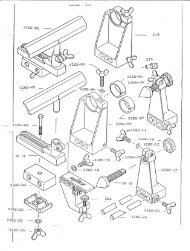
Width between finger tenons "a"milling cutter in the machine.To change the milling cutter:corresponds wrth the diameter of theunlock coll-et chuckexchange milling cutter (4), watchout for sharp edges !lock co]let chuFo-_Dia. 5Adjusting cutter depth "c'!- Lay workpiece on the sliding worktable (Z).- Adjust cutter depth with the micrometer (3) untir the cutter (4),islocated fractionally above the workpiece.- Lock cutter in position using the 1ocking screw (5).Adjusting width of finger tenons "b)Loosen clamping screw (6)- Adjust the gauge (7) with micrometercorresponding to the milling cutter- Retighten clamping screw.screw (8) to read the sizediameter of the calibrated sca1e.
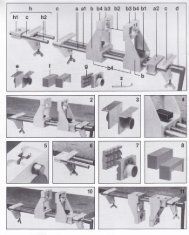
Imporbant hints:f7. Pull sliding worktabl-e back toward your body.Thj-s is the normal position before you start each operation !2. The sliding worktabl-e moves easily if the sliding guide bearingsare greased regularly.3. Blow the chips off the worktable or use an extractor, never useyour fingers. The danger of an accj-dent is great!Before milling the workpiece you must construct a sample joint inwaste wood to test for play in the joint fingers. Mill- all fingers onthe sample pieces and assemble them. If they go together too easily,the gauge adjuster (7) must be corrected towards the "-". If the tenonfingers are too tight correct towards the "+". 'The finger tenons must fit together without appJ-ying force and withoutplay, but must however have enough "air" between them to allow roomfor an adequate amount of glue.Depending on the type of wood the tenons should be narrower than thetimber thickness.With the sample comb joint finished and the necessary adjustments made,it is recommended to proceed with the work startj-ng with sides 1 and 3and thereafter completi-ng si.des 2 and 4.
Lay the workpiece against the left hand sideof the gauge and mill the first slot.AII the remaining tenons are machined bytransferring the newly milled slot againstthe left hand side of the gauge. Attentionmust be paid to ensure that the workpieceis always held tight against the gauge.After one end of side (1) hqs been miIled itis turned vertically by 180u, and theopposite end is machined in a similar way.Side (3) is milled in exactly the same wayas side (1).For milling both sides (2) and (4), placeside (.1) to^the gauge and turn it horizontallythrough 180" in such a way that your sidenumbering is now facing toward you.The last gap between the tenons of side (1)is now placed against the left side of thegaugd and the side (2) to be machined isplaced against the left side of side (1)and then the first slot of side (2) ismachined.When this is done remove side (1) and millthe remaining slots as before.Now^side (2) is turned vertically through180- and then the first slot is milledwith reference to side (1) as on the otherend and the remaining slots milled.The same procedure is used for side (4).6
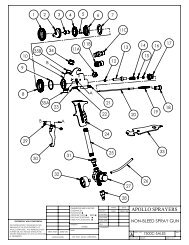
Technical DataComb Jointing <strong>Machine</strong> <strong>ZFG</strong> t2 for makingfinger tenons4mm - 12mmAdjustable width of tenons using'scale and micrometer screwAdjustable fit using micrometer screwConnection for dust extractionAccessoriesMilling Motor with Euro-collarand coilet chuckPower consumptionSpindle speed0 43mmo 6,35mm (8mm)450 Watt27'000 rPmCollet chuck with clamPing nutHSS-MiIling cutter setQ 4, 6, 8, 10mmWe reserve the right to change the technical specifications in theinterests of product development.7
02\zo\:,-NGI-/tit-i \J-Tl6mI