Monitor Removal and Installation - Megatouch
Monitor Removal and Installation - Megatouch
Monitor Removal and Installation - Megatouch

Create successful ePaper yourself
Turn your PDF publications into a flip-book with our unique Google optimized e-Paper software.
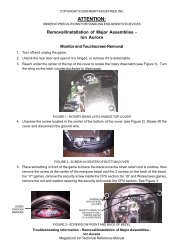
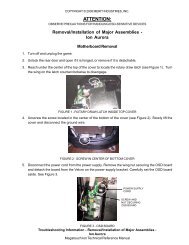
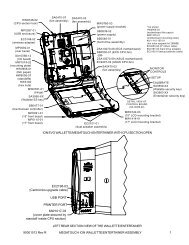
COPYRIGHT © 2005 MERIT INDUSTRIES, INC.ATTENTION:OBSERVE PRECAUTIONS FOR HANDLING ELECTROSTATIC DEVICES<strong>Removal</strong>/<strong>Installation</strong> of Major Assemblies -Fusion Ion<strong>Monitor</strong> <strong>Removal</strong>1. Turn off <strong>and</strong> unplug the game.2. Unlock <strong>and</strong> open the bezel.3. Remove the 6 thumbnuts fastening the bezel to the game. See Figure 1.4. Loosen the bezel only enough to gain access to the wire connections underneath, then disconnectthe button controller wire connection at the foot of the bezel.5. Proceed to the top of the bezel <strong>and</strong> remove the dongle socket wire <strong>and</strong> ground wire. See Figure 2.Also remove the wire connection to the coin mechanism on the opposite side of the bezel.6. Remove the bezel.7. Remove the tie wraps securing the wire harnesses to the back of the monitor. Disconnect theVGA monitor cable connection <strong>and</strong> ground wire. See Figure 1.8. Disconnect the LCD connector <strong>and</strong> remove the OSD cable connection from the monitor. SeeFigure 1.9. Remove the tie wrap around the touchscreen controller <strong>and</strong> disconnect the touchscreen controllercable. See Figure 1. Also disconnect the Molex connector (orange <strong>and</strong> gray wires).10. Use dental floss to carefully cut the foam tape holding the touchscreen to the monitor until you areable to completely remove the screen. Once the touchscreen is completely free from the monitor,remove any residual foam tape from the monitor with denatured alcohol.11. Remove the 4 screws securing the monitor to the bezel, then gently remove the monitor. SeeFigure 3.<strong>Monitor</strong> <strong>Installation</strong>1. Line up the new monitor with the screw holes on the wooden frame <strong>and</strong> secure the monitor inplace with the 4 existing screws. See Figure 3. The white edge of the monitor <strong>and</strong> the monitorwire connections should face the bottom of the game.2. Clean the glass on the reverse side of the new or existing touchscreen with the supplied alcoholwipe, then cut pieces of the supplied 1/2” foam tape long enough to cover each edge of the monitorwithout overlapping. After the tape is in place on the monitor, peel off the backing. Carefully placethe touchscreen over the monitor in the same manner it was attached to the old monitor, makingsure the screen is properly <strong>and</strong> evenly aligned over the glass. Clean the front of the touchscreenwith the supplied alcohol wipe once it is in place.3. Lift the bezel to access the reverse side of the monitor. Connect the touchscreen controller cableto the touchscreen controller, then connect the Molex connector (orange <strong>and</strong> gray wires). SeeFigure 1.4. Restore the OSD cable <strong>and</strong> the VGA monitor cable to the back of the monitor. Also reconnect theVGA monitor cable ground wire. See Figure 1.5. Reconnect the LCD power connector (black <strong>and</strong> yellow wires). See Figure 1.Troubleshooting Information - <strong>Removal</strong>/<strong>Installation</strong> of Major Assemblies -Fusion Ion
COPYRIGHT © 2005 MERIT INDUSTRIES, INC.ATTENTION:OBSERVE PRECAUTIONS FOR HANDLING ELECTROSTATIC DEVICES<strong>Removal</strong>/<strong>Installation</strong> of Major Assemblies -Fusion Ion (cont’d)6. Return the bezel in place on top of the game, but do not secure it. Reconnect all wire connectionsattached to the bezel, including the dongle socket wire, ground wire (see Figure 2), coin mechanism<strong>and</strong> button controller connections.7. Secure the bezel completely by fastening the 6 existing thumbnuts. See Figure 1.8. Plug in <strong>and</strong> turn on the game.9. When the game is finished booting, press the CALIBRATE button.10. Close <strong>and</strong> lock the bezel, then calibrate the touchscreen.VGA MONITOR CABLEGROUNDWIRESOSD CABLECONNECTIONLCD POWERCONNECTORTHUMBNUTS(6 PLACES)TOUCHSCREEN CONTROLLERTOUCHSCREENCONTROLLER CABLEFIGURE 1 - REAR VIEW OF MONITOR / UNDERSIDE OF BEZELTroubleshooting Information - <strong>Removal</strong>/<strong>Installation</strong> of Major Assemblies -Fusion Ion<strong>Megatouch</strong> Ion Technical Reference Manual
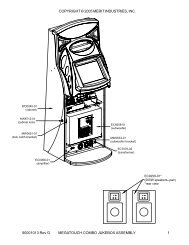
COPYRIGHT © 2005 MERIT INDUSTRIES, INC.GROUNDWIREDONGLESOCKETFIGURE 2 - DONGLE SOCKET AND GROUND WIRE CONNECTIONSSCREWSFASTENINGMONITOR TOGAME(4 PLACES)FIGURE 3 - MONITOR (WITH BEZEL REMOVED)Troubleshooting Information - <strong>Removal</strong>/<strong>Installation</strong> of Major Assemblies -Fusion Ion