You also want an ePaper? Increase the reach of your titles
YUMPU automatically turns print PDFs into web optimized ePapers that Google loves.
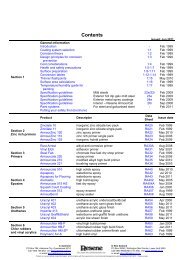
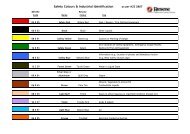
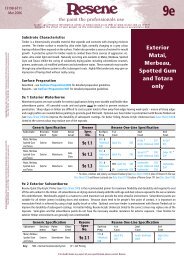
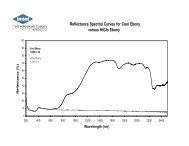
<strong>Resene</strong> Professional development programme69How much paint?Height ofceilingPainting checklistYou will need:Extension poleLint-free cloth (<strong>for</strong> cleaning)Paint potPaintbrushPutty and/or fillersRollerRoller traySandpaperTac ragTurpsLitres needed <strong>for</strong> walls*Distance around room in metres10m 12m 14m 16m 18m 20m 22m 24m2.2 metres 2.0 2.5 2.5 3.0 3.5 3.5 4.0 4.52.5 metres 2.0 2.5 3.0 3.5 4.0 4.0 4.5 5.02.8 metres 2.5 3.0 3.5 4.0 4.5 5.0 5.0 5.53.1 metres 2.5 3.0 3.5 4.0 4.5 5.0 5.5 6.03.4 metres 3.0 3.5 4.0 4.5 5.0 5.5 6.0 6.53.7 metres 3.5 4.0 4.5 5.0 5.5 6.0 7.0 7.54.0 metres 3.5 4.0 5.0 5.5 6.0 6.5 7.5 8.0Litres* needed<strong>for</strong> ceiling1.0 1.0 1.5 1.5 2.0 2.0 2.5 2.5* All figures <strong>for</strong> one coat only. * Spreading rate of 12m 2 per litre.* Large doorways or windows reduce the amount of paint required.You may need:Brush cleanerDust maskGlovesMasking tapePaint stripperPainter’s glovesPole sanderPutty knifeRags<strong>Resene</strong> Hot Weather Additive<strong>Resene</strong> Interior Paintwork Cleaner<strong>Resene</strong> Moss & Mould Killer<strong>Resene</strong> Paint Prep and HousewashScraperSteel woolWindow scraperPut your colour to the testNo matter Learn how <strong>painting</strong> you select techniques your colours, withalways use our testpots free how to videos confirm yourWatch and learn with our free step by stepchoices invideos.the areaView recommendedyou are planningpaint applicationtopaint. <strong>Resene</strong> testpots are techniques available <strong>for</strong> a range from of <strong>painting</strong> your projects local –staining or <strong>painting</strong> weatherboards, <strong>painting</strong><strong>Resene</strong> ColorShop or Reseller interior walls, or you trim, joinery, can order ceilings and online muchmore.from the <strong>Resene</strong> website.Print and use the project worksheets as a handyreference <strong>for</strong> your decorating project.Be PaintWise Free <strong>for</strong> you to view on the <strong>Resene</strong> website,www.resene.com/videos.For tips on minimising the impact ofyour decorating on the environment seewww.resene.co.nz/paintwise.htm.www.resene.co.nz.paintwise.htm<strong>Resene</strong> How toVideosChoose to help the environmentYou can minimise the effect your next decoratingproject has on the environment by choosing one ofthe <strong>Resene</strong> range of Environmental Choice approvedproducts. Put your colour to the testNo matter how you select your colours, always use testpots to confirmyour choices in the area you are planning to paint. <strong>Resene</strong> testpotsare available from your local <strong>Resene</strong> ColorShop or Reseller or you canorder online from the <strong>Resene</strong> website.ExteriorStep 1 – Treat <strong>for</strong> moss and mouldMost exterior surfaces, except bare galvanised iron, will have mould,and possibly moss, growing on them. It is not enough to remove mossand mould without first killing it as any residual spores will simply growback underneath the new paint causing it to flake off.To treat, simply use a garden sprayer to apply <strong>Resene</strong> Moss & MouldKiller (D80). Wait a few hours <strong>for</strong> the solution to take effect andthoroughly scrub off.Step 2 – WashingThe purpose of washing is to remove contaminants, such as dirt, salt,mould residue (now it’s been killed), poorly adhered paint and chalkiness,from old painted surfaces.The most effective way is to use <strong>Resene</strong> Paint Prep and Housewash(D812) or if you are <strong>painting</strong> a roof, <strong>Resene</strong> Roof and Metal Wash (D88).Simply wet the area with fresh water and wash using a soft bristledbrush as you would a car. If you are preparing windows use a scouringpad or a 3M stripper pad. A short bristled scrubbing brush is ideal <strong>for</strong>unpainted concrete and plaster. Rinse clean with fresh water.Waterblasting is useful <strong>for</strong> hard surfaces, such as concrete and galvanisediron, particularly when paint layers need to be removed. However as acleaner it is less effective than <strong>Resene</strong> Paint Prep and Housewash (D812)and when used on timber can damage it.Waterblasting is not recommended <strong>for</strong> joinery.An alternative is to use a wire brush or stripper pad to remove flakingpaint from concrete particularly if only small areas are flaking. A 3Mstripper pad is ideal <strong>for</strong> removing flaking paint and mild rust fromgalvanised iron – avoid using a wire brush on galvanised iron as it willdamage the surrounding protective zinc layer.Step 3 – Scraping and sanding timber and joineryIf the old paint surface is sound and `deglossed´ then it typically will notneed to be sanded. An exception to this is where old enamels have notbeen exposed to U.V. light and are hard, embrittled with age and haveretained much of their original gloss – usually on the opening edges ofwindow joinery and under eaves etc. Refer to the Sanding chart.Flaking paint will need to be scraped off. Once done, sand back to asound surface ensuring the paint edges are feathered.Note: 1: It is important to spot prime any bare timber the same day asit is sanded and be<strong>for</strong>e any filling to prevent overnight dew lifting thenewly feathered paint edge.Note 2: It is good practice to rinse areas with clean water be<strong>for</strong>e <strong>painting</strong>commences each day to remove any salt deposits – especially within1.5km of the sea.Step 4 – FillingImperfections and repaired areas, such as punched nails and cracks intimber and plaster, will need to be filled, and in some cases sanded, be<strong>for</strong>espot priming or <strong>painting</strong> can commence. The following chart identifiesthe most appropriate fillers <strong>for</strong> exterior use. The product packaging alsorecommends where and how to use.You are now ready to paint.<strong>Resene</strong> CoolColoursKeep your paintwork cooler with a <strong>Resene</strong> CoolColourA <strong>Resene</strong> CoolColours looks will reflect like a normal more heat colour than but standard thanks to special paintspigmentreducingtechnologystress onitthereflectscoatingmoreandof thesubst<strong>rates</strong>un’s energy,andsominimisingit doesn’tget as a hot as a standard colour would. The colours work by reflectingheat transference inside, reducing substrate related damage,energy in the near and far infra-red region of the spectrum even thoughthey such absorb as warping, strongly and in the reducing visible region. the need <strong>for</strong> air conditioning.<strong>Resene</strong><strong>Resene</strong>CoolColourCoolColourstechnologyare availableis availablein ainrangea rangeofof<strong>Resene</strong><strong>Resene</strong>premiumpremiumpaints and suitable stains suitable <strong>for</strong> a wide <strong>for</strong> a range wide range of exterior of exterior projects, projects, especiallywhere dark colours are are planned. planned. Ask Ask your your <strong>Resene</strong> <strong>Resene</strong> ColorShop ColorShop staffwhether staff whether a <strong>Resene</strong> a CoolColour <strong>Resene</strong> CoolColour finish is right finish <strong>for</strong> your is project. right <strong>for</strong> yourproject.