Drop-Off Manual - Vectronic Aerospace GmbH
Drop-Off Manual - Vectronic Aerospace GmbH
Drop-Off Manual - Vectronic Aerospace GmbH

Create successful ePaper yourself
Turn your PDF publications into a flip-book with our unique Google optimized e-Paper software.
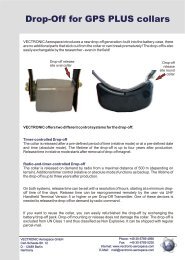
Doc. No.: GPS Plus <strong>Drop</strong>-<strong>Off</strong> Manager <strong>Manual</strong>Date: 25.11.2011VECTRONIC <strong>Aerospace</strong>Table of FiguresFigure 1: Battery case with integrated drop-off unit and magnet to put drop-off in stand-bymode ......................................................................................................................... 6Figure 2: Opening window with extended trees on left side ...................................................... 9Figure 3: Terminal Telemetry window for <strong>Drop</strong> <strong>Off</strong> Release Transmitter .............................. 10Figure 4: Window to register drop-offs registered on the computer to the terminal ............... 11Figure 5: Warning before unregistered drop-offs are removed from terminal......................... 12Figure 6: Window for terminal firmware upload ..................................................................... 12Figure 7: Window for setting the drop-off clock ..................................................................... 13Figure 8: Windows for clock initialisation ............................................................................... 14Figure 9: Window for configuration of drop-off timer control ................................................ 15Figure 10: Windows for transmitting the release mode and time ............................................ 16Figure 11: Window for drop-off firmware upload ................................................................... 17Figure 12: Windows for uploading firmware to the drop-off .................................................. 18Figure 13: Progress bar during firmware upload ..................................................................... 18Figure 14: Success message for drop-off firmware upload ...................................................... 19Figure 15: Window for drop-off telemetry .............................................................................. 20Figure 16: Windows while manually triggering telemetry ...................................................... 21Figure 17: Window during request of specific drop-off telemetry .......................................... 22Figure 18: Window with telemetry data ................................................................................... 22Figure 19: Main window with drop-off list (red arrow) ........................................................... 24Figure 20: <strong>Drop</strong>-<strong>Off</strong> list ........................................................................................................... 24This design is the property of VECTRONIC <strong>Aerospace</strong> <strong>GmbH</strong>. Unauthorized duplication or distribution to a third party is prohibited.VECTRONIC <strong>Aerospace</strong> 5 /30 <strong>Manual</strong>_<strong>Drop</strong><strong>Off</strong>.docx.doc
Doc. No.: GPS Plus <strong>Drop</strong>-<strong>Off</strong> Manager <strong>Manual</strong>Date: 25.11.2011VECTRONIC <strong>Aerospace</strong>2 Fast guide to use the drop-offIn most cases you will receive the drop-off fully configured to your requirements. To makesure it works properly, follow some basic steps:In the lab/office/field station:1. Make yourself familiar with the entire collar and its parts (for details on the collar refer tothe Collar <strong>Manual</strong>)2. To check and maybe change the configuration of the drop-off, you need either an UHF orVHF Handheld Terminal Version 5 or higher, or a <strong>Drop</strong>-off Release Transmitter. Attachedthis device via USB to your computer and start the GPS PLUS <strong>Drop</strong> <strong>Off</strong> Manager.3. Register the new drop-offs on your computer following the instruction in chapter 8:Register a new drop-off.4. Check the release mode and time of the collar following the instruction in chapter 7.4:<strong>Drop</strong>-off telemetry.5. If necessary, change release mode and time following the instruction in chapter 7.2:Release Time.When deploying the collar6. Make sure the magnet is removed from the battery case, otherwise the drop-off staysdeactivated and will not release the collar.Note: Though a radio-and-timer controlled drop-off can be triggered from a distance of up to500 m, it is not possible to change its configuration from that distance.Registration, communication, and set-up of the drop-off will be explained in more detail inthe next chapter.<strong>Drop</strong>-off release:The drop-off release is explained in detail in the UHF/VHF Handheld Terminal or the Radio<strong>Drop</strong>-off Transmitter <strong>Manual</strong>. If you want to release the drop-off, follow these steps: Turn on the Terminal and press F6.Select a drop-off from the list using the arrows (keys 8, 4, 6 and 2) and press Enter.Press F5 to release the drop-off. Press Enter to return to the drop-off list.This design is the property of VECTRONIC <strong>Aerospace</strong> <strong>GmbH</strong>. Unauthorized duplication or distribution to a third party is prohibited.VECTRONIC <strong>Aerospace</strong> 7 /30 <strong>Manual</strong>_<strong>Drop</strong><strong>Off</strong>.docx.doc
Doc. No.: GPS Plus <strong>Drop</strong>-<strong>Off</strong> Manager <strong>Manual</strong>Date: 25.11.2011VECTRONIC <strong>Aerospace</strong>3 Communication with drop-offTo communicate and configure the GPS Plus <strong>Drop</strong> <strong>Off</strong> Manager, you need either a UHFHandheld Terminal hardware Version 5.0 or higher, or a <strong>Drop</strong> <strong>Off</strong> Release Transmitter (bothdevice are named as “terminal” in software and handbook). Connect the terminal to yourcomputer via USB cable and turn on the terminal. The drop-off needs to be positioned withinsome centimeters of the terminal. Connection between terminal and drop-off is established viaradio transmission. In order to communicate with a drop-off it has to be registered on theTerminal. This is done in the GPS Plus <strong>Drop</strong> <strong>Off</strong> Manager (see Chapter 6). Though theterminal is needed to transmit commands and information between the GPS Plus <strong>Drop</strong> <strong>Off</strong>Manager and the drop-off, input is done entirely through the computer.This design is the property of VECTRONIC <strong>Aerospace</strong> <strong>GmbH</strong>. Unauthorized duplication or distribution to a third party is prohibited.VECTRONIC <strong>Aerospace</strong> 8 /30 <strong>Manual</strong>_<strong>Drop</strong><strong>Off</strong>.docx.doc
Doc. No.: GPS Plus <strong>Drop</strong>-<strong>Off</strong> Manager <strong>Manual</strong>Date: 25.11.2011VECTRONIC <strong>Aerospace</strong>4 Getting startedThe GPS Plus <strong>Drop</strong> <strong>Off</strong> Manager is a tool to configure the terminal, which controls andcommunicates with the drop-offs. It allows you to read out telemetry data from this terminaland the drop-offs, register drop-offs on a computer and on the terminal, and configure thesedrop-offs.To install the GPS Plus <strong>Drop</strong> <strong>Off</strong> Manager, go to the VECTRONIC CD delivered with yourcollar and find the file GP_<strong>Drop</strong>-<strong>Off</strong>_Manager_X_X_X_setup.exe.Start this file and followthe instructions.All program options can be accessed with the left trees (“Devices”, “Configuration”).Figure 2: Opening window with extended trees on left sideNote: The device tree will only appear if a terminal is attached and switched on; otherwise thedevice field will remain empty.This design is the property of VECTRONIC <strong>Aerospace</strong> <strong>GmbH</strong>. Unauthorized duplication or distribution to a third party is prohibited.VECTRONIC <strong>Aerospace</strong> 9 /30 <strong>Manual</strong>_<strong>Drop</strong><strong>Off</strong>.docx.doc
Doc. No.: GPS Plus <strong>Drop</strong>-<strong>Off</strong> Manager <strong>Manual</strong>Date: 25.11.2011VECTRONIC <strong>Aerospace</strong>5 Reading out Terminal TelemetryThe command Terminal → Telemetry allows you to read out telemetry data from your UHFHandheld Terminal or the <strong>Drop</strong> <strong>Off</strong> Release Transmitter. In the center section of the screen,you will always see the serial number of the connected terminal.Figure 3: Terminal Telemetry window for <strong>Drop</strong> <strong>Off</strong> Release TransmitterSoftwareVersionDateNumber of the software version on the terminalRelease date of software version currently running on terminalInternalVoltage [V]Battery Voltage The Eneloop rechargeable batteries in the <strong>Drop</strong> <strong>Off</strong>Release Transmitter must be in a range between 4.05 and 5.0 Volt.For radio release of the drop-off, the voltage should be close to 5.0Volt.The internal Li-Ion battery of the UHF Handheld Terminal has a validvoltage range of 3 – 4.1 Volt.This design is the property of VECTRONIC <strong>Aerospace</strong> <strong>GmbH</strong>. Unauthorized duplication or distribution to a third party is prohibited.VECTRONIC <strong>Aerospace</strong> 10 /30 <strong>Manual</strong>_<strong>Drop</strong><strong>Off</strong>.docx.doc
Doc. No.: GPS Plus <strong>Drop</strong>-<strong>Off</strong> Manager <strong>Manual</strong>Date: 25.11.2011VECTRONIC <strong>Aerospace</strong>6 Configuration of the drop-off list on the TerminalBefore you can change the drop-off settings, you need to register the drop-off on yourterminal. The command Terminal → Configuration → <strong>Drop</strong>-<strong>Off</strong>s opens a window to transferdrop-offs which are registered on the computer to the terminal and to edit the terminal's dropofflist.Figure 4: Window to register drop-offs registered on the computer to the terminalTwo lists are shown. On the left is a list of all drop-offs registered on the computer, but not onthe terminal. On the right is a list of all drop-offs registered on the terminal. <strong>Drop</strong>-offsregistered on the computer are coloured black. <strong>Drop</strong>-offs registered only on the terminal arecoloured red. You can only configure drop-offs that are registered on the computer you arecurrently working at AND on the terminal you are using.Underneath the left list, the number of available drop-offs and of those currently selected isgiven. To add a drop-off to the terminal, select it and press Add or drag it to the right windowwith the cursor. To remove a drop-off from the terminal list, select it and press Remove.Note: If you remove a drop-off from the terminal which is NOT registered on the currentcomputer, you will not be able to register it again unless you connect the terminal to acomputer on which the drop-off is registered.This design is the property of VECTRONIC <strong>Aerospace</strong> <strong>GmbH</strong>. Unauthorized duplication or distribution to a third party is prohibited.VECTRONIC <strong>Aerospace</strong> 11 /30 <strong>Manual</strong>_<strong>Drop</strong><strong>Off</strong>.docx.doc
Doc. No.: GPS Plus <strong>Drop</strong>-<strong>Off</strong> Manager <strong>Manual</strong>Date: 25.11.2011VECTRONIC <strong>Aerospace</strong>If you attempt to remove a drop-off not registered on your computer, the following warningwill appear (Figure 5):Figure 5: Warning before unregistered drop-offs are removed from terminal6.1 Terminal Firmware UploadIf you are using a <strong>Drop</strong> <strong>Off</strong> Release Transmitter, you can upload new firmware at this point.Choose the firmware .BIN-file with the button and press Apply. You can follow the uploadon the progress bars on the screen and on the transmitter.Figure 6: Window for terminal firmware uploadThis design is the property of VECTRONIC <strong>Aerospace</strong> <strong>GmbH</strong>. Unauthorized duplication or distribution to a third party is prohibited.VECTRONIC <strong>Aerospace</strong> 12 /30 <strong>Manual</strong>_<strong>Drop</strong><strong>Off</strong>.docx.doc
Doc. No.: GPS Plus <strong>Drop</strong>-<strong>Off</strong> Manager <strong>Manual</strong>Date: 25.11.2011VECTRONIC <strong>Aerospace</strong>7 <strong>Drop</strong>-off set-up7.1 Setting the drop-off clockYou can select a drop-off's serial number from the drop down list and change its date andtime. With Today and Now you set the drop-offs time to the current computer time. Note thatthe time given in the centre section is the terminal's time, which is not necessarily identicalwith the drop-off's time. Transfer the new time to the terminal by pressing Apply.Figure 7: Window for setting the drop-off clockThe window shown in Figure 8 will appear in succession:This design is the property of VECTRONIC <strong>Aerospace</strong> <strong>GmbH</strong>. Unauthorized duplication or distribution to a third party is prohibited.VECTRONIC <strong>Aerospace</strong> 13 /30 <strong>Manual</strong>_<strong>Drop</strong><strong>Off</strong>.docx.doc
Doc. No.: GPS Plus <strong>Drop</strong>-<strong>Off</strong> Manager <strong>Manual</strong>Date: 25.11.2011VECTRONIC <strong>Aerospace</strong>Figure 8: Windows for clock initialisationIf the magnet is not already attached to the drop-off, put it now to the designated dent or feltpad (see Figure 1 for correct position). Wait eight seconds for the drop-off to respond to theterminal. When the next window appears, detach the magnet from the drop-off. After up to 12seconds, the next window will inform you that the initialisation has been finished.This design is the property of VECTRONIC <strong>Aerospace</strong> <strong>GmbH</strong>. Unauthorized duplication or distribution to a third party is prohibited.VECTRONIC <strong>Aerospace</strong> 14 /30 <strong>Manual</strong>_<strong>Drop</strong><strong>Off</strong>.docx.doc
Doc. No.: GPS Plus <strong>Drop</strong>-<strong>Off</strong> Manager <strong>Manual</strong>Date: 25.11.2011VECTRONIC <strong>Aerospace</strong>7.2 Release TimeYou can set a drop-off release period or time. First choose a drop-off's serial number from thedrop down list (Figure 9). This window will not give you the current settings of the drop-off,but the default settings. There are two modes for the timer controlled release:Relative Mode: You define a time span of weeks, days and hours after the magnet hasbeen detached from the drop-off. The maximal time span that can be entered is 208 weeksand 5 days (4 years). This is the estimated life span of the drop-off's battery, so a longertime span would very likely result in the drop-off not being triggered.Note: The release count-down will be reset every time the magnet is attached. However,even with the magnet attached the estimated life span will only be four years.Figure 9: Window for configuration of drop-off timer controlThis design is the property of VECTRONIC <strong>Aerospace</strong> <strong>GmbH</strong>. Unauthorized duplication or distribution to a third party is prohibited.VECTRONIC <strong>Aerospace</strong> 15 /30 <strong>Manual</strong>_<strong>Drop</strong><strong>Off</strong>.docx.doc
Doc. No.: GPS Plus <strong>Drop</strong>-<strong>Off</strong> Manager <strong>Manual</strong>Date: 25.11.2011VECTRONIC <strong>Aerospace</strong>Absolute Mode: You define a discrete day and time (hours, minutes, seconds) for therelease. By default, the release date is set to four years after the current date.Note: If the magnet is attached on the date of release, the drop-off unit is disabled andwill not fire. If the magnet is removed afterwards, the drop-off unit will stay disabledfor five days, before it fires. This will give you enough time to change the release timeand prevent misfiring. Due to this safety precaution, it is not possible to set the releasedate to shorter than five days from configuration time.To change the release time, press Apply and follow the instructions (Figure 10). If the releasetime in the relative mode is shorter than one day, you will be warned and have the chance toabort the process and select a longer release time.Figure 10: Windows for transmitting the release mode and timeThis design is the property of VECTRONIC <strong>Aerospace</strong> <strong>GmbH</strong>. Unauthorized duplication or distribution to a third party is prohibited.VECTRONIC <strong>Aerospace</strong> 16 /30 <strong>Manual</strong>_<strong>Drop</strong><strong>Off</strong>.docx.doc
Doc. No.: GPS Plus <strong>Drop</strong>-<strong>Off</strong> Manager <strong>Manual</strong>Date: 25.11.2011VECTRONIC <strong>Aerospace</strong>7.3 Firmware UploadYou can also upload new firmware on the drop-off. Choose the firmware .BIN-file with thebutton and press Apply.Figure 11: Window for drop-off firmware uploadThe following windows will guide you through the process. If the magnet is not alreadyattached to the drop-off, put it now to the designated dent or felt pad (see Figure 1 for correctposition). Wait eight seconds for the drop-off to respond to the terminal. When the nextwindow appears, detach the magnet from the drop-off. After up to 12 seconds, the nextwindow will ask you to attach the magnet again, and then to detach it.Note: You will be asked twice to attach and detach the magnet!This design is the property of VECTRONIC <strong>Aerospace</strong> <strong>GmbH</strong>. Unauthorized duplication or distribution to a third party is prohibited.VECTRONIC <strong>Aerospace</strong> 17 /30 <strong>Manual</strong>_<strong>Drop</strong><strong>Off</strong>.docx.doc
Doc. No.: GPS Plus <strong>Drop</strong>-<strong>Off</strong> Manager <strong>Manual</strong>Date: 25.11.2011VECTRONIC <strong>Aerospace</strong>Figure 12: Windows for uploading firmware to the drop-offAfter the Upload has started, you can track the upload on the progress bar (Figure 23).Figure 13: Progress bar during firmware uploadThis design is the property of VECTRONIC <strong>Aerospace</strong> <strong>GmbH</strong>. Unauthorized duplication or distribution to a third party is prohibited.VECTRONIC <strong>Aerospace</strong> 18 /30 <strong>Manual</strong>_<strong>Drop</strong><strong>Off</strong>.docx.doc
Doc. No.: GPS Plus <strong>Drop</strong>-<strong>Off</strong> Manager <strong>Manual</strong>Date: 25.11.2011VECTRONIC <strong>Aerospace</strong>At the end of the successful upload you will see this picture:Figure 14: Success message for drop-off firmware uploadRecovery from failed updateIn rare cases it is possible that communication between terminal and drop-off is interruptedduring update. In this case, the drop-off will not respond correctly to the terminal anymore. Ifyou did not receive the success message shown in Figure 14, check “Recover from a failedupdate”. The program will now reinitialise communication with the terminal and restart theupdate.7.4 <strong>Drop</strong>-off telemetryWith <strong>Drop</strong>-<strong>Off</strong> → Telemetry, you can access the drop-off's current configuration. There are twoways to access the drop-off (Figure 15):“Wait for manually triggered telemetry transmission”: The terminal searches for drop-offsin its range and gives telemetry from the first drop-off it establishes contact with. This isthe fastest option, but it will only communicate with drop-offs with attached magnet.(Note: Attaching the magnet will reset the relative time counts and thus the time to elapseuntil release. Information on how long the drop-off has been active before will get lost.)“Get telemetry from specific <strong>Drop</strong>-<strong>Off</strong> (radio-controlled <strong>Drop</strong>-offs only)”: The terminalsearches for a specific collar. (Note: Only applicable for radio-controlled collars whileradio-communication is enabled.) This takes more time than the unspecific telemetry.Note: While the magnet is detached from the drop-off, it counts down the time to release. Tomake sure that the release time is counted from the time of deployment and the drop-off doesnot fire while in the storage, attach the drop-off magnet after configuration and detached itonly when deploying the collar to the animal. You can reset the release time counter byattaching the magnet for a short moment.To receive telemetry data, press Request to access the drop-offs.This design is the property of VECTRONIC <strong>Aerospace</strong> <strong>GmbH</strong>. Unauthorized duplication or distribution to a third party is prohibited.VECTRONIC <strong>Aerospace</strong> 19 /30 <strong>Manual</strong>_<strong>Drop</strong><strong>Off</strong>.docx.doc
Doc. No.: GPS Plus <strong>Drop</strong>-<strong>Off</strong> Manager <strong>Manual</strong>Date: 25.11.2011VECTRONIC <strong>Aerospace</strong>Figure 15: Window for drop-off telemetryThis design is the property of VECTRONIC <strong>Aerospace</strong> <strong>GmbH</strong>. Unauthorized duplication or distribution to a third party is prohibited.VECTRONIC <strong>Aerospace</strong> 20 /30 <strong>Manual</strong>_<strong>Drop</strong><strong>Off</strong>.docx.doc
Doc. No.: GPS Plus <strong>Drop</strong>-<strong>Off</strong> Manager <strong>Manual</strong>Date: 25.11.2011VECTRONIC <strong>Aerospace</strong>7.4.1 <strong>Manual</strong>ly triggered telemetryThe following windows will guide you through the process of manually triggered telemetrytransmission:Figure 16: Windows while manually triggering telemetryThis design is the property of VECTRONIC <strong>Aerospace</strong> <strong>GmbH</strong>. Unauthorized duplication or distribution to a third party is prohibited.VECTRONIC <strong>Aerospace</strong> 21 /30 <strong>Manual</strong>_<strong>Drop</strong><strong>Off</strong>.docx.doc
Doc. No.: GPS Plus <strong>Drop</strong>-<strong>Off</strong> Manager <strong>Manual</strong>Date: 25.11.2011VECTRONIC <strong>Aerospace</strong>7.4.2 Specific telemetryFor specific telemetry, make sure that the magnet is detached from the drop-off. Only onewindow will appear in this process and you do not need to move the magnet:Figure 17: Window during request of specific drop-off telemetryIf the magnet is still attached, the information Command (not responding) will appear in thetop frame. After successful communication, the telemetry data will appear (Figure 18).Figure 18: Window with telemetry dataStatus<strong>Drop</strong>-off IDInternal clockRF enabledID number of the drop-offthe current date and time of the drop-offinformation if radio transmission of the drop-off is enabled (yes/no)ReleaseThis design is the property of VECTRONIC <strong>Aerospace</strong> <strong>GmbH</strong>. Unauthorized duplication or distribution to a third party is prohibited.VECTRONIC <strong>Aerospace</strong> 22 /30 <strong>Manual</strong>_<strong>Drop</strong><strong>Off</strong>.docx.doc
Doc. No.: GPS Plus <strong>Drop</strong>-<strong>Off</strong> Manager <strong>Manual</strong>Date: 25.11.2011VECTRONIC <strong>Aerospace</strong>Release modeRelease timeActive fortimer release mode currently enabled in the drop-off (relative/absolute)relative time span or absolute date currently programmed into thedrop-offtime the drop-off has been active since last configurationSoftwareSoftware VersionSoftware dateversion number of software currently installed on the drop-offrelease date of software currently installed on the drop-offNote: Telemetry from specific drop-off is only possible for radio-controlled drop-offs, notfor timer-controlled drop-offs.Note: When using telemetry from specific drop-off, make sure you enter the correct serialnumber of the drop-off, not of the collar.Note: The telemetry data will be removed from the mask if you switch to another window.This design is the property of VECTRONIC <strong>Aerospace</strong> <strong>GmbH</strong>. Unauthorized duplication or distribution to a third party is prohibited.VECTRONIC <strong>Aerospace</strong> 23 /30 <strong>Manual</strong>_<strong>Drop</strong><strong>Off</strong>.docx.doc
Doc. No.: GPS Plus <strong>Drop</strong>-<strong>Off</strong> Manager <strong>Manual</strong>Date: 25.11.2011VECTRONIC <strong>Aerospace</strong>8 Register a new drop-offTo register a drop-off on your computer, use Tools Load registration file. The registrationfiles can be found on the CD accompanying the drop-offs in the folder KeyFiles. If you selecta key file, the drop-off will be automatically added to your drop-off list (see red arrow inFigure 19).Figure 19: Main window with drop-off list (red arrow)To delete a drop-off from this list, use right-click on the dropoffand select Delete.Figure 20: <strong>Drop</strong>-<strong>Off</strong> listThis design is the property of VECTRONIC <strong>Aerospace</strong> <strong>GmbH</strong>. Unauthorized duplication or distribution to a third party is prohibited.VECTRONIC <strong>Aerospace</strong> 24 /30 <strong>Manual</strong>_<strong>Drop</strong><strong>Off</strong>.docx.doc
Doc. No.: GPS Plus <strong>Drop</strong>-<strong>Off</strong> Manager <strong>Manual</strong>Date: 25.11.2011VECTRONIC <strong>Aerospace</strong>9 Error messageseCommReceiverFailed: No response received from Terminal. Make sure it is turned onand try again.This message will appear whenever the computer was not able to establish contact with theterminal.The request timed out. Please try again. If the issue persists, there might be a problemwith the <strong>Drop</strong>-<strong>Off</strong>.This message will appear whenever the terminal was not able to establish contact with thedrop-off. To keep energy consumption low, the drop-off will only wake up every 8 s tolisten for communication from the terminal. If the terminal does not reach the drop-offduring this time, you have to resend the request. A time-out is most likely if you need tomove the magnet during the defined window, for if the magnet is moved to late, thewindow will be missed.If you receive a time-out message, check if the magnet is correctly removed or in thecorrect position on the drop-off. Also check if the drop-off is in range of the terminal.Retry again and make sure that you move the magnet at the correct times. If the problempersists, contact us for further steps.No response received from Terminal!This message indicates a communication problem between computer and terminal. Pleasecheck if the terminal is switched on and correctly plugged into the USB-port of yourcomputer.This design is the property of VECTRONIC <strong>Aerospace</strong> <strong>GmbH</strong>. Unauthorized duplication or distribution to a third party is prohibited.VECTRONIC <strong>Aerospace</strong> 25 /30 <strong>Manual</strong>_<strong>Drop</strong><strong>Off</strong>.docx.doc
Doc. No.: GPS Plus <strong>Drop</strong>-<strong>Off</strong> Manager <strong>Manual</strong>Date: 25.11.2011VECTRONIC <strong>Aerospace</strong>10 Installation of the Release Transmitter driverIn some cases, the driver for the release transmitter will not be installed automatically. If thisis the case, follow these steps for Windows XP:1. Insert the VECTRONIC CD into your PC.2. Connect the Release transmitter to your PC via an USB cable. Your PC will automaticallytry to install the device and the Found New Hardware Wizard will open:3. Select “No, not this time” and click on “Next”.This design is the property of VECTRONIC <strong>Aerospace</strong> <strong>GmbH</strong>. Unauthorized duplication or distribution to a third party is prohibited.VECTRONIC <strong>Aerospace</strong> 26 /30 <strong>Manual</strong>_<strong>Drop</strong><strong>Off</strong>.docx.doc
Doc. No.: GPS Plus <strong>Drop</strong>-<strong>Off</strong> Manager <strong>Manual</strong>Date: 25.11.2011VECTRONIC <strong>Aerospace</strong>4. Select “Install from a list or specific location”This design is the property of VECTRONIC <strong>Aerospace</strong> <strong>GmbH</strong>. Unauthorized duplication or distribution to a third party is prohibited.VECTRONIC <strong>Aerospace</strong> 27 /30 <strong>Manual</strong>_<strong>Drop</strong><strong>Off</strong>.docx.doc
Doc. No.: GPS Plus <strong>Drop</strong>-<strong>Off</strong> Manager <strong>Manual</strong>Date: 25.11.2011VECTRONIC <strong>Aerospace</strong>5. Select “Search removeable media”. Go to the VECTRONIC CD and select the folder“<strong>Drop</strong> <strong>Off</strong> Manager \ USB Driver for Release Transmitter”.6. Select continue anyway. The driver will now be installed. After the driver has beeninstalled successfully, switch on the release transmitter by pressing the button. Youcan now use the release transmitter.Follow these steps for Windows Vista / 7:1. Insert the VECTRONIC CD into your PC.2. Connect the Release transmitter to your PC via an USB cable. Your PC willautomatically try to install the device.3. A warning will appear reporting that the device was not installed correctly. Open theDevice Manager: Go to “Start” “Control Panel” “Hardware and Sound” “Devices and Printers: Device Manager”.This design is the property of VECTRONIC <strong>Aerospace</strong> <strong>GmbH</strong>. Unauthorized duplication or distribution to a third party is prohibited.VECTRONIC <strong>Aerospace</strong> 28 /30 <strong>Manual</strong>_<strong>Drop</strong><strong>Off</strong>.docx.doc
Doc. No.: GPS Plus <strong>Drop</strong>-<strong>Off</strong> Manager <strong>Manual</strong>Date: 25.11.2011VECTRONIC <strong>Aerospace</strong>4. Open the node “Other Devices” and double-click on GPS Plus Release Transmitter.5. Click on “Update Driver”.6. Select “Browse my computer for driver software”.This design is the property of VECTRONIC <strong>Aerospace</strong> <strong>GmbH</strong>. Unauthorized duplication or distribution to a third party is prohibited.VECTRONIC <strong>Aerospace</strong> 29 /30 <strong>Manual</strong>_<strong>Drop</strong><strong>Off</strong>.docx.doc
Doc. No.: GPS Plus <strong>Drop</strong>-<strong>Off</strong> Manager <strong>Manual</strong>Date: 25.11.2011VECTRONIC <strong>Aerospace</strong>7. Browse on the VECTRONIC CD for the folder “<strong>Drop</strong> <strong>Off</strong> Manager \ USB Driver forRelease Transmitter” and click “Next”.8. Windows will warn you that it cannot verify the publisher of this driver software.Click on “Install this driver software anyway”. Windows will now install the driversoftware.9. After the driver has been installed successfully, switch on the release transmitter bypressing thebutton. You can now use the release transmitter.This design is the property of VECTRONIC <strong>Aerospace</strong> <strong>GmbH</strong>. Unauthorized duplication or distribution to a third party is prohibited.VECTRONIC <strong>Aerospace</strong> 30 /30 <strong>Manual</strong>_<strong>Drop</strong><strong>Off</strong>.docx.doc