Create successful ePaper yourself
Turn your PDF publications into a flip-book with our unique Google optimized e-Paper software.
Contents<br />
1. Introduction....................................................................................................................................................... 2<br />
2. Features............................................................................................................................................................. 3<br />
3. Safety Notes...................................................................................................................................................... 4<br />
4. Your Receiver and its Functions ..................................................................................................................... 5<br />
4.1 Remote Control Functions ........................................................................................................................... 5<br />
4.2 Front Panel Controls .................................................................................................................................... 6<br />
4.3 Rear Panel Connections(<strong>DT</strong>-<strong>2000T</strong>) ............................................................................................................ 7<br />
4.4 Rear Panel Connections(<strong>DT</strong>-2010T)............................................................................................................. 8<br />
5. Setting Up Your System................................................................................................................................... 9<br />
5.1 Setting Up Your Receiver............................................................................................................................. 9<br />
5.2 General Settings........................................................................................................................................... 9<br />
6. Quick Start ........................................................................................................................................................ 10<br />
6.1 Switching Your Receiver On ........................................................................................................................ 10<br />
6.2 Reinstallation................................................................................................................................................ 10<br />
6.3 Selecting Channels ...................................................................................................................................... 11<br />
6.4 Volume Control / Mute Sound ..................................................................................................................... 11<br />
6.5 Listening to the Radio .................................................................................................................................. 11<br />
6.6 Selecting the Audio Mode............................................................................................................................ 11<br />
6.7 Programme Lists and Sort Manager............................................................................................................ 12<br />
6.8 Channel Information..................................................................................................................................... 12<br />
6.8.1 EPG Button ............................................................................................................................................... 12<br />
6.8.2 INFO Button .............................................................................................................................................. 13<br />
6.9 Subtitles and Teletext .................................................................................................................................. 13<br />
7. Advanced Operation......................................................................................................................................... 14<br />
7.1 Channel Search............................................................................................................................................ 14<br />
7.1.1 Auto Search .............................................................................................................................................. 14<br />
7.1.2 <strong>Manual</strong> Search .......................................................................................................................................... 15<br />
7.2 Favourite List................................................................................................................................................ 15<br />
7.3 Timer Recording........................................................................................................................................... 16<br />
8. Main Menu Guide.............................................................................................................................................. 18<br />
8.1 General Settings........................................................................................................................................... 18<br />
8.2 Favourite List Manager ................................................................................................................................ 18<br />
8.3 Channel Manager......................................................................................................................................... 18<br />
8.4 Parental Lock Manager ................................................................................................................................ 19<br />
8.5 System Information ...................................................................................................................................... 19<br />
9. Additional Information ..................................................................................................................................... 20<br />
9.1 Upgrading the Receiver Software ................................................................................................................ 20<br />
9.2 Master Password.......................................................................................................................................... 20<br />
10. Trouble Shooting ............................................................................................................................................ 21<br />
11. Recycling and Disposal.................................................................................................................................. 21<br />
12. Technical data ................................................................................................................................................ 22
Introduction Features<br />
1. Introduction<br />
Thank you for purchasing your digital terrestrial receiver. ALL Receiver products are manufactured to the<br />
highest standards at our ISO 9002 accredited manufacturing plants.<br />
You naturally want to begin viewing your favourite programmes as quickly as possible - this is why we have<br />
designed the menu to fully meet your requirements. To ensure that you get to know your unit properly and<br />
that you can use and programme all features, please read this manual carefully.<br />
Thank you for purchasing your Receiver digital terrestrial receiver. In doing so you have chosen an appliance<br />
built for the future, allowing you to take advantage of numerous programmes and additional services such<br />
as electronic programme guides which will eventually replace conventional analogue transmissions.<br />
If it is necessary to return your receiver, please send it together with all accessories and in its original<br />
packaging. Including a copy of your invoice or receipt as well as a detailed description of the problem.<br />
Please ensure that you affix adequate postage to the parcel and refer all repairs to an authorised retailer.<br />
We hope you enjoy using this product.<br />
2. Features<br />
Basic Features<br />
• Simple Operation through On Screen Display<br />
• 2 SCARTS for TV and VCR( <strong>DT</strong>-<strong>2000T</strong>) or 1 SCART for TV and 1 RF modulator(<strong>DT</strong>-2010T)<br />
• Cinch audio outputs for HiFi amplifier and Digital Audio<br />
• Fully Infrared based Remote Control<br />
• RS232 Serial Link for Interaction with personal computer<br />
• Display Signal Strength Meter for easy initial set up<br />
• CD Quality Audio<br />
• Volume control (32 Steps)<br />
• Teletext supported by internal software<br />
• Subtitle function<br />
• Favourite channel function<br />
• Last channel recall function<br />
• Variable aspect ratio (4:3,16:9)<br />
• Display 7days Electronic Programme Guide (EPG)<br />
• Multi-Lingual function<br />
• Ten events timer(<strong>DT</strong>-<strong>2000T</strong>)<br />
• Parental Lock Facility for Channel and Receiver Access<br />
• Five Sorting methods (Alphabet, pay/free, normal/locked)<br />
2 3
4<br />
Satety Notes<br />
3. Safety Notes<br />
This appliance is designed exclusively for receiving terrestrial signals as described in this guide. It must not<br />
be used for any other purpose. Keep the appliance out of reach of children. To avoid injury or demage to<br />
your receiver, please note the following:<br />
WARNING:<br />
Never remove the cover or any part of it!<br />
Do not allow liquids or objects to get into the receiver!<br />
DANGER:<br />
Do not cover ventilation holes - there is a risk of fire if receiver overheating!<br />
DANGER:<br />
Use only original or professionally recommended spare parts.<br />
Failure to do so may result in damage or injury and will invalidate the guarantee.<br />
CAUTION:<br />
Switch off the appliance during electrical storms or if it is not to be used for long periods.<br />
Disconnect the antenna cable during an electrical storm.<br />
ATTENTION:<br />
Only ever use a clean cloth slightly moistened with clean water to clean the receiver; do not<br />
use any chemical additives!<br />
ATTENTION:<br />
Place the unit in a well-ventilated and cool environment.<br />
ATTENTION:<br />
Do not put heavy or wet items on the receiver. They may damage the unit.<br />
ATTENTION:<br />
Do not install the unit in the following conditions:<br />
- Where it is exposed to direct sunlight.<br />
- Where the atmosphere is humid or wet.<br />
- Where the temperature is too high or too low.<br />
4. Your Receiver and it’s Functions<br />
4.1 Remote Control Functions<br />
4.1.1 Basics<br />
When inserting batteries into the remote control unit.<br />
make sure that polarities match (+/-)!<br />
POWER button<br />
Your Receiver and it’s Functions<br />
Name Function<br />
Numeric buttons (0-9)<br />
Use to switch the Receiver (Set-Top Box) between Standby Mode and<br />
Operation Mode.<br />
Use to switch channels in Viewing Mode; use to enter numeric values<br />
in Menu Mode.<br />
EPG button<br />
Displays a channel’s programme information or EPG<br />
(Electronic Programme Guide).<br />
TV/RADIO button Switches between TV and radio services.<br />
MUTE button Enables/Disables the Sound<br />
EXIT button Exits from a Menu .<br />
MENU button Exits from Viewing Mode to Menu Mode.<br />
BACK button Returns to the previous menu in Menu Mode.<br />
INFO button Shows the information of the current channel.<br />
TTX button Shows Teletext using internal<br />
5
6<br />
Front Panel Controls<br />
Name Function<br />
CH UP and CH DOWN Use to navigate through menu items in Menu Mode; use to switch<br />
buttons between channels in Viewing Mode.<br />
PAGE UP and<br />
PAGE DOWN buttons<br />
Use to scroll through pages of channel list.<br />
LEFT / RIGHT buttons<br />
VOL UP and<br />
VOL DOWN buttons<br />
4.2 Front Panel Controls<br />
Use to change settings in Menu Mode; use to switch between channels<br />
in Viewing Mode.<br />
Increases or decreases the volume.<br />
Moves from the current menu to a submenu in Menu Mode or executes<br />
OK button<br />
the action corresponding to the selected menu item.<br />
Displays the channel list in Viewing Mode.<br />
AUDIO button Use to select audio language and Audio Mode.<br />
TIMER button<br />
Use to set the local time or to move to the Recording List from which<br />
you can set the timer recording.<br />
LAST button Returns to the previously watched channel.<br />
SUBTITLE button<br />
Turns the display of subtitle text ON or OFF for a programme with<br />
subtitle information (subtitles for hearing-impaired viewers).<br />
Name Function<br />
POWER button<br />
Use to switch the Receiver between Standby Mode and Operation<br />
Mode.<br />
CH UP and CH DOWN Use to navigate through menu item in Menu Mode; use to switch<br />
buttons between channels in Viewing Mode<br />
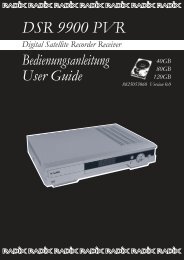
4.3 Rear Panel Connections (<strong>DT</strong>-<strong>2000T</strong>)<br />
Rear Panel Connections(<strong>DT</strong>-<strong>2000T</strong>)<br />
Name Function<br />
Main Connections<br />
Connect this lead to the mains outlet (120V~250V AC 50/60 Hz) after all other<br />
connections have been made.<br />
RF IN UHF/VHF ANT in for Local TV reception<br />
RF OUT Antenna Loop Out<br />
TV SCART Connection Connect your TV via a SCART cable to this connector.<br />
VCR SCART Connection Connect your VCR via a SCART cable to this connector.<br />
VIDEO Connection for<br />
VCR or TV<br />
Composite video output for connecting to an AV monitor etc.<br />
AUDIO Connection for<br />
HiFi System<br />
Audio outputs for connecting to a HiFi system.<br />
RS-232 Connection to PC<br />
Connect your PC via this connector when you wish to upgrade the system<br />
software.<br />
7
8<br />
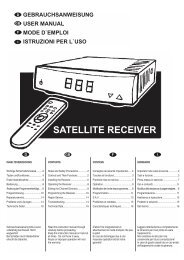
Rear Panel Connections(<strong>DT</strong>-2010T)<br />
4.4 Rear Panel Connections (<strong>DT</strong>-2010T)<br />
Name Function<br />
Main Connections<br />
Connect this lead to the mains outlet (210V~250V AC 50/60 Hz) after all other<br />
connections have been made.<br />
RF IN UHF/VHF ANT in for Local TV reception<br />
RF OUT Antenna Loop Out<br />
TV SCART Connection Connect your TV via a SCART cable to this connector.<br />
VIDEO Connection for<br />
VCR or TV<br />
Composite video output for connecting to an AV monitor etc.<br />
AUDIO Connection for<br />
HiFi System<br />
Audio outputs for connecting to a HiFi system.<br />
RS-232 Connection to PC<br />
Connect your PC via this connector when you wish to upgrade the system<br />
software.<br />
ANT IN UHF/VHF Antenna In for local TV reception<br />
TV Out UHF out for TV<br />
5. Setting Up Your System<br />
Setting Up Your System<br />
This chapter explains the settings you will need to make before using the Receiver (Set-Top Box) for the first<br />
time.<br />
5.1 Setting Up Your Receiver<br />
Connect the Receiver to your TV. Refer to Section<br />
4.3 on Rear Panel Connections for more details.<br />
Press the POWER button on the remote control or<br />
on the Receiver. “ON” message appears on the<br />
front display of the Receiver and the Language<br />
Selection menu appears on your TV.<br />
Use the CH UP and CH DOWN buttons on the<br />
remote control or on the Receiver to select the<br />
language of your choice and then press the OK<br />
button. The General Settings menu appears.<br />
5.2 General Settings<br />
In the General Settings menu, you can set the Time<br />
Zone and other settings for the Receiver. In<br />
general, if you purchased the Receiver from your<br />
local vendor, these settings will already be as<br />
appropriate for your area.<br />
There are several items in the General Settings menu.<br />
You can use these to set the various settings of the<br />
Receiver. Use the CH UP and CH DOWN buttons or<br />
the LEFT / RIGHT buttons to make a selection and<br />
then press the OK button.<br />
• Time Zone<br />
Select the time zone for your location.<br />
• Summer Time<br />
Select “ON” to set Summertime or “OFF” to set<br />
Wintertime.<br />
• TV Aspect Ratio<br />
Select the aspect ratio for your TV (4:3 or 16:9).<br />
• Menu Language<br />
Select the menu language.<br />
• Main Audio Language<br />
Select the audio language for multilanguage<br />
channels.<br />
• Main Subtitle Language<br />
Select the subtitle language for subtitle text.<br />
[ <strong>DT</strong>-<strong>2000T</strong> ]<br />
[ <strong>DT</strong>-2010T ]<br />
9
10<br />
Quick Start<br />
• RF Modulator (<strong>DT</strong>2010T only)<br />
For better picture quality, use a SCART cable to connect the Receiver to your TV.<br />
If you are going to use a UHF coaxial cable instead, perform the following steps.<br />
Select RF Modulator TV Mode<br />
Use the LEFT/RIGHT buttons to select a Type (PAL B/G, PAL I, etc.)<br />
Select “RF Modulator Channel”<br />
Use the LEFT/RIGHT buttons to select a channel.<br />
• Antenna Booster Power<br />
You can choose ON/OFF of 5V power supply to Antenna.<br />
6. Quick Start<br />
This chapter provides you with instructions on the basic operations of the Receiver. As mentioned<br />
previously, the general settings and channels will already have been set for your area. That is, you should be<br />
able to operate the Receiver without referring to the instructions in Section 5.<br />
6.1 Switching Your Receiver On<br />
Press the POWER button on the Receiver or on the remote control to power on the Receiver. Press the<br />
POWER button on the Receiver or on the remote control again to switch to Standby Mode.<br />
6.2 Reinstallation<br />
In general, the Receiver is already set up for you to watch the TV programmes available in your area. To<br />
watch a preset TV programme, you will need to perform the following steps.<br />
Press the MENU button on the remote control to go to the Channel Manager.<br />
Select Reinstallation and then press the OK button.<br />
When the Input Password message appears,<br />
enter the password and then press the OK<br />
button.<br />
Once the Reinstallation is initiated, you will be<br />
taken to the Language Selection screen. (See 5.1<br />
Setting Up Your Receiver.) Select the language of<br />
your choice.<br />
You will automatically be taken to the General<br />
Settings screen. Use the EXIT button on the<br />
remote control to switch to Viewing Mode.<br />
Now you should be able to see a TV programme<br />
on your TV screen.<br />
Depending on the model of your Receiver, your local TV programmes may not have been set on the<br />
Receiver.<br />
6.3 Selecting Channels<br />
The following steps are for viewing a preset channel.<br />
Volume Control / Mute Sound<br />
To select the channel you want to watch, use one of the following methods.<br />
• Select the channel using the Numeric buttons.<br />
• Select the channel using the CH UP and CH DOWN buttons on the remote control or on the<br />
Receiver.<br />
• Press the OK button and select a channel from the channel list.<br />
Select the desired channel and then press the OK button. Your selected channel appears on the TV<br />
screen.<br />
• To return to the last channel you were watching, press the LAST button.<br />
• Info Box<br />
This is the box that appears at the bottom of your TV screen and displays information on the current<br />
channel.<br />
It displays information such as the titles of the current and next programmes as well as the quality of<br />
terrestrial reception and signal strength. For more detailed information, select the title of the programme<br />
you want to learn more about and then press the INFO button.<br />
6.4 Volume Control / Mute Sound<br />
Use the VOL UP and VOL DOWN buttons on the remote control to adjust the volume of the TV.<br />
When either button is pressed, the volume indicator appears on the TV screen.<br />
When you have finished adjusting the volume, the volume indicator disappears automatically.<br />
Press the MUTE button on the remote control to disable the sound temporarily.<br />
Press the MUTE button again to restore the sound.<br />
6.5 Listening to the Radio<br />
The Receiver also enables you to listen to radio stations.<br />
To listen to the radio, press the TV/RADIO button on the remote control.<br />
To return to TV viewing, press the TV/RADIO button again.<br />
6.6 Selecting the Audio Mode<br />
This involves setting the audio language and the Audio Mode. The audio language is set to the<br />
language you selected as Main Audio Language in General Settings. That is, you can use this mode to<br />
watch a TV programme in a language other than the language you set as the Main Audio Language. If<br />
you press the AUDIO button again after the Receiver has been turned OFF, you can again watch the TV<br />
programme in the Main Audio Language.<br />
Press the AUDIO button on the remote control.<br />
To change the audio language, use the CH UP and CH DOWN buttons to select one of the languages<br />
provided by the broadcaster.<br />
Use the LEFT / RIGHT buttons to select the Audio Mode you want. Available modes are as follows:<br />
• Stereo: Sound comes from both speakers.<br />
• Mono (L): Sound comes only from the left speaker.<br />
• Mono (R): Sound comes only from the right speaker.<br />
• AC-3: Dolby Digital (To listen to Dolby Digital, connect an amplifier with Dolby Digital decoding to the<br />
SPDIF output.)<br />
To return to Viewing Mode, press the AUDIO button again or press the EXIT button.<br />
11
12<br />
Programme List and Sort Manager<br />
6.7 Programme List and Sort Manager<br />
Digital TV offers hundreds of channels. Therefore,<br />
all the available channels are managed as a list. In<br />
this section, we will take a look at how to display<br />
the list you want and how to sort such lists. This is<br />
convenient when searching for the list or channel<br />
you want.<br />
To view this list, press the OK button while<br />
watching TV or listening to the radio.<br />
3 coloured buttons are used to manage the<br />
Programme List.<br />
• RED button: Use this to create a user-defined list.<br />
Press the GREEN button on the remote control to switch to the list you created.<br />
• GREEN button:<br />
- Total List : Use to add selected channel to other list.<br />
Press the GREEN button to display User lists at the right corner of the window.<br />
Select preferred list and press the OK button.<br />
• User List : Use to remove selected channel from the list.<br />
• YELLOW button: Use this to sort or filtering the Programme List.<br />
Press YELLOW button to display Sorting window.<br />
Set each option of Sorting (Alphabet, Scramble and Locked) and Filter and press the OK button.<br />
If press YELLOW button without select any option, then it return to default setting.<br />
6.8 Channel Information<br />
Note that, not all broadcasters provide channel information. Depending on the broadcaster, channel<br />
information may not always be available. You can use the EPG and INFO buttons to view the channel<br />
information.<br />
6.8.1 EPG (Electronic Programme Guide) Button<br />
Use this button to view information on programme titles, broadcast schedule, programme<br />
synopsis, etc., which are provided by the broadcaster of the current channel.<br />
While watching TV, press the EPG button.<br />
Select the programme you want to learn<br />
more about. Use the CH UP and CH<br />
DOWN buttons to navigate through<br />
different programmes and use the LEFT /<br />
RIGHT buttons to navigate through the<br />
days of the week.<br />
Press the OK button. A synopsis of the<br />
selected programme appears.<br />
6.8.2 INFO Button<br />
Use this button to obtain information about<br />
the current programme.<br />
Subtitles and Teletext<br />
While watching TV or listening to the radio,<br />
press the INFO button. When the button is<br />
pressed once, channel information will be<br />
displayed in the Info Box.<br />
The Info Box appears. You can check the<br />
information on the channel, such as the<br />
titles of the current and next programmes,<br />
signal strength, and quality of reception.<br />
Press the INFO button again to display<br />
additional information, such as a synopsis<br />
of the current programme, theme, etc. To<br />
display information about the next scheduled programme, press the LEFT /RIGHT button.<br />
To return to Viewing Mode, press the INFO button again or press the EXIT button.<br />
6.9 Subtitles and Teletext<br />
The Receiver is capable of receiving subtitles and Teletext. Subtitles and Teletext may not be available<br />
depending on the terrestrial broadcaster.<br />
• Subtitles<br />
- To display subtitle text, press the SUBTITLE button on the remote control.<br />
- Press the SUBTITLE button again to clear the display of subtitle text.<br />
• Teletext by internal software<br />
It’s possible to see the teletext by oneself using internal software in the receiver regardless of supporting<br />
teletext on TV(In case of teletext supporting on TV, it’s possible to see the teletext regardless of using<br />
internal software.)<br />
Show No. 100 page when the TTX button is pressed.(basic page)<br />
Move to another page using number button or UP/DOWN button. At this time, jump to the nearest<br />
page in case of not existing page or not completed download.<br />
In case of several subpage combining, basically it can automatically changed.<br />
But it’s possible to move to subpae using LEFT/RIGHT button.<br />
(The first number of subpage and the last number of subpage will be appeared at the left lower side.)<br />
Close teletext using Exit button.<br />
The function of three color buttons are like below in the watching screen of teletext.<br />
- Green : Move to default (100) page.<br />
- Yellow : Move to recently watched page.<br />
- Blue : Change from display screen of teletext to translucent condition.<br />
13
14<br />
Advanced Operation<br />
7. Advanced Operation<br />
This chapter provides instructions on using some of the most frequently used features of the Receiver.<br />
7.1 Channel Search<br />
Digital TV offers hundreds of channels. Therefore, it is important for you to be able to search for all the<br />
channels that suit your environment and preferences. There are 3 different methods of channel search:<br />
Auto Search, <strong>Manual</strong> Search, and Network Search. In general, Auto Search is the one used most<br />
frequently.<br />
Press the MENU button on the remote control to go to the Main Menu.<br />
Select Channel Manager and then press the OK button. You will see different submenus, including<br />
Auto Search and <strong>Manual</strong> Search, on the Channel Manager screen.<br />
7.1.1 Auto Search<br />
Use this search to have the Receiver<br />
automatically search all the channels<br />
Select Auto Search and then press the<br />
OK button. TV and radio broadcast<br />
channels will be searched.<br />
The names of the channels will be listed.<br />
Press the EXIT button to return to Viewing<br />
Mode and check that the reception of the<br />
selected channel is good.<br />
7.1.2 <strong>Manual</strong> Search<br />
Use this channel search by entering the TP information manually to the Receiver. This channel<br />
search is often used to search for a particular channel or those channels that Auto Search has<br />
missed, but requires comparatively more expertise.<br />
Select <strong>Manual</strong> Search and then press<br />
the OK button.<br />
Move scroll bar to your preferred Channel<br />
and press the OK button and there will be<br />
Check mark.<br />
Press the RED button to start search.<br />
The names of the channels will be listed.<br />
Press the EXIT button to return to Viewing<br />
Mode and check that the reception of the<br />
selected channel is good.<br />
Favourite List Manager<br />
7.2 Favourite List Manager<br />
The Favourite List is a collection of your favourite channels.<br />
Digital TV offers hundreds of channels. Therefore, it is almost impossible to select channels by pressing<br />
the actual channel number each time you want to watch a different channel. You should group the<br />
desired channels into a list. Use this feature for convenient channel management.<br />
Press the MENU button on the remote control to<br />
go to the Main Menu.<br />
Select Favourite List Manager and then select<br />
Edit List Name .<br />
Create list names. A list name is the name given<br />
to a list of channels that is grouped by an<br />
individual. That is, if digital TV is enjoyed by a<br />
family, each member of the family can create their<br />
own channel group. For example, when creating<br />
list names, you can assign names like Father ,<br />
Mother , etc. The list names can be anything you<br />
like. Follow the on-screen instructions to create<br />
them.<br />
After creating a list name, press the RED button.<br />
Select Add/Remove Channels and then press<br />
the OK button.<br />
Select the list name you have created.<br />
Add channels from the Total List to your<br />
Favourite List. You can also remove channels<br />
from your Favourite List. Follow the on-screen<br />
instructions.<br />
Press the OK button to exit the menu.<br />
The Favourite List Manager provides the following additional functions.<br />
• Edit Channel Name<br />
Use this to edit channel names. Select the channel name you want to change from the Total List and<br />
then change it.<br />
Use the CH UP and CH DOWN buttons to select Edit Channel Name .<br />
Use the LEFT / RIGHT buttons to select the list containing the channel for which you want to<br />
change the name.<br />
Select the channel and then press the OK button.<br />
When the screen changes to allow you to change the channel name, follow the on-screen<br />
instructions to change the name.<br />
Press the OK button.<br />
15
16<br />
Timer Recording<br />
• Rearrange Channels<br />
Use this to change the order of the channels. Select the name of the channel that you want to change<br />
the order in the list, press the OK button, use the CH UP and CH DOWN buttons to change the order,<br />
and then press the OK button.<br />
Use the CH UP and CH DOWN buttons to select Rearrange Channels .<br />
Use the LEFT / RIGHT buttons to select the list containing the channel whose order you want to<br />
change within that list.<br />
Select the channel and then press the OK button. The selected channel will be highlighted in blue.<br />
Use the LEFT / RIGHT buttons, CH UP and CH DOWN buttons, and PAGE UP and PAGE DOWN<br />
buttons to move the highlighted channel to the desired position.<br />
Press the OK button.<br />
• Remove Channels from Total List<br />
Use this to remove the selected channels from the Total List. Select the channel you want to remove<br />
from the list and then press the OK button.<br />
Use the CH UP and CH DOWN buttons to select Remove Channels from Total List and then<br />
press the OK button.<br />
When the Remove Channels from Total List screen appears, select the channel(s) you want to<br />
delete from the Total List, using the OK button, and the more them to the Recycled pressing a<br />
Right button.<br />
The channel(s) you want to delete should appear in the Recycled. Press the EXIT button.<br />
When the message Do you want to delete the channels in the Recycled? appears, press the OK<br />
button. The selected channel(s) will be deleted.<br />
7.3 Timer Recording(<strong>DT</strong><strong>2000T</strong> only)<br />
Use this to make a timer recording. You can record up to 10 programmes.<br />
Using the Timer Recording feature, you can record your favourite TV programmes on the VCR.<br />
Recording on the HDD is only possible with a PVR<br />
type model.<br />
Press the TIMER button on the remote control to<br />
go to the Recording List.<br />
The message “Please set user time first”<br />
appears followed by the User Time Setting<br />
screen. Set user time according to the current<br />
time. If the user time is already set, this step will<br />
be skipped.<br />
When the Recording List screen appears, press<br />
the OK button to enter necessary information.<br />
Move to the Recording Setting menu. To record a programme, enter information such as, channel, start<br />
time, end time, programme type (Once, Daily, Weekly), etc.<br />
Timer Recording<br />
• Network<br />
Select the network transmitting the channel you want to record. Use the LEFT / RIGHT buttons to<br />
select the network.(Use the terrestrial only).<br />
• Channel<br />
Select the channel you want to record. Use the LEFT / RIGHT buttons to select the channel.<br />
• Start Date<br />
Set the start date (Day/Month/Year) of the program you want to record. Use the Numeric buttons to set<br />
the recording start date.<br />
• Start Time<br />
Set the start time (Hour/Minute) of the program you want to record. Use the Numeric buttons to set the<br />
recording start time.<br />
• Duration<br />
Use the Numeric buttons to set the recording time duration.(Hour/Minute)<br />
• Type<br />
Set the type (Once/Daily/Weekly) of the program you want to record. You can record the program once<br />
or daily at the same time or weekly at the same time. Select the type accordingly. Use the LEFT /<br />
RIGHT buttons to select the program type.<br />
• Recording<br />
Starts the recording according to the above<br />
settings. Press the OK button.<br />
After the settings are completed, select<br />
Recording and then press the OK button. If<br />
the channel you selected has been locked, the<br />
Password Input screen appears. Enter the<br />
password.<br />
You can check the timer recording settings<br />
from the Recording List.<br />
• A message appears 1 minute before the recording start time, asking you whether or not to proceed<br />
with the recording. To proceed with the recording, press the OK button. Otherwise, press the CANCEL<br />
button.<br />
• Even if the power is turned off, the Receiver will automatically power on at the recording start time to<br />
proceed with the recording. When the recording ends, it will return to its previous state.<br />
• Once the recording has started, only the channel that is currently being recorded will be shown. During<br />
recording, none of the buttons except the POWER button will respond. REC appears on the front<br />
panel display of the Receiver.<br />
• If the programme type is set to Once , it will be deleted from the Recording List after the recording<br />
ends.<br />
If the programme type is set to Daily or Weekly , the channel recording information will be changed<br />
to the next scheduled date and then stored.<br />
17
18<br />
Main Menu Guide<br />
• EPG Recording<br />
This function enables you to use the EPG time information to book a recording.<br />
Press the EPG button.<br />
Use the CH UP and CH DOWN buttons and the LEFT / RIGHT buttons to select the time and the<br />
channel.<br />
Press the TIMER button. The selected recording is added to the Timer List.<br />
8. Main Menu Guide<br />
8.1 General Settings<br />
Refer to Section 5.2 on General Settings for details.<br />
8.2 Favourite List Manager<br />
Refer to Section 7.2 on Favourite List Manager for<br />
details.<br />
8.3 Channel Manager<br />
Refer to Section 7.1 on Channel Search for details<br />
on Auto Search, and <strong>Manual</strong> Search.<br />
We will take a look at other functions.<br />
Reinstallation<br />
Use this to restore all settings to their default values.<br />
Press the MENU button on the remote control.<br />
Select Channel Manager .<br />
Select Reinstallation .<br />
When the Input Password message appears, enter the password.<br />
The settings (such as channel information and language) on the Receiver will be restored to their<br />
defaults. However, the Receiver cannot revert to its default state if the password has been changed.<br />
When you perform Reinstallation of the Receiver, the Receiver will be initialized in one of two ways. The<br />
difference is determined by the Receiver model type .<br />
• Settings will be restored to their factory default settings and channel information programmed at the<br />
factory will remain unchanged.<br />
• Settings will be restored to their factory default settings and channel information programmed at the<br />
factory will also be deleted.<br />
Parental Lock Manager<br />
Delete All Channels<br />
Use this if necessary to delete all your channels . If you use this, channels only will be deleted without<br />
affecting your existing settings .<br />
Press the MENU button on the remote control.<br />
Select Channel Manager .<br />
Select Delete All Channels .<br />
When the Input Password message appears, enter the password.<br />
When the message asking you to confirm the delete operation appears, press the OK button.<br />
8.4 Parental Lock Manager<br />
This allows you to lock particular channels or the Receiver itself. For example, you can prevent your children<br />
from accessing adult programme using this function.<br />
Press the MENU button on the remote control.<br />
Select Parental Lock Manager .<br />
When the Input Password message appears,<br />
enter the password. The factory default user<br />
password is 0000 .<br />
When the Parental Lock Manager screen appears,<br />
set the following items.<br />
• Channel Lock<br />
Select the channel you want to lock. When<br />
someone switches to the locked channel, the<br />
password screen will appear.<br />
• Access Lock<br />
Enable or disable whether to ask for the password when the Receiver is powered on. This may be set<br />
either On or Off.<br />
• Change Password<br />
Select this to change the password. When someone switches to the locked channel, the password<br />
screen will appear.<br />
8.5 System Information<br />
This displays brief information on the Receiver’s<br />
software.<br />
Use this to check the software version or release<br />
date of the current software before upgrading<br />
System information is as follows:<br />
• Date<br />
• Software Version<br />
• Firmware<br />
19
20<br />
Additional Information<br />
9. Additional Information<br />
9.1 Upgrading the Receiver Software<br />
You can upgrade the software on the Receiver. To upgrade the software on the Receiver, contact the<br />
store where you purchased the set. To check the software version, select “System Information” from<br />
the Main Menu and then press the OK button. After the software upgrade, you may need to perform<br />
Reinstallation on the Receiver. Refer to Section 8.3 on Channel Manager for information on<br />
Reinstallation.<br />
Caution<br />
When you perform Reinstallation, all existing data will be lost.<br />
Connect the cable.<br />
Run the programme from your PC.<br />
Turn off the Receiver and then turn it back on.<br />
Please visit our website<br />
[http://www.radixworld.com/korea/product/download.asp and click Download Guide]<br />
9.2 Master Password<br />
The Master Password is the general password you will need to use to access the Receiver if you have<br />
forgotten your User Password. The following 4-digit number is the Master Password. It is<br />
recommended that you record your User Password in the space provided below. The User Password is<br />
set to “0000” by default.<br />
• Master Password<br />
9 8 1 5<br />
• User Password<br />
10. Trouble Shooting<br />
Trouble Shooting<br />
Note:<br />
Digital communications involve the simultaneous transfer and processing of large amounts of data.<br />
Changing channels may take longer in comparison to analogue devices.<br />
Problem Solution<br />
1) No Video<br />
11. Recycling and Disposal<br />
- Channel Data changed. - Execute Re-Installation or <strong>Manual</strong>/Auto Channel<br />
Search (Please refer to the <strong>Manual</strong> for details).<br />
2) No Audio<br />
- Check the audio mute controls- Check Audio Language; Press Audio Key and<br />
try to change the language or change Main Audio language on general<br />
settings menu.<br />
3) Fail to boot receiver. - Reapply AC power- Contact A/S Center if this problem occurs continuously.<br />
4) Fail to search channel - signal Line connection<br />
5) Screen shows No Signal<br />
continuously<br />
- signal Line connection<br />
6) Video Freeze<br />
- Bad Signal stream or bad channel; move to another channel - Reapply AC<br />
power<br />
7) Remote control<br />
does not respond<br />
- Receiver could be interfered with Noise from other electric home appliances.<br />
Put the receiver in some other place. - Check if the battery of Remote Control<br />
is empty.<br />
8) Fail to catch Preprogram<br />
channel<br />
- Execute the Re-Installation process or <strong>Manual</strong>/Auto Search.<br />
9) No OSD MENU - Check SCART, ensure it is connected to your receiver and TV correctly<br />
10) Fail to Download<br />
through Serial<br />
- PC232 Port problem<br />
Please dispose of the device, packaging such as polystyrene and all batteries in accordance with your local<br />
regulations and recycle wherever possible, Follow all relevant regulations and dispose of the materials at<br />
the correct locations. Consult the relevant regulations available from your local environmental protection<br />
agency or similar.<br />
21
22<br />
Technical Data<br />
12. Technical data<br />
Tuner / Front-End Demodulator<br />
IF Input Frequency 174MHz~230MHz, 470MHz~862MHz<br />
IF Loop though output 50 ~ 860MHz<br />
Input Impedance 75ohms<br />
Input Signal Level -80dBm ~-20dBm<br />
Channel Bandwidth 7MHz, 8MHz<br />
Demodulation According DVB-T<br />
Type COFDM 2K, 8K<br />
Mode QPSK, 16QAM, 64QAM<br />
Viterbi Decoding Rate 1/2,2/3,3/4,5/6,7/8<br />
Guard Interval Modes 1/32,1/16,1/8,1/4 active symbol duration<br />
Reed Solomon Decoding FEC: 204,188,t=8<br />
Transport Demultiplexer<br />
Demultiplex According to ISO/IEC 13818-1<br />
Max. Input Stream 60MHz(Serial)/7.5MHz(Parallel)<br />
PID Handling Capability 32 PID<br />
SI Filtering According to DVB-SI spec (ETS 300 468)<br />
Video Decoding Parameters<br />
Video Decoding ISO/IEC 13818-2 MP@ML<br />
Aspect Ratio 4:3 16:9<br />
Resolution MAX. 720 X 576<br />
Audio Decoding Parameters<br />
Audio Decoding ISO/IEC 13818-3 Layer I & II<br />
Operating mode Mono, Stereo<br />
Sampling Frequency 32, 44.1, 48KHz<br />
Baseband Video/Audio Output<br />
Video Output Impedance 75ohms<br />
Video Output Level 1Vp_p<br />
Audio Output Impedance 600ohms Unbalanced<br />
Audio Output Level 3.0Vp_p With Volume Control<br />
Microprocessor and Main Memories<br />
Microprocessor Type ST20-C2(STi5518)<br />
Flash ROM(for programme memory) 1M X 16bit<br />
SDRAM(for decoding) 4M X 16bit<br />
Data Service Port<br />
Connector 9 Pin D-Female Type<br />
Protocol RS-232 Asynch<br />
Data Rate Max 115200 bps<br />
Front Panel<br />
4 Digit LED Display Channel Numbers Display<br />
3 Buttons Power , Up , Down<br />
IR Sensor 38KHz<br />
Rear Panel<br />
IF Input IEC FEMAIL<br />
IF Loop though output IEC MAIL<br />
Cinch output Audio (Left, Right), Video,Digital Out(SPDIF)<br />
2SCART Output 1TV, 1VCR<br />
RS232 Serial Port 9 Pin D-Female Type<br />
Power Cord Europe Flexible Cord<br />
Technical Data<br />
Remote Control Unit<br />
Type IR (Carrier Freq. 38KHz)<br />
Battery 2 X 1.5V AAA<br />
31 Keys Power, 0~9, Mute, Info, Up, Down, Left, Right,<br />
Back, Radio, OK, Menu, Exit, EPG, AD,<br />
Timer Last, Page Up/Down, Subtitle, Audio,<br />
Volume Up/Down<br />
General Data<br />
Input Power Voltage AC 210 ~ 250V, 50/60Hz<br />
Power Consumption Max 15Watts (Standard)<br />
Dimension (W X D X H) 275 X 156 X 56mm<br />
Weight 1.1Kg<br />
Operation Temperature 0 ~ 40 Deg.<br />
23
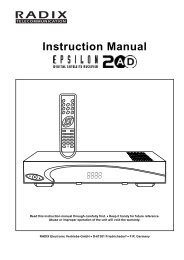
MAIN MENU<br />
5. System Information<br />
4. Parental Lock Manager<br />
3. Channel Manager<br />
1. General Setting 2. Favorite List Manager<br />
Input Password<br />
Auto Search<br />
Edit List Name<br />
Time Zone<br />
Channel Lock<br />
<strong>Manual</strong> Search<br />
Add/Remove ch.<br />
Summer Time<br />
Access Lock<br />
Channel data transfer<br />
Edit Channel Name<br />
TV aspect Ratio<br />
Change Password<br />
Delete all Channels<br />
Rearrange Channels<br />
Menu Language<br />
Reinstallation<br />
Remove Ch. total list<br />
Main Audio Language<br />
Main Subtitle Language<br />
RF Modulator TV Mode<br />
<strong>DT</strong>-2010T Only<br />
RF Modulator Channel<br />
Antenna Booster Power<br />
Main Map<br />
Audio Key Menu Key Subtitle Key<br />
Favorite Video<br />
OK Key<br />
Default Video<br />
Alphabet<br />
Change List<br />
Red Key<br />
Free/Scramble<br />
Radio Key<br />
Last Key Info Key<br />
Add to List<br />
Green Key<br />
Normal / Locked<br />
Sorting Manager<br />
Yellow Key<br />
I-Plate Menu<br />
Now/Next EPG<br />
Info Key<br />
<strong>DT</strong>-<strong>2000T</strong> Only<br />
User time setting Recording List Recording Setting<br />
Timer Key<br />
Menu<br />
Sub Menu<br />
Channel Guide<br />
EPG Key<br />
Pop up Menu<br />
Key description<br />
Info Key Now/Next EPG