Scandlight DMX Controller PRO USER MANUAL - Ljudia
Scandlight DMX Controller PRO USER MANUAL - Ljudia
Scandlight DMX Controller PRO USER MANUAL - Ljudia

You also want an ePaper? Increase the reach of your titles
YUMPU automatically turns print PDFs into web optimized ePapers that Google loves.
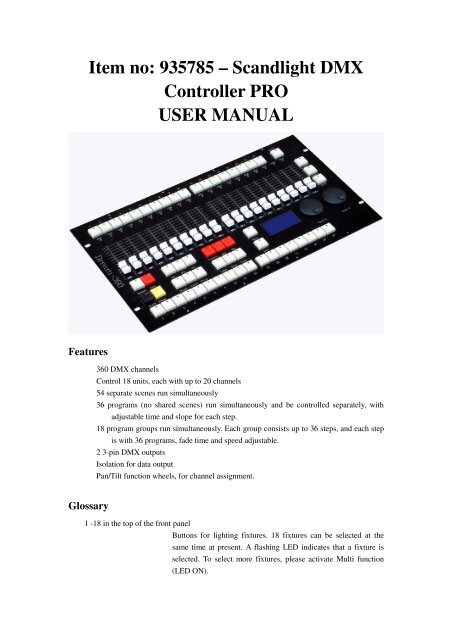
AUDIO INPUTMIDI INPUTTHUMBAudio line inMIDI inputMIDI direct outputFixture SelectionThere are 18 buttons on the top of the front panel (over the sliders). They are for fixture selection.LED on means a fixture is selected. A flashing LED indicates the data output status of sliderchannel. Two or more fixtures can be selected once the Multi button is activated. However, if not,you can select only one fixture. After selection, you are able to control the channels of the selectedfixture(s).SlidersOnce the fixtures are selected, they can be controlled with the sliders.Pull the sliders to the bottom, and then push them up till the fixture shows you the desired effect.You will see the slider LED light on, which indicates that there is data output from the controllerto the fixture. If the sliders are at the bottom end, the LED will keep flashing. This indicates thatthe output data is 0. Data by manual operation on the sliders are prior to data from the runningscenes/chases/groups. To release the output data of a channel, press Release and hold it, then movethe slider.Manual ControlStepDescription1 Select fixture(s) by pressing Light “x”2 Pull the sliders to the bottom, and then push them up till thefixture shows you the desired effect. You will see the sliderLED light on, which indicates that there is data output from thecontroller to the fixture. The higher the output value, thebrighter the LED would be..Note:After pressing Release button and then push a slider, it will release the correspondent channel, andthe slider’s LED will turn off.If there is a chase, a scene or an environment running on that channel, the slider’s LED willchange its brightness according to the output value.Press Clear/Exit button to clear out all manual output on the channels. As a result, thecorresponding slider LEDs will turn off.Press ALL OFF button to clear out all manual output on the channels. As a result, thecorresponding slider LEDs will turn off, and all chases, scenes and environment will be closed.The manual value can switchably be output.Note: Manual mode has the highest output privilege. For example, when a channel is occupied bya chase/scene/group, at this moment you move the channel slider, the chase/scene/group willconcede and the manual data will be output.The Clear Button
When one of “SC1” “SC2” “SC3” “Chase1” “Chase2” “Group” is activated on, to pressClear/Exit button will clear out all output data from the manual operated sliders.When one of “SC1” “SC2” “SC3” is activated on, to press Clear/Exit button and to holdit for 1 second will clear out all output data from the manual operated sliders andwill close all running scenes.When one of “Chase1” “Chase2” is activated on, to press Clear/Exit button and to hold itfor 1 second will clear out all output data from the manual operated sliders andwill close all running chases.When “Group” is activated on, to press Clear/Exit button and to hold it for 1 second willclear out all output data from the manual operated sliders and will close allrunning groups.Create a SceneStepDescription1 Select the desired fixture(s).2 Move the sliders to make the needed light effect.3 Press Program to enter programming mode.4 Select one of “SC1” “SC2” “SC3” to store the scene.5 Press a number button to store the scene.6 The controller will then store the scene into the selectednumber button, and automatically exit programming mode.Note: The LED of manual-operated sliders will light on or flash (output value 0). All thesesliders will be stored into the scene; but those sliders whose LEDs are off will not be. If youdon’t want to store a channel, press Release and then move the slider to release the channel.By doing so, the LED of the slider will turn off. It is high recommended to releaseunnecessary channels be storage, to guarantee the desired lighting effects when two or morescenes/chases/groups are running simultaneously.If error message shows when storing a scene, it means there already exists a scene in thatbutton, and the scene is running; or the scene you want to store is empty so that it is not forstorage.Run a SceneStepDescription1 Select one of “SC1” “SC2” “SC3” to activate a scene.2 A fast flashing LED on the number buttons indicates anexisting scene.3 Select a fast flashing number to run the scene. Then, the LEDwill slow down flashing. A slow flashing LED indicates arunning scene. The higher the output value on thechannel, the brighter the LED would be.Note:If a channel of a scene is at the same time controlled under manual mode, then the scene onthat channel will concede for manual output. Press Release to release manual output, then therunning of a scene will take effect.
Create a ChaseThere are several ways to create a chase: 1. To adjust the sliders by manual; 2. To create scenesfirst, and then pick up the scenes into the chase; and 3. Mixture of 1 and 2.1. Create a chase by adjusting the sliders by manual:StepDescription1 Press Program to enter programming mode2 Select one of “Chase1” “Chase2” to store the chase.Select a number from 1 – 18 as the number of the chase. If the3number LED is on, it means there is an existing chase in it.4 Select the desired fixture(s).5 Move the sliders till you get the desired effect.If the LED of E/XY is on, the pan/tilt value can be adjusted with thefunction wheels.If the LED of E/XY is off, then time and slope can be adjusted withthe function wheels.Briefly press Clear/Exit once, to clear out the value of the sliders.6To exit programming mode, press Clear/Exit and hold it.Press Release and move the slider to release a channel.Press to edit the previous or the next scene in the chase.Press DEL to delete a step in the chase.Press Music/Insert to insert a step in the chase.Press ADD/ALL to save the effect into the chase. Then, it will7 automatically jump to the next step. Repeat 4 – 7 to edit anothereffect.8 Press Program to store and exit the chase.2. To create scenes first, and then pick up the scenes into the chase:StepDescription1 Create scenes (see Create a Scene)2 Press Program to enter programming mode3 Select one of “Chase1” “Chase2” to store the chase.Select a number from 1 – 18 as the number of the chase. If the4number LED is on, it means there is an existing chase in it.Select the desired one from SC1, SC2 and SC3, to store into the5chase.When a scene is selected, the data start output for preview, but it hasnot yet been added into the chase. The default time and slope are both63 seconds, which can be adjusted with the function wheels (LED ofE/XY is off).Press ADD/ALL to add the selected scene into the chase. Then, it will7 automatically jump to the next step. Repeat 5 – 7 to add anotherscene.
Press DEL to delete a scene in the chase.Press Music/Insert to insert a scene in the chase.8Press to edit the previous or the next scene in the chase. Youcan move further when the current scene is empty.Whenever press Clear/Exit for a long time, you will exit9programming mode without saving.10 Press Program to store and exit the chase.3. Mixture of 1 and 2.StepDescription1 Create scenes (see Create a Scene)2 Press Program to enter programming mode3 Select one of “Chase1” “Chase2” to store the chase.Select a number from 1 – 18 as the number of the chase. If the4number LED is on, it means there is an existing chase in it.If you want to select effects from scenes, select a desired one fromSC1, SC2 and SC3, to store into the chase. The selected scene can be5 adjusted by moving the sliders.If you want to create a effect, select the desired fixture(s), and thenmove the sliders.Press ADD/ALL to add the selected scene into the chase. Then, it will6 automatically jump to the next step. Repeat 5 – 6 to add anotherscene.Press DEL to delete a scene in the chase.Press Music/Insert to insert a scene in the chase.7Press to edit the previous or the next scene in the chase. Youcan move further when the current scene is empty.Whenever press Clear/Exit for a long time, you will exit8programming mode without saving.9 Press Program to store and exit the chase.Note: To create an effect for a chase, make sure that all the LEDs of the irrelevant sliders are off.If not, press Release and then move the slider to release that channel. Any channel with outputvalue will be stored into the chase. So, if an irrelevant channel is stored, you will have anunexpected effect.Run a ChaseStepDescription1 Select Chase1 or Chase2, in which the chases are stored.2 An existing chase will be in the number button, which LED is fast flashing.3 Press the number button to run the chase. Then, the LED will slow downflashing. This is indicating that the chase is running. If more than one chases
Note:are running simultaneously, then the LEDs of other chases on the numberbuttons will stop flashing.Pay attention to different flashings of LEDs. Different flashings indicate different runningstatus. Fast flashing means there is a chase in that number button, but it is not running; Slowflashing means the chase in it is running, and ready for adjustment; An ever on LED means thechase in it is running, but not for adjustment.The following parameters can be adjusted in a running chase:Chase is running obverse《== Chase is running reverse==》Auto/LMusic/InsertChase is running under Auto modeChase is running under sound activation modeADD/ALL Roll the function wheel Speed/X to adjust the running speed of a chase; Slope/Y isto adjust the slope of a chase. (If ADD/ALL is not press, then Speed/X andSlope/Y are to adjust the speed and slope of a single step in the chase.) To adjustspeed and slope, please make sure that the LED of E/XY is off; if not, switch itoff.Clear/Exit Press for 1 second to close all chases.If a channel of a chase is at the same time controlled under manual mode, then the chase on thatchannel will concede for manual output. An ever on LED indicates manual output; a flashing LEDindicates a running chase.Create a Chase GroupThere are 18 chase groups in the controller, each with up to 36 steps and each step consists of upto 36 chases. The speed of each step can be adjusted, from 0.5 second/step to 10 minutes/step.To create a chase group, follow the steps below:StepDescription1 Press “Program” button to enter programming mode.2 Press “Group” to select a group.3 Select a number button as number of the group for storing. An ever onLED on the number button indicates an existing group.Note:4 After the number button is selected, the controller will immediatelyswitch to chase selecting mode. The default setting is to select chasesfrom Chase1 into the chase group. A flashing number button indicates anexisting chase.5 Once a chase is selected, it will be activated to run. The controller canadd up to 36 steps. Press E/XY to switch off its LED, then roll thefunction wheel Speed/X to adjust the running time of each step.6 Press ADD/ALL to add the selected chase into the chase group. Thecontroller will automatically jump to the next step, and will switch off theactivated chase.7 Repeat Step 5-6, to add all the desired chases into the group.8 Press Program to exit and save the chase group.
During the procedure, if you press Clear/Exit for a long time, then you will exit the operation andnothing will be saved.Run a Chase GroupStepDescription1 Press Group to select a chase group2 A fast flashing LED of a number button indicates an existing chasegroup.3 Select a chase group by pressing a number button. A slow flashing LEDof a number button indicates a running chase group.Note:Press Clear/Exit button to close all running groups.Assign the Function WheelsYou can assign one or more channels to the X/Y of the function wheels, as shown below:StepDescription1 Press Program to enter programming mode.2 Select =>> Set X or Set X or
Latch: In Latch Mode, you can run one or more scenes/chases/chase groups simultaneously.Swap: In Swap Mode, you can run only one scene/chase/chase group.Flash: In Flash Mode, you can only run scene/chase/chase group by pressing the button; Oncerelease, the running stops.BlackoutPress and activate Blackout button to blackout.PausePress and activate Pause button to pause all running programs.Language SelectionStepDescription1 Press Program to enter programming mode2 Press Auto/L to switch between Chinese/English.Thanks for reading. Any comments/advices/suggestions are welcome!scand