Create successful ePaper yourself
Turn your PDF publications into a flip-book with our unique Google optimized e-Paper software.
SUMAStatistical & Scientific Computing Core29 Oct 2009 SSCC/NIMH 1
29 Oct 2009 SSCC/NIMH 2
29 Oct 2009 SSCC/NIMH 3
29 Oct 2009 SSCC/NIMH 4
SUMA29 Oct 2009 SSCC/NIMH 5
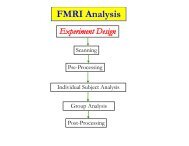
SUrface MApping with AFNI• Surface mapping & viewing program tightly linked tointeractive AFNI — but SUMA is a separate program• Complements AFNI’s slice and volume renderingmodes– AFNI works with data defined over volumes– SUMA works with data defined over surfaces• Provides a framework for fast and user-customizablesurface-based analysis• Supports surface models created by:FreeSurfer http://surfer.nmr.mgh.harvard.eduSureFit/Caret http://stp.wustl.edu/resources/display.htmlBrainVoyager http://www.brainvoyager.com• Allows representation of 2D and 3D objects inprojection frame or surface coordinate space.29 Oct 2009 SSCC/NIMH 6
The Process of Using SUMA PreSUMA (setup phase): Collect, align, and average high-quality, high-resolution anatomical dataOn NIMH’s GE 3 Tesla scanners, 2-4 MPRAGE datasets do wellCorrect image non-uniformity Using AFNI’s 3dUniformize or the N3 normalization tool [J.G. Sled et al. 98]Create and correct surfaces Using FreeSurfer, SureFit, or BrainVoyager CircumSUMA: Create standard-mesh version of surface models Align surface with experimental data Using @SUMA_AlignToExperimentMap experimental volumetric data to surfaceUsing AFNI and SUMA (interactively or with command line program)Time series analysis on datasets defined over surface domain Smoothing, statistics, clustering, group analysis.29 Oct 2009 SSCC/NIMH 7
The Simpler and Lesser Process• For display (mostly) of Talairach data: Use the Talairach surfaces created from the N27brain dataset using FreeSurfer. Ready to use, no surface creation or alignmentneeded (but match to your subject’s anatomy willnot be very good)29 Oct 2009 SSCC/NIMH 8
A: Preparing surface modelsfor SUMAHigh-Res.AnatomicalMRI dataCreate SurfaceModels(FreeSurfer,Caret, etc.)@SUMA_Make_Spec_*SurfVolAFNI-format Surface Volumethat is aligned with surfacemodelsSpec FileASCII file definingrelationships betweendifferent surfaces29 Oct 2009 SSCC/NIMH 9
@SUMA_Make_Spec_* scripts• These scripts prepare surfaces and volumes for use with SUMA:★ @SUMA_Make_Spec_FS★ @SUMA_Make_Spec_SFfor FreeSurfer surfacesfor SureFit surfaces★ @SUMA_Make_Spec_Caret for Caret surfaces• Output of these scripts include:★ Surface Volume: SurfVol★ AFNI dataset created from anatomical MRI, used to create thesurfaces★ AFNI volumes of cortical and subcortical segmentations (FreeSurfer)★ ASCII versions of all surfaces (FreeSurfer)★ Surface specifications file: (*.spec)★ ASCII file defining relationships between family of surfaces.29 Oct 2009 SSCC/NIMH 10
Viewing Surfaces with SUMA• After @SUMA_Make_Spec_* scripts are run, surface models shouldbe in excellent alignment with SurfVol★ Use SUMA to verify alignment★ Scroll through the volume to make sure surfaces are accurate➥ Check especially for inferior temporal and occipital areas• Demo using FreeSurfer surfaces:Hands-On★ cd suma_demo/SurfData/SUMA➥ This is where the output of @SUMA_Make_Spec_FS resides★ afni –niml &➥ launches AFNI to allow the viewing of DemoSubj_lh.spec➥ the –niml option tells AFNI to listen to connections from SUMA★ suma –spec DemoSubj_lh.spec –sv DemoSubj_SurfVol+orig &➥ or execute the script: tcsh run_suma29 Oct 2009 SSCC/NIMH 11
Check for proper alignment and defects• With both SUMA and AFNI running★ Press ‘t’ in the suma window to ‘talk’ to AFNI★ This sends anatomically correct surface(s) to AFNI★ Switch AFNI Underlay to DemoSubj_SurfVol+orig★ Contours are the intersection of the surface with the slice.Hands-On➭ You could also see boxes representing the nodes that are within ± 1 / 2slice from the center of the slice in view.➭ Colors and node box visibility can be changed to suit your desiresfrom the Control Surface button in AFNI.★ Navigate through the volume in AFNI➥ make sure you have an excellent alignment between volume andsurface➥ make sure surface adequately represents areas of the brain thatare difficult to segment➭ occipital cortex➭ inferior frontal and inferior temporal regions➭ Surface may look good in SUMA, but may not match anatomy insome places — this is why you check surfaces in AFNI display29 Oct 2009 SSCC/NIMH 12
Check for proper alignment and defects• The Surface Volume and the surfaces must be in nearly perfectalignment.★ If you have an improper alignment, it should be addressedhere and now➥ This should not happen for FreeSurfer and SureFit surfacescreated in the standard fashion.★ Watch for error messages and warnings that come up in theshell as the surfaces are read in. These messages should beexamined once per subject, since they do not change unlessthe surface’s geometry or topology is changed.★ Viewed without the volume underlay, it is extremely difficult totell if surface models with no topological defects accuratelyrepresent the cortical surface.Hands-On29 Oct 2009 SSCC/NIMH 13
Basic SUMA viewer functions• Rotating the surface:★ Mouse button-1: keep it down while moving the mouse left toright. This rotates the surface about the screen's Y-axis (dottedgreen). Let go of button-1 (usually the left button).★ Repeat with up and down motion for rotation about X-axis andmotion in various directions for rotations mimicking those of atrackball interface.★ Also try up/down/left/right ↑ ↓ ← → arrow keys.➥ Arrow keys rotate by increments specified by the Unixenvironment variable: SUMA_ArrowRotAngle (degrees).➥ You can set SUMA environment variables in file ~/.sumarcHands-On29 Oct 2009 SSCC/NIMH 14
Basic SUMA viewer functions• Prying & Z rotating the hemispheres:★ Mouse ctrl+button-1: Moving the mouse horizontally whilebutton 1 is pressed and ctrl is down will pry hemispheres apartfor better visualization. The prying behavior is different forspherical and flattened surfaces. Better try it than read about it.★ Ctrl+button 1 doubleclick: Undo prying.★ Mouse shift+button-1: Rotate surfaces about screen’s Z-axis.This option is useful for positioning flat surfaces when displayedone at at time. In most other circumstances it leads toconfusion.★ Shift+button 1 doubleclick: Undo Z rotationHands-On29 Oct 2009 SSCC/NIMH 15
Basic SUMA viewer functions• Translating the surface:★ Mouse button-2: keep it down while moving the mouse totranslate surface along screen X and Y axes or anycombinations of the two.★ Also try Shift+arrow keys.• Zooming in/out:★ Both buttons 1&2 or Shift+button 2: while pressing buttons,move mouse down or up to zoom in and out, respectively.★ Also try keyboard buttons 'Z' and 'z' for zooming in and out,respectively.Hands-On29 Oct 2009 SSCC/NIMH 16
Basic SUMA viewer functions• Picking a Node or Facet:★ Mouse button 3: press over a location on a surface to pick theclosest facet and node to the location of the pointer.➥ The closest node is highlighted with a blue sphere➥ The closest facet is highlighted with a gray triangle★ Note the information written to the shell regarding the propertiesof the picked Node and Facet.★ When connected to AFNI (after having pressed ‘t’), watch theAFNI crosshair jump to the corresponding location in the volume.★ Conversely, position the crosshair in AFNI (left click) at a positionclose to the surface and watch the crosshair relocate in SUMA.• You can swap button 1 & 3’s functions using the environmentvariable: SUMA_SwapButtons_1_3Hands-On29 Oct 2009 SSCC/NIMH 17
Basic SUMA viewer functions• Cardinal views (along coordinate directions):★ ctrl + Left/Right: Views along LR axis★ ctrl + Up/Down: Views along SI axis★ ctrl + shift + Up/down: Views along AP axis• Resetting the view point:★ Press Home (fn+left arrow macs) to get back to the originalvantage point.• Using momentum feature:★ Press ‘m’ to toggle momentum on. Click the left mouse buttonand release the button as you are dragging the mouse.• Lots more:★ Function keys modify various aspects of the display★ Those may be usurped by OS X, see Keyboard setup★ ctrl+h opens a help window for all interactive options.Hands-On29 Oct 2009 SSCC/NIMH 18
Recording your beautiful SUMA images• Using ‘r’ in SUMA to record the current scene (a single image).• Using ‘r’ on the colorbar creates an image of the colorbar.• Using ‘R’ to record continuously the rendered scene, as you change it.• Images are captured by an AFNI-esque image viewer.★ Identical consecutive images are rejected★ Images caused by window expose events are ignored★ Images can be saved in all ways allowed by AFNI, including MPEGand animated GIF movies★ If you let the recorder run continuously with very large images, youmight quickly run out of memory on your computer!• Using ‘ctrl+r’ in SUMA to record current image directly to disk (see ‘ctrl+h’ for details)• You can save/load viewer setting used to create a figureHands-On★Use FileSave View and FileLoad View29 Oct 2009 SSCC/NIMH 19
world AFNI SUMA world• AFNI and SUMA are independent programs and communicate usingNIML formatted data elements (a subset of XML)★ Via shared memory or TCP/IP network sockets★ Both AFNI and SUMA can also communicate with other programs• NIML: NeuroImaging Markup Language (developed by RW Cox)★ NIML is the main format for SUMA’s data storage• NIML API library for packing/unpacking data is available• Protocol allows independent program to communicate with AFNI• Advantages include:★ Programs execute on separate machines★ Fast development (programming with NIML is pretty easy)★ Screen real-estate (more displays)• Blemishes include:★ Only one AFNI can be listening for connections★ Only one SUMA can connect to AFNI29 Oct 2009 SSCC/NIMH 20
What’s a surface made of?NodeEdge29 Oct 2009 SSCC/NIMH 21
Relationships between surface models• Surface Geometry:★ refers to the spatial coordinates of nodes forming a surface model• Surface Topology:★ refers to the connectivity between nodes forming a surface model• A family of surfaces with different geometry but similar topology iscreated for each surface model.★ white/grey, pial, inflated, spherical, flattened, etc.• Some models’ geometries are anatomically correct★ Pial and/or white matter surfaces can be used for relating to volumedata.★ Inflated, flattened and spherical cannot be directly linked to volumedata. The link is done via their corresponding anatomically-correctsurfaces.• Those relationships are encoded in the Spec file.29 Oct 2009 SSCC/NIMH 22
• Geometry: Spatial location★ X,Y,Z coordinates of brainstructuresGeometry and Topology• Topology: Spatial connectivity★ Relative positions of brainstructures along the surface• Geometric proximity does not imply topological proximity• If you care about the topology of activation, you should transferFMRI data onto the surface before spatial manipulations of the data29 Oct 2009 SSCC/NIMH 23
SmoothWmInflatedPialInflated,OccipitalcutSphericalOverlay ofanatomicallycorrect Pial andSmoothWmsurfaces overanatomicalvolumeFlattened,Occipitalcut29 Oct 2009 SSCC/NIMH 24
Viewing the group of surfaces• Switch Viewing States:★ '.' (period) switches to next viewing state (pial then inflated, …)★ ',' (comma) switches to previous viewing state★ Navigate on any of the surfaces and watch AFNI’s crosshairtrack surface★ SPACE toggles between current state and MappingReference state• Viewing multiple states concurrently:★ ctrl+n opens a new SUMA controller (up to 6 allowed, morepossible but ridiculous)★ switch states in any of the viewers★ all viewers are still connected to AFNI (if any are)Hands-On29 Oct 2009 SSCC/NIMH 29
Viewing the group of surfaces• Controlling link between viewers:★ Open SUMA controller with ctrl+u or View->SUMA Controller★ SUMA controller crosshair locking options:➥ ‘-’: no locking➥ ‘i’: node index locking (i.e., topology based)➥ ‘c’: node coordinate locking (i.e., geometry based)★ SUMA controller view point locking➥ ‘v’: depress toggle button to link view point across viewers.➭ Surface rotation and translation in one viewer is reflectedin all linked viewersHands-On29 Oct 2009 SSCC/NIMH 30
Standardizing Surfaces For Group Analysis• Now that surfaces have been checked for quality, we willtransform them for group analysis• This step is the equivalent of standard-space normalization forvolume-based analysis.• In volume-based analysis:– goal is to have the same voxel spatial location correspond tothe same anatomical location in all subjects• In surface-based analysis– goal is to have the same node index correspond to the sameanatomical location in all subjects29 Oct 2009 SSCC/NIMH 31
Group analysis• Group analysis requires data defined over aspatial domain common to all subjects★ Talairach space for volume-based analysis★ With low order registration+ Small amount of geometric distortion- No respect for topology of activation★ With high order registration+ Preserves the topology of action- Considerable geometric distortion★ Spherical coordinate system for surface-basedanalysis+ Preserves the topology of activation- Considerable geometric distortion• Preserving the topology of activation is Goodin general and crucial for★ Retinotopy★ Plasticity★ High-resolution Mapping29 Oct 2009 SSCC/NIMH 32
Subject dataSpherical WarpingYellow stripis one sulcusbeing matchedSurface-based warping (based on matching geometrical features likesulci and gyri) is more accurate than the more common low orderTalairach volume-based analysis because it preserves the topology ofthe cortical sheet and uses more landmarks for the warping29 Oct 2009 SSCC/NIMH 33
Mapping dataProblem is thatsurfaces fromdifferent subjectsare nottopologicallyisomorphic(different meshes).One Solution:Data from eachsubject are mappedonto the icosahedralsurface for groupanalysisCumbersome andunnecessary secondinterpolationn 2n 1n 329 Oct 2009 SSCC/NIMH 34
Our WayInstead of interpolatingdata values to theicosahedral nodes,interpolate using thecoordinates of theoriginal surface’s node.This results in a newsurface that is virtuallyidentical in geometryto the original surfacebut with the mesh ofthe icosahedron - thesame mesh for eachsubject.Cross-subject surfacebased analysis is thusreduced to node-basedanalysis29 Oct 2009 SSCC/NIMH 35
Compare surfaces: Original and Standard29 Oct 2009 SSCC/NIMH 36
Standard meshes for 6 subjects• 6 standard-meshsurface models fromdifferent subjects.• Node colors encodefor node index n onthe standard mesh.• Nodes with similarindices correspond tocomparable sulcallandmarks despiteanatomical variabilityacross subjects.29 Oct 2009 SSCC/NIMH 37
• Original-mesh versions of standard-mesh surfaces with same coloration scheme• Surfaces have differing numbers of nodes, some colors may not be represented• Nodes with similar indices no longer correspond to comparable anatomical areas• Small clusters of red color show new nodes later added to correct topologicalerrors29 Oct 2009 SSCC/NIMH 38
Creating Standard-Mesh Surfaces• Required Data:– Original Surface models– Warped Spherical surface– Spec file of the surfaces above (i.e. DemoSubj_lh.spec)• Creating the standard-mesh versions of the original surfacesMapIcosahedron -spec Demo_Subj_lh.spec \ Written by B. Argall-ld 141 \-prefix ld141-spec SpecFile: option specifying spec file with original surfaces-ld n : number of subdivisions for each edge of the icosahedron.Nv = 2 + 10n 2(198812 vertices)Nt = 20n 2(397620 triangles)Ne = 30n 2(596430 edges)-prefix: prefix assigned to standard mesh surfaces• @SUMA_Make_Spec_FS now generates standard-mesh surfacesby default. See @SUMA_Make_Spec_FS –help for details.• Script run_stdmeshes was used to generate standard-meshsurfaces for the hands-on material29 Oct 2009 SSCC/NIMH 39
Using Standard-Mesh Surfaces• Subsequent analysis will use standard-mesh surfaces, not originals★ Map single-subject data to corresponding standard-mesh surfaces.★ Use any of AFNI’s 3dXXX voxel-based statistical tools to perform withinandcross-subject analysis in the surface domain★ 3dXXX programs can read/write NIML-formatted datasets defined oversurface domains as well as true 3D volume files• Creating standard-mesh surfaces takes a couple of minutes per subject• You can compare original and standard surfaces using:– SUMA• create a spec file containing both original and standard-meshsurfaces.• open two views, one showing original surface and one showingstandard-mesh surfaces• link viewers by coordinates (not by node index) from the SUMAcontroller (ctrl+u)– CompareSurfaces Written by Shruti Japee• a program that calculates the distance from each node on surface 1along its normal to surface 2– SurfaceMetrics• a program that calculates metrics of the mesh like edge lengths,triangle areas, curvature, etc.29 Oct 2009 SSCC/NIMH 40
Artifacts with standard meshes• In the past, there have been localized distortions between thestandard-mesh surface and the original surface.• These had all been caused by topological errors in the originalspherical surfaces.• SurfQual was written to highlight these errors★ if causing distortions, errors must be fixed with the program used togenerate them.★ These topological errors can be ignored if they do not cause any visibledistortions in the standard-mesh surfaces.• Distortions in triangle sizes are the dual of compression/stretchingon the registered sphere. If distortions are extreme, revisitregularization parameters of the registration procedure.29 Oct 2009 SSCC/NIMH 41
B: Aligning Surface w/ Experiment DataSurfVolSurface VolumeAnatomicallycorrect surface@SUMA_AlignToExperimentExpVolExperiment VolumeSurfVol_Alnd_Exp(SurfVol Aligned toExpVolW/ Alignment Xform)ApplyAlignmentXformFunc. 1Func. 2Func. NAFNICortical SurfaceAligned toExperiment data29 Oct 2009 SSCC/NIMH 42
B: Aligning Surface w/ Experiment Data• Functional data are assumed to be in register with experiment’sanatomical★ Align Anatomical to EPI using: align_epi_anat.py.• Surface Volume is aligned to experiment’s anatomical volumewith rigid-body or affine transformation★ The script @SUMA_AlignToExperiment simplifies this stepand rarely fails. If it does, you could try manual registrationwith 3dTagalign★ Brain coverage and image types should be comparable, notnecessarily identical• Functional data are not interpolated29 Oct 2009 SSCC/NIMH 43
B: Aligning Surface w/ Experiment Data• Demo: (close previous SUMA and AFNI sessions)★ cd suma_demo/afni➥ DemoSubj_spgrax+orig (experiment’s high-res. anatomical scan)➥ DemoSubj_EccExpavir+orig & DemoSubj_EccExpavir.DEL+orig (EPItimeseries and function.)★ To perform the alignment we ran the SUMA package script:Hands-On@SUMA_AlignToExperiment \-exp_anat DemoSubj_spgrsa+orig \-surf_anat../SurfData/SUMA/DemoSubj_SurfVol+orig➥ This script uses 3dvolreg or 3dAllineate to align the experiment’sanatomical volume to the Surface Volume.➥ The script takes care of resampling (with 3dresample) the experiment’sanatomical volume to match the Surface Volume if need be.➥ The output volume is named with the prefix of the Surface Volume withthe suffix _Alnd_Exp (read “Aligned to Experiment”).➥ Use –wd option if exp_anat has been non-rigidly aligned to the epi29 Oct 2009 SSCC/NIMH 44
• Launch AFNI to check that volumes aligned well:B: Aligning Surface w/ Experiment Dataafni –niml &Switch Underlay to DemoSubj_SurfVol_Alnd_Exp+origSwitch Overlay to DemoSubj_spgrsa+origVisually check the alignment:For example, with pointer in slice viewing window:press 'o' on the keyboard to turn off the overlaypress 'u' repeatedly to toggle between displaying the two volumes★ Launch SUMA to check alignment of surface with volumessuma –spec ../SurfData/SUMA/std.DemoSubj_lh.spec \–sv DemoSubj_SurfVol_Alnd_Exp+orig &➥ or execute the script: tcsh run_sumaPress ‘t’ to talk to AFNI➥ You should see a surface overlaid onto DemoSubj_SurfVol_Alnd_Exp+orig➥ Alignment should be proper, otherwise you have a problem.Hands-On29 Oct 2009 SSCC/NIMH 45
C: Mapping FMRI Data Onto SurfaceSurfVolACreateSurfaceModelsSUMABAlign ToExperimentAlignmentXformExpVolApplyAlignmentXformFunc. 1Func. 2Func. NAFNICMappingEngine29 Oct 2009 SSCC/NIMH 46
Mapping Options• Surface/volume Intersection • Shell/volume Intersection29 Oct 2009 SSCC/NIMH 47
• Surface/volume Intersection★ One voxel per node(whatever voxel that node lies inside of)Mapping options(Pial surface)(Gray/Whitemattersurface)• Shell/volume Intersection Multiple voxels possible pernode29 Oct 2009 SSCC/NIMH 48
Mapping Habits• When mapping data from volume to surface domains★ If mapping assigns multiple voxels to one node➥ How do you deal with functional datasets?➭ Do you average statistics?➭ Do you apply a threshold before or after averaging?» What if some of the voxels are active and some are not?➥ These problems are best avoided by:➭ Mapping the time series data onto the surface➭ Performing statistical analysis directly in the surface domain using3dXXX AFNI programs• When combining surface data across subjects★ Same concerns as with volumetric group analysis• You can also create volumetric data from surface-based data★ use 3dSurf2Vol, the inverse of 3dVol2Surf29 Oct 2009 SSCC/NIMH 49
Interactive Mapping Onto Surface• Interactive mapping is controlled by AFNI’s Vol2Surf plugin★ Mapping is done using anatomically correct surfaces sent to AFNIwith the overlay data volume.➥ See plugin’s help for details.★ Only colors (not data values) are sent from AFNI to SUMA.• Demo (Continued): To map data from volume to surface interactively:★ Execute tcsh run_3dVol2Surf, to ensure you have demo sets.★ Switch Overlay to DemoSubj_EccExpavir.DEL★ Define Overlay with:➥ Olay: Delay➥ Thr: Corr. Coef.➥ Pos. color mapping➥ #20 color map➥ See Function➭ You should see the function on the surface model in SUMA.➭ The colors are applied to all topologically related surfaces➭ NOTE: Only AFNI controller A sends function back to SUMA➥ Change threshold in AFNI and watch change in SUMAHands-On29 Oct 2009 SSCC/NIMH 50
Command-line Mapping• 3dVol2Surf maps data from a 3D volume dataset directly onto thecortical surface, creating a new dataset defined over a surface3dVol2Surf-spec ../SurfData/SUMA/std.DemoSubj_lh.spec \-surf_A lh.smoothwm.asc \-surf_B lh.pial.asc \-sv DemoSubj_SurfVol_Alnd_Exp+orig \-grid_parent DemoSubj_EccExpavir.DEL+orig \-map_func ave \-f_steps 10 \-f_index nodes \-out_nimlv2s.lh.DEL.niml.dsetWritten by Rick Reynolds(see output of 3dVol2Surf -help for details.)• Execute script tcsh run_3dVol2Surf to map various types of data ontothe surfacesHands-On29 Oct 2009 SSCC/NIMH 51
Options for 3dVol2Surf example★Basic Parameters:-spec: SUMA spec file containing surface(s) to be used in mapping.-surf_A (-surf_B): Surface(s) to be used in the mapping.-sv: Surface Volume used to align surface to data-grid_parent: AFNI volume containing data to be mapped.-map_func: Method for handling voxels to node mapping-out_niml: Output dataset file in NIML format★Optional parameters (just a few of them):-cmask: Option for masking data in DataVol on the fly..-oom_value V0 : Assign V0 to nodes in masked voxels-oob_value V1: Assign V1 to nodes that are not covered by any voxels-oom_value and -oob_value are useful for creating ‘full’ datasets.29 Oct 2009 SSCC/NIMH 52
Format of surface-based datasets• The output dataset can be thought of as a table of numbers.• Each column represents data from one sub-brick in the volume• Each row represents the values mapped to a node• By default, a surface dataset is ‘sparse’; containing only rows for the nodesthat had data mapped onto them• When combining surface-based datasets, it is safest to work with ‘full’datasets which contain a row for each node• ConvertDset can turn ‘sparse’ datasets into ‘full’ ones.• Useful tools for manipulating datasets:• 3dinfo (Information as viewed by AFNI’s 3dXXX progams)• SurfDsetInfo (Information as viewed by SUMA)• ConvertDset (A tool to convert between formats)• Selection qualifiers to dataset names[SEL] to select certain columns (sub-bricks){SEL} to select certain rows#SEL# to select certain nodes• The format of SEL is the same as in AFNI, see section 'INPUT DATASETNAMES' in 3dcalc -help for details.[i] to select the node index column (NIML dsets only)29 Oct 2009 SSCC/NIMH 53
Colorizing Results Interactively• Demo (continued):★ In SUMA, press ‘ctrl+s’ to open Surface Controller.➥ Use ViewSurface Controller if you were born after 1981.Hands-On29 Oct 2009 SSCC/NIMH 58
• Demo (continued):Graphing Time Series★ Press “Load Dset” and read in “v2s.lh.TS.niml.dset”★ Contralateral dataset, if sanely named, gets automatically loaded too➥ In SUMA, press ‘g’ to graph data points at the selected node➥ Select other nodes (or right-click+drag) to see data at other nodes➥ Press ‘Freeze’ on graph window to preserve current graph➥ Clicking on other nodes will start a new graphHands-On29 Oct 2009 SSCC/NIMH 59
• Demo (continued):Colorizing results interactively★ Press “Load Dset” and read in “v2s.lh.DEL.niml.dset”➥ SUMA will colorize the loaded Dset (create a color plane for Dset) anddisplay it on the top of pre-existing color planes.➥ We begin by describing the right side block “Dset Mapping” which isused to colorize a Dset. Many of the options mimic those in AFNI’s“Define OverLay” controls.➥ Many features are not mentioned here. See online docs. and BHelp.★ From the Dset Mapping block (right side of interface)➥ Select column Corr. Coef. for Threshold (T)➭ Press ‘v’ button to apply thresholding➭ Use scale to set the threshold. Nodes whose cross correlation valuedoes not pass the threshold will not get colored➭ Note p (uncorrected), and q values (FDR) below the slider➭ FDR values are per-hemisphere➭ Note:➭ For simplicity, we mapped a statistical dataset onto the surface. Thisresulted in statistical parameters being averaged without being normalized➭ A better approach would be to map the time series, and then perform thestatistical computation. See script ./run_3dVol2Surf for examples.Hands-On29 Oct 2009 SSCC/NIMH 60
• Demo (continued):• Mapping Parameters Table:➥ Used for setting the clipping ranges.➥ Clipping is only done for color mapping. Actual data values do notchange.★ Column Min:➥ Minimum clip value. Clips values (v) in the Dset less thanMinimum (min): if v < min then v = min★ Column Max:Dset Mapping block➥ Maximum clip value. Clips values (v) in the Dset larger thanMaximum (max): if v > max then v = max★ Row I➥ Intensity clipping range. Values in the intensity data that are lessthan Min are colored by the first (bottom) color of the colormap.Values larger than Max are mapped to the top color.★ Left click on the I locks ranges from automatic resetting when youchoose a different dataset column for I★ Right click on the I resets values to full range in dataHands-On29 Oct 2009 SSCC/NIMH 61
• Demo (continued):• Col:Switch between color mapping modes.• Cmp:Int: Interpolate linearly between colors in colormapNN : Use the nearest color in the colormap.Dir: Use intensity values as indices into the colormap. In Dir mode,the intensity clipping range is of no use.Switch between available color maps. If the number of colormaps istoo large for the menu button, right click over the 'Cmp' label and achooser with a slider bar will appear.Alternately, as with many of SUMA’s menus, detach the menu byselecting the dashed line at the top of the menu list. Once detached,the menu window can be resized so you can access all elements invery long lists.More help is available via ctrl+h while mouse is over the colormapBias: This is mostly for fun — shifts node coordinates by the data valueHands-OnDset Mapping block29 Oct 2009 SSCC/NIMH 62
• Demo (continued):• The Colormap:The colormap is actually a display surface in disguise and sharessome of the functions of SUMA’s viewers: Keyboard Controls while mouse cursor is over colormap:r : record image of colormapCtrl+h : a help message for the Dset Mapping blockz : Zoom in on colormapMaximum zoom shows 2 colors in the mapZ : Zoom out on colormapMinimum zoom shows all colors in the mapUp/Down arrows : rotate colormap up/down.Home : Reset zoom and translation parametersMouse ControlsDset Mapping blockNone yet, some maybe coming somedayHands-On29 Oct 2009 SSCC/NIMH 63
• Demo (continued):• |T| :★ Toggle Absolute thresholding.Dset Mapping block➥ OFF: Hide node color for nodes ‘n’ that have:T(n) < Tscale➥ ON: Hide node color for nodes that have:| T(n) | < Tscalewhere: Tscale is the value set by the threshold scale.T(n) is the value in the selected threshold column (T).• sym I :★ Toggle Intensity range symmetry about 0.➥ ON : Intensity clipping range is forced to go from -val to val . This allowsyou to mimic AFNI's color ranging mode.➥ OFF: Intensity clipping range can be changed to your liking.• shw 0 :★ Toggle color hiding of nodes with intensity = 0➥ ON : 0 intensities are mapped to the colormap as any other values.➥ OFF: 0 intensities are hidden, a là AFNIHands-On29 Oct 2009 SSCC/NIMH 64
• Demo (continued):• Interactive Clustering:Dset Mapping block★ Left click on ‘Clst’ to activate/deactivate. Cluster table is output toshell. Clicking on a node shows its cluster label in the viewer.★ Conn: Minimum distance between nodes in the same cluster➥ Default is in mm (units of the surface coords). Negative valuesspecify distance in number of edges between nodes.★ Area: Minimum area () criterion for accepting a cluster.➥ Default area units are in mm 2 . Negative numbers indicate maskingby node number rather than area.• Data Range Table:★ Full range of values in Dset.Hands-On➥ Right click in “Node” columns to have crosshairs jump to thatnode’s location.➥ You might have to move the surface around to see wherethe crosshairs have jumped29 Oct 2009 SSCC/NIMH 65
• Demo (continued):• Xhr:Xhair Info block★ Crosshair coordinates on this controller's surface. Entering new coordinatesmakes the crosshair jump to that location (like 'ctrl+j').➥ Use 'alt+l' (that’s a lower-case ‘ell’) to center crosshairs in your viewer.• Node:★ Node index of node in focus on this controller's surface. Nodes in focus arehighlighted by the blue sphere in the crosshair. Entering a new node's indexwill put that node in focus and send the crosshair to its location (like 'j').• Node Values Table:★ Data Values at node in focus➥ Column Intens: Intensity (I) value➥ Column Thresh: Threshold (T) value➥ Column Bright: Brightness modulation (B)➥ Row Val: Data Values at node in focus• Node Label Table:★ Row Lbl:➥ Labels available at the node in focus. Labels include FreeSurfer’sparcellations, intensity, threshold, and brightness values, clusterHands-Onmembership, etc. You’re better off reading the label from the viewer.29 Oct 2009 SSCC/NIMH 66
• Demo (Continued):• Dset Info Table:★ Row Lbl: Label of Dset.Dset Controls block★ Row Par: Parent surface of Dset.• Ord:★ Order of Dset's colorplane. Dset with highest number is on top of thestack. Separate stacks exits for foreground (fg:) and backgroundplanes (bg:).• Opa:Hands-On★ Opacity of Dset's colorplane. Opaque planes have an opacity of 1,transparent planes have an opacity of 0. Opacities are used whenmixing planes within the same stack foreground (fg:) or background(bg:).★ Opacity values are not applied to the first plane in a group.Consequently, if you have just one plane to work with, opacity valueis meaningless.★ Color mixing can be done in two ways, use F7 to toggle betweenmixing modes.29 Oct 2009 SSCC/NIMH 67
Dset Controls block• Demo (Continued):• Dim:★Dimming factor to apply to colormap before mapping the intensity (I)data. The colormap, if displayed on the right, is not visibly affected byDim but the colors mapped onto the surface are.★ For RGB Dsets (.col files), Dim is applied to the RGB colors directly.• Dsp:★ How to display node color values. Options include pseudocoloring,contouring (at discrete color levels), both, or none.• 1: (for 1 only)Hands-On★ If ON, view only the selected Dset’s colors. No mixing of colors in theforeground stack is done.★ If OFF, mix the color planes in the foreground stack.★ This option makes it easy to view one Dset’s colors at a time withouthaving to worry about color mixing, opacity, and stacking order.★ Needless to say, options such as ‘Ord:’ and ‘Opa:’ in this panel are oflittle use when this button is ON.29 Oct 2009 SSCC/NIMH 68
Color overlay planes• Colorized Dsets are organized into layered color planes★ 2 commonly used planes are:➥ Surface Convexity (usually in gray scale)➥ AFNI Function (usually in color)★ Planes are assigned to two groups➥ Background planes (like Convexity)➥ Foreground planes (like AFNI Function)★ Many other planes can be added to either group.• Color planes of the same group are mixed together:★ Planes are stacked based on their order and opacity.★ Opacity of 1 st plane in a group does not affect color mixing.★ There are 2 modes for mixing colors. See F7 key in SUMA.Plane 1: 80% opacityPlane 2: 30% opacity29 Oct 2009 SSCC/NIMH 71
Color overlay planes• Node colors displayed on surface are obtained by:★ 1 st : mixing background planes★ 2 nd : mixing foreground planes★ 3 rd : layering mixed foreground atop mixed background plane➥ When foreground colors overlap background colors, they eithermask (hide) or get attenuated by the background’s brightness.29 Oct 2009 SSCC/NIMH 72
Layering fore- & background planes• Demo (continued):★ View an inflated surface with function from AFNI★ Turn foreground plane(s) off by pressing ‘f’ once➥ Now all you see is the background plane(s)★ Turn background planes off by pressing ‘b’ once➥ Now all you see is “No Color” color on all nodes★ Turn foreground plane(s) back on with ‘f’➥ Now you have foreground without background★ Turn background plane(s) back on with ‘b’➥ Now you have foreground atop background➥ You can still see the background underneath theforeground—this is due to the backgroundbrightness attenuation of the foreground colors.★ Toggle background intensity attenuation off and onwith ‘a’ and see the effect on the resultant maps.Hands-On29 Oct 2009 SSCC/NIMH 73
Playing with color plane opacity• Demo (continue from inflated view with function)★ ‘ctrl+s’ or ViewSurface Controller to open surface controller➥ Turn OFF ‘1 Only’★ Load in color plane lh.1D.col with ‘Load Col’ or ‘c’➥ This is an RGB Dset, color mapping controls are hidden➥ Plane is placed atop of the foreground group➥ Its opacity is 1 so it will obscure the functional data➥ Background attenuation is not affected by plane’s opacity.➭ try turning it on and off again with ‘a’➥ Now lower the opacity of lh.1D.col with Opa: and watch thecolors from the planes below start to show throughHands-On29 Oct 2009 SSCC/NIMH 74
Playing with color plane order• Demo (continue from inflated view with function)★ You could put lh.1D.col below the function➥ Switch Dset to get a list of available planes➥ Prefixes fg: and bg: denote plane’s group membership➥ Select lh.1D.col and lower its order with the Ord: button➥ Select FuncAfni_0 and play with its opacity➥ Note: You can’t make a plane change its group membership, yet.★ You can’t delete a loaded color plane yet, but you can hide it.★ Turn ‘1’ ON if you just want to see the selected plane.• Test!★ The one whose label is shown in the surface controller★ Find a way to flip between the mapping from AFNI and the mappingdone with 3dVol2Surf before.➥ Appreciate the differences between the two mappings.Hands-On29 Oct 2009 SSCC/NIMH 75
• DemoDrawing surface-based ROIs★ ‘Ctrl+d’ or ToolsDraw ROI to open ROI drawing tool➥ When in Draw ROI mode (cursor turns into target circles)➭ The pick (usually third) mouse button is used for drawing➭ Picking is done by combining shift key and pick button➥ If pen mode is selected (cursor turns into a pen)➭ Drawing and picking (with shift) are done with the 1 st mouse buttonand rotations are done with the third button★ When you draw for the first time, a new “drawn ROI” is created.➥ Note the Parent: field in the ROI frame gets filled when you drawHands-On29 Oct 2009 SSCC/NIMH 76
Drawing surface-based ROIs• Demo★ Move the mouse to a new location and click again to draw a linefrom the location of the first click to a new one.★ Or click while dragging the mouse to create a smoother line.★ Both drawing methods might fail if you are drawing over veryrough terrain.➥ When that happens, you continue from where the drawingstopped.➥ Drawing in 3D looks easy but it isn’t.★ Use Undo and Redo when you get your drawings messed up.★ To close a loop you can press ‘Join’ button or double clickHands-On29 Oct 2009 SSCC/NIMH 77
Drawing surface-based ROIs• Demo (Continued)★ To fill a closed loop, click inside the loop.➥ Note: If you have patterns that make a figure 8 jealous you mighthave to do multiple fills.★ Press Finish when you are done drawing and have set the drawinglabel and value to your liking.★ Now you can draw another ROI, and another and another.★ Drawing can be started/continued on any of the related surfaces➥ When you hit ‘Join’, the loop is closed using the surface where theROI was created★ Switch ROI to switch between ROIs and delete/modify them.★ Load to load ROIs from file★ Save to save ROIs to file➥ 1D or NIML = Format of ROI file➥ This or All = which ROI to save into the fileHands-On29 Oct 2009 SSCC/NIMH 78
Surface ROI Volume ROI• ROIs files should be transformed to dataset files (Dset).★ A dataset file has an equal number of values for each node★ You can draw two ROIs, such that some nodes belong tomore than one ROI (i.e., they have more than one value)• The program ROI2dataset is used to change ROIs to datasets• Execute: tcsh run_ROI2datasetROI2dataset -label_dset lh.OccROIs.niml.dset \-input lh.OccROIs.niml.roi• Note the warning:Warning SUMA_ROIv2dataset:155/2536 nodes had duplicate entries.(ie same node part of more than 1 ROI)Duplicate entries were eliminated.★ At the moment, duplicate entries are ignored, 1 st come, 1 stadopted. More options could be added if truly necessary.Hands-On29 Oct 2009 SSCC/NIMH 79
Surface ROI Volume ROI• lh.OccROIs.1D.dset (created on the previous slide) can be transformed into avolume ROI with 3dSurf2Vol• Execute: source run_3dSurf2Vol3dSurf2Vol -spec../SurfData/SUMA/DemoSubj_lh.spec \-surf_A lh.smoothwm.asc \-surf_B lh.pial.asc \-sv DemoSubj_SurfVol_Alnd_Exp+orig \-grid_parent DemoSubj_SurfVol_Alnd_Exp+orig \-map_func max \-f_steps 10 \-f_p1_mm -0.5 -f_pn_fr 0.5 \-sdata lh.OccROIs.niml.dset \-prefix lh.OccROIs-grid_parent specifies the output volume’s geometric properties-f_p1_mm, -f_pn_fr: Specify extensions on node pair segment, either in mm orfractions of segment length (both used simultaneously here for illustration)-sdata_1D: Specify surface data fileHands-On29 Oct 2009 SSCC/NIMH 80
Surface ROI Volume ROI• Mention also other programs for volume computations?• Selection of ROIs by name?• Plug for run_ programs….Hands-On29 Oct 2009 SSCC/NIMH 81
Surface ROI Volume ROIcheck your own lh.OccROIs+orig in AFNIHands-On29 Oct 2009 SSCC/NIMH 82
Smoothing data on surface models• Data smoothing (along the surface) is done with SurfSmooth★ The difficulty in smoothing lies in calculating geodesic distances betweennode pairs.★ Smoothing can be performed by solving the diffusion equation on thesurface. However effect of the kernel is is somewhat poorly estimated.Number of iterations needed is a wild guess with numerical accuracyissues. Better smooth until a certain smoothness is reached.★ SurfSmooth can estimate smoothness★ until desired smoothness is reached★ or until additional smoothness is achieved• Demo (close SUMA and afni)★ Execute: tcsh run_SurfSmooth_data➥ The script will use the output of 3dVol2Surf in run_3dVol2Surf to maptimeseries data onto the surfaces➥ SUMA is then launched and the script waits for you to setup therecorder ON with ‘R’➥ Hit Enter twice (in the shell) to launch the smoothing programHands-On➥ Watch the smoothing progress with each iteration. You can play thewhole sequence at the end.29 Oct 2009 SSCC/NIMH 83
Look At Your Data!Solution:Increase Niter29 Oct 2009 SSCC/NIMH 84
Smoothing geometry of surface• Surface geometry smoothing can also be done with SurfSmooth★ The difficulty in geometry smoothing is in preventing the surfacefrom shrinking in size.★ SurfSmooth uses the smoothing algorithm by (Taubin G. 2000)• Demo (close SUMA and AFNI)★ Execute: tcsh run_SurfSmooth_geom➥ The script will add noise to the smoothwm surface, then filter it➥ SUMA is then launched and the script waits for you to setup➭ Turn off background colors (‘b’)➭ Switch to noisy surface (‘.’)➭ Turn recorder ON (‘R’)➥ Hit Enter twice (in the shell) to launch the smoothing program➥ Watch the smoothing progress with each iteration. You canplay the whole sequence at the end (e.g., with the ‘v’ key in theimage viewer window)Hands-On29 Oct 2009 SSCC/NIMH 85
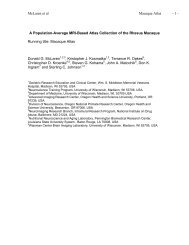
Talairach data display, for panache• Without creating individualized surfaces, you can display data on aTalairach-ed surface model.★ The surface models were created with FreeSurfer from the N27dataset. (Holmes, CJ et al. JCAT 1998)★ Anatomical volume and surfaces were Talairach-ed using AFNI andSUMA, respectively. (Surfaces created by Brenna Argall)• Demo: (close previous SUMA and AFNI sessions)★ cd suma_demo/afni_tlrc➥ You should find Anat+tlrc and a functional dataset in Talairach space★ afni –niml &➥ setup function as shown in the earlier slidessuma –spec ../SurfData_tlrc/SUMA/N27_lh_tlrc.spec \–sv Anat+tlrc➥ start communication with AFNI➥ map function onto surface➥ appreciate the geometric limitations of this approach➥ ignore the limitation and make cool picturesHands-On29 Oct 2009 SSCC/NIMH 86
• afni_proc.pyProcessing Pipelines★ With a couple of extra options (-spec and –sv), afni_proc.py canprocess single-subject data in the surface domain.★ This includes surface-based smoothing and regresion analysis.★ See example 8 in afni_proc.py -help★ All voxel wise programs will work with surface-based data★ Level-II (group) analysis programs are applicable to surface-basedresults.★ 3dcalc, 3dROIstats, 3dMEMA, 3dLME, 3dMVM, etc.• @RetinoProc★ Process retinotopic data, see @RetinoProc –help for detail includingtest dataHands-On29 Oct 2009 SSCC/NIMH 87
Demos/Autmaginations• @DO.examples• @DriveSuma• @RetinoProc• @Install_TSrestMovieDemo• @Install_AfniRetinoDemo• @Install_InstaCorr_Demo• http://afni.nimh.nih.gov/sscc/staff/ziad/Misc_Download/Beauteous/ChunmaoWang.lh_lat_inflated.mpgHands-On29 Oct 2009 SSCC/NIMH 88
Auxiliary programs• To see a list of all programs in SUMA:★ suma –progs• 3dSurf2Vol (by R. Reynolds)★ Maps data in surface domain volumetric domain• 3dVol2Surf (by R. Reynolds)★ Maps data in volume domain to surface domain• CompareSurfaces (by S. Japee)★ calculates the distance along the normal from one surface tothe next• ConvertSurface★ Converts surfaces between the different formats that SUMAcan read:➥ FreeSurfer➥ SureFit➥ Simple ASCII matrix format➥ PLY format➥ GIFTI (XML-based) format★ Converts surface coordinates to Talairach space• ConvexHull★ Finds the convex hull of a volume or a set of points29 Oct 2009 SSCC/NIMH 89
Auxiliary programs• CreateIcosahedron (by B. Argall)★ Creates Icosahedral meshes of varying node counts• inspec★ Outputs information about a spec file• IsoSurface★ Creates an isosurface from a volumetric dataset• MakeColorMap★ Creates colormaps for use with AFNI• MapIcosahedron (by B. Argall)★ transforms the topology of surface models to standardmodels without distorting the geometry (tested withFreeSurfer’s spherical mapping).★ use to check for errors in topology of spherical surfaces• quickspec★ Creates a spec file for one or a set of surfaces (quick anddirty)• ROI2dataset★ Transforms ROI files into surface datasets29 Oct 2009 SSCC/NIMH 90
• ScaleToMapAuxiliary programs★ Transforms a set of node values to node colors based on chosencolor map• SurfaceMetrics★ Outputs other information about the surface such as the edge list,curvature, triangle areas (mostly for debugging use)• SurfClust★ Clustering on the surface• SurfMeasures (by R. Reynolds)★ Outputs node-based surface measures such as areas, volumes,thickness, surface normals, etc. etc.• SurfSmooth★ a program for filtering surface data and/or surface geometry• SurfPatch★ Creates surface patches from a set of nodes.• SurfQual★ Locates topological errors in spherical surfaces.29 Oct 2009 SSCC/NIMH 91
Getting Helped• suma –help for SUMA’s command line usage• ‘ctrl+h’ opens a window with help for:★ SUMA’s usage when cursor is in viewer★ SUMA’s colormap usage when cursor is over colormap• BHelp provides help for most buttons in the GUI interface• AFNI’s web site:★ http://afni.nimh.nih.gov/★ http://afni.nimh.nih.gov/afni/community/board• AFNI’s Message Board• E-mail to saadz@mail.nih.gov• If you can’t get help here, please get help somewhere.29 Oct 2009 SSCC/NIMH 92
Developers:Brenna ArgallShruti JapeeRick ReynoldsThanks to:Critics:Mike BeauchampPat BellgowanData and Documentation:Peggy ChristidisGetting Help Somewhere:Karen DuttonSysAdmin:Brian PittmanTesting: Samia SaadMRI Pulse Sequence andSegmentationHauke HeekerenSean Marrett29 Oct 2009 SSCC/NIMH 93