D-R 800, manual, uk, version 2008-01-29 - Webshop, Gas Analysis ...
D-R 800, manual, uk, version 2008-01-29 - Webshop, Gas Analysis ...
D-R 800, manual, uk, version 2008-01-29 - Webshop, Gas Analysis ...

Create successful ePaper yourself
Turn your PDF publications into a flip-book with our unique Google optimized e-Paper software.
D-R <strong>800</strong>ManualDust Concentration MeterGmbHKollaustraße 105 · D-22453 Hamburg · www.durag.de
Document:man_dr<strong>800</strong>_<strong>uk</strong>.docVersion: <strong>01</strong>.02.<strong>2008</strong>Last update: 04.02.<strong>2008</strong>Print date: 18.02.<strong>2008</strong>This documentationis valid from:Software-Version 1.71DURAG GmbHKollaustraße 105D-22453 HamburgTelephone: +49 (40) 55 42 18 – 0Fax : +49 (40) 58 41 54E-Mail: info@durag.deInternet: www.durag.deThis documentation (approx. 112 pages) has been compiled with the greatest care. However, allliability must be excluded.The contents of this document can be changed without notice.The documentation of DURAG GmbH refers toa.) the complete equipment in principle, even if individual program modules or parts have not beenpurchasedb.) the current status of the equipment design at the time of updating this documentation (seeabove).© DURAG GmbH <strong>2008</strong> Editorial: Herbert Lange.All rights reserved.This document or parts of it may not be duplicated or communicated without the express consent ofDURAG GmbH, irrespective of by which method or means, electronic or mechanical, this occurs.
ContentsContents0 Foreword 51 General 91.1 Brief overview of the contents 91.2 Typographical conventions 1<strong>01</strong>.3 Meaning of the warnings and notes used 102 Safety Instructions 152.1 General safety instructions 152.2 Hazard from electrical equipment 162.3 Hazard from laser light 162.4 Hazard from hot, aggressive or explosive gases or high measuring gas pressure 162.5 Hazard to the device due to purge air failure 172.6 Proper use 172.7 Qualified personnel 183 Quick Information 213.1 Safety 213.2 Brief Introduction 223.3 Calibration 233.4 Operation 234 Product Description 274.1 Notes on delivery 274.2 Scope of supply 284.3 Special accessories <strong>29</strong>4.4 Notes on the product 304.5 Conformity/Approvals 304.6 Identification of the product 304.7 Notes on warranty 314.8 Device description 314.9 Fields of application 314.10 Equipment 325 Design and Function 355.1 Functional description of the system components 355.2 Functional diagram 365.3 Design of the supply unit 37D-R <strong>800</strong> 3
Contents6 Project Planning, Assembly, Commissioning 416.1 Safety 416.2 Installation 426.3 Assembly 476.4 Commissioning 547 Operation 597.1 Menu structure 607.2 Editing mode: 627.3 Shortcuts 647.4 Description of the individual display and input fields 647.5 Set-up, adjustment 758 Maintenance 858.1 Customer service information 858.2 Safety 858.3 Maintenance intervals 868.4 Replacement material 868.5 Maintenance work 868.6 Messages 899 Technical data 959.1 Performance features 959.2 Dimensions and weights 959.3 Supply 959.4 Connections 969.5 Environment 969.6 Control parameters for code level 1 - overview 9710 Menu structure 9811 Standards and regulations 1<strong>01</strong>12 Declaration of Conformity 10213 Glossary 10514 Index 10715 DURAG GROUP company addresses 1114 D-R <strong>800</strong>
Foreword0 ForewordThe purpose of this <strong>manual</strong> is to help you to become acquainted with yourDURAG product.In this publication you will find information and technical data on planning,installation / commissioning, operation and maintenance of the D-R <strong>800</strong>.This information is completed by the functional diagram for both the completesystem and the equipment components, as well as a spare parts list.Our aim is to make a decisive contribution to your success with our productsand services. We hope that the information provided here will enable us to doso.Should you have any further questions on products or applications from theDURAG GROUP, please use our Support & Service!You will find the relevant addresses and telephone numbers on page 111(DURAG GROUP company addresses).Further information is also available from www.durag.dePlease read the following information carefully! It is important for your safetyand for preventing damage to the D-R <strong>800</strong> and to the environment.D-R <strong>800</strong> 5
General1.2 Typographical conventionsIn order to make the text of this <strong>manual</strong> clear, text elements such as safetyinstructions, warnings, tips, keyboard symbols, menu addresses etc. aredisplayed differently.The following conventions apply in this <strong>manual</strong>:Safety instructions and warnings appear as follows in this <strong>manual</strong>:WARNINGDanger from electrical equipmentBefore removing the housing or accidental-contact protection, the equipmentmust be disconnected from the power supply.A note or tip is shown like this:No control cycle is started during test measurements and simulation.If a button is pressed on the measuring unit, it is shown like this:+ MOD STOMenu addresses are shown like this:Measured value display A0<strong>01</strong>.3 Meaning of the warnings and notes usedPlease always comply with the following warnings and safety instructions inthis <strong>manual</strong>. They serve to avert dangers to life and limb of users andmaintenance personnel and to prevent damage to property.They are highlighted in this <strong>manual</strong> by the signs defined here. They are alsomarked by symbols at the points where they appear. The signs used have thefollowing meanings for the purposes of this <strong>manual</strong> and the information on theproduct itself:10 D-R <strong>800</strong>
1BGeneralD-R <strong>800</strong>Dust Concentration Meter022 Safety Instructions2.1 General safety instructions2.2 Hazard from electrical equipment2.3 Hazard from laser light2.4 Hazard from hot, aggressive or explosive gases or high measuring gas pressure2.5 Hazard to the device due to purge air failure2.6 Proper use2.7 Qualified personnelD-R <strong>800</strong> 13
Safety Instructions2 Safety InstructionsPlease always comply with the following warnings and safety instructions inthis <strong>manual</strong>. They serve to avert dangers to life and limb of users andmaintenance personnel and to prevent damage to property.2.1 General safety instructionsThe DURAG Dust Concentration Meter D-R <strong>800</strong> complies with the state-ofthe-artand the recognised safety regulations; nevertheless, dangers can stillarise.Therefore only operate the product in perfect condition and in compliance withthe operating <strong>manual</strong>. Changes in the normal operation are indications offunctional impairments which must be taken seriously. In this connection, payattention to:• The development of smoke or unusual odours,• Excessive temperature of system parts,• Unexplained changes in power consumption,• Triggering of monitoring devices,• Abnormal operating noise from the purge air blower,• Unusual vibrations,• Abnormal, strong fluctuations or shifts in the measuring results.The D-R <strong>800</strong>is used for the measurement of dust emission in flues and dustextraction lines etc.. Improper use or handling can result in damage to healthor property. Therefore, please read this chapter thoroughly and comply withthe instructions during all activities on the D-R <strong>800</strong> as well as the safetyinstructions and warnings in the individual chapters of this operating <strong>manual</strong>.In principle, the following warnings and safety instructions apply for theD-R <strong>800</strong> :• The statutory provisions applicable for the system and the technicalregulations implementing these provisions must be complied with duringpreparation and performance of work.• Persons working with the system must take account of the local, systemspecificconditions and operation-related dangers and provisions.• Operating <strong>manual</strong>s and documentation belong to the equipment system D-R <strong>800</strong> must be present in-situ. The information highlighted therein for theprevention of dangers and damage must be complied with.• Suitable protective devices and personal safety gear must be available inadequate quantities and be used by the personnel according to therespective danger potential.• The device may only be operated in perfect condition and in compliancewith the safety instructions!• The devices as a whole, as well as the individual components, may only beoperated in the original design. If elements are replaced, the manufacturer'sgenuine parts must be used• Any interventions or modifications to the design of approved devices willresult in loss of the approval.D-R <strong>800</strong> 15
Safety Instructions2.2 Hazard from electrical equipmentThis device is operated with electricity. Therefore, only appropriately qualifiedpersonnel may carry out work on this device. These personnel must bethoroughly familiar with all danger sources and repair measures in accordancewith these operating instructions.WARNINGDanger from electrical equipmentBefore removing the housing or accidental-contact protection, the equipmentmust be disconnected from the power supply.• The devices may only be connected to the supply voltage shown on thetype plate.• The devices may only be operated on a power supply with an earthingcontact. The protective action must not be cancelled by an extensionwithout an earthing contact. Any interruption in the protective earthconductor inside or outside the device is dangerous and is not permitted.• Cables should be laid so that risk of accident due to tripping or gettingcaught on the lines is excluded.This device has been manufactured so that safe separation between primaryand secondary electric circuits is ensured. Low voltages that are connectedmust also be generated with safe separation.2.3 Hazard from laser lightCAUTIONDanger from laser lightRisk of blinding!Laser protection class II (radiant power
Safety Instructions• Never touch parts that could be hot without temperature-resistant safetyglovesWARNINGIn the case of measuring channels with harmful gases, high temperatures orhigh pressure, the Dust Concentration Meter and measuring lance may onlybe mounted or demounted when the system is stationary!The flue gas temperature must not fall below the dew point, so that thechannel is free from condensed gas.Otherwise, depending on the type of gas, acids can form on the measuringlance in combination with condensate. These can endanger the maintenancepersonnel and damage the measuring lance!Take account of changes in the measuring gas temperature and the dew point,particularly during run up/down of the system to be measured.2.5 Hazard to the device due to purge air failureCAUTIONThe purpose of the purge air is to protect the subassembly mounted on thedust channel. It shields the components from hot and/or aggressive gases.The purge air supply must therefore be ensured even when the system isstationary; if it fails, the transmitter/receiver unit can quickly be destroyed.The operator must therefore ensure that:• the purge air supply operates reliably and without interruption,• a failure is detected immediately,• the transmitter/receiver unit is removed from the channel and the channelopening covered in the event of a purge air failure.2.6 Proper useThe DURAG D-R <strong>800</strong> described in this <strong>manual</strong> is an innovative measuringdevice using laser technology for monitoring dust emission in e.g. powerstations, cement plants and smelting plants, in the wood and chemicalindustry, waste incineration and dust filter plants.It is used for the measurement and monitoring of small to medium emissions inaccordance with European regulations. Its use is independent of the speedand charge of the dust particles to be measured.The parameters specified in the Technical data from page 95, especially theambient conditions, must be complied with and observed.The D-R <strong>800</strong> has been developed, manufactured, inspected and documentedin compliance with the pertinent safety standards. If the handling and safetyinstructions described for project planning, assembly, proper operation andmaintenance are complied with, no dangers normally arise from the device inrespect of damage to property or the health of people.D-R <strong>800</strong> 17
Safety InstructionsThis device has been manufactured so that safe separation between primaryand secondary electric circuits is ensured. Low voltages that are connectedmust also be generated with safe separation.Faultless and safe operation of this device also requires appropriate transport,correct storage, installation and assembly as well as careful operation andmaintenance by qualified personnel.2.7 Qualified personnelThe operator's personnel who are responsible for safety must ensure that workon DURAG equipment or systems is only carried out by qualified skilledpersonnel, whose competence has been checked by responsible experts.In the event of unqualified operations on the device or failure to comply withthe warnings provided in this <strong>manual</strong> or affixed to the device, physical injuriesand/or damage to property can occur.Qualified personnel for the purposes of the safety-related instructions in this<strong>manual</strong> or on the product itself are persons who can identify potential dangersin good time and prevent them. Skilled personnel/experts are persons inaccordance with DIN VDE <strong>01</strong>05 or IEC 364 or directly comparable standards.The following knowledge is essential:• Exact knowledge of operation-related dangers (e.g. due to toxic, hot orpressurised gases, gas-liquid mixtures etc.).• Knowledge of system conditions, pertinent standards, regulations andaccident prevention regulations.• Adequate knowledge of the system ,D-R <strong>800</strong> acquired through appropriatetraining.On the basis of this training, qualified personnel are authorised by the personresponsible for the safety of people and system to carry out work on DURAGequipment or systems,• either as project planning personnel, are familiar with the safety concepts ofautomation technology,• as operating personnel, are instructed in handling automation technologyequipment and are familiar with the contents of this <strong>manual</strong> relating tooperation,• as repair and/or service personnel, have training that qualifies them torepair such automation technology equipment or have authorisation tocommission, earth and identify circuits and devices/systems in accordancewith the safety-related standards.18 D-R <strong>800</strong>
2BSafety InstructionsD-R <strong>800</strong>Dust Concentration Meter033 Quick Information3.1 Safety3.2 Brief Introduction3.3 Calibration3.4 OperationD-R <strong>800</strong> 19
Quick Information3 Quick Information3.1 SafetyIn this chapter we have summarised the essential information on set-up andoperation of the Dust Concentration Meter D-R <strong>800</strong>. This chapter is intendedfor operating and maintenance personnel who already have experience inusing the measuring system, are familiar with the operating <strong>manual</strong> and whowill make sure that they have not overlooked anything important with the quickinformation. You must be familiar with the comprehensive information providedin the subsequent chapters of this <strong>manual</strong> before using the quick information.Please also comply with the safety instructions. They serve to avert dangersto life and limb of users and maintenance personnel and to prevent damageto property.WARNINGDanger of electric shockOnce the housing or accidental-contact protection have been removed, liveparts are accessible. Before working on the device, the mains connectingleads must therefore be disconnected from the power and protected againstunauthorised re-activation. If the accidental-contact protection has beenremoved, it must be replaced before switching on the mains voltage. Onlyappropriately qualified and trained personnel may carry out work on thisdevice. These personnel must be thoroughly familiar with all danger sourcesand repair measures in accordance with these operating instructions.Use of the Dust Concentration Meter D-R <strong>800</strong> in potentially explosive areasand measurement in explosive gas mixtures is not permittedIn the case of measuring channels with harmful gases, high temperatures orhigh pressure, the Dust Concentration Meter and measuring lance may onlybe mounted or demounted when the system is stationary!CAUTIONDanger from laser lightRisk of blinding!Laser protection class II (radiant power
Quick Information3.2 Brief IntroductionCheck prerequisites for operation using the checklist on page.42CAUTIONThe flue gas temperature must not fall below the dew point, so that thechannel is free from condensed gas.Otherwise, depending on the type of gas, acids can form on the measuringlance in combination with condensate. These can endanger the maintenancepersonnel and damage the measuring lance!Take account of changes in the measuring gas temperature and the dew point,particularly during run up/down of the system to be measured.Insert measuring lance with operational purge air into the dust channel andsecure.Screw the connector tightly to the measuring lance.Turn on the voltage.The D-R <strong>800</strong> executes an auto-initialisation for approx. 15 s and is then inmeasuring mode. The dust concentration is measured and output to thecurrent outputs according to the parameterisation. All digital and analogueinputs are evaluated. The measurements are independent of the displayedmenu field.Select the desired current gain range in the Current gain menu item (E5) .In addition to the current gain range, the percentage utilisation of the selectedrange is displayed. It must be ensured that utilisation of 100% is notexceeded in any operating situation.Select an adjustment factor (E6) for a valid dust concentration.Select the dust concentration in the menu item Current output 1 Assignment(F1).In the menu item Current output 1 Measuring range (F1), preset the valuefor the dust concentration at which 20 mA will be output at current output 1.If the scattered light (with E02 also dust concentration) is zero, 4 mA is output.If the scattered light exceeds the specified value, the current output is limitedto 20 mA.In order to generate an error message from a current output overflow, one ofthe two limit values must be set to 20 mA (limit value G<strong>01</strong>-G02) and this limitvalue output to a relay (relay assignment G03-G06).22 D-R <strong>800</strong>
Quick Information3.3 CalibrationThe measured scattered light can only be reliably displayed as dustconcentration in mg/m3 after calibration by an approved test institute.3.4 OperationFor callibration also see page 75.The + and keys are used to navigate the menu branches.The main menu fields (vertical) are marked by a list symbol in the bottom leftcorner of the display.You can move between the main menu (vertical) and the submenus(horizontal) by pressing the MOD key.The MOD LED lights up for all fields in which an entry can be made.In order to make an entry, press the STO key - the STO LED lights up. Afterchanging the value, it is stored with STO - the STO LED flashes. To end anentry without storing, press the MOD key.To change a value, move the cursor with the key and increase therespective number with the + key.To make a text selection, select a value from the list with + and .Details on operation can be found from page 59.D-R <strong>800</strong> 23
Quick InformationD-R <strong>800</strong>Dust Concentration Meter044 Product Description4.1 Notes on delivery4.2 Scope of supply4.3 Special accessories4.4 Notes on the product4.5 Conformity/Approvals4.6 Identification of the product4.7 Notes on warranty4.8 Device description4.9 Fields of application4.10 EquipmentD-R <strong>800</strong> 25
Product Description4 Product DescriptionIn this chapter you will find information on scope of supply, specialaccessories, approvals, guarantee, fields of application - in short, everythingrelating to the D-R <strong>800</strong> .4.1 Notes on deliveryThe Dust Concentration Meter D-R <strong>800</strong> is delivered in a packaged unit. Thisgenerally includes the supply unit with key, the measuring unit with lance andsupply cable, the purge air hose and this <strong>manual</strong>.The measuring lance with laser system is optically calibrated and will nottolerate rough treatment. It is therefore packed with special care in appropriatemouldings. We recommend storing the packaging in case the device needs tobe returned for service or repair.D-R <strong>800</strong> 27
Product Description4.2 Scope of supplyScope of supply of the standard system D-R <strong>800</strong>:R<strong>800</strong>SYS00-VERR <strong>800</strong>SYS00-VER for installation on vertical channelsR<strong>800</strong>SYS10-HORR <strong>800</strong>SYS10-HOR for installation on horizontal channelsMeasuring lance BR<strong>800</strong>PR10for horizontal channelsormeasuring lance BR<strong>800</strong>PR00for vertical channelsLength of measuring lance <strong>800</strong> mmSupply unitBR<strong>800</strong>SU00Connection cable 3 m BR<strong>800</strong>CC10Purge air hose 3 m BR<strong>800</strong>FH10with fixing clampsFlange with welded-in pipe 130 mm(ST37) and sealBR<strong>800</strong>FL10Alternatively also available in V4APrinted brief introduction anddetailed <strong>manual</strong> on CD28 D-R <strong>800</strong>
Product Description4.3 Special accessoriesMeasuring lance BR<strong>800</strong>PR10for horizontal channelsormeasuring lance BR<strong>800</strong>PR00for vertical channelsLength of measuring lance 400 mmOption:Connection cable 10 m BR<strong>800</strong>CC20Option:Purge air hose 10 m BR<strong>800</strong>FH20with fixing clampsOptions:Pipe length 240 mm: BR<strong>800</strong>FL20Pipe length 500 mm: BR<strong>800</strong>FL30Alternatively also available in V4AOption:Protective coverapprox. 175 x 180 x 145 mm(HxWxD)Option:Control unit, comprising:Filter holder and filter set (4 pieces)D-R <strong>800</strong> - 80Option:Detailed printed <strong>manual</strong>D-R <strong>800</strong> <strong>29</strong>
Product Description4.4 Notes on the productThe DURAG Dust Concentration Meter D-R <strong>800</strong> is used for continuousmeasurement of dust emission in flues and dust extraction lines etc.As well as monitoring the efficiency of filter plants by recording the residualdust quantity, this device also instantaneously reports unacceptably large dustor flue gas emissions. Consequently, it is often possible to intervene directly inthe process of the monitored system and thus to ensure reliable observance ofthe prescribed limit values.The use of dust concentration meters is vital not only for monitoring processesin the chemical industry or in cement plants, where dust emissions are anessential criterion for perfect operation of the plant, but also for the costeffectiveand correct operation of large boiler plants in power stations, districtheating plants or industrial operations.In refineries and other petrochemical plants, the metallurgy industry, in refuseand waste incineration plants, in soot plants and in all situations whereunacceptable dust emissions could result in environmental pollution, DURAGdust concentration meters reliably monitor adherence to the legal limit values.4.5 Conformity/ApprovalsThe D-R <strong>800</strong> has been developed, manufactured, inspected and documentedin compliance with the pertinent safety standards. If the handling and safetyinstructions described for project planning, assembly, proper operation andmaintenance are complied with, no dangers normally arise from the device inrespect of damage to property or the health of people.• Suitability-tested by the TÜV Köln, Test report 936/21205307/B• Itemized in the list of suitable measuring devices for continuous emissionmeasuring• GOST-R• MCERTS (in process)The declarations of conformity can be found in the Appendix from page 102.4.6 Identification of the productThe type plate is located on the left side of the housing.30 D-R <strong>800</strong>
Product Description4.7 Notes on warrantyFaultless and safe operation of this device also requires appropriate transport,correct storage, installation and assembly as well as careful operation andmaintenance by qualified personnel.The warranty for equipment from the DURAG GROUP is 12 months from thedate of delivery.4.8 Device descriptionThe Dust Concentration Meter D-R <strong>800</strong> comprises two components:the connection or supply unit with the purge air supply andthe evaluation unit with the measuring lance.The two units combine to form an innovative measuring device using lasertechnology to monitor small to medium dust emissions according to the newEuropean regulations.• Integrated display in the probe: Measuring value, threshold value,parameter• In-situ measuring procedure with continuous measurement• High sensitivity• Easy installation on one side of the flue• Can also be deployed in thick-walled stone/insulated channels• No laborious device adjustment• Long lifetime, as there are no moving parts inside the flue• Hermetically sealed electronic housing against exhaust gas• Parameterisation and operation via keyboard plus easily readable displaydirectly on device or via bus interface• Automatic function test with soiling correction• Two analogue outputs with adjustable measuring ranges• Automatic switching of output ranges according to 17. BImSchVThis device has been manufactured so that safe separation between primaryand secondary electric circuits is ensured. Low voltages that are connectedmust also be generated with safe separation.4.9 Fields of applicationThe DURAG D-R <strong>800</strong> described in this <strong>manual</strong> is a device for monitoring dustemissions in e.g.:• Power stations and cement plants• The metallurgy and wood industries, chemical industry etc.• Waste incineration plants• Dust filter plantsD-R <strong>800</strong> 31
Product DescriptionIt is used for the measurement and monitoring of small to medium emissions inaccordance with European regulations. Its use is independent of the speedand charge of the dust particles to be measured under the specified ambientconditions.• Permissible ambient temperature: - 20°C to + 50°C• Class of protection IP65• Max. emission temperature +220°C• Min. emission temperature > Exhaust gas dew point• Min/max stat. exhaust gas pressure -50 hPa to +10 hPa(in relation to normal pressure)The parameters specified in the Technical data from page 95 must becomplied with and observed.4.10 EquipmentDesign variantsBR<strong>800</strong>PR00Photo: Vertical measuring lance for vertical channelsThe yellow sealing cap for the cleaning aperture is on the left of the device!BR<strong>800</strong>PR00 Graphic: The arrow shows the possible flow directions.The red dots on the device are located parallel to the flow direction!BR<strong>800</strong>PR10 Photo: Horizontal measuring lance for horizontalchannelsThe yellow sealing cap for the cleaning aperture is located on the under side ofthe device!BR<strong>800</strong>PR10 Graphic: The arrow shows the possible flow directions.The red dots on the device are located parallel to the flow direction!32 D-R <strong>800</strong>
3BProduct DescriptionD-R <strong>800</strong>Dust Concentration Meter055 Design and Function5.1 Functional description of the system components5.2 Functional diagram5.3 Design of the supply unitD-R <strong>800</strong> 33
Design and Function5 Design and FunctionThis chapter explains the units that make up the measuring system and howthese units work together.5.1 Functional description of the system componentsThe Dust Concentration Meter D-R <strong>800</strong> consists of two components:• the connection or supply unit with purge air supply and• the evaluation or measuring unit with the measuring lance.In addition, the device can be integrated into an environmental and processdata management system (e.g. DURAG D-EMS 2000) via the supply unit withbus interface.D-R <strong>800</strong> 35
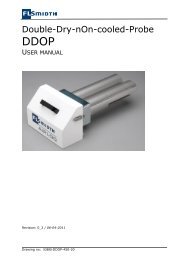
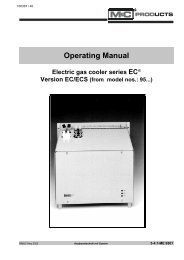
Design and Function5.2 Functional diagramThe D-R <strong>800</strong> measuring device operates according to the forward scatteringprinciple. The concentrated and modulated light of a laser diode penetrates themeasuring volume. The light scattered by the dust particles is largely scatteredforwards, therefore the receiving lens is positioned here.The scattered light is generated in proportion to the dust concentrationpresent, so the more dust, the more scattered light. The light is guided by anoptical waveguide to the receiving diode, where it is processed to the desiredend size by a sensitive electronic unit. The obtained measuring result iscalibratable and can, in accordance with directive EN 13284-1, be displayedon the dust concentration in mg/m³.Particle in Measuring Volumedr<strong>800</strong>_11_000For the automatic function test and the legal control cycle, a beam splitter witha shutter has been used inside the electronic housing in this system. Itswitches between the actual optical measurement and the comparison path.Consequently, there are no moving parts in the corrosive exhaust gas channel.This also ensures that the termination between lance and electronic housing isgas-tight.The installation of the measuring lance is very easy. A flange tube is simplymounted to the exhaust gas channel. The subsequent basic calibration of thesystem can be carried out by software.The current outputs are parameterised to the scattered light. In order to alsodisplay the dust content in milligrams on the device, a factor and an offset forconverting scattered light into mg/m³ must be entered. However, this does notaffect the current outputs, limit values etc..A pollution measurement is performed every 5 min in order to record dustdeposits on the optical boundary surfaces and the ageing of the opticalelements.36 D-R <strong>800</strong>
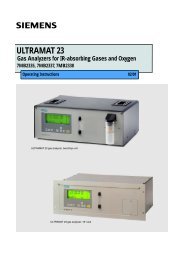
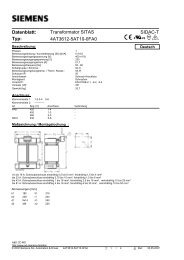
Design and Function5.3 Design of the supply unitThe supply unit comprises• the power supply for lance and purge air blower• the purge air blower• the terminal strip for customer inputs and outputs• D-Sub socket (RS485 interface) for connecting a PCAll customer terminals are housed in the supply unit.RS485 D-SUBsocketConnectionterminalsPower supplyFuseDr<strong>800</strong>_08_020Probe connectingcableInputs and outputs (customer)Purge airhosePurge airinletD-R <strong>800</strong> 37
4BDesign and FunctionD-R <strong>800</strong>Dust Concentration Meter066 Project Planning, Assembly, Commissioning6.1 Safety6.2 Installation6.2.1 Prerequisites for use6.2.2 Transport6.2.3 Installation location, place of use6.3 Assembly6.3.1 Welding-in the flange6.3.2 Connection of power supply, operating media6.4 Commissioning6.4.1 Measures before initial commissioning6.4.2 CommissioningD-R <strong>800</strong> 39
Project Planning, Assembly, Commissioning6 Project Planning, Assembly, CommissioningThis chapter specifies the prerequisites for use of the D-R <strong>800</strong>. We explainwhere the correct measuring point is in the flue, points requiring specialattention when installing the measuring lance and how to connect purge airand electronics.6.1 SafetyWARNINGDanger of electric shockOnce the housing or accidental-contact protection have been removed, liveparts are accessible. Before working on the device, the mains connectingleads must therefore be disconnected from the power and protected againstunauthorised re-activation. If the accidental contact protection is removed, itmust be replaced before switching on the mains voltage. Only appropriatelyqualified and trained personnel may carry out work on this device. Thesepersonnel must be thoroughly familiar with all danger sources and repairmeasures in accordance with these operating instructions.Use of the Dust Concentration Meter D-R <strong>800</strong> in potentially explosive areasand measurement in explosive gas mixtures is not permittedIn the case of measuring channels with harmful gases, high temperatures DustConcentration Meter or high pressure, the and measuring lance may only bemounted or demounted when the system is stationary!CAUTIONDanger from laser lightRisk of blinding!Laser protection class II (radiant power
Project Planning, Assembly, Commissioning6.2 InstallationAssembly sequence:Check the prerequisites for use (see below)Selection of the measuring pointWelding-in the flangeInstallation of the supply unitElectrical connection of the supply unitConnection of the measuring lance to the purge air and start-up of the purgeairFlange-mounting of the measuring lanceConnection of the measuring lance by means of the 18-pin cable.Commissioning of the D-R <strong>800</strong>Programming of the necessary measuring parameters (in the next chapter)6.2.1 Prerequisites for useDefined prerequisites must be checked for use of the Dust ConcentrationMeter D-R <strong>800</strong>. The suitability of the device can be quickly and simplyestablished with the help of the following checklist.Checklist: Prerequisites for operation of the D-R <strong>800</strong>Is the temperature of the flue gasabove the dew point, so that thechannel is free from condensedgas?Is the measuring point in a verticalchannel?Is the measuring point in ahorizontal channel?If the temperature regularly fallsbelow the dew point then the D-R<strong>800</strong> is not suitable for thisapplication.You need a measuring lanceBR<strong>800</strong>PR00You need a measuring lanceBR<strong>800</strong>PR10Which current gain is required? Define the average dustconcentration expected and anylimit value to be monitored.What is the wall thickness of thechannel at the measuring point?What is the prevailing pressure inthe measuring channel, withreference to the normal pressure?Is suitable purge air available?The optically active section of themeasuring lance must be locatedfreely in the gas flow, therefore thewall thickness including insulationand any obstructive fittings mustnot exceed 500 mm.The maximum over-pressure foruse of the standard blower isapprox. 10 hPa.The fresh air drawn in by thesupply unit for the purge air mustbe dust and oil free and have atemperature of -20 to +40 °C.□□□□□□□42 D-R <strong>800</strong>
Project Planning, Assembly, CommissioningWhat is the temperature of theexhaust gas to be monitored?Is the exhaust gas to be monitoredmore than averagely aggressive toV4A steel?Is the measuring point locatedoutside?Is the planned mounting locationsafe for the service personnel?The standard <strong>version</strong> of the D-R <strong>800</strong> can be used in the exhaustgas temperature range from dewpoint up to max. 220 °C.The measuring lance is made ofexceptionally high quality, lowcorrosionstainless steel (1.4571).In this case, a protective cover canbe used for the head of themeasuring lance.The work platform should beapprox. 1.5 m below themeasurement opening. All parts ofthe measuring system must besafely accessible. The validcountry-specific accidentprevention regulations must beobserved.□□□□D-R <strong>800</strong> 43
Project Planning, Assembly, CommissioningNotes on selection of the correct flange / measuring lance lengthStandard FlangeBR<strong>800</strong>FL10/20/30Duct Wall,respectivelyInsulationFlangeFlue dimensionr<strong>800</strong>_26_0<strong>01</strong> flangeLengthFlange Tube30Projectionof FlangeLength ofmeasuring lance400/<strong>800</strong>The measuring point should be as far as possible from the channel walls! Thepossible flue dimension depending on the flange and lance length used isdetermined from the following table:Measuringlength400 mmlance Measuringlength<strong>800</strong>mmlanceMaxwall thickness<strong>29</strong>0 – 690 mm > 1000 mm 100 mm 130 mm400 – <strong>800</strong> mm > <strong>800</strong> mm 210 mm 240 mmX > 350 mm 470 mm 500 mmFlue dimensionFlange tube lengthThe exact dimensions of the measuring unit are shown in the followingdrawing. The dimensions [in mm] refer to the <strong>800</strong> mm lance(dimensions in brackets for 400 mm lance length).184617 (217) 76,3 96Ø 60r<strong>800</strong>_25_000789 (389)44 D-R <strong>800</strong>
Project Planning, Assembly, Commissioning6.2.2 TransportThe laser in the lance is optically calibrated, therefore avoid impacts to themeasuring lance. If the measuring light beam does not reach the receiving unitcleanly due to rough treatment, the measuring result will be falsified. Use theoriginal packaging for transport where possible: The mouldings used in itensure safe transport.6.2.3 Installation location, place of useInstructions on selecting a suitable measuring pointAs the technical conditions differ widely in the various boiler or dust extractionplants, chimneys or flues, we recommend that the measuring point isdetermined by the responsible measuring institute (e.g. TÜV.WARNINGThe flue gas temperature must not fall below the dew point, so that thechannel is free from condensed gas.Otherwise, depending on the type of gas, acids can form on the measuringlance in combination with condensate. These can endanger the maintenancepersonnel and damage the measuring lance!Take account of changes in the measuring gas temperature and the dew point,particularly during run up/down of the system to be measured.The dust and flue gas distribution in the measuring channel must be ashomogeneous as possible at the measuring point for the D-R <strong>800</strong> . The path ofthe light beam through the exhaust gas must be as vertical as possible to theprevailing flow direction.Adequate space must be provided for the complete system at the plannedmeasuring point, particularly for safe operation by the service personnel.The measuring point should be a sufficient distance before or after redirectionsor changes in cross-section:For channel with circularcross-sectionDistance min. 3 x Dwith D = diameterFor channel with rectangularcross-sectionDistance min. 3 x Dwith D = hydraulic diameteraccording to the formulaF = area, U = circumferenceThe installation location must be free from vibrations and oscillations wherepossible. If this is not possible, the device should be installed so that it isisolated from any vibrating suction draught, so that the measuring system isnot affected.D-R <strong>800</strong> 45
Project Planning, Assembly, Commissioningmin.3 x DDmin.3 x Ddr<strong>800</strong>_07The inlet section (channel length before the measuring point) and the outletsection (channel length after the measuring point) should be at least 3 x D (D= inner diameter of the channel.On chimneys with round internal dimensions "D" means the diameter.In the case of square or rectangular cross-sections, the hydraulic diameter isused.1/3B2/3Adr<strong>800</strong>_12If there is not enough space available, the inlet section (A) must be longer thanthe outlet section (B) in the ratio of 1:2.46 D-R <strong>800</strong>
Project Planning, Assembly, Commissioning6.3 Assembly6.3.1 Welding-in the flangeThe welded-in flange is welded-in differently in a vertical and a horizontal flue.The two red dots (arrows in centre of diagram) are always located on the levelof the exhaust gas flow. In a correctly designed and installed system, the reddots on the lance flange must always correspond to the red dots on thewelded-in flange. In both cases, the flange protrudes by 30 mm in the channel(see illustrations).Welding-in drawing D-R <strong>800</strong> for a horizontal channel.130 mmL184...88°M1070 mm76dr<strong>800</strong>_13_0<strong>01</strong>45°30Welding-in drawing D-R <strong>800</strong> for a vertical channel.45°130 mmL184...88°M1070 mm76dr<strong>800</strong>_14_0<strong>01</strong>30WARNINGNever insert the measuring lance into the flange or dust channel without anoperational purge air supply. The measuring lance and transmitting/receivingunit will quickly be irreversibly damaged by overheating and dust.D-R <strong>800</strong> 47
Project Planning, Assembly, Commissioning6.3.2 Connection of power supply, operating mediaMounting the supply unit.All external connections of the DURAG Dust Concentration Meters areconnected via the supply unit. Power supply, data interface and purge airsupply are located in this unit.Mount the device near the measuring lance. The standard connection cablesfor the measuring lance are 3 m long. Lengths of 10 m are also available.As the purge air is provided in the supply unit (2), the device housing must bepressure-tight. For this reason the housing door is sealed with a rubber beadand any unused cable apertures are sealed with stoppers.(1) Purge air suction sleeve48 D-R <strong>800</strong>
Project Planning, Assembly, CommissioningInstallation, Electrical connectionAll customer terminals are housed in the supply unit.WARNINGDanger of electric shockOnce the housing or accidental contact protection have been opened, liveparts are accessible. Before working on the device, the mains connectingleads must therefore be disconnected from the power and protected againstunauthorised re-activation. If the accidental-contact protection has beenremoved, it must be replaced before switching on the mains voltage.The measuring lance is connected to the supply unit with an 18-pin cable. Thecable is assembled with a connector on the measuring lance side and ispermanently connected to the supply unit.All customer connections are made in the right section of the terminal strip(white areas in the figure below).The mains fuse is integrated into the L terminal. To change the fuse, swing theterminal to the right and open.2Open side, insert fusefuse: 5 x 20 mm, 1 A, SLO-BLOr<strong>800</strong>_10_00<strong>01</strong>Pull up hereL1The function assignment of the relay output contacts and the digital inputs isperformed in the software.The 9-pin D-Sub socket provides the RS485 interface in parallel with terminals11 and 12. A PC can be directly connected here with an appropriate cable anda converter to RS232.If an RS485 connection is wired to terminals 11 and 12, this must first beprovided with at least single-pole isolation before the D-SUB connection canbe used for data transfer.D-SUB, RS 4853r<strong>800</strong>_RS48512112D-R <strong>800</strong> 49
Project Planning, Assembly, CommissioningD-SUB, 9 pin, RS485 connectionUse only when connections 11 or 12 are not engagedCustomer Wiring22 1222 12 22 1222 12A2 A1A2 A1 A2 A1A2 A1Relay 4Relay 3Relay 2Relay 124 14 24 14 24 14 24 1421 11 21 11 21 11 21 11e.g. limit value 2e.g. limit value 1e.g. servicee.g. maintenance1211109RS485digital input 2Use only when D-SUB connector is not in usepotential free contact24 V87654321-+-+-+digital input 1 potential free contacttemperature transmitter 4...20 mAanalog output 2 4...20 mA, max. 500 Ohm loadanalog output 1 4...20 mA, max. 500 Ohm loadNPEPEMains85 ... 264 VAC, 47 ... 63 Hzdr<strong>800</strong>_15_003L1Factory Wiring50 D-R <strong>800</strong>
Project Planning, Assembly, CommissioningTerminal assignmentClampFunctionRelay 4 – 11Relay 4 – 14Relay 3 – 11Relay 3 – 14Relay 2 – 11Relay 2 – 14Relay 1 – 11Relay 1 – 14COMNOCOMNOCOMNOCOMNORelay 4Relay 3Relay 2Relay 1230 VAC16 A750VA230 VAC16 A750VA230 VAC16 A750VA230 VAC16 A750VAe.g.limit value 2e.g.limit value 1e.g.servicee.g.maintenanceD-Sub Pin 2 A (+)D-Sub Pin 3 B (-)RS4859600 BaudModbuscyclicaloutputordata12 B (-)11 A (+)10 - (DGND)9 +RS485digital In <strong>29</strong>600 Baudactive9 mAModbus orcyclicaloutpute.g.lockingdataexternal8 - (DGND)7 +digital In 1active9 mAe.g. externalmaintenance6 - (DGND)5 +mA Inactive4 - 20 mATemperatureinput4 - (AGND)3 +mA Out 2active4 - 20 mAMeasured valueoutput range 22 - (AGND)1 +mA Out 1active4 - 20 mAMeasured valueoutput range 1PEPEPEPENL1NL85 - 264VAC47 – 63 Hz,SupplyThe two potential-free current outputs 1/2 and 3/4 are active and have acommon frame potential.The current input 5/6 is active and intended for the direct connection of anoptional temperature transmitter. The frame potential is located on that of thesupply.Terminals 11/12 and D-Sub 2/3 are parallel-wired.If an RS485 connection is wired to terminals 11 and 12, this must first beprovided with at least single-pole isolation before the D-SUB connection canbe used for data transfer.D-R <strong>800</strong> 51
Project Planning, Assembly, CommissioningInstallation, purge air supplyThe purpose of the purge air is to protect the subassembly mounted to thedust channel. It shields the components from hot and/or aggressive gases.The purge air supply must therefore be ensured even when the system isstationary; if it fails, the transmitter/receiver unit can quickly be destroyed.The operator must therefore ensure that:• the purge air supply operates reliably and without interruption,• a failure is detected immediately,• the transmitting/receiving unit is removed from the channel and the channelopening is covered in the event of a purge air failure.The purge air is provided from the supply unit (2). For this reason the devicehousing must be pressure-tight, the housing door must be sealed with a rubberbead and any unused cable apertures sealed with stoppers.Connect the supply unit and the measuring lance together with the purge airhose. To do this, push the hose over the hose connection glands and secure itwith the hose clamps provided. The standard hose length is 3 m. Lengths of10 m are also available.Supply unit(1) Blower supply air(2) Purge air connectionMeasuring unit(1) Inspection cap(2) Purge air connection(3) Electrical and data connectionfrom supply unitThe measuring lance has two openings. The purge air is connected to theopening with the hose connection gland. The other opening enables cleaningof the optical system.52 D-R <strong>800</strong>
Project Planning, Assembly, CommissioningThe two connections on the measuring lance must not be swapped. Otherwisethe supply of purge air to the measuring lance will not be possible, and thetransmitting/receiving unit will quickly be irreversibly damaged by overheatingand dust.Never push the measuring lance into the dust channel without switching on thepurge air supply!The purge air hose is designed for a max. ambient temperature of approx.80°C.The fresh air drawn in by the supply unit for the lance flushing must be dustand oil free and have a temperature of -20 to +40 °C. However, the crucialfactor is the dew point at the measuring lance, depending on the temperaturesand emissions in the dust channel.If air of adequate quality is unavailable at the supply unit, the fresh air can alsobe drawn from another suitable point. The lead-in is then provided by anadditional purge air hose, which is fixed to the hose connection gland at theblower input.Costs due to high purge air filter wear and the associated maintenance can beavoided with a clean purge air supply.D-R <strong>800</strong> 53
Project Planning, Assembly, Commissioning6.4 Commissioning6.4.1 Measures before initial commissioningAre the prerequisites for operation fulfilled?Is the supplied dust measuring lance suitable for the existing channelin respect of its gas flow orientation (horizontal, vertical flow direction,see chapter Equipment on page 32)?With a vertical channel, the red marks must be at the top and bottomof the lance flange. For a horizontal channel they must be on the rightand left, in relation to the horizontally aligned display. In line with this,for a horizontal channel the red marks on the welded-in (mounted)channel flange must be on the right and left and, for a verticalchannel, above and below the flange hole centre.Is the supply unit installed and supplied with current?Has the cabling work been carried out as described in chapterAssembly on page 47 ff. ?Is an adequately long purge air hose available, and if necessary alsoan additional hose for purge air supply with cleaner air?□□□□CAUTIONCAUTIONWARNINGDanger from laser lightRisk of blinding!Laser protection class II (radiant power
Project Planning, Assembly, Commissioning6.4.2 CommissioningThe supply unit is now supplied with current, so that the purge air hose pushesclean ambient air through the dust measuring lance. An air draught must beperceptible at the diaphragm openings.Figure:Diaphragm openingsIf this is the case, the dust measuring lance can be inserted into the channelflange together with the flange seal. The red marking on the channel flangemust agree with a red marking on the lance flange. The lance is then screwedto the channel flange with four self-locking M10 nuts.Lastly, the connection cable is attached to the measuring lance with the plugconnection and secured with the union screw connection.The connection cable can be safely detached and reconnected duringoperation. The measuring lance then performs a reset and an autoinitialisation.Any measuring results not saved beforehand will be lost!After each switch on, the device performs an auto-check and a referencemeasurement. “I24 Initial” flashes on the display.Measurement is then started immediately, and the current dust concentration(A<strong>01</strong>) is shown on the display.D-R <strong>800</strong> 55
Project Planning, Assembly, CommissioningThe designations used here e.g. "(A<strong>01</strong>)" refer to the corresponding menufields in the software. Please also see chapter Menu structure on page 98 inthe Appendix.Four keys are used to navigate in the menu - see chapter Operation from page59. The measurement and measured value output run continuously in thebackground.For commissioning, the menu fields in the menu branches E00 to I00 shouldbe checked and parameterised if necessary (see from page 68).Test measurement (zero point / reference point / pollution)The purpose of the test measurements is to check the device. They can bestarted <strong>manual</strong>ly via the menu fields (J02, J03 or J04). During a testmeasurement the measured value is output at the first current output; thesecond current output is frozen at the last value. The test measurements areended by pressing the MOD key .56 D-R <strong>800</strong>
5BProject Planning, Assembly, CommissioningD-R <strong>800</strong>Dust Concentration Meter077 Operation7.1 Menu structure7.2 Editing mode:7.3 Shortcuts7.4 Description of the individual display and input fields7.4.1 Overview of the main menu7.4.2 Measured value display (A00)7.4.3 Logbook (B00)7.4.4 Info(C00)7.4.5 Code input (D00)7.4.6 General parameterisation (E00)7.4.7 Parameterisation of current outputs (F00)7.4.8 Parameterisation of digital I/O (G00) (Parametr. of digital inputs/outputs)7.4.9 Temp(erature) measurement parameterisation (H00)7.4.10 Communication parameterisation (I00)7.4.11 Maintenance (J00)7.4.12 Device check (K00)7.5 Set-up, adjustment7.5.1 Calibration7.5.2 Measuring status7.5.3 Interface communicationD-R <strong>800</strong> 57
Operation7 OperationIn this chapter we will explain how to use the D-R <strong>800</strong>. We explain theprinciple of the operator menu, operation and use of the four keys, we describethe individual display and input fields and their use and provide information onimportant parameters and data which must be entered before commissioningfor expedient use of the system.The operation of the D-R <strong>800</strong> is organised into a two-dimensional menustructure. The overview of this structure can be found in the Appendix on page98. To facilitate orientation, the respective menu address (e.g. F05 = Errorcurrent menu) is located at the bottom right of the menu fields in this overview.This ID code is used in the <strong>manual</strong> to uniquely identify menu pages.By simultaneously pressing the + & keys for approx. 1 s, you can alsotemporarily display this code in the top right of the display for orientation.The keys on the measuring unit are not the same as the keys on a computerkeyboard. Considerably more time is required to process the key presses.Therefore, press the keys for barely a second.D-R <strong>800</strong> 59
Operation7.1 Menu structureVertical: Main menuThe first column, labelled with A00 to K00, represents the main menu.All fields of the main menu are marked by a list symbol in the bottom rightcorner of the display.DisplayR<strong>800</strong>_16_002Key Function+ Down in the main menu Up in the main menuMOD Changes to the submenus (apart from Code input)STO No function (apart from Code input)60 D-R <strong>800</strong>
OperationHorizontal: submenuThe fields of the selected submenus are arranged horizontally (lines labelledwith numbers from <strong>01</strong> to 10 ). Either information is displayed in these lines, oran entry is made.The MOD LED lights up for all menu fields in which an entry can be made (1).r<strong>800</strong>_17_000Key Function+ Next field Previous fieldMOD Back to main menuSTO Editing modeD-R <strong>800</strong> 61
Operation7.2 Editing mode:edit numberAfter changing to editing mode with STO , a number can be entered (red LEDof STO key is activated).Key Function+ Increases the number at the cursor position Changes the cursor positionMOD Reject changesMOD Save changesIn the "Edit number" editing mode, a cursor appears under the number to beedited.If the value is stored in the EEprom, the red LED flashes on the STO key.Example: Edit number+-Integration time+-Hardwareamplification+-STOIntegration time023 s 4+r<strong>800</strong>_18_0<strong>01</strong>Integration time0235s-MODCancelIntegration time STO0235 s Save input(STO-LED flashes)62 D-R <strong>800</strong>
OperationSelect textIn the “Select text” editing mode, a flashing cursor appears on the far right ofthe second line.After changing to editing mode with STO (red LED on STO key isactivated).Key Function+ Select function (up) Select function (down)MOD Reject changesMOD Save changesIn the "Assign operating temp" editing mode, a flashing cursor appears on thefar right of the second line.If the value is stored in the EEprom, the red LED flashes on the STO key.Example: Temperature measurement parameterisation+-OperTempAssignment+-Current input4 mA point+-STOConstant+r<strong>800</strong>_19_020Current input-MODCancelSTOSave selection(STO-LED flashes)D-R <strong>800</strong> 63
Operation7.3 ShortcutsSimultaneously press (approx. 1 s) the following keys:KeycombinationFunctionMOD & Directly jumps to Scattered light(A02) orDust(A<strong>01</strong>).MOD & +STO & MODDirectly jumps back to the field from whichMOD & was executed.Manual cancellation of the control cycle.+ & Displays index of current field.STO & MOD& + & Software reset of the D-R <strong>800</strong>.7.4 Description of the individual display and input fieldsMeasured value displayLogbookOn the following pages, the measuring unit is shown in the margin column ofthe main menu and, framed in bold, the current position:InfoCode inputGeneral parameterisationParameterisation of currentoutputsThe overview of the entire menu structure can be found in the Appendix onpage 98, the overview of the control parameters on page 97.Parameterisation of digital I/OTemperature measurementparameterisationParameterisationCommunicationMaintenanceDevice check7.4.1 Overview of the main menu• Measured value display A00:Shows the current measured values, the status of the analogue and digitalinputs and outputs.• Logbook B00:Shows the last 20 errors or events since the last restart.• Info C00:Displays the serial number, date of manufacture and SW <strong>version</strong>.64 D-R <strong>800</strong>
OperationData can only be output up to this level (code level 0, menus A-D). In order toprevent access to the settings and unauthorised changes to them byunauthorised persons, access to code level 1 (menus E-K) is protected by acode.• Code input D00:Input field for the unlocking code to obtain access to the other menu fields.• General parameterisation E00:Input fields for: Language, adjustment values, integration time, current gain,control cycle and operator code.• Parameterisation of current outputs F00:Setting of current outputs.• Parameterisation of digital I/O G00:Assignment of functions for relay outputs, digital inputs and limit values.• Temperature measurement parameterisation H00:Input fields for operating temperature measurement / current input andconstant operating temperature.• Communication parameterisation I00:Input fields for communication via the RS485 Modbus or cyclically.• Maintenance J00:Manual starting of zero point, reference point, pollution, control cycle andcalibration measurement. Resetting of all customer parameters.• Device checkK00:Fields for testing the analogue and digital interfaces.Access to the following displays can be easily understood with the help of anexample:Example:to display the scattered light (A02)Please note beforehand:The keys on the measuring unit are not the same as the keys on a computerkeyboard. Considerably more time is required to process the key presses.Therefore, press the keys for barely a second.You are in the Measured value display menu (A00).With MOD and then + , go to the submenu (A<strong>01</strong>). Pressing + againtakes you to the submenu(A02)."Scattered light" appears in the top line of the display and a 3-digit numberwith a decimal point, e.g. 1<strong>01</strong>.0, appears in the bottom line.To return to the main menu (in this case to A00) press the MOD key.D-R <strong>800</strong> 65
Operation7.4.2 Measured value display (A00)Measured value displayLogbookInfoCode inputGeneral parameterisationParameterisation of currentoutputsParameterisation of digital I/OTemperature measurementparameterisationParameterisationCommunicationMaintenanceDevice checkDust concentration (A<strong>01</strong>)Dust content display.Scattered light (A02)Displays the unit-free value of the measured scattered light.Current outputs (A03)Displays the actual current output values. For the second current output, theoutput range currently being used (R1 / R2) is also displayed.Operating temperature (A04)Displays the operating temperature. If the external current input is selected, themA value of the current input is also displayed.Pollution (A05)Displays the percentage pollution of the device.Relay contacts (A06)Displays the status of the relays.1: Relay activeInput contacts (A07)Displays the status of the digital inputs.1: Input openLimit values (A08)Displays the status of both limit values1: Limit value active7.4.3 Logbook (B00)Measured value displayLogbookInfoCode inputGeneral parameterisationParameterisation of currentoutputsParameterisation of digital I/OTemperature measurementparameterisationErrors / Events (B<strong>01</strong>)The last twenty errors / events are stored.When new errors / events are added, the old errors or events that are notcurrently active are overwritten first of all. You can switch between themessages with the + & keys.The second line of the display means:t: Time in minutes since the error occurred.T: Time in minutes for which the error has been pending.If no value is specified, the error is still active.ParameterisationCommunicationMaintenanceDevice check66 D-R <strong>800</strong>
Operation7.4.4 Info(C00)Measured value displayLogbookInfoCode inputGeneral parameterisationParameterisation of currentoutputsSerial number (C<strong>01</strong>)Displays the serial number of the device.Date of manufacture(C02)Displays the date of manufacture of the device.Firmware <strong>version</strong>(C03)Displays the firmware <strong>version</strong> of the device.Parameterisation of digital I/OTemperature measurementparameterisationParameterisationCommunicationMaintenanceDevice check7.4.5 Code input (D00)Measured value displayLogbookInfoCode inputGeneral parameterisationParameterisation of currentoutputsParameterisation of digital I/OTemperature measurementparameterisationParameterisationCommunicationMaintenanceDevice checkThere are different operating levels in the D-R <strong>800</strong>. After switch on, the deviceis in code level 0. Code level 1 is released by entering the operator code in theCode input menu field (D00).To enter the code, in the Code input menu field (D00) press the STOkey and then enter the code. See page 62 Editing mode: Edit number.Code level 0 displays all measured values and the status of the device.Code level 1 contains all user-relevant menu fields for parameter input.In order to lock the device again, an incorrect code must be confirmed with theSTO key in the Code input menu field (D00). 30 minutes after its lastoperation, the D-R <strong>800</strong> automatically reverts to code level 0 (not with testmeasurements - see Maintenance (J00)).When the device is delivered, the operator code is: 1234. It should be changedduring parameterisation in the Operator code menu field (E09), to protectthe device against unauthorised access.D-R <strong>800</strong> 67
Operation7.4.6 General parameterisation (E00)Measured value displayLogbookInfoCode inputGeneral parameterisationParameterisation of currentoutputsParameterisation of digital I/OTemperature measurementparameterisationParameterisationCommunicationMaintenanceDevice checkLanguage (E<strong>01</strong>)Display of the language for the menu texts.Adjustment factor (E02)The factor for converting scattered light to dust concentration (if necessaryobtained from the test institute during calibration) is entered here. Afterentering the exponent and confirming with STO , the cursor jumps to themantissa. This must also be confirmed with STO .For calibration, please also see page 23 and page 75Adjustment offset (E03)An offset for the dust concentration can be entered here. This offset is alsodetermined by the test institute during calibration if necessary.Characteristic curve (E04)An exponent (x1, x² or x³) for converting scattered light to dust concentrationcan be set here (only required in special cases, generally assignment islinear).Dust [mg/m³] = Adjustment factor [mg/m³] . (Scattered light Exponent ) +adjustment offset [mg/m³]Integration time (E05)Specified in seconds.When the device is switched on, the entire memory is set to zero. Individualmeasured values are then permanently recorded and stored in the memory for1<strong>800</strong> seconds. The integration time specifies the time period over which theaverage value of the recorded data is formed (5 – 1<strong>800</strong>s) and output ascurrent measured value.The unattenuated individual measured values from the last 1<strong>800</strong> seconds arestored in the RAM, so that in the event of a change in the integration time thecorrect attenuated measured value is immediately calculated from the storedindividual measured values and output.(Hardware-)Current gain (E06)Selection of the current gain stage. In addition to the selected current gainstage, the current percentage utilisation of this range is displayed. Thus youcan (and must) ensure that a 100% utilisation is not exceeded in any operatingsituation (current gain range 3 provides the lowest current gain).Control cycle time (E07)The time interval for the control cycle is entered here. If a value of zero isentered, the control cycle is switched off.Control cycle output time (E08)Specifies the time in seconds for which the individual measured values (zeropoint, pollution and reference point) are to be kept in the display, before theyare replaced by the value available as current measured value in (E05 ).Operator code (E09)The four-digit code that protects code level 1 can be changed here. When thedevice is delivered, the operator code is 1234.68 D-R <strong>800</strong>
Operation7.4.7 Parameterisation of current outputs (F00)Measured value displayLogbookInfoCode inputGeneral parameterisationParameterisation of currentoutputsParameterisation of digital I/OTemperature measurementparameterisationParameterisationCommunicationMaintenanceCurrent output 1 assignment ( F<strong>01</strong>)Selection of the output between dust concentration and operating temperature.Current output 1 output range (F02)(supply unit terminals 1 and 2)Selection of the dust concentrationA dust concentration value (in mg/m³) can be assigned to the current output forits maximum value (20 mA).At the minimum value of 4 mA, the dust concentration is zero.The assignment curve between min and max is linear.If the dust concentration exceeds the assigned value, the current output islimited to 20 mA.Device checkExample:to set the dust concentration value (in mg/m³) or operating temperature(in °C)You are already in the Parameterisation of current outputs menu (F00).Press MOD and then + to go to the submenu (F<strong>01</strong>). Pressing + againtakes you to the submenu (F02). Now press STO to go into editing mode,so that you can enter the dust concentration value. The LEDs of both the STOand the MOD key are now illuminated.A 3-digit number with a decimal point appears in the display; the first positionin front of the decimal point is underlined, which means that this position cannow be changed. To do this press + ; with each press the displayed numberis increased by one. If you make too many presses, simply continue and gothrough the sequence again, until you reach the correct number.Once the first position is correctly set, go to the second position (to the left)with and repeat the setting procedure, pressing the + key as frequentlyas required.Go to the third position with if applicable, and also enter this figure asdescribed.Input of the max. dust concentration value is now complete and is saved bypressing STO . When the value has been successfully saved, the STO LEDconfirms this by flashing a couple of times.In order to generate an error message from a current output overflow, a limitvalue (in mg/m³) must have been set to 20 mA for the respective currentoutput (in the G<strong>01</strong> or G02) menu.If the operating temperature has been selected in the field (F<strong>01</strong>), 4 mA isoutput for 0 °C and 20 mA for the temperature value assigned here (seeexample of dust concentration value/operating temperature input). Theassignment curve between min and max is linear.D-R <strong>800</strong> 69
OperationCurrent output 2 - output range 1 (F03)(supply unit terminals 3 and 4)A dust concentration value (in mg/m³) can be assigned to the maximumcurrent flow (20 mA) here too. (see example of dust concentration value /operating temperature input, but change to the submenu (F03 or F04)beforehand). If the dust concentration is equal to zero, 4 mA is output. If thedust concentration exceeds the specified value, the current output is limited to20 mA.Current output 2 - output range 2 (F04)(supply unit terminals 3 and 4)If a value different from zero is input here, the range switching is activatedautomatically for current output 2. If a value greater than 20 mA is reachedwith the first output range set for current output 2, switching to output range 2set here occurs automatically. As soon as the measured value in output range1 gives a value less than 17.5 mA, the first output range is switched back to.0 mg/m³ = 4 mAmax 1 mg/m³ = 20 mAOutput range 1X 117,5 mAX 1Output range 2X 2max 2 mg/m³ = 20 mAr<strong>800</strong>_28_002 current output range0 mg/m³ = 4 mATipThe range switching occurs automatically if a value is entered in current output2 – output range 2. In order to make the currently used range visibleexternally, it should be output on one of the four relays. This function must be<strong>manual</strong>ly assigned to the relay (default relay R3) ( see menu (G05) for R3).Error current (F05)The normal current range for temperature or dust concentration is 4 - 20 mA. Ifan error is detected in the device, which results in invalid measured values andmay require the user to make adjustments to the device, an error current isoutput in fixed, selectable values of 0 – 3.8 mA (default 2.4 mA) at both erroroutputs, on request. Please also see Control parameters for code level 1 -overview from page 97.70 D-R <strong>800</strong>
Operation7.4.8 Parameterisation of digital I/O (G00)(Parametr. of digital inputs/outputs)Measured value displayLogbookInfoCode inputGeneral parameterisationParameterisation of currentoutputsParameterisation of digitalI/OTemperature measurementparameterisationParameterisationCommunicationMaintenanceDevice checkLimit value 1 / 2 (G<strong>01</strong>/G02)The limit value is output in mg/m³ here. If the entered value is exceeded, therelevant limit value is set. In order to output this to a relay contact, the contactmust be parameterised accordingly.Relay 1 - 4 assignment (G03-G06)The function of the relays is defined here.Relay contact open:FaultMaintenanceLimit value 1Limit value 2Autorange I2OffThe relay is de-energisedFault status: Relay contact openMaintenance status Relay contact openLimit value 1 exceeded: Relay contact openLimit value 2 exceeded: Relay contact openAutomatic switching of the output range of currentoutput 2Output range 1: Relay contact closedNo functionInput 1 / 2 assignment (G07/G08)The function of the inputs is defined here.Contact open:Contact closed:MaintenanceStart contr.c.LockingOffThe digital input is open - 24V presentThe digital input is switched to ground(DGND)External maintenance inputContact closed:Device is stopped and sets the error Externalmaintenance.External input for starting thecontrol cycleContact closed (> 0,5 s):Control cycle is startedExternal hardware lockContact closed:Parameters can only be viewed but not changedNo functionD-R <strong>800</strong> 71
Operation7.4.9 Temp(erature) measurement parameterisation (H00)Measured value displayLogbookInfoCode inputGeneral parameterisationParameterisation of currentoutputsIn order to determine the dust concentration correctly, the gas temperature is afactor that should be included in the calculations. The change in volume - andconsequently also the change in dust concentration - can thus be calculatedand compensated. The D-R <strong>800</strong> uses the following equation.Dust concentration =Scattered light x (1 + operating temperature [°C] / 273.15) x adjustment factor +adjustment offsetParameterisation of digital I/OTemperature measurementparameterisationParameterisationCommunicationMaintenanceDevice checkOperating temperature assignment( H<strong>01</strong>)Selection between:• external operating temperature measurement via the 4 - 20 mA currentinput (supply unit terminals 5 and 6)and assignment of the minimum temperature value in °Cwhich must correspond to 4 mA, in menu field (H02) andassignment of the maximum temperature value in °Cwhich must correspond to 20 mA, in menu field (H03) (the assignmentcurve between min and max is linear) or• assignment of a constant operating temperature in °Cin the constantoperating temperature menu field (H04)For the input of data into the measuring unit, please also see the example onpage 69.7.4.10 Communication parameterisation (I00)Measured value displayLogbookCommunication ( I<strong>01</strong>)Definition of communication mode on the RS485 interface.InfoCode inputModbusModbus communication - see Modbus <strong>manual</strong>General parameterisationParameterisation of currentoutputsParameterisation of digital I/OTemperature measurementparameterisationParameterisationCommunicationMaintenanceDevice checkCyclicalOffCycle time (I02)A number of data are cyclically output on the RS485 - seeCyclical data outputNo digital communicationInterval time for cyclical data output in seconds.Modbus address (I03)Device address for Modbus communication.72 D-R <strong>800</strong>
Operation7.4.11 Maintenance (J00)Measured value displayLogbookInfoCode inputGeneral parameterisationParameterisation of currentoutputsParameterisation of digital I/OTemperature measurementparameterisationParameterisationCommunicationMaintenanceDevice checkSet internal maintenance (J<strong>01</strong>)Pressing the STO key sets the "I17 int. maintenance" status in this menufield. This status is ended again with the STO or MOD keys. The effect isidentical to the external maintenance contact.Zero point measurement (J02)The measurement is started <strong>manual</strong>ly with the STO key. The measurementis executed until ended with the STO or MOD keys.Measure ref(erence)point (J03)The measurement is started <strong>manual</strong>ly with the STO key. The measurementis executed until ended with the STO or MOD keys.Pollution measurement (J04)The measurement is started <strong>manual</strong>ly with the STO key. The measurementis executed until ended with the STO or MOD keys.For the fields zero point, reference point and pollution measurement, themeasurement is started as soon as the STO key is pressed.For the fields zero point, reference point, pollution measurement and duringthe control cycle, these are output to current output 1. Current output 2 isfrozen at the last dust measuring value.Start control cycle (J05)The control cycle can be started <strong>manual</strong>ly here. The effects are identical tothose of the external input contact or the cyclical control cycle.Calibration (J06)In this menu field, the linearity of the D-R <strong>800</strong> can be checked.The device must be removed from the flue first of all(Please always comply with the safety instructions amongst others on page 78).• Start calibration. The device performs a measurement in the pollution pathfor one minute in order to determine the current reference value for theunfiltered beam path.Nothing must be put in the beam path during this reference measurement.• The various filter disks can then be set on the control unit. The attenuationis output on the display. This should correspond to the (target-) values ofthe disks (difference < 2%). Description of Installation of filter disks forchecking linearity see page 78.The filter disks are available as the option "Control unit, comprises:Filter holder and filter set (4 pieces) D-R <strong>800</strong> – 80" (see page <strong>29</strong>).D-R <strong>800</strong> 73
OperationTipFor a series of menu fields that start a particular process, the default value is"Cancel".“Start” must be selected with the + or keys and then confirmed with theSTO key.Reset EEprom (J07)Via this menu field, ALL parameters in code level 1 are reset to the defaultvalues (see table on page 97).Apply EEprom <strong>version</strong> (J08)If the error message "E03 EEp.Version" occurs, there is a discrepancybetween the current EEprom table and the EEprom table required by thesoftware (e.g. after a software update). After setting the deviating parametersto valid values, you can acknowledge error E03 here. Which parameters arenew or now have a different function is indicated with each software <strong>version</strong>.EEprom <strong>version</strong> (J09)The current EEprom <strong>version</strong> of the data stored in the EEprom (HW) and theEEprom <strong>version</strong> required by the software (SW) is displayed here.If the two <strong>version</strong>s differ, e.g. due to a software update, the parametersrequired for the new software must be entered and the EEprom <strong>version</strong>updated (Apply EEprom <strong>version</strong>(J08)).7.4.12 Device check (K00)Measured value displayLogbookInfoCode inputGeneral parameterisationParameterisation of currentoutputsParameterisation of digitalI/OTemperature measurementparameterisationParameterisationCommunicationMaintenanceDevice checkThe hardware and the wiring can be tested with the test routines. While thesetests are running, the device is not ready for measuring - “I25 Simulation”display.Press the STO key to start a test. End the test with the STO or the MODkey.Current output 1 / 2 test (K<strong>01</strong>/K02)The entered value is output directly to the current output.RS485 test (K03)Each byte sent to the D-R <strong>800</strong> is returned and shown on the display.The default Modbus address is 42dec.Relay test (K04)The relays can be set in succession with the + or keys.Input contacts test (K05)The status of the digital inputs is displayed.Current input test (K06)The actual current input value is displayed.74 D-R <strong>800</strong>
Operation7.5 Set-up, adjustment7.5.1 CalibrationBefore the D-R <strong>800</strong> can output correct dust values, it must be set up orcalibrated.In principle, a gravimetric comparison measurement should be performed by arecognised test institute (accredited measuring body) in accordance withEN 13284 to calibrate the D-R <strong>800</strong> .During this process the measured values of the D-R <strong>800</strong> are compared withthe dust concentrations from the gravimetric comparison measurement. At theend of the comparison measurement, a table is compiled with value pairs fromthe current signals of the D-R <strong>800</strong> and the dust contents determined by thestandard reference measuring procedure [mg/m³]. (see value pairs tablebelow)Symbols used:a y-intercept of calibration function according to EN 13284 – 2b'a'bcGradient of calibration function according to EN 13284 – 2Adjustment offset after calibration, otherwise 0.0(E03)Adjustment factor after calibration, in comparison with I neutral(E02)Concentration determined according to EN 13284 – 2 from thecurrent signal I'c Concentration which the D-R <strong>800</strong> can display, if ''c endcorrectly entered approximately equal to cCurrent output output range (F02)a&'b& areI Current signal from the current output of the D-R <strong>800</strong>JF Adjustment factor before calibration according to EN 13284 – 2, incomparison with I neutral (E02)SS endScattered light proportional to the dust content in the measuringchannelScattered light which must not be exceeded, otherwise currentsignal overflowAs a necessary intermediate step for generating the current signal, theinstrument-internal scattered light is first of all shown on any (non-calibrated)concentration display, with a default adjustment factor ( JF ) of 0.<strong>01</strong> (chapter'General prameterisation from page 68), Adjustment factor c (E02).It is very important for the adjustment offset (E03) to be unchanged at 0.0before calibration (EN 13284-2)!This concentration display will in turn correspond to the default output range of'20 mA cend = 25 mg/m³ (parameterisation of current outputs (F02)), mappedonto a range of 4 to 20 mA.D-R <strong>800</strong> 75
OperationThe following simple relationship applies:'cmg mgend= JF * S end 25 = 0,<strong>01</strong> ⋅ 2500 )3 3m m(example. The current I is calculated from the scattered light S according tothe following function f(S):⎛ 16⎞f ( S ) = ⎜ JF S ⎟⋅ ⋅ + 4 mAJF S⎝ ⋅end ⎠Here you can see that the adjustment factor JF for the current output I maybe any value!An example of a possible table with values pairs current i of the D-R <strong>800</strong> andconcentration from the gravimetric comparison measurement could look likethis:Value pairs table:Example of a calibration tableValue pairs tablePair of values iScatteredlightSConcentrationD-R <strong>800</strong>display'cmg/m³CurrentImAPair of values1 -11 -0.11 3.93 0.20Pair of values2 110 1.10 4.70 0.80Pair of values3 182 1.82 5.16 2.00Pair of values4 673 6.73 8.34 2.70Pair of values5 2202 22.02 18.09 10.00Concentration fromgravimetriccomparisonmeasurementcmg/m³From the calibration table obtained (framed in bold), in accordance with theprocedure specified in EN 13284-2, the calibration function : c = a + b ⋅ I isthen determined, witha : y-intercept of the calibration functionExample: -2.246 mg/m³b : Gradient of the calibration functionExample: 0.669 mg/m³/mA.ii76 D-R <strong>800</strong>
Operationapplies'c= b ⋅ I +a(in accordance withEN13284-2)CurrentImA3.93 0.384.70 0.905.16 1.218.34 3.3418.09 9.87Concentration'cmg/m³These values are subjected to a variability check during calibration(permissible deviation of the gravimetric concentrations from those of the D-R<strong>800</strong>, has not been done for this example).From the intercept a and the gradient b of the calibration function, thecorrect parameters can be defined for the concentration of the D-R <strong>800</strong> , asfollows:'a = a + 4 ⋅ b Adjustment offset (E03)Example.:0.432 mg/m³b'b= 16 ⋅S endExample:0.0428 mg/m³/mA''applies c = b' ⋅ S + a Adjustment factor after calibration (E02)7.5.2 Measuring statusInitialisationAfter switching on, the D-R <strong>800</strong> executes an auto-initialisation for approx. 15 s.The various measuring status (apart from measuring) are indicated by flashingon the display. The reference point is located at approx. 70% of the measuringrange.MeasuringThe device is in measuring mode. The dust concentration is measured andoutput to the current outputs according to the parameterisation. All digital andanalogue inputs are evaluated. The measurements are independent of thedisplayed menu field.Internal / external maintenanceThe D-R <strong>800</strong> is put into maintenance - externally by an input contact orinternally via the menu field Set internal maintenance (J<strong>01</strong>). The internalD-R <strong>800</strong> 77
Operationmeasurements continue but are not output and are also not used for averagevalue formation. The error current is output at the current outputs.Control cycleA control cycle is performed - started externally by an input contact, internallyvia the menu field Start control cycle(J05) or cyclically with the time set in themenu field Control cycle time(E07).First of all a zero point measurement, then a pollution measurement and finallya reference point measurement are performed. The control cycle measuringvalues are output at the first current output; the second current output is frozenat the last value. The duration of the individual steps can be defined in themenu field Control cycle output time (E08). The values can also be outputdigitally via the cyclical communication(see chap. Interface communication).Test measurement (zero point / reference point / pollution)The purpose of the test measurements is to check the device. They can bestarted <strong>manual</strong>ly via the menu fields (J02, J03 or J04). During a testmeasurement the measured value is output at the first current output; thesecond current output is frozen at the last value. The test measurements areended by pressing the MOD key .No control cycle is started during test measurements and simulation.Installation of filter disks for checking linearityof the D-R <strong>800</strong>.Calibration (J06)First of all the device must be removed from the flue. Don’t switch off the purgeair supply yet.WARNINGWARNINGParticular danger from gasesIf the flange connection to the measuring channel becomes loose, hot orhazardous gases can escape! Personnel must put on protective clothing andprotective mask beforehand if necessary.Danger of burnsNever touch parts that could be hot without temperature-resistant equipmentand safety gloves respectively.Mount the calibration holder with its plane side to the lens diaphragm on the20 mm circular tube of carrier lance. The pressure pin should take its matchingposition in the depression in the lens diaphragm.The depression in the lens diaphragm could be soiled from insertion in thestack.If the depression isn’t visible, please clean lens diaphragm with oil-freecompressed air or a lint free cloth, if necessary with clear water and ethylalcohol.78 D-R <strong>800</strong>
OperationInsert the four different neutral density filters* one after another carefully intothe calibration holder and do the nominal/actual value comparison, using thedata table below.* The transmission value of the delivered neutral density filters is exactlydetermined by the manufacturer. Every filter has a customized number toenable definite allocation of the detected transmission value. By runningcalibration the displayed value from D-R <strong>800</strong> (actual value in table) shoulddiffer less then 2% from the determined value of the manufacturer (targetvalue in table). Following table could be used as template to documentconducted calibration.Nominal valueof neutraldensity filters10%20%40%50%Sample:Customizednumber**Targetvalue**Actualvalue*Date10% 07111006 8,7% 8,8% 02.08.2007* allowable variation from target value absolute 2%** number/value to be taken from the filterSimulationSimulation status is set when a menu field from the submenu Devicecheck(K00) is activated. All other outputs apart from the tested function areundefined.7.5.3 Interface communicationIn the Communication(I<strong>01</strong>)menu field you can select no, Modbus or cyclicalcommunication. Communication occurs at a rate of 9600 baud, 8 bits withoutparity and 1.5 stopbits.D-R <strong>800</strong> 79
OperationModbusThe Modbus address can be set in the menu field Modbus address(I03)The default Modbus address is 42dec.Please also note the Modbus <strong>manual</strong> with detailed descriptions and definitionsof the Modbus functions and registers.Cyclical communicationDuring cyclical communication the D-R <strong>800</strong> outputs a data packet (frame) ofseveral measured values as ASCII characters.The values are separated by a semi-colon (ASCII 59dec) and each frame isended with a line feed (ASCII 13dec.The following frame is then output in accordance with the set cycle time (I02):[Counter]; [Serial number]; [SW <strong>version</strong>]; [Current gain]; [Dust]; [Scatteredlight]; [Sensor temperature]; [Laser temperature]; [Operating temperature];[Zero point]; [Pollution]; [Reference point]; [Extended device status]; [Eventfield]; [Checksum];ASCII 13dezPlease note that the output for the zero and ref point is set to -250(corresponds to -25%), as long as no control cycle has been performed. Thefollowing table clearly shows the variables with their value ranges.No. Variables gen. customer min max Factor Unit1 Counter 0 9999999 - -2 Serial number 0 99999999 - -3 SW <strong>version</strong> 0 9999 0.<strong>01</strong> -4 Current gain 0 3 - -5 Dust -100 9999 0.<strong>01</strong> mg/m³6 Scattered light -500 65535 0.1 -7 Sensor temperature - - 0.1 K8 Laser temperature - - 0.1 K9 Operating temperature 2735 6735 0.1 K10 Zero point 0 999 0.1 %11 Pollution 0 999 0.1 %12 Reference point 0 999 0.1 %13 Extended device status 0 FFFF Bit coded see below. -14 Event field 0 FFFFFFFF Bit coded see below. -15 Checksum 0 65535 Sum of all ASCII charactersBit no. 7 6 5 4 3 2 1 0Devicestatus* 0x00<strong>01</strong>FaultMaintenanceLockingOutputrange 20 0Limitvalue 2Limitvalue 180 D-R <strong>800</strong>
OperationDevicestatus* 0x<strong>01</strong>00EndcontrolcycleReferencepointmeasurementPollutionmeasure-mentZero pointmeasurementReferencepoint,<strong>manual</strong>Pollution,<strong>manual</strong>Zeropoint,<strong>manual</strong>Normalmeasure-mentBit no. 7 6 5 4 3 2 1 0Event field* 0x000000<strong>01</strong>Event field* 0x0000<strong>01</strong>00Event field* 0x00<strong>01</strong>0000Event field* 0x<strong>01</strong>000000E08 E07 E06 E05 E04 E03 E02 E<strong>01</strong>E16 E15 E14 E13 E12 E11 E10 E09I24 I23 I22 I21 I20 0 0 E170 0 0 I<strong>29</strong> I28 I27 I26 I25D-R <strong>800</strong> 81
6BOperationD-R <strong>800</strong>Dust Concentration Meter088 Maintenance8.1 Customer service information8.2 Safety8.3 Maintenance intervals8.4 Replacement material8.5 Maintenance work8.5.1 Inspection, control and adjustment tasks8.5.2 Lubrication, maintenance and cleaning tasks8.5.3 Functional check8.5.4 Filter change8.6 MessagesD-R <strong>800</strong> 83
Maintenance8 MaintenanceThe D-R <strong>800</strong> is an easily maintained Dust Concentration Meter.This chapter explains the necessary maintenance tasks, such as visualinspections and filter change.8.1 Customer service information8.2 SafetyMaintenance can also be performed by DURAG GmbH on request. We wouldbe happy to explain the advantages of a maintenance contract for yourcompany. The measuring device can also be commissioned D-R <strong>800</strong> byDURAG. Welding-in of the flange tube and the electrical installation up to thesupply unit must be carried out by approved specialist companies. We willgladly provide you with details of these. Our service address and telephonenumbers can be found in the Appendix on page 111.WARNINGCAUTIONDanger of electric shockOnce the housing or accidental contact protection have been opened, liveparts are accessible. Before working on the device, the mains connectingleads must therefore be disconnected from the power and protected againstunauthorised re-activation. If the accidental contact protection is removed, itmust be replaced before switching on the mains voltage.Danger from laser lightRisk of blinding!- Never look directly into the beam path- Do not direct the laser beam of the D-R <strong>800</strong> at people- Look out for reflections of the laser beamDamage to property by unauthorised personnelThe person responsible for safety must ensure that only qualified (authorised)personnel operate the measuring system described in this Manual.Particular care must be taken to ensure that the warnings on operatorprotection and measuring system protection specified in this Manual areknown and adhered to.D-R <strong>800</strong> 85
Maintenance8.3 Maintenance intervalsThe D-R <strong>800</strong> is a low-maintenance measuring system with system-dependentmeasuring intervals, which must be defined by the operator. These depend on:• the type of measuring medium• the pressure conditions• the general ambient conditions (e.g. climatic conditions at the measuringpoint)It is expedient to start with a short maintenance interval initially (typically 4weeks), and then to gradually extend this to up to 6 months, depending on theconditions.Independently of this, however, a check should be performed every fourweeks.Lack of or inadequate maintenance of the measuring system is likely to resultin failure of and possibly damage to the lance and the measuring head due toincreasing pollution of the measuring lance, after system warnings to thiseffect.8.4 Replacement materialPurge air filter:DescriptionFilter cartridge for integrated blowerOrder codewdifilterpico8.5 Maintenance work8.5.1 Inspection, control and adjustment tasks• Check the purge air unit, including the purge air hoses, for damage.• Check that the hose connections are leak-free and fit securely.• Blow out the purge air hoses if necessary.86 D-R <strong>800</strong>
Maintenance8.5.2 Lubrication, maintenance and cleaning tasks• Switch the D-R <strong>800</strong> into Maintenance.a) Via parameterisation of the Maintenance menu group (J<strong>01</strong>): activateMaintenance.b) Via a bridge contact for closing digital input 1 (contact between terminals13 and 14) or input 2 (contact between terminals 15 and 16), depending onwhich input has been selected in the Parameterisation of digital I/O(G<strong>01</strong>/G02).WARNINGIn the case of measuring channels with harmful gases, high temperatures orhigh pressure, the Dust Concentration Meter and measuring lance may onlybe mounted or demounted when the system is stationary!• Remove the D-R <strong>800</strong> from the flue; the purge air must remain operational.• Disconnect the supply unit from the mains voltage.• Clean the outer parts of the device, paying particular attention to free exit ofthe purge air at the diaphragm openings.D-R <strong>800</strong> 87
Maintenance8.5.3 Functional check• To check the optical boundary surfacesa) The yellow inspection cap must be unscrewed on the transmitter side.8.5.4 Filter change• b) The lance cap must be removed on the receiver side;if visible deposits have formed, these must be removed with oil-freecompressed air or a soft lint-free cloth, using water and alcohol if necessary.• Replace the inspection cap and the lance cap.The maintenance intervals for the filters depend on the quality of the intake air.• Check the purge air filter in the supply unit.Open the bayonet catch of the black filter housing by turning itanticlockwise. If there is loose dirt in the housing, the filter cartridge must beremoved. Clean the filter housing. Insert new filter cartridge. When closingthe filter housing, make sure that the lock engages.Change filter:Turn lid counterclockwise,remove downwards andpull filter outr<strong>800</strong>_04_0<strong>01</strong>88 D-R <strong>800</strong>
Maintenance• Any deposits in the welded-in pipes must be removed.• Supply the supply unit with power again, so that the purge air blower runsand the measuring head starts measuring.• Wait for result of auto-test.• If the auto-test is successful, replace the D-R <strong>800</strong> in the channel flange.8.6 MessagesThe last occurring and active event is shown flashing on the display. Eventscan be information on the measuring status (Ixx) or error messages (Exx).The last 10 events can be viewed in the Logbook menu (B<strong>01</strong>).There are various levels for the error and information messages; these areidentified internally by the maintenance and fault flags. These flags can beoutput to relays in the input fields (G03) to (G06) of the menu groupParameterisation of digital I/O(G00) .A distinction is made between actual errors (Exx) and information on themeasuring status (Ixx). The effects of the different status can be seen in thefollowing tables:“Maintenance”flag"Fault"flagMeasuring valueRederrorLEDMeasures- - ok - None- X ok X action requiredX - reject - NoneXXreject +error current outputXaction requiredD-R <strong>800</strong> 89
MaintenanceMessageDescriptionMaintenanceflagFault flagPossiblecauseRemedy- no errorE<strong>01</strong> EEp.AckE02 EEp.ChecksumEEpromdoes notrespondEEpromChecksumerrorXXXXError whenreading / writingSwitch device off and onagain;Change and save anyparameters;If the error still occurs,contact the Servicedepartment.The device must beadjusted by DURAGE03 EEp.VersionEEprom<strong>version</strong> errorXXSoftware updaterequires a newEEprom tableThe new values must besaved; then execute menufieldApply EEprom <strong>version</strong>(J08)E04 RAM error RAM error X X RAM defectiveE05 ROM error ROM error X X ROM defectiveE06 AD converterADconverterread errorXXConverterdefectiveE07 laser off Laser off X X Laser defectiveE08 AdjustmentAdjustmenterrorE09 New device New device X XOverflow ME11 Overflow RE12 Overflow AMeasuringlightoverflowOverflow ofpollutionlightOverflowduringadjustmentXXXXXXValues duringadjustmentoutside thepermissible rangeDevice is not fullyadjustedDust content toohigh; Increase thediaphragmsLaser incorrectlysetIncorrectadjustment diskselectedRestart device;If the error still occurs,contact the ServicedepartmentCheck the control unit;Repeat adjustmentPerform adjustmentContact ServicedepartmentSelect lower current gain;Clean deviceContact ServicedepartmentInsert correct adjustmentdiskRepeat adjustment90 D-R <strong>800</strong>
MaintenanceMessageE13 Pollution>30%E14 Pollution>60%E15 mA-In < 4mAE16 mA-In > 20mAE17 overflow II20 ExternalmaintenanceI21 InternalmaintenanceI23 Control cycleI24 Initial.I25 SimulationI26 AdjustmentI27 Test measurementI28 CalibrationDescriptionPollutionexceeds30%Pollutionexceeds60%Currentinput valuetoo smallCurrentinput valuetoo largeInternalcomputeroverflowExternalmaintenanceinput is setInternalmaintenanceis setControlcycle isrunningInitialisationrunningSimulationrunningAdjustmentrunningTestmeasuringrunningCalibrationrunningMaintenanceflagXXXXXXXXXXXXFault flagPossiblecauseRemedyX Device is soiled Clean deviceXXXXXXXDevice is heavilysoiledTemp. transmitterdefective, cablebreakage or outsidemeasuring rangeThe dust contentcalculation has anoverflowThe externalmaintenance inputis closedThe device hasbeen switched toMaintenance in themenuThe control cyclehas been startedcyclically internally,externally or via themenuThe device hasbeen restartedA field from theDevice check area(K00) has beenselected and startedin the menuAn adjustment hasbeen startedA test measurement(zero point,reference point orpollution) has beenstartedCalibration hasbeen startedClean deviceCheck temperaturetransmitterCheck adjustment factorOpen inputPress STO or MOD keyto endWait or cancel with theSTO + MOD keysNote: Cancellation mayresult in an incorrectpollution displayWaitPress MOD key to endComplete adjustmentPress MOD key to endPress MOD key to endD-R <strong>800</strong> 91
D-R <strong>800</strong>Dust Concentration MeterAppendix9 Technical data9.1 Performance features9.2 Dimensions and weights9.3 Supply9.4 Connections9.5 Environment9.6 Control parameters for code level 1 - overview10 Menu structure11 Standards and regulations12 Declaration of Conformity13 Glossary14 Index15 DURAG GROUP company addressesD-R <strong>800</strong> 93
Technical data9 Technical data9.1 Performance featuresMeasuring rangeAccuracyMeasured value integrationtimeControl cycleLaser protection classMinimum measuring range 0-10 mg/m³Maximum measuring range 0-200 mg/m³- depending on dust type -±2% from the measuring range end value5 - 1<strong>800</strong> s freely definable in second increments0.1 to 48 h freely definable in 0.1 h incrementsIIRadiant power < 1mW at 655 nm9.2 Dimensions and weightsDimensions of measuringlanceWeight of measuring lanceDimensions of supply unitWeight of supply unit1000 x 160 x 160 mmapprox. 7 kg380 x 300 x 210 mmapprox. 13 kg9.3 SupplyMainsPower consumptionFuse protectionClass of protection IP 6585-264 VAC, 47-63 Hz50 W (complete system)Supply unit: Miniature fuse, 5x20 mm 1A slowblowEvaluation unit: RM 50.5A slow-blowD-R <strong>800</strong> 95
Technical data9.4 ConnectionsRelaysCurrent outputsDigital inputsCurrent inputCommunicationFour freely programmable potential-free relayoutputs for e.g. limit values, fault, maintenance…Breaking capacity: 230 V~; 1 A2 freely programmable potential-free currentoutputs for dust concentration and temperature0 - 20 mA; Live-Zero 4 mA; max. load 500 ohm2 freely programmable digital inputs for potentialfreecontacts;e.g. maintenance, control cycle…Internal supply; 24 V; 9 mA1 active current input for operating temperaturemeasurement4 - 20 mA; 24 V; Load 200 ohmCyclical data output or ModbusRS485; 9600 Baud; 8 bit without parity;1.5 stop bits9.5 EnvironmentPermissibletemperaturePurge air temperatureambient-20°C to +50°CMax. emission temperature +220 °CMin. emission temperatureMin max stat. exhaust gaspressure> Acid dew point on the measuring lance> Exhaust gas dew point-50 to +10 hPa96 D-R <strong>800</strong>
Technical data9.6 Control parameters for code level 1 - overviewField nameMenuno.min max defaultLanguage E<strong>01</strong> Only language <strong>version</strong> displayed Language -DisplayedunitAdjustment factor E02 0.1000E-9 1.9999 0.<strong>01</strong>00 mg/m³Adjustment offset E03 -50.0 50.0 0 mg/m³Characteristic curve E04 x^1, x^2, x^3 linear x^1 -Integration time E05 5 1<strong>800</strong> 10 sCurrent gain E06 0 3 1 -Control cycle time E07 0 48.0 24.0 hControl cycle output time E08 45 240 90 sOperator code E09 0000 9999 1234 -Current output 1 assignment F<strong>01</strong> Scattered light; Operating temperature Scattered light -Current output 1Output rangeCurrent output 2Output range 1Current output 2Output range 2Scattered light 5.0 999.9 25.0 mgF020.0 400.0 25.0 °COperatingtemp.F03 5.0 999.0 50.0 mgF04 0 999.0 0 (off) mgError current F05 0 mA; 2 mA; 2.4 mA; 3.8 mA; Off 2.4 mALimit value 1 G<strong>01</strong> 0.1 999.0 15.0 mgLimit value 2 G02 0.1 999.0 45.0 mgRelay 1 assignment G03 Fault -Relay 2 assignment G04 Fault; Maintenance; Limit value 1; Maintenance -Relay 3 assignment G05 Limit value 2; Autorange; Off Limit value 1 -Relay 4 assignmentInput 1 assignmentInput 2 assignmentG06G07G08External maintenance; control cycle;locking; OffLimit value 2 -ExternalmaintenanceControl cycle -Temp. input assignment H<strong>01</strong> Current input; constant Constant -Current input 4 mA point H02 0 400 0 °CCurrent input 20 mA point H03 0 400 100 °CTemp. constant H04 0 400 0 °CCommunication I<strong>01</strong> Modbus; cyclical; off Off -Cycle time I02 10 240 60 sModbus address I03 0 255 42 --D-R <strong>800</strong> 97
Menu structure10 Menu structureResetD-R<strong>800</strong>Vx.xxMODMeasured valuedisplayA00MODDust concentrationA<strong>01</strong>+-Scattered lightA02+-mA outputsA03+-OperatingtemperatureA04+-PollutionA05+--+MODLogbookB00MODError / EventsxB<strong>01</strong>x+-+MODInfo MOD Serial number +-Manufacturedate+-Firmware<strong>version</strong>C00 C<strong>01</strong> C02 C03+-Code inputD00codeebene 0-+MODParameterisationgeneralE00MODDisplaylanguageE<strong>01</strong>+-AdjustmentfactorE02+-AdjustmentoffsetE03+-characteristiccurveE04+-IntegrationtimeE05+--+MODParameterisationcurrent outputF00MODCurrent output 1assignmentF<strong>01</strong>+-Current output 1 + Current Output 2 + Current output 2range- range 1- range 2F02 F03 F04+-Error currentF05+--+MODParameterisationdigital I/OG00MODLimit value 1 +-Limit value 2 +-Relay 1assignment+-Relay 2assignment+-Relay 3assignmentG<strong>01</strong> G02 G03 G04 G05+--+MODMOD Operating +++ OperatingParameterisationtemperatureCurrent inputCurrent inputtemperaturetemp. measuringassignment - 4 mA point - 20 mA point -H00 H<strong>01</strong> H02 H03 constant H04+--+MODParameterisationcommunicationI00MODCommunication +-Cycle time +-Modbus adressI<strong>01</strong> I02 I03+--+MODMaintenance MOD Set internalmaintenance+-Zero pointmeasuring+-Reference pointmeasuring+-Pollutionmeasuring+-Start controlcycleJ00 J<strong>01</strong> J02 J03 J04 J05+--+MODDevice checkK00MODTestcurrent output 1+-Testcurrent output 2+-TestRs485+-Testrelay+-Testinput contactsK<strong>01</strong> K02 K03K04 K05+-code level 1-98 D-R <strong>800</strong>
Menu structureD-R<strong>800</strong> menu structure from V1.60Continued+-RelaycontactsA06+-InpucontactsA07+-LimitvaluesA08+-+-MeasuringrangeE06+-Control cycletimeE07+-Control cycleoutput timeE08+-Operator codeE09+-+-Relay 4assignment+-Input 1assignment+-Input 2assignmentG06 G07 G08+-+-CallibrationJ06+-ResetparameterJ07+-Apply EEprom<strong>version</strong>J08+-EEprom<strong>version</strong>J09+-+-Testcurrent inputK06+-D-R <strong>800</strong> 99
Standards and regulations11 Standards and regulationsThe DURAG GROUP is well-known for its high quality standards and has beencertified to ISO 90<strong>01</strong> for a number of years. The products are manufactured tonational, European and international standards.The following are taken into account:• VDI 2066 / VDI 3950 – German dust measurement standard• EN 14181– European quality assurance standard for automatic measuringequipment• EN 13284 – European standard for determining small dust concentrations1<strong>01</strong> D-R <strong>800</strong>
Declaration of Conformity12 Declaration of ConformityUmweltbundesamtBekanntmachungüber die bundeseinheitliche Praxisbei der Überwachung der Emissionenund der ImmissionenVom 12. April 2007I.Eignung von Messeinrichtungenzur kontinuierlichen Überwachung von EmissionenUnter Bezugnahme auf Nummer 3 der Richtlinie über die BundeseinheitlichePraxis bei der Überwachung der Emissionen — Rundschreibendes Bundesministeriums für Umwelt, Naturschutz undReaktorsicherheit (BMU) vom 13, Juni 2005 — IG I 2 - 45053/5(GMBl. 2005 S. 795) — wird im Auftrag des BMU die Eignung derfolgenden Messeinrichtungen bekannt gegeben:1 Staubförmige Emissionen (Staubkonzentration)1.1 D-R <strong>800</strong> für StaubHersteller:DURAG GmbH, HamburgEignung:Für genehmigungsbedürftige Anlagen und Anlagen der 27,BImSchVMessbereiche bei der Eignungsprüfung:Staub: 0—15 mg/m 30—100 % T (Referenzmessbereich)Software Version: 1.91Hinweise:1. Bei der manuellen Kalibrierung ergab sich ein Messbereich, vonca. 0—16,5 mg/m 3 Staub.2. Das WartungsIntervall beträgt zwei Monate.3. Ergänzungsprüfung zur Bekanntmachung des Umweltbundesamtes vom 12. September 2006 (BAnz S. 6715).Prüfbericht:TÜV Rheinland Immissionsschutz und Energiesysteme GmbH,Köln, TÜV Rheinland GroupBericht-Nr.: 936/21205307/B vom 13. Dezember 2006102 D-R <strong>800</strong>
Declaration of ConformityD-R <strong>800</strong> 103
Glossary13 GlossaryAbsorbance: (Phys.) Attenuation of a wavemotion (radiation) when passing througha mediumAfter con<strong>version</strong> of the transmission intoabsorbance and after a (→) gravimetriccomparison measurement, the displayoccurs in mg/m³. For dust concentrationsthis result is specified in mg/Nm³ throughcomputation to the reference values T, P,RF.BImSchVFederal Immission Control ActClaus plantAll H 2 S-containing exhaust gases thatdevelop are processed in the Claus plant.The toxic H 2 S is converted intoelementary sulphur and water during thisprocess.Cyclical communicationInterface communication in which dataare bundled into data packets andtransferred in a defined order, separatedby defined characters (e.g. semicolon).Forward scatteringIn physics scattering generally refers to thedeflection of an object through interactionwith another local object (scatteringcentre). An example is the scattering oflight on fine particulates. Forwardscattering refers to scattering processes inwhich only a small deflection occurs(small scattering angle). The measurementis therefore recorded from the front, soagainst the beam direction.FrameThis generally means a data packet inthis <strong>manual</strong>Gravimetry: (Chem.) Measurement analysis;method for quantitative definition ofelements and groups in mixtures ofmaterials.In situ measuring methodThe term in situ (lat. for at the (original)location, on the premises, "on the spot") inenvironmental technology denotes theexecution of defined procedures on thespot.Modbus (interface communication)The Modbus protocol is a communicationprotocol based on a master/slave orclient/server architecture. Modbus hasbecome a facto standard in industry, as itis an open protocol.A master (e.g. a PC) and several slaves(e.g. measurement and control systems)can be connected by means of Modbus.Offset or adjustment offsetIn this <strong>manual</strong> offset denotes a staticvalue which is added to or subtractedfrom a measured value, in order to adjustthe zero value, for example.Opacity-: (optics) NontransparencyA light beam is sent through a mixture ofgas and particles and attenuated throughabsorption and scattering. The moreparticles are found in the light beam, thestronger the opacity. The ratio of receivedlight to initial light is a measurement of thetransmission or the reciprocal opacity.Reciprocal: mutual;Reciprocal value: (Math.) Inverse value(permutation of numerators anddenominators in a fraction)RS485 interface- analogous to the RS422 interface - hasbeen developed for serial high-speeddata transfer over long distances and isbecoming increasingly widespread in theindustrial sector.The data cables must be implemented astwisted pairs.Scattered lightA light source emits light which is diffusedby particles in the gas and recorded by adetector. The scattered light principle issuitable for small dust loads to under 1mg/m3. The relationship between (→)measured value display and dust load isdetermined by means of gravimetriccomparison measurement.105 D-R <strong>800</strong>
GlossaryD-R <strong>800</strong> 106
Index14 IndexAAbsorbance 103Adjustment factor 68Adjustment offset 68, 75Apply EEprom <strong>version</strong>: 74Approvals 30Assembly sequence 42BImSchV 103BCCalibration 23, 73, 75Calibration table 76Characteristic curve 68ChecklistPrerequisite Operation 54Prerequisites for use 42Claus plant 103Code input 67Code level 1Control parameters 70, 95Commissioning 55Communication 72Communication parameterisation: 72Communication, cyclical 103Company addresses 109ConnectionPower supply 48purge air supply 52Control cycleControl cycle 78Control cycle time 68Control cycle output time: 68Current gain 68Current input test: 74Current outputtest 1 / 2 74Current output 1assignment 69output range 69Current output 2Assignment output range 1 70output range 2 70Current outputs 66Cycle time 72Cyclical communication 78D-R <strong>800</strong> 107DDate of manufacture 67Design variants 32Device check 74Display and input fields 64Display language 68Dust concentration 66EEditing mode 62Eeprom <strong>version</strong>: 74Electrical connection 49EN 13284 99EN 14181 99Equipment 32Error current 70Errors / Events 66ExampleData input on measuring unit 69Scattered light display 65FFault flag: 87Fields of application 31Filter cartridge 84Filter change 86Firmware <strong>version</strong> 67Flange / measuring lance length 44Forward scattering 103Frame 78Functional description 35Functional diagram 36GGeneral parameterisation: 68gravimetric comparison measurement 75Gravimetry 103HHazardfrom electrical equipment 16
Indexfrom laser light 16to the device due to purge air failure 17Initialisation 77Input 1 / 2 assignment 71Input contacts 66Input contacts test: 74In-situ 103Integration time 68Interface communication 78Internal / external maintenance 77Language 68Limit value 1 / 2 71Limit values 66Logbook 66ILMMains fuse 49Maintenance 73, 83Maintenance flag: 87Maintenance intervals 84Maintenance work 84Measure reference point 73Measure zero point 73Measured value display 66Measured value display: 66Measuring 77Measuring point, suitable: 45MenParameterisation gen. 68MenuCode input 67Communication parameterisation 72Device check 74Info 67Logbook 66Main menu 64Maintenance 73Paramet. of current outputs 69Paramet. of digital 71Temperature parameterisation 72Menu structure(A00) 66(AI0) 72(B00) 66(C00) 67(D00) 67(E00) 68(F00) 69(G00) 71(H00) 72(J00) 73(K00) 74horizontal 61Overview diagram 96vertical 60Messages 88Messages on the measuring unit 87Modbus 78, 103Modbus address 72NNotesEnvironmental protection 11general Tip or information 11OOpacity 103Operating levels 67Operating temperature 66Operating temperature assignment 72Operation 56, 59Operator code delivery status 68PParameterisationof current outputs 69Parameterisation of digital I/OPersonnel, qualified 18Pollution 66Prerequisites for use 42RReciprocal 103Regulations 99Reject changes: 62Relay 1 - 4 assignment 71Relay contacts 66Relay test: 74Replacement material 84Reset EEprom: 74RS485 interface 103RS485 test: 74108 D-R <strong>800</strong>
IndexSSafety instructions, general 15Save changes: 62Scattered light 66, 103Scope of supply 28Special accessories <strong>29</strong>Serial number 67Set internal maintenance 73Shortcuts 64Simulation 78Standards 99Start control cycle: 73Supply unit 37Symbols, used 75System components 35Danger of crushing 11Electric current 11Explosion 11General warning sign 11Hot surface 11Humidity 11Laser radiation 11Radioactivity 11TTechnical data 93Connections 94Dimensions and weights 93Environment 94Performance features 93Supply 93Temperature measurement parameterisation :72Terminal assignment 51Test 74Test measurement 78Typographical conventions 10Use, proper 17UVValue pairs table 76VariableCyclical communication 79VDI 2066 / VDI 3950 99WWarnings, gen.Average risk - Warning 11High risk - Danger 11Minor risk - Caution 11Warnings, meaning. 10Warnings, spec.Chemical burns 11D-R <strong>800</strong> 109
Index110 D-R <strong>800</strong>
DURAG GROUP company addresses15 DURAG GROUP company addressesDURAG GmbHKollaustr. 105 ▪ 22453 HamburgTel. +49 40 55 42 18 – 0 ▪ Fax +49 40 58 41 54E-Mail: info@durag.deDVN – DURAG Vertrieb NordKollaustr. 105 ▪ 22453 HamburgTel. +49 40 55 42 18 – 0 ▪ Fax +49 40 58 41 54E-Mail: dvn@durag.deDVO – DURAG Vertrieb OstMeißner Ring 4 ▪ 09599 FreibergTel. +49 37 31 30 04 – 0 ▪ Fax +49 37 31 30 04 – 22E-Mail: durag.freiberg@durag.deDVS – DURAG Vertrieb SüdWeidenweg 16 ▪ 73087 Bad BollTel. +49 71 64 9 12 25 – 0 ▪ Fax +49 71 64 9 12 25 – 50E-mail: info@dvs-badboll.deDVW – DURAG Vertrieb WestAn der Pönt 53a ▪ 40885 RatingenTel. +49 21 02 74 00 – 0 ▪ Fax +49 21 02 74 00 – 28E-Mail: dvw@durag.deDURAG France SarlParc GIP Paris Charles de Gaulle49 rue Léonard de VinciBP 7<strong>01</strong>6695691 GOUSSAINVILLEFranceTel. +33 1 30 18 11 80 ▪ Fax +33 1 39 33 83 60E-Mail: info@durag-france.frDURAG UK OfficeHoneysuckle CottageRidding BankStoke-on-TrentStaffordshire, ST4 8SBGreat BritainTel. +44 17 82 65 76 66 ▪ Fax +44 17 82 64 60 20E-Mail: durag.<strong>uk</strong>@durag .deDURAG, Inc.Southridge Business Center,1355 Mendota Heights Road,Suite 200Mendota Heights,Minnesota MN 55120USATel. +1 65 14 51 – 17 10 ▪ Fax +1 65 14 57 – 76 84E-Mail: info@durag.comDurag India Instrumentation Private Limited#143/16, 4th Main Road,Industrial Town, RajajinagarBangalore 560 044IndiaTel.: + 91 80 23 14 56 26 & 23 14 56 27Fax: + 91 80 23 14 56 26 & 23 14 56 27 Extn. 30E-Mail: info@duragindia.comDURAG ChinaRoom 708 ▪ TSENG CHOW Commercial Mansion1590 Yan An West RoadShanghai 200052 ▪ P.R. ChinaTel. +86 21 62 80 82 77 ▪ Fax +86 21 62 80 92 36E-Mail: durag.china@durag.deD-R <strong>800</strong> 111
GmbHKollaustraße 105 · D-22453 Hamburg · www.durag.de