WEBER CARBURETOR TROUBLESHOOTING GUIDE - Niva Manuals
WEBER CARBURETOR TROUBLESHOOTING GUIDE - Niva Manuals
WEBER CARBURETOR TROUBLESHOOTING GUIDE - Niva Manuals
Create successful ePaper yourself
Turn your PDF publications into a flip-book with our unique Google optimized e-Paper software.
<strong>WEBER</strong> <strong>CARBURETOR</strong><br />
<strong>TROUBLESHOOTING</strong> <strong>GUIDE</strong><br />
This guide is to help pinpoint problems by diagnosing engine symptoms<br />
associated with specific vehicle operating conditions.<br />
The chart will guide you step by step to help correct these problems.<br />
For successful troubleshooting, please do the following:<br />
1. Complete all steps suggested in the box, and any that follow in<br />
the guide.<br />
2. Complete all of the suggestions in order, doing so will eliminate<br />
any secondary problems.<br />
3. Follow diagnosis directions completely (Cleaning, adjustment etc.)<br />
4. Do not do any other procedures other than the ones suggested.<br />
This Weber carburetor has been manufactured using very high quality control<br />
standards. Through years of experience we have found that most carburetor<br />
problems are caused by other engine components.<br />
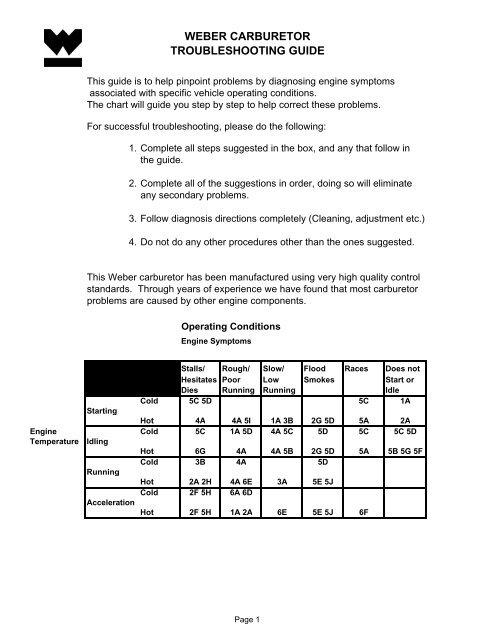
Operating Conditions<br />
Engine Symptoms<br />
Stalls/ Rough/ Slow/ Flood Races Does not<br />
Hesitates Poor Low Smokes Start or<br />
Dies Running Running Idle<br />
Cold 5C 5D 5C 1A<br />
Starting<br />
Hot 4A 4A 5I 1A 3B 2G 5D 5A 2A<br />
Engine Cold 5C 1A 5D 4A 5C 5D 5C 5C 5D<br />
Temperature Idling<br />
Hot 6G 4A 4A 5B 2G 5D 5A 5B 5G 5F<br />
Cold 3B 4A 5D<br />
Running<br />
Hot 2A 2H 4A 6E 3A 5E 5J<br />
Cold 2F 5H 6A 6D<br />
Acceleration<br />
Hot 2F 5H 1A 2A 6E 5E 5J 6F<br />
Page 1
<strong>WEBER</strong> <strong>CARBURETOR</strong><br />
<strong>TROUBLESHOOTING</strong> <strong>GUIDE</strong><br />
FOR YOUR SAFETY<br />
Remember ! A Clean engine will make all work easier, accurate, and safer.<br />
ALWAYS:<br />
Use new hose clamps on fuel hoses.<br />
Replace any cracked or missing hoses.<br />
(fuel, vacuum or coolant)<br />
Label any hose or wire before removing.<br />
Use an insulated connector for any wire.<br />
NEVER:<br />
Allow any dirt in the carburetor.<br />
Run the engine without proper<br />
filtration (Air and Fuel Filters).<br />
Allow fuel to leak or spill<br />
Damage any gasket surfaces<br />
Over tighten Jets or levers.<br />
1. ELECTRICAL SYSTEM<br />
To make sure that the ignition system is working correctly do steps 1 A - 1C<br />
with the ignition on.<br />
IMPORTANT NOTE<br />
Make sure that the battery is fully charged with no<br />
corrosion present on the terminals.<br />
A. Test the fuse for the ignition/charging circuit:<br />
If you do not have 12 volts at either side if the fuse, replace fuse.<br />
B. Check static ignition timing:<br />
Make sure that you do not have excessive free play at the<br />
distributor shaft.<br />
C. See if the distributor is 180 degrees out of time:<br />
Do a comparison to the cam timing or by reversing opposite pairs of<br />
ignition wires at the distributor cap.<br />
2. FUEL DELIVERY<br />
To make sure that the quality and supply of fuel to the carburetor is correct,<br />
please so steps 2A - 2I . In our experience we have seen that fuel contaminated<br />
with water, dirt or rust is the major cause of carburetor problems. Use fuel as<br />
fresh as possible.<br />
IMPORTANT NOTE On vehicles equipped with electric fuel pumps. Most are not<br />
powered with out the engine running or starter engaged.<br />
A. Test the fuel flow at the carburetor by disconnecting the fuel supply hose<br />
and directing the fuel flow into a small dry, clean can when the fuel pump is<br />
activated.<br />
IMPORTANT NOTE<br />
DO NOT ALLOW ANY CHANCE OF A SPARK DISCONNECT<br />
THE PRIMARY WIRE(S) )usually a small 16 Gauge wire)<br />
THAT CONNECTS THE GROUND (-) SIDE TERMINAL OF THE<br />
COIL TO THE DISTRIBUTOR ( OR SPARK BOX, IF SOLID<br />
STATE IGNITION).<br />
If fuel flow is adequate go to step 2 E<br />
If fuel flow is not adequate go to step 2B<br />
Page 2
<strong>WEBER</strong> <strong>CARBURETOR</strong><br />
<strong>TROUBLESHOOTING</strong> <strong>GUIDE</strong><br />
B. Test the fuel flow at the fuel filter and then at the Fuel Pump:<br />
If fuel flow is not adequate go to step 2C.<br />
C. Check to see if the fuel tank is empty or if the lines are blocked. They maybe<br />
blocked by dirt, ice, or other contaminants.<br />
If you have fuel in the tank and the lines are not blocked go to 2D.<br />
D. If the vehicle is equipped with an electric fuel pump, test the pump by applying<br />
12 volts and a ground to the pump. If you have a mechanical pump, crank the<br />
engine over.<br />
If you do not have any fuel flow. Replace the pump.<br />
E. Check to see if the fuel is old or bad. ( If vehicle has been out of service for an<br />
extended period chances are that the fuel is bad.)<br />
If the fuel does not smell right:<br />
Try some fresh fuel a few drops at a time in the Carburetor inlet.<br />
IMPORTANT NOTE AVOID FUEL CONTACT WITH SKIN<br />
F. Check to see if the fuel is contaminated with rust or water:<br />
To check remove and empty out fuel filter (from the inlet side) into a clean,<br />
dry can , or if your vehicle has a drain plug on the fuel tank, empty some fuel<br />
from the tank into a clean, dry can. Remember Water and Fuel do not mix.<br />
G. Test the fuel pressure output with a fuel pressure gauge. If the fuel pressure<br />
exceeds 3.5 psi, install a fuel pressure regulator.<br />
H. See if the Fuel Return and the Fuel supply line are reversed. On some Weber<br />
carburetors that have a fuel return, remove the fitting one at a time from the<br />
carb. The Fuel return is restricted and the fuel inlet is totally open.<br />
I. Make sure that none of the fuel lines are crimped or kinked.<br />
3. ENGINE<br />
To make sure that engine is mechanically sound. Please do steps 3a - 3C<br />
A. Do a compression check on all of the cylinders. Compression should be over<br />
125 psi per cylinder, and with in 10% of each other.<br />
B. See if the intake manifold bolts or loose or missing.<br />
C. If you have a heated intake. Make sure that the heat source is connected.<br />
On most vehicles it is heated by water. Check with your Shop manual for<br />
the heat source on your intake.<br />
4. VACUUM SYSTEM<br />
To make sure that you do not have any vacuum leaks, check all vacuum<br />
operated devices, and connections to the intake manifold. Use the suggested<br />
tests to check.<br />
IMPORTANT NOTE THE VACUUM DEVICES ARE CONTROLS AND VALVES THAT REQUIRE<br />
Page 3
<strong>WEBER</strong> <strong>CARBURETOR</strong><br />
<strong>TROUBLESHOOTING</strong> <strong>GUIDE</strong><br />
SEALED VACUUM CONNECTIONS TO PROPERLY OPERATE.<br />
A. Testing the vacuum system with a handheld vacuum pump is very helpful<br />
in finding leaking hoses and devices in the system away from the carburetor.<br />
(Vacuum testers have an attached vacuum gauge to measure vacuum)<br />
Start at the carburetor and work your way toward the engine, remove vacuum<br />
hoses one at a time. Be careful not to mix up any hoses.<br />
Plug the source of the vacuum and connect the vacuum pump to the source<br />
and test for any malfunctions in the system.<br />
TO TEST OTHER VACUUM CONTROLLED DEVICES:<br />
Distributor Advance<br />
Distributor Retard<br />
EGR Valve<br />
Deceleration Valve<br />
Canister Purge<br />
Go to 4 B<br />
look for a change in the engine timing.<br />
Test with a timing light.<br />
Stalling will be normal when tested.<br />
engine will idle faster when tested.<br />
If the engine speed fluctuates with the hose disconnected,<br />
canister is fuel of fuel due to a problem in the tank vent or<br />
the fuel tank is overfilled.<br />
B. Using the method of pinching off hoses is helpful when you have hoses that<br />
are leaking, such as air cleaner hoses and other devices.<br />
Install the air inlet duct or air cleaner.<br />
Start the engine and let it run at idle.<br />
One by one pinch off vacuum hoses with pliers and listen for a<br />
change in engine RPM.<br />
Recheck any suspected problems with the Vacuum pump.<br />
TO TEST :<br />
Hoses<br />
Choke stove air door ( thermostatic air cleaner)<br />
Power Brake Booster Heater Controls, in all positions<br />
Cruise Control<br />
Air Conditioning fast idle , ignition on A/C on<br />
Headlight Doors<br />
Vacuum Reservoirs and amplifiers<br />
PCV Valve (idle should drop 50 RPM)<br />
Go To 4 C<br />
C. Using Carburetor Cleaner to check for leaks. This will help you find defective<br />
gaskets and hidden leaks.<br />
IMPORTANT NOTE AVOID SPRAYING YOUR SELF READ ALL CAUTION LABELS<br />
AND WASH AFTER USING<br />
Remove air inlet duct or air cleaner and plug any vacuum sources removed.<br />
With the engine idling, spray carburetor cleaner into the air inlet of the<br />
carburetor to determine the effect of running.<br />
Wait until the engine returns to the previous idle.<br />
Spray carburetor cleaner on the outside of the carburetor and intake manifold.<br />
If you have a vacuum leak the idle speed should have changed.<br />
TO TEST :<br />
Some vacuum leakage at the throttle shaft is normal.<br />
Intake manifold.<br />
All gaskets and seals.<br />
Fittings and plugs.<br />
Page 4
<strong>WEBER</strong> <strong>CARBURETOR</strong><br />
<strong>TROUBLESHOOTING</strong> <strong>GUIDE</strong><br />
5 <strong>CARBURETOR</strong><br />
Do the following steps only after you have completed 1A, 2A, 3A and 4A.<br />
This will help you save time and avoid creating any secondary problems.<br />
In our experiences most problems initially thought to be carburetor problems<br />
are those caused by other engine components.<br />
A. Testing the choke and the throttle linkage:<br />
Check that you have free movement at the carburetor with an assistant operating<br />
the gas pedal. In our experiences over tightened throttle shafts contribute to<br />
many carburetor problems.<br />
B. Testing the Idle Speed Adjustment:<br />
With the engine at normal operating temperature, adjust to manufacturers<br />
specs: turn adjustment screw in (clockwise) to raise the speed and out (counterclockwise)<br />
to lower).<br />
C. Testing the Fast Idle Adjustment:<br />
It may be necessary to perform this test first thing in the morning or after the<br />
vehicle has been allowed to cool down.<br />
With the engine cold, press the gas pedal to the floor once and release.<br />
Start Vehicle. Engine speed should be 2000 RPM - 2500 RPM after about<br />
10 seconds. Turn engine off. To adjust turn fast idle screw in to increase<br />
fast idle speed and out to decrease. Do not disturb the carburetor linkage<br />
during this adjustment. Without touching the gas pedal start engine again<br />
check engine RPM. If you have to readjust use the procedure above .<br />
D. Testing the Automatic Choke adjustment.<br />
The choke is preset at the factory but in some cases it may be necessary<br />
to readjust.<br />
The choke assembly must be cool ( below 68 F 20C) before attempting to<br />
make any adjustments. First fully rotate the throttle lever and release;<br />
Check for smooth operation; the choke plate should be all the way closed.<br />
Make a reference mark on the carburetor and the choke where the two faces<br />
meet. Loosen the three 7mm hex head screws one full turn. While holding<br />
the throttle about one third open, adjust the closing tension on the choke<br />
plates just fully close; then slightly increase the tension on the spring by<br />
continuing to rotate the thermostat 1/8" measured in the outer diameter of the<br />
thermostat. Tighten the three 7mm hex head screws without distorting the<br />
retainer ring; fast idle speed my need to be readjusted. If the choke plates<br />
do not fully open after running the engine for three minutes go to step 5E<br />
E. Testing the choke thermostat assembly<br />
The electric choke terminal must have a key hot 12 volt source.<br />
The carburetor is grounded to the engine by a metal to metal connection.<br />
If the vehicle was originally equipped with an electric choke and or an idle<br />
solenoid use that wire. If you do not have a wire present , splice into the wire<br />
leading from the ignition switch to the coil or ballast resistor.<br />
Water chokes must have a free flow of engine coolant.<br />
F. Testing the idle cut-off solenoid (if equipped)<br />
With the solenoid on the carburetor and ignition on and engine off,<br />
disconnect the wire from the solenoid and listen for a click; then with the<br />
engine idling, disconnect the wire leading to the solenoid. The engine should<br />
stop. If the engine does not stop the solenoid is likely defective.<br />
Page 5
<strong>WEBER</strong> <strong>CARBURETOR</strong><br />
<strong>TROUBLESHOOTING</strong> <strong>GUIDE</strong><br />
G. Testing the idle mixture adjustment:<br />
Adjust with the engine at idle speed; turn the mixture adjustment screw in<br />
(clockwise) by quarter turns until the engine speed drops; turn out<br />
(counter clockwise) while counting quarter turns until the idle rises and<br />
again drops noticeably; turn in again to middle setting.<br />
If RPM does not change go to 5H<br />
H. Cleaning the idle circuit<br />
Locate and remove the primary idle jet holder (this is also the idle solenoid<br />
if so equipped). Remove the jet from the holder, hold up to a light and check for<br />
roundness of the cavity. Remove the idle mixture screw from the the carburetor,<br />
blow clean compressed air through the two open passages. Replace the jet<br />
in the holder and install back in the carburetor along with the idle mixture screw.<br />
I. Make sure that all of the vacuum lines are installed to the correct signal source.<br />
Install a vacuum pump with a gauge. Start engine and operate throttle.<br />
If vacuum is present at idle it is a manifold vacuum source. If vacuum is present<br />
at partial throttle it is a ported vacuum source. If vacuum is present at a high<br />
rpm it is a venturi vacuum source.<br />
Refer to your shop manual or any labels under the hood that show vacuum<br />
hose routing.<br />
J. Set the Float Level<br />
Float level problems are very rare with New Weber Carburetors. Refer to a<br />
Weber Shop manual or contact your Weber Dealer for specifications or<br />
instructions. Also check for dirt or other foreign matter in the needle and seat.<br />
6. PERSISTENT PROBLEMS<br />
The following problems are not listed in the guide because they are unique,<br />
difficult to diagnose and are beyond the scope of the guide. We have listed<br />
them because of past experiences.<br />
A. Replace spark plugs; use only new spark plugs with the correct heat range.<br />
B. Make sure that the ground strap is properly connected. It is necessary that<br />
the engine is grounded to the chassis and battery.<br />
C. Double check or have any work coincidental to the problem such as<br />
body work or engine repairs, a tune up , installation of an alarm, stereo or<br />
emissions inspection.<br />
D. Check for any damage to the exhaust system or an internally collapsed muffler.<br />
E. Check your sparkplugs. Most Shop manuals have a chart in color showing<br />
what the spark plugs should look like. Rejetting of the carb may be necessary.<br />
F. See if the Transmission is slipping. This applies to both automatic and standard.<br />
G. Make sure that the fuel tank vent hose is not plugged at the canister.<br />
H. Some Vehicles , including Nissans, have two wires that go to the electric choke.<br />
One is a ground wire and does not have to be connected.<br />
I. Some original Electric Fuel pumps pressure exceeds 3.5 psi. Check with a<br />
pressure gauge or look in shop manual. A pressure regulator may be necessary.<br />
J. On some water cooled VW's , vibrations caused by worn motor mounts may<br />
cause the carburetor top to fracture.<br />
K. When the throttle return spring is located on the same side as the throttle<br />
lever, check to make sure that the first spring coil does not get trapped between<br />
the lever and the carburetor. This will cause binding.<br />
L. On progressive carbs incorrect installation of the throttle lever can cause<br />
Page 6
<strong>WEBER</strong> <strong>CARBURETOR</strong><br />
<strong>TROUBLESHOOTING</strong> <strong>GUIDE</strong><br />
both throttle plates to open at the same time. This is wrong. The progressive is<br />
designed that the primary barrel opens up before the secondary.<br />
M. On Multiple carburetor applications it is required that all of the carburetors<br />
be synchronized.<br />
N. If you experience intermittent problems. Any diagnosis should be carried<br />
out when the problem occurs. Be prepared carry any necessary tools.<br />
O. Go over the troubleshooting guide and see if any steps were missed or<br />
not understood.<br />
If you have any installation or operational problems with your carb. Call or email<br />
our Technical assistance Department.<br />
Telephone 1 800 871 3405<br />
Email WeberTech@intercoproducts.com<br />
We have found that the following publications can be very helpful in the operation,<br />
repair and tuning of Weber Carburetors.<br />
Title<br />
Part Number<br />
Weber Tuning Manual 95.0000.54<br />
Haynes Weber Book HM 393<br />
HP Weber Book HP 774<br />
HP774 HM393 95.0000.54<br />
TOOLS THAT SHOULD BE USED FOR MULTIPLE CARB SETUPS:<br />
STE Synchrometers<br />
SK<br />
BK<br />
Standardreads<br />
1-30 KG/H<br />
High Volumereads<br />
2-40 KG/H<br />
Page 7
<strong>WEBER</strong> <strong>CARBURETOR</strong><br />
<strong>TROUBLESHOOTING</strong> <strong>GUIDE</strong><br />
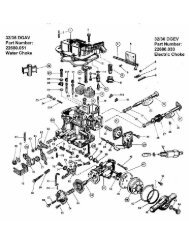
32/36 DFEV <strong>CARBURETOR</strong><br />
Fuel Inlet<br />
Accelerator<br />
Pump<br />
Vacuum Advance<br />
Port<br />
Electric Choke<br />
Choke Pull off<br />
Idle Mixture Screw<br />
Choke Pull off<br />
Fast Idle Screw<br />
Idle Speed Screw<br />
Throttle Lever<br />
32/36 DGEV <strong>CARBURETOR</strong><br />
Fast Idle Screw<br />
Fuel Inlet<br />
Fuel Filter Inspection Plug<br />
Choke Pull Off<br />
Throttle Lever<br />
Idle Mixture Screw<br />
Primary Idle Screw<br />
Electric Choke<br />
Accelerator pump<br />
Vacuum Advance Port<br />
Additional Ported Vacuum Source<br />
Page 8


