Gateway installation manual - Riverside Hydronics
Gateway installation manual - Riverside Hydronics
Gateway installation manual - Riverside Hydronics

Create successful ePaper yourself
Turn your PDF publications into a flip-book with our unique Google optimized e-Paper software.
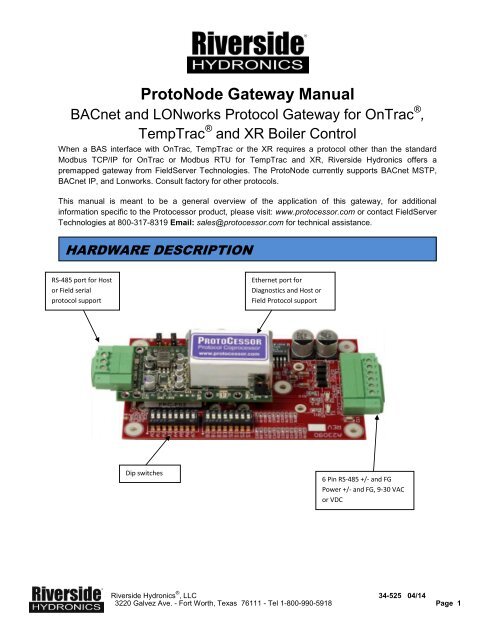
ProtoNode <strong>Gateway</strong> Manual<br />
BACnet and LONworks Protocol <strong>Gateway</strong> for OnTrac ® ,<br />
TempTrac ® and XR Boiler Control<br />
When a BAS interface with OnTrac, TempTrac or the XR requires a protocol other than the standard<br />
Modbus TCP/IP for OnTrac or Modbus RTU for TempTrac and XR, <strong>Riverside</strong> <strong>Hydronics</strong> offers a<br />
premapped gateway from FieldServer Technologies. The ProtoNode currently supports BACnet MSTP,<br />
BACnet IP, and Lonworks. Consult factory for other protocols.<br />
This <strong>manual</strong> is meant to be a general overview of the application of this gateway, for additional<br />
information specific to the Protocessor product, please visit: www.protocessor.com or contact FieldServer<br />
Technologies at 800-317-8319 Email: sales@protocessor.com for technical assistance.<br />
HARDWARE DESCRIPTION<br />
RS-485 port for Host<br />
or Field serial<br />
protocol support<br />
Ethernet port for<br />
Diagnostics and Host or<br />
Field Protocol support<br />
Dip switches<br />
6 Pin RS-485 +/- and FG<br />
Power +/- and FG, 9-30 VAC<br />
or VDC<br />
<strong>Riverside</strong> <strong>Hydronics</strong> ® , LLC 34-525 04/14<br />
3220 Galvez Ave. - Fort Worth, Texas 76111 - Tel 1-800-990-5918 Page 1
SETTINGS AND DEFAULTS BACnet ProtoNode<br />
BACnet ProtoNode KIT PN: 115734 Includes ProtoNode, Power Supply, ProtoNode Manual,<br />
Supplemental Documentation based on requested configuration 34-525A-1 or 34-525B-1 or 34-525C-1.<br />
BAS is to interface with: OnTrac Boiler Management System using BACnet MSTP or IP<br />
(PROF1.CSV)<br />
SUPPLEMENTAL DOCUMENTATION 34-525C-1<br />
STARTING INSTANCE NUMBER: 37500 _________________<br />
Virtual Tier 1 Boilers INSTANCE NUMBERS: 37501-37520 ____________________<br />
Virtual Tier 2 Boilers INSTANCE NUMBERS: 37521-37528 ____________________<br />
SUB NETWORK NUMBER: 5 _______<br />
DEVICE IP ADDRESS (AND BACNET IP ADDRESS): 192.168.1.24 ________________________<br />
OnTrac MODBUS TCP IP ADDRESS: 192.168.1.100 ___________________________<br />
MAC ADDRESS: 3 _________<br />
BACnet MSTP BAUD RATE: 38400 __________________<br />
BAS is to interface with: TempTrac devices using BACnet MSTP or IP (PROF2.CSV)<br />
Number of TempTrac Devices 1-8: 2 ____<br />
SUPPLEMENTAL DOCUMENTATION 34-525A-1<br />
STARTING INSTANCE NUMBER: 37500-37501 _________________<br />
SUB NETWORK NUMBER: 5 _______<br />
DEVICE IP ADDRESS (AND BACNET IP ADDRESS): 192.168.1.24 ________________________<br />
MAC ADDRESS: 3 _________<br />
BACnet MSTP BAUD RATE: 38400 __________________<br />
BAS is to interface with: XR devices using BACnet MSTP or IP (PROF3.CSV)<br />
Number of XR Devices 1-8: 2 ____<br />
SUPPLAMENTAL DOCUMENTATION 34-525B-1<br />
STARTING INSTANCE NUMBER: 37500-37501 _________________<br />
SUB NETWORK NUMBER: 5 _______<br />
DEVICE IP ADDRESS (AND BACNET IP ADDRESS): 192.168.1.24 ________________________<br />
MAC ADDRESS: 3 _________<br />
BACnet MSTP BAUD RATE: 38400 __________________<br />
<strong>Riverside</strong> <strong>Hydronics</strong> ® , LLC 34-525 04/14<br />
3220 Galvez Ave. - Fort Worth, Texas 76111 - Tel 1-800-990-5918 Page 2
SETTINGS AND DEFAULTS LONworks ProtoNode<br />
LONworks ProtoNode KIT PN: 118068 Includes ProtoNode, Power Supply, ProtoNode Manual,<br />
Supplemental Documentation based on requested configuration 34-525A-2 or 34-525B-2 or 34-525C-2.<br />
BAS is to interface with: TempTrac devices using LONworks (PROF2.CSV)<br />
Number of TempTrac Devices 1-8: 2 ____<br />
SUPPLEMENTAL DOCUMENTATION 34-525A-2<br />
DEVICE IP ADDRESS for utility interface: 192.168.1.24 ________________________<br />
BAS is to interface with: XR devices using LONworks (PROF3.CSV)<br />
Number of XR Devices 1-9: 2 ____<br />
SUPPLEMENTAL DOCUMENTATION 34-525B-2<br />
DEVICE IP ADDRESS for utility interface: 192.168.1.24 ________________________<br />
BAS is to interface with: OnTrac Boiler Management System using LONworks (PROF1.CSV)<br />
SUPPLEMENTAL DOCUMENTATION 34-525C-2<br />
DEVICE IP ADDRESS for utility interface: 192.168.1.24 ________________________<br />
OnTrac MODBUS TCP IP ADDRESS: 192.168.1.100 ___________________________<br />
Number of Tier 1 Boilers: (20) ______________<br />
Number of Tire 2 Boilers: (8) _____________<br />
SETTINGS AND DEFAULTS LONworks ProtoNode<br />
LONworks ProtoNode KIT PN: 118068 Includes ProtoNode, Power Supply, ProtoNode Manual 34-525,<br />
Supplemental Documentation based on requested configuration 34-525A-2 or 34-525B-2 or 34-525C-2.<br />
BAS is to interface with: OnTrac Boiler Management System using LONworks (PROF1.CSV)<br />
SUPPLEMENTAL DOCUMENTATION 34-525C-2<br />
DEVICE IP ADDRESS for utility interface: 192.168.1.24 ________________________<br />
OnTrac MODBUS TCP IP ADDRESS: 192.168.1.100 ___________________________<br />
BAS is to interface with: TempTrac devices using LONworks (PROF2.CSV)<br />
Number of TempTrac Devices: 2 ____<br />
SUPPLEMENTAL DOCUMENTATION 34-525A-2<br />
DEVICE IP ADDRESS for utility interface: 192.168.1.24 ________________________<br />
BAS is to interface with: XR devices using LONworks (PROF3.CSV)<br />
Number of TempTrac Devices: 2 ____<br />
SUPPLEMENTAL DOCUMENTATION 34-525B-2<br />
DEVICE IP ADDRESS for utility interface: 192.168.1.24 ________________________<br />
<strong>Riverside</strong> <strong>Hydronics</strong> ® , LLC 34-525 04/14<br />
3220 Galvez Ave. - Fort Worth, Texas 76111 - Tel 1-800-990-5918 Page 3
INTERFACE (PROFILE) SELECTION<br />
Dip switches S0 to S3 select the register profile to be used. The profile, is a text file located inside the<br />
ProtoNode gateway. By selecting the file to be used, it will allow the gateway to be configured for<br />
interface with different devices.<br />
Dip switches S0 to S3 select the register profile to be used.<br />
S3 S2 S1 S0 Configuration Register list and documentation<br />
Off Off Off Off PROF1.CSV Interface with 1<br />
OnTrac<br />
Off Off Off On PROF2.CSV Interface with 1-8<br />
TempTrac devices<br />
Off Off On Off PROF3.CSV Interface with 1-8 XR<br />
devices<br />
Document 34-525C-1 for BACNET, and 34-525C-2 for LONworks<br />
BAS – <strong>Gateway</strong> – OnTrac – TempTrac on appliances<br />
Document: 34-525A-1 for BACNET, and 34-525B-2 for LONworks<br />
BAS - <strong>Gateway</strong> – TempTracs on appliances<br />
Document: 34-525B-1 for BACNET, and 34-525B-2 for LONworks.<br />
BAS – <strong>Gateway</strong> – XR on appliances<br />
Tables for register list are available at our website and are specific to the protocol used by the Building<br />
Automation system. See supplemental documentation for full functionality.<br />
A and B switches: The purpose can vary or not be needed depending on the protocol being used.<br />
Details of the switch settings can be found in the supplemental documentation for the particular<br />
application you have.<br />
Dip switches B0 to B3: Generally used to set the baud rate for the Building Automation Systems serial<br />
Interface.<br />
Dip switches A0 to A7: Generally used to set the address of gateway on Building Automation Systems.<br />
OFF<br />
ON<br />
<strong>Riverside</strong> <strong>Hydronics</strong> ® , LLC 34-525 04/14<br />
3220 Galvez Ave. - Fort Worth, Texas 76111 - Tel 1-800-990-5918 Page 4
SYSTEM OVERVIEW for the ONTRAC PROFILE (PROF1)<br />
The Protonode is external protocol gateway and should be powered and located external to the OnTrac.<br />
OR<br />
Customer<br />
Protocol<br />
Serial<br />
Customer<br />
Protocol<br />
Ethernet<br />
Ethernet (TCP/IP)<br />
Router/Switch<br />
Modbus TCP/IP<br />
<strong>Riverside</strong> <strong>Hydronics</strong> ® , LLC 34-525 04/14<br />
3220 Galvez Ave. - Fort Worth, Texas 76111 - Tel 1-800-990-5918 Page 5
SYSTEM OVERVIEW TEMPTRAC & XR (PROF2 & 3)<br />
BACnet MSTP<br />
OR<br />
BACnet IP<br />
BACnet GATEWAY<br />
BUILDING<br />
AUTOMATION SYSTEM<br />
1-8 XR OPERATING CONTROLS<br />
Modbus RTU<br />
1 – 8 TEMPTRAC<br />
OPERATING CONTROLS<br />
OR<br />
Protonode<br />
+ - GND R C GND<br />
N<br />
Power 9-30 Vac<br />
or Vdc<br />
COMMON/SHIELD<br />
OPTIONAL FIELD INSTALLED<br />
TERMINATION RESISTOR<br />
RS-485 +/-<br />
LT<br />
T1<br />
TempTrac<br />
XJ485 SERIAL INTERFACE<br />
Optional serial cable must be<br />
ordered with the heater/boiler.<br />
- +<br />
- +<br />
XR<br />
Note: Wiring for the RS485 serial network should be made in a “daisy chained” 2 wire shielded/twisted pair.<br />
<strong>Riverside</strong> <strong>Hydronics</strong> ® , LLC 34-525 04/14<br />
3220 Galvez Ave. - Fort Worth, Texas 76111 - Tel 1-800-990-5918 Page 6
CONNECTION TO PROTONODE USING UTILITIES<br />
The default ProtoNode IP address may not fit within the existing network address pool. The following<br />
instructions describe the utilities used for changing the ProtoNode IP address. If interfacing with an<br />
OnTrac, you may need to edit the profile in the ProtoNode to include the OnTrac’s IP address, this is<br />
explained in detail in the supplement document 34-525C-1 and 34-525C-2. The OnTrac IP setting<br />
procedure is explained in the OnTrac <strong>manual</strong> 34-152. Utilities for configuring the ProtoNode are available<br />
from Fieldserver’s website. Make sure that the Fieldserver Utilities are downloaded and installed on your<br />
computer.<br />
( http://www.fieldserver.com/docs/downloads/Install.zip )<br />
Connect an Ethernet cross-over cable between the PC and ProtoCessor or connect the ProtoCessor and<br />
the PC to a Hub/switch using straight through patch cables.<br />
The Default IP Address of the ProtoNode IP address is 192.168.1.24, Subnet Mask is 255.255.255.0.<br />
If the PC and the ProtoNode are on different IP Networks, assign a Static IP Address to the PC on the<br />
same network. Example, with the default settings of the gateway on 192.168.1.24, the network is<br />
192.168.1.XXX then 192.168.1.8 will be a valid IP address for your computer. Instructions on how to<br />
change the IP address of your computer is beyond the scope of this <strong>manual</strong>.<br />
Launch: FieldServer Utilities > Ping Utility ("C:\FieldServer Technologies\FieldServer Utilities\Bin\ruiping.exe"). If the IP<br />
Address of the ProtoNode module appears on the screen, the ProtoNode is running.<br />
You can exit this program by hitting ESC key.<br />
The next program “Remote User Interface” is used to change the IP address of the gateway, view<br />
communication between the devices, and update the configuration files of the gateway.<br />
<strong>Riverside</strong> <strong>Hydronics</strong> ® , LLC 34-525 04/14<br />
3220 Galvez Ave. - Fort Worth, Texas 76111 - Tel 1-800-990-5918 Page 7
CONNECTION TO PROTONODE USING UTILITIES<br />
Launch: FieldServer Utilities > Remote User Interface ("C:\FieldServer Technologies\FieldServer Utilities\Bin\ruinet.exe").<br />
The following screen will appear if it can connect to the gateway:<br />
CHANGE IP ADDRESS: Option “I” will allow changing the IP address of the <strong>Gateway</strong>.<br />
VIEW COMMUNICATION: Select “O” from the main menu screen for Connect Overview to see the<br />
number of messages on each protocol. If the ProtoNode gateway is communicating correctly with the<br />
device then the display will show Tx and Rx messages without any errors. Below SMT is the<br />
communication of your computer with the gateway, and can be disregarded. Modbus RTU is<br />
communication directly to a TempTrac, not used in this example. Modbus/TCP is the communication to<br />
the OnTrac boiler group control. BACnet_MSTP is the BAS talking to the gateway. In this example, the<br />
BAS is not using the BACnet_IP interface.<br />
<strong>Riverside</strong> <strong>Hydronics</strong> ® , LLC 34-525 04/14<br />
3220 Galvez Ave. - Fort Worth, Texas 76111 - Tel 1-800-990-5918 Page 8
CONNECTION TO PROTONODE USING UTILITIES<br />
BACK UP GATEWAY FILES: It is highly recommended to back up the configuration files before<br />
performing any update or editing of the configuration. In order to back up the configuration files stored on<br />
the gateway, perform the following steps.<br />
<br />
<br />
<br />
<br />
<br />
<br />
<br />
<br />
Clear or move any files from the Field Server Configuration files folder. There is a short cut to this<br />
in the program group: FieldServer Utilities > Config ("C:\FieldServer Technologies\FieldServer<br />
Utilities\Config”).<br />
From the main menu hit U (Upload Configuration file from Field Server).<br />
Hit U to upload the default CONFIG.CSV to your computer.<br />
Once that is complete, you will need to enable the “Other Filenames” option by hitting the “O” in<br />
the Upload menu.<br />
Once this is done, perform the following for each file PROF1.CSV, PROF2.CSV, PROF3.CSV<br />
From the Upload menu, Hit ”R” and then type the file name PROF1.CSV and hit Enter.<br />
Hit “L” and type the same name again and hit Enter.<br />
Hit “U” to upload the file to your computer. It will be located in the previously mentioned CONFIG<br />
folder.<br />
Once this has been done for all the files, back up the files in your CONFIG folder in case you<br />
need to revert back to the original files.<br />
UPDATE CONFIGURATION FILES ON GATEWAY: Once the files have been backed up and save to a<br />
safe place, you can then place the new files, or edited old file in the CONFIG folder for transfer to the<br />
gateway.<br />
<br />
<br />
<br />
<br />
<br />
<br />
<br />
Clear any old program from the CONFIG folder, and place the files that are to be transferred to<br />
the gateway in this folder.<br />
From the main menu, hit “D” (Download Configuration file to Field Server).<br />
From this menu, if you are uploading the CONFIG.CSV file, simply hit the “D” key again.<br />
To transfer any of the other files, you will need to enable the “Other Filenames” option by hitting<br />
the “O” in the Download Menu.<br />
To transfer the PROF1.CSV file from the CONFIG directory on your laptop to the gateway:<br />
From the Upload menu, hit “L” and type PROF1.CSV and hit Enter.<br />
Hit “R” and type the same name again and hit Enter.<br />
Hit “D” to Download to the <strong>Gateway</strong>.<br />
Once all files that are required have been transferred to the gateway, get back to the main menu by<br />
hitting ESC, from the main menu, hit “!” to reboot the gateway (or remove power from gateway). It will<br />
take a couple of minutes to reboot. Once it has finished, from the main menu, hit “E” to see if there are<br />
any errors after loading the new configuration files.<br />
The default IP for the OnTrac is 192.168.1.100 and the Default for the gateway is 192.168.1.24. If the<br />
building IP network require different IP addresses, it is necessary to change both the Protonode<br />
PROF1.CSV client configuration for the OnTrac and the OnTrac IP. This topic is covered in detail in the<br />
34-525C-1 BACnet document, and the 34-525C-2 LONworks Document. See the OnTrac <strong>manual</strong><br />
Document 34-152 for instructions on changing the OnTrac IP address.<br />
<strong>Riverside</strong> <strong>Hydronics</strong> ® , LLC 34-525 04/14<br />
3220 Galvez Ave. - Fort Worth, Texas 76111 - Tel 1-800-990-5918 Page 9
ASSIGNING TEMPTRAC ADDRESSES<br />
In order to set up the network communication system, each water heater’s TempTrac control must be<br />
assigned an address. In <strong>installation</strong>s with multiple TempTrac controls, a different address must be<br />
assigned to each TempTrac.<br />
The following instructions are specific to the TempTrac®. If your water heater uses a different control<br />
refer to the programming instruction for that control to set the address.<br />
1. On the face of the TempTrac control, enter the programming mode by pressing and<br />
holding the “set” and “down arrow” keys together for 3 seconds.<br />
2. The upper LED readout should read “St1” with a numeral (the St1 setting) appearing in the lower LED<br />
readout.<br />
IMPORTANT: If the lower readout indicates “Pof”, the TempTrac control is locked for programming. To<br />
unlock the control, press and hold the “up arrow” and “down arrow” keys together until the lower LED<br />
readout indicates “Pon”. The TempTrac control is now unlocked. Repeat step 1 to proceed with<br />
assigning the TempTrac address.<br />
3. Press the “down arrow” key.<br />
4. “Pr2” will appear in the upper LED readout and “Pas” will appear in the lower LED readout.<br />
Press the “set” key to begin entering the password to allow programming.<br />
5. In the lower LED, the value “0 - -” (zero, dash, dash) with a flashing zero will be displayed.<br />
6. The programming password is “321”. Use up arrow key to input each digit in the security code.<br />
Confirm each digit by pressing “set” key. After each confirmation, the next digit will begin to flash.<br />
7. After entering the third digit and pressing “set”, “Pr2” will appear in the upper<br />
LED readout. Press the “down arrow” key three times and the parameter<br />
“Adr” will appear in the upper LED readout. The lower LED readout will<br />
indicate the default address “1”. (See image to the right.)<br />
8. Press the “set” key once and the number will begin to blink. Use the “up<br />
arrow” key to set the address from (1 to 247). When the proper address is<br />
indicated in the lower LED, press “set” key.<br />
Adr<br />
1<br />
9. The address is programmed. After approximately 30 seconds, the LED<br />
readouts will return to the default temperature reading mode.<br />
<strong>Riverside</strong> <strong>Hydronics</strong> ® , LLC 34-525 04/14<br />
3220 Galvez Ave. - Fort Worth, Texas 76111 - Tel 1-800-990-5918 Page 10