FibeAir 4800 - Meridian Microwave
FibeAir 4800 - Meridian Microwave
FibeAir 4800 - Meridian Microwave

You also want an ePaper? Increase the reach of your titles
YUMPU automatically turns print PDFs into web optimized ePapers that Google loves.
<strong>FibeAir</strong> ® <strong>4800</strong><br />
Point-to-Point Wireless<br />
Product Family<br />
Installation and<br />
Operation Guide<br />
Version 9.0
Notice<br />
This document contains information that is proprietary to Ceragon Networks Ltd.<br />
No part of this publication may be reproduced, modified, or distributed without prior written<br />
authorization of Ceragon Networks Ltd.<br />
This document is provided as is, without warranty of any kind.<br />
Registered TradeMarks<br />
Ceragon Networks ® is a registered trademark of Ceragon Networks Ltd.<br />
<strong>FibeAir</strong> ® is a registered trademark of Ceragon Networks Ltd.<br />
CeraView ® is a registered trademark of Ceragon Networks Ltd.<br />
Other names mentioned in this publication are owned by their respective holders.<br />
TradeMarks<br />
CeraMap TM , ConfigAir TM , PolyView TM , EncryptAir TM , CeraMon TM , EtherAir TM , and MicroWave<br />
Fiber TM , are trademarks of Ceragon Networks Ltd.<br />
Other names mentioned in this publication are owned by their respective holders.<br />
Statement of Conditions<br />
The information contained in this document is subject to change without notice.<br />
Ceragon Networks Ltd. shall not be liable for errors contained herein or for incidental or<br />
consequential damage in connection with the furnishing, performance, or use of this document<br />
or equipment supplied with it.<br />
Information to User<br />
Any changes or modifications of equipment not expressly approved by the manufacturer could<br />
void the user’s authority to operate the equipment and the warranty for such equipment.<br />
Copyright © 2006 by Ceragon Networks Ltd. All rights reserved.<br />
Corporate Headquarters:<br />
Ceragon Networks Ltd.<br />
24 Raoul Wallenberg St.<br />
Tel Aviv 69719, Israel<br />
Tel: 972-3-645-5733<br />
Fax: 972-3-645-5499<br />
Email: info@ceragon.com<br />
North American Headquarters:<br />
Ceragon Networks Inc.<br />
10 Forest Avenue,<br />
Paramus, NJ 07652, USA<br />
Tel: 1-201-845-6955<br />
Toll Free: 1-877-FIBEAIR<br />
Fax: 1-201-845-5665<br />
Email: infous@ceragon.com<br />
www.ceragon.com<br />
European Headquarters:<br />
Ceragon Networks (UK) Ltd.<br />
4 Oak Tree Park, Burnt Meadow Road<br />
North Moons Moat, Redditch,<br />
Worcestershire B98 9NZ, UK<br />
Tel: 44-(0)-1527-591900<br />
Fax: 44-(0)-1527-591903<br />
Email: infoeuro@ceragon.com<br />
APAC Headquarters<br />
Ceragon Networks (HK) Ltd.<br />
Singapore RO<br />
Level 34 Centennial Tower<br />
3 Temasek Avenue<br />
Singapore 039190<br />
Tel - + 65 6549 7886<br />
Fax: +65 6549 7011
Quick Start Guide<br />
Installation of FA<strong>4800</strong> should be carried out only by a qualified technician. If you<br />
are familiar with FA<strong>4800</strong>, use this guide to prepare the units for operation. If you<br />
are not familiar with FA<strong>4800</strong>, please read the Installation and operation Manual<br />
carefully.<br />
1. Equipment Required<br />
The following is a list of equipment required for installing a FA<strong>4800</strong> link:<br />
• RJ-45 crimp tool (if pre-assembled cable is not used)<br />
• Drill (for wall mounting only)<br />
• IDU and ODU grounding cables<br />
• 13 mm (½″) spanner/wrench<br />
• ODU to IDU cable if not ordered (outdoor class, CAT-5e, 4 twisted pairs)<br />
• Cable ties<br />
• Laptop running Windows 2000 or Windows XP.<br />
2. Before the Installation<br />
1. Verify that all equipment and tools are available.<br />
2. Install the FA<strong>4800</strong> software on the laptop; the installation takes several<br />
minutes.<br />
The software installation leaves the FA<strong>4800</strong> Manager icon on the desktop.<br />
<strong>FibeAir</strong> <strong>4800</strong> Installation and Operation Guide 1
Quick Start<br />
<strong>FibeAir</strong> <strong>4800</strong> Installation and Operation Guide<br />
3. Installing the FA<strong>4800</strong> Units<br />
➤<br />
To install the ODU:<br />
1. At site A, route the ODU cable from the ODU location (on the roof) to the<br />
IDU location (inside the building). The maximum length is 100m.<br />
2. Mount the ODU unit to the mast or wall, using the mounting kit and mounting<br />
instructions.<br />
Notes<br />
Do not tightly secure the ODU until the alignment process is complete.<br />
When installing the ODU is important to check that there are no direct obstructions<br />
in front of the ODU between the two link sites.<br />
3. Verify that the ODU mounting brackets are connected to ground.<br />
4. Connect the ODU chassis ground to ground.<br />
5. Connect the RJ-45 connectors to both ends of the cable using the pinout table<br />
and diagram below:<br />
IDU RJ-45 Wire Color Function ODU RJ-45<br />
1 twisted White/Green Ethernet (RxN) 1<br />
2 pair Green Ethernet (RxT) 2<br />
3 twisted White/Orange Ethernet (TxT) 3<br />
6 pair Orange Ethernet (TxN) 6<br />
4 twisted Blue Power (+) 4<br />
5 pair White/Blue Power (+) 5<br />
7 twisted White/Brown Power (−) 7<br />
8 pair Brown Power (−) 8<br />
6. Secure the ODU and ground cables to the mast or brackets using cable ties.<br />
7. Repeat the procedure at site B.<br />
➤ To align the ODU:<br />
1. Connect power to the site A IDU.<br />
2 <strong>FibeAir</strong> <strong>4800</strong> Installation and Operation Guide
<strong>FibeAir</strong> <strong>4800</strong> Installation and Operation Guide<br />
Quick Start<br />
After approximately 20 seconds the ODU beeper starts beeping. This is<br />
normal.<br />
2. Verify normal operation of the IDU by the LED indications on the front panel.<br />
Indicator Color Status<br />
PWR Green ON<br />
IDU-E<br />
Orange<br />
Green<br />
ON for short duration during startup<br />
ON during normal operation<br />
ODU Green ON shows normal operation<br />
AIR I/F<br />
Orange<br />
Green<br />
ON for short duration during startup<br />
ON shows normal operation<br />
SERVICE Green ON shows normal operation<br />
OFF when Service is configured for Ethernet only<br />
Warning<br />
Do not stand in front of a live outdoor unit.<br />
3. Align the site A ODU in the direction of the site B ODU.<br />
4. Connect power to the site B IDU.<br />
After approximately 20 seconds the ODU beeper starts beeping. This is<br />
normal.<br />
5. Verify normal operation of the IDU by the LED indications on the panel.<br />
Indicator Color Status<br />
PWR Green ON IDU-C only<br />
IDU<br />
Orange<br />
Green<br />
ON for short duration during startup<br />
ON during normal operation<br />
ODU Green ON shows normal operation<br />
AIR I/F<br />
Orange<br />
Green<br />
ON for short duration during startup<br />
ON shows normal operation<br />
SERVICE Green ON shows normal operation<br />
OFF when Service is configured for Ethernet only<br />
6. Make an azimuth sweep with the site B ODU of 180 degrees so that the site A<br />
ODU position is learned by the site B ODU.<br />
7. Turn the site B ODU slowly back towards the site A direction, listening to the<br />
beep sequence until optimal alignment is achieved.<br />
Beeper Sequence<br />
[approx. 1s]<br />
=beeper on<br />
=beeper off<br />
Description<br />
Best Signal so far<br />
<strong>FibeAir</strong> <strong>4800</strong> Installation and Operation Guide 3
Quick Start<br />
<strong>FibeAir</strong> <strong>4800</strong> Installation and Operation Guide<br />
Signal quality increased<br />
No change in signal<br />
Signal quality decreased<br />
[approx. 2s]<br />
No air link<br />
Note Three beeps and a pause is the best signal<br />
Two beeps and a pause, signal quality increased<br />
One beep and pause is no signal change<br />
Any other signal detects no signal between ODUs.<br />
Note<br />
8. Secure the site B ODU to the mast/wall.<br />
9. At site A, adjust the ODU slowly while listening to the beeper sequence until<br />
the best signal is attained.<br />
10. Secure the site A ODU to the mast/wall.<br />
11. Monitor the link quality for about 15 minutes to verify stability.<br />
12. Connect the management station to one of the two IDUs in the link.<br />
13. Double-click the FA<strong>4800</strong> Manager icon to start the application.<br />
14. Click the Installation button to open the installation wizard and follow the<br />
installation steps.<br />
15. After selection of the radio channel and the link rate (as determined in the Link<br />
Budget Calculator utility), verify that the link quality bar in the FA<strong>4800</strong><br />
manager is within the green range for TDM service and within the yellow<br />
range for Ethernet service.<br />
Achieve the best possible link quality values. In case of radio link loss, verify the<br />
ODU alignment, or change the radio channel in both sides of the link. When the<br />
radio link resumes, continue the installation process.<br />
4 <strong>FibeAir</strong> <strong>4800</strong> Installation and Operation Guide
<strong>FibeAir</strong> <strong>4800</strong> Installation and Operation Guide<br />
Quick Start<br />
4. Connecting the Power<br />
Warning<br />
Before connecting any cable, the protective earth terminals of the AC/DC<br />
adapter must be connected to the protective ground conductor of the mains<br />
power cord. If you are using an extension cord (power cable) make sure it is<br />
grounded as well.<br />
Any interruption of the protective (grounding) conductor (inside or outside the<br />
instrument) or disconnecting of the protective earth terminal can make this<br />
unit dangerous. Intentional interruption is prohibited.<br />
Connecting Power to an IDU-E<br />
Power is supplied to the FA<strong>4800</strong> via an external AC/DC converter, which receives<br />
power from 100–240 VAC source and converts it to -48 VDC.<br />
➤<br />
To connect power to the IDU-E:<br />
1. At site A, connect the 2-pin connector of the AC/DC converter to the 2-pin DC<br />
power connector on the IDU rear panel.<br />
2. Connect the AC/DC converter 3-prong plug to a mains outlet.<br />
The unit turns on automatically upon connection to the mains.<br />
The green PWR indicator turns on, and the IDU indicator blinks orange for<br />
approximately 40 seconds during startup. See Normal Indicators section in<br />
Chapter 3.<br />
3. After approximately 20 seconds the ODU starts beeping. The beeps continue<br />
until the ODUs are aligned and the link set up.<br />
4. Wait for approximately one minute, then repeat for Site B.<br />
Connecting Power to an IDU-C<br />
AC power is supplied to the FA<strong>4800</strong> through a standard 3-prong plug.<br />
AC power should be supplied via a 1.5m (5 ft) standard power cable terminated<br />
by a standard 3-prong socket. A cable is provided with the unit.<br />
➤<br />
➤<br />
To connect AC power to an IDU-C:<br />
1. Connect the power cable socket to the power connector on the FA<strong>4800</strong> front<br />
panel.<br />
2. Connect the power cable plug to the mains outlet.<br />
The unit will be turned on automatically upon connection to the mains.<br />
To connect DC power to an IDU-C<br />
A special IEC 60320 adapter for -48 VDC or -24 VDC power connection is<br />
supplied with the unit.<br />
<strong>FibeAir</strong> <strong>4800</strong> Installation and Operation Guide 5
Quick Start<br />
<strong>FibeAir</strong> <strong>4800</strong> Installation and Operation Guide<br />
5. Connecting the User Equipment<br />
➤<br />
To connect user equipment to the IDU:<br />
1. Connect the user equipment (such as PBX) to the IDU RJ-45 port designated<br />
Trunk:<br />
<br />
On the rear panel of the IDU-E<br />
<br />
On the front panel of the IDU-C<br />
2. Connect user hub/router or any other compatible device to the IDU RJ-45 port<br />
designated LAN.<br />
<br />
On the rear panel of the IDU-E<br />
<br />
On the front panel of the IDU-C<br />
Notes<br />
• IDU-C has an integrated LAN switch that provides two 10/100BaseT ports. The<br />
Integrated LAN switch does not support spanning tree.<br />
• The two LAN ports can be connected to two separate LAN segments.<br />
Caution Do not connect both LAN ports to the same LAN segment, a loop will be created<br />
that will flood the network.<br />
6 <strong>FibeAir</strong> <strong>4800</strong> Installation and Operation Guide
Contents<br />
Chapter 1. Introduction<br />
1.1 Overview..................................................................................................................... 1-1<br />
Application ...........................................................................................................................1-1<br />
Versions................................................................................................................................1-1<br />
Features................................................................................................................................1-2<br />
1.2 Physical Description..................................................................................................... 1-4<br />
IDU-E...................................................................................................................................1-5<br />
IDU-C ..................................................................................................................................1-5<br />
ODU....................................................................................................................................1-5<br />
1.3 Functional Description................................................................................................. 1-6<br />
1.4 Technical Specifications............................................................................................... 1-7<br />
Chapter 2. Installation and Setup<br />
2.1 Introduction................................................................................................................. 2-1<br />
2.2 Site Requirements and Prerequisites ............................................................................ 2-1<br />
2.3 Package Contents ........................................................................................................ 2-2<br />
2.4 Equipment Required.................................................................................................... 2-3<br />
2.5 Installation Sequence................................................................................................... 2-3<br />
2.6 Mounting the ODU ..................................................................................................... 2-4<br />
2.7 Connecting the ODU to the IDU................................................................................. 2-5<br />
2.8 Installing FA<strong>4800</strong> Management Software ..................................................................... 2-7<br />
2.9 Connecting the Power ................................................................................................. 2-7<br />
Connecting Power to an IDU-E .............................................................................................2-7<br />
Connecting Power to an IDU-C ............................................................................................2-8<br />
2.10 Starting the FA<strong>4800</strong> Manager Software ........................................................................ 2-8<br />
2.11 Over the Air Connection Indication ........................................................................... 2-12<br />
2.12 Aligning ODUs with the Beeper................................................................................. 2-12<br />
2.13 Calculating the Air Interface Rate............................................................................... 2-14<br />
2.14 Installing the Link....................................................................................................... 2-14<br />
Selecting Channels..............................................................................................................2-18<br />
Selecting the Service Parameters .........................................................................................2-19<br />
Setting the Clock Configuration...........................................................................................2-21<br />
Setting the T1 Line Code.....................................................................................................2-23<br />
2.15 Connecting the User Equipment ................................................................................ 2-25<br />
Chapter 3. Operation<br />
3.1 Turning On FA<strong>4800</strong>..................................................................................................... 3-1<br />
3.2 Controls and Indicators................................................................................................ 3-2<br />
IDU Front Panel Indicators....................................................................................................3-2<br />
WAN/LAN Indicators ............................................................................................................3-3<br />
Normal Indications ...............................................................................................................3-3<br />
3.3 Default Settings............................................................................................................ 3-4<br />
3.4 Managing FA<strong>4800</strong> ....................................................................................................... 3-5<br />
3.5 Turning Off FA<strong>4800</strong>..................................................................................................... 3-7<br />
FA<strong>4800</strong> Ver.<br />
i
Table of Contents<br />
Installation and Operation Manual<br />
Chapter 4. Configuration<br />
4.1 Configuring the System Parameters.............................................................................. 4-1<br />
4.2 Selecting Channels....................................................................................................... 4-3<br />
FA<strong>4800</strong> with Automatic Channel Select ................................................................................4-4<br />
FA<strong>4800</strong> 5.4 GHz ETSI Version ..............................................................................................4-5<br />
4.3 Configuring Service Parameters.................................................................................... 4-6<br />
4.4 Setting the Clock Configuration.................................................................................... 4-9<br />
4.5 Setting the T1 Line Code ........................................................................................... 4-13<br />
4.6 Editing the Configuration Parameters ......................................................................... 4-14<br />
4.7 Changing the Transmit Power .................................................................................... 4-16<br />
4.8 Defining the Management Addresses ......................................................................... 4-18<br />
4.9 Setting the Date and Time ......................................................................................... 4-19<br />
4.10 Configuring the Bridge............................................................................................... 4-21<br />
ODU Bridge Mode .............................................................................................................4-23<br />
IDU Aging time...................................................................................................................4-23<br />
4.11 Configuring Ethernet Mode........................................................................................ 4-24<br />
4.12 Changing Community Values..................................................................................... 4-25<br />
Editing Community Strings ..................................................................................................4-25<br />
Forgotten Community string................................................................................................4-27<br />
4.13 Changing Passwords .................................................................................................. 4-28<br />
Changing the Management Password ..................................................................................4-28<br />
Changing the Link Password................................................................................................4-28<br />
Forgotten the Link Password ...............................................................................................4-29<br />
4.14 Muting the Beeper..................................................................................................... 4-29<br />
4.15 Setting External Alarm Inputs ..................................................................................... 4-30<br />
4.16 Managing Configuration Files..................................................................................... 4-31<br />
Saving FA<strong>4800</strong> Configuration in a File.................................................................................4-31<br />
Restoring a Configuration File .............................................................................................4-31<br />
4.17 Reinstalling the Link................................................................................................... 4-31<br />
4.18 Resetting FA<strong>4800</strong>....................................................................................................... 4-32<br />
4.19 Displaying the Inventory ............................................................................................ 4-32<br />
Chapter 5. Diagnostics and Troubleshooting<br />
5.1 Automatic Link Data Collection (Get Link Information) ................................................ 5-1<br />
5.2 Monitoring Performance.............................................................................................. 5-2<br />
Saving the Monitor Log .........................................................................................................5-2<br />
Setting the Events Preferences ...............................................................................................5-3<br />
Saving the Events Log............................................................................................................5-4<br />
5.3 Viewing Performance Reports...................................................................................... 5-4<br />
5.4 Error Detection and Alarms........................................................................................ 5-10<br />
5.5 Testing FA<strong>4800</strong>.......................................................................................................... 5-12<br />
Local External Loopback .....................................................................................................5-13<br />
Remote Internal Loopback..................................................................................................5-14<br />
Remote External Loopback .................................................................................................5-15<br />
Local Internal Loopback......................................................................................................5-15<br />
5.6 Troubleshooting......................................................................................................... 5-15<br />
5.7 Frequently Asked Questions ...................................................................................... 5-16<br />
5.8 Technical Support...................................................................................................... 5-19<br />
ii<br />
FA<strong>4800</strong> Ver.
Installation and Operation Manual<br />
Table of Contents<br />
Appendix A. Wiring Specifications<br />
Appendix B. Mast and Wall Installation<br />
Appendix A. Link Budget Calculator<br />
Appendix D. AIND Antenna Alignment Procedure<br />
Appendix E. Antenna Characteristics<br />
FA<strong>4800</strong> Ver.<br />
iii
Chapter 1<br />
Introduction<br />
1.1 Overview<br />
FA<strong>4800</strong> is a carrier-class, high capacity, Point-to-Point broadband wireless<br />
transmission system. FA<strong>4800</strong> combines legacy TDM and Ethernet services over 2.3,<br />
2.4, 4.9 and 5.x GHz license-exempt bands and is suitable for deployment in FCC,<br />
ETSI, CN, UK, and CSA-regulated countries. The system provides up to 48 Mbps<br />
wireless link and supports ranges of up to 80 km (50 miles) with an external antenna.<br />
Note that for FA<strong>4800</strong> systems with earlier ODU hardware versions, contact Ceragon<br />
technical support for the relevant manual.<br />
Application<br />
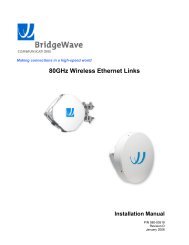
Figure 1-1 illustrates a typical point-to-point application of two FA<strong>4800</strong> units.<br />
Site A<br />
Site B<br />
PBX<br />
Up to 80 km (50 miles)<br />
PBX<br />
E1/T1<br />
E1/T1<br />
E1/T1<br />
E1/T1<br />
10/100BaseT<br />
<strong>FibeAir</strong> <strong>4800</strong><br />
<strong>FibeAir</strong> <strong>4800</strong><br />
10/100 BaseT<br />
LAN<br />
Versions<br />
Figure 1-1. Typical Application<br />
FA<strong>4800</strong> is available for operation in several different frequency ranges, with<br />
versions for ETSI and FCC regulations.<br />
• F23, 2.300–2.400 GHz<br />
• F24, 2.400–2.4835 GHz<br />
• F49, 4.940–4.990 GHz<br />
• F53, 5.250–5.350 GHz<br />
• F54, 5.470–5.725 GHz<br />
• F58, 5.725–5.850 GHz<br />
LAN<br />
<strong>FibeAir</strong> <strong>4800</strong> Installation and Operation Guide 1-1
Chapter 1 Introduction<br />
<strong>FibeAir</strong> <strong>4800</strong> Installation and Operation Guide<br />
• F59, 5.865–5.935 GHz<br />
• F53HP, high-power version, supports a dynamic range of 12 dB transmit<br />
power.<br />
• F54E, limited transmit power as specified by the ETSI standard.<br />
• F54-HG, high-gain version for the ETSI regulated markets, to be used with<br />
28 dBi external antenna only.<br />
• F54HP, high-power version, supports high transmit power up to 18 dBm.<br />
• F58/UK, complies with UK DFS/TPC standard.<br />
• AIND, All indoor unit. Available with IDU options 4E1 or 4T1, and ODU<br />
options F58/FCC.<br />
FA<strong>4800</strong>-AIND integrates the ODU and the IDU-C into a single 19" IDU-C box.<br />
• ACCESS, Ethernet only units powered over the Ethernet via PoE unit. Available<br />
in F23, F24, or F58 frequency ranges.<br />
Features<br />
Wireless Link<br />
FA<strong>4800</strong> delivers up to 48 Mbps data rate for Ethernet and E1/T1 traffic. The<br />
system supports a variety of spectrum bands and can be configured to operate in<br />
any channel in the band with a carrier step resolution of 5, 10, or 20 MHz (2.x<br />
GHz versions 10 or 20 MHz only).<br />
FA<strong>4800</strong> operation complies with ETSI, CSA, CN, UK, and the FCC 47CFR Part 15<br />
and subpart C and E requirements.<br />
FA<strong>4800</strong> employs Time Division Duplex (TDD) transmission. This technology<br />
simplifies the installation and configuration procedure. There is no need to plan<br />
and to allocate separate channels for the uplink and downlink data streams.<br />
Operation over 2.4 GHz and 5.x GHz bands is not affected by harsh weather<br />
conditions, such as fog, heavy rain etc.<br />
LAN Interface<br />
The FA<strong>4800</strong> LAN port provides 10/100BaseT interfaces with autonegotiation and<br />
transparent VLAN support. Traffic handling is provided by a MAC-level<br />
self-learning bridge.<br />
TDM Interface<br />
The FA<strong>4800</strong> TDM interface accepts E1 or T1 traffic, supporting the following:<br />
• Unframed operation (E1 and T1)<br />
• AMI and B8ZS zero suppression (T1).<br />
Advanced Encryption System<br />
FA<strong>4800</strong> (version 1.500 and above) ensures user's data security with one of the<br />
most sophisticated commercially available combined encryption and<br />
authentication techniques, CCM/AES. This technique combines message<br />
1-2 <strong>FibeAir</strong> <strong>4800</strong> Installation and Operation Guide
<strong>FibeAir</strong> <strong>4800</strong> Installation and Operation Manual<br />
Chapter 1 Introduction<br />
authentication (preventing antispoofing and replay protection) with commercial<br />
encryption, and complies with the IEEE 802.11i (phase iii) security<br />
recommendations.<br />
CCM/AES uses a symmetric 128-bit encryption key (EK), and a nonce, and<br />
provides both message encryption and authenticating signature. The nonce<br />
mechanism enables the receiver to remember already received genuine messages<br />
and reject all replayed messages.<br />
Initial encryption and authentication is based on a user-defined master key (Link<br />
Password). While standard Wireless LAN encrypts only the Ethernet Payload,<br />
FA<strong>4800</strong> encrypts both the source and destination MAC addresses.<br />
Management<br />
FA<strong>4800</strong> has full local and remote management capabilities. The user-friendly<br />
SNMP-based management tool provides full end-to-end configuration, event log<br />
and performance monitoring capabilities.<br />
Diagnostics and Performance Monitoring<br />
FA<strong>4800</strong> supports activating local and remote loopbacks on E1/T1 links.<br />
FA<strong>4800</strong> constantly monitors the data transmission process, evaluates received<br />
signal strength, and signal quality. It also monitors received traffic and frame rate<br />
(FPS) for local and remote units.<br />
Automatic Channel Select<br />
Some versions of FA<strong>4800</strong> have the Automatic Channel Select feature, which<br />
operates via a Dynamic Frequency Selection (DFS) mechanism. This enables<br />
coexistence with any radar system that may be active in the area. FA<strong>4800</strong><br />
performs channel monitoring and selects the channel with the lowest interference<br />
for the transmission.<br />
FA<strong>4800</strong> operation complies with ETSI requirements where the ETSI version has<br />
been purchased.<br />
Adaptive Rate Modulation (ARA)<br />
FA<strong>4800</strong> changes modulation automatically depending on channel characteristics in<br />
order to guarantee continuation of service. The adaptive modulation enables the<br />
user to maximize Ethernet throughput without degradation of the TDM service<br />
quality. When Ethernet only service is used, the adaptive modulation enables<br />
improving the Ethernet performance in case of air performance degradation<br />
(periodical interference or RSS changes).<br />
In case of interference at one site, there is no need to use a lower modulation at<br />
the other site (as in previous versions). In such a case the actual rate changes<br />
automatically only at the problematic site, while the second side of the link<br />
maintains the highest possible rate (Asymmetric).<br />
Adaptive modulation can be selected in both Installation and Configuration<br />
wizards.<br />
<strong>FibeAir</strong> <strong>4800</strong> Installation and Operation Guide 1-3
Chapter 1 Introduction<br />
<strong>FibeAir</strong> <strong>4800</strong> Installation and Operation Guide<br />
Transmit Power Control<br />
The Transmit Power Control (TPC) function, provides the capability of defining the<br />
transmit power in order to comply with the ETSI standard requirement of<br />
30 dB maximum. See Table 4-1 for full details of transmit power control.<br />
Alarm Connector<br />
The IDU-C has two external alarm inputs in the form of dry-contact relays. The<br />
Alarm interface is located on the front panel of the IDU-C and is a 9-pin D-type<br />
female connector. The user enables or disables each of the alarms and can<br />
configure the text that appears in the alarm trap. The ODU sends the alarm within<br />
less than a second from actual alarm trigger.<br />
The alarm connector is available as an ordering option for the IDU-E.<br />
Optional External Antenna<br />
FA<strong>4800</strong> supports configuration of an external antenna. In this configuration, the<br />
outdoor unit is supplied with an N-type connector that connects through a coax<br />
cable to the external antenna.<br />
An external antenna can extend the range of the link, and in some cases, may help<br />
to reduce environmental interferences. Various external antennas are available for<br />
the FA<strong>4800</strong> operating frequencies.<br />
For example, an optional flat panel 28 dBi external antenna increases the<br />
operation range of FA<strong>4800</strong> up to 80 km (50 miles).<br />
1.2 Physical Description<br />
FA<strong>4800</strong> system consists of an Outdoor Unit (ODU) and an Indoor Unit (IDU)<br />
Figure 1-2 shows the IDU-E, IDU-C carrier class unit, and an ODU with integrated<br />
antenna.<br />
1-4 <strong>FibeAir</strong> <strong>4800</strong> Installation and Operation Guide
<strong>FibeAir</strong> <strong>4800</strong> Installation and Operation Manual<br />
Chapter 1 Introduction<br />
Figure 1-2. FA<strong>4800</strong> Units<br />
IDU-E<br />
IDU-C<br />
ODU<br />
The front panel of the IDU-E includes five LEDs, which display the status of E1/T1<br />
traffic, wireless link, self-test results, the ODU-to-IDU link, and power status. For a<br />
detailed description of the front panel LEDs, see Chapter 3.<br />
The rear panel of the IDU includes the connectors for power, WAN, LAN, E1/T1,<br />
and the ODU. The wiring specifications are detailed in Appendix A. The rear panel<br />
LEDs are described in Chapter 3.<br />
The IDU-C front panel includes four LEDs that display the status of E1/T1and,<br />
wireless link, self-test results, and ODU-to-IDU link. For a detailed description of<br />
the front panel LEDs, see Chapter 3.<br />
ODU includes a power connector, which receives -48 VDC, and RJ-45 for<br />
Ethernet traffic from the IDU. The ODU is attached to a mast using a special<br />
mounting kit, which is supplied with the unit.<br />
The ODU can be used with an integrated antenna, as illustrated in Figure 1-2, or<br />
with an external antenna. If an external antenna is to be used, then the ODU is<br />
supplied fitted with an N-type connector.<br />
<strong>FibeAir</strong> <strong>4800</strong> Installation and Operation Guide 1-5
Chapter 1 Introduction<br />
<strong>FibeAir</strong> <strong>4800</strong> Installation and Operation Guide<br />
1.3 Functional Description<br />
FA<strong>4800</strong> system comprises of the following units:<br />
• Outdoor Unit (ODU): An enclosed aluminum frame with a front sealed<br />
plastic cover, containing an integrated transceiver with an antenna, RF<br />
module, modem and standard interfaces. The ODU stores all the configuration<br />
parameters of the FA<strong>4800</strong> system. Figure 1-3 shows the ODU block diagram.<br />
• Indoor Unit (IDU-E or IDU-C): The interface unit between the ODU and the<br />
user. It converts 100–240 VAC to -48VDC, and sends it on to the ODU. The<br />
IDU does not store any configuration data. Therefore, there is no need for<br />
additional configuration of the FA<strong>4800</strong> system when replacing an IDU.<br />
Figure 1-3. ODU Block Diagram<br />
1-6 <strong>FibeAir</strong> <strong>4800</strong> Installation and Operation Guide
<strong>FibeAir</strong> <strong>4800</strong> Installation and Operation Manual<br />
Chapter 1 Introduction<br />
1.4 Technical Specifications<br />
Air Interface Technology OFDM<br />
Duplexing Method<br />
Capacity<br />
Modulation<br />
Channel Resolution<br />
Transmitter Power<br />
Range<br />
Time Division Duplex (TDD)<br />
Configurable up to 48 Mbps<br />
OFDM - BPSK, QPSK, 16QAM, 64QAM<br />
5/10/20 MHz<br />
Frequency Bands [GHz] 2.300–<br />
2.483<br />
Standard<br />
Specification is different per product, for further details refer<br />
to the Link Budget Calculator<br />
Up to 41 km (25.5 miles)<br />
Up to 80 km (50 miles) with an external antenna<br />
ACCESS versions up to 20 km.<br />
FCC<br />
ETSI<br />
Antennas (See Antenna Characteristics in Appendix E)<br />
4.940–<br />
4.990<br />
5.150–<br />
5.350<br />
5.470–<br />
5.725<br />
5.725–<br />
5.850<br />
FCC FCC ETSI FCC<br />
LAN Interface PHY Up to 2 × 10/100BaseT, auto-sensing<br />
Framing/Coding<br />
Bridging<br />
Line Impedance<br />
VLAN Support<br />
Frame Size<br />
Connector<br />
IEEE 802.3/U<br />
Self-learning, up to 2048 MAC addresses<br />
100Ω<br />
Transparent<br />
1536 bytes max<br />
RJ-45<br />
E1 Interface Data Rate Unframed (transparent) 2.048 MHz<br />
(Specification may be different per ordering option)<br />
Line Interface<br />
Connector<br />
HDB3<br />
RJ-45<br />
No. of Ports IDU-E: 1 or 2<br />
IDU-C: 4<br />
<strong>FibeAir</strong> <strong>4800</strong> Installation and Operation Guide 1-7
Chapter 1 Introduction<br />
<strong>FibeAir</strong> <strong>4800</strong> Installation and Operation Guide<br />
T1 Interface Data Rate Unframed (transparent) 1.544 MHz<br />
(Specification may be different per ordering option)<br />
Zero Suppression<br />
Connector<br />
AMI, B8ZS<br />
RJ-45<br />
No. Of Ports IDU-E: 1 or 2<br />
IDU-C: 4<br />
Indicators PWR (green) Power status (IDU-E only)<br />
IDU (green)<br />
ODU (green/red)<br />
AIR I/F (green/red)<br />
SERVICE (green/red)<br />
IDU-C status<br />
ODU-to-IDU link status<br />
Air Interface status<br />
E1/T1 signal status<br />
Power Source IDU-E: 100–240 VAC via external AC/DC converter<br />
IDU-C: 100–240 VAC via AC cable<br />
-48 VDC (-42 to –60 VDC)<br />
24 VDC<br />
Power Received by<br />
the ODU<br />
Power Consumption<br />
Connector<br />
-48 VDC<br />
ODU plus IDU-E – 10W max<br />
ODU plus IDU-C – 14W max<br />
IDU-E 2-pin<br />
IDU-C AC – 3-pin IEC connector<br />
DC – 3-pin terminal block<br />
Alarm<br />
Connector<br />
DB-9 female<br />
Connector Electrical Characteristics Dry Contact, 30V/2A<br />
Max input current, 0.01A at 0.5W (R=5K)<br />
Physical Outdoor Unit (ODU) With integrated antenna<br />
Height 24.5 cm / 9.3 in 30.5 cm / 12 in<br />
Width 13.5 cm / 5.13 in 30.5 cm / 12 in<br />
Depth 4.0 cm / 1.57 in 5.8 cm / 2.3 in<br />
Weight 1.0 kg / 2.2 lb 1.5 kg / 3.3 lb<br />
Indoor Unit IDU-E IDU-C<br />
Height 4.5 cm / 1.7 in (1U) 4.5 cm / 1.7 in (1U)<br />
Width 23.5 cm / 9.3 in 29 cm / 11.5 in<br />
Depth 16.5 cm / 6.7 in 43 cm / 17.7 in<br />
Weight 0.5 kg / 1.1 lb 1.5 kg / 3.3 lb<br />
Environment<br />
Outdoor Unit (ODU)<br />
Enclosure<br />
All-weather case<br />
Temperature -35 to 60°C/-31 to 140°F<br />
1-8 <strong>FibeAir</strong> <strong>4800</strong> Installation and Operation Guide
<strong>FibeAir</strong> <strong>4800</strong> Installation and Operation Manual<br />
Chapter 1 Introduction<br />
Indoor Unit (IDU-E and IDU-C)<br />
Temperature -0 to 50°C/32 to 122°F<br />
Humidity<br />
Up to 90%, non-condensing<br />
<strong>FibeAir</strong> <strong>4800</strong> Installation and Operation Guide 1-9
Chapter 2<br />
Installation and Setup<br />
Warning<br />
2.1 Introduction<br />
This section describes the installation, alignment, and setup procedures for a<br />
FA<strong>4800</strong> system.<br />
After installing the hardware and establishing a link, refer to Chapter 3 for<br />
operation instructions and Chapter 4 for configuration instructions.<br />
In case a problem is encountered, refer to Chapter 5 for test and diagnostic<br />
instructions.<br />
•<br />
Internal settings, adjustment, maintenance, and repairs may be performed<br />
only by a skilled technician who is aware of the hazards involved.<br />
Always observe standard safety precautions during installation, operation, and<br />
maintenance of this product.<br />
2.2 Site Requirements and Prerequisites<br />
For the IDU units, allow at least 90 cm (36 in) of frontal clearance for operating<br />
and maintenance accessibility. Allow at least 10 cm (4 in) clearance at the rear of<br />
the unit for signal lines and interface cables.<br />
The ambient operating temperature should be –45 to 60°C/–49 to 140°F (ODU),<br />
or –5 to 45°C/23 to 113°F (IDU) at a relative humidity of up to 90%,<br />
non-condensing.<br />
<strong>FibeAir</strong> <strong>4800</strong> Installation and Operation Guide 2-1
Chapter 2 Installation and Setup<br />
<strong>FibeAir</strong> <strong>4800</strong> Installation and Operation Guide<br />
2.3 Package Contents<br />
The FA<strong>4800</strong> packages include the following items:<br />
• ODU package contains:<br />
ODU<br />
Mast/Wall mounting kit plus mounting instructions<br />
FA<strong>4800</strong> Manager installation CD<br />
Spare RJ-45 connector<br />
• IDU package contains:<br />
Or<br />
IDU<br />
110V/220V adapter<br />
IDU wall-mounting drilling template<br />
Self adhesive label showing the IDU LED operation<br />
Spare RJ-45 connector<br />
• IDU-E Package Contains:<br />
IDU-E<br />
Self adhesive label showing the MAC address and the alternative<br />
community string KEY. Keep this label safe.<br />
For AC model, 110/240 VAC with 3-pin terminal block connector (green)<br />
For DC model, 3-prong connector cable<br />
Standard 1-U, 19” carrier rack<br />
Spare RJ-45 connector<br />
• External antenna (if ordered)<br />
• ODU/IDU cable at length ordered (optional)<br />
• Technical documentation CD<br />
2-2 <strong>FibeAir</strong> <strong>4800</strong> Installation and Operation Guide
<strong>FibeAir</strong> <strong>4800</strong> Installation and Operation Guide<br />
Chapter 2 Installation and Setup<br />
2.4 Equipment Required<br />
The following is a list of the equipment required for installing the FA<strong>4800</strong><br />
hardware.<br />
• RJ-45 crimp tool (if pre-assembled ODU/IDU cable is not used)<br />
• Drill (for wall mounting only)<br />
• IDU and ODU grounding cable<br />
• 13 mm (½″) spanner/wrench<br />
• ODU to IDU cable if not ordered (Outdoor class, CAT-5e, 4 twisted pairs)<br />
• Cable ties<br />
• Laptop running Windows 2000 or Windows XP.<br />
2.5 Installation Sequence<br />
The FA<strong>4800</strong> system installation is achieved by following the steps listed below:<br />
1. Installing ODUs at both sites of the link.<br />
2. Assembling the ODU cable and connecting ODU to IDU at both sites.<br />
3. Connecting the power.<br />
4. Installing the management program on the network management station.<br />
5. Aligning the ODUs.<br />
6. Use the Link Budget Calculator Application<br />
7. Running the Installation wizard from the management program.<br />
8. Connecting user equipment to the local and remote IDUs.<br />
Figure 2-1 illustrates a typical installation of FA<strong>4800</strong> with an external antenna.<br />
<strong>FibeAir</strong> <strong>4800</strong> Installation and Operation Guide 2-3
Chapter 2 Installation and Setup<br />
<strong>FibeAir</strong> <strong>4800</strong> Installation and Operation Guide<br />
Figure 2-1. Typical Installation Diagram<br />
2.6 Mounting the ODU<br />
The ODU is the transmitting and receiving element of the FA<strong>4800</strong> system. The<br />
ODU can be mounted on a mast or a wall. In both installations, the supplied<br />
mounting kit is used to secure the ODU. Appendix B describes the mast/wall<br />
installation instructions.<br />
A FA<strong>4800</strong> link operates in pairs of two FA<strong>4800</strong> systems with the same<br />
configuration. Both systems must be installed, and the antennas of the outdoor<br />
units must be aligned for maximum throughput.<br />
2-4 <strong>FibeAir</strong> <strong>4800</strong> Installation and Operation Guide
<strong>FibeAir</strong> <strong>4800</strong> Installation and Operation Guide<br />
Chapter 2 Installation and Setup<br />
Warning<br />
➤<br />
Note<br />
•<br />
Prior to connecting cables to the ODU, the protective earth terminal (screw) of<br />
the ODU must be connected to an external protective ground conductor or to<br />
a grounded mast.<br />
Only a qualified person using the proper safety equipment should climb the<br />
antenna mast. Only trained professional installers should be used when<br />
installing or dismantling ODUs and masts.<br />
To mount the ODU:<br />
1. Verify that the ODU mounting brackets are properly grounded.<br />
2. Assemble the ODU unit onto the mast or wall. Refer to Appendix B for the<br />
ODU mounting instructions.<br />
3. Connect the ground cable to the chassis point on the ODU.<br />
4. Attach the ODU cable to the RJ-45 connector. Refer to Appendix A for the<br />
connector pinout.<br />
5. Secure the cables to the mast or brackets using UV-rated cable ties.<br />
6. Repeat the procedure at the remote site.<br />
•<br />
Do not tightly secure the ODU to its mounting brackets until the alignment process<br />
of the antenna is complete.<br />
When installing the ODU, check that there are no direct obstructions in front of the<br />
ODU or interference from man-made obstacles.<br />
➤<br />
2.7 Connecting the ODU to the IDU<br />
The ODU cable conducts all the user traffic between the IDU and the ODU. The<br />
ODU cable also provides -48 VDC supply to the ODU. The maximum length for<br />
one leg of the ODU cable is 100m (328 ft) in accordance with 10/100BaseT<br />
standards.<br />
ODU cable is supplied pre-assembled with RJ-45 connectors, at the length<br />
specified when ordering. If the ODU cable was not ordered, use Cat. 5e shielded<br />
cable. Wiring specifications are given in Appendix A.<br />
To connect the ODU to the IDU<br />
1. Route the cable from the ODU location into the building.<br />
2. Secure the cable along its path.<br />
3. Connect the ODU cable to the RJ-45 connector on the IDU designated ODU<br />
or WAN. Figure 2-2 illustrates a typical IDU rear panel. Figure 2-3 illustrates a<br />
typical IDU-E front panel. There may be differences in the panels of<br />
depending on the versions of the IDU.<br />
<strong>FibeAir</strong> <strong>4800</strong> Installation and Operation Guide 2-5
Chapter 2 Installation and Setup<br />
<strong>FibeAir</strong> <strong>4800</strong> Installation and Operation Guide<br />
DC IN<br />
48-60V --- 1A<br />
- + ODU<br />
LAN<br />
TRUNK 1 TRUNK 2<br />
Figure 2-2. Typical IDU Rear Panel<br />
Figure 2-3. Typical IDU-C Front Panels<br />
Figure 2-4. FA<strong>4800</strong>-AIND All Indoor Radio Unit<br />
Note<br />
•<br />
The IDU and IDU-C panels may be fitted with different connector combinations<br />
depending on the model ordered.<br />
2-6 <strong>FibeAir</strong> <strong>4800</strong> Installation and Operation Guide
<strong>FibeAir</strong> <strong>4800</strong> Installation and Operation Guide<br />
Chapter 2 Installation and Setup<br />
➤<br />
2.8 Installing FA<strong>4800</strong> Management Software<br />
The FA<strong>4800</strong> management application is distributed on CD-ROM as an executable<br />
file. The application has the following PC requirements:<br />
• Memory: 128 MB RAM<br />
• Disk: 1 GB free hard disk space<br />
• Processor: Pentium 3 or higher<br />
• Network: 10/100BaseT NIC<br />
• Graphics: Card and monitor that support 1024×768 screen resolution<br />
with 16 bit color<br />
• Operating system: Windows 2000/XP<br />
• Microsoft Explorer 5.01 or later.<br />
To install the FA<strong>4800</strong> management program:<br />
1. Insert the CD-ROM into your CD-ROM drive.<br />
2. The autorun feature starts to install the software automatically.<br />
If the installation does not start automatically, run setup.exe.<br />
3. Follow the on-screen instructions of the installation wizard to complete setup<br />
of the FA<strong>4800</strong> Management program in the desired location.<br />
Any PC running the FA<strong>4800</strong> management application can be used to configure<br />
FA<strong>4800</strong> units.<br />
Warning<br />
2.9 Connecting the Power<br />
•<br />
Before connecting any cable, the protective earth terminals of the AC/DC<br />
adapter must be connected to the protective ground conductor of the mains<br />
power cord. If you are using an extension cord (power cable) make sure it is<br />
grounded as well.<br />
Any interruption of the protective (grounding) conductor (inside or outside the<br />
instrument) or disconnecting of the protective earth terminal can make this<br />
unit dangerous. Intentional interruption is prohibited.<br />
Connecting Power to an IDU-E<br />
➤<br />
Power is supplied to the FA<strong>4800</strong> IDU-E via an external AC/DC converter, which<br />
receives power from a 100–240 VAC source and converts it to -48 VDC.<br />
To connect power to the IDUs:<br />
1. At site A, connect the 2-pin connector of the AC/DC converter to the 2-pin DC<br />
power connector on the IDU rear panel.<br />
2. Connect the AC/DC converter 3-prong plug to a mains outlet.<br />
<strong>FibeAir</strong> <strong>4800</strong> Installation and Operation Guide 2-7
Chapter 2 Installation and Setup<br />
<strong>FibeAir</strong> <strong>4800</strong> Installation and Operation Guide<br />
The unit turns on automatically upon connection to the mains.<br />
The green PWR indicator turns on, and the IDU indicator blinks orange for<br />
approximately 40 seconds during startup. See Normal Indicators section in<br />
Chapter 3.<br />
After approximately 20 seconds the ODU starts beeping. The beeps<br />
continue until the ODUs are aligned and the link set up.<br />
3. Wait for approximately one minute, then repeat for Site B.<br />
Connecting Power to an IDU-C<br />
AC power is supplied to the FA<strong>4800</strong> IDU-C through a standard 3-prong plug.<br />
AC power should be supplied via a 1.5m (5 ft) standard power cable terminated<br />
by a standard 3-prong socket. A cable is provided with the unit.<br />
➤<br />
➤<br />
To connect AC power to an IDU-C:<br />
1. Connect the power cable socket to the power connector on the FA<strong>4800</strong> front<br />
panel.<br />
2. Connect the power cable plug to the mains outlet.<br />
The unit turns on automatically upon connection to the mains.<br />
To connect DC power to an IDU-C<br />
A special IEC 60320 adapter for-48 VDC power connection is supplied with the<br />
unit.<br />
2.10 Starting the FA<strong>4800</strong> Manager Software<br />
➤<br />
To start the FA<strong>4800</strong> Manager:<br />
1. Connect the management station to the LAN.<br />
2. Double-click the FA<strong>4800</strong> Manager icon on the desktop, or click Start ><br />
Programs > FA<strong>4800</strong> Manager.<br />
The Login dialog box appears.<br />
2-8 <strong>FibeAir</strong> <strong>4800</strong> Installation and Operation Guide
<strong>FibeAir</strong> <strong>4800</strong> Installation and Operation Guide<br />
Chapter 2 Installation and Setup<br />
3. Select the suitable option:<br />
Figure 2-5. Login Screen<br />
Select Local Connection (Broadcast), if user is connected directly to the<br />
IDU LAN port.<br />
Enter IP address (of the ODU)<br />
Default address: 10.0.0.120<br />
The Subnet mask is 255.0.0.0.<br />
Note<br />
•<br />
The actual IP address is defined during link configuration (see Defining the<br />
Management Addresses).<br />
4. Enter the password<br />
Default password – admin (see the section on Changing the Management<br />
Password)<br />
5. Click the Read only check box if entering the system as a Read only user.<br />
6. If you are a user with Read-Write permission, click Options to enter the<br />
community options.<br />
FA<strong>4800</strong> is protected with Community passwords. A user may be defined with<br />
read-only permission or with read-write permission. See the section Changing<br />
Community Values for more detail.<br />
• If using the system for the first time, enter netman (default) in the read-only<br />
and read-write fields.<br />
• If community values have previously been defined, enter them in the readonly<br />
or read-write communities.<br />
• If you are a user with read-only permission, click the Read Only Mode check<br />
box.<br />
The FA<strong>4800</strong> Manager main screen is displayed<br />
<strong>FibeAir</strong> <strong>4800</strong> Installation and Operation Guide 2-9
Chapter 2 Installation and Setup<br />
<strong>FibeAir</strong> <strong>4800</strong> Installation and Operation Guide<br />
2-10 <strong>FibeAir</strong> <strong>4800</strong> Installation and Operation Guide
<strong>FibeAir</strong> <strong>4800</strong> Installation and Operation Guide<br />
Chapter 2 Installation and Setup<br />
Figure 2-<br />
Figure 2-6. FA<strong>4800</strong> Manager Main Screen<br />
<strong>FibeAir</strong> <strong>4800</strong> Installation and Operation Guide 2-11
Chapter 2 Installation and Setup<br />
<strong>FibeAir</strong> <strong>4800</strong> Installation and Operation Guide<br />
2.11 Over the Air Connection Indication<br />
During the login the Manager reports on over the air connection.<br />
Note<br />
Over the Air connection to remote unit is not recommended<br />
• Select the relevant option for your login requirements.<br />
Figure 2-7. Over the Air Connection<br />
2.12 Aligning ODUs with the Beeper<br />
Perform the FA<strong>4800</strong> ODU alignment using the beepers located inside the ODUs.<br />
The beeper facility is not suitable for aligning the All Indoor Units, AIND. To align<br />
an AIND system see Appendix D for alternative alignment methods.<br />
To speed up the installation time, alignment of a FA<strong>4800</strong> Link can be performed<br />
by two teams simultaneously, at site A and at site B.<br />
➤<br />
To align the ODUs via ODU Beeper:<br />
1. Verify that power is connected to the IDUs at both sites.<br />
•<br />
Do not stand in front of a live ODU.<br />
Warning<br />
2. The ODU starts beeping 20 seconds after power up, and continues beeping<br />
until the ODUs are aligned, and the link is established.<br />
3. Verify normal operation of the IDU by the LED indications on the front panel.<br />
(See Normal Indications.)<br />
4. Coarsely align the site B ODU in the direction of the site A ODU.<br />
5. Make an azimuth sweep of 180 degrees with the site A ODU. So that the<br />
strongest signal from site B can be learnt.<br />
2-12 <strong>FibeAir</strong> <strong>4800</strong> Installation and Operation Guide
<strong>FibeAir</strong> <strong>4800</strong> Installation and Operation Guide<br />
Chapter 2 Installation and Setup<br />
6. Slowly turning the site A ODU back towards the position of Site B, listen to the<br />
beeps until the best signal is reached. See Figure 2- for the beeper signals.<br />
Beeper Sequence<br />
[approx. 1s]<br />
=beeper on<br />
=beeper off<br />
Description<br />
Best Signal so far<br />
Signal quality increased<br />
No change in signal<br />
Signal quality decreased<br />
[approx. 2s]<br />
No air link<br />
Figure 2-8. Beeper Sequence for ODU Alignment<br />
Note<br />
•<br />
Three beeps and a pause is the best signal<br />
Two beeps and a pause, signal quality increased<br />
One beep and pause is no signal change<br />
Any other signal detects no signal between ODUs.<br />
7. Secure the site A ODU to the mast/wall.<br />
8. At site B, adjust the ODU slowly whilst listening to the beeper sequence until<br />
the best signal is attained.<br />
9. Secure the site B ODU to the mast/wall.<br />
10. Monitor the link quality for about 15 minutes to verify stability.<br />
<strong>FibeAir</strong> <strong>4800</strong> Installation and Operation Guide 2-13
Chapter 2 Installation and Setup<br />
<strong>FibeAir</strong> <strong>4800</strong> Installation and Operation Guide<br />
2.13 Calculating the Air Interface Rate<br />
The Air Interface rate is the data transmission rate from one site to the other, over<br />
the wireless FA<strong>4800</strong> interface. Use the Link Budget Calculator Utility in order to<br />
calculate the optimal air interface rate and the expected performance of the link<br />
operating at the user’s requirements.<br />
The ARA, Adaptive Rate Modulation feature performs this task automatically and<br />
ensures that the transmission rate is set to maximum whilst the link quality<br />
throughput is maintained.<br />
➤<br />
To open the Link Budget Calculator Utility<br />
1. Click Help on the Menu Bar.<br />
2. Select Link Budget Calculator.<br />
The Link Budget Calculator Utility opens. See Appendix C for full<br />
instructions how to use the Link Budget Calculator Utility.<br />
2.14 Installing the Link<br />
During the installation procedure, the definition of all parameters is automatically<br />
applied to both sides of the link.<br />
➤<br />
To install the link:<br />
1. Verify that the management station is properly connected to the same LAN as<br />
the IDU, and the FA<strong>4800</strong> Manager application is running.<br />
2. In the toolbar, click the Link Installation button.<br />
The Installation wizard opens.<br />
2-14 <strong>FibeAir</strong> <strong>4800</strong> Installation and Operation Guide
<strong>FibeAir</strong> <strong>4800</strong> Installation and Operation Guide<br />
Chapter 2 Installation and Setup<br />
Figure 2-9. Link Installation Wizard<br />
3. Click Next to proceed with the installation procedure.<br />
A message box is displayed.<br />
4. On the first installation the default link password must be changed.<br />
Click OK in the message box.<br />
The Change Link Password dialog box opens.<br />
Note<br />
Use the Hide Characters check box for maximum security.<br />
<strong>FibeAir</strong> <strong>4800</strong> Installation and Operation Guide 2-15
Chapter 2 Installation and Setup<br />
<strong>FibeAir</strong> <strong>4800</strong> Installation and Operation Guide<br />
Figure 2-10. Change Link Password dialog box<br />
5. Enter the default link password wireless-bridge.<br />
6. Enter a new password.<br />
7. Retype the new password in the confirm field.<br />
8. Click OK.<br />
9. Click Yes when asked if you want to change the link password.<br />
10. Click OK at the successful message.<br />
The system dialog box opens.<br />
2-16 <strong>FibeAir</strong> <strong>4800</strong> Installation and Operation Guide
<strong>FibeAir</strong> <strong>4800</strong> Installation and Operation Guide<br />
Chapter 2 Installation and Setup<br />
Figure 2-11. Installation Wizard, System dialog box<br />
11. Enter a SSID (System ID). The SSID must include at least eight alphanumeric<br />
characters. Up to 24 characters are allowed.<br />
Note<br />
Note<br />
•<br />
Both sides of a link must have the same SSID number for data transmission to take<br />
place.<br />
12. Enter a Link Name for the link identification.<br />
13. Enter a name for site 1.<br />
14. Enter a name for site 2.<br />
15. Enter the Link Password (version 1.400 and after). See Changing the Link<br />
Password for details on the Link Password.<br />
•<br />
It the Link Password is incorrect a link will be established but configuration cannot<br />
be performed and no services will be available.<br />
A new link password may be obtained from Technical Support or use the alternative<br />
password supplied with the product. See Changing the Link Password for more<br />
details.<br />
16. Click Next.<br />
<strong>FibeAir</strong> <strong>4800</strong> Installation and Operation Guide 2-17
Chapter 2 Installation and Setup<br />
<strong>FibeAir</strong> <strong>4800</strong> Installation and Operation Guide<br />
Selecting Channels<br />
The Channel Setting dialog box appears. This dialog box may be different<br />
according to the version that you have purchased.<br />
FA<strong>4800</strong> later than version 1.300 have a feature called Automatic Channel Select,<br />
which allows you to define several alternative frequency channels if interference is<br />
detected on the channel in use.<br />
• For FA<strong>4800</strong> with the Automatic Channel Select feature see FA<strong>4800</strong> with<br />
Automatic Channel Select (applies to versions after 1.300).<br />
• For FA<strong>4800</strong> 5.4 GHz ETSI version see FA<strong>4800</strong> 5.4 GHz ETSI Version.<br />
FA<strong>4800</strong> with Automatic Channel Select<br />
Automatic Channel Select gives FA<strong>4800</strong> the ability to change frequency channels<br />
automatically if interference is detected on the current operating channel.<br />
Figure 2-12. Channel Select dialog box - Automatic Channel Select<br />
Note<br />
17. Select the main frequency from the Installation Channel menu.<br />
18. Select the required Channel Bandwidth 5, 10, or 20 MHz.<br />
F2.x GHz versions operate at 10 or 20 MHz steps only.<br />
2-18 <strong>FibeAir</strong> <strong>4800</strong> Installation and Operation Guide
<strong>FibeAir</strong> <strong>4800</strong> Installation and Operation Guide<br />
Chapter 2 Installation and Setup<br />
19. Click the check box if Automatic Channel Selection is required.<br />
20. Click the check boxes in the Available Channels List of all the allowable<br />
channels that can be automatically selected.<br />
Selecting a new channel causes the system quality to change. The quality bar<br />
shows the adjustment until the system finds the best quality link.<br />
21. If you are not satisfied with the channel that is selected automatically, click<br />
Reselect Channel.<br />
A new channel will be selected from one of the Available Channels that<br />
has been defined.<br />
22. Click Next.<br />
The Evaluating Rate box appears. The optimum rate for the link is selected.<br />
The Service Parameters dialog box opens.<br />
FA<strong>4800</strong> 5.4 GHz ETSI Version<br />
In accordance with ETSI, if FA<strong>4800</strong> detects Radar interference it changes the<br />
frequency channel automatically. This feature is termed Dynamic Frequency<br />
Selection (DFS). In this version, the Automatic Channel Selection is selected by<br />
default and a minimum of two channels must be defined as available.<br />
1. Select the main frequency from the Operating Channel menu.<br />
2. Select the Bandwidth required.<br />
Note<br />
•<br />
Automatic Channel Selection is selected by default.<br />
3. Click at least two check boxes in the Available Channels List of all the<br />
allowable channels that can be automatically selected.<br />
Note<br />
•<br />
Installation will not continue until at least two channels are defined.<br />
Selecting a new channel causes the system quality to change. The quality bar<br />
shows the adjustment until the system finds the best quality link.<br />
Any channel selected is evaluated for 60 seconds; therefore this selection<br />
process may take a few minutes.<br />
4. If you are not satisfied with the channel that is selected automatically, click<br />
Reselect Channel.<br />
A new channel will be selected from one of the Available Channels that<br />
has been defined.<br />
5. Click Next.<br />
The Evaluating Rate box appears. The optimum rate for the link is selected.<br />
The Service Parameters dialog box opens.<br />
Selecting the Service Parameters<br />
Note<br />
The user defines the type of service required, Ethernet Only or Ethernet with<br />
TDM. The bandwidth remaining available for Ethernet if TDM services are<br />
required is shown in the dialog box.<br />
FA<strong>4800</strong> ACCESS versions are Ethernet Only.<br />
<strong>FibeAir</strong> <strong>4800</strong> Installation and Operation Guide 2-19
Chapter 2 Installation and Setup<br />
<strong>FibeAir</strong> <strong>4800</strong> Installation and Operation Guide<br />
Figure 2-13. Installation Wizard, Services dialog box<br />
➤<br />
To select the services:<br />
1. In the Service dialog box, select one of the following:<br />
E1/T1 – E1/T1 data and Ethernet data.<br />
The Ethernet BW field shows the remaining bandwidth in Mbps available<br />
for Ethernet. The available bandwidth depends on the number of E1/T1<br />
ports selected.<br />
Ethernet Only<br />
2. Select the required transmission rate.<br />
If Adaptive is selected FA<strong>4800</strong> constantly monitors and adjusts the transmission<br />
rate to ensure maximum throughput for the link at the highest quality. ACCESS<br />
versions are preset to adaptive and the rate selection is disabled.<br />
3. Click Next.<br />
If TDM services were selected, then the TDM parameters dialog box<br />
appears, (see Figure 2-15).<br />
4. The optimum transmission rate for the selected services is evaluated. Table 2-1<br />
shows the rates used by FA<strong>4800</strong>. ACCESS versions do not have TDM services,<br />
they operate at a rate of 2 Mbps.<br />
2-20 <strong>FibeAir</strong> <strong>4800</strong> Installation and Operation Guide
<strong>FibeAir</strong> <strong>4800</strong> Installation and Operation Guide<br />
Chapter 2 Installation and Setup<br />
If Ethernet Only was selected, then the Finish screen appears<br />
(see Figure 2-16) showing a summary of the link configuration, the<br />
alignment is complete.<br />
Table 2-1. Rates per Bandwidth<br />
Modulation/FEC 5 MHz 10 MHz 20 MHz<br />
BPSK / ¾ 2.25 Mbps 4.5 Mbps 9 Mbps<br />
QPSK / ½ 3 Mbps 6 Mbps 12 Mbps<br />
QPSK / ¾ 4.5 Mbps 9 Mbps 18 Mbps<br />
16QAM / ½ 6 Mbps 12 Mbps 24 Mbps<br />
16QAM / ¾ 9 Mbps 18 Mbps 36 Mbps<br />
64QAM / 2 / 3 12 Mbps 24 Mbps 48 Mbps<br />
64QAM / ¾ 13.5 Mbps 27 Mbps<br />
Setting the Clock Configuration<br />
If TDM services are selected then the TDM parameters dialog box appears. (TDM<br />
is not relevant in FA<strong>4800</strong> ACCESS versions.)<br />
The TDM Parameters dialog box contains five working modes; select the<br />
appropriate clock mode according to your application. Choosing one of these<br />
modes sets the TDM clock behavior on both sides of the link. The user equipment<br />
must be configured as described in the table below.<br />
<strong>FibeAir</strong> <strong>4800</strong> Installation and Operation Guide 2-21
Chapter 2 Installation and Setup<br />
<strong>FibeAir</strong> <strong>4800</strong> Installation and Operation Guide<br />
Table 2-2. TDM Clock Modes<br />
Unit clock mode<br />
Local Unit<br />
Remote<br />
Unit<br />
User equipment side<br />
HQ side<br />
Branch side<br />
1 Transparent Transparent Internal/Recover Internal/Recover<br />
2 Loop Time Recover Internal Recover<br />
3 Recover Loop Time Recover Internal<br />
4 Internal Recover Recover Recover<br />
5 Recover Internal Recover Recover<br />
Note<br />
Transparent/Transparent<br />
FA<strong>4800</strong> transparently regenerates the clock from line clock side to Tx<br />
clock on the opposite side of the link.<br />
Loop time/Recover<br />
The local unit receive clock is the transmit clock on both sides of the link.<br />
Recover/Loop time<br />
The remote unit receive clock is the transmit clock on both sides.<br />
Internal/Recover<br />
The local unit internal oscillator generates the clock while the remote unit<br />
recovers this clock.<br />
Recover/Internal<br />
The remote unit internal oscillator generates the clock while the local unit<br />
recovers this clock.<br />
•<br />
The Line code option is used with T1 Systems.<br />
2-22 <strong>FibeAir</strong> <strong>4800</strong> Installation and Operation Guide
<strong>FibeAir</strong> <strong>4800</strong> Installation and Operation Guide<br />
Chapter 2 Installation and Setup<br />
Figure 2-14. TDM Parameters dialog box<br />
Note<br />
•<br />
This dialog box is available only with IDU-E units, it is activated after TDM service<br />
was chosen in the previous Service dialog box. In Ethernet only services, the TDM<br />
dialog box does not appear.<br />
Setting the T1 Line Code<br />
➤<br />
The T1 line code can be set as B8Zs or AMI in the TDM Parameters dialog box.<br />
The default is B8ZS.<br />
To change the line code<br />
1. In the TDM Parameters dialog box, set the line code to B8ZS or AMI as<br />
required.<br />
2. Click Next to show the finish screen.<br />
<strong>FibeAir</strong> <strong>4800</strong> Installation and Operation Guide 2-23
Chapter 2 Installation and Setup<br />
<strong>FibeAir</strong> <strong>4800</strong> Installation and Operation Guide<br />
Figure 2-15. Installation Wizard, Finish Screen<br />
5. Click Finish to complete the installation wizard.<br />
When the wireless link is established between the site A and site B units,<br />
the Quality bar is within the yellow area for Ethernet only links, or within<br />
the green area for Ethernet plus TDM links.<br />
6. Verify that the Radio Signal Strength (RSS) is according to expected results as<br />
determined by the Link Budget Calculator.<br />
2-24 <strong>FibeAir</strong> <strong>4800</strong> Installation and Operation Guide
<strong>FibeAir</strong> <strong>4800</strong> Installation and Operation Guide<br />
Chapter 2 Installation and Setup<br />
➤<br />
Notes<br />
2.15 Connecting the User Equipment<br />
The IDU is a standalone desktop, wall-mounted or rack-installed unit. Figure 2-2<br />
illustrates a typical rear panel of the IDU.<br />
To connect user equipment to the IDU:<br />
1. Connect user E1/T1 traffic to the IDU panel RJ-45 port designated TRUNK.<br />
There may be multiple Trunk ports available depending on unit ordered.<br />
Refer to Appendix A for the connector pinout.<br />
2. Connect user hub/router or any other compatible device to the IDU panel<br />
RJ-45 port designated LAN. There may be multiple LAN ports available for<br />
connecting to different LANs depending on the IDU unit ordered.<br />
Refer to Appendix A for the connector pinout.<br />
•<br />
Use a straight cable for router connection.<br />
Do not connect two LAN ports to the same LAN, or flooding may occur.<br />
<strong>FibeAir</strong> <strong>4800</strong> Installation and Operation Guide 2-25
Chapter 3<br />
Operation<br />
This section provides the following information for FA<strong>4800</strong>:<br />
• Operating procedures (turning-on and turning-off)<br />
• IDU indicators<br />
• Normal Indications<br />
• Default settings<br />
• Managing the FA<strong>4800</strong><br />
3.1 Turning On FA<strong>4800</strong><br />
➤<br />
To turn on FA<strong>4800</strong>:<br />
• Connect the AC/DC converter to the IDU power connector and to the mains.<br />
See Chapter 2 for full instructions on connecting the power.<br />
The PWR indicator lights up (IDU-E only) and remains lit as long as the<br />
IDU is receiving power.<br />
FA<strong>4800</strong> requires no operator attention once installed, with the exception of<br />
occasional monitoring of front panel indicators and statistics data. Intervention is<br />
only required when FA<strong>4800</strong> must be configured to its operational requirements, or<br />
diagnostic tests are performed.<br />
<strong>FibeAir</strong> <strong>4800</strong> Installation and Operation Guide 3-1
Chapter 3 Operation<br />
<strong>FibeAir</strong> <strong>4800</strong> Installation and Operation Guide<br />
IDU Front Panel Indicators<br />
3.2 Controls and Indicators<br />
The front panel of the IDU and IDU-E includes a series of LED indicators that<br />
show the operating status of the unit. Figure 3-1 shows the IDU front panel,<br />
Figure 3-2 shows an IDU-E front panel. Table 3-1, Table 3-2, and Table 3-3<br />
describe the indicators.<br />
Figure 3-1. IDU-E Front Panel<br />
Figure 3-2. Typical IDU-C Front Panels<br />
Table 3-1. Front Panel LEDs<br />
Name Color Function<br />
PWR Green ON –Power supply is ON (IDU-E only)<br />
IDU Green<br />
Orange<br />
Red<br />
ON – IDU operational<br />
ON – During power-up only<br />
ON – Failure<br />
ODU Green<br />
Red<br />
ON – ODU-to-IDU communication link is operating<br />
ON – ODU-to-IDU communication link is disrupted<br />
AIR I/F Green<br />
Orange<br />
Red<br />
ON – Wireless link is synchronized<br />
ON – During installation only<br />
ON – Wireless link lost synchronization<br />
SERVICE Green<br />
Orange<br />
ON – E1 or T1 line is synchronized<br />
ON – Alarm detected at the remote interface<br />
3-2 <strong>FibeAir</strong> <strong>4800</strong> Installation and Operation Guide
<strong>FibeAir</strong> <strong>4800</strong> Installation and Operation Guide<br />
Chapter 3 Operation<br />
Red<br />
ON – Local or Remote loopback<br />
ON – Alarm detected at the local interface<br />
WAN/LAN Indicators<br />
The WAN/LAN and TDM connectors (IDU-E rear panel, IDU-C front panel) have<br />
LED indicators that show the operating status. Table 3-2 and Table 3-3 describe the<br />
indicators.<br />
Table 3-2. WAN/LAN LEDs<br />
Name Color Function Location<br />
LINK Green On – Good Ethernet link integrity WAN/LAN<br />
connectors<br />
ACT Yellow Blinks according to the Ethernet traffic WAN/LAN<br />
connectors<br />
Table 3-3. TDM Traffic Indicators<br />
Function Green LED Red LED<br />
OK On Off<br />
AIS Off On<br />
LOS Off On<br />
Loopback On Blinking<br />
Normal Indications<br />
Upon turning on FA<strong>4800</strong>, the PWR LED in the IDU-E front panel lights to indicate<br />
that FA<strong>4800</strong> is on. Table 3-4 shows the correct status of the indicators at powerup.<br />
Table 3-4. FA<strong>4800</strong> Indicators at Startup<br />
Indicator Color Status<br />
PWR Green ON (IDU-E only)<br />
IDU<br />
Orange<br />
Green<br />
ON for short duration during startup<br />
ON during normal operation<br />
ODU Green ON shows normal operation<br />
AIR I/F<br />
Orange<br />
Green<br />
ON for short duration during startup<br />
ON shows normal operation<br />
SERVICE Green ON shows normal operation<br />
OFF when Service is configured for Ethernet only<br />
If the above LED indications do not appear following initial power turn-on, refer to<br />
Chapter 5 for the diagnostic test instructions.<br />
<strong>FibeAir</strong> <strong>4800</strong> Installation and Operation Guide 3-3
Chapter 3 Operation<br />
<strong>FibeAir</strong> <strong>4800</strong> Installation and Operation Guide<br />
3.3 Default Settings<br />
Table 3-5 lists the default settings of the FA<strong>4800</strong> configuration parameters.<br />
Table 3-5. Default Settings<br />
Parameter<br />
Default Value<br />
ODU IP Address 10.0.0.120<br />
Subnet Mask 255.0.0.0<br />
SSID –<br />
Frequency<br />
Rate<br />
Services<br />
Ethernet Configuration<br />
Bridge<br />
Community values<br />
First Frequency in the range<br />
Adaptive<br />
Ethernet<br />
Auto Detect<br />
Hub Mode.<br />
Aging time = 300 sec<br />
Read-write – netman<br />
Local – public-bru1<br />
Remote – public-bru4097<br />
3-4 <strong>FibeAir</strong> <strong>4800</strong> Installation and Operation Guide
<strong>FibeAir</strong> <strong>4800</strong> Installation and Operation Guide<br />
Chapter 3 Operation<br />
3.4 Managing FA<strong>4800</strong><br />
Before starting a management session, make sure that a communication link<br />
between local and remote units exists. The Link Status indication bar in the middle<br />
of the Main menu must be green and the Radio Link - Sync message must appear<br />
in the event log (see Figure 3-3).<br />
Figure 3-3. Main Screen, Wireless Link is Active<br />
The <strong>FibeAir</strong> Manager main screen consists of the following elements:<br />
• Toolbar – includes buttons serving for:<br />
<br />
<br />
<br />
<br />
<br />
Changing configuration parameters of operating wireless link; assigning text<br />
files for storing alarms, statistics and configuration data (Link Configuration<br />
button)<br />
Performing preliminary configuration of the system (Link Installation<br />
button). This button is disabled once a link is defined.<br />
Clearing error counters (Clear Counters button)<br />
Logging off <strong>FibeAir</strong> Manager (Log Off button)<br />
Exiting <strong>FibeAir</strong> Manager (Exit button)<br />
<strong>FibeAir</strong> <strong>4800</strong> Installation and Operation Guide 3-5
Chapter 3 Operation<br />
<strong>FibeAir</strong> <strong>4800</strong> Installation and Operation Guide<br />
• Menu bar<br />
<br />
<br />
<br />
<br />
File Menu – Log off, and exit<br />
Configuration – use for link configuration, individual site configuration or<br />
link installation<br />
Tools – set preferences, event log handling, change password<br />
Maintenance – Loopbacks, system reset.<br />
• Link details pane – summarizes information on the radio frequency, IP<br />
bandwidth, type of TDM service, number of assigned E1 or T1 timeslots, and<br />
IP details of the local and remote FA<strong>4800</strong> units.<br />
• Monitor pane – displays the link quality between local and remote devices and<br />
the following statistics:<br />
<br />
<br />
<br />
<br />
Radio signal strength (RSS) in dBm<br />
Current Ethernet bandwidth in Mbps. This is not the actual traffic rate, but<br />
the maximum capacity that can be supported currently, see Figure 3-4.<br />
The scale on the bar adjusts according the link distance and the link<br />
budget.<br />
Local/remote receive and transmit traffic rate, in Mbps or Fps (frames per<br />
second).<br />
TDM status<br />
The Estimated Time Between Errors bar gives an indication of the TDM<br />
quality. The ETBE constantly calculates the expected TDM Error second<br />
ratio according to the current air interface conditions.<br />
• Event log – stores alarms generated by local and remote units.<br />
• Status Bar – displays the following ions:<br />
<br />
<br />
<br />
<br />
<br />
Connectivity icon showing how the device is connected to the Ethernet.<br />
Network mode to the local unit – using IP of the local unit<br />
Over the Air connection - using IP address of the remote for over the<br />
air connection<br />
Local mode using broadcast - direct connection to IDU LAN port<br />
without IP address. This mode is only recommended when the<br />
managed PC is connected directly to the IDU (no network involved) the<br />
managed PC must have a static IP configured. (No DHCP)<br />
Encryption icon showing if the link is encrypted<br />
encrypted link<br />
Link Password Validation failed. The link is encrypted with default<br />
keys. Service and configuration is unavailable. Need to change the link<br />
password in either site<br />
No Encryption – an older release is used. No encryption is available<br />
3-6 <strong>FibeAir</strong> <strong>4800</strong> Installation and Operation Guide
<strong>FibeAir</strong> <strong>4800</strong> Installation and Operation Guide<br />
Chapter 3 Operation<br />
Figure 3-4. Ethernet Bandwidth Indication<br />
➤<br />
To change link configuration parameters:<br />
1. In the Main menu, click Configure Link.<br />
The Configure Link wizard appears. See Chapter 4 for configuration details.<br />
2. Click Next.<br />
3. Continue through the configuration wizard and define the Link name and ID,<br />
Channel, Rate and Services.<br />
4. Once you finish changing configuration parameters, click Finish.<br />
The system takes a few seconds to activate the link with the new<br />
configuration.<br />
3.5 Turning Off FA<strong>4800</strong><br />
➤<br />
To turn off FA<strong>4800</strong>:<br />
1. Exit the management application.<br />
2. Remove the AC/DC converter power cord from the mains.<br />
<strong>FibeAir</strong> <strong>4800</strong> Installation and Operation Guide 3-7
Chapter 4<br />
Configuration<br />
This chapter describes configuration procedures, which are performed after the<br />
physical installation of the local and remote FA<strong>4800</strong> units and the Installation Link<br />
wizard has been performed. A second wizard is used to redefine the configuration<br />
parameters if necessary. Both sites in the link are defined simultaneously.<br />
The following parameters are configured via the configuration wizard:<br />
• System parameters<br />
• Frequency channel<br />
• Air interface rate<br />
• Service parameters.<br />
The following parameters are configured via the Configuration dialog box.<br />
• Transmit power<br />
• Management and trap addresses<br />
• Bridge mode<br />
• Ethernet mode<br />
• Community values.<br />
4.1 Configuring the System Parameters<br />
After installing the link, the system configuration can be modified.<br />
Note<br />
➤<br />
All parameter changes are automatically applied to both sides of the link.<br />
To change general parameters:<br />
1. In the Main menu, click the Link Configuration button.<br />
2. The Configuration wizard opens (Figure 4-1).<br />
<strong>FibeAir</strong> <strong>4800</strong> Installation and Operation Guide 4-1
Chapter 4 Configuration<br />
<strong>FibeAir</strong> <strong>4800</strong> Installation and Operation Guide<br />
Figure 4-1. Configuration Link Wizard<br />
3. Click Next.<br />
4. The Link Configuration dialog box appears (see Figure 4-2).<br />
4-2 <strong>FibeAir</strong> <strong>4800</strong> Installation and Operation Guide
<strong>FibeAir</strong> <strong>4800</strong> Installation and Operation Guide<br />
Chapter 4 Configuration<br />
Figure 4-2. Link Configuration, System dialog box<br />
5. In the System dialog box, enter the new data for the link. All fields with a white<br />
background can be edited.<br />
6. Click Next.<br />
The Frequency dialog box appears.<br />
4.2 Selecting Channels<br />
The user is required to define the operating frequency channel. Newer versions of<br />
FA<strong>4800</strong> have a feature called Automatic Channel Select. This allows you to define<br />
several allowable frequency channels that FA<strong>4800</strong> can change to in event that<br />
interference is detected on the channel in use.<br />
• For FA<strong>4800</strong> with the Automatic Channel Select feature see FA<strong>4800</strong> with<br />
Automatic Channel Select.<br />
• For FA<strong>4800</strong> 5.4 GHz ETSI version see FA<strong>4800</strong> 5.4 GHz ETSI Version.<br />
<strong>FibeAir</strong> <strong>4800</strong> Installation and Operation Guide 4-3
Chapter 4 Configuration<br />
<strong>FibeAir</strong> <strong>4800</strong> Installation and Operation Guide<br />
FA<strong>4800</strong> with Automatic Channel Select<br />
Automatic Channel Select enables FA<strong>4800</strong> to change frequency channels<br />
automatically if interference is detected on the current operating channel.<br />
Figure 4-3. Channel Select dialog box - Automatic Channel Select<br />
➤<br />
To define automatic channel selection:<br />
1. Select the main frequency from the Operating Channel menu.<br />
2. Select the required Bandwidth 5, 10, or 20 MHz.<br />
Note<br />
F2.x GHz versions operate at 10 or 20 MHz steps only.<br />
3. Click the check box if Automatic Channel Selection is required.<br />
4. Click the check boxes in the Available Channels List of all the allowable<br />
channels that can be automatically selected.<br />
5. If you are not satisfied with the channel that is selected automatically, click<br />
Reselect Channel.<br />
A new channel will be selected from one of the Available Channels that<br />
have been defined.<br />
Note<br />
By clicking Reselect Channel, the ODU starts scanning all the channels from the<br />
available channels list and looks for radio frequency activity in each of the channels.<br />
4-4 <strong>FibeAir</strong> <strong>4800</strong> Installation and Operation Guide
<strong>FibeAir</strong> <strong>4800</strong> Installation and Operation Guide<br />
Chapter 4 Configuration<br />
It tries to select the optimal pure channel. If another channel is required, the<br />
operating channel that the ODU finds most pure must be removed from the<br />
available channel list.<br />
1. Click Next.<br />
FA<strong>4800</strong> 5.4 GHz ETSI Version<br />
The Rate Select box appears.<br />
In accordance with ETSI, unlicensed wireless data equipment is not allowed to<br />
interrupt radar services. Therefore, if FA<strong>4800</strong> detects Radar interference it<br />
automatically changes the frequency channel. This feature is termed Dynamic<br />
Frequency Selection (DFS). According to the standard, a channel with active Radar<br />
is prohibited from use for 30 minutes. Before any transmission, FA<strong>4800</strong> probes a<br />
channel for Radar signals for a period of 60 seconds.<br />
In the 5.4 GHz ETSI version, the Automatic Channel Selection is selected by<br />
default and a minimum of two channels must be defined as available.<br />
Figure 4-4. Channel Select dialog box (DFS, ETSI requirement)<br />
The sign on the configuration Wizard and Status bar indicates that the radar<br />
detection is on.<br />
<strong>FibeAir</strong> <strong>4800</strong> Installation and Operation Guide 4-5
Chapter 4 Configuration<br />
<strong>FibeAir</strong> <strong>4800</strong> Installation and Operation Guide<br />
➤<br />
To define automatic channel selection in the 5.4 ETSI version<br />
1. Select the main frequency from the Operating Channel menu.<br />
Note<br />
Automatic Channel Selection is selected by default.<br />
2. Click at least two check boxes in the Available Channels List of all the<br />
allowable channels that can be automatically selected.<br />
Note<br />
Note<br />
Installation will not continue until at least two channels are defined.<br />
Selecting a new channel causes the system quality to change. The quality bar<br />
shows the adjustment until the system finds the best quality link.<br />
Any channel selected is evaluated for 60 seconds; therefore this selection<br />
process may take a few minutes.<br />
3. If you are not satisfied with the channel that is selected automatically, click<br />
Reselect Channel.<br />
A new channel will be selected from one of the Available Channels that<br />
have been defined.<br />
The reselection process may take a few minutes.<br />
4. Click Next.<br />
The maximum rate is selected according to the link conditions<br />
The quality bar shows the adjustment until the system finds the best quality<br />
link.<br />
6. Click Next.<br />
The Service Parameters dialog box appears.<br />
4.3 Configuring Service Parameters<br />
The user defines the type of service required, Ethernet Only or Ethernet with<br />
TDM. The bandwidth remaining available for Ethernet if TDM services are<br />
required is shown in the dialog box.<br />
Note<br />
FA<strong>4800</strong> ACCESS versions are Ethernet Only.<br />
In the Service Parameters dialog box select if FA<strong>4800</strong> is to provide E1/T1,<br />
(x1 or x2 for IDU-E, or x4 for IDU-C). Define the required transmission rate, and<br />
the distance between the sites.<br />
➤<br />
To configure E1/T1 and Ethernet services:<br />
1. In the Service dialog box, select one of the following:<br />
Ethernet plus a number of E1/T1 channels (see Figure 4-5).<br />
Ethernet data only (see Figure 4-6).<br />
2. Select the transmission rate required.<br />
The default rate is Adaptive. ACCESS versions only operate in Adaptive mode.<br />
Adaptive Modulation - The system changes modulation automatically<br />
depending on channel characteristics in order to guarantee continuation of<br />
4-6 <strong>FibeAir</strong> <strong>4800</strong> Installation and Operation Guide
<strong>FibeAir</strong> <strong>4800</strong> Installation and Operation Guide<br />
Chapter 4 Configuration<br />
service. The adaptive modulation enables the user to maximize Ethernet<br />
throughput without degradation of the TDM service quality.<br />
When Ethernet only service is used, the adaptive modulation enables<br />
improving the Ethernet performance in case of air performance<br />
degradation (periodical interference or RSS changes).<br />
Note that in case of interference at one site, there is no need to use a<br />
lower modulation at the other site (as in previous versions). In such a case<br />
the actual rate changes automatically only at the problematic site, while the<br />
second side of the link maintains the highest rate possible (Asymmetric).<br />
Adaptive modulation can be changed in both Installation and<br />
Configuration wizards.<br />
3. Type in the distance between the sites.<br />
If TDM services are selected, then the Evaluate icon shows on the screen<br />
whilst the maximum rate is evaluated.<br />
When evaluation is complete the icon changes and the following message<br />
is shown:<br />
4. Click Next.<br />
Service has been evaluated, click Next to continue.<br />
The TDM Parameters dialog box or the Finish screen appears depending<br />
on which services were selected.<br />
<strong>FibeAir</strong> <strong>4800</strong> Installation and Operation Guide 4-7
Chapter 4 Configuration<br />
<strong>FibeAir</strong> <strong>4800</strong> Installation and Operation Guide<br />
Figure 4-5. Service Parameters Dialog Box, E1/T1 Interface<br />
4-8 <strong>FibeAir</strong> <strong>4800</strong> Installation and Operation Guide
<strong>FibeAir</strong> <strong>4800</strong> Installation and Operation Guide<br />
Chapter 4 Configuration<br />
Figure 4-6. Service Parameters Dialog Box, Evaluation Icon<br />
4.4 Setting the Clock Configuration<br />
The TDM clock feature is enabled in all carrier class IDU’s in addition to new<br />
hardware IDU’s. A TDM dialog box will appear where IDU supports the clocking<br />
configuration feature (see Figure 4-7 and Figure 4-8).<br />
A new master clock configuration option is available in the Link Configuration<br />
Wizard. The automatic mode selects the clock from the first trunk that is working<br />
in normal mode (or is configured to loop-back maintenance). If a specific trunk is<br />
selected, this trunk shall be used as the system master regardless of the trunks<br />
state. The current master clock trunk is also displayed.<br />
<strong>FibeAir</strong> <strong>4800</strong> Installation and Operation Guide 4-9
Chapter 4 Configuration<br />
<strong>FibeAir</strong> <strong>4800</strong> Installation and Operation Guide<br />
Figure 4-7. TDM clock dialog box for T1 IDU<br />
4-10 <strong>FibeAir</strong> <strong>4800</strong> Installation and Operation Guide
<strong>FibeAir</strong> <strong>4800</strong> Installation and Operation Guide<br />
Chapter 4 Configuration<br />
Figure 4-8. TDM clock dialog box for E1 IDU<br />
If TDM services are selected then the TDM parameters dialog box appears.<br />
The TDM Parameters dialog box contains five working modes; select the<br />
appropriate clock mode according to your application. Choosing one of these<br />
modes sets the TDM clock behavior on both sides of the link. The user equipment<br />
must be configured as described in the following table.<br />
<strong>FibeAir</strong> <strong>4800</strong> Installation and Operation Guide 4-11
Chapter 4 Configuration<br />
<strong>FibeAir</strong> <strong>4800</strong> Installation and Operation Guide<br />
Table 4-1. TDM Clock Modes<br />
Unit clock mode<br />
User equipment side<br />
Local Unit Remote Unit HQ side Branch side<br />
1 Transparent Transparent Internal/Recover Internal/Recover<br />
2 Loop Time Recover Internal Recover<br />
3 Recover Loop Time Recover Internal<br />
4 Internal Recover Recover Recover<br />
5 Recover Internal Recover Recover<br />
Note<br />
Transparent/Transparent<br />
FA<strong>4800</strong> transparently regenerates the clock from line clock side to Tx<br />
clock on the opposite side of the link.<br />
Loop time/Recover<br />
The local unit receive clock is the transmit clock on both sides of the link.<br />
Recover/Loop time<br />
The remote unit receive clock is the transmit clock on both sides.<br />
Internal/Recover<br />
The local unit internal oscillator generates the clock while the remote unit<br />
recovers this clock.<br />
Recover/Internal<br />
The remote unit internal oscillator generates the clock while the local unit<br />
recovers this clock.<br />
The Line code option is used with T1 Systems.<br />
4-12 <strong>FibeAir</strong> <strong>4800</strong> Installation and Operation Guide
<strong>FibeAir</strong> <strong>4800</strong> Installation and Operation Guide<br />
Chapter 4 Configuration<br />
4.5 Setting the T1 Line Code<br />
The T1 line code can be set as B8Zs or AMI in the TDM Parameters dialog box.<br />
The default is B8ZS.<br />
➤<br />
To change the line code<br />
1. Run the Configuration wizard until you reach the Services dialog box.<br />
2. Verify that T1 services have been selected.<br />
3. Click Next to open the TDM Parameters dialog box.<br />
4. Set the line code to B8ZS or AMI as required.<br />
Note<br />
5. Click Next to finish the wizard.<br />
This dialog box is available only when TDM service was selected in the previous<br />
Services dialog box.<br />
1. Click Next.<br />
The Finish screen appears, showing a summary of the link configuration<br />
(see Figure 4-9).<br />
<strong>FibeAir</strong> <strong>4800</strong> Installation and Operation Guide 4-13
Chapter 4 Configuration<br />
<strong>FibeAir</strong> <strong>4800</strong> Installation and Operation Guide<br />
Figure 4-9. Configuration Link, Finish screen<br />
7. Click Finish to complete the configuration wizard.<br />
The Main screen is displayed.<br />
4.6 Editing the Configuration Parameters<br />
You can edit the configuration parameters for each site individually without<br />
running a wizard.<br />
From the Configuration dialog box, (see Figure 4-10) the following functions are<br />
available by selecting the items on the left of the dialog box:<br />
System<br />
Edit the contact person and location details. View the system<br />
details<br />
Air Interface Change the transmit power<br />
Inventory<br />
View the hardware and software inventory.<br />
Management Configure the IP address, Subnet Mask, Default Gateway, and the<br />
Trap Destination.<br />
4-14 <strong>FibeAir</strong> <strong>4800</strong> Installation and Operation Guide
<strong>FibeAir</strong> <strong>4800</strong> Installation and Operation Guide<br />
Chapter 4 Configuration<br />
Security<br />
Date and Time<br />
Advanced<br />
Change the Community Values and the Link Password<br />
Set the date and time of the server and of the system.<br />
Configure the Bridge, define the LAN connection and set the<br />
external alarm inputs.<br />
From the Configuration dialog box, the following functions are available by clicking<br />
the buttons at the top of the dialog box:<br />
Backup<br />
Restore<br />
Save a backup.ini file with the current configuration.<br />
Load the backup.ini file created by the backup.<br />
Installation Mode Return to Installation Mode for the entire link.<br />
Selecting the Mute check box before clicking the Install Mode<br />
button mutes the Beeper.<br />
Mute<br />
Mutes the Beeper at startup. Reactivate the beeper during<br />
alignment.<br />
➤<br />
To edit the Configuration Parameters:<br />
1. Click Configuration from the main menu.<br />
2. Select which site to configure.<br />
The Configuration dialog box opens. (See Figure 4-10)<br />
<strong>FibeAir</strong> <strong>4800</strong> Installation and Operation Guide 4-15
Chapter 4 Configuration<br />
<strong>FibeAir</strong> <strong>4800</strong> Installation and Operation Guide<br />
Figure 4-10. Configuration Dialog Box<br />
3. Select the appropriate item in the left hand list to open a dialog box.<br />
4. Click Apply to save the changes.<br />
4.7 Changing the Transmit Power<br />
Each site can have a different transmit power level.<br />
➤<br />
To change the Transmit Power:<br />
1. Click Configuration from the main menu.<br />
2. Select which site to configure.<br />
The Configuration dialog box opens.<br />
3. Select Air Interface.<br />
4. Select the required Transmit Power Level. Table 4-2 shows the available<br />
power limits for each FA<strong>4800</strong> system.<br />
5. Click Apply to save the changes.<br />
4-16 <strong>FibeAir</strong> <strong>4800</strong> Installation and Operation Guide
<strong>FibeAir</strong> <strong>4800</strong> Installation and Operation Guide<br />
Chapter 4 Configuration<br />
Figure 4-11. Changing the Transmit Power<br />
<strong>FibeAir</strong> <strong>4800</strong> Installation and Operation Guide 4-17
Chapter 4 Configuration<br />
<strong>FibeAir</strong> <strong>4800</strong> Installation and Operation Guide<br />
Table 4-2. Typical Transmit Power Limits<br />
Regulation Version Min Tx<br />
[dB]<br />
Max Tx<br />
[dB]<br />
MaxTx at<br />
36 Mbps<br />
[dB]<br />
MaxTx at<br />
48 Mbps<br />
[dB]<br />
Power<br />
Control<br />
FCC<br />
F58 4 16 14 10 Yes<br />
F58/EXT 4 16 14 10 Yes<br />
F49 14 15 15 14 No<br />
F53 -3 8 8 8 Yes<br />
F53/EXT 3 3 3 3 No<br />
F24 18 18 18 18 No<br />
F53HP 10 16 14 10 Yes<br />
India F58CN -1 10 10 10 Yes<br />
China F24/EXT/ETSI -4 -4 -4 -4 No<br />
ETSI<br />
F54 2 8 8 8 Yes<br />
F54/ETSI 2 8 8 8 Yes<br />
F54-HG/EXT -3 3 3 3 Yes<br />
4.8 Defining the Management Addresses<br />
Each site must be configured separately, first site A then site B.<br />
➤<br />
Note<br />
To define the Management Addresses:<br />
1. Click Configuration from the main menu.<br />
2. Select which site to configure.<br />
The Configuration dialog box opens.<br />
3. Select Management (see Figure 4-12).<br />
4. Enter the IP address of the ODU in the IP address field.<br />
If performing configuration from the <strong>FibeAir</strong> manager, the IP address is entered in<br />
the login screen (Figure 2-4)<br />
5. Enter the Subnet Mask.<br />
6. Enter the Default Gateway.<br />
7. Enter the Trap Destination. This is the IP address of the PC running the<br />
management application. The event log will be stored at this address.<br />
8. Click Apply to save the changes.<br />
4-18 <strong>FibeAir</strong> <strong>4800</strong> Installation and Operation Guide
<strong>FibeAir</strong> <strong>4800</strong> Installation and Operation Guide<br />
Chapter 4 Configuration<br />
Notes<br />
Figure 4-12. Configuration, Management<br />
The Installation mode button opens the Link Installation wizard to reinstall the link.<br />
The Backup and Restore buttons are for saving and restoring the configuration files.<br />
4.9 Setting the Date and Time<br />
➤<br />
To set Date and time<br />
The ODU maintains a date and time value. The date and time value should be<br />
synchronized with any Network Time Protocol (NTP) version 3 compatible server 1 .<br />
On power-up the ODU configures the initial date and time using an NTP server. If<br />
the server IP is not configured or is not reachable, a default time is set. When<br />
configuring the NTP server IP, you should also configure the offset from the<br />
Universal Coordinated Time (UTC). If there is no server available, you can either<br />
set the date and time, or you can set the manager workstation time. Note that<br />
manual setting is not recommended since reset, power up, or synchronization with<br />
an NTP server will override the setting.<br />
1 Windows XP is configured by default as a server.<br />
<strong>FibeAir</strong> <strong>4800</strong> Installation and Operation Guide 4-19
Chapter 4 Configuration<br />
<strong>FibeAir</strong> <strong>4800</strong> Installation and Operation Guide<br />
Note<br />
• The NTP uses UDP port 123. If a firewall is configured between the ODU and<br />
the NTP server this port must be opened 2 .<br />
• It can take up to 8 minutes for the NTP to synchronize the ODU date and time.<br />
1. Click Configuration from the main menu.<br />
2. Select which site to configure.<br />
The Configuration dialog box opens.<br />
3. Select Date & Time (see Figure 4-13).<br />
Figure 4-13. Date & Time configuration<br />
4. If entering an address for the NTP Server, click Clear, and then enter the new<br />
address.<br />
5. Set the Offset value.<br />
6. To manually set the date and time, click Change (Figure 4-14) and edit the<br />
new values.<br />
2 Windows XP command w32tm /stripchart /computer: can be use to<br />
check the NTP server connectivity<br />
4-20 <strong>FibeAir</strong> <strong>4800</strong> Installation and Operation Guide
<strong>FibeAir</strong> <strong>4800</strong> Installation and Operation Guide<br />
Chapter 4 Configuration<br />
Figure 4-14. Manually changing date and time<br />
4.10 Configuring the Bridge<br />
Bridge configuration is required in various network topologies, such as protection<br />
(1+1) and ring application. The bridge configuration parameters are located under<br />
the Advanced tab of the Configuration dialog box (Figure 4-15). There are three<br />
parameters to configure:<br />
• ODU bridge mode<br />
• IDU Aging time<br />
• Ethernet mode<br />
<strong>FibeAir</strong> <strong>4800</strong> Installation and Operation Guide 4-21
Chapter 4 Configuration<br />
<strong>FibeAir</strong> <strong>4800</strong> Installation and Operation Guide<br />
Figure 4-15. Advanced Configuration-Ethernet<br />
4-22 <strong>FibeAir</strong> <strong>4800</strong> Installation and Operation Guide
<strong>FibeAir</strong> <strong>4800</strong> Installation and Operation Guide<br />
Chapter 4 Configuration<br />
ODU Bridge Mode<br />
This parameter controls the ODU mode with two optional values,<br />
• Hub Mode – in Hub mode the ODU transparently forwards the all the packets<br />
over the wireless link.<br />
• Bridge Mode – In Bridge mode the ODU performs both learning and aging,<br />
the aging time of the ODU is fixed at 300 seconds.<br />
Note<br />
Changing these modes requires system reset.<br />
IDU Aging time<br />
Notes<br />
This parameter controls the IDU aging time.<br />
The IDU has a 2047 MAC address-learning table. The aging time parameter<br />
controls the time each MAC address is dropped from the table.<br />
Default value is 300 seconds.<br />
Any change to these parameters is effective immediately.<br />
Each side of the link can be configured separately.<br />
The following list details common configurations; both sides are must be<br />
configured with the same parameter.<br />
• Standard (Default) Configuration for Ethernet Applications<br />
Set IDU aging to 300 seconds, ODU set to Bridge mode, Figure 4-15.<br />
• Fast aging mode – for rapid network topology changes<br />
Set IDU aging to one second, ODU set to Hub mode.<br />
• Hub Mode<br />
The ODU is set to HUB mode. IDU aging is not applicable.<br />
• Ethernet Bridge<br />
The ODU is set to Bridge mode. The IDU aging is not applicable.<br />
<strong>FibeAir</strong> <strong>4800</strong> Installation and Operation Guide 4-23
Chapter 4 Configuration<br />
<strong>FibeAir</strong> <strong>4800</strong> Installation and Operation Guide<br />
4.11 Configuring Ethernet Mode<br />
The Ethernet mode is configurable for line speed (10/100BaseT) and duplex mode<br />
(half or full duplex). FA<strong>4800</strong> provides an Auto detect feature where the line speed<br />
and duplex mode are detected automatically using autonegotiation. Use the<br />
manual configuration when external equipment does not support autonegotiation.<br />
The default setting is Auto Detect. (See Figure 4-15)<br />
Note<br />
➤<br />
Note<br />
It is not recommended to configure the port that is used for the management<br />
connection, since a wrong configuration can cause management disconnection or<br />
Ethernet services interruption.<br />
To configure the Ethernet Mode:<br />
1. From the Configuration menu, select the site to reconfigure.<br />
The Configuration dialog box opens.<br />
2. In the Ethernet Ports Configuration pane, use the drop-down menu to select<br />
the LAN configuration.<br />
3. Click Apply to save the changes.<br />
It is possible to close the Ethernet service by disconnecting the Ethernet port. The<br />
user should be aware that it is possible to close the port and not have any access to<br />
the device. If this should occur the workaround is as follows:<br />
• Connect the system from the remote site<br />
• Connect via other Ethernet port (IDU-C)<br />
• Power down the equipment and connect immediately after the power up (the<br />
fastest way is to enter install mode).<br />
4-24 <strong>FibeAir</strong> <strong>4800</strong> Installation and Operation Guide
<strong>FibeAir</strong> <strong>4800</strong> Installation and Operation Guide<br />
Chapter 4 Configuration<br />
4.12 Changing Community Values<br />
Note<br />
The ODU communicates with the management application using SNMPv1<br />
protocol. The protocol defines three types of communities:<br />
• Read-Only for retrieving information from the ODU<br />
• Read-Write to configure and control the ODU<br />
• Trap used by the ODU to issue traps.<br />
The community string must be entered at login. The user must know the password<br />
and the correct community string in order to gain access to the system. A user may<br />
have read-only privileges.<br />
It is not possible to manage the ODU if the read-write or the read community<br />
values are forgotten. A new community value may be obtained from technical<br />
support for the purpose of setting new community; the serial number or the MAC<br />
address of the ODU must be supplied.<br />
The manager application and the ODU use the community strings public-bru1 for<br />
the local unit and public-bru4097 for the remote unit. These are the factory<br />
defaults, but can only be used one time on the first installation.<br />
A new community string must be set when entering the system for the first time.<br />
The read-write community and read-only community have a minimum of five<br />
alphanumeric characters. (Bru1 and bru4097 are not permitted). Changing the<br />
trap community is optional by clicking the check box.<br />
Editing Community Strings<br />
The community change dialog box is available from the Configuration > Security<br />
tab. Both read-write and read-only communities must be defined.<br />
On entering for the first time, use netman as the current community. The<br />
community string must be changed when entering the system for the first time, and<br />
the community string netman cannot be used again.<br />
<strong>FibeAir</strong> <strong>4800</strong> Installation and Operation Guide 4-25
Chapter 4 Configuration<br />
<strong>FibeAir</strong> <strong>4800</strong> Installation and Operation Guide<br />
➤<br />
To change a community:<br />
1. From the Configuration dialog box, select the Security tab<br />
2. Type the current read-write community (default is netman).<br />
3. Select the communities to be changed by clicking the check box.<br />
4. Type the new community and re-type to confirm.<br />
5. Click OK to save.<br />
Figure 4-16. Changing the Community String<br />
4-26 <strong>FibeAir</strong> <strong>4800</strong> Installation and Operation Guide
<strong>FibeAir</strong> <strong>4800</strong> Installation and Operation Guide<br />
Chapter 4 Configuration<br />
Forgotten Community string<br />
If the read-write community string is unknown, an alternative community key can<br />
be used. The alternative community key is unique per ODU and can be used only<br />
in order to change the community strings. The alternative community key is<br />
supplied with the product, and it is recommended to keep it safe.<br />
If both the read-write community and the alternative community key are<br />
unavailable, then an alternative community key can be obtained from customer<br />
support using the ODU serial number or MAC address. The serial number is<br />
located on the product, and the MAC address is displayed in the manager<br />
inventory tab.<br />
When you have the alternative community key, click the Forgot Community<br />
button and enter the Alternative Community (Figure 4-17). Then reconfigure the<br />
read-write community string.<br />
Figure 4-17. Alternative Community Dialog box<br />
<strong>FibeAir</strong> <strong>4800</strong> Installation and Operation Guide 4-27
Chapter 4 Configuration<br />
<strong>FibeAir</strong> <strong>4800</strong> Installation and Operation Guide<br />
4.13 Changing Passwords<br />
There are two passwords necessary to use the FA<strong>4800</strong> system. The first is<br />
encountered when running the management software, the second, the link<br />
Password is used for encryption purposes and is found when installing or<br />
configuring the link.<br />
Changing the Management Password<br />
➤<br />
To change the management password<br />
1. From the Tools menu, select Change Password<br />
2. The Change Password dialog box appears.<br />
3. Enter current password, and new password.<br />
4. Click OK to confirm.<br />
Changing the Link Password<br />
FA<strong>4800</strong> Radio Link is encrypted using Advanced Encryption System (AES) using a<br />
128 bit dynamic key. During the installation process a Link Password must be set.<br />
An Initial encryption key is generated. Each time a link is established the<br />
Encryption key is validated. If the validation failed the link is established but no<br />
service or configuration is allowed. In this state the user can change the link<br />
password of each of the sites.<br />
➤<br />
To change the Link Password:<br />
1. From the Configuration dialog box, select the Security tab<br />
2. Click Change next to the Link Password field box.<br />
The Change Link Password dialog box appears.<br />
3. Enter the current link password.<br />
4. Enter the new password.<br />
5. Enter the new password again in the Confirm box.<br />
4-28 <strong>FibeAir</strong> <strong>4800</strong> Installation and Operation Guide
<strong>FibeAir</strong> <strong>4800</strong> Installation and Operation Guide<br />
Chapter 4 Configuration<br />
Forgotten the Link Password<br />
In case of a forgotten link password, the user may enter the key password supplied<br />
with the product. The key password may be obtained from customer support after<br />
validation of the device serial number or MAC address. The user may change the<br />
link password of both sides of the link at any time using the Link Configuration<br />
Wizard.<br />
➤<br />
To enter the key password:<br />
1. From the Configuration dialog box, select the Security tab.<br />
2. Click Change next to the Link Password field box.<br />
The Change Link Password dialog box appears.<br />
3. Click the Forgot Link Password button.<br />
The Key Link Password dialog box appears.<br />
4. Type the key link password.<br />
5. A new link password may now be set.<br />
4.14 Muting the Beeper<br />
The ODU beeper starts beeping as soon as power is supplied, and continues until<br />
the ODUs are aligned and the link established.<br />
It is possible to mute the beeper until the alignment procedure is to be performed.<br />
➤<br />
➤<br />
To mute the beeper:<br />
1. Click on Configuration in the Menu bar and select the relevant site.<br />
The Configuration dialog box opens.<br />
2. In the Configuration dialog box, click the Buzzer button. The button toggles<br />
between on and off.<br />
3. The Beeper stops.<br />
To restore the beeper:<br />
1. Click Configuration in the Menu bar and select the relevant site.<br />
The Configuration dialog box opens.<br />
2. In the Configuration dialog box, click the Buzzer button. The button toggles<br />
between on and off.<br />
3. The Beeper starts.<br />
<strong>FibeAir</strong> <strong>4800</strong> Installation and Operation Guide 4-29
Chapter 4 Configuration<br />
<strong>FibeAir</strong> <strong>4800</strong> Installation and Operation Guide<br />
4.15 Setting External Alarm Inputs<br />
➤<br />
The IDU-C has two external alarm inputs in the form of dry-contact relays. The<br />
Alarm interface is located on the front panel of the IDU-C and is a 9-pin D-type<br />
female connector, see Appendix A for the pinout. The user enables or disables<br />
each of the alarms and can configure the text that appears in the alarm trap. The<br />
ODU sends the alarm within less than a second from actual alarm trigger.<br />
To set the external alarm inputs:<br />
1. Open the Site Configuration Alarms configuration by clicking Configuration ><br />
Advanced.<br />
Figure 4-18. External Alarm Configuration<br />
2. Enter a description of the alarms in the fields.<br />
3. Click Apply to save.<br />
4-30 <strong>FibeAir</strong> <strong>4800</strong> Installation and Operation Guide
<strong>FibeAir</strong> <strong>4800</strong> Installation and Operation Guide<br />
Chapter 4 Configuration<br />
4.16 Managing Configuration Files<br />
Saving FA<strong>4800</strong> Configuration in a File<br />
FA<strong>4800</strong> management software allows you to save configuration parameters of the<br />
local and remote units on the management station as an INI file. Each site is saved<br />
in a separate INI file.<br />
➤<br />
To save the configuration in a file:<br />
1. Click Configuration from the main menu.<br />
2. Select which site to backup.<br />
The configuration dialog box opens.<br />
3. Click Backup.<br />
4. In the Save As dialog box, indicate in which folder and under what name<br />
configuration file is to be saved, and click Save.<br />
Restoring a Configuration File<br />
Configuration files (*.ini) can be uploaded from the management station. Verified<br />
configuration files can be distributed to other units that use the same<br />
configuration.<br />
➤<br />
To restore a configuration file:<br />
1. From the Configuration menu, select the site to reconfigure.<br />
The Configuration dialog box opens.<br />
2. Click Restore.<br />
3. From the Open dialog box select *.ini file to upload and click OK.<br />
4.17 Reinstalling the Link<br />
Note<br />
➤<br />
It may be necessary to reinstall the link if the ODUs should need to be<br />
realigned.<br />
Reinstalling the link causes both sites to go into install mode.<br />
To reinstall the link:<br />
1. Click Configuration in the Menu bar and select any one of the sites.<br />
The Configuration dialog box opens.<br />
2. Click the Install Mode button in the Configuration dialog box.<br />
A message box asking if you want to enter install mode appears.<br />
3. Click Yes to continue.<br />
FA<strong>4800</strong> enters install mode and the beeper starts beeping.<br />
4. Realign the ODUs and complete the Installation wizard (see Chapter2).<br />
<strong>FibeAir</strong> <strong>4800</strong> Installation and Operation Guide 4-31
Chapter 4 Configuration<br />
<strong>FibeAir</strong> <strong>4800</strong> Installation and Operation Guide<br />
4.18 Resetting FA<strong>4800</strong><br />
Note<br />
➤<br />
➤<br />
Resetting the link causes service disconnection.<br />
In order to maintain the link configuration, reset the remote FA<strong>4800</strong> first.<br />
To reset FA<strong>4800</strong>:<br />
1. From Maintenance, reset the remote FA<strong>4800</strong>.<br />
2. From Maintenance, reset the local FA<strong>4800</strong>.<br />
To reset to Factory Defaults<br />
1. Click Configuration in the Menu bar and select any one of the sites.<br />
The Configuration dialog box opens.<br />
2. Select Operations in the Configuration dialog box.<br />
3. Click the Restore Defaults button.<br />
A message box asking if you want to restore factory default appears.<br />
4. Click the check box if you want to keep the current IP settings.<br />
5. Click Yes to continue.<br />
4.19 Displaying the Inventory<br />
➤<br />
To view the inventory data<br />
1. Click Configuration from the main menu.<br />
2. Select which site to configure.<br />
The configuration dialog box opens.<br />
3. Select Inventory (Figure 4-19).<br />
Note<br />
This screen is for viewing purposes only.<br />
4-32 <strong>FibeAir</strong> <strong>4800</strong> Installation and Operation Guide
<strong>FibeAir</strong> <strong>4800</strong> Installation and Operation Guide<br />
Chapter 4 Configuration<br />
Figure 4-19. Inventory Screen<br />
<strong>FibeAir</strong> <strong>4800</strong> Installation and Operation Guide 4-33
Chapter 5<br />
Diagnostics and<br />
Troubleshooting<br />
This chapter describes the FA<strong>4800</strong> diagnostic functions, which include:<br />
• Monitoring Performance<br />
• Error detection and alarms<br />
• Diagnostic tests (local and remote loopbacks on E1 or T1 link)<br />
• Troubleshooting<br />
• Frequently asked questions.<br />
5.1 Automatic Link Data Collection (Get Link<br />
Information)<br />
The Get Link Information feature collects all the link and Manager information<br />
which can be used for diagnostics.<br />
In the event of needing to contact technical support please send this file so as to<br />
speed up the assistance.<br />
➤<br />
To get link information<br />
1. Click Help on the menu bar, select Link Information.<br />
The Get Link Information dialog box appears. See Figure 5-1.<br />
2. Select or deselect the data options. If the file is to be sent to Technical Support<br />
leave all options checked.<br />
3. Click File Path to get to the directory to save the file in.<br />
4. Click Start to save the information.<br />
The file is saved as Link Information.txt<br />
<strong>FibeAir</strong> <strong>4800</strong> Installation and Operation Guide 5-1
Chapter 5 Diagnostics and Troubleshooting<br />
<strong>FibeAir</strong> <strong>4800</strong> Installation and Operation Guide<br />
Figure 5-1. Get Link Information<br />
5.2 Monitoring Performance<br />
FA<strong>4800</strong> constantly monitors traffic over the radio link and collects the following<br />
statistics data:<br />
• Site 1/Site 2 received traffic rate (in Mbps)<br />
• Site 1/Site 2 received frames rate (in Mbps)<br />
• Radio signal strength (in dBm)<br />
• Error (Blocks).<br />
Saving the Monitor Log<br />
The statistics (monitor) log and event log can be saved as TXT files. New alarms are<br />
automatically added to the text file, as they enter the event log.<br />
➤<br />
To save the monitor log:<br />
1. From the Tools menu, choose Preferences.<br />
The Preferences dialog box appears (see Figure 5-2).<br />
2. Click the Monitor Tab.<br />
3. Select the file to save.<br />
4. Click the check box to open the file for saving.<br />
5. Click the button and in the Select File dialog box indicate in which folder<br />
and under what name the alarm log file is to be saved.<br />
6. Set the time interval for adding data to the file.<br />
5-2 <strong>FibeAir</strong> <strong>4800</strong> Installation and Operation Guide
<strong>FibeAir</strong> <strong>4800</strong> Installation and Operation Guide<br />
Chapter 5 Diagnostics and Troubleshooting<br />
7. Click OK to save the file<br />
Figure 5-2. Preferences Dialog Box, Monitor Tab<br />
Setting the Events Preferences<br />
You can define a color that the traps are displayed in the monitor pane, according<br />
to severity of the event. The severity is predefined.<br />
➤<br />
➤<br />
➤<br />
To set the trap color:<br />
1. From the Tools menu, choose Preferences.<br />
The Preferences dialog box appears).<br />
2. Click the Events Tab (see Figure 5-3).<br />
3. Select the Event priority type and click on the button.<br />
A color chart opens.<br />
4. Select the desired color.<br />
5. Repeat for all the trap types.<br />
To set the trap background color:<br />
• Click Background Color to change the text background.<br />
To reset the trap colors:<br />
• Click Reset Settings to return to the default color settings.<br />
<strong>FibeAir</strong> <strong>4800</strong> Installation and Operation Guide 5-3
Chapter 5 Diagnostics and Troubleshooting<br />
<strong>FibeAir</strong> <strong>4800</strong> Installation and Operation Guide<br />
Saving the Events Log<br />
➤<br />
To save the event log:<br />
1. From the Tools menu, choose Preferences.<br />
The Preferences dialog box appears (see Figure 5-3).<br />
2. Click the Events Tab.<br />
3. Select the file to save.<br />
4. Click the check box to open the file for saving.<br />
5. Click the button and in the Select File dialog box indicate in which folder<br />
and under what name the alarm log file is to be saved, and click OK.<br />
Figure 5-3. Preferences Dialog Box, Event Log Tab<br />
5.3 Viewing Performance Reports<br />
The Performance Monitor Report displays performance views of each of the<br />
interfaces 1 (see Figure 5-4). Several performance data are collected for each of the<br />
interfaces (ES, SES, and UAS), as well as Specific data per Interface type (e.g., TX<br />
1 Ethernet performance is not collected in PoE systems.<br />
5-4 <strong>FibeAir</strong> <strong>4800</strong> Installation and Operation Guide
<strong>FibeAir</strong> <strong>4800</strong> Installation and Operation Guide<br />
Chapter 5 Diagnostics and Troubleshooting<br />
and RX bytes for Ethernet). For the Air Interface, user defined thresholds data are<br />
collected. Refer to Table 5-1 and Table 5-2.<br />
Data is collected and selectively displayed based on three time intervals as selected<br />
by the Interval radio buttons:<br />
• Current (t=0)<br />
• 15 minutes Intervals<br />
• Daily.<br />
The most important parameter is the UAS. This parameter counts the time the air<br />
link was not providing any service. There are several potential reasons for this<br />
situation; one of the sites has a power failure, high interference, maintenance<br />
operation etc.<br />
The next important parameter is the Radio BBER Threshold. This parameter counts<br />
the seconds in which the radio performance is below a user specified threshold.<br />
The threshold is measured in percent. The threshold can be set from 0.1% up to<br />
50%.<br />
For links with E1/T1 service the recommended value is 1% (Which is the system<br />
default). Excellent TDM service, is expected below the 1% threshold, meaning that<br />
for 1% threshold, the expected BBER value should be 0 if there are no problems<br />
during the 15 min interval. When the BBER threshold increses some degraded<br />
service might be noticed.<br />
For links with Ethernet only service, 8% threshold is recommended and not 1%<br />
(Which is the system default) meaning that for 8% threshold, the recommended<br />
BBER value should be 0 if there are no problems during the 15 min interval. Since<br />
FA<strong>4800</strong> provides a loss less Ethernet service, there is throughput degradation in<br />
case of interference. The degradation is proportional to the BBER.<br />
Radio RSS Threshold can also be used to indicate problems in the radio channel.<br />
After verifying the RSS according to the link budget calculator during the<br />
installation (see installation manual). A value of -5dB from the current RSS is<br />
recommended as a threshold.<br />
<strong>FibeAir</strong> <strong>4800</strong> Installation and Operation Guide 5-5
Chapter 5 Diagnostics and Troubleshooting<br />
<strong>FibeAir</strong> <strong>4800</strong> Installation and Operation Guide<br />
Figure 5-4. Performance Monitoring Report window<br />
5-6 <strong>FibeAir</strong> <strong>4800</strong> Installation and Operation Guide
<strong>FibeAir</strong> <strong>4800</strong> Installation and Operation Guide<br />
Chapter 5 Diagnostics and Troubleshooting<br />
Table 5-1. Explanation of performance data<br />
Data type Reported value Explanation<br />
Generic PM Data<br />
Air Interface PM Data<br />
UAS – Unavailable<br />
Seconds<br />
ES – Error Second<br />
SES – Severe Error Second<br />
BBE – Background Block<br />
Error<br />
Integrity<br />
Max RSL<br />
Min RSL<br />
Max TSL<br />
Min TSL<br />
RSL Threshold 1<br />
RSL Threshold 2<br />
Seconds in which the<br />
interface was out of<br />
service.<br />
The number of seconds in<br />
which there was at least<br />
an error block. Note that<br />
notation of an error block<br />
is different per interface.<br />
The number of seconds in<br />
which the service quality is<br />
low (the actual BBER ratio<br />
varies per interface).<br />
The number of error block<br />
in an interval.<br />
A flag indicating that the<br />
data is valid. Note that the<br />
PM data is not valid if not<br />
all the values were stored 2 .<br />
The maximum of the<br />
receive signal level<br />
(measured in dBm).<br />
The minimum of the<br />
receive signal level<br />
(measured in dBm).<br />
The maximum of the<br />
transmit signal level<br />
(measured in dBm) 3 .<br />
The minimum of the<br />
transmit signal level<br />
(measured in dBm).<br />
This parameter counts the<br />
number of seconds in<br />
which the RSL is below<br />
the specified threshold.<br />
This parameter counts the<br />
number of seconds in<br />
which the RSL is below<br />
the specified threshold.<br />
2 Possible reasons are: Clock changes within the interval and Power up reset<br />
3 The transmit power is fixed. The value can be changed only by user<br />
configuration<br />
<strong>FibeAir</strong> <strong>4800</strong> Installation and Operation Guide 5-7
Chapter 5 Diagnostics and Troubleshooting<br />
<strong>FibeAir</strong> <strong>4800</strong> Installation and Operation Guide<br />
Data type Reported value Explanation<br />
Ethernet Interface PM Data<br />
TSL Threshold 1<br />
BBER Threshold<br />
Received Bytes<br />
Transmitted Bytes<br />
This parameter counts the<br />
number of seconds in<br />
which the RSL is above<br />
the specified threshold.<br />
The BBER Threshold value<br />
counts the number of<br />
seconds in which the<br />
Background Block Error<br />
Ratio (BBER) exceeds the<br />
specified threshold. Note,<br />
that the system is design<br />
for excellent quality of<br />
service with BBER of less<br />
then 1%. (at 1% BBER<br />
expected TDM BER is less<br />
than 1E-6.<br />
The number of Mega<br />
bytes received in the<br />
specified port within the<br />
interval<br />
The number of Mega<br />
bytes received in the<br />
specified port within the<br />
interval.<br />
Table 5-2. Action of the tool bar button commands<br />
Button<br />
Get Data<br />
Save<br />
Clear<br />
Selection pane<br />
Threshold<br />
Close<br />
Action<br />
Uploads the selected report from the ODU.<br />
Saves the data in a CSV or Text format for additional analysis.<br />
Removes the current data from the window.<br />
Selects the site, interface, and interval to be displayed.<br />
Opens the threshold configuration dialog box (Figure 5-5) to set the Air<br />
Interface thresholds. Note that threshold change is effected immediately,<br />
but it does not change any historical data.<br />
Closes the Performance Monitor Report window.<br />
5-8 <strong>FibeAir</strong> <strong>4800</strong> Installation and Operation Guide
<strong>FibeAir</strong> <strong>4800</strong> Installation and Operation Guide<br />
Chapter 5 Diagnostics and Troubleshooting<br />
Figure 5-5. Threshold configuration dialog box<br />
<strong>FibeAir</strong> <strong>4800</strong> Installation and Operation Guide 5-9
Chapter 5 Diagnostics and Troubleshooting<br />
<strong>FibeAir</strong> <strong>4800</strong> Installation and Operation Guide<br />
5.4 Error Detection and Alarms<br />
FA<strong>4800</strong> detects fault conditions of the radio and user links and initiates alarms to<br />
alert the user.<br />
Note<br />
To store the event log, first define the IP address, subnet mask, default gateway and<br />
trap address of the management PC, see Chapter 4 for details.<br />
Alarms (traps) are displayed in the Event Log in the lower panel of the Main Menu<br />
screen. The alarm log is saved as a TXT file.<br />
The event log includes the following fields:<br />
• Sequential number (ID)<br />
• Date and time stamp<br />
• Message<br />
• Trap source<br />
• IP address of the ODU that initiated alarm.<br />
5-10 <strong>FibeAir</strong> <strong>4800</strong> Installation and Operation Guide
<strong>FibeAir</strong> <strong>4800</strong> Installation and Operation Guide<br />
Chapter 5 Diagnostics and Troubleshooting<br />
Table 5-3. FA<strong>4800</strong> Alarms and Information Messages<br />
Message<br />
Radio Link – Sync<br />
Radio Link – Out Of Sync<br />
Link Has Been Reset<br />
TDM Interface – Normal<br />
TDM Interface – LOS<br />
TDM Interface – LOS<br />
TDM Interface – AIS<br />
TDM Interface – Loopback<br />
Link Resetting<br />
Local ODU Resetting<br />
Monitor was stopped since no<br />
connection to the link<br />
TDM Service – Normal<br />
TDM Service – Alarm<br />
Configuration problem detected<br />
Channel Scanning in progress<br />
Transmitting on GHz<br />
Radar activity was detected in ,<br />
on channel GHz<br />
Monitoring fo Radar activity on channel<br />
GHz<br />
Bit Failed indication<br />
Link Status<br />
Site Status<br />
Description<br />
Radio link is synchronized<br />
Radio link lost synchronization<br />
ODU was reset due to internal problem<br />
TDM interface is operating properly<br />
Loss of Synchronization is reported by TDM interface<br />
Loss of Signal is reported by TDM interface<br />
Alarm Indication Signal is reported by TDM interface<br />
A loopback is active on TDM interface<br />
Wireless link reset from the management station. This alarm is<br />
caused by automatic reset after link configuration.<br />
The local ODU reset from the management station.<br />
No ODU-to-IDU traffic was detected during the last 20 minutes.<br />
TDM service is operating properly<br />
Error has been detected on a TDM line<br />
The link needs to be reinstalled<br />
The ODU is scanning the channels for the remote ODU<br />
The ODU is transmitting on the frequency channel listed<br />
For DFS versions only. Radar is detected; the channel is prohibited<br />
for 30 minutes.<br />
For DFS versions only. ODU is looking for Radar activity.<br />
Indicates ODU hardware problem. Send error code to Technical<br />
Support.<br />
Indicates incorrect connection or operation with the link. For<br />
example link out of range. Available in 1.620 versions and above.<br />
Indicates incorrect connection or operation at the site. Available in<br />
1.620 versions and above.<br />
➤<br />
To view summary of saved alarms<br />
• From the Tools menu, choose Active Alarm Summary.<br />
The Active Alarms Summary window opens. See Table 5-4; for an<br />
explanation of the command buttons.<br />
<strong>FibeAir</strong> <strong>4800</strong> Installation and Operation Guide 5-11
Chapter 5 Diagnostics and Troubleshooting<br />
<strong>FibeAir</strong> <strong>4800</strong> Installation and Operation Guide<br />
Figure 5-6. Active Alarms Summary<br />
Table 5-4. Active Alarms command buttons<br />
Command<br />
Save<br />
Refresh<br />
Site<br />
Close<br />
Action<br />
Saves the alarms in CSV or text format for further analysis.<br />
Reads the alarms from the ODU, and displays the alarms.<br />
Selects site for the active alarms.<br />
Closes the active alarm window.<br />
5.5 Testing FA<strong>4800</strong><br />
FA<strong>4800</strong> supports activation of the internal and external loopbacks on the local and<br />
remote units.<br />
➤<br />
To activate a loopback:<br />
1. From the Maintenance menu, choose Set Loopbacks.<br />
The Loopbacks dialog box appears (see Figure 5-7).<br />
5-12 <strong>FibeAir</strong> <strong>4800</strong> Installation and Operation Guide
<strong>FibeAir</strong> <strong>4800</strong> Installation and Operation Guide<br />
Chapter 5 Diagnostics and Troubleshooting<br />
2. From the Local or Remote drop-down box, select a loopback that you intend<br />
to run, and click OK.<br />
A confirmation message appears.<br />
➤<br />
3. Click OK to activate a loopback.<br />
FA<strong>4800</strong> activates selected loopback. A loopback status arrow in the Main<br />
menu turns green to indicate an active loopback.<br />
To deactivate a loopback:<br />
• From the From the Local or Remote drop-down box of the Loopbacks dialog<br />
box, select None and click OK.<br />
A loopback is deactivated and the corresponding status arrow in the Main<br />
menu becomes dimmed.<br />
Local External Loopback<br />
Figure 5-7. Loopbacks Dialog Box<br />
Local FA<strong>4800</strong> can be set to an external loopback to test the local E1/T1 port and<br />
its connection to the local side user equipment. In this mode, data coming from<br />
the local user equipment is looped back to it (see Figure 5-8). This loopback is<br />
initiated from a management station connected to the local unit.<br />
<strong>FibeAir</strong> <strong>4800</strong> Installation and Operation Guide 5-13
Chapter 5 Diagnostics and Troubleshooting<br />
<strong>FibeAir</strong> <strong>4800</strong> Installation and Operation Guide<br />
E1/T1<br />
Interface<br />
Testing<br />
Equipment<br />
Local ODU<br />
Remote Internal Loopback<br />
Management<br />
Station<br />
Figure 5-8. Local External Loopback<br />
Remote FA<strong>4800</strong> can be set to an internal loopback to test connection between the<br />
local and remote units, the local E1/T1 port and its connection to the local side<br />
user equipment. In this mode, data coming from the local FA<strong>4800</strong> is looped back<br />
to it (see Figure 5-9). This loopback is initiated from a management station<br />
connected to the local unit.<br />
E1/T1<br />
Interface<br />
E1/T1<br />
Interface<br />
Testing<br />
Equipment<br />
Remote ODU<br />
Local ODU<br />
Management<br />
Station<br />
Figure 5-9. Remote Internal Loopback<br />
5-14 <strong>FibeAir</strong> <strong>4800</strong> Installation and Operation Guide
<strong>FibeAir</strong> <strong>4800</strong> Installation and Operation Guide<br />
Chapter 5 Diagnostics and Troubleshooting<br />
Remote External Loopback<br />
Remote FA<strong>4800</strong> can be set to an external loopback to test the remote E1/T1 port<br />
and its connection to the remote side user equipment. In this mode, data coming<br />
from the remote user equipment is looped back to it (see Figure 5-10). This<br />
loopback is initiated by an inband command sent from a management station<br />
connected to the local unit.<br />
E1/T1 E1/T1<br />
Interface<br />
Interface<br />
Testing<br />
Equipment<br />
Inband Loopback<br />
Activation Command<br />
Remote ODU<br />
Local ODU<br />
Local Internal Loopback<br />
Figure 5-10. Remote External Loopback<br />
Management<br />
Station<br />
Local FA<strong>4800</strong> can be set to close an internal loopback to test connection between<br />
the local and remote units, remote E1/T1 port and its connection to the remote<br />
side user equipment. In this mode, data coming from the remote user equipment<br />
is looped back to it (see Figure 5-11). This loopback is initiated by an inband<br />
command sent from a management station connected to the local unit.<br />
E1/T1<br />
Interface<br />
Inband Loopback<br />
Activation Command<br />
E1/T1<br />
Interface<br />
Testing<br />
Equipment<br />
Remote ODU<br />
Local ODU<br />
Figure 5-11. Local Internal Loopback<br />
Management<br />
Station<br />
5.6 Troubleshooting<br />
Use Table 5-6 and Table 5-6 to diagnose any faults in the system.<br />
Table 5-5. Troubleshooting<br />
Symptom<br />
Remedy<br />
<strong>FibeAir</strong> <strong>4800</strong> Installation and Operation Guide 5-15
Chapter 5 Diagnostics and Troubleshooting<br />
<strong>FibeAir</strong> <strong>4800</strong> Installation and Operation Guide<br />
No power<br />
No signal<br />
Weak signal<br />
Verify that AC power is connected to the IDU.<br />
Verify that the ODU cable is properly wired and connected.<br />
Complete the installation procedure from the management<br />
software.<br />
Verify the ODU alignment. Check that the radio configuration<br />
of both site A and site B units are the same (channel and<br />
SSID).<br />
Verify the ODU alignment, reconfigure the link.<br />
Verify the beeper sounds the Best Signal sequence.<br />
The FA<strong>4800</strong> LEDs show faults in the system or the link.<br />
Table 5-6. Troubleshooting with FA<strong>4800</strong> LEDs<br />
LED Status Remedy<br />
PWR Off Check that AC adapter is connected to the IDU-E<br />
and the AC power outlet.<br />
IDU Orange Check that the IDU/ODU cable is properly wired<br />
and connected.<br />
ODU Red Check that the IDU/ODU cable is properly wired<br />
and connected.<br />
AIR I/F<br />
SERVICE<br />
Orange<br />
Red<br />
Off<br />
Orange<br />
Red<br />
Complete the installation procedure from the<br />
management software.<br />
Check the ODU Antenna alignment. Check that<br />
the radio configuration of both site A and site B<br />
units are the same (channel and SSID).<br />
Check the TDM service configuration in the NMS.<br />
Check that the system is not in loopback mode.<br />
Check the site B IDU ports and cables and site B<br />
external equipment.<br />
Check the site A IDU ports, cables and external<br />
equipment.<br />
5.7 Frequently Asked Questions<br />
Q: What performance issues will arise due to environmental conditions?<br />
A: FA<strong>4800</strong> is not sensitive to environmental conditions. However if heavy rain or<br />
snowfall is expected ensure the performance by allowing a higher fade margin in<br />
the link budget planning calculations.<br />
Q: When using the FA<strong>4800</strong>, what is the potential for interference between our<br />
system and other cellular or wireless Networks devices?<br />
5-16 <strong>FibeAir</strong> <strong>4800</strong> Installation and Operation Guide
<strong>FibeAir</strong> <strong>4800</strong> Installation and Operation Guide<br />
Chapter 5 Diagnostics and Troubleshooting<br />
A: The FA<strong>4800</strong> is a robust system. However since it operates in unlicensed band<br />
there maybe some interference. Nevertheless, the fact that we can manually set<br />
the frequency gives us the flexibility to find a clear channel. In addition each<br />
FA<strong>4800</strong> link uses unique user configurable SSID code.<br />
Q: What protocol does the FA<strong>4800</strong> use, i.e. 802.11?<br />
A: FA<strong>4800</strong> uses a proprietary protocol; this protocol contains improved options<br />
that more efficiently support the clock reconstruction from the TDM services.<br />
Q: What type of security is offered on FA<strong>4800</strong>?<br />
A: FA<strong>4800</strong> has three levels of security:<br />
1. AES hardware mechanism<br />
2. Each unit uses a unique SSID link-specific code (up to 24 alphanumeric<br />
characters)<br />
3. Proprietary protocol protects from eavesdropping from other systems.<br />
<strong>FibeAir</strong> <strong>4800</strong> Installation and Operation Guide 5-17
Chapter 5 Diagnostics and Troubleshooting<br />
<strong>FibeAir</strong> <strong>4800</strong> Installation and Operation Guide<br />
Q: Can we use horizontal and vertical polarization on the same frequency to<br />
double the number of wireless links?<br />
A: Installing two FA<strong>4800</strong> systems in the same band with cross polarization provides<br />
20–25 dB separations. Nevertheless, since there are reflections, the cross<br />
polarization separation is decreased and spatial separation is recommended.<br />
Q: Could you add the frequency of 5.735 to the manual selection in order to<br />
increase the number of 20 MHz channels to six?<br />
A: Currently the system provides fixed channels, with one manual frequency<br />
setting. The manual setting provides flexibility of spectrum selection, including<br />
5.735 MHz.<br />
Q: Can we mange FA<strong>4800</strong> using SNMPc other than the supplied management<br />
software that comes with the units?<br />
A: Yes. The FA<strong>4800</strong> is SNMP-based. FA<strong>4800</strong> can be managed when using other<br />
SNMP software after implementing CERAGON MIB’s.<br />
Q: Can FA<strong>4800</strong> be managed and configured via Telnet?<br />
A: No. Use only the FA<strong>4800</strong> software manager.<br />
Q: Can I use FA<strong>4800</strong> with any vendor’s external antenna?<br />
A: Yes. CERAGON supplies the FA<strong>4800</strong> external ODU with an N-type typical<br />
connector. Any vendor’s external antenna that can be cascaded to our external<br />
unit can be used without problem. Please note that dB losses in the cascading<br />
cable between the external ODU and antenna should be taken into consideration.<br />
(In the supplied cascading cable of one meter we have 1 dB loss)<br />
Q: Do we need to add external arrestors on FA<strong>4800</strong> cables?<br />
A: The FA<strong>4800</strong> ODU includes arrestors and lightning protection. Therefore there is<br />
no need to add additional arrestors.<br />
Note<br />
Q: What is the actual Ethernet data rate and maximum throughput?<br />
A: The maximum net throughput of FA<strong>4800</strong> is full duplex 18 Mbps.<br />
FA<strong>4800</strong> is a symmetrical system<br />
Q: What is the sensitivity for each rate of the FA<strong>4800</strong>?<br />
A: The rate sensitivities are:<br />
Rate<br />
[Mbps]<br />
Sensitivity<br />
[dB]<br />
12 -84<br />
18 -81<br />
36 -74<br />
48 -68<br />
5-18 <strong>FibeAir</strong> <strong>4800</strong> Installation and Operation Guide
<strong>FibeAir</strong> <strong>4800</strong> Installation and Operation Guide<br />
Chapter 5 Diagnostics and Troubleshooting<br />
Q: Does FA<strong>4800</strong> withhold any MAC Addresses?<br />
A: The FA<strong>4800</strong> is a layer 2 Bridge (VLAN transparent). The built-in switch contains<br />
a MAC Address table up to 2047.<br />
Q: Can I use any category 5e cable in order to connect the IDU and ODU?<br />
A: The cable should be suitable for outdoor use, and shielded Category 5e.<br />
Q: What are the BER values expected in the FA<strong>4800</strong> link?<br />
A: 10-11 (according to BER sensitivity threshold)<br />
Q: Does FA<strong>4800</strong> use DSSS technique?<br />
A: No, FA<strong>4800</strong> uses the advanced OFDM technique.<br />
Q: What are the main advantages of the FA<strong>4800</strong> solution (e.g., wireline,<br />
wireless, etc.) over other possible alternatives?<br />
A:<br />
• Easy and intuitive installation using audio indication.<br />
• Easy configuration using the management software of overall link site-to-site,<br />
there is no need to travel between the two sites in order to change the<br />
configuration.<br />
• Easy migration between transition channels site-to-site.<br />
• Full backup option – backup and restore using ini files.<br />
• Very light ODU (1.5 kg).<br />
• No RF loses between IDU and ODU.<br />
• Robust Air Interface Layer 2 ARQ insures “error-free” Ethernet service even in<br />
harsh conditions. Retransmit mechanism for TDM esures low BER.<br />
• Integrated up to 4 E1/T1 and Ethernet radio over one single product.<br />
• Supports a variety of applications Voice and Data over single radio – no need<br />
for external mediation device.<br />
• Smooth migration to VoIP applications.<br />
• Carrier class compliant with ITU standards for E1 and T1.<br />
• Low and constant TDM latency (8 msec).<br />
• Extremely accurate recovered clock low cost replacement to PDH radios.<br />
5.8 Technical Support<br />
Technical support for this product can be obtained from the local distributor from<br />
whom it was purchased.<br />
<strong>FibeAir</strong> <strong>4800</strong> Installation and Operation Guide 5-19
Chapter 5 Diagnostics and Troubleshooting<br />
<strong>FibeAir</strong> <strong>4800</strong> Installation and Operation Guide<br />
For further information, please contact the CERAGON distributor nearest you or<br />
one of CERAGON's offices worldwide. This information can be found at<br />
www.ceragon.com.<br />
5-20 <strong>FibeAir</strong> <strong>4800</strong> Installation and Operation Guide
Appendix A<br />
Wiring Specifications<br />
A.1 ODU-IDU Cable<br />
The ODU-IDU cable is standard CAT-5, 4 twisted-pair 24 AWG FTP, terminated<br />
with RJ-45 connectors on both ends. It is covered by a cable gland on the ODU<br />
side for hermetic sealing.<br />
Table A-1 shows the connector pinout.<br />
Table A-1. ODU-IDU Cable Connector Pinout<br />
IDU RJ-45 Wire Color Function ODU RJ-45<br />
1 twisted White/Green Ethernet (RxN) 1<br />
2 pair Green Ethernet (RxT) 2<br />
3 twisted White/Orange Ethernet (TxT) 3<br />
6 pair Orange Ethernet (TxN) 6<br />
4 twisted Blue Power (+) 4<br />
5 pair White/Blue Power (+) 5<br />
7 twisted White/Brown Power (−) 7<br />
8 pair Brown Power (−) 8<br />
Figure A-1. RJ-45 wiring for IDU-ODU cable<br />
<strong>FibeAir</strong> <strong>4800</strong> Installation and Operation Guide A-1
Appendix A Wiring Specifications<br />
<strong>FibeAir</strong> <strong>4800</strong> Installation and Operation Guide<br />
A.2 User Port Connectors<br />
The IDU includes ports for connecting E1/T1 and 10/100BaseT Ethernet user<br />
devices.<br />
Trunk Port<br />
The Trunk (E1/T1) interface terminates in an 8-pin RJ-45 balanced connector,<br />
wired in accordance to Table A-2.<br />
Table A-2. E1/T1 Connector Pinout<br />
Pin<br />
Function<br />
4,5 Receive (input)<br />
1,2 Transmit (output)<br />
A-2 <strong>FibeAir</strong> <strong>4800</strong> Installation and Operation Guide
<strong>FibeAir</strong> <strong>4800</strong> Installation and Operation Guide<br />
Appendix A Wiring Specifications<br />
LAN Port<br />
The LAN 10/100BaseT interface terminates in an 8-pin RJ-45 connector, wired in<br />
accordance to Table A-3.<br />
Table A-3. Fast Ethernet Connector Pinout<br />
Pin Signal Function<br />
1 TD (+) Transmit Data (positive)<br />
2 TD (–) Transmit Data (negative)<br />
3 RD (+) Receive Data (positive)<br />
6 RD (–) Receive Data (negative)<br />
IDU-C DC Power Terminal<br />
A.3 IDU-C Connectors<br />
Table A-4. Terminal Block 3-pin -48VDC<br />
Pin<br />
Connection<br />
Right +<br />
Center Chassis<br />
Left –<br />
<strong>FibeAir</strong> <strong>4800</strong> Installation and Operation Guide A-3
Appendix A Wiring Specifications<br />
<strong>FibeAir</strong> <strong>4800</strong> Installation and Operation Guide<br />
IDU-C Alarm Connector<br />
Table Table A-5 lists the alarm connector pinout.<br />
Table A-5. Alarm Connector (Dry-Contact)<br />
Pin<br />
Description<br />
1 Input 1 Positive<br />
6 Input 1 Negative<br />
2 Input 2 Positive<br />
7 Input 2 Negative<br />
3 Output 1 Normally Closed<br />
8 Output 1 Common<br />
4 Output 1 Normally Open<br />
9 Output 2 Common<br />
5 Output 2 Normally Open<br />
Alarm Connector<br />
+ve 1<br />
10 to 50 VDC alarm voltage<br />
Input 1<br />
-ve<br />
6<br />
+ve<br />
2<br />
Input 2<br />
- ve 7<br />
-10 to -50 VDC alarm voltage<br />
N/C<br />
3<br />
Ext. current limit resistor<br />
Alarm LED<br />
Output 1 N/O<br />
4<br />
COM<br />
8<br />
Ext. DC Power<br />
N/O<br />
7<br />
Ext. current limit resistor<br />
Alarm Buzzer<br />
Output 2<br />
COM<br />
9<br />
Ext. DC Power<br />
Figure A-2. Example for connecting the alarm connector<br />
A-4 <strong>FibeAir</strong> <strong>4800</strong> Installation and Operation Guide
Appendix B<br />
Mast and Wall Installation<br />
B.1 Mounting the ODU<br />
The ODU can be mounted on a mast or a wall.<br />
ODU Mounting Kit Contents<br />
The ODU mounting kit includes the following items:<br />
• One Large Clamp (see figure B-1)<br />
• One Small Clamp (see figure B-2)<br />
• One Arm (see figure B-3)<br />
• Four Screw hex head M8x40<br />
• Two Screw hex head M8x70<br />
• Four Washer flat M8<br />
• Three Washer spring M8<br />
• Two M8 Nuts.<br />
Figure B-1. Large<br />
Clamp<br />
Figure B-2. Small<br />
Clamp<br />
Figure B-3. Arm<br />
<strong>FibeAir</strong> <strong>4800</strong> Installation and Operation Guide B-1
Appendix B Mast and Wall Installation<br />
<strong>FibeAir</strong> <strong>4800</strong> Installation and Operation Guide<br />
Mounting <strong>FibeAir</strong> <strong>4800</strong> on a Mast<br />
B-2 <strong>FibeAir</strong> <strong>4800</strong> Installation and Operation Guide
<strong>FibeAir</strong> <strong>4800</strong> Installation and Operation Guide<br />
Appendix B Mast and Wall Installation<br />
Mounting FA<strong>4800</strong> on a Wall<br />
<strong>FibeAir</strong> <strong>4800</strong> Installation and Operation Guide B-3
Appendix B Mast and Wall Installation<br />
<strong>FibeAir</strong> <strong>4800</strong> Installation and Operation Guide<br />
B.2 Mounting an External Antenna<br />
The optional external antenna can be mounted on a mast.<br />
External Antenna Mounting Kit Contents<br />
The external antenna mounting kit includes the following items:<br />
• Twelve flat washers<br />
• Eight spring washers<br />
• Eight hex nuts<br />
• Four bolts<br />
• One U-bracket<br />
• One pivoting bracket<br />
• Two metal strap clamps.<br />
➤<br />
To install external antenna on the mast:<br />
1. Attach the U-bracket to the back of the antenna using four flat washers, four<br />
spring washers and four hex nuts.<br />
2. Attach the pivoting bracket to the U-bracket using eight flat washers, four<br />
spring washers, four hex nuts and four bolts.<br />
3. Pass both strap clamps through the vertical slots in the pivoting bracket.<br />
4. Attach the antenna to the mast using the two strap clamps.<br />
5. Adjust the required tilt using the angular scale and tighten all bolts and nuts at<br />
the required position.<br />
B-4 <strong>FibeAir</strong> <strong>4800</strong> Installation and Operation Guide
Appendix A<br />
Link Budget Calculator<br />
1.1 Overview<br />
The Link Budget Calculator is a utility for calculating the expected performance of<br />
the FA<strong>4800</strong> wireless link and the possible configurations for a specific link range.<br />
The utility allows you to calculate the expected RSS of the link, and find the type<br />
of services and their effective throughput as a function of the link range and<br />
deployment conditions.<br />
The Link Budget Calculator is supplied on the FA<strong>4800</strong> Manager CD. After<br />
installation, it may also be accessed from the menu bar of the WinLink Manager<br />
(see Figure A-1).<br />
Figure A-1. Accessfsing the Link Budget Manager Calculator<br />
Overview
Link Budget Calculator<br />
FA<strong>4800</strong> Installation and Operation Manual<br />
1.2 Using the Link Budget Calculator<br />
The Link Budget Calculator comprises of one table where all the link parameters<br />
are defined.<br />
Figure A-2. Link Budget Screen<br />
➤<br />
Note<br />
To calculate the link budget<br />
1. Select your WinLink system product from the dropdown list of products.<br />
2. Select the rate from the dropdown list. The rate defines the air-interface rate in<br />
Mbps. The system operates in TDD mode and has overhead of the airinterface<br />
protocol and therefore the accurate actual throughput is provided in<br />
the ‘Service’ Row and the effective Ethernet throughput is provided in the<br />
‘Ethernet Rate’.<br />
•<br />
Throughput can be decreased as a function of range due to propagation delay.<br />
The remaining fields are completed automatically depending on the product<br />
selected in the product field. Standard FA<strong>4800</strong> system parameters are entered<br />
as default. Fields in blue boxes may be edited if non-standard antennas and<br />
cables are used.<br />
The Fade margin is the minimum margin that is required for LOS conditions.<br />
For degraded link conditions, a larger fade margin should be taken into<br />
account.<br />
Using the Link Budget Calculator
FA<strong>4800</strong> Installation and Operation Manual<br />
Link Budget Calculator<br />
The Tx power EIRP for the system is given in dBm and Watts.<br />
3. Type the required link distance and select units of distance, kilometers or<br />
miles.<br />
4. Select the general conditions<br />
5. Select the services required<br />
6. Click Calculate<br />
The Expected Performance parameters are calculated and displayed in the<br />
lower part of the table.<br />
Expected RSS – this is the number that the FA<strong>4800</strong> Manager software<br />
shows when the FA<strong>4800</strong> ODUs are best aligned.<br />
Ethernet Rate – Maximum throughput available with the chosen system.<br />
7. If the expected performance is not suitable for your application, select a<br />
different data rate and re-calculate.<br />
Using the Link Budget Calculator
Appendix D<br />
AIND Antenna Alignment<br />
Procedure<br />
Use this procedure when using the all indoor system FA<strong>4800</strong>-ANID or manually<br />
aligning two FA<strong>4800</strong> units.<br />
To achieve the best benefit and link budget from the <strong>FibeAir</strong> installation, the link<br />
antennas must be aligned; the two antennas should exactly face each other.<br />
In order to achieve the best performance, the line of sight must be as clear as<br />
possible with no obstructions between the two sites.<br />
Prior to attempting <strong>FibeAir</strong> alignment, install the hardware and software in<br />
accordance with the FA<strong>4800</strong> Installation and Operation Manual. Figure D-1 shows<br />
the link setup. At least two people are needed to perform the alignment<br />
procedures.<br />
Once the alignment is complete, you are able to evaluate the quality of the link.<br />
Site A<br />
AirMux<br />
IDUx<br />
IDUx<br />
Site B<br />
Figure D-1. FA<strong>4800</strong> Link Setup<br />
<strong>FibeAir</strong> <strong>4800</strong> Installation and Operation Guide D-1
Appendix D AIND Antenna Alignment Procedure<br />
<strong>FibeAir</strong> <strong>4800</strong> Installation and Operation Guide<br />
D.1 Expected Signal Level<br />
Based on the link budget parameters of the actual <strong>FibeAir</strong> sites, you need to<br />
calculate the expected signal level that will be received by the receiving site.<br />
Use the Link Budget Calculator utility supplied on the FA<strong>4800</strong> Manager Software<br />
CD-ROM to calculate the expected performance of the FA<strong>4800</strong> wireless link. The<br />
utility allows you to determine the RSS of the link, and find the number of E1/T1<br />
services available at various data rates, with the minimum and maximum distance.<br />
Equipment Setup<br />
➤<br />
D.2 Performing FA<strong>4800</strong>-AIND Alignment<br />
The supervisor of the antenna alignment is situated at the receive site with the<br />
Spectrum Analyzer.<br />
To set up the antenna alignment equipment:<br />
1. Coarsely align the two antennas. Use the compass readings taken during the<br />
Site Survey to point the antennas in the correct direction.<br />
2. Connect the equipment as shown in Figure D-1 but connect a spectrum<br />
analyzer in place of the remote FA<strong>4800</strong>-AIND.<br />
3. Turn on the CW transmit signal from site A (from the FA<strong>4800</strong> NMS).<br />
4. 4. At site B, tune the SA to the frequency transmitted.<br />
5. 5. Increase the SA sensitivity according to the expected receive signal.<br />
Align the antennas:<br />
Note<br />
• When one antenna is moved, the opposite site is passive<br />
• Move the antennas very slowly<br />
1. Slowly move the site B antenna azimuth axis (the elevation axis should be<br />
locked) until you see the best signal on the SA Lock the azimuth axis.<br />
2. Slowly move the site A antenna azimuth axis (the elevation axis should be<br />
locked) until you see the best signal on the SA.<br />
Lock the azimuth axis.<br />
3. Slowly move the site B antenna elevation axis (the azimuth axis should be<br />
locked) until you see the best signal on the SA.<br />
Lock the elevation axis.<br />
4. Slowly move the site A antenna elevation axis (the azimuth axis should be<br />
locked) until you see the best signal on the SA.<br />
Lock the elevation axis.<br />
5. Repeat steps 1 to 4 until the reading on the SA is equal or as close as possible<br />
to the calculated receive signal (for Rx Power Level see Expected Signal Level).<br />
D-2 <strong>FibeAir</strong> <strong>4800</strong> Installation and Operation Guide
<strong>FibeAir</strong> <strong>4800</strong> Installation and Operation Guide<br />
Appendix D AIND Antenna Alignment Procedure<br />
When the SA reads the expected receive signal, the antennas are aligned and<br />
there is an indication of a good link between the sites.<br />
6. Tighten the antenna azimuth axis and elevation axis.<br />
7. Stop the CW function. The NMS will restart the system.<br />
8. Connect FA<strong>4800</strong>-AIND unit to external antenna. See FA<strong>4800</strong> Installation and<br />
Operation Manual for details. The operational link is shown in Figure 2-3.<br />
9. Configure FA<strong>4800</strong> NMS at both sites to operate at the pure channel frequency<br />
found in the RF survey. FA<strong>4800</strong> is now ready for operation.<br />
D.3 Configuring the Link<br />
1. Run the Installation Wizard in the FA<strong>4800</strong> Manager Software to set the<br />
configuration of the link. Configure the link in accordance with the parameters<br />
calculated in the Link Budget Calculator.<br />
2. FA<strong>4800</strong> has a unique identification number, the SSID. Each side of the link<br />
looks for its partner with the same SSID. Therefore both sides of the link must<br />
be configured with the same SSID.<br />
3. The FA<strong>4800</strong> link is now ready for operation.<br />
D.4 Evaluating the Link<br />
With the link operating at a pure channel as determined by the<br />
RF survey procedure, the recommended performance threshold of an FA<strong>4800</strong> link<br />
is the following:<br />
RSS: –84 dBm minimum<br />
There are cases when there is no line of sight, but still the link is of an acceptable<br />
quality.<br />
If the link is not within the acceptable limit, see Troubleshooting.<br />
D.5 Troubleshooting<br />
If the link is not within the acceptable limit as defined in Evaluating the Link, check<br />
the following:<br />
• Verify that both antennas have the same polarization (horizontal/vertical).<br />
• Check all the FA<strong>4800</strong>-AIND cable connectors for faulty connections.<br />
• Verify that there are no obstacles in the Fresnel zone of the antenna path such<br />
as large buildings, trees, etc.<br />
<strong>FibeAir</strong> <strong>4800</strong> Installation and Operation Guide D-3
Appendix D AIND Antenna Alignment Procedure<br />
<strong>FibeAir</strong> <strong>4800</strong> Installation and Operation Guide<br />
• Use a spectrum analyzer with suitable sensitivity to measure the signal at the<br />
distance between the sites.<br />
If nothing improves the receive power level, check the overall link.<br />
• Reduce the distance of the link–move the equipment from one site closer to<br />
the other site–where it is possible to actually see the antennas with the naked<br />
eye.<br />
• If you now get the expected receive signal level, you can assume that the<br />
equipment is operational, and the problem arises from interference between<br />
the sites.<br />
D-4 <strong>FibeAir</strong> <strong>4800</strong> Installation and Operation Guide
Appendix E<br />
Antenna Characteristics<br />
An antenna is the radiating and receiving element from which the radio signal, in<br />
the form of RF power, is radiated to its surroundings and vice versa. The<br />
transmission range is a function of the antenna gain and transmitting power. These<br />
factors are limited by country regulations.<br />
FA<strong>4800</strong> may be operated with an integrated antenna attached to the ODU unit,<br />
or with an external antenna wired to the ODU via an N-type connector. All cables<br />
and connections must be connected correctly to reduce losses. The required<br />
antenna impedance is 50Ω.<br />
Table E-1. Antenna Characteristics<br />
Type<br />
Gain<br />
[dBi]<br />
Max Range<br />
[km][miles]<br />
Beam<br />
[degrees]<br />
Dimensions<br />
[mm] [in]<br />
Weight<br />
[kg] [Ib]<br />
Connector Lightning<br />
Protection<br />
5.8, 5.4, 5.3 GHz<br />
Integrated Flat panel 22 40 25 9.0 305×305×58 12×12×2.3 0.5 1.1 NR Yes<br />
External Flat panel 28 80 50 4.5 600×600×51 23.6×23.6×2 5.0 11.0 N-type No<br />
5.8 GHz only<br />
External Dish 32.5 80 50 4.5 Dia 900 Dia 35.4 10 22 N-type No<br />
4.9 GHz<br />
External Flat panel 21 24 15 9.0 305×305×58 12×12×2.3 0.5 1.1 N-type Yes<br />
External Dish 27 80 50 5 Dia 600 Dia 23.6 5.0 11.0 N-type Yes<br />
2.4 GHz<br />
Integrated Flat panel 17 40 25 20 305×305×58 12×12×2.3 0.5 1.1 NR Yes<br />
External Grid 24 80 50 7.5 600×997×380 23.5×39.2×15 2.0 4.6 N-type No<br />
<strong>FibeAir</strong> <strong>4800</strong> Installation and Operation Guide E-1
Appendix E Antenna Characteristics<br />
<strong>FibeAir</strong> <strong>4800</strong> Installation and Operation Guide<br />
The Parabolic dish antenna is a high-gain, reflector antenna used for<br />
radio, television, and data communications. The relatively short<br />
wavelength of electromagnetic (radio) energy at these frequencies<br />
allows reasonably sized reflectors to exhibit the very desirable highly<br />
directional response for both receiving and transmitting.<br />
Parabolic Dish Antenna<br />
Used for 2.4 GHz applications. Due to the large size, the grid design<br />
minimizes weight and windloading.<br />
Grid Antenna<br />
E-2 <strong>FibeAir</strong> <strong>4800</strong> Installation and Operation Guide