Installation Manual - Meridian Microwave
Installation Manual - Meridian Microwave
Installation Manual - Meridian Microwave

Create successful ePaper yourself
Turn your PDF publications into a flip-book with our unique Google optimized e-Paper software.
AR/GE/FE/U 80/80X <strong>Installation</strong> <strong>Manual</strong><br />
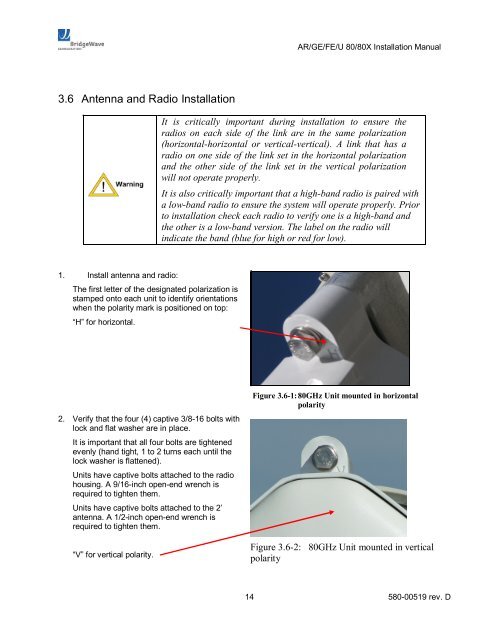
3.6 Antenna and Radio <strong>Installation</strong><br />
It is critically important during installation to ensure the<br />
radios on each side of the link are in the same polarization<br />
(horizontalhorizontal or verticalvertical). A link that has a<br />
radio on one side of the link set in the horizontal polarization<br />
and the other side of the link set in the vertical polarization<br />
will not operate properly.<br />
It is also critically important that a highband radio is paired with<br />
a lowband radio to ensure the system will operate properly. Prior<br />
to installation check each radio to verify one is a highband and<br />
the other is a lowband version. The label on the radio will<br />
indicate the band (blue for high or red for low).<br />
1. Install antenna and radio:<br />
The first letter of the designated polarization is<br />
stamped onto each unit to identify orientations<br />
when the polarity mark is positioned on top:<br />
“H” for horizontal.<br />
2. Verify that the four (4) captive 3/816 bolts with<br />
lock and flat washer are in place.<br />
It is important that all four bolts are tightened<br />
evenly (hand tight, 1 to 2 turns each until the<br />
lock washer is flattened).<br />
Units have captive bolts attached to the radio<br />
housing. A 9/16inch openend wrench is<br />
required to tighten them.<br />
Units have captive bolts attached to the 2’<br />
antenna. A 1/2inch openend wrench is<br />
required to tighten them.<br />
“V” for vertical polarity.<br />
Figure 3.61:80GHz Unit mounted in horizontal<br />
polarity<br />
Figure 3.62: 80GHz Unit mounted in vertical<br />
polarity<br />
14 58000519 rev. D