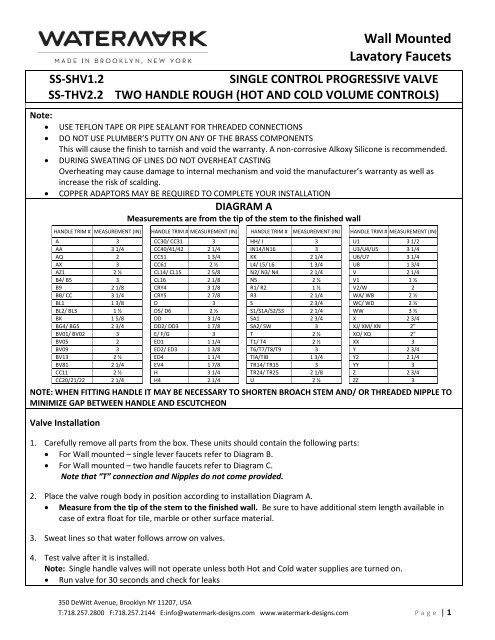
Wall Mounted Lavatory Faucets - Watermark Designs
Wall Mounted Lavatory Faucets - Watermark Designs
Wall Mounted Lavatory Faucets - Watermark Designs

Create successful ePaper yourself
Turn your PDF publications into a flip-book with our unique Google optimized e-Paper software.
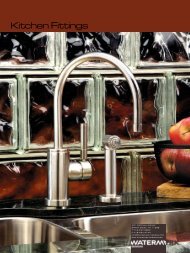
<strong>Wall</strong> <strong>Mounted</strong><br />
<strong>Lavatory</strong> <strong>Faucets</strong><br />
SS-SHV1.2<br />
SINGLE CONTROL PROGRESSIVE VALVE<br />
SS-THV2.2 TWO HANDLE ROUGH (HOT AND COLD VOLUME CONTROLS)<br />
Note:<br />
• USE TEFLON TAPE OR PIPE SEALANT FOR THREADED CONNECTIONS<br />
• DO NOT USE PLUMBER’S PUTTY ON ANY OF THE BRASS COMPONENTS<br />
This will cause the finish to tarnish and void the warranty. A non-corrosive Alkoxy Silicone is recommended.<br />
• DURING SWEATING OF LINES DO NOT OVERHEAT CASTING<br />
Overheating may cause damage to internal mechanism and void the manufacturer’s warranty as well as<br />
increase the risk of scalding.<br />
• COPPER ADAPTORS MAY BE REQUIRED TO COMPLETE YOUR INSTALLATION<br />
DIAGRAM A<br />
Measurements are from the tip of the stem to the finished wall<br />
HANDLE TRIM # MEASUREMENT (IN) HANDLE TRIM # MEASUREMENT (IN) HANDLE TRIM # MEASUREMENT (IN) HANDLE TRIM # MEASUREMENT (IN)<br />
A 3 CC30/ CC31 3 HH/ I 3 U1 3 1/2<br />
AA 3 1/4 CC40/41/42 2 1/4 IN14/IN16 3 U3/U4/U5 3 1/4<br />
AQ 2 CC51 1 3/4 KK 2 1/4 U6/U7 3 1/4<br />
AX 3 CC61 2 ½ L4/ L5/ L6 1 3/4 U8 1 3/4<br />
AZ1 2 ½ CL14/ CL15 2 5/8 N2/ N3/ N4 2 1/4 V 2 1/4<br />
B4/ B5 3 CL16 2 1/8 N5 2 ½ V1 1 ½<br />
B9 2 1/8 CRY4 3 1/8 R1/ R2 1 ½ V2/W 2<br />
BB/ CC 3 1/4 CRY5 2 7/8 R3 2 1/4 WA/ WB 2 ½<br />
BL1 1 3/8 D 3 S 2 3/4 WC/ WD 2 ½<br />
BL2/ BL3 1 ½ D5/ D6 2 ½ S1/S1A/S2/S3 2 1/4 WW 3 ½<br />
BK 1 5/8 DD 3 1/4 SA1 2 3/4 X 2 3/4<br />
BG4/ BG5 2 3/4 DD2/ DD3 1 7/8 SA2/ SW 3 XJ/ XM/ XN 2”<br />
BV01/ BV02 3 E/ F/G 3 T 2 ½ XO/ XQ 2”<br />
BV05 2 ED1 1 1/4 T1/ T4 2 ½ XX 3<br />
BV09 3 ED2/ ED3 1 3/8 T6/T7/T8/T9 3 Y 2 3/4<br />
BV13 2 ½ ED4 1 1/4 TIA/TIB 1 3/4 Y2 2 1/4<br />
BV81 2 1/4 EV4 1 7/8 TR14/ TR15 3 YY 3<br />
CC11 2 ½ H 3 1/4 TR24/ TR25 2 1/8 Z 2 3/4<br />
CC20/21/22 2 1/4 H4 2 1/4 U 2 ½ ZZ 3<br />
NOTE: WHEN FITTING HANDLE IT MAY BE NECESSARY TO SHORTEN BROACH STEM AND/ OR THREADED NIPPLE TO<br />
MINIMIZE GAP BETWEEN HANDLE AND ESCUTCHEON<br />
Valve Installation<br />
1. Carefully remove all parts from the box. These units should contain the following parts:<br />
• For <strong>Wall</strong> mounted – single lever faucets refer to Diagram B.<br />
• For <strong>Wall</strong> mounted – two handle faucets refer to Diagram C.<br />
Note that “T” connection and Nipples do not come provided.<br />
2. Place the valve rough body in position according to installation Diagram A.<br />
• Measure from the tip of the stem to the finished wall. Be sure to have additional stem length available in<br />
case of extra float for tile, marble or other surface material.<br />
3. Sweat lines so that water follows arrow on valves.<br />
4. Test valve after it is installed.<br />
Note: Single handle valves will not operate unless both Hot and Cold water supplies are turned on.<br />
• Run valve for 30 seconds and check for leaks<br />
350 DeWitt Avenue, Brooklyn NY 11207, USA<br />
T:718.257.2800 F:718.257.2144 E:info@watermark-designs.com www.watermark-designs.com Page | 1
<strong>Wall</strong> <strong>Mounted</strong><br />
<strong>Lavatory</strong> <strong>Faucets</strong><br />
DIAGRAM B<br />
Refer to Diagram A<br />
3<br />
4<br />
1<br />
2<br />
ITEM # PART #<br />
1 STEM<br />
ALL THREAD<br />
2 NIPPLE<br />
3 HANDLE TRIM<br />
4 SPOUT<br />
5 TENSION NUT<br />
ALL THREAD<br />
6 NIPPLE<br />
7 STEM<br />
DIAGRAM C<br />
5<br />
6<br />
7<br />
350 DeWitt Avenue, Brooklyn NY 11207, USA<br />
T:718.257.2800 F:718.257.2144 E:info@watermark-designs.com www.watermark-designs.com Page | 2
<strong>Wall</strong> <strong>Mounted</strong><br />
<strong>Lavatory</strong> <strong>Faucets</strong><br />
5. Once valve has been tested proceed to close wall. Be sure to leave holes large enough to access the stem.<br />
• NOTE: Single handle valve hole should be kept to 1 5/8” to maintain access to stem.<br />
• NOTE: Two handle valve holes should be kept to 1” to maintain access to stem.<br />
6. Install Trim.<br />
• Mount and hand tighten escutcheons to all thread nipples.<br />
• Install handles on valves. Stems can be cut down if necessary.<br />
• NOTE: Female thread is 2” deep.<br />
• NOTE: For two handle valves:<br />
For heavier lever handles tighten stem tension adjustment nut.<br />
It is recommended that the handles close in a horizontal position (9:00 and 3:00 going from left to right)<br />
and open up towards 12:00 in case of loss of water pressure.<br />
• NOTE: Alignment kits are provided to aid in positioning handles horizontally.<br />
• If valve is set too far in the wall, 1” extension kits may be ordered:<br />
Model # SS-EXT60 for SS-THV2.2 two handle wall rough<br />
Model # SS-EXT20 for SS-SHV1.2 single handle wall rough<br />
7. Install lavatory spout.<br />
• Connect brass threaded nipple from the center of the tee connection to the lavatory spout. It may be<br />
necessary to cut down the nipple. Refer to Diagram D<br />
o Note: Trims with spout from Group A require the nipple to extend 1/2” beyond the finished wall.<br />
o Trims with spouts from Group B require the nipple to be recessed 1/2” behind the finished wall.<br />
o Trims with spouts from Group C require a female nipple to be recessed 1/2” behind the finished wall.<br />
Diagram D<br />
FLUSH CONNECTION ½” NPT<br />
RECESS CONNECTION ½” NPT<br />
(FEMALE THREAD)<br />
RECESS CONNECTION ½” NPT<br />
(MALE THREAD)<br />
GROUP A<br />
(SERIES 22, 24, 25, 26, 27, 28, 29, 31,<br />
32, 34, 37, 44, 86, 96, 160, 80, 203, 314)<br />
GROUP B<br />
(SERIES 30, 33, 140, 150, 201, 205,<br />
206, 310, 311, 312, 316, 319, 321)<br />
GROUP C<br />
(SERIES 35)<br />
350 DeWitt Avenue, Brooklyn NY 11207, USA<br />
T:718.257.2800 F:718.257.2144 E:info@watermark-designs.com www.watermark-designs.com Page | 3
SS-SHV1.2<br />
<strong>Wall</strong> <strong>Mounted</strong><br />
<strong>Lavatory</strong> <strong>Faucets</strong><br />
Cartridge Model #: CRTSHV1.2<br />
SS-THV2.2<br />
Cartridge Model #: CRT503-H<br />
(hot) and CRT503-C (cold)<br />
Rev. 5/2014<br />
350 DeWitt Avenue, Brooklyn NY 11207, USA<br />
T:718.257.2800 F:718.257.2144 E:info@watermark-designs.com www.watermark-designs.com Page | 4