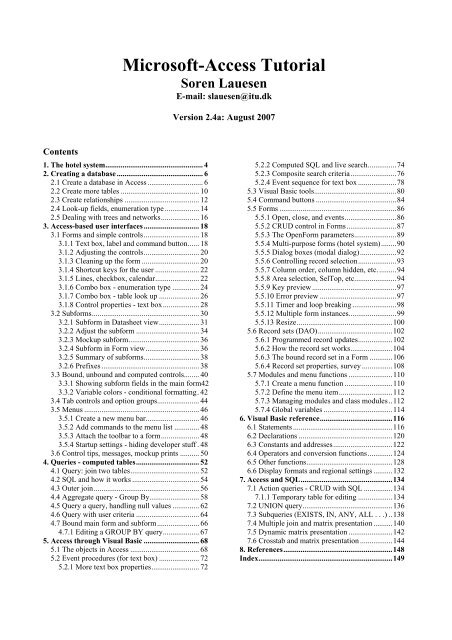
Microsoft-Access Tutorial
Microsoft-Access Tutorial
Microsoft-Access Tutorial

You also want an ePaper? Increase the reach of your titles
YUMPU automatically turns print PDFs into web optimized ePapers that Google loves.
<strong>Microsoft</strong>-<strong>Access</strong> <strong>Tutorial</strong><br />
Soren Lauesen<br />
E-mail: slauesen@itu.dk<br />
Version 2.4a: August 2007<br />
Contents<br />
1. The hotel system................................................... 4<br />
2. Creating a database ............................................. 6<br />
2.1 Create a database in <strong>Access</strong> ............................. 6<br />
2.2 Create more tables ......................................... 10<br />
2.3 Create relationships ....................................... 12<br />
2.4 Look-up fields, enumeration type.................. 14<br />
2.5 Dealing with trees and networks.................... 16<br />
3. <strong>Access</strong>-based user interfaces............................. 18<br />
3.1 Forms and simple controls............................. 18<br />
3.1.1 Text box, label and command button...... 18<br />
3.1.2 Adjusting the controls............................. 20<br />
3.1.3 Cleaning up the form .............................. 20<br />
3.1.4 Shortcut keys for the user ....................... 22<br />
3.1.5 Lines, checkbox, calendar....................... 22<br />
3.1.6 Combo box - enumeration type .............. 24<br />
3.1.7 Combo box - table look up ..................... 26<br />
3.1.8 Control properties - text box................... 28<br />
3.2 Subforms........................................................ 30<br />
3.2.1 Subform in Datasheet view..................... 31<br />
3.2.2 Adjust the subform ................................. 34<br />
3.2.3 Mockup subform..................................... 36<br />
3.2.4 Subform in Form view............................ 36<br />
3.2.5 Summary of subforms............................. 38<br />
3.2.6 Prefixes ................................................... 38<br />
3.3 Bound, unbound and computed controls........ 40<br />
3.3.1 Showing subform fields in the main form42<br />
3.3.2 Variable colors - conditional formatting. 42<br />
3.4 Tab controls and option groups...................... 44<br />
3.5 Menus ............................................................ 46<br />
3.5.1 Create a new menu bar............................ 46<br />
3.5.2 Add commands to the menu list ............. 48<br />
3.5.3 Attach the toolbar to a form.................... 48<br />
3.5.4 Startup settings - hiding developer stuff . 48<br />
3.6 Control tips, messages, mockup prints .......... 50<br />
4. Queries - computed tables................................. 52<br />
4.1 Query: join two tables.................................... 52<br />
4.2 SQL and how it works ................................... 54<br />
4.3 Outer join....................................................... 56<br />
4.4 Aggregate query - Group By.......................... 58<br />
4.5 Query a query, handling null values .............. 62<br />
4.6 Query with user criteria ................................. 64<br />
4.7 Bound main form and subform...................... 66<br />
4.7.1 Editing a GROUP BY query................... 67<br />
5. <strong>Access</strong> through Visual Basic ............................. 68<br />
5.1 The objects in <strong>Access</strong> .................................... 68<br />
5.2 Event procedures (for text box) ..................... 72<br />
5.2.1 More text box properties......................... 72<br />
5.2.2 Computed SQL and live search...............74<br />
5.2.3 Composite search criteria........................76<br />
5.2.4 Event sequence for text box ....................78<br />
5.3 Visual Basic tools...........................................80<br />
5.4 Command buttons ..........................................84<br />
5.5 Forms .............................................................86<br />
5.5.1 Open, close, and events...........................86<br />
5.5.2 CRUD control in Forms..........................87<br />
5.5.3 The OpenForm parameters......................89<br />
5.5.4 Multi-purpose forms (hotel system)........90<br />
5.5.5 Dialog boxes (modal dialog)...................92<br />
5.5.6 Controlling record selection....................93<br />
5.5.7 Column order, column hidden, etc..........94<br />
5.5.8 Area selection, SelTop, etc......................94<br />
5.5.9 Key preview ............................................97<br />
5.5.10 Error preview ........................................97<br />
5.5.11 Timer and loop breaking .......................98<br />
5.5.12 Multiple form instances.........................99<br />
5.5.13 Resize..................................................100<br />
5.6 Record sets (DAO).......................................102<br />
5.6.1 Programmed record updates..................102<br />
5.6.2 How the record set works......................104<br />
5.6.3 The bound record set in a Form ............106<br />
5.6.4 Record set properties, survey ................108<br />
5.7 Modules and menu functions .......................110<br />
5.7.1 Create a menu function .........................110<br />
5.7.2 Define the menu item............................112<br />
5.7.3 Managing modules and class modules..112<br />
5.7.4 Global variables ....................................114<br />
6. Visual Basic reference......................................116<br />
6.1 Statements ....................................................116<br />
6.2 Declarations .................................................120<br />
6.3 Constants and addresses...............................122<br />
6.4 Operators and conversion functions.............124<br />
6.5 Other functions.............................................128<br />
6.6 Display formats and regional settings ..........132<br />
7. <strong>Access</strong> and SQL................................................134<br />
7.1 Action queries - CRUD with SQL ...............134<br />
7.1.1 Temporary table for editing ..................134<br />
7.2 UNION query...............................................136<br />
7.3 Subqueries (EXISTS, IN, ANY, ALL . . .) ..138<br />
7.4 Multiple join and matrix presentation ..........140<br />
7.5 Dynamic matrix presentation .......................142<br />
7.6 Crosstab and matrix presentation .................144<br />
8. References.........................................................148<br />
Index......................................................................149
Printing instructions<br />
Print on A4 paper with 2-sided printing so that text and associated figures are on<br />
opposing pages.<br />
Version 1: October 2004.<br />
Version 2.1: November 2004. Changes:<br />
a. Restructured section 3.2 with small additions.<br />
b. Section 7.1 on action queries added.<br />
c. Small changes and additions to Chapter 6 with corresponding changes in the<br />
Reference Card.<br />
d. Index provided<br />
Version 2.2: April 2004. Changes:<br />
a. SQL HAVING introduced in section 4.2 and the example in section 4.4.<br />
b. More on aggregate functions in section 4.4.<br />
c. ColumnOrder, ColumnWidth discussed in section 5.5.7.<br />
d. Selection of an area in the datasheet is discussed in section 5.5.8.<br />
e. Section 5.7 (action queries) now moved to Chapter 7.<br />
f. Action queries, Union, Subqueries, Crosstab, etc. discussed in Chapter 7 (a new<br />
chapter).<br />
g. Various small changes and improved explanations here and there.<br />
Version 2.3: September 2006. Changes:<br />
a. <strong>Access</strong> 2003 dialog when opening a database changed (page 8).<br />
b. Look-up fields for foreign keys deleted (last part of section 2.4). <strong>Access</strong>'s<br />
automatic creation of relationships caused too much confusion.<br />
c. Combo boxes described in sections 3.1.6 and 3.1.7.<br />
d. More events explained in section 5.2.3.<br />
e. Various misprints corrected.<br />
Version 2.4: August 2007. Changes:<br />
a. Partial integrity (page 12).<br />
b. Adding a label to a control (page 20).<br />
c. DateTime Picker (page 22).<br />
d. More Null rules (page 62, 77, 124).<br />
e. <strong>Access</strong> data model and experiments improved (page 68-70).<br />
f. Composite search criteria, more computed SQL, date comparison (page 76-77).<br />
g. Event sequence for textbox: small corrections, e.g. OldValue (page 78).<br />
h. Improved area selection (page 95-96).<br />
i. Error handling, user errors (page 97-98).<br />
j. Timer and loop breaking (page 98-99).<br />
k. Managing modules and class modules (page 112).<br />
l. Error handling, VBA errors, Err object (page 117).<br />
m. Enum type (page 121).<br />
n. Partition operator (page 124).<br />
o. Week number in the Format function (page 126).<br />
p. Dynamic matrix simplified (page 136).<br />
q. Minor corrections and improvements in many places.<br />
r. Version 2.4a: Note on AutoNumber added to Figures 2.1C and 2.4.<br />
© Soren Lauesen, 2007<br />
Permission is granted to make paper copies of the file on a non-profit basis as long<br />
as the source is clearly stated.<br />
2 Preface
Preface<br />
This booklet shows how to construct a complex application<br />
in <strong>Microsoft</strong> <strong>Access</strong> (MS-<strong>Access</strong>). We assume<br />
that the user interface has been designed already as a<br />
paper-based mockup (a prototype). How to design a<br />
good user interface is a separate story explained in<br />
User Interface Design - a Software Engineering Perspective,<br />
by Soren Lauesen.<br />
After design, development continues with constructing<br />
the database, constructing the user interface, binding<br />
the user interface to the database, and finally develop<br />
the program. This is what this booklet is about.<br />
The reason we illustrate the construction process with<br />
MS-<strong>Access</strong> is that it is a widely available tool. Anybody<br />
who has <strong>Microsoft</strong> Office with MS-Word, also<br />
has <strong>Access</strong> and the programming language Visual Basic<br />
behind <strong>Access</strong>.<br />
MS-<strong>Access</strong> is also a good illustration of many principles<br />
that exist on other platforms too, for instance a relational<br />
database, a Graphical User Interface (GUI),<br />
event handling, and an object-oriented programming<br />
language. MS-<strong>Access</strong> contains all of these parts - cooperating<br />
reasonably smoothly.<br />
Organization of the booklet<br />
The chapters in the booklet are organized like this:<br />
1. An introduction to the hotel system that is used as<br />
an example throughout the booklet.<br />
2. Creating a database. Construct a database that corresponds<br />
to the data model behind the design. The<br />
user will only see the database indirectly - through<br />
the screens we construct.<br />
3. <strong>Access</strong>-based user interfaces. Construct the screens<br />
and menus that the user will see. We follow the paper-based<br />
mockup designed in User Interface Design.<br />
You can use the result as a tool-based<br />
mockup.<br />
4. Queries - computed tables. Connect the screens to<br />
the database, usually by means of queries - computed<br />
data tables. The result will be a partially<br />
functional prototype.<br />
5. <strong>Access</strong> through Visual Basic. Program what the<br />
buttons and menus will do when the user activates<br />
them. The result will be a fully functional prototype<br />
and later the final system to be delivered to the<br />
customer. The first part of the chapter is tutorial -<br />
mandatory reading if you want to work with Visual<br />
Basic and <strong>Access</strong>. The rest of the chapter is for<br />
looking up various subjects. We assume you know<br />
a bit of programming already.<br />
6. Visual Basic reference. A reference guide to the<br />
Visual Basic language for Applications (VBA).<br />
7. <strong>Access</strong> and SQL. An overview of the remaining<br />
parts of SQL, for instance how to update the<br />
database through SQL. We also explain how to<br />
generate matrices of data with dynamically changing<br />
headings.<br />
Using the booklet for teaching<br />
We have experimented with using the booklet for<br />
teaching. First we tried to present part of the material<br />
with a projector, then let the students try it out on their<br />
own, next present some more, etc. Although the<br />
students listened carefully, it turned out to be a waste<br />
of time, partly because the students worked with vastly<br />
different pace.<br />
Now we give a 15 minute introduction to the main<br />
parts of <strong>Access</strong>: the database window, the tables, the<br />
forms - and how they relate to what they have learned<br />
in user interface design. Then the students work on<br />
their own. We have instructors to help them out when<br />
they get stuck.<br />
The hotel system<br />
We have chosen to illustrate the construction process<br />
with a hotel example, because most people have an<br />
idea what it is about, yet it is sufficiently complex to<br />
show typical solutions in larger systems. Some of the<br />
complexities are that a hotel has many types of rooms<br />
at different prices; a guest can book several rooms,<br />
maybe in overlapping periods; a room may need renovation<br />
or repair, making it unavailable for a period; the<br />
hotel keeps track of regular guests and their visits over<br />
time.<br />
Simplifications<br />
However, we have simplified the system in many other<br />
ways to shorten the discussion. For instance we ignore<br />
that in most hotels, rooms are not booked by room<br />
number, but by room type; hotels usually overbook, i.e.<br />
book more rooms than they have, expecting that some<br />
customers will not turn up. We also ignore all the other<br />
aspects of operating a hotel, for instance keeping track<br />
of when rooms are cleaned and ready for the next<br />
guest, purchasing goods, planning who is to be on duty<br />
for the next weeks, payroll and general accounting. In<br />
spite of these simplifications, the example still shows<br />
the structure of larger systems.<br />
On-line resources<br />
A demo-version of the hotel system, a VBA reference<br />
card, etc. are available from the authors's web site:<br />
www.itu.dk/people/slauesen. Comments are welcome.<br />
Soren Lauesen, slauesen@itu.dk<br />
Preface 3
1. The hotel system<br />
In this booklet we illustrate MS-<strong>Access</strong> by means of a<br />
system for supporting a hotel reception. The system is<br />
used as the main example in User Interface Design - a<br />
Software Engineering Perspective, by Soren Lauesen.<br />
If you know the book, skip this section and go straight<br />
to Chapter 2.<br />
Screens<br />
The hotel system consists of the screens shown in Figure<br />
1A.<br />
Find guest. The Find guest screen allows the receptionist<br />
to find a guest or a booking in the database. The<br />
receptionist may enter part of the guest name and click<br />
the Find guest button. The system then updates the<br />
lower part of the screen to show the guests or bookings<br />
that match. The receptionist may also find the guest by<br />
his phone number, room number, or stay number (also<br />
called booking number).<br />
The receptionist can select the guest from the list and<br />
click the buttons to see details of the booking or create<br />
a new booking for the guest.<br />
Room Selection. The Room Selection screen gives an<br />
overview of available rooms in a certain period. Availability<br />
is shown as IN when the room is occupied,<br />
BOO when it is booked, etc. The receptionist may<br />
specify the period of interest and the type of room, then<br />
click the Find room button. The system updates the table<br />
at the bottom of the screen to show the rooms of<br />
interest. The receptionist can then choose a room and<br />
book it for the guest – or check a guest into the room.<br />
Stay. The Stay screen shows all the details of a booking,<br />
for instance the guest and his address, the rooms<br />
he has booked and the prices. When the guest is<br />
checked in, the Stay screen also shows breakfast and<br />
other services he has received. The system shows these<br />
details on the Services tab. Here the receptionist can<br />
Fig 1B. Tables as E/R model<br />
record services that the guest has received. The system<br />
uses the term Stay to mean a booking or a guest who<br />
has checked in.<br />
Breakfast list. The Breakfast screen shows the breakfast<br />
servings for a specific date. It handles just two<br />
kinds of breakfast: self-service breakfast in the restaurant<br />
(buffet) and breakfast served in the room. The<br />
waiter in the restaurant has a paper copy of the list and<br />
records the servings here. Later the receptionist enters<br />
the data through the Breakfast screen.<br />
Service list. The Service list shows the price for each<br />
kind of service. Hotel management uses this list to<br />
change service prices or add new kinds of service.<br />
Database<br />
The system uses a database with several tables. They<br />
are shown as an E/R data model on Figure 1B.<br />
tblGuest has a record for each guest with his address<br />
and phone number.<br />
tblStay has a record for each stay (booking or checked<br />
in) with a booking number (stay number) and the pay<br />
method.<br />
tblRoom has a record for each room in the hotel.<br />
tblRoomState has a record for each date where a room<br />
is occupied. It connects to the room occupied and the<br />
stay that occupies it. If the room is occupied for repair,<br />
it doesn’t connect to a stay.<br />
tblRoomType has a record for each type of room (room<br />
class) with a short description of the room type, the<br />
number of beds, and the prices.<br />
tblService has a record for each type of service with its<br />
name and price per unit.<br />
tblServiceReceived has a record for each delivery of<br />
service to a guest. It connects to the type of service and<br />
to the stay where the service is charged (there is an invoice<br />
for each stay).<br />
tblGuest<br />
tblStay<br />
tblServiceReceived<br />
tblServiceType<br />
tblRoomState<br />
tblRoom<br />
tblRoomType<br />
4 1. The hotel system
Fig 1A. Hotel system screens<br />
1. The hotel system 5
2. Creating a database<br />
Highlights<br />
• Transform the data model to a database in MS-<br />
<strong>Access</strong>.<br />
• Use lookup-fields to enter foreign keys and enumeration<br />
types.<br />
In this chapter you learn how to realize a data model as<br />
a relational database in <strong>Microsoft</strong> <strong>Access</strong>. We assume<br />
that you know about data modeling, tables, attributes,<br />
and foreign keys as explained in User Interface Design.<br />
The description below is based on <strong>Access</strong> 2000, but<br />
2.1 Create a database in <strong>Access</strong><br />
In <strong>Microsoft</strong> <strong>Access</strong> a database consists of one single<br />
file. The file contains all the tables of the database, the<br />
relationships (the crow's feet), queries (computed tables),<br />
forms (user windows), and many other things.<br />
As a systems developer you will design tables and user<br />
windows. As a user you will enter data into the tables<br />
(usually through user windows) and get data out of the<br />
tables, for instance through the same windows or<br />
through printed reports.<br />
In <strong>Access</strong> it is very easy to switch between the developer<br />
role and the user role. As a developer you will<br />
typically design some tables, then switch to the user<br />
role to enter data into them, then switch back to the developer<br />
role to change the design, design more tables,<br />
etc. <strong>Access</strong> can to a large extent restructure the data<br />
that already is in the database so that it matches the<br />
new table design.<br />
there are only small differences from <strong>Access</strong> 97 and<br />
<strong>Access</strong> 2003. We will mention the more important<br />
ones.<br />
In this and the following chapters we will use the hotel<br />
system as an example, and you will construct several<br />
parts of the system. However, the purpose is not to<br />
construct the hotel system, but to show how MS-<br />
<strong>Access</strong> works. This knowledge will enable you to construct<br />
a functional version of your own system - for instance<br />
the one you have designed when reading User<br />
Interface Design.<br />
Warning: Make sure you follow the steps below<br />
closely. Don't skip any of the numbered steps. The<br />
result might be that you get stuck later in the text.<br />
Create the database<br />
1. Locate the <strong>Access</strong> program. Depending on the way<br />
the system is set up, you may find it under Programs<br />
-> <strong>Microsoft</strong> <strong>Access</strong> or Programs -> <strong>Microsoft</strong><br />
Office -> <strong>Microsoft</strong> <strong>Access</strong>.<br />
2. In <strong>Access</strong> 97 and 2000: Open <strong>Access</strong> and ask for a<br />
"blank" database.<br />
In <strong>Access</strong> 2003: Open <strong>Access</strong> and click the New<br />
icon (under the File menu). Then click Blank database<br />
in the help area to the far right.<br />
3. <strong>Access</strong> now asks where to store the new database.<br />
Select the folder you want and give the database<br />
the name hotel (or hotel.mdb).<br />
The screen now shows the database window. It should<br />
look like Figure 2.1A. (In <strong>Access</strong> 97 it looks slightly<br />
Fig 2.1A The <strong>Access</strong> database window<br />
One <strong>Access</strong> database = one file.<br />
File name = hotel.mdb<br />
Use the table.<br />
Shortcut: Enter<br />
Design the table.<br />
Shortcut: Ctrl+Enter<br />
Create a<br />
table<br />
The database window:<br />
List of tables<br />
(empty initially)<br />
6 2. Creating a database
Fig 2.1B Define a table (design view)<br />
Table name. <strong>Access</strong> asks for it the<br />
first time you close the window.<br />
Primary key.<br />
Right click<br />
One line<br />
per field<br />
Possible<br />
data types<br />
Field properties.<br />
Also use F1 - Help.<br />
different). We have selected the Tables tab, but there<br />
are no tables or other things in the database as yet.<br />
However, you see three icons that can create tables for<br />
you. When you have created a table, it will appear in<br />
the table window and you can then Open it and enter<br />
data into it, or you can Design it, i.e. change the definition<br />
of it. (In <strong>Access</strong> 97 the database window looks<br />
like a traditional tab form. There are no create-icons,<br />
but function buttons for the same purpose.)<br />
Define a table<br />
4. Double click on Create table in Design view.<br />
Now you get a window as shown on Figure 2.1B. Here<br />
you define the fields (attributes) of the table. The list of<br />
fields runs downwards with one line per field. Initially<br />
there are only empty lines. The table hasn't got a name<br />
yet. <strong>Access</strong> asks for the name when you close the window.<br />
The figure shows the finished guest table. You see the<br />
field names to the left. In the middle column is the type<br />
of the field - Data Type. The figure shows all the possible<br />
types as a combo box. The most important data<br />
types are Text, Number, Date/Time, and AutoNumber.<br />
An AutoNumber is a counter that <strong>Access</strong> increases for<br />
each new record, so that it serves as a unique key. The<br />
value is a Long Integer (32-bit integer). We explain<br />
more about data types in the next section.<br />
5. Fill in all the field lines according to the attributes<br />
in the guest table (see the figure). All the fields are<br />
of type Text, except the guestID which is of type<br />
AutoNumber.<br />
Note that although we say phone number and passport<br />
number, these fields are texts because the "numbers"<br />
contain parentheses, dashes and maybe letters.<br />
When you have chosen a data type, you can choose a<br />
number of other field properties. They are in the lower<br />
part of the window. On the figure you can see that the<br />
name field is a text field with space for 50 characters.<br />
You can also see that the user doesn't have to enter<br />
anything in the name field (Required=No). You should<br />
change this to Yes since it doesn't make sense to have a<br />
guest without a name.<br />
Try to use <strong>Access</strong>'s help to find more information about<br />
the data types and their properties. For instance, put the<br />
cursor in the Data Type of a field and click F1. Or<br />
point at one of the properties and click F1.<br />
Lookup Wizard is not a field type. If you select Lookup<br />
Wizard, it makes the field into a combo box where the<br />
user can select a value instead of typing it into the<br />
field. We will look closer at Lookup in section 2.4.<br />
Key fields<br />
Often you have to define a key field so that other tables<br />
can refer to this one. In our case, guestID must be the<br />
key field:<br />
6. Right-click somewhere in the guestID line. Then<br />
select Primary Key. <strong>Access</strong> now shows that the<br />
field is the key.<br />
2. Creating a database 7
You can remove the key property again by once more<br />
selecting Primary Key. If the key consists of more than<br />
one field, you first select all the fields by clicking on<br />
their left-hand marker with Ctrl down. Then select<br />
Primary Key by right-clicking inside one of the field<br />
lines.<br />
7. Close the window. <strong>Access</strong> asks you for the name<br />
of the table. Call it tblGuest. (The prefix tbl will<br />
help you remember that it is a table. As the system<br />
grows, there will be guest windows, guest buttons<br />
and many other things. Without discipline on your<br />
part, it becomes a mess.)<br />
If you have not defined a primary key, <strong>Access</strong> will<br />
warn you and suggest that it makes one for you. Don't<br />
let it - do it yourself. Or at least check what <strong>Access</strong><br />
makes in its excessive helpfulness.<br />
Enter data<br />
After these efforts, it is time to record some guests.<br />
Fortunately it is easy:<br />
8. Select the guest table in the database window.<br />
Click Open or just use Enter.<br />
Now the system shows the table in user mode (Datasheet<br />
view) so that you can enter guest data.<br />
9. Enter the guests shown on Figure 2.1C. You add a<br />
new guest in the empty line of the table - the one<br />
marked with a star. Notice that as soon you start<br />
entering something, the record indicator changes to<br />
a pencil and a new star line appears. The pencil<br />
shows that you are editing the record, and the<br />
record you see is not yet in the database.<br />
On Figure 2.1C we originally entered a guest that got<br />
guestID 4, later deleted this guest. <strong>Access</strong> will never<br />
reuse number 4 for a guest.<br />
Close and reopen the database<br />
To feel confident with <strong>Access</strong>, it is a good idea to close<br />
and open the database now.<br />
10. Close the large <strong>Access</strong> window. (Not the small<br />
database window inside the <strong>Access</strong> window.)<br />
Notice that <strong>Access</strong> doesn't ask whether you want to<br />
save changes. <strong>Access</strong> saves them all along, for instance<br />
when you define a table or when you enter a record in<br />
the table.<br />
11. Find your database file (hotel.mdb) in the file folders.<br />
Use Enter or double click to open it.<br />
<strong>Access</strong> 2003 is very security concerned and asks you<br />
several questions when you open the file. The dialog<br />
may vary from one installation to another, but is<br />
something like this:<br />
12. The file may not be safe. Do you want to open it?<br />
Your database is safe, so answer Open.<br />
13. Unsafe expressions are not blocked. Do you want<br />
to block them? You want full freedom, so answer<br />
No.<br />
14. <strong>Access</strong> warns you one more time whether you<br />
want to open. Say Open or Yes. (In some versions<br />
the question is a very long text box, and you<br />
cannot understand it. Say yes anyway.)<br />
As an alternative, you may say yes to blocking the<br />
unsafe expressions. This will save you some questions<br />
when you open the file in the future. However, some<br />
installations don't allow you to block expressions.<br />
Note that <strong>Access</strong> 2003 shows that your database is in<br />
<strong>Access</strong> 2000 format. This is all right. It allows you to<br />
use it also from <strong>Access</strong> 2000. You can convert it to<br />
other formats with Tools -> Database Utilities -> Convert<br />
Database.<br />
Undo. Use Esc to undo the changes you have made to<br />
the current record.<br />
• The first Esc undoes changes to the field where the<br />
cursor is.<br />
• The second Esc undoes all changes to the record<br />
where the cursor is.<br />
As soon as you move the cursor to the next line,<br />
<strong>Access</strong> stores the record in the database and you cannot<br />
make an automatic undo anymore. However, you can<br />
manually edit the stored record. Notice that the pencil<br />
disappears when the record is stored in the database.<br />
Shortcut keys for data entry<br />
F2: Toggles between selecting the entire field and selecting<br />
a data entry point.<br />
Shift+F2: Opens a small window with space for the<br />
entire field. Useful for entering long texts into a<br />
field that is shown only partly in the table. However,<br />
the text cannot be longer than you specified in<br />
the table definition.<br />
Alt+ArrowDown: Opens a combo box. Choose with<br />
the arrows and Enter.<br />
Shortcut keys for navigation<br />
Tab and Shift+Tab: Moves from field to field.<br />
Ctrl+Tab: Moves from one tab form to the next, for instance<br />
in the lower part of the table definition window.<br />
F6: Moves between upper and lower section of a window,<br />
for instance in the table definition window.<br />
Ctrl+Enter: Opens the table in design mode (in the database<br />
window).<br />
See also shortcuts on the reference card<br />
8 2. Creating a database
Fig 2.1C Enter data in user mode (datasheet view)<br />
In database window:<br />
Select table -> Open (or Enter)<br />
AutoNumber: You get<br />
1, 2, 3, 4. Don't worry<br />
that it is different<br />
from the figure.<br />
Record<br />
selector<br />
Add<br />
record<br />
F2 to select entire field<br />
Shift+F2 to see field in a separate window<br />
Edit<br />
indicator<br />
Esc to undo.<br />
First Esc: Undo field change<br />
Second: Undo record changes<br />
2. Creating a database 9
2.2 Create more tables<br />
You should now create the remaining tables for the<br />
hotel. The data model on Figure 2.2 shows the tables<br />
we will use. To simplify your job, we have shown all<br />
the keys, including the foreign keys and the artificial<br />
keys.<br />
1. Close the guest table.<br />
2. Create all the remaining tables in the same way as<br />
you created the guest table (from the Tables tab<br />
use Create table in Design view - or click New).<br />
Make sure you define all the fields. Otherwise you will<br />
get stuck when later constructing the user interface.<br />
Here are a few notes about the various tables:<br />
tblStay:<br />
stayID is the primary key of tblStay. Make it an Auto-<br />
Number.<br />
guestID is a foreign key that refers to the AutoNumber<br />
in tblGuest. The foreign key must have a matching<br />
data type - a long integer. Choose Data Type =<br />
Number and Field Size = Long Integer. Warning:<br />
Don't make the foreign key an AutoNumber. This<br />
would cause <strong>Access</strong> to fill in the foreign key fields<br />
automatically, and you cannot change the numbers<br />
so that they point to the primary keys in the guest<br />
table.<br />
paymethod is an enumeration type. Make it an integer<br />
(a 16-bit integer, not a long integer). Choose Data<br />
Type = Number and Field Size= Integer. We will<br />
use the value 1 to denote Cash, the value 2 to denote<br />
Visa, etc. We will look closer at this in section<br />
2.4.<br />
state must also be an enumeration type. Make it an integer.<br />
Here the value 1 will denote booked, 2 in, etc.<br />
tblRoomType:<br />
Contains one record for each type of room, for instance<br />
one for double rooms, one for single rooms, etc. (In the<br />
book User Interface Design, we added this table late in<br />
the design process to illustrate the normalization concept.)<br />
roomType is an artificial key. An AutoNumber is okay.<br />
description is a short text, for instance "double room,<br />
bath".<br />
bedCount is the number of beds in the room, including<br />
temporary beds.<br />
price1 and price2 are the standard price and a possible<br />
discount price. The price should be a decimal number.<br />
Choose Data Type=Number, Field Size= Single,<br />
Decimal Places =2.<br />
tblRoom:<br />
roomID is a natural key - the number on the door. So<br />
don't use an AutoNumber. Use an integer.<br />
roomType is a foreign key that refers to tblRoomType.<br />
(You should by know how to deal with it.)<br />
tblRoomState:<br />
stayID and roomID are foreign keys. Ensure their types<br />
match what they refer to. Notice that roomID refers<br />
to a natural key, not to an AutoNumber.<br />
date should be a Date/Time field with Format = Short<br />
Date.<br />
personCount is the number of persons staying in the<br />
room. An integer should suffice.<br />
state is similar to state for tblStay, although the values<br />
are slightly different.<br />
The key consists of two fields: roomID and date. It is a<br />
bit tricky to specify this: select both fields by<br />
clicking on the left-hand marker (hold down Ctrl<br />
while selecting the second field). Then right-click<br />
somewhere on the text inside the line.<br />
Optional tables<br />
The following two tables are needed for the full system.<br />
However, you don't need to create them in order<br />
to follow the tutorial.<br />
tblServiceType:<br />
serviceID is an artificial key. Should be an Auto-<br />
Number.<br />
name and price should be obvious. The price should be<br />
a decimal number. Choose Data Type=Number,<br />
Field Size= Single, Decimal Places =2.<br />
tblServiceReceived:<br />
stayID and serviceID are foreign keys that refer to<br />
AutoNumbers. The foreign keys must thus be long<br />
integers.<br />
roomID is an optional reference to a room. An integer<br />
should suffice. (This reference is needed when a<br />
waiter records a service for a specific room and the<br />
guest has more than one room.)<br />
date should be a Date/Time field. Choose Format =<br />
Short Date.<br />
quantity is the number of items the guest has got - an<br />
integer should suffice.<br />
Data types<br />
Data is stored in the computer according to its type.<br />
Here is a description of the most important types in the<br />
data base. Visual Basic deals with almost the same<br />
types (see section 6.2 and the reference card under<br />
Declarations).<br />
Text. The field can contain any characters. The Field<br />
Size property defines the maximum number of characters.<br />
The maximum cannot be above 255 characters.<br />
Memo. Like a text field, but the maximum number of<br />
characters is 65,535. <strong>Access</strong> takes more time to process<br />
a memo field, so use text fields if adequate.<br />
Number. The field can contain a number. The Field<br />
Size property defines what kind of number:<br />
10 2. Creating a database
• Integer. A small integer. It must be in the range -<br />
32,768 to +32,767 (a 16-bit integer).<br />
• Long Integer. It must be in the range from around<br />
-2,140 million to +2,140 million (a 32-bit integer).<br />
• Single. A decimal number in the range from<br />
-3.4*10 38 to +3.4*10 38 with an accuracy of 6 or 7<br />
significant digits (a 32-bit floating point number).<br />
• Double. A decimal number in the range from<br />
-1.8*10 308 to +1.8*10 308 with 14 significant digits<br />
(a 64-bit floating point number).<br />
• Decimal. A very long integer with a decimal point<br />
placed somewhere. Intended for monetary calculations<br />
where rounding must be strictly controlled.<br />
In the book we use Single or Double instead.<br />
Numbers can be shown in many ways depending on the<br />
format property of the field. You may for instance<br />
show them with a fixed number of decimals, with a<br />
currency symbol, etc.<br />
Some formats show data in a way that depends on the<br />
regional settings of the computer. If you for instance<br />
specify the format of a number as Currency, the<br />
number will show with a $ on a US computer and with<br />
a £ on a British computer.<br />
Date/Time. The field gives a point in time. In the<br />
computer it is stored as the number of days since<br />
30/12-1899 at 0:00. It is really a Double number, so the<br />
number of days may include a fraction of a day. In this<br />
way the field specifies the date as well as the time with<br />
high precision. As an example, the number 1 corresponds<br />
to 31/12-1899 at 0:00, the number 1.75 to<br />
31/12-1899 at 18:00 (6 PM).<br />
Usually we don't show a date field as a number, but as<br />
a date and/or a time. The format property specifies this.<br />
Also here you can choose a format that adapts to the<br />
regional setting.<br />
Yes/No. The field contains a Boolean value shown<br />
either as Yes/No, True/False, or On/Off. The format<br />
property specifies this.<br />
AutoNumber. The field is a long integer (32 bits) that<br />
<strong>Access</strong> generates itself as a unique number in the table.<br />
<strong>Access</strong> numbers the records 1, 2, . . . as you enter the<br />
records. However, you cannot trust that the sequence is<br />
unbroken. For instance when you add a record and<br />
undo the addition before having completed it, <strong>Access</strong><br />
uses the next number in the sequence anyway.<br />
A foreign key is a field (or several fields) that refer to<br />
something unique in another table - usually the primary<br />
key. Be careful here. The foreign key and the primary<br />
key must have the same type. However, when the<br />
primary key is an AutoNumber, the foreign key must<br />
be a long integer.<br />
Changing a data type. <strong>Access</strong> is quite liberal with<br />
changing a data type to something else - even if there<br />
are data in the records. It can also change an Auto-<br />
Number field to a number field, but not the other way<br />
around. If you need to change field B to an Auto-<br />
Number, create a new field C and make it an Auto-<br />
Number. Then delete field B and rename field C to B.<br />
If you for some reason want to store a record with an<br />
AutoNumber of your own choice (for instance create a<br />
stay with stayID=728), you need to append the record<br />
with an INSERT query (see section 7.1). You cannot<br />
just type in the stayID.<br />
Fig 2.2 Create remaining tables<br />
Optional tables<br />
guestID, name, address1,<br />
address2, address3,<br />
phone, passport<br />
tblGuest<br />
stayID, serviceID,<br />
roomID, date, quantity<br />
serviceID, name, price<br />
stayID, guestID,<br />
paymethod (cash | visa ...),<br />
state (booked | in |out | canceled)<br />
stayID, roomID,<br />
date, personCount,<br />
state (booked | occupied | repair)<br />
tblStay<br />
tblRoomState<br />
tblServiceReceived<br />
tblServiceType<br />
roomID, roomType<br />
tblRoom<br />
tblRoomType<br />
roomType, description<br />
bedCount, price1, price2<br />
2. Creating a database 11
2.3 Create relationships<br />
When we have several tables, we can make relationships<br />
(crow's feet). Then we get an E/R model instead<br />
of a simple collection of tables. The relationships allow<br />
<strong>Access</strong> to help us retrieve data across tables, check referential<br />
integrity, etc.<br />
Figure 2.3 shows the hotel relationships in <strong>Access</strong>. It<br />
resembles the crow's feet model quite well. You define<br />
the relationships in this way:<br />
1. Start in the database window and right-click<br />
somewhere.<br />
2. Choose Relationships.<br />
Now you see an empty Relationship Window. You<br />
have to tell <strong>Access</strong> which tables to show here. Sometimes<br />
a Show Table window pops up by itself. Otherwise<br />
you have to invoke it with a right-click in the relationship<br />
window.<br />
3. In the Show Table window, select the tables you<br />
want to include. In the hotel system it is all the tables.<br />
4. Click Add and close the window. Now the tables<br />
should be in the relationship window.<br />
5. Create the relationship between tblGuest and<br />
tblStay by dragging guestID from one table to<br />
guestID in the other.<br />
6. An edit-relationship window pops up. If not, rightclick<br />
on the relationship connector and choose the<br />
edit window.<br />
<strong>Access</strong> may complain:<br />
Relationships must be on the same number of fields<br />
with the same data types.<br />
The cause is often that one end of the connector is an<br />
AutoNumber and the other end a simple integer. It<br />
must be a long integer to match the AutoNumber.<br />
In the edit-relationship window, you can specify<br />
foreign keys that consist of several fields. You can also<br />
specify that the relationship has referential integrity, so<br />
that all records on the m-side point to a record on the 1-<br />
side.<br />
7. In our case, all stays must point to a guest, so mark<br />
the connector enforce referential integrity. (If<br />
<strong>Access</strong> refuses this, it is most likely because you<br />
have not defined the foreign key as a long integer.)<br />
8. Close the relationship window. The relationship<br />
connector now appears in the window between the<br />
foreign key and its target.<br />
The referential integrity makes <strong>Access</strong> show the connector<br />
as 1-∞ (1:m). Based on referential integrity and<br />
whether the connected fields are primary keys, <strong>Access</strong><br />
may also decide that it is a 1:1 relationship. It is not<br />
important what <strong>Access</strong> decides in these matters. You<br />
can later tell it otherwise when you want to use the<br />
connector.<br />
9. Create the remaining relationships too. Note that<br />
there is no referential integrity between tblStay and<br />
tblRoomState. It is on purpose - if the room is in<br />
repair state there is no connected stay.<br />
Partial integrity. <strong>Access</strong> provides a more relaxed<br />
version of referential integrity. It allows the foreign key<br />
to be either empty (Null) or point to a record on the 1-<br />
side. This is the case for the relationship between<br />
tblStay and tblRoomState. Give it partial integrity in<br />
this way:<br />
10. Open tblRoomState in design view. For stayID<br />
(the foreign key) set the Default Value to empty<br />
(delete all characters in the field). Also set<br />
Required to No.<br />
11. In the relationship window, right-click on the<br />
connector and choose the edit window. Select<br />
enforce referential integrity.<br />
Note that you cannot see in the relationship window<br />
whether the relationship has full or partial referential<br />
integrity.<br />
Deleting a relationship. If you need to delete a relationship,<br />
click it and press Del.<br />
12 2. Creating a database
Fig 2.3 Create relationships<br />
Right-click in database window.<br />
Select Relationships<br />
Choose tables to show<br />
in the ER diagram<br />
Right-click in ER diagram.<br />
Select Show Table<br />
Foreign key<br />
Primary key<br />
Create a relationship:<br />
Drag 1-side field to m-side field (or opposite).<br />
Edit the relationship - Referential integrity!<br />
2. Creating a database 13
2.4 Look-up fields, enumeration type<br />
Your next task will be to fill in some data in all the tables.<br />
However, some of the fields are cumbersome to<br />
fill in correctly. As an example, the pay method field is<br />
a code where 1 means Cash, 2 Visa, etc. The user<br />
should not have to remember these codes, so we will<br />
let the user choose the value from a list. It is an<br />
enumeration-type field:<br />
paymethod(Cash | Visa | . . . )<br />
Figure 2.4 shows what we want when the user fills in<br />
the paymethod field. We want the field to be a combo<br />
box where the user can select the mnemonic text while<br />
<strong>Access</strong> stores the number code. Here is how to do it:<br />
1. Open tblStay in design view. (Select it and click<br />
Design or use Ctrl+Enter).<br />
2. Select the paymethod field and the data type<br />
Lookup Wizard.<br />
3. <strong>Access</strong> asks whether you (as a user) want to select<br />
the values from a table or from a list of values that<br />
you (as a designer) type in. Choose to type them<br />
in. Then click Next.<br />
4. <strong>Access</strong> asks how many columns your combo box<br />
should have. Choose two and fill in the columns as<br />
shown on the figure. Then click Next.<br />
5. <strong>Access</strong> asks which column holds the value to store<br />
in the table. In our case it is column 1.<br />
6. Finally, <strong>Access</strong> asks for the column name that the<br />
user will see. In our case, paymethod is okay.<br />
Click Finish.<br />
Fill in some stay records<br />
You are now going to create some stay records and<br />
connect them to a guest.<br />
7. Close the table design window and open it in user<br />
mode.<br />
8. Also open tblGuest in user mode. Keep the two<br />
tables side by side so you can see both. Make sure<br />
you have created some guests. Otherwise do it<br />
now.<br />
9. Fill in a stay record using the combo box for<br />
paymethod. Notice that what you see as a designer,<br />
is the number stored in the database. The user<br />
should not see the number, but the text. We can<br />
arrange for this when the field becomes a text box<br />
in the user window (see section 3.2.2).<br />
10. Also fill in the foreign key guestID so that it refers<br />
to one of the guests. Since there is referential<br />
integrity, <strong>Access</strong> won't let you store the stay record<br />
without a proper guestID. If you get into real<br />
trouble, use Esc twice (see the Panic box for the<br />
explanation).<br />
11. Fill in a few more stay records in the same way.<br />
How the look-up field works<br />
Open tblStay in design mode and study the Lookup tab<br />
for paymethod (bottom of Figure 2.4). The display<br />
control property is Combo Box. It means that when the<br />
user is to fill in the paymethod, he sees a combo box.<br />
• For ordinary fields Display Control is Text Box. A<br />
text box shows texts, numbers, etc. as a string of<br />
characters. If you want to change the field back to<br />
an ordinary field, just set Display Control to Text<br />
Box.<br />
The values the user can choose between are listed in<br />
Row Source. You may edit the values here. Column<br />
Count shows that these values are to be displayed as<br />
two columns. Notice that Limit to List is No. It means<br />
that the user can enter other values than those in the<br />
list. In our case, it is not desirable, so set the property<br />
to Yes. Sections 3.1.6 and 3.1.7 explain more about<br />
combo boxes.<br />
Undo the Lookup Wizard?<br />
How do you make the field an ordinary field rather<br />
than a lookup field? It doesn't help to make it an integer<br />
or a text. Choose the Lookup tab at the bottom of the<br />
table design window. Change Display Control to Text<br />
Box. (See bottom of Figure 2.4.)<br />
Panic? Undo data entry<br />
When you enter data into the tables, <strong>Access</strong> checks<br />
against the rules you have defined for the tables and the<br />
relationships. For instance, when you enter the guestID<br />
in tblStay, this ID must correspond to a guest in the<br />
guest table. <strong>Access</strong> doesn't allow you to leave the<br />
record before this is fixed. The reason is that <strong>Access</strong><br />
stores the record in the database as soon as you move<br />
the cursor away from the record. And the database<br />
must meet all the rules you have stated.<br />
Sometimes you may not know what to type to satisfy<br />
<strong>Access</strong>, and on the other hand you cannot leave the record<br />
to look at what to type. Many users panic here and<br />
even switch off the power to close down the system.<br />
The solution is to use Esc twice:<br />
• First Esc: Undoes the correction you made in the<br />
field where the cursor is.<br />
• Second Esc: Undoes all the changes you made to<br />
the record where the cursor is. This means that the<br />
database returns to a consistent state where all the<br />
rules are met.<br />
14 2. Creating a database
Fig 2.4 Look-up fields, enumeration type<br />
Desired result<br />
How?<br />
AutoNumber: You get<br />
1, 2, 3, 4. Don't worry.<br />
Table in design mode:<br />
Select Paymethod -><br />
Data Type -> Lookup Wizard<br />
What to store<br />
in the table<br />
The values the<br />
user sees<br />
To undo the Wizard:<br />
Change to Text Box<br />
Possible values<br />
User may enter<br />
anything.<br />
Should be Yes?<br />
Populate the database<br />
12. Define the other enumeration fields as lookup<br />
fields in the same way (the state fields in tblStay<br />
and tblRoomState).<br />
13. Fill in some realistic data in all the tables. You<br />
may for instance use data corresponding to the<br />
situation in Figure 1A. Now you have test data for<br />
the rest of the booklet.<br />
Important: Compact the database<br />
<strong>Access</strong> is very liberate with disk space and when you<br />
change things, it consumes new blocks on the disk.<br />
You may soon find that a simple little database uses<br />
several megabytes. Fortunately, <strong>Access</strong> can compact<br />
the database. Do that every now and then in this way:<br />
14. Select Tools->Database Utilities->Compact and<br />
Repair Database. That is all. You may check that<br />
the file length actually became much smaller. (In<br />
<strong>Access</strong> 97, the Compact and the Repair utilities are<br />
separate.)<br />
2. Creating a database 15
2.5 Dealing with trees and networks<br />
E/R models can neatly describe complex relationships,<br />
for instance as we saw it for the flight routes in User<br />
Interface Design. Figure 2.5 shows the E/R model, but<br />
<strong>Access</strong> cannot show such a model directly.<br />
The problem is that <strong>Access</strong> identifies a relationship by<br />
means of the two tables it connects. This means that<br />
<strong>Access</strong> cannot have two connectors between the same<br />
two tables. Also you cannot have a self-referential connector.<br />
In the flight route model we need both of these.<br />
As a compensation, <strong>Access</strong> offers shadow copies of a<br />
table. The table and its shadow copies are the same table,<br />
but they have different names. You can now create<br />
connectors to the shadow copies and thus indirectly<br />
create multiple connectors between the same two tables.<br />
Figure 2.5 shows how to handle the flight routes in<br />
<strong>Access</strong> by means of shadow copies.<br />
1. Create a new database, FlightRoutes. Create the<br />
tables City, Leg and Route in the usual way.<br />
2. Open the relationship window and add all three tables<br />
to the relationship window. Then add City and<br />
Leg once more. The relationship window should<br />
now contain also a City_1 and a Leg_1 as shown<br />
on the figure.<br />
3. Drag the connectors as shown. You now have two<br />
connectors between City and Leg. One is determined<br />
by City and the foreign key from. The other<br />
is determined by City_1 and the foreign key to.<br />
You also have a self-referential connector from<br />
Leg to itself. It is determined by Leg_1 and the<br />
foreign key next.<br />
4. Try to fill in data for AA331 according to the figure.<br />
Note that there are only one City table and one<br />
Leg table to fill in. The shadow tables are not real<br />
tables.<br />
16 2. Creating a database
Fig 2.5 Flight routes - shadow tables<br />
cityID, name<br />
from<br />
City<br />
to<br />
Route<br />
Leg<br />
next<br />
routeID, mon, tue,<br />
wed, thu, fri, sat, sun<br />
legID,<br />
route, next, from, to<br />
deptTime, arrTime,<br />
Route: AA331. Mon, Wed<br />
Arr Dep<br />
Chicago 10:45<br />
Columbus 11:40 12:20<br />
Washington 13:30 14:15<br />
New York 15:10<br />
A leg<br />
Right-click -> Show table.<br />
Show City once more.<br />
Two relationships between City<br />
and Leg: Shadow copy of City.<br />
Relationship between Leg and<br />
Leg: Shadow copy of Leg.<br />
2. Creating a database 17
3. <strong>Access</strong>-based user interfaces<br />
Highlights<br />
• Construct user windows (Forms).<br />
• Add fields, sub-windows, etc. (Controls).<br />
• Construct menus and other details.<br />
An <strong>Access</strong>-based user interface consists of user windows<br />
(called Forms in <strong>Access</strong>) , menus, and all the<br />
little things such as error messages (message boxes)<br />
and pop up help when the cursor rests on a field<br />
3.1 Forms and simple controls<br />
In this section we will gradually implement the<br />
mockup window you see in Figure 3.1A. This window<br />
helps the receptionist find a guest or a booking in the<br />
database. Large hotels may have more than 100,000<br />
guests in the database.<br />
In the <strong>Access</strong> world, the window consists of a Form<br />
with various Controls on it. A control may be a simple<br />
field such as Last name, a button such as Find guest, an<br />
area for a list of records such as the list of stays, and<br />
several other things.<br />
Let us get started:<br />
1. Start in the database window, click the Forms tab,<br />
and select Create form in Design view.<br />
You now get an empty form in design mode, looking<br />
somewhat like the one at the bottom of the figure. We<br />
will put some of the controls on this form in a moment.<br />
In order to align the controls nicely, it is best to show a<br />
visible grid of dots on the form:<br />
2. The property box for the form should be open. If<br />
not, double click on the anonymous little square on<br />
the form - where the rulers meet.<br />
3. Set the grid dots. The form has a grid of lines.<br />
They may be spaced as on the figure - a one-cm<br />
grid. Or with larger cells - a one-inch grid. We also<br />
want to see the grid dots. Look at the Format tab<br />
and find the Grid X and Grid Y properties. (They<br />
are far down the list - you may have to scroll down<br />
to them). For a one-cm grid, set Grid X=5 and<br />
Grid Y=5. For a one-inch grid set Grid X=12 and<br />
Grid Y=12. Move the cursor to another property to<br />
make the changes take effect. You should now see<br />
a grid of dots as on the figure.<br />
(control tips). These are the things the user sees on the<br />
screen. <strong>Access</strong> provides a lot of built-in functionality<br />
that makes the user interface respond to user actions.<br />
However, for a real system the built-in functionality is<br />
rarely sufficient, and you will have to add your own<br />
program pieces written in Visual Basic.<br />
In this chapter we look only at what the user sees on<br />
the screen. We hardly put real data into the fields. What<br />
we are after is a tool-based mockup. Later we will add<br />
real data and functionality to the screens.<br />
3.1.1 Text box, label and command button<br />
4. The screen should show a toolbox window where<br />
you can choose between various controls (bottom<br />
left on the figure). If it doesn't, use View -><br />
Toolbox to see it.<br />
5. Click the Text Box tool that looks like ab| and then<br />
draw the white part of the field Last name. Draw it<br />
so that it is two grid units high and about ten units<br />
wide.<br />
At this stage, don't worry if your controls are not properly<br />
aligned and sized. We explain about these details<br />
below. To delete a control, select it and click Del. Or<br />
use Esc to undo the last thing you made.<br />
6. <strong>Access</strong> has automatically added a label part to the<br />
left of the field. Click it and change the label for<br />
the control to Last name:<br />
7. Draw the two next text boxes as shown on the figure<br />
(Street and Phone). If you double click the text<br />
box icon in the toolbox, the draw tool remains selected<br />
so that you can draw many text boxes.<br />
(Click Esc to get rid of it.)<br />
8. Also draw a spare text box for later experiments<br />
(Text 6 on the figure).<br />
9. Now make sure the Wizard button is off at the top<br />
of the toolbox.<br />
10. Select the Command Button tool and draw the New<br />
guest button. Make it three grid units high to allow<br />
space for the text on the button. Click on the text<br />
in the box to change it.<br />
If you have the Wizard button on, <strong>Access</strong> will try to<br />
make the button do something. (Our mockup has<br />
nothing to do, so don't use the Wizard.)<br />
In general, two grid units are a good height for a text<br />
box and three units are suited for a command button.<br />
18 3. <strong>Access</strong>-based user interfaces
Fig 3.1A Create a Form - a user window<br />
The Form<br />
Controls<br />
Wanted:<br />
Tool-based<br />
mockup<br />
The Forms<br />
(user windows)<br />
of the database<br />
Create a Form<br />
List of forms<br />
(empty initially)<br />
Property box for<br />
the Form.<br />
Click for<br />
Form<br />
properties<br />
Toolbox:<br />
Click Text Box control.<br />
Draw a box on the Form.<br />
Set grid size to<br />
5 units per cm .<br />
3. <strong>Access</strong>-based user interfaces 19
Using the fields<br />
You may wonder why <strong>Access</strong> writes unbound inside<br />
all the boxes. It means that the box is not bound to any<br />
record in the database. The user may enter something<br />
but it is not automatically stored in the database. Try<br />
this:<br />
11. Close the form. <strong>Access</strong> asks for its name. Call it<br />
frmFindStay. (We use the prefix frm for forms.)<br />
12. Open it again in user mode. It should now look<br />
like the bottom of Figure 3.1B. This is how the<br />
user would see the form.<br />
13. Try to enter something in the fields. It stays on the<br />
screen, but is it persistent data?<br />
14. Close the form and open it again (in user mode).<br />
All the fields are blank - no data was saved. It was<br />
just dialog data - not persistent data. Click the<br />
command button - nothing happens. It is just a<br />
mockup we have made. (In the next chapters we<br />
will add real data and functionality.)<br />
3.1.2 Adjusting the controls<br />
1. Close the form and open it in design mode. Select<br />
one of the text boxes. Notice the two black handles,<br />
one on the label part and one on the text box.<br />
2. Moving and sizing. Point the mouse at the label<br />
handle. The cursor changes to a finger. Try to drag<br />
the label part around. The text box itself doesn't<br />
move. Point at the text box handle and use the finger<br />
to drag it around.<br />
3. Point at the border of the text box. The cursor<br />
changes to a hand. Drag it - both label and text box<br />
should move.<br />
4. Point at one of the sizing handles in the corners or<br />
on the middle of a side. Drag here and the box<br />
changes size.<br />
5. Deleting a control. Click on the text box and click<br />
Delete. Oops - both box and label disappeared!<br />
Undo it using the Undo button or Ctrl+Z.<br />
6. Click on the label part. Notice that now the sizing<br />
handles are on the label part. Click Delete. The label<br />
part disappears.<br />
If you want a label without the text box, select the label<br />
tool from the toolbox and draw a label control.<br />
If you want to add a label to a label-less text box, select<br />
some label, copy it (Ctrl+C), select the text box and<br />
paste the label (Ctrl+V).<br />
7. Moving and sizing with the keyboard. Select a<br />
control, then try moving it around with Ctrl+up,<br />
Ctrl+down, etc. Try moving it with Shift+up, etc.<br />
Now it changes size. This is one way to fine-tune<br />
the positions and sizes. There is no way to enlarge<br />
the picture as you can do in Word and many other<br />
programs.<br />
8. Select several controls at the same time. Either<br />
hold Shift down while clicking on the controls one<br />
by one, or drag a rectangle around them. (All controls<br />
touching the rectangle will be selected.) Now<br />
try to move and resize the controls with the keyboard,<br />
or drag them with the mouse.<br />
9. Undo. You can undo your last operation with the<br />
Undo button or Ctrl+Z. But only the last! You can<br />
undo all changes since you last opened the form by<br />
closing the form and saying No to saving the<br />
changes. Try it now - you don't want to save the<br />
last adjustments.<br />
Make sure you see all menu items<br />
<strong>Access</strong> 2000 and 2003 have an annoying feature where<br />
it shows only the last menu items you have used. It<br />
makes it difficult to follow the procedures below. Get<br />
rid of this feature:<br />
10. Right-click anywhere in the menus. Select Customize->Options.<br />
<strong>Access</strong> 2000: Look at the<br />
checkbox "Menus show recently used commands<br />
first". Make sure that there is no check mark here.<br />
<strong>Access</strong> 2003: Look at the checkbox "Always show<br />
full menus". Make sure there is check mark here.<br />
The Format menu and the grid<br />
Open the form in design mode and select a control.<br />
Now look at the Format menu at the top of the <strong>Access</strong><br />
window. There are several things here that can help<br />
you design the form:<br />
• Snap to Grid. If you check this box, all controls<br />
you draw or move with the mouse will snap to the<br />
grid in all four corners. If the grid points are<br />
closely spaced - more than 9 per cm - <strong>Access</strong><br />
doesn't show the grid, but snaps to it anyway.<br />
• Align. You can align the selected controls to the<br />
left, right, etc. or you can align them to the grid.<br />
Only their top-left point is aligned. They don't<br />
change size.<br />
• Size. You can change the size of the selected controls<br />
so that they just fit the data in the control<br />
(matching the chosen font size). Or you can make<br />
them fit the grid in all four corners. Finally, you<br />
can give all the selected controls the same width or<br />
height.<br />
• Change to ... You can transform the selected control<br />
to another one - with reasonable limitations.<br />
For instance you can turn a text box into a combo<br />
box or vice versa.<br />
3.1.3 Cleaning up the form<br />
You may notice that the form has things in the corners<br />
that we don't want in the final user window (bottom of<br />
Figure 3.1B). The title bar, for instance, holds our programmer-oriented<br />
form name, frmFindStay. It should<br />
be Find Guest. There are also record selectors, navigation<br />
buttons, and space for a scroll bar that we don't<br />
need in the final window. We can correct all of this by<br />
setting properties of the form:<br />
11. Make sure the form is open in design mode. Show<br />
the property box for the form (double-click the little<br />
square where the rulers meet).<br />
20 3. <strong>Access</strong>-based user interfaces
Fig 3.1B Adjusting controls and the Form<br />
Form name. <strong>Access</strong> asks for it<br />
when you first close the form.<br />
Handle for moving<br />
Label part .<br />
Handle for moving<br />
Text Box part .<br />
Drag here to<br />
move both.<br />
MinMax buttons<br />
Control Box<br />
Caption<br />
Record<br />
Selector<br />
Form View:<br />
User mode<br />
Navigation<br />
Buttons<br />
Underline letter for<br />
shortcut: &New guest<br />
Space for<br />
scroll bar<br />
12. Set these properties on the Format tab: Caption<br />
(the form name the user sees), Scroll bars (not<br />
needed), Record selector (not needed), Navigation<br />
buttons (not needed).<br />
There are other interesting properties on the Format tab<br />
that you may need for other windows:<br />
• Border Style specifies whether the form looks like<br />
a resizable window, a dialog box or a message<br />
box.<br />
• Control Box is the buttons on the left and right of<br />
the title bar. You may hide them.<br />
• MinMax buttons and Close button are shown<br />
when the control box is shown, but you may disable<br />
them.<br />
• Picture is none in our case, but you may specify a<br />
picture file to be used as background.<br />
You can get a good explanation of most of the properties<br />
by selecting the property and clicking F1.<br />
Look and feel - Autoformat<br />
You can give the form another look by means of Autoformat.<br />
This changes the style, that is the background<br />
of the form and the appearance of all fields and<br />
buttons. You may try it if you like:<br />
• Open the form in design mode. From the Format<br />
menu at the top of the <strong>Access</strong> window, select<br />
AutoFormat.<br />
• You can choose various auto-formats. Through the<br />
Options button you can determine whether you<br />
want to change also field colors, fonts and borders.<br />
When you close the AutoFormat box, the form has<br />
changed its look.<br />
• You may also create a new auto-format style based<br />
on one of your forms. Open the form in design<br />
view. In the AutoFormat box, select Customize -><br />
Create a new, and give the new AutoFormat a<br />
name. You can then use this auto-format for other<br />
forms.<br />
3. <strong>Access</strong>-based user interfaces 21
3.1.4 Shortcut keys for the user<br />
In the final system, the user should be able to work<br />
without a mouse. An easy way to do this is to assign a<br />
shortcut key for each button and each label. As an<br />
example, we might want the user to activate New Guest<br />
with Alt+N. Why not do it now?<br />
1. Change the name on the button into &New guest.<br />
Change to user mode with the little icon in the top<br />
left corner (Figure 3.1C). You should see that the<br />
N is underlined.<br />
2. Try Alt+N to move the cursor to NewGuest. Try<br />
Tab and Shift+Tab to move between fields.<br />
3. Add shortcut keys for the other labels too, for instance<br />
as &Last name. Try it out in user mode.<br />
What if you want a label with an &, such as<br />
Bed&Breakfast? <strong>Access</strong> will treat & as a shortcut<br />
mark. Remedy: Write && instead of &.<br />
Tip: Changing mode/view. During design, you frequently<br />
change between design mode and user mode.<br />
The little icon at the top left (Figure 3.1C) allows you<br />
to toggle between the modes. Click it - you change to<br />
user mode (called Form View in <strong>Access</strong>). Click it again<br />
- you change to design mode (Design View).<br />
The icon has also a menu of views that you can roll<br />
down as shown on the figure. There is one more view,<br />
Datasheet View, which we will use later. It shows all<br />
fields of the form as a table.<br />
Saving. The form is not saved when you change mode.<br />
You can thus experiment easily with the design. Saving<br />
is not done until you close the form or explicitly save it<br />
with Ctrl+S.<br />
Shortcuts. You can change to design mode with<br />
Alt+V+Enter, and to user mode with F5.<br />
3.1.5 Lines, checkbox, calendar<br />
Above we have tried some of the controls: text box,<br />
label, and command button. Figure 3.1C shows some<br />
other controls you may try now:<br />
1. Line. Select the Line tool from the toolbox and<br />
draw a line somewhere on the form. The line is<br />
just a visual effect. It has no functionality.<br />
2. Rectangle. Select Rectangle from the toolbox and<br />
draw a rectangle around some of the existing controls,<br />
for instance the left fields. The rectangle is<br />
just a visual effect without functionality.<br />
3. Colors. Double click on the rectangle to open its<br />
property box. On the format tab, give the rectangle<br />
a back color and set back style to normal. Now it<br />
hides the controls it surrounds. Use the main<br />
<strong>Access</strong> menu, Format -> SendToBack, to move it<br />
behind the other controls. Experiment with different<br />
back colors, border styles, and border colors. It<br />
may in some cases be a good way of grouping<br />
controls visually.<br />
4. Checkbox. Select the checkbox tool and put a<br />
checkbox on the form. The checkbox has functionality<br />
and shows a yes/no variable (a Boolean variable).<br />
You can of course change the value in user<br />
mode. If the variable is undefined - as it is initially<br />
- the checkbox is gray in user mode.<br />
Calendar control. The middle part of Figure 3.1C also<br />
shows a calendar control.<br />
5. To make room for the calendar control, extend the<br />
grid area of the form by dragging its borders in<br />
design mode.<br />
6. Select the lower right icon of the toolbox (the<br />
hammer). It gives access to more controls, most of<br />
them rather complex. Depending on the way<br />
<strong>Access</strong> was installed, you can see more or less of<br />
the many controls. One of them is a Calendar control.<br />
If you cannot see any Calendar control, you may have<br />
to tell <strong>Access</strong> to look for it. Use Tools -> References.<br />
You now see a list of the software packages <strong>Access</strong><br />
may look at. Find a Calendar Control and make sure it<br />
has a check mark. Then close the reference list and select<br />
once more the hammer from the toolbox.<br />
7. Select the Calendar from the tool list and draw a<br />
large rectangle with the tool.<br />
The Calendar control shows a single date variable. In<br />
user mode you can click on a date in the calendar and<br />
in that way store a date in the variable. In principle, the<br />
Calendar control is just a kind of text box with a different<br />
way of presenting and editing the text value.<br />
DateTime picker. The bottom part of Figure 3.1C<br />
shows two DateTime pickers. They look like combo<br />
boxes, but when the user clicks the down-arrow, a<br />
calendar appears.<br />
8. Extend the grid area further, or remove the<br />
calendar control.<br />
9. Select the hammer tool again and look for<br />
<strong>Microsoft</strong> Date and Time Picker Control. Select it.<br />
(You may have to include it from Tools -><br />
Reference, as above.)<br />
10. Draw the combo-box part of the control. You now<br />
have a control that holds a date-time variable. Try<br />
it out in user mode. Notice how the user can<br />
increase or decrease dates and months with arrow<br />
up and down.<br />
11. The control doesn't have label. Give it one: Select<br />
one of the other labels. Copy it (Ctrl+C). Select the<br />
date-time control and paste it (Ctrl-V).<br />
12. Create the other date-time control in the same way<br />
- or copy and paste the first one.<br />
13. Experiment with the properties of the DateTime<br />
picker: In design mode, double-click the control. A<br />
22 3. <strong>Access</strong>-based user interfaces
Fig 3.1C Form after changes<br />
Select view mode:<br />
Design, Form, Datasheet<br />
Line<br />
(visual effect only)<br />
Shortcut keys<br />
Rectangle<br />
(visual effect only)<br />
Checkbox<br />
control<br />
Calendar<br />
control<br />
DateTimePicker<br />
control<br />
DateTimePicker<br />
drop-down<br />
special DTPicker properties window should<br />
appear.<br />
(You can also get to this special window from <strong>Access</strong>'s<br />
standard property window: Select the Other-tab and<br />
then Custom.)<br />
14. Try changing the date format: Select format 3,<br />
dtpCustom. In the CustomFormat box, define the<br />
format as dd-MM-yyyy. Note that MM means<br />
month, while mm means minute. (See also Figure<br />
6.4B, Format function).<br />
Try other changes too, for instance the UpDown<br />
checkbox and the colors.<br />
15. We are not going to use this fancy version of the<br />
form in the following. If you want to keep it, save<br />
a copy of it: Select the form in the database window<br />
and use copy and paste.<br />
16. Delete the line, rectangle, checkbox and calendar<br />
controls. We don't need them in the following.<br />
3. <strong>Access</strong>-based user interfaces 23
3.1.6 Combo box - enumeration type<br />
Combo boxes are a bit more complex. We will first<br />
make the Include combo box shown on Figure 3.1D. It<br />
is one of the search criteria for guests, and with some<br />
programming it will allow the user to display only<br />
booked stays, only canceled stays, etc.<br />
Technically speaking, this combo box holds a value of<br />
enumeration type:<br />
include(booked | canceled | . . . )<br />
In the same way as in the database, the user should see<br />
the values booked, canceled, etc., but they should be<br />
stored as the values 1, 2, etc.<br />
1. Switch to design mode.<br />
2. Set the Wizard button on at the top of the toolbox.<br />
3. Select the Combo box tool and draw the Include<br />
box as shown at the top right of the figure.<br />
The Wizard appears. It works much the same way as<br />
when you defined an enumeration-type field in the<br />
database (section 2.4):<br />
4. The Wizard asks you whether you want to look up<br />
the values from a table or type them in yourself.<br />
Select the latter and click Next.<br />
5. The Wizard asks you how many columns you<br />
want. Choose two: one for the stored value and<br />
one for the value the user should see.<br />
6. Fill in the columns as shown, and click Next.<br />
7. The Wizard asks you to specify whether the stored<br />
value is column one or two. Select column 1 and<br />
click Next.<br />
8. Finally, you may specify the label text in front of<br />
the combo box. Use the text Include: (Or modify<br />
the text directly on the Form). Finish the Wizard.<br />
Look a the result in user mode. It doesn't look quite<br />
right. The drop-down list has two columns and the box<br />
itself shows the number - not the user text. We have to<br />
repair this:<br />
9. Look at the property box of the combo box. The<br />
Format tab has a field called Column Widths. It<br />
shows the widths of the two columns. Set the<br />
width of the first column to 0 (see the bottom of<br />
Figure 3.1D).<br />
10. Try it out in user mode. Everything should look<br />
right by now.<br />
• The Format tab has other interesting fields. You<br />
may for instance adjust the List Width for the drop<br />
down list.<br />
11. Select the Data tab. Row Source holds the values<br />
in the list. You may edit them here.<br />
12. Limit to List defines whether the user is allowed to<br />
enter other values than those in the list. In this<br />
case, it should be set to Yes.<br />
• Bound Column defines which column to use for<br />
the stored value.<br />
24 3. <strong>Access</strong>-based user interfaces
Fig 3.1D Combo Box - enumeration type<br />
Wanted:<br />
Combo box<br />
Width of first<br />
column = 0<br />
3. <strong>Access</strong>-based user interfaces 25
3.1.7 Combo box - table look up<br />
We will now make the Room type combo box shown<br />
on Figure 3.1E. This combo box might be another<br />
sorting criteria. The combo box is not an enumeration<br />
type where the designer has typed in the values, but a<br />
table look up. In the example it stores a roomType ID,<br />
but the user will see the name of the room type.<br />
1. Switch to design mode and make sure the Wizard<br />
button is on.<br />
2. Select the Combo box tool and draw the Room<br />
Type box.<br />
3. Tell the Wizard that you want the combo box to<br />
look up the values in a table. Click Next.<br />
4. Select tblRoomType as the source. Click Next.<br />
5. Tell the Wizard that you want to show these fields<br />
as columns: roomType, description. Click Next.<br />
6. Ask the Wizard to hide the key column. This<br />
means that the key will be stored, but the<br />
description shown to the user. Finish the Wizard.<br />
Try out the combo box in user mode. It should look all<br />
right.<br />
The bottom of Figure 3.1E shows the Data tab for the<br />
combo box:<br />
• Row Source now contains a formula called an<br />
SQL-expression. It specifies how to compute the<br />
list that the user will see. We will look at SQLexpressions<br />
in section 4.2.<br />
• Bound Column indicates the column that holds the<br />
value to be stored in the table. In our case it is column<br />
one, which holds roomType.<br />
We won't use these combo boxes later in the booklet.<br />
You may leave them on the form or delete them.<br />
26 3. <strong>Access</strong>-based user interfaces
Fig 3.1E Combo Box - table lookup<br />
Wanted:<br />
Combo box<br />
3. <strong>Access</strong>-based user interfaces 27
3.1.8 Control properties - text box<br />
Each control has a lot of properties that define its color,<br />
font, and many other things. We will explain some of<br />
these properties below, using the text box as an example.<br />
Select a text box and look at its property box (Figure<br />
3.1F). If the property box isn't open, bring it up by<br />
double clicking on some control. There are more than<br />
60 properties for a text box. Here we will look at some<br />
of them.<br />
Text box - properties on the Format tab<br />
• Format and decimal places specify the data type<br />
of the control, much the same way as you can<br />
specify the data type for a database field. You can<br />
select among a number of predefined formats, or<br />
type your own format into the format field. The<br />
formats are similar to the Visual Basic formats<br />
(see section 6.4 and the reference card).<br />
• Scroll Bars. A text box may be large and show a<br />
text consisting of many lines. This property specifies<br />
whether it should have scrollbars.<br />
• Left, Top, Width, Height specify the position and<br />
size of the control. You may set these properties<br />
instead of dragging with the mouse.<br />
• Back color, fore color, font name, etc. specify<br />
colors, borders and other visible properties of the<br />
control.<br />
• Text Align. You can align the text, e.g. left for a<br />
name, right for a number.<br />
Text box - properties on the Data tab<br />
• Control Source specifies how the value is computed<br />
and where it is stored. For unbound controls<br />
as those on the FindGuest form, control source is<br />
blank. We look at the other possibilities in section<br />
3.3.<br />
• Input Mask specifies the text box format when<br />
the box has the focus and the user types into it.<br />
The mask may for instance be used to enter dates<br />
with predefined slashes and hyphens. The input<br />
mask follows different rules than the format<br />
property. (Not described in this booklet.)<br />
• When Locked is Yes, the user cannot enter data<br />
into the text box.<br />
• When Enabled is Yes, the text box can have the<br />
focus.<br />
When Enabled is No, the user cannot enter anything<br />
in the box because the cursor doesn't stop<br />
there. In this case, Locked has an interesting influence<br />
on the box color. If Locked is No, the field is<br />
gray. If it is Yes, the color follows the normal pattern<br />
determined by Back color and Fore color.<br />
Text box - properties on the Other tab<br />
• Name is the programmer's name for the text box.<br />
Visual Basic programs refer to the text box with<br />
this name. The designer can change the name. Notice<br />
that the name is shown in the title bar too.<br />
• Tab Index determines how the cursor moves<br />
through the controls when the user tabs through<br />
the form. Tab indexes run from 0 and up. When<br />
the form opens, the cursor is in the control with tab<br />
index 0. The tab key moves the cursor though tab<br />
index 0, 1, 2, etc.<br />
• ControlTip is the pop-up text the user sees when<br />
the mouse rests on the text box.<br />
Label control - properties on the Format tab<br />
The text box has an associated label. The label has a<br />
programmer's name. In the example, <strong>Access</strong> has given<br />
the label the name Label7.<br />
• Caption is the label text the user sees. In this case<br />
<strong>Access</strong> generated the caption Text6: The designer<br />
can change it, of course.<br />
Many of these properties exist also for other control<br />
types, for instance for the combo box. For the command<br />
button, many of them work too. For some strange<br />
reason, however, you cannot align the text on a command<br />
button. It is always centered. In the hotel system<br />
we have made a fake left align by entering spaces after<br />
the name. You have to enter the spaces directly on the<br />
button - you cannot do it in the Caption property.<br />
To learn more about a property, click the property line<br />
and click F1 for help.<br />
28 3. <strong>Access</strong>-based user interfaces
Fig 3.1F Control properties - text box<br />
The textbox<br />
Text6<br />
Date, number, Yes/No . . .<br />
For large text fields<br />
Position and size<br />
How data is computed<br />
Can have focus<br />
User can enter data<br />
Name property -<br />
the programmer’s name<br />
The label for<br />
the textbox<br />
Name property -<br />
the programmer’s name<br />
Field sequence when the<br />
user tabs through the form<br />
Pop-up help when the<br />
mouse rests on the field<br />
Caption property -<br />
the user’s name<br />
3. <strong>Access</strong>-based user interfaces 29
3.2 Subforms<br />
Figure 3.2A shows the FindGuest form we want to<br />
construct. The controls at the upper part of the form are<br />
now easy, but how do we handle the list of stays at the<br />
lower part? Basically we make a field that can show a<br />
list of data. This field is called a Subform control. The<br />
data in the list is a combination of data from tblGuest,<br />
tblStay, and other tables. In the next chapter we will<br />
show how to combine these data.<br />
To simplify matters right now, we will make an experimental<br />
version of frmFindStay, where the subform<br />
shows only guest data.<br />
The bottom of Figure 3.2A shows the experimental<br />
version. The main form is frmFindStay, which we<br />
made in section 3.1. On it we have made a subform<br />
control - the white area. The list of data is another form<br />
(a continuous form) that shows a list of guest records.<br />
On the figure we have shown this continuous form in<br />
two versions: as a form and as a datasheet.<br />
When we have made the subform control and the continuous<br />
form, it is a simple matter to connect the two.<br />
The result is a form looking like the final FindGuest.<br />
Fig 3.2A Main form and Subform<br />
Final version<br />
Subform<br />
Experimental version<br />
Main form<br />
Subform control<br />
A continuous form in Form view<br />
A continuous form in Datasheet view<br />
30 3. <strong>Access</strong>-based user interfaces
3.2.1 Subform in Datasheet view<br />
First we will make the continuous form that shows the<br />
guest data. We could create it from scratch in the same<br />
way as we created frmFindStay, but in this case <strong>Access</strong><br />
has a Wizard that helps us a lot. Figure 3.2B illustrates<br />
how to use it:<br />
1. Start in the database window, click the Forms tab,<br />
and select Create form by using Wizard. (In<br />
<strong>Access</strong> 97 you click New, then select Form<br />
Wizard.)<br />
2. <strong>Access</strong> asks you which table to base the form on.<br />
Choose tblGuest.<br />
3. Select the fields you want to include. In our case,<br />
select all fields except the guestID field, which the<br />
user should not see. Click Next.<br />
4. <strong>Access</strong> asks you to select a layout for the form.<br />
The best layout in our case is Columnar. It will<br />
show the fields with labels. Click Next.<br />
It is tempting to choose the datasheet layout rather than<br />
columnar. Don't do it. It works, but the fields get no<br />
labels and this makes it much harder to give the fields<br />
user-oriented names later in the process.<br />
5. The next screen asks you to select a style, meaning<br />
the look of the frames around the fields, the picture<br />
behind the fields, etc. Choose Standard in this case<br />
where we just want a simple look.<br />
6. Finally, give the form a name. Choose fsubStay-<br />
List. The prefix fsub is conventionally used for a<br />
form that becomes a subform. Click Finish.<br />
Fig 3.2B Create the continuous form<br />
In database window:<br />
Select Forms -><br />
Create form by using wizard<br />
Base form on<br />
guest table<br />
All fields<br />
exceptguestID<br />
Columnar format:<br />
Fields with labels<br />
3. <strong>Access</strong>-based user interfaces 31
You will now see the form in user mode as on Figure<br />
3.2C. You can use PageDown and PageUp to walk<br />
through the guests. Or you can use the navigation buttons<br />
at the bottom of the form. You may enter data into<br />
the form. The data will end up in the guest table.<br />
Choose datasheet view<br />
7. Select the continuous form and use the view icon<br />
to change to Datasheet View. Adjust the width of<br />
the form and the widths of the columns. The result<br />
should be as on the lower part of Figure 3.2C.<br />
When we insert the continuous form into the Find<br />
Guest form, we want it to be shown only as a datasheet.<br />
Specify it in this way:<br />
8. Select the continuous form and switch to design<br />
view. Open the property box of the form and select<br />
the Format tab. Set Default View to Datasheet.<br />
<strong>Access</strong> 2000: Also set Views Allowed to Datasheet.<br />
<strong>Access</strong> 2003: Disallow Form View and<br />
allow Datasheet View.<br />
Bound and unbound forms<br />
9. Use the opportunity to look at the Data tab for the<br />
form properties. It shows that Record Source is<br />
tblGuest. This is why the form can show fields<br />
from the guest table. We say that fsubStayList is<br />
bound to tblGuest.<br />
10. Switch to Datasheet view to check that everything<br />
is okay. Then close the continuous form.<br />
Create the subform control<br />
Now it is time to use the continuous form as a subform<br />
on frmFindStay.<br />
11. Open frmFindStay in design view. Extend the grid<br />
area by dragging its borders (see Figure 3.2D).<br />
12. Select the Subform/Subreport tool and draw a large<br />
box as on the figure. The result is a subform control.<br />
Delete the label for the subform control<br />
(called Child7 or the like).<br />
13. Look at the property box for the subform control.<br />
Set the name property on the Other tab: Name =<br />
subStayList. The prefix sub is used for subform<br />
controls.<br />
Connect the continuous form to the subform control<br />
14. Look at the Data tab for the subform control. Set<br />
this property: Source Object = fsubStayList (select<br />
it from the drop-down list).<br />
15. Switch to Form View.<br />
The result should be as shown at the bottom of Figure<br />
3.2D. The result is not pretty, but is easy to correct the<br />
problems. Notice the names we use:<br />
• Name of the Subform control: subStayList<br />
• Name of the Continuous form: fsubStayList (seen<br />
in the <strong>Access</strong> database window)<br />
32 3. <strong>Access</strong>-based user interfaces
Fig 3.2C Continuous form<br />
Continuous<br />
form in Form view<br />
Navigation<br />
Buttons<br />
Adjust dividing lines.<br />
Drag or double-click<br />
heading line<br />
In Datasheet<br />
view<br />
Fig 3.2D Creating and connecting the subform control<br />
Draw a subform<br />
control<br />
Connect to fsubStayList<br />
Name property:<br />
Other -> Name = subStayList<br />
Result in<br />
Datasheet view<br />
3. <strong>Access</strong>-based user interfaces 33
3.2.2 Adjust the subform<br />
To make the subform look nicer, we remove the navigation<br />
buttons at the bottom, give the columns useroriented<br />
names, etc. (See Figure 3.2E.)<br />
1. Open fsubStayList in design mode. Open the property<br />
box for the form and set Navigation Buttons to<br />
No.<br />
2. Remove the unnecessary fields address2, address3<br />
and passport. (Select them and click Delete.)<br />
3. Change the labels to user-oriented names. (Click<br />
the label and change the text on the spot.)<br />
4. Close fsubStayList and open the main form in user<br />
mode. It should look like Figure 3.2E.<br />
Notice that the labels are used as column headings.<br />
You may wonder what happens if we have a text box<br />
without a label. In this case the control name (the Visual<br />
Basic name) is used as a heading. You may change<br />
the control name to a user-oriented name, but it is<br />
harder and would influence a program that addresses<br />
the text box.<br />
5. Adjust column widths. The user can adjust the<br />
column widths. Try it: Point the mouse to a dividing<br />
line in the header section (see Figure 3.2E).<br />
Drag the dividing line to adjust the column width.<br />
Double-click the dividing line to have <strong>Access</strong> fit<br />
the line to the existing data. The column widths are<br />
persistent data that are stored as part of fsubStay-<br />
List.<br />
6. Column sequence. The user can also adjust the<br />
column sequence: Click the column heading to<br />
mark the entire column. Then drag the entire<br />
column to another position in the sheet. The<br />
column sequence is also persistent data.<br />
7. Sorting rows. The user may ask for the data rows<br />
to be sorted according to a specific column: Rightclick<br />
somewhere in the column and choose Sort<br />
Ascending or Sort Descending. The sorting sequence<br />
is also persistent data. <strong>Access</strong> records the<br />
sorting sequence as the Order By property of the<br />
form.<br />
Add another field<br />
What to do if you have forgotten one of the fields on<br />
the subform? Starting all over with the Wizard is<br />
cumbersome. The solution is to use the Field List to<br />
add the missing field:<br />
• Switch to design view. Click the Field List icon on<br />
the tool bar (Figure 3.2E). All fields from the<br />
record source come up as a list.<br />
• Drag the missing field from the list to the form.<br />
Adjust lookup fields<br />
When the field is defined as a lookup field in the<br />
database, it becomes a combo box on the form. This is<br />
usually fine, except for the fact that in the database we<br />
wanted the visible value to be the real thing stored in<br />
the database, for instance the code 2 for Visa. This was<br />
convenient when we as designers entered test data into<br />
the database.<br />
On the user interface we don't want the user to see the<br />
codes, but the mnemonic values, for instance Visa.<br />
Here is how to do it:<br />
• Open the property box for the combo box. On the<br />
Format tab, look at Column Widths. Set the first<br />
column width to 0. This makes this column<br />
invisible to the user.<br />
Font size for datasheets. The datasheets in the booklet<br />
use font size 8 (default is 10). You can set size 8 as the<br />
default font size. Select Tools -> Options -> Datasheet<br />
-> Default Font -> Size = 8. This setting will influence<br />
all datasheets where you haven't set the font size<br />
explicitly.<br />
How to open the continuous form in design mode:<br />
You may simply open the continuous form from the<br />
database window. However, you may also access it<br />
from the main form in design view:<br />
<strong>Access</strong> 2000 and 2003: When the main form is in design<br />
mode, the subform control will usually also show<br />
the continuous form. You may click and adjust the<br />
controls directly inside the subform control.<br />
<strong>Access</strong> 97: When the main form is in design mode, the<br />
subform field is always blank. Click in the form outside<br />
any control. Next double-click the subform control.<br />
The continuous form will then open in design<br />
mode.<br />
34 3. <strong>Access</strong>-based user interfaces
Fig 3.2E Adjusting the subform<br />
Remove navigation<br />
buttons through<br />
property box<br />
Delete unneccesary<br />
fields<br />
Change labels to<br />
user-oriented names<br />
Drag to<br />
form<br />
Field List for<br />
adding more fields<br />
Adjust dividing lines.<br />
Drag or double-click heading line<br />
Reorder columns:<br />
Mark column + drag and drop<br />
3. <strong>Access</strong>-based user interfaces 35
3.2.3 Mockup subform<br />
Above we have based our experimental subform on<br />
tblGuest rather than a complex computation of the real<br />
stay list. This was to try the mechanisms - it looks all<br />
wrong to the user. When we make a tool-based mockup<br />
for usability testing, we need the planned columns, but<br />
the data fields should be empty because we add the<br />
data with pencil.<br />
The easiest way to make such a mockup is to start with<br />
any continuous form and add dummy text boxes. We<br />
will use this technique to create a mockup list of rooms<br />
occupied by a guest (Figure 3.2F). (We will later use<br />
this form in the Stay window.) When filled in with<br />
pencil, the list shows the first night, the number of<br />
nights, the room number, the number of persons in the<br />
room, the price per night, and the total for all the<br />
nights.<br />
1. Make a copy of fsubStayList: In the database window,<br />
select fsubStayList, copy it with Ctrl+C and<br />
paste it with Ctrl+V. Give the copy the name fsub-<br />
StayRooms.<br />
2. Open fsubStayRooms in design mode. Remove all<br />
fields relating to the guest and insert text boxes as<br />
shown. Give the labels the user-oriented names.<br />
3. Change the caption of the form, for instance to<br />
RoomList.<br />
4. Switch to Datasheet mode, and the mockup should<br />
be ready.<br />
How does this work? The subform is bound to tblGuest<br />
and shows a line for each guest. However, the line<br />
doesn't show any guest fields, only the text boxes we<br />
have added. These text boxes are only dialog data.<br />
They don't store anything in the database. If you for<br />
instance enter a number in Nights, you will see the<br />
same number in all the lines. There is only one instance<br />
of the dialog data.<br />
If you want more lines in the mockup, add new guests<br />
to tblGuest. The mockup shows one line for each guest.<br />
Insert a table directly as a subform?<br />
<strong>Access</strong> 2000 and 2003 allow you to connect a subform<br />
control to a table - without making a continuous form.<br />
Don't use this shortcut.<br />
3.2.4 Subform in Form view<br />
A continuous form can also be shown in Form view.<br />
This gives us more freedom to structure the data presentation.<br />
As an example, we will create a subform that<br />
makes Find Guest look like Figure 3.2G. The subform<br />
area now shows a heading area and a list of small<br />
forms - the details. Here is how to do it:<br />
1. Make another copy of fsubStayList (Ctrl+C and<br />
Ctrl+V). Give the copy the name fsubStayList2.<br />
2. Open the copy in Design view and drag the border<br />
between header and footer so that you see a header<br />
area (Figure 3.2G). If you cannot see the Form<br />
Header bar, use the View menu:<br />
View -> Form Header/Footer.<br />
3. Change the form so it looks like Figure 3.2G:<br />
• Remove the labels from the detail area and<br />
adjust the sizes of the three fields as shown.<br />
• Adjust the size of the detail area to remove<br />
empty space at the bottom.<br />
• Draw fresh labels in the header area.<br />
At this point, the user can only see the form in Datasheet<br />
view. Change this:<br />
4. On the property sheet for the form, set Default<br />
Views to Continuous Forms and Views Allowed<br />
to Form.<br />
In user mode you will now see the continuous form as<br />
a list of small forms. You may connect it to the main<br />
form to get the wanted result: Change the SourceObject<br />
property of the subform control.<br />
Form Wizard - tabular layout<br />
It is a bit cumbersome to construct the continuous form<br />
in this way. You may let the Form Wizard do some of<br />
the job:<br />
5. From the database window, click the Forms tab<br />
and select Create Form by using Wizard.<br />
6. Select the proper table, next select Tabular layout.<br />
7. Finally select a style (e.g. Standard) and give the<br />
form a name.<br />
You will now have a form that looks very much like<br />
the one you constructed above.<br />
The result looks okay at first sight, but you have no<br />
control of the appearance. You cannot remove navigation<br />
buttons, use colors in the fields, or address the<br />
user's selection from a Visual Basic program.<br />
36 3. <strong>Access</strong>-based user interfaces
Fig 3.2F Mockup subform: Roomlist for a guest<br />
Wanted:<br />
Tool-based<br />
mockup list<br />
Make a copy of fsubStayList<br />
Call it fsubRoomListMockup<br />
Delete all<br />
guest fields<br />
Add unbound textboxes<br />
Give them user oriented labels<br />
Switch to Datasheet view<br />
- the mockup is ready<br />
Fig 3.2G Subform in Form view<br />
Wanted: Subform<br />
in Form view<br />
Header<br />
Details<br />
Make a copy of<br />
fsubStayList<br />
Call it fsubStayList2<br />
Drag Detail down to<br />
make a Form Header<br />
Header<br />
Delete labels from detail area.<br />
Adjust fields.<br />
Add labels to<br />
the header<br />
Detail<br />
3. <strong>Access</strong>-based user interfaces 37
3.2.5 Summary of subforms<br />
Datasheet view or form view?<br />
Datasheets and forms not only look different. They<br />
have other usability differences too.<br />
Datasheet view allows cursor movements in all directions<br />
as in a spreadsheet. It also allows the user to select<br />
a rectangle of cells. The Visual Basic program can<br />
find out which cells the user has selected.<br />
The weakness is that the display format is very restricted.<br />
Each record is shown as a single line with text<br />
boxes, combo boxes, etc. Also the column headings are<br />
very restricted. They are just simple texts and they<br />
cannot even be empty.<br />
Form view allows all the available display formats,<br />
including pictures retrieved from a database. (There<br />
cannot, however, be continuous forms inside another<br />
continuous form. Continuous forms can only be used in<br />
one level.)<br />
The weakness of forms is that the cursor moves less<br />
intuitively. The user can tab through the fields of each<br />
record, but not easily move up and down the list of records.<br />
Furthermore, the user can only select a full<br />
record, not part of a record.<br />
Current record. A subform can show many records at<br />
the same time, but only one of them is the current<br />
record. It is marked with the little arrow to the left, the<br />
record selector, as shown on Figure 3.2H. (You may<br />
change the form settings so that the record selector area<br />
is invisible.)<br />
When the user types something into the form, it will<br />
always be into the current record. When the cursor<br />
moves into another record, it becomes current.<br />
Until now we have only seen a main form that is not<br />
bound to the database. But main forms may be bound<br />
too. Then they have a current record and they need the<br />
record selector (see examples in section 4.7).<br />
The subform concepts<br />
Figure 3.2H gives a summary of the many subform<br />
concepts we have used above. A main form is a user<br />
window with title bar, etc. It may contain one or more<br />
subform controls.<br />
Each subform control may be connected to a continuous<br />
form. The continuous form can be shown in<br />
Form view. Then it has a form header and a list of detail<br />
forms. The continuous form can also be shown in<br />
Datasheet view. Then it looks like a table.<br />
Properties. The following properties (attributes) are<br />
important to understand when you work with subforms.<br />
Figure 3.2H shows examples of these properties.<br />
Main form: The Name property is the designer's form<br />
name. It is this form name you see in the database<br />
window. You can only change the name<br />
there. The Caption property is the name the<br />
user sees in the title bar of the form. You can set<br />
the caption through the Format tab in the property<br />
box.<br />
Subform control: The Name is the designer's name of<br />
the control. A program would use this name to<br />
address the control. You can set the name property<br />
through the Other tab in the property box.<br />
The SourceObject indicates the continuous<br />
form connected to the subform control.<br />
Continuous form: The Name is the form name that you<br />
see in the database window. Record Source indicates<br />
the table bound to the form. Default<br />
View indicates whether the form is shown as a<br />
datasheet or as detail forms with a header. Another<br />
property, Views Allowed, indicates<br />
whether the user can change from one view to<br />
another.<br />
3.2.6 Prefixes<br />
A prefix is a few letters before a name. The prefix<br />
helps the reader understand what this name is about. Is<br />
it the name of a table, a form, etc? In just slightly<br />
complex systems, prefixes are crucial to help the<br />
developers. The bottom of Figure 3.2H shows the full<br />
list of prefixes used in this booklet. For subforms the<br />
following are important:<br />
tbl<br />
frm<br />
sub<br />
fsub<br />
Table names.<br />
Names of main forms.<br />
Names of subform controls.<br />
Names of continuous forms connected to a subform<br />
control.<br />
38 3. <strong>Access</strong>-based user interfaces
Fig 3.2H Summary of subform concepts<br />
Main form:<br />
Name = frmFindStay<br />
Caption = Find Guest<br />
Main form<br />
Subform control<br />
Subform control:<br />
Name = subStayList<br />
SourceObject = fsubStayList<br />
Continuous form:<br />
Name = fsubStayList<br />
Record Source = tblGuest<br />
Default View = Continuous Forms<br />
Views Allowed = Both<br />
Current<br />
record<br />
Continuous form<br />
in Form view<br />
Continuous form<br />
in Datasheet view<br />
Table behind the<br />
continuous form<br />
Control prefixes:<br />
cbo Combobox control.<br />
chk Checkbox control.<br />
cmd Command button<br />
ctl Other type of control<br />
grp Option group<br />
lbl Label<br />
mni Menu item<br />
lst Listbox<br />
opt Option button<br />
sub Subform control<br />
tgl Toggle button<br />
txt Text control<br />
Other prefixes:<br />
bas Module (used by VBA)<br />
frm Main form.<br />
fsub Continuous form (connected to a subform control).<br />
qry Query<br />
qxtb Crosstab query<br />
tbl Table<br />
3. <strong>Access</strong>-based user interfaces 39
3.3 Bound, unbound and computed controls<br />
A form may be bound to a table. In this case its<br />
controls can be bound to fields of the table, so that the<br />
user can see the fields and update them through the<br />
control. As an example, fsubStayList was bound to the<br />
guest table, and we could see and update the guest data.<br />
In this section we will look at this in more detail. We<br />
will explicitly bind controls and let controls be computed<br />
from multiple fields.<br />
Unbound control in a bound form<br />
1. Open fsubStayList2 in design mode.<br />
2. Select the checkbox tool and add a checkbox to the<br />
detail form as shown on Figure 3.3A.<br />
3. Switch to user mode. There will be a checkbox in<br />
each detail form, but all of them will be gray. The<br />
reason is that the checkbox has not got any value<br />
yet.<br />
4. Click the checkbox so that it shows a tick. Move to<br />
the next record. All the checkboxes have now got a<br />
tick. Click to remove the tick. It disappears from<br />
all the checkboxes.<br />
As we added the checkbox, it became an unbound<br />
control. The Yes/No value is not stored in the database,<br />
but it is a single dialog variable in the form. All the<br />
checkboxes show this single variable and thus show the<br />
same. If you close and open fsubStayList2, the dialog<br />
variables disappear and are created again. The checkboxes<br />
are gray again.<br />
Bound control<br />
5. Show fsubStayList2 in design mode. Set this property<br />
for the checkbox:<br />
Data -> ControlSource = passport<br />
(choose the field from the list). Change to user<br />
mode.<br />
This action binds the checkbox control to the passport<br />
field in tblGuest. The first form instance shows data<br />
from the first record in tblGuest, the second instance<br />
shows data from the second record, etc. You can bind<br />
the control to any field in tblGuest no matter whether it<br />
was included when the Wizard generated the form.<br />
In user mode, the checkboxes still look gray but that is<br />
because they try to show the passport fields. A<br />
checkbox can show a Yes/No value or a number (with<br />
zero shown as No). The passport fields are either blank<br />
or contain a text, and the checkbox doesn't know what<br />
to show.<br />
6. Try to check and uncheck some of the boxes.<br />
Notice that they are independent of each other. The<br />
Yes/No value is stored in the passport field of<br />
tblGuest. Look at the table contents. Notice that<br />
Yes is stored as -1, No as 0. (Sorry if some of the<br />
real passport numbers disappeared.)<br />
Computed control<br />
7. Combine two database fields. A text box may be<br />
computed from database fields. Try it with the<br />
address text box. Set its ControlSource to this expression<br />
= phone & address2<br />
(Make sure to type the equal sign too.)<br />
The equal sign changes the checkbox to a computed<br />
control. The & is the concatenation operator. We have<br />
asked <strong>Access</strong> to concatenate the two guest fields and<br />
show them as a single text. Check in user mode that<br />
this is what you get. However, now you cannot enter<br />
anything in the address text box - <strong>Access</strong> has no place<br />
to store what you enter.<br />
On Figure 3.3A we have made the combined field look<br />
a bit better with a comma and a space between the two<br />
parts. As shown on the figure, we have concatenated<br />
the control source from three parts, the phone field, a<br />
text constant holding the comma and a space, and the<br />
address2 field:<br />
= phone & ", " & address2<br />
Don't worry about the square brackets on the figure.<br />
<strong>Access</strong> often adds them as a parenthesis around names<br />
in order to deal with names that contain spaces, # and<br />
other strange characters.<br />
Troublesome expressions<br />
Sometimes an expression may give strange results because<br />
the expression happens to refer to something you<br />
didn't anticipate. Here are some examples.<br />
8. Self-reference. Concatenating phone and address<br />
is just an experiment. It is more useful to concatenate<br />
address1 and address2. Try to enter this control<br />
source in the address text box:<br />
= address1 & ", " & address2<br />
<strong>Access</strong> doesn't give you an error message, but in user<br />
mode you will see the text #Error rather than the guest<br />
data. This highly user-friendly message (;-) is in this<br />
case caused by a self-reference:<br />
Notice that the programmer name for the address text<br />
box is address1 - exactly the same as the name of the<br />
database field. <strong>Access</strong> assumes that we want to concatenate<br />
the address1 text box and the address2 field. In<br />
order to do this, <strong>Access</strong> has to compute the address1<br />
text box, but this means concatenating address1 and<br />
address2 once again. The computation would never<br />
stop and <strong>Access</strong> shows it with #Error.<br />
9. Repair self-reference. In order to repair the<br />
problem, give the address1 text box another programmer<br />
name. On the Other tab, replace the<br />
name address1 with Address. In user mode, the<br />
form should now look as the last form on Figure<br />
3.3A.<br />
40 3. <strong>Access</strong>-based user interfaces
Fig 3.3A Bound and unbound controls<br />
Add a checkbox<br />
to the detail form.<br />
As an experiment,<br />
bind it to the passport field<br />
Set Control Source to combine<br />
two guest fields into one.<br />
Result in user mode<br />
Final result: Two address lines in one<br />
Let us look at another troublesome problem:<br />
10. Referring to a built-in property. Let us try to<br />
concatenate the guest name with address2. Change<br />
the text box control source to:<br />
= name & ", " & address2<br />
In user mode, you will see that you don't get the name<br />
of the guest, but the name of the form itself! The reason<br />
is that a form has a Name property, and this is what<br />
you referred to. Notice that <strong>Access</strong> changed the name<br />
you typed to [Name]. This is a sign that <strong>Access</strong> recognized<br />
the name as something spelled with a capital N -<br />
in this case a property name.<br />
To avoid the problem, precede the name with a bang<br />
operator (!):<br />
= !name & ", " & address2<br />
The bang operator tells <strong>Access</strong> that you want a control<br />
or a database field - not a built-in property. We will<br />
discuss this a lot more in section 5.1.<br />
11. Name mistake. Try to use a non-existing name in<br />
the control source:<br />
= zz & address2<br />
<strong>Access</strong> doesn't give you an error message, but in user<br />
mode you will see the text #Name? instead of the guest<br />
data.<br />
3. <strong>Access</strong>-based user interfaces 41
3.3.1 Showing subform fields in the main<br />
form<br />
In <strong>Access</strong> 97 and 2000 you may also let a field in the<br />
main form draw on data in the subform. Figure 3.3B<br />
shows an example. We let a text box show a field from<br />
the subform. Try it in this way:<br />
1. Open frmFindStay in design mode and select the<br />
spare text box (Text6 on the figure). Set its control<br />
source to<br />
= subStayList ! name<br />
(Remember the equal sign.)<br />
This tells <strong>Access</strong> to look into the subform control<br />
to find the field name. Switch to user mode.<br />
The spare text box should now show the guest name<br />
from the currently selected record. Try selecting different<br />
records to see that the text box is updated automatically.<br />
Detail area. This approach can be useful if you want to<br />
show details of the selected record. You might for instance<br />
set off an area of the main form for details of the<br />
selected record. The area might show several fields<br />
from the selected record.<br />
Unfortunately, in <strong>Access</strong> 2003 this doesn't work<br />
automatically. You can set the control sources, but<br />
<strong>Access</strong> doesn't update the fields automatically. You<br />
have to do some programming to update the fields.<br />
Other expressions<br />
You can use a wide range of operators and functions to<br />
compute the control value, such as<br />
+, -, *, Sin( ), IIf( )<br />
The rules correspond to what you can write in Visual<br />
Basic, and they are similar to those you find in other<br />
programming languages. See section 6.4 for the<br />
detailed rules.<br />
In practice, you will rarely use complex expressions in<br />
the controls. Complex computations are usually done<br />
either as part of computing a table with an SQL query,<br />
or as part of a Visual Basic program.<br />
3.3.2 Variable colors - conditional<br />
formatting<br />
You can determine the colors and other format aspects<br />
of a control through the Format tab of the property box.<br />
For instance you can set Back Color of Guest to<br />
something different than white. However, the back<br />
color will be the same in every detail form.<br />
Sometimes you can vastly improve the user interface<br />
by showing critical data in color. This means that only<br />
some of the detail records will have a colored control.<br />
It might be tempting to do this by using an expression<br />
for Back Color, but this is not possible. Before <strong>Access</strong><br />
2000 it was actually completely impossible to have<br />
variable colors in continuous forms.<br />
Value-dependent color<br />
In <strong>Access</strong> 2000 and 2003 there is a primitive way to<br />
deal with variable colors. We can for instance let a<br />
number be green in the range 0 to 49, yellow in the<br />
range 50 to 69, and red otherwise. Or we could let a<br />
text be yellow in the alphabetical range from H to P,<br />
and red above it. Try it:<br />
2. Open fsubStayList in any mode, for instance Datasheet<br />
view to get a good overview of the records.<br />
3. Select the Guest name (the name control). Use the<br />
Format menu at the top of the <strong>Access</strong> window and<br />
select Conditional Formatting.<br />
4. Set up the conditional formatting as shown on Figure<br />
3.3C. Specify yellow background for the range<br />
"h" to "p" and red from "p" and up. You can add or<br />
delete conditions by means of the Add and Delete<br />
buttons at the bottom.<br />
5. Close the conditional formatting box and check<br />
that the colors are as expected. You may also try to<br />
enter new guests to check how the ranges work in<br />
detail.<br />
The variable colors work in datasheet view as well as<br />
form view. The colors do not show in the table behind<br />
the form (tblGuest).<br />
Default colors. At the top of the Conditional Formatting<br />
box, you can set the default color for the control.<br />
You can also set it through the Back Color property on<br />
the Format tab. However, this only defines the default<br />
color in form view. In datasheet view, the default color<br />
is defined by datasheet settings (use the main menu:<br />
Format -> Datasheet and Format -> Font).<br />
Expression-dependent color<br />
You may also let the color of one field depend on the<br />
values of other fields. As an example, we could let the<br />
color of the Address control depend on the Guest<br />
name. You might try this:<br />
6. Select the Address control (initially named<br />
address1) and select conditional formatting.<br />
7. For Condition 1, select Expression Is. Then select<br />
a background color and specify this expression for<br />
the background color to be used:<br />
!name > "h"<br />
When you close the conditional formatting window, all<br />
guests with names after H should have the new background<br />
color for the address, but they don't! The reason<br />
is that conditional formatting doesn't address fields in<br />
the same way as the control source property (I would<br />
call this a bug in <strong>Access</strong>). You have to use a more<br />
elaborate expression:<br />
8. Use the full address for the field<br />
Forms ! fsubStayList ! name > "h"<br />
The full address tells <strong>Access</strong> to look for a form called<br />
fsubStayList and find the name control in it. This<br />
42 3. <strong>Access</strong>-based user interfaces
Fig 3.3B Showing subform fields in the main form<br />
Set Control Source to show<br />
name of selected guest.<br />
Textbox Textbox automatically<br />
reflects the current selection.<br />
<strong>Access</strong> 97 and 2000 only<br />
Fig 3.3C Variable colors<br />
Select Guest field.<br />
Main menu:<br />
Format -> Conditional Formatting<br />
Specify condition and<br />
new background color.<br />
should work correctly when you close the formatting<br />
box. (In some cases <strong>Access</strong> shows an error message<br />
saying that it cannot find the Forms field. Ignore it, the<br />
formula works anyway.)<br />
Unfortunately, this full address works only when we<br />
see fsubStayList separately, but not when we see it as a<br />
subform of frmFindStay. We will have to use an even<br />
more elaborate address to tell <strong>Access</strong> that it is a subform<br />
of frmFindStay we talk about. The address to be<br />
used is<br />
Forms ! frmFindStay ! subStayList !name > "h"<br />
We will explain a lot more about these addresses in<br />
section 5.1.<br />
3. <strong>Access</strong>-based user interfaces 43
3.4 Tab controls and option groups<br />
Tab controls<br />
When space is insufficient on the form, a tab control is<br />
a way out. The property box in <strong>Access</strong> and the option<br />
window in many MS-Windows programs use tab controls<br />
to put ever more fields on a single window.<br />
Figure 3.4 shows how we use a tab control in the hotel<br />
system. The Stay window shows all details of a stay (a<br />
booking). It contains one tab control with two tab<br />
pages. The first tab page shows the rooms booked or<br />
occupied by the guest. The second tab page shows the<br />
services received, for instance breakfast. Try to make<br />
the essential parts of this form:<br />
1. Create a new form from the database window's<br />
Form tab (use Create form in Design view). Remember<br />
to set the grid size so that the grid is visible.<br />
2. Add the Stay No. field to the form (to be used for<br />
stayID later), but don't care to add all the other<br />
fields.<br />
3. Extend the grid area. Select the Tab-control tool<br />
from the toolbox and draw a large rectangle on the<br />
form.<br />
You now get three new controls on the form: the tab<br />
control and two tab pages in it. When you click in the<br />
empty area to the right of the tabs, you select the entire<br />
tab control. If you click on one of the tabs, you select<br />
this particular tab page.<br />
How to add further tab pages to the control? You rightclick<br />
the tab and select Insert Page. In the hotel system,<br />
two pages are enough. We need a subform on each<br />
of the two tab pages. Proceed like this:<br />
4. Select the first tab page. In its property box, enter<br />
the caption Rooms.<br />
5. Make sure the tab-page is selected and not the entire<br />
tab control. Select the subform tool from the<br />
toolbox and draw a subform on the tab page.<br />
6. Select the text box tool from the toolbox and draw<br />
the two fields for totals on the tab page.<br />
7. Also add the last total field (Total rooms and<br />
services till now). Note that it must be below the<br />
tab control. In design mode, the form should now<br />
look like the right part of Figure 3.4.<br />
8. Connect the mockup room list to the first tab page<br />
in this way. Select the subform control and set its<br />
SourceObject property to fsubStayRooms. (You<br />
created this subform in section 3.2.3.) In user<br />
mode, the form should now look like the left part<br />
of Figure 3.4.<br />
9. Select the second tab page and give it the caption<br />
Services. If you like, you can insert subforms and<br />
other controls on this tab too, similar to the Rooms<br />
tab.<br />
10. Give the Stay form a caption. Close it and give it<br />
the name frmStay.<br />
Warning: It may be tempting to draw a control on the<br />
main form and then drag it to the tab pages. On the<br />
screen it may look right, but it isn't. The control sticks<br />
to the main form and may be either in front of all the<br />
tab pages or behind all of them. You may, however,<br />
copy a control from the main form, select the tab page,<br />
and then paste the control there. When you click the<br />
various tab pages, you see that it sticks to the right<br />
page.<br />
Option groups<br />
If the user has to choose between a few options, it is<br />
traditional to show them as an option group with radio<br />
buttons (called option buttons in <strong>Access</strong>). The bottom<br />
of Figure 3.4 shows an example where the user can<br />
choose the paymethod with radio buttons.<br />
An option group is in some ways similar to a tab control.<br />
It is a control that contains other controls. However,<br />
an option group is just an elaborate way of<br />
showing a single integer value. The current value determines<br />
which radio button has a dot. In our example<br />
this integer would be the paymethod. Make the option<br />
group in this way:<br />
11. In design mode, choose the Option group tool<br />
from the toolbox. Make sure the Wizard is off.<br />
Draw a rectangle like the one on the figure.<br />
12. You have now got the control and its label. The<br />
label is shown across the top border. You can drag<br />
them around exactly as text boxes. Change the label<br />
to Paymethod.<br />
13. Select the Option button tool from the toolbox.<br />
Drag a rectangle where the option button and its<br />
label will be - or just click at the top left corner of<br />
this rectangle. Draw four option buttons.<br />
14. Change the labels for the options to Cash, Visa,<br />
etc.<br />
Look at the result in user mode. The buttons are all<br />
gray. Why? Because the control has no value - it cannot<br />
choose which button to give a dot. Remedy? Click<br />
in one of the buttons. If you click the first button, the<br />
control will get the value 1. If you click the second one,<br />
it becomes 2, etc.<br />
44 3. <strong>Access</strong>-based user interfaces
Fig 3.4 Tab control and Option group<br />
Wanted<br />
Select entire Tab control<br />
Option<br />
Command<br />
group.<br />
Draw on form.<br />
Add Option<br />
buttons.<br />
Select Tab control.<br />
Draw Command on form.<br />
Select one of the tab pages.<br />
Draw controls on it - or copy<br />
and paste.<br />
3. <strong>Access</strong>-based user interfaces 45
3.5 Menus<br />
In <strong>Access</strong> a form cannot have menus. Only the big<br />
<strong>Access</strong> window can have menus, but they can change<br />
according to which form is in focus.<br />
Before we start implementing the hotel menu, we need<br />
some terminology. Figure 3.5A shows what we are<br />
talking about. Initially, the <strong>Access</strong> window has a menu<br />
bar and one or more tool bars. <strong>Access</strong> uses the common<br />
term toolbar for menu bars as well as real toolbars.<br />
The toolbar concept also covers the free-floating<br />
toolbars, called toolboxes, and shortcut menus that pop<br />
up when you right click on a control. In a moment we<br />
will add another menu bar to be used by the hotel<br />
system.<br />
Each menu bar has one or more menus. A menu consists<br />
of a menu heading - the one we see on the menu<br />
bar - and the menu list that drops down when you select<br />
the menu heading.<br />
The menu list contains the menu items. Most of them<br />
are commands. They do the real work when selected.<br />
Some of the menu items may be second-level menu<br />
headings. They open another menu list when selected,<br />
and this is how we make multi-level menus. <strong>Access</strong><br />
uses the word command for the real commands as well<br />
as the lower-level menu headings.<br />
3.5.1 Create a new menu bar<br />
You can make menus whether in design mode or user<br />
mode.<br />
1. Right-click any point on the existing menus and<br />
select Customize. (Or use Tools -> Customize).<br />
You now get the customize window as shown on<br />
Figure 3.5A.<br />
2. On the Toolbars tab, click the New button. <strong>Access</strong><br />
asks for the name of the new toolbar. Call it Hotel<br />
- the name the user will see if he chooses the toolbar<br />
with the View menu. Click OK, and up comes<br />
a tiny menu bar - floating in the universe.<br />
3. Click the Properties button in the Customize win-<br />
Fig 3.5A Create a new menu bar<br />
Menu bar<br />
New menu bar: Hotel<br />
Tool bar<br />
Menu:<br />
Menu heading in the menu bar.<br />
Menu list that drops down<br />
Command<br />
(menu item)<br />
Right-click.<br />
Select Customize<br />
Create a new<br />
toolbar/menubar.<br />
Name it Hotel<br />
Make it a<br />
menubar<br />
Drag<br />
Command<br />
it to the<br />
menubar/toolbar area.<br />
Checked toolbars<br />
shown as default<br />
46 3. <strong>Access</strong>-based user interfaces
dow and set the Type of the new toolbar to Menu<br />
Bar. Close the properties window.<br />
The type of the toolbar determines where it is shown. If<br />
it is a Menu Bar, it will be shown at the top with any<br />
other menu bar. If it is a Toolbar, it will be shown below<br />
the menu bars.<br />
4. The new menu bar is still floating in the universe.<br />
Drag it to the fellow tool bars in the top of the<br />
<strong>Access</strong> window.<br />
The menu bar area should now look like the bottom of<br />
Figure 3.5A. The new menu bar looks very empty because<br />
it has no menus.<br />
Add menus to the menu bar<br />
5. Select the Commands tab in the Customize window<br />
(see Figure 3.5B).<br />
This Command tab is really confusing. It allows you to<br />
choose between a lot of built-in menu items - those that<br />
already are in the various toolbars - but also add new<br />
menu items. All these menu items are grouped according<br />
to categories. For most commands you can get a<br />
short description by selecting the command and clicking<br />
the Description button.<br />
6. Go to the bottom of the category list and select<br />
New Menu. This category consists of only one<br />
command - a new menu. Select this New Menu<br />
command and drag it to the new menu bar. Since<br />
we want several menus on the menu bar, drag it a<br />
couple of times. The toolbar area should now look<br />
like the one on Figure 3.5B.<br />
7. Keep the Customize window open and right-click<br />
each of the new menus to give it a name. For the<br />
hotel system, use the names &Rooms, &Stays and<br />
&Breakfast. The &-sign shows that the following<br />
letter is to be underlined and used as a shortcut<br />
(e.g. Alt+S for Stays).<br />
Fig 3.5B Add menus to the menubar<br />
Drag<br />
Command<br />
new menu headings<br />
to the toolbar.<br />
Command<br />
Right-click and<br />
give it a name.<br />
3. <strong>Access</strong>-based user interfaces 47
3.5.2 Add commands to the menu list<br />
As an example, we will add two commands to the Stays<br />
menu: One that opens the FindStay screen and one that<br />
cancels (deletes) a stay.<br />
1. Select the Commands tab in the customize window<br />
and the category All Forms (Figure 3.5C).<br />
This category gives access to commands that open an<br />
existing form. You see the existing forms to the right.<br />
2. Select frmFindStay and drag this command to the<br />
Stays menu heading. Wait a moment for the Stays<br />
menu to unfold so that you can place the command<br />
on the menu list.<br />
3. Right-click the command and give it the name<br />
Show FindGuest screen and the style Text Only.<br />
The right-click allows you to do many other things to<br />
this command. You can assign an icon to it and edit the<br />
icon. (This is more useful when you design toolbars<br />
and toolboxes rather than menu bars.) If you click<br />
Properties at the bottom of the list, you can determine<br />
which action the command shall perform when selected.<br />
In our case, we use the built-in action Open a<br />
form.<br />
Add the CancelStay command<br />
4. Select the category File and the command Custom.<br />
(This is the only command that doesn't build on an<br />
existing command.) Drag this command to the<br />
Stays menu and position it properly relative to the<br />
other command on the menu.<br />
5. Right-click the command and set its name to<br />
Cancel Stay.<br />
The Custom command has no built-in action. In its<br />
property box, we will later add a call to a Visual Basic<br />
function (section 5.7) that cancels the stay.<br />
6. Close the Customize window and try out the commands.<br />
The ShowFindGuest command should actually<br />
work, while the CancelStay does nothing at<br />
present.<br />
You may add all the other menus and commands at this<br />
stage to complete the mockup, but better spend your<br />
time doing it for your own design project.<br />
3.5.3 Attach the toolbar to a form<br />
You can attach a toolbar to a form so that it is shown<br />
only when this form is in focus.<br />
7. First hide the Hotel menu: Right click any toolbar<br />
to open the customize window. On the Toolbars<br />
tab, find the Hotel menu at the end of the list. Remove<br />
the check mark and close Customize.<br />
8. The Hotel menu is not visible anymore. Now open<br />
frmFindStay in Design view. In the form's property<br />
box, select the Other tab. Set the Menu Bar<br />
property to Hotel and close the form.<br />
When you now open frmFindStay in user mode, the<br />
Hotel menu will be visible and it will have replaced<br />
<strong>Access</strong>'s standard menu. Open frmStay too and switch<br />
the focus back and forth between the two forms. The<br />
menus will change accordingly.<br />
If you like, you can make another toolbar and give it<br />
the type Toolbar. Then attach it to frmStay through the<br />
Other-tab, but make it the Toolbar of frmStay rather<br />
than the Menu Bar. Open both forms in user mode and<br />
switch the focus back and forth. Notice that when<br />
frmStay is in focus, its toolbar overwrites <strong>Access</strong>'s<br />
standard toolbar. When frmFindStay is in focus, its<br />
menu bar overwrites <strong>Access</strong>'s standard menu bar.<br />
3.5.4 Startup settings - hiding developer<br />
stuff<br />
When the system is finished, the user should not see all<br />
the <strong>Access</strong> menus, the database window for selecting<br />
and creating forms, etc. It may be necessary to hide all<br />
of this already in the mockup. Here is how to do it:<br />
9. Select Tools->Startup. You now see the startup<br />
settings (Figure 3.5D).<br />
10. Change these settings: Application Title = Hotel<br />
system (the user sees this name in the title bar instead<br />
of the name <strong>Access</strong>). Menu bar = Hotel (the<br />
user sees this menu at the top of the screen). Display<br />
Form/page = frmFindStay (the user sees this<br />
form on the screen initially).<br />
11. Hide the standard things: Full menus and Database<br />
window.<br />
This will give the correct view for a mockup. When<br />
you later have a functional system, you should disable<br />
most other things too, for instance built-in shortcut<br />
menus (right-click menus) and special keys, for instance<br />
F11 to open the database window.<br />
12. Close the database and open it again. You should<br />
now see the naked application window with only<br />
the FindStay window and the hotel menu.<br />
Help! How do you get it back to normal so that you<br />
can work as a developer? You cannot even change the<br />
startup settings anymore. Of course there is a solution:<br />
13. Close the hotel system window again. Now hold<br />
down Shift while you open it. Keep Shift down<br />
until it is completely open. (In <strong>Access</strong> 2003 this<br />
includes answering about unsafe files.)<br />
The window looks again the developer way, and you<br />
can change the startup settings. You might leave them<br />
in the final user version and remember to use Shift<br />
every time you are working as a developer. My experience<br />
is that this is too cumbersome and you forget<br />
48 3. <strong>Access</strong>-based user interfaces
Fig 3.5C Add commands to the menu list<br />
Drag<br />
Command<br />
new command<br />
to the menu (wait a moment<br />
for the menu list to drop down).<br />
Right-click and<br />
give<br />
Command<br />
it a name.<br />
Define style.<br />
See short explanation<br />
of the command.<br />
Fig 3.5D Startup settings for hiding developer stuff<br />
Initial<br />
settings<br />
Name shown in<br />
<strong>Access</strong> title bar<br />
The menu shown<br />
The startup form<br />
Hide other menus<br />
Hide database window<br />
about the Shift too often. I always set them back when<br />
I have tried it out.<br />
3. <strong>Access</strong>-based user interfaces 49
3.6 Control tips, messages, mockup prints<br />
Control tips - pop-up help<br />
In the final system we can add Control Tips - the small<br />
texts that pop up when the mouse rests a moment on a<br />
button or another control (Figure 3.6). We can make<br />
them in the tool-based mockup, cut them out, and show<br />
them to the user as stickers. Let us make a control tip<br />
for the Find guest button on frmFindStay:<br />
1. Open frmFindStay in design mode. Click on the<br />
NewGuest button to open its property box.<br />
2. On the Other tab, enter the ControlTip text. There<br />
is little space to type in, so use Shift+F2 to open a<br />
larger window to type in. You may want to split<br />
the text into two or more lines - oops - the window<br />
closes! Use Ctrl+Enter to change line.<br />
3. Switch to user mode and check that the control tip<br />
works.<br />
Messages<br />
The final system will have many messages to show to<br />
the user in various circumstances. They will be deeply<br />
embedded in the Visual Basic program, but when using<br />
the mockup for usability tests, the facilitator has to<br />
bring them up as stickers. So at this stage we have to<br />
generate them on the screen and then print them out.<br />
Figure 3.6 shows the easiest way to do it. It works both<br />
in design mode and user mode.<br />
4. Open the Immediate window with Ctrl+G. (Also<br />
called the Debug window.)<br />
5. If you work in <strong>Access</strong> 2000 or 2003, this also<br />
opens the Visual Basic window where you can<br />
program. Make the Visual Basic window smaller<br />
than the full screen (use the restore button next to<br />
the cross that closes the window).<br />
Immediate window. The Immediate window is also<br />
called the debug window. In it you can type Visual Basic<br />
statements and have them executed immediately.<br />
MsgBox. We will use the MsgBox function. It has<br />
many parameters, but in most cases we just use the first<br />
two:<br />
MsgBox "the message text to show",<br />
the buttons to show + the icon to use<br />
For our mockup we won't even care about the message<br />
text. We just show it as a very long empty text to make<br />
the message box wide enough. We print out the message<br />
box, copy it and fill in the message text by hand.<br />
6. Enter the first line shown in the Immediate window:<br />
msgbox "<br />
", vbYesNo+vbInformation<br />
As soon as you click Enter, Visual Basic will execute<br />
the statement and show the message box. Print it at this<br />
stage (see below). Then play the user's role and answer<br />
Yes.<br />
7. Do the same for the next three lines in the Immediate<br />
window. This gives you a sample of the four<br />
basic types of messages in MS Windows.<br />
The strange words vbYesNo etc. are named constants.<br />
Actually, vbYesNo is 4 and vbInformation is 64. When<br />
you add them together, Visual basic can see that you<br />
want a Yes and a No button, plus the icon for an Information<br />
message.<br />
VBA guides. Visual Basic can guide you while you<br />
type in the statement. If it doesn't do it by itself, type<br />
Ctrl+I after the function name. It will then show the<br />
parameters you may type. After the first comma, type<br />
Ctrl+Shift+J and it will show a list of the possible constants<br />
at this point. You may select a constant from the<br />
list and use Tab to insert it in the statement.<br />
Leave Visual Basic. How do you get out of Visual<br />
Basic and back to the <strong>Access</strong> world? Simply close the<br />
Visual Basic window. This doesn't close the database<br />
window.<br />
Printing the screens<br />
Above we have developed the mockup so that the right<br />
things appear on the screen. How do you get them on<br />
paper for use as mockups in usability testing? In the<br />
standard installation of MS-Windows and MS-Office<br />
there is only one way as far as I know:<br />
8. Press Alt+PrtSc (Print Screen). This copies the<br />
currently selected large window (the entire <strong>Access</strong><br />
window) to the clipboard.<br />
When you have selected a message box, Alt+PrtSc<br />
copies only this box to the clipboard.<br />
9. Paste it into a Word document.<br />
50 3. <strong>Access</strong>-based user interfaces
Fig 3.6 Messages and control tips<br />
Select New guest in Design mode.<br />
Define ControlTip text.<br />
Use Shift+F2 for long texts<br />
To show a message box:<br />
Enter the Visual Basic world<br />
with Ctrl+G (debugger)<br />
Type these commands.<br />
In the document, you now see a copy of the entire window<br />
(or the message box). For mockup purposes, you<br />
will only need a small part of the entire window. Crop<br />
away the unnecessary parts as follows:<br />
10. In the Word document, select the screen picture. If<br />
necessary, open the Picture toolbox (View -><br />
Toolbars -> Picture).<br />
11. Select the Crop tool from the picture toolbox.<br />
12. Crop the picture so that you only have the necessary<br />
part left.<br />
Copy a menu. With this approach you cannot copy a<br />
drop-down menu, because it rolls up when you press<br />
Alt. To copy a drop-down menu, you have to use Print<br />
Screen without Alt. This copies the entire screen to the<br />
clipboard. You then have to crop away most of the<br />
screen, but it can be done.<br />
You can add as many screen parts to the Word document<br />
as you like. Then print it and your mockup is almost<br />
ready. What remains is to copy pages, trim message<br />
boxes and control tips with scissors, and write<br />
data in the various windows. Usually it is best to enlarge<br />
the screens when you copy them.<br />
This works but is very cumbersome, and it is almost<br />
impossible to crop away exactly the right amount.<br />
Further, the document becomes a huge file due to all<br />
the large screen dumps (they are there in full size even<br />
if you have cropped most of them away).<br />
For professional use, get a screen grabber (a screen<br />
capture tool). There are freeware screen grabbers available<br />
that work very well. These tools help you copy<br />
just the right part of the screen, and many of them can<br />
also capture a menu when it is rolled down.<br />
3. <strong>Access</strong>-based user interfaces 51
4. Queries - computed tables<br />
Highlights<br />
• Combine multiple tables into one (Query).<br />
• Basics of Structured Query Language (SQL).<br />
• User-entered search criteria.<br />
4.1 Query: join two tables<br />
In Chapter 3 we had a simple version of the Find Guest<br />
window. It showed a list of guests based on data from<br />
the Guest table. In the real system we want to show a<br />
list of stays, including data about the guest and the<br />
room booked. This means that we have to combine<br />
data from the Stay table, the Guest table, and the<br />
RoomState table.<br />
Our first version of the stay list will just combine the<br />
Stay table and the Guest table. The bottom of Figure<br />
4.1 shows the result we want: a single table with some<br />
fields from tblStay and some from tblGuest.<br />
Create a query<br />
1. Start in the database window. Select Queries and<br />
Create query in Design view. (In <strong>Access</strong> 97 select<br />
New and then Design view.)<br />
2. <strong>Access</strong> asks you to select the tables you want to<br />
combine. Select tblGuest and tblStay (Figure 4.1).<br />
Click Add and then Close.<br />
You now see the query design window (middle of Figure<br />
4.1). The top part of the window is an E/R-model,<br />
in our case consisting of tblGuest and tblStay. <strong>Access</strong><br />
has included the relationship from the full E/R-model.<br />
It shows that the tables will be combined according to<br />
guestID. This is just what we want in our case, but in<br />
other cases you have to remove the relationships you<br />
don't need and add new ones that you need for the<br />
query. These changed relationships are only used in the<br />
query; they don't influence the full E/R-model.<br />
You may delete tables from the query window or add<br />
further tables by right-clicking in the E/R-model.<br />
In the lower part of the window, you see the query<br />
grid where we will make a column for each field in the<br />
computed table.<br />
3. Drag stayID from tblStay to the grid. Then drag<br />
name, address1 and phone from tblGuest. Finally,<br />
drag state from tblStay. (You may also doubleclick<br />
the fields.)<br />
You may rearrange the columns by selecting a column<br />
and dragging it to another place.<br />
4. Switch to datasheet view. The query table should<br />
look like the bottom of the figure. It contains all<br />
In this chapter we will begin making a functional prototype<br />
that can show real data and update it. To do this,<br />
we often have to combine data from many tables in the<br />
database. All relational database systems provide<br />
means for combining tables into new tables by means<br />
of queries. In this chapter we will see how to do it in<br />
<strong>Access</strong>.<br />
stays recorded in the database with guest information<br />
attached. In the example, John Simpson has<br />
three stays and Yun Chen two stays.<br />
5. Save the query and give it the name qryStayList.<br />
(The standard prefix for queries is qry.)<br />
This looks almost too easy. What happens really?<br />
<strong>Access</strong> has made a so-called join of tblGuest and<br />
tblStay. According to the E/R-model, each record in<br />
tblStay has a connecting string to a record in tblGuest.<br />
In the query table, there will be one record for each of<br />
these strings. If one of the stays didn't have a string to a<br />
guest, this stay would not occur in the result.<br />
Since each query record corresponds to a string between<br />
two source records, we can include arbitrary<br />
fields from both source tables. This is what we have<br />
done.<br />
Star = all fields? Note that the data model at the top of<br />
the query window has a star in each box. It means "all<br />
fields". You may drag it to the grid and all source fields<br />
will be included in the query table. This may be convenient,<br />
but don't do it yet. Why? Assume that you<br />
drag the star from both tables. Then you will have two<br />
guestID fields in the result. You then have to refer to<br />
them as tblStay.guestID and tblGuest.guestID. This<br />
leads to endless confusion later, particularly because<br />
some of <strong>Access</strong>'s built-in Wizards cannot figure out<br />
about these names and screw things up.<br />
Dynaset and data entry to query table<br />
The query not only shows data, it can also be used for<br />
data entry. Try these experiments:<br />
6. Open qryStayList and tblGuest at the same time.<br />
7. In the query table, change the name of one of the<br />
guests. As soon as you move the cursor to the next<br />
line, you will see the change in the query table as<br />
well as the guest table.<br />
8. In tblGuest, try to change the guest name again.<br />
The query table will be updated immediately.<br />
The query table we look at is a dynaset because it is<br />
updated automatically. We can enter data into it because<br />
it is a simple query where <strong>Access</strong> can find out<br />
how to store the data into the source tables. For more<br />
complex queries, this is not possible.<br />
52 4. Queries - computed tables
Fig 4.1 Query - join two tables<br />
Computed<br />
tables<br />
Tables<br />
to join<br />
Drag the wanted<br />
fields to grid.<br />
(Or double click)<br />
Datasheet<br />
view<br />
Query grid<br />
Wanted:<br />
List of stays<br />
with guest data<br />
The query has a property called Recordset Type. It is<br />
Dynaset as a standard, but you can change it to Snapshot.<br />
Then <strong>Access</strong> computes the record list when you<br />
open the query, and doesn't update it dynamically. In<br />
this case you cannot enter data through the query.<br />
(How to find the Recordset Property? From the query<br />
design window, use View -> Properties. But don't<br />
change anything right now.)<br />
Adding/deleting records in a dynaset<br />
9. In the query table, enter a guest name in the last<br />
line (with star-indication). When you move the<br />
cursor up, you have created a new guest record<br />
(but not a new stay record). You cannot see it in<br />
tblGuest, but if you close and open tblGuest, you<br />
will see it. (Using the sort button A/Z on the toolbar<br />
will also show the new guest.)<br />
10. In the query table, enter a state in the last line and<br />
move the cursor up. <strong>Access</strong> refuses to do it. It tries<br />
to create a stay record, but lacks the foreign key to<br />
the guest and cannot preserve the referential integrity.<br />
If you had included the foreign key in the<br />
query, you could set it now and succeed. Never<br />
mind. (Remember to use Esc to get out of the inconsistent<br />
data update.)<br />
11. In the query table, try to delete a line. What you<br />
delete is the stay record, not the guest record.<br />
Conclusion. The dynaset is suitable for editing data<br />
produced by a simple query. As soon as you fill in a<br />
field in the new record line (star-marked), <strong>Access</strong> will<br />
try to create a new record. If you fill in a field from the<br />
guest table, <strong>Access</strong> will make a guest record. If you fill<br />
in a field from the stay table, <strong>Access</strong> will (also) make a<br />
stay record. When you move the cursor to another<br />
record, <strong>Access</strong> will check that referential integrity and<br />
other rules are met.<br />
4. Queries - computed tables 53
4.2 SQL and how it works<br />
SQL means Structured Query Language. Behind a<br />
query is always an SQL-statement that specifies what<br />
to compute. Let us look at the SQL statement in<br />
qryStayList:<br />
1. Open qryStayList. Select SQL view with the view<br />
menu at the top left of the <strong>Access</strong> window.<br />
The result should be as shown on Figure 4.2. At first<br />
sight, an SQL-statement looks overwhelming, but after<br />
a while it is not so hard to read. Most SQL-statements<br />
are SELECT statements with this structure:<br />
SELECT <br />
FROM <br />
The SELECT part corresponds to the top-two lines of<br />
the query grid. Field names may include strange characters,<br />
and in this case <strong>Access</strong> surrounds the name with<br />
square brackets to avoid that the name is interpreted as<br />
something else. (Often <strong>Access</strong> surrounds the names<br />
with square brackets for no apparent reason.) Examples<br />
of names with strange characters:<br />
guest# written as [guest#]<br />
Guest History written as [Guest History]<br />
The FROM part corresponds to the tables and the relationships<br />
in the top part of the query window. In our<br />
example, the FROM part says that tblGuest and tblStay<br />
must be joined, and the join criterion must be that<br />
guestID must be equal in the two tables.<br />
Actually, <strong>Access</strong> stores the query as an SQL-statement,<br />
and when we want to see the query in design view,<br />
<strong>Access</strong> translates it into a grid and the data model. You<br />
can sometimes observe this when you have set up the<br />
grid in one way. When you close the query and open it<br />
again, the grid looks different, for instance with the<br />
columns in a different sequence. Your version and<br />
<strong>Access</strong>'s version correspond to the same SQL statement.<br />
You can also type the SQL-statement directly in SQLview.<br />
<strong>Access</strong> may still be able to show it as a grid, but<br />
for some SQL-statements it is not possible. For instance<br />
this is the case with a UNION statement, where<br />
two tables are to be concatenated one after the other.<br />
<strong>Access</strong> can handle this, but not show it as a grid.<br />
Expert <strong>Access</strong> developers sometimes define a query<br />
with a grid, sometimes with SQL, and often they<br />
switch between the two during development.<br />
Capital letters. <strong>Access</strong> doesn't care whether you type<br />
with capitals or small letters. For instance you may<br />
type SELECT with small letters, but when you close<br />
and open the query in SQL view, SELECT will be with<br />
capitals. When you define field names and other<br />
names, <strong>Access</strong> remembers the capitalization in the<br />
name definition, but accepts names written with different<br />
caps as equivalent.<br />
The matrix at the bottom of Figure 4.2 illustrates what<br />
the SQL-statement basically does. It finds the result in<br />
seven steps (a to g):<br />
a) Cartesian product. The SQL-engine takes the<br />
first guest record and extends it with all the fields<br />
from the first stay record. It corresponds to the top<br />
left cell of the matrix. Then it takes the second<br />
guest record and extends it with the first stay<br />
record. This corresponds to the second cell in the<br />
top row. And so on for all the guest records. This<br />
corresponds to all the cells in the top-row of the<br />
matrix. Then it does it once again using the second<br />
stay record. This gives the second row of the matrix.<br />
And so on until we have got a row for each<br />
stay record.<br />
In summary, the matrix corresponds to all the possible<br />
combinations of a stay and a guest. If tblGuest has x<br />
records and tblStay y records, the result will be x*y<br />
records. This is called the Cartesian product after the<br />
mathematician and philosopher Des Cartes.<br />
b) Join. Next, the SQL-engine discards all cells<br />
where the join criterion is not met. In our case, the<br />
criterion is that guestID must be equal in the two<br />
source tables. What is left are the cells marked<br />
with a cross on the figure. Notice that all stays are<br />
included because they have a cross in their row.<br />
However some guests (for instance guest 2) are not<br />
included because no stay is recorded for them in<br />
the database.<br />
c) Where. We can also specify Where criteria, for<br />
instance<br />
Where state=1<br />
This would cause the SQL-engine to discard all<br />
cells where state isn't one. They are discarded at<br />
this point of the process.<br />
d) Group By. We can specify Group-By criteria.<br />
They cause the SQL-engine to bundle the<br />
remaining records according to the Group-By<br />
criteria and compress each bundle into one record.<br />
e) Having. If we have a Group-By, we can also<br />
specify Having criteria. They tell the SQL-engine<br />
to keep only bundles that meet the criterion. Other<br />
bundles are discarded at this point.<br />
f) Order By. We can ask the SQL-engine to order<br />
the remaining records according to some criteria.<br />
Some people say that the records are sorted rather<br />
than ordered.<br />
54 4. Queries - computed tables
Fig 4.2 What SQL does step-by-step<br />
tblStay:<br />
tblGuest: guestID<br />
stayID, guestID<br />
1 2 5 6 8<br />
728 1<br />
736 1<br />
740 1<br />
727 5<br />
729 5<br />
737 6<br />
739 8<br />
a) Cartesian product:<br />
5*7 combinations of guest and stay<br />
b) Join:<br />
Include only those where<br />
tblGuest.guestID = tblStay.guestID<br />
c) Where:<br />
Include only those where . . .<br />
d) Group By:<br />
Compress bundles of records to one<br />
e) Having:<br />
Include only bundles where . . .<br />
f) Order By:<br />
Sort the remaining records according to . . .<br />
g) Select:<br />
Select and compute new fields,<br />
discard the rest<br />
g) Select. Finally, SQL discards all the fields that we<br />
have not mentioned in the SELECT-part. In the<br />
grid there is a Show indication in each column. It<br />
indicates that this column must be in the SELECTpart<br />
and be shown in the final table. We will later<br />
see that we can compute new fields in the<br />
SELECT part. This computation also takes place at<br />
this stage.<br />
Notice that these rules tell us that we can have join<br />
criteria (and other criteria) that refer to fields that are<br />
not shown in the result. We have utilized this rule in<br />
qryStayList because the join criterion is given by<br />
guestID, which isn't in the result at all.<br />
Although the query result is as described above, the<br />
SQL-engine doesn't arrive at it that way. It would take<br />
much too long time in large databases. Assume that we<br />
joined two tables each with 10,000 records. The SQLengine<br />
would have to create 100 million combination<br />
records, and then discard most of them. In practice, the<br />
SQL-engine uses index tables and other tricks to create<br />
only the "crosses".<br />
Wonder why we talk about <strong>Access</strong> and the SQL-engine?<br />
You don't see the SQL-engine directly because<br />
<strong>Access</strong>'s user interface hides it. But <strong>Access</strong> and the<br />
SQL-engine are two different software components.<br />
We may connect our <strong>Access</strong> application to another<br />
SQL-engine than the one delivered with <strong>Access</strong>. As an<br />
example, we might connect it to an Oracle database.<br />
Most of our user interface would still work the same<br />
way.<br />
4. Queries - computed tables 55
4.3 Outer join<br />
The query we made above used an INNER JOIN in the<br />
SQL-statement. Can we also make an outer join? Yes,<br />
and we need it right now. Usability tests showed that<br />
users had troubles distinguishing guests from stays.<br />
The solution turned out to be that whatever the user<br />
searched for, the system would show matching stays<br />
and matching guests.<br />
What we need is a list of all stays, but the list must also<br />
include guests that have no stay at present in the database<br />
(guest 2 on Figure 4.2 was an example). Now we<br />
want to include all guests, no matter whether they have<br />
a matching stay or not. This is an OUTER JOIN. Make<br />
it this way:<br />
1. Make sure there is a guest in the database without<br />
a stay. If not, enter a new guest record now.<br />
2. Show qryStayList in design mode (Figure 4.3).<br />
3. Select the relationship arrow, then right-click it.<br />
Choose inclusion of all records from tblGuest.<br />
4. Switch to datasheet view. Now the stay-less guests<br />
should appear on the list. These lines will have<br />
blanks in the fields originating in tblStay.<br />
5. Look also at the SQL version. It now says<br />
FROM tblGuest LEFT JOIN qryStayArrival<br />
ON ...<br />
This means that all records in the left side table<br />
have to be included. Right joins exist too, of<br />
course. An outer join means a Left or a Right Join.<br />
What happens in an outer join? When the system finds<br />
a guest without any stay, it combines the guest with a<br />
blank stay record and includes it in the result. The bottom<br />
of Figure 4.3 shows how this rule would include<br />
guest 2. Blank fields have the value Null.<br />
56 4. Queries - computed tables
Fig 4.3 Outer join<br />
Wanted:<br />
Include all guests<br />
Outer join:<br />
Right-click and choose<br />
Blanks for stay fields<br />
tblStay:<br />
stayID, guestID<br />
728 1<br />
736 1<br />
740 1<br />
727 5<br />
729 5<br />
737 6<br />
739 8<br />
1 2 5 6 8<br />
tblGuest: guestID<br />
SELECT tblStay.stayID, tblGuest.name, . . .<br />
FROM tblGuest LEFT JOIN tblStay ON<br />
tblGuest.guestID = tblStay.guestID;<br />
Outer join:<br />
Add missing guests combined<br />
with a blank stay (Null values).<br />
Null stay<br />
4. Queries - computed tables 57
4.4 Aggregate query - Group By<br />
If we want to use the stay list for the real user interface,<br />
we still lack something: the arrival date and the room<br />
number. In order to get this data, we have to include<br />
data from tblRoomState:<br />
arrival = first date among the room states.<br />
room = first roomID among the room states.<br />
When there is more than one room,<br />
show only the text "more".<br />
We will first compute an extended version of the stay<br />
table with these data added to each stay. The small datasheet<br />
to the right in Figure 4.4A outlines the desired<br />
result. In order to do this, we have to bundle all room<br />
states of the stay into one, leaving only the arrival date<br />
and the room indication. This is an example of an aggregate<br />
query. Here is how to do it:<br />
1. From the database window, create a new query in<br />
design mode. Include tblRoomState and tblStay.<br />
(See top of Figure 4.4A.)<br />
2. Drag these fields to the grid: stayID, guestID, state<br />
(from tblStay) , date and roomID. You now have<br />
an ordinary inner join based on the criterion<br />
tblRoomState.stayID=tblStay.stayID<br />
3. Change to datasheet view. You should now see a<br />
table like the one at the lower left of Figure 4.4A.<br />
It contains a record for each of the room states -<br />
with some of the stay fields added.<br />
Find the smallest date and roomID. We want to<br />
combine all records with the same stayID into one, as<br />
shown on the figure. For instance we have four records<br />
with stayID = 727. They make up a bundle of records.<br />
All the records in the bundle have the same stayID, but<br />
they have different dates and room numbers. We want<br />
to compress this bundle into one record - the one<br />
shown to the right.<br />
4. Click the sum symbol on the tool bar (Σ) or rightclick<br />
in the grid to find the Σ. You will now see a<br />
new row in the grid, Total.<br />
Initially, <strong>Access</strong> shows Group By everywhere in the<br />
total-line. We want to group records by stayID. For<br />
date and roomID we want to find the lowest value in<br />
each group:<br />
5. Change the total-setting for the date column to<br />
Min. Do the same for the roomID column. If you<br />
now change to datasheet view, you should see a<br />
shorter table, somewhat like the one to the right.<br />
The heading for the date column now says MinOfDate<br />
and it correctly shows the first date for this stay. The<br />
roomID column is similar.<br />
You may wonder why we have left guestID and state<br />
as Group By. Actually, when two records have the<br />
same stayID, they also have the same guestID and<br />
state, because these columns are fields from the stay<br />
table. So grouping by them is alright. You may try to<br />
change the setting for guestID to Min rather than<br />
Group By. It makes no change in the result since all<br />
records in the bundle have the same stayID and thus<br />
the same guestID.<br />
6. Save the query and give it the name qryStay-<br />
Arrival.<br />
Alias - renaming a column. At this stage the arrival<br />
date is computed correctly, but we would like a different<br />
name (an alias) for the column:<br />
7. Open the query in design view. In the grid, change<br />
the heading of the date column to arrival: date.<br />
This causes <strong>Access</strong> to compute the first date as before,<br />
but give the result the name arrival.<br />
Computed field. The last thing missing is that the first<br />
roomID may be confusing to the user if there is more<br />
than one room in the stay. It is particularly confusing if<br />
John Simpson first stays in room 12, then moves to<br />
room 11. The stay list would then indicate room 11 and<br />
the receptionist might by mistake give him the key for<br />
room 11 when he arrives. This is why we want to show<br />
"more" if the stay involves more than one room. The<br />
receptionist will then have to open the stay window to<br />
see which rooms and when.<br />
In order to find out whether there are more than one<br />
room in the stay, we compute the Min and Max of<br />
roomID and compare them:<br />
8. Add another roomID column in the grid and let it<br />
compute Max rather than Min (Figure 4.4A). Rename<br />
the two roomID columns to A and B as<br />
shown.<br />
9. Use a blank column - no dragging of fields. In the<br />
total line, indicate that it is an Expression (a computed<br />
value). In the top line specify this expression:<br />
room: IIf(A=B, A, "more")<br />
Warning: Depending on the regional settings of<br />
your computer, you may have to use semicolons<br />
instead of commas (see more in section 6.6):<br />
room: IIf(A=B; A; "more")<br />
This expression says that we want a new field called<br />
room. If column A (the smallest roomID) is equal to<br />
columnB (the largest roomID), then the result shown<br />
must be this roomID. Otherwise the result must be the<br />
text "more". The operator IIf is called an immediate if.<br />
See the result in datasheet mode. It should be as shown<br />
at the lower right of Figure 4.4A. The room column is<br />
what we need for the stay list.<br />
Also have a look at the SQL-version:<br />
58 4. Queries - computed tables
Fig 4.4A Aggregate query - Group By - bundle records<br />
Alias<br />
Σ: Group By<br />
Wanted result:<br />
grouped by stayID<br />
Bundle -> Min(date)<br />
SELECT Min(tblRoomState.date) AS arrival . . .<br />
FROM tblStay INNER JOIN tblRoomState<br />
ON tblStay.stayID = tblRoomState.stayID<br />
GROUP BY tblStay.stayID . . . ;<br />
SELECT Min(tblRoomState.date) AS arrival . . .<br />
FROM tblStay INNER JOIN tblRoomState ON<br />
tblStay.stayID = tblRoomState.stayID<br />
GROUP BY tblStay.stayID . . . ;<br />
The renaming is in SQL handled by AS arrival in the<br />
first line. The bundling of records is handled by<br />
GROUP BY in the last line. Group By works after the<br />
Join, but before the Select is made. The Select part can<br />
thus refer to any of the fields Grouped By, but what<br />
about the non-grouped fields, for instance date? If we<br />
mention them in the Select part, which of the date values<br />
in the bundle should the computer choose? For this<br />
reason, non-grouped fields must be accessed via Min or<br />
another aggregate function.<br />
4. Queries - computed tables 59
Select bundles HAVING<br />
We may select only certain bundles and discard the<br />
rest. Figure 4.4B shows an example. We want to keep<br />
only the stays with arrival 21-10-2002 (European date<br />
format).<br />
10. In the grid column for arrival, set the criterion as<br />
shown in the figure. The result should be as shown<br />
at the lower right of the figure.<br />
First(x), Last(x) The first (last) value in column x of<br />
the bundle. May be null. Although <strong>Access</strong><br />
allows it, never use these functions in a<br />
query. The reason is that the sequence of<br />
the records is arbitrary during the SQL-engine's<br />
work - even if you specify that the<br />
input or the result be ordered in some way.<br />
The result will be a random record in the<br />
bundle.<br />
Also have a look at the SQL-version:<br />
SELECT Min(tblRoomState.date) AS arrival . . .<br />
FROM . . .<br />
GROUP BY tblStay.stayID<br />
HAVING Min(tblRoomState.date) = #10/21/02# ;<br />
Notice that in the query grid, we could just set the<br />
criterion on the arrival column. It is tempting to make<br />
a similar thing in SQL:<br />
SELECT Min(tblRoomState.date) AS arrival . . .<br />
FROM . . .<br />
GROUP BY tblStay.stayID<br />
HAVING arrival = #10/21/02# ;<br />
However, this fails because SQL doesn't compute new<br />
fields such as arrival until all the criteria have been<br />
handled. Thus arrival isn't available at the time when<br />
HAVING is dealt with. So in SQL you have to repeat<br />
the Min-expression in the HAVING clause.<br />
Also notice the date formats. In the query grid we use<br />
the regional date formats, but in SQL we must use US<br />
date formats.<br />
Other aggregate functions<br />
Above we have used two aggregate functions, Min and<br />
Max. There are others available. Here is a summary of<br />
them:<br />
Var(x)<br />
VarP(x)<br />
First and Last are not parts of SQL because<br />
the result of a true SQL query is a set of<br />
records, not an ordered list of records. It<br />
makes no sense to talk about the first or<br />
last in a set. Ordering of the records into a<br />
list only makes sense when the records are<br />
used outside SQL. As an example, First<br />
and Last may be used in Visual Basic to<br />
find the first or last value in a list shown to<br />
the user.<br />
The variance of the values in column x. A<br />
variance is used in statistical analysis. It<br />
shows how much the x values in the<br />
bundle deviate from the average x value.<br />
First the Var-function computes the<br />
differences between each x and the<br />
average in the bundle. Then it squares the<br />
differences and finds the total of the<br />
squares. Finally it finds the average<br />
squared difference by dividing with<br />
Count(x)-1.<br />
Similar to Var(x) but divides with<br />
Count(x) rather than Count(x)-1. You<br />
cannot select VarP in the query grid, but<br />
you can specify it in SQL.<br />
Count(x)<br />
The number of records in the bundle.<br />
Records with a null value in column x are<br />
not counted.<br />
In statistics, Var(x) is suited if the group is<br />
a sample of a larger population, while<br />
VarP(x) is suited for the entire population.<br />
Sum(x)<br />
Avg(x)<br />
The total of the non-null values in column<br />
x of the bundle. Null if all values are null.<br />
The average of the non-null values, i.e.<br />
Sum/Count. Null if all values are null.<br />
StDev(x)<br />
The standard deviation of the values in<br />
column x. It is the square root of Var(x).<br />
While Var(x) exaggerates large deviations,<br />
StDev(x) is more like an average<br />
deviation.<br />
Min(x), Max(x) The lowest (highest) non-null value.<br />
Null if all values are null.<br />
StDevP(x) The square root of VarP(x).<br />
60 4. Queries - computed tables
Fig 4.4B Select bundles HAVING . . .<br />
Stays HAVING<br />
arrival this date.<br />
Local date format<br />
SELECT Min(tblRoomState.date) AS arrival . . .<br />
FROM tblStay INNER JOIN tblRoomState<br />
ON tblStay.stayID = tblRoomState.stayID<br />
GROUP BY tblStay.stayID<br />
HAVING Min(tblRoomState.date) = #21/10/02#;<br />
HAVING arrival<br />
this date<br />
US date format<br />
Aggregation and expressions<br />
You can specify the aggregate functions in the totalline<br />
of the grid, but you can also use them in expressions<br />
that compute a field. For instance we could have<br />
spared column A and B above, and instead written this<br />
expression in the room column:<br />
room: IIf (Min(tblRoomState.roomID) =<br />
Max(tblRoomState.roomID),<br />
Min(tblRoomState.roomID), "more")<br />
Dynaset<br />
A Group By query cannot be used as a dynaset<br />
although you can set its Recordset property to Dynaset.<br />
It will not be updated dynamically, but the VBA<br />
program can ask for a requery of the list. The user<br />
cannot update fields in a Group By query - not even the<br />
Group By fields, which in principle might be<br />
updatable. See section 4.7.1 for ways to deal with it.<br />
This will only work, of course, in a Group By query.<br />
You can also aggregate computed values that combine<br />
data from more than one table, such as this:<br />
Min(tblA.x + tblB.y )<br />
4. Queries - computed tables 61
4.5 Query a query, handling null values<br />
At this point we have a query that produces an improved<br />
stay list with arrival date and room indication.<br />
Queries can in many ways be used exactly as tables.<br />
Now we want to join the improved stay list with the<br />
guest table to get the final stay list in the Find Guest<br />
window. The procedure is similar to when we made the<br />
first qryStayList:<br />
Outer join qryStayArrival with tblGuest<br />
1. First delete the old qryStayList from the database<br />
window (or rename it to qryStayList2).<br />
2. Create a new query in Design view. Add tblGuest<br />
and qryStayArrival to the query window (see Figure<br />
4.5).<br />
3. <strong>Access</strong> may guess that you want to join tblGuest<br />
and qryStayArrival on guestID. Otherwise, you<br />
have to create this relationship by dragging<br />
guestID from one table to the other.<br />
4. Make the join an outer join so that all guests are<br />
included. (Select the connector and right-click.)<br />
5. Drag the fields to the grid as shown. Include the<br />
guestID from tblGuest. It will not be shown to the<br />
user in the final form, but we need it to make the<br />
program know which guest the user points at.<br />
6. Close the query and give it the name qryStayList.<br />
Open it again in datasheet mode.<br />
In datasheet mode, you will get something like the<br />
table at the bottom of the figure. We are very close to<br />
the final result, but the guest lines without stay look<br />
wrong. They appear in the middle of the list - looks<br />
stupid. Second they have a room indication "more".<br />
Very confusing - there is no stay for these guests, so<br />
how can <strong>Access</strong> come up with this?<br />
Sort the list. Let us first fix the ordering problem. It<br />
would be better to sort the list by arrival date, and then<br />
put the stay-less guests at the end. It is easy:<br />
7. In the grid, use the Sort line for arrival. Set it to<br />
Decreasing. When you see the list in datasheet<br />
mode, the latest arrival is first and the stay-less<br />
guests last. SQL considers the null value smaller<br />
than any other value, so the stay-less guests are<br />
last. (Below we will look at a way to order the<br />
stays according to increasing arrival times, yet<br />
have the stay-less guests last.)<br />
If you look at the SQL version, you see that SQL<br />
expresses the sorting as ORDER BY arrival.<br />
Null=null?<br />
The erroneous "more" indications are more puzzling.<br />
Let us look closer at the way a query is computed. In<br />
section 4.2 we explained that after discarding the<br />
useless Cartesian combinations, the SQL-engine<br />
computes the final fields in each record. The room field<br />
is a computed field, and what have we asked SQL to<br />
do? Compute this expression:<br />
room: IIf(A=B, A, "more")<br />
For the stay-less guests, both A (the lowest room number)<br />
and B (the highest room number) are null because<br />
the guest is combined with an empty stay record. Now,<br />
what is the value of null=null? You might think it is<br />
True, but not so in SQL. Actually the value is null,<br />
which is neither True nor False.<br />
Think of null as "unknown". Is unknown = unknown?<br />
Hard to know, in other words it is "unknown".<br />
The general rule is that any expression with a null<br />
somewhere is null. So null+7 is null and null>7 is null.<br />
Similarly null=7 is null.<br />
Hey, how do you test whether something is null?<br />
Asking if x = null will always give null. The IsNull<br />
function helps us out:<br />
IsNull(x) is true when x is null.<br />
There are a few other exceptions to the general rule:<br />
Null and False is False.<br />
No matter what the unknown is, the result will be false.<br />
Null or True is True.<br />
No matter what the unknown is, the result will be true.<br />
"Abc" & Null is "Abc"<br />
The & operator always converts both operands to texts<br />
as far as possible, so Null becomes an empty text.<br />
We might try to repair the room expression by means<br />
of the IsNull function, but there is a simpler solution in<br />
this case. We just ask whether A is different from B<br />
and if so, the result will be "more":<br />
8. In the grid for qryStayArrival, change the room<br />
expression to this:<br />
room: IIf(A B, "more", A)<br />
9. Save qryStayArrival and reopen qryStayList. The<br />
result should now be right.<br />
When A and B are null, AB will be null and SQL<br />
will select A. True is required to select "more". So the<br />
result will be A, which is null. Just what we want.<br />
Sorting null last. As a finishing touch, we will fix the<br />
ordering problem. The trick is to compute a field where<br />
null values become higher than anything else, and then<br />
sort by this field:<br />
10. In the grid for qryStayList, use an empty column.<br />
Enter this expression in the top line:<br />
s: IIf( IsNull(arrival), 365000, arrival)<br />
62 4. Queries - computed tables
Fig 4.5 Query a query, Null values<br />
Order By arrival<br />
You may get<br />
“more” here.<br />
Why?<br />
Here we compute a field s by means of another IIf-expression.<br />
We ask explicitly whether arrival is null, and<br />
if so use the large value 365000. Otherwise we use<br />
arrival as it is. Look at the result in datasheet view.<br />
Notice that 365000 is shown as a large date around<br />
1000 years ahead. Why? Remember that a date is<br />
stored as the number of days since December 30, 1899.<br />
Since a year is around 365 days, we have thus specified<br />
a date around 1000 years after this date.<br />
(Remember the year-2000 problem? We have now created<br />
a year 2899 problem. We don't care - we will all<br />
be dead at that time. Or should we care anyway?)<br />
11. Now remove the Sort indication from the arrival<br />
column, and set an Increasing indication for the s-<br />
column. Check in datasheet view that it looks<br />
right.<br />
12. Tiny problem remaining. We don't want the s-column<br />
to appear in the result. In the grid, remove the<br />
Show indication for the s-column. Check that the<br />
list is sorted correctly and doesn't have the s-column.<br />
13. Close qryStayList and save the changes. Now open<br />
it again and look at the query grid. The s-column is<br />
still there, but it is not called "s" anymore. This is<br />
an example of <strong>Access</strong> changing the grid behind<br />
our back. No harm is done, because it still works<br />
correctly. <strong>Access</strong> translated the grid into SQL and<br />
when we opened the query again, it constructed the<br />
grid from the SQL version. Try to look at the SQL<br />
version to see what the Sort indication and the<br />
Show indication becomes in SQL.<br />
At this stage we finally have a stay list that is worth<br />
showing in the user's Find Guest window. In the next<br />
section we will use it for this purpose and also do a bit<br />
about the search criteria.<br />
4. Queries - computed tables 63
4.6 Query with user criteria<br />
Queries are often used in combination with search criteria.<br />
The user enters a criterion and the system shows<br />
a list of matching records. This is what we want in the<br />
Find Guest window. First we will make a continuous<br />
form based on qryStayList. The procedure is similar to<br />
when we made the first fsubStayList:<br />
Create the continuous form<br />
1. In the database window's Form tab, use the Form<br />
Wizard. Choose qryStayList as the base for the<br />
form.<br />
2. Select inclusion of all fields except guestID.<br />
Choose the Columnar layout to get a continuous<br />
form with labels, next choose the Standard style.<br />
3. Save the form and give it the name fsubStayList.<br />
(Replace the old fsubStayList or rename it.)<br />
We are going to use the subform in datasheet view,<br />
which gives a compact format and easy navigation. If<br />
you look at the subform in datasheet view, you will<br />
notice that the column headings are programmer-oriented<br />
rather than user-oriented. Furthermore, the state<br />
field is shown as a code rather than as the mnemonic<br />
text booked, out, etc.<br />
We want the datasheet to look like Figure 4.6.<br />
Change headings, etc.<br />
4. Open fsubStayList in Design view.<br />
5. For each of the fields, change its label to the useroriented<br />
name.<br />
6. For the state field, also change a few things on the<br />
Format tab: Width of the first column should be 0<br />
in order that the state code is not shown, but only<br />
the mnemonic text (section 2.4). Also set Text<br />
Align to Left.<br />
7. For the form itself, set Default View and Views<br />
Allowed, remove the navigation buttons. Also set<br />
the Caption to fsubStayList rather than the query<br />
name. (The user will not see the caption when the<br />
form is used as a subform, but the designer can<br />
easily get confused when seeing the query name in<br />
the title of the subform.)<br />
Check the result in datasheet view. Then it is time to<br />
use it the FindStay form:<br />
Connect continuous form to master form<br />
8. Open frmFindStay in user mode (Form view).<br />
Since the new continuous form has the same name<br />
as the old one, the result should look like the middle<br />
of Figure 4.6. To make it look like the final<br />
system, you would have to enlarge the FindStay<br />
form and the subform control. You would also<br />
have to add more criteria fields and command<br />
buttons. It is not important to do it in this exercise.<br />
Simple search criteria<br />
In the real system, there will be thousands of guests<br />
and stays, so search criteria are essential. Start out with<br />
some simple experiments with search criteria:<br />
9. Close frmFindStay and open qryStayList in design<br />
mode.<br />
10. In the Criteria line of the grid, fill in a criterion for<br />
the name column (bottom of Figure 4.6). Try entering<br />
= "john simpson"<br />
Change to datasheet mode. Now you should only<br />
see John Simpson's stays. (The SQL-engine<br />
doesn't care about capitalization.)<br />
11. Try this too:<br />
< "john simpson"<br />
You get all guests alphabetically before John<br />
Simpson.<br />
12. Try the criterion "john". There will be no matches<br />
since no name field contains just "john".<br />
13. Now try with a wild-card expression:<br />
Like ("john*")<br />
You get all guests with names starting with "john".<br />
Try<br />
Like ("*s*")<br />
You get all guests with an "s" in their name.<br />
The operator Like is a kind of equal sign. It just interprets<br />
the stars in the text string as "any characters at<br />
this place". Note that we can have stars in several<br />
places, for instance before and after the text we look<br />
for. Like is also called the wildcard operator. See more<br />
in section 6.4<br />
User-specified search criteria<br />
In order to let the user specify the name part he is<br />
looking for, we have to retrieve the criterion at run<br />
time. We want to specify a criterion something like this<br />
Like ("* *")<br />
However, the Like operator knows about the stars, but<br />
not about finding the user text. We have to combine the<br />
text by means of the &-operator from three texts: the<br />
first star, the user text, and the last star. The expression<br />
will be something like this<br />
Like ("*" & & "*")<br />
In our case, the user text will be in the Last-name text<br />
box on the master form. We will call this control<br />
txtName. In <strong>Access</strong> we can then address the text box<br />
with this expression:<br />
Forms!frmFindStay!txtName<br />
64 4. Queries - computed tables
Fig 4.6 Query with user criteria<br />
User-oriented headings<br />
Mnemonic states<br />
Other -> Name =<br />
txtName<br />
Connected<br />
to fsubStayList<br />
A simple search criterion.<br />
Or try a user-defined search criterion:<br />
Like ("*" &<br />
[forms]![frmfindstay]![txtname] & "*")<br />
This strange-looking expression means: Look in the<br />
collection of forms to find frmFindStay. Then look in<br />
the collection of controls on this form to find txtName.<br />
This is Visual Basic's way of addressing objects, and in<br />
the next chapter we will look more closely at how it<br />
works.<br />
Ready to combine the pieces?<br />
14. Open qryFindStay in design mode. Set this criterion<br />
expression in the name column:<br />
Like ("*" & forms!frmfindstay!txtname & "*")<br />
Don't worry if <strong>Access</strong> adds brackets as usual.<br />
15. Close qryFindStay and open frmFindStay in design<br />
mode.<br />
16. Select the Last-name text box and set its name to<br />
txtName (on the Other tab). The prefix txt is the<br />
standard prefix for text boxes.<br />
17. Switch to Form mode. The list looks as usual.<br />
Enter for instance an s in the text box. Then click<br />
F9 for requery. You should now see only guests<br />
with an s in their name.<br />
18. Try other criteria. When you have a blank text box,<br />
the system shows the entire list. Why? In this case<br />
it looks for "**", meaning anything followed by<br />
anything. All names will match!<br />
In the final system, the user should not use F9 to<br />
search, but our carefully planned and tested buttons and<br />
their shortcuts. In a live search, the system will respond<br />
character by character as the user enters a criterion. All<br />
of this needs some Visual Basic programming, and we<br />
will show it in section 5.2.2.<br />
4. Queries - computed tables 65
4.7 Bound main form and subform<br />
In many cases we want to bind a main form (a window)<br />
to the database. One example is the stay window. It<br />
should show data about a single stay and guest (Figure<br />
4.7). On the stay window, we also have a list of rooms,<br />
and it should show the rooms for this stay.<br />
As you see, we need two queries: one to combine stay<br />
and guest to supply data for the main Stay form; another<br />
to extract room data for the list of rooms. We will<br />
now outline how to do it. We will shorten the explanation<br />
a bit and leave it to you to open and close things<br />
properly.<br />
Finish the main form<br />
1. Make a query, qryStay (not shown on the figure).<br />
It must join tblGuest and tblStay. It should include<br />
all of the fields, since they will all be needed<br />
somewhere on the Stay form. The easiest way is to<br />
drag the two stars from the tables to the grid. Don't<br />
worry that we get two guestID fields - one from<br />
each table. We actually need them in the later programs.<br />
2. Bind to qryStay. You should have made a simple<br />
version of frmStay already (section 3.4). Now set<br />
its Record Source to qryStay in order to connect it<br />
to the query.<br />
3. Connect the existing main-form controls to the<br />
query. For instance the Stay No. field should have<br />
its ControlSource set to stayID, in order to show<br />
this query field in the text box.<br />
4. Add fields. Add a few more fields to the main<br />
Stay window, for instance the name, address and<br />
state. A convenient way to do it is to use the small<br />
Field List window that may have popped up when<br />
you connected the form to the query. Otherwise<br />
open the Field List window through the View<br />
menu or with the Field List icon next to the<br />
hammer icon. Drag a field to the form to create a<br />
text box and associated label. <strong>Access</strong> will<br />
automatically bind the text box to the query field.<br />
5. For combo boxes, such as pay method and state,<br />
make the first column width zero to let the user see<br />
the mnemonic text rather than the number code.<br />
Have a look at the stay window in user mode. It should<br />
show the first stay. You can use PageUp and Page-<br />
Down to browse through all the stays. You can edit<br />
guest and stay data through the window since the dynaset<br />
behind the form allows it.<br />
In the final system, the user should be allowed to edit<br />
data this way, but it makes no sense to allow him<br />
browsing through thousands of stays this way. We will<br />
later see how to control this and the creation of new<br />
stays (section 5.5.2).<br />
Make the subform<br />
We will now make the subform that shows the rooms<br />
for the stay.<br />
6. Make a query, qryStayRooms. It is a join of three<br />
tables: tblRoomState, tblRoom, and tblRoomType<br />
(Figure 4.7).<br />
The result of the raw query would be a list of all room<br />
states with data added about the room type and the<br />
prices. For a long stay, this would give an awfully long<br />
list of room states with one line per day. We want to<br />
shorten it to one line per room. In each line we need to<br />
show the first date the room is used and the number of<br />
nights it is used in total.<br />
The query should give a result like the datasheet to the<br />
right in Figure 4.7. Here is a description of the fields in<br />
the query result. Try to define the query on your own.<br />
stayID: Not shown in the continuous form, but needed<br />
to bind the list properly to the main form.<br />
roomID: Not shown directly in the continuous form,<br />
but needed by the program to find out what the user<br />
has selected.<br />
From: The first date this room was used by the stay.<br />
Nights: The number of nights this room was used by<br />
the stay.<br />
Room: A computed text string consisting of roomID, a<br />
comma, and the description from tblRoomType.<br />
Persons: The number of persons actually staying in the<br />
room.<br />
Price: The price - taking into account a possible discount<br />
for one person staying in a double room.<br />
More precisely, when the number of actual persons<br />
is one and the bedCount is more than one, price2<br />
should be used. Otherwise price1.<br />
Total: The total price for the room for all these nights.<br />
Binding the subform to the main form<br />
7. The query is to be shown in the subform on the<br />
Rooms tab. First make a continuous form based on<br />
qryStayRooms. Use the Form Wizard and omit<br />
stayID and roomID from the continuous form.<br />
Since the field names above are user-oriented, the<br />
continuous form should automatically look correct<br />
in datasheet view.<br />
8. Connect the continuous form to the subform control<br />
on the Rooms tab. When you now look at the<br />
Stay window in user mode, you will see that the<br />
subform shows all rooms in the database.<br />
9. To show only the rooms related to the stay, set<br />
these properties on the Data tab for the subform<br />
control:<br />
Link Child Fields = stayID<br />
Link Master Fields = stayID.<br />
66 4. Queries - computed tables
Fig 4.7 Bound main form<br />
Wanted result<br />
RecordSource = qryStay<br />
Link to main<br />
form stayID<br />
RecordSource = qryStayRooms<br />
Query for<br />
the subform<br />
In this way you specify that you only want to see those<br />
child records (in qryStayRooms) where stayID matches<br />
stayID in the master form.<br />
Now the stay window should look right. Try browsing<br />
through the stays and notice how the room lists vary<br />
from one stay to another.<br />
4.7.1 Editing a GROUP BY query<br />
What kind of actions can the user make on a complex<br />
query table such as qryStayRooms? Actually very<br />
little. It would make sense to edit the number of<br />
persons in the room, but since the room list is made by<br />
a Group By, this is impossible. There are two ways out:<br />
a) Dialog box. Provide an edit-button that the user<br />
can click when he has selected a rooms line. The<br />
user will then see a dialog box where he can enter<br />
the number of persons and possible other editable<br />
data. When he closes the button, the VBA program<br />
updates the corresponding room state records.<br />
b) Store query result in a temporary table. The<br />
alternative is to store the query result as a new,<br />
temporary table. (SQL can do this by means of an<br />
INSERT INTO query. See section 7.1) Then you<br />
show this table instead of qryRoomState. Since<br />
this is a table and not a query, the user can edit it.<br />
Next, the VBA program will have to transfer the<br />
changes to tblRoomState.<br />
Programming issues such as these are the reason many<br />
software applications don't allow the user to edit directly<br />
in what he sees, but offer him a dialog box instead.<br />
4. Queries - computed tables 67
5. <strong>Access</strong> through Visual Basic<br />
Highlights<br />
• Addressing and changing Forms, Controls and<br />
records<br />
• Responding to clicks, typing and other events.<br />
When you develop <strong>Access</strong>-based user interfaces, you<br />
soon get to a point where the built-in features don't suffice.<br />
It happens for instance when buttons or menu<br />
items must do something a bit complex. Then you need<br />
to make program pieces that cooperate with the built-in<br />
features.<br />
From this chapter and on, we assume that you have<br />
some understanding of programming in general. For<br />
instance that a program consists of statements that can<br />
be executed one by one; that it has variables and can<br />
change them during the execution; that it can call a<br />
procedure (also called subroutine, function, method or<br />
operation), which executes and then returns to the place<br />
where it was called; and that a procedure may have<br />
parameters.<br />
5.1 The objects in <strong>Access</strong><br />
In the previous chapters we have encountered a lot of<br />
<strong>Access</strong> concepts: tables, queries, forms, and controls.<br />
How do they relate to each other? Figure 5.1A is a<br />
slightly simplified data model for all of these concepts.<br />
When you work with <strong>Access</strong>, you really work with two<br />
different systems, the SQL engine and <strong>Access</strong>. The<br />
SQL engine supplied with <strong>Access</strong> is called the Jet Engine.<br />
It is used also by other systems than <strong>Access</strong>. You<br />
can for instance use your database through Excel and<br />
Word too. <strong>Access</strong> is primarily a tool for accessing data<br />
in databases through user windows (forms). <strong>Access</strong> can<br />
also work with other SQL engines than Jet, for instance<br />
Oracle. When doing this, you may lose some designer<br />
features but gain other qualities, for instance speed and<br />
reliability.<br />
Databases<br />
The database class on Figure 5.1A contains the currently<br />
open databases. Until now we have only looked<br />
at one database, but <strong>Access</strong> can handle and connect to<br />
several open databases at the same time.<br />
Recordsets, tables and queries<br />
A database contains a number of recordsets. Some<br />
recordsets are tables, others are queries (shown as<br />
subclasses). Each recordset has a description for each<br />
of its fields. The description includes the field name,<br />
the field type, format, etc.<br />
We will first have a look at the built-in objects, for<br />
instance Forms and Controls. We will see how they can<br />
be addressed from the programming language, Visual<br />
Basic for Applications (VBA). Next we see what<br />
happens when the user types or clicks something, and<br />
how the VBA program can respond. We will also look<br />
at the tools available to the programmer.<br />
From section 5.4 and on, the text is no longer a tutorial<br />
you have to follow to understand the rest. We don't say<br />
do this and do that, although we still explain<br />
experiments you can do to explore <strong>Access</strong>. These<br />
sections are for looking up some topic, for instance<br />
how you can open and close forms from VBA, how<br />
you can access records in the database, etc.<br />
We only show pieces of VBA in this chapter. Chapter 6<br />
is for reference purposes and covers VBA systematically.<br />
The VBA-language itself is rather simple and has<br />
the same components as many other programming languages,<br />
for instance Java and C++. The difficult part is<br />
how the program cooperates with the built-in objects<br />
and how these objects really work. This is our focus in<br />
this chapter.<br />
A query has also an SQL-property - the text that<br />
describes how to compute the records in the query.<br />
Tables and queries play much the same role. Both of<br />
them can for instance be the record source for a Form.<br />
Records and fields<br />
Each recordset contains a number of records, and each<br />
record contains a number of fields. Each field has only<br />
one attribute, the value stored in the field.<br />
You can see the records in Datasheet view. You look<br />
either directly into a table or into records selected and<br />
computed by a query. The model shows that each<br />
recordset keeps track of a current record in the set.<br />
The model in Figure 5.1A doesn't show that each field<br />
actually may belong to several recordsets, for instance<br />
fields that are seen through several queries at the same<br />
time. (It is one of the simplifications we have made.)<br />
<strong>Access</strong> instances<br />
The <strong>Access</strong> class on Figure 5.1A contains the currently<br />
open <strong>Access</strong> windows. When you open an mdb-file,<br />
you will see an <strong>Access</strong> window with title bar and a database<br />
window inside. The <strong>Access</strong> window corresponds<br />
to an object in the <strong>Access</strong> class. You may open another<br />
mdb-file, and will then get another <strong>Access</strong> window<br />
(another instance) and another object in the <strong>Access</strong><br />
class.<br />
68 5. <strong>Access</strong> through Visual Basic
Fig 5.1A The objects in <strong>Access</strong><br />
Forms<br />
<strong>Access</strong><br />
Form<br />
Name,<br />
RecordSource,<br />
Events<br />
Name,<br />
Position ...<br />
Control<br />
Controls<br />
Open forms<br />
bound to<br />
Form<br />
Subform<br />
Name<br />
Database<br />
Recordset<br />
Record<br />
current<br />
record<br />
Table<br />
Query<br />
SQL<br />
Field FieldDescr<br />
value<br />
Name, type, ...<br />
Form, SourceObject, LinkChildFields . . .<br />
Properties<br />
Property<br />
Textbox<br />
Combo<br />
Button<br />
ControlSource,<br />
Value, Locked . . .<br />
ControlSource,<br />
Value, Locked . . .<br />
Forms(0)<br />
Forms(“frmFindStay”)<br />
Forms ! frmFindStay . Caption = . . .<br />
Named item<br />
in collection<br />
Property<br />
Forms ! frmFindStay ! txtName.Value = “abc”<br />
Forms ! frmFindStay! subStayList.Form ! stayID.Value<br />
Forms<br />
Each <strong>Access</strong> window contains a collection of open<br />
Forms. These are the forms you can address from<br />
VBA. (The closed forms are there too, of course, but<br />
you must open them before you can address them.)<br />
Notice that the 1:m connector from <strong>Access</strong> to Form has<br />
the name Forms. You can use this name to address the<br />
forms:<br />
Forms(0)<br />
Gives you the first open form.<br />
Forms("frmFindStay")<br />
Gives you the open form with the name<br />
frmFindStay.<br />
Forms!frmFindStay<br />
Another way of getting this open form.<br />
Notice that you can address a form by its sequential<br />
number in the Forms collection or by its name. You<br />
can address it by its name in two ways: With the name<br />
in quotes inside a parenthesis, or with an exclamation<br />
mark and the name without quotes. (Sometimes it is<br />
useful to store the name of a form in a variable. To<br />
access the form you write the name of this variable<br />
inside the parenthesis.)<br />
The exclamation mark is called the bang-operator. It<br />
works exactly as the name in the parenthesis, but is<br />
simpler to read and write. You can use the addressing<br />
methods to set a property of a form. The following<br />
statement will for instance change the user-oriented<br />
name (heading) of frmFindStay:<br />
Forms!frmFindStay.Caption = "Guest Lookup"<br />
Set and get properties - try it out<br />
The addressing mechanisms are very important when<br />
you use VBA, but you have to practice.<br />
1. Open the hotel database and open frmFindStay<br />
(the Find Guest window).<br />
2. Open the Immediate window with Ctrl+G.<br />
3. If you work in <strong>Access</strong> 2000 or 2003, this also<br />
opens the Visual Basic window where you can<br />
program. Make the Visual Basic window smaller<br />
than the full screen (use the Restore button next to<br />
the cross that closes the window).<br />
Figure 5.1B shows the Immediate window. You can<br />
enter VBA statements here and have them executed<br />
immediately. Try to set and get some properties:<br />
4. Enter this statement:<br />
Forms!frmFindStay. Caption = "Guest Lookup"<br />
You should see the form heading change.<br />
Note: Don't use spaces around ! or before .<br />
5. Use the ? statement to print the caption in the<br />
Immediate window:<br />
?Forms!frmFindStay. Caption<br />
6. Try printing the caption using the other addressing<br />
mechanisms: Forms(0) and Forms("frmFindStay").<br />
7. Close and reopen frmFindStay. The caption should<br />
now be back to Find Guest.<br />
What happens here? The caption is just a dialogue<br />
variable that doesn't survive close and open. However,<br />
when you constructed the form, you specified the caption<br />
as Find Guest. This setting is the default value for<br />
the caption property when you open the form. Any<br />
5. <strong>Access</strong> through Visual Basic 69
caption changes you make in the open form will be lost<br />
when you close the form.<br />
(It is possible to change the default value for the<br />
Caption with VBA. Just open frmFindStay in design<br />
mode and then set Caption in the same way.)<br />
8. Keep frmFindStay open and open also fsubStay-<br />
List. (This subform is also used inside<br />
frmFindStay). Change and print its caption.<br />
The change has no effect on the subform inside<br />
frmFindStay. We are dealing with two open instances<br />
of fsubStayList. We cannot even access the subform<br />
instance with Forms( ). It is not a member of this<br />
collection.<br />
Controls<br />
Each form contains a collection of Controls, for instance<br />
text boxes and command buttons. In the same<br />
way as for forms, you can address a control on the<br />
form in these ways:<br />
Forms(0). Controls(0)<br />
The first control on the first open form.<br />
Forms(0). Controls("txtName")<br />
The txtName control on the first open form.<br />
Forms!frmFindStay. Controls!txtName<br />
The txtName control on frmFindStay.<br />
In the last line, notice how the first bang selects the<br />
form by name, the other the control by name. Notice<br />
also the usual dot-operator. It selects a built-in property<br />
of the form.<br />
To shorten these long expressions, VBA works with<br />
default collections. The Controls collection is the default<br />
collection on a form. This means that if you omit<br />
the word Controls, VBA will look in the controls-collection<br />
anyway. You could thus write this instead:<br />
Forms(0) (0) The first control on the first open form.<br />
Forms(0) ("txtName")<br />
The txtName control on the first open form.<br />
Forms!frmFindStay!txtName<br />
The txtName control on frmFindStay.<br />
Controls come in many variants (sub-classes), for instance<br />
Subform, Text Box, Combo Box, Command<br />
button. They all have a name, a position, a height and a<br />
width, but otherwise they have very different properties.<br />
We will look at some of the controls in more detail<br />
later.<br />
Try it out<br />
9. If you have followed the earlier exercises closely,<br />
the name of the Last-name field should be<br />
txtName. Try setting the value of this control:<br />
Forms!frmFindStay!txtName. Value = "abc"<br />
You should see the text box changing on the form.<br />
10. The default property of a field is the Value, so this<br />
statement should work the same way:<br />
Forms!frmFindStay!txtName = "def"<br />
11. Try printing and setting some other properties of<br />
txtName, for instance FontSize.<br />
12. Also try printing the Name property of txtName.<br />
Its name should be "txtName". You should not be<br />
able to change the name unless you set the form in<br />
design mode.<br />
A form may be bound to a recordset, and the property<br />
RecordSource specifies how.<br />
13. Use the ?-command to print the record source for<br />
the two open forms. FrmFindStay should have an<br />
empty record source while fsubStayList should be<br />
bound.<br />
When the form is bound, it can show records from the<br />
recordset. In single-form view, it shows only one<br />
record at a time. In continuous-form and datasheet<br />
view it can show a sequence of records. In all cases, an<br />
arrow in the record selector area marks the current<br />
record. From VBA, you can address the current record:<br />
14. Print the value of the stayID for the current record<br />
in fsubStayList:<br />
? forms!fsubstaylist!stayid<br />
Check that it matches the open fsubStayList.<br />
15. Use the mouse to select another record in the open<br />
fsubStayList. Now repeat the ? command. You<br />
should see the stayID for the new current record.<br />
Collections<br />
Collections have a count property, which gives you the<br />
number of items in the collection.<br />
16. Try printing the number of items in the Forms<br />
collection:<br />
?Forms. Count<br />
Is it correct?<br />
17. The controls on a form are also a collection, called<br />
Controls. Try in the same way to print the number<br />
of controls on frmFindStay and fsubStayList.<br />
Even the properties of a control or a form make up a<br />
collection, called Properties (see Figure 5.1A). You<br />
may also look into them with the general addressing<br />
mechanism.<br />
Keep frmFindStay open for further exercises in the<br />
next section.<br />
Subform<br />
SourceObject property. A subform control has many<br />
properties, but a particularly interesting one is SourceObject.<br />
It is the name of the form to show. When we<br />
constructed frmFindStay, we set SourceObject to fsub-<br />
StayList. We can see it and change it from VBA:<br />
18. First display the SourceObject property:<br />
?Forms!frmFindStay!subStayList. SourceObject<br />
The first part of this statement is the reference to sub-<br />
StayList on frmFindStay. Now comes a dot saying that<br />
70 5. <strong>Access</strong> through Visual Basic
Fig 5.1B Addressing the objects<br />
frmFindStay<br />
txtName<br />
subStayList<br />
+ fsubStayList<br />
current record<br />
Ctrl+G: Open the<br />
Immediate window<br />
we look for the SourceObject property of subStayList.<br />
The result is the name of the fsub. (Notice that our prefix<br />
rules help us distinguish between the subform control<br />
and the fsub connected to this control).<br />
19. Try setting SourceObject to nothing (an empty text<br />
in quotes):<br />
Forms!frmFindStay!subStayList. SourceObject = ""<br />
The subform in the user window becomes blank.<br />
Try setting it back again (it is a text, so remember<br />
the quotes.)<br />
As soon as we set SourceObject, <strong>Access</strong> closes the<br />
previous subform and opens the new one. The Source-<br />
Object property is a dialogue variable, so a change will<br />
not survive close and open.<br />
Form property. Above we looked at the SourceObject<br />
property, which is a text - the name of the fsub. But a<br />
subform has another interesting property, Form. It is a<br />
reference to the open form that is shown in the subform<br />
area. You cannot see this property in the property box<br />
because it is not a text, but a pointer that only exists in<br />
user mode. However, you can use the Form property in<br />
VBA.<br />
20. Try this command in the Immediate window:<br />
?Forms!frmFindStay!subStayList. Form!name<br />
It should print the name of the guest selected in the<br />
subform area. The first part is the reference to sub-<br />
StayList on frmFindStay. Now comes a dot saying that<br />
we look for the Form property of subStayList. The result<br />
is a reference to the open form that is shown in the<br />
subform area.<br />
Next comes a bang and a reference to the name field,<br />
i.e. the address of a guest. Now which guest? The subform<br />
shows many records - which of the addresses will<br />
we get? The address in the currently selected record.<br />
Was this what you got? Try selecting another record on<br />
the list and repeat the command.<br />
Bang versus dot<br />
21. Try using a dot instead of a bang before name:<br />
?Forms!frmFindStay!subStayList. Form. name<br />
It doesn't print the name of the guest, but the name of<br />
the subform. Because of the dot, the statement asks for<br />
the name property of the form.<br />
When you use the bang, you ask for a control on the<br />
fsub - or a field in the bound record behind the fsub.<br />
Abbreviations. Above we have used the full address<br />
expressions, but <strong>Access</strong> allows various abbreviations.<br />
For instance you may refer to the guest control of the<br />
subform in any of these ways:<br />
Dot instead of bang<br />
Forms!frmFindStay!subStayList. Form. address1<br />
This works only because there is no address1 property<br />
in a form.<br />
Form omitted<br />
Forms!frmFindStay!subStayList!guest<br />
However, you cannot omit Form and use a dot at the<br />
same time. <strong>Access</strong> will believe that you ask for a property<br />
of the sub-control.<br />
Warning. The bang mechanism works only in Visual<br />
Basic. It doesn't work in SQL. For instance you have to<br />
write<br />
... JOIN ON tblGuest.guestID = tblStay.guestID<br />
If you write tblGuest!guestID, the system gives an error<br />
message.<br />
5. <strong>Access</strong> through Visual Basic 71
5.2 Event procedures (for text box)<br />
Above, we have executed VBA statements through the<br />
Immediate window, but when the user uses the system,<br />
we need another way to activate VBA. We want the<br />
system to respond to user actions, for instance the user<br />
clicking a button, typing something in a text box, etc.<br />
These user actions are called events. You can write a<br />
VBA procedure for each kind of event.<br />
AfterUpdate event<br />
We will now write an event procedure that makes<br />
txtName respond when the user has entered a search<br />
criterion.<br />
1. Open frmFindStay, select the txtName search criterion,<br />
and view the property box. (In <strong>Access</strong> 97<br />
you can only do this in Design mode.)<br />
2. Look at the Event tab. It has a list of the events<br />
that the control can respond to (Figure 5.2A). The<br />
event we are interested in is AfterUpdate. It happens<br />
when the user has finished entering the text in<br />
the control.<br />
3. Create event procedure. Choose AfterUpdate, the<br />
three dots, and Code Builder. This creates the<br />
event procedure for AfterUpdate.<br />
You are now in the Visual Basic window. You may<br />
make the window smaller so that you can see frmFind-<br />
Stay too. Also make the <strong>Access</strong> window smaller so that<br />
you can see the two windows side by side.<br />
Inside the Visual Basic window you see the event procedure<br />
for AfterUpdate (Figure 5.2A, right). The first<br />
line reads<br />
Private Sub txtName_AfterUpdate<br />
It shows that it is the AfterUpdate subroutine (procedure)<br />
for the txtName control.<br />
4. The body of the procedure is initially empty. Now<br />
enter this statement:<br />
Me!subStayList . Requery<br />
Me. The word Me means the open form where this<br />
control is placed - in this case the same as<br />
Forms!frmFindStay. We ask <strong>Access</strong> to find the<br />
subStayList control. Finally we ask <strong>Access</strong> to call the<br />
procedure Requery in this control. The result is that<br />
subStayList recomputes the query behind the subform.<br />
Since the query gets its where-condition from txtName,<br />
the stay list should change.<br />
Omitting Me. In most cases you can omit Me. You<br />
may for instance write<br />
subStayList . Requery<br />
The exception is when some built-in function or<br />
property has the same name as the control. In the<br />
following sections we will sometimes write Me for<br />
emphasis, sometimes omit it.<br />
When is the AfterUpdate procedure called? Whenever<br />
the user shows that he has finished entering the text, for<br />
instance when he clicks on another control in the same<br />
form, tabs to another field, or hits Enter. Try it:<br />
5. Enter a criterion in the name field, for instance "a".<br />
Click Enter. The stay list should now shrink according<br />
to the new criterion. Enter another criterion<br />
and use Tab. The system should respond.<br />
6. Change the criterion and then - without using Enter,<br />
etc. - click in another window, for instance the<br />
property box. The stay list should not change because<br />
txtName still has the focus and <strong>Access</strong> assumes<br />
that the user hasn't finished the field. Now<br />
click another field on FindStay. The stay list<br />
should respond.<br />
5.2.1 More text box properties<br />
We will now make txtName respond each time the user<br />
hits a key. To do this, we need to act on another event,<br />
OnChange. This event happens whenever the user<br />
types something in the text box or deletes a character.<br />
When <strong>Access</strong> calls this event procedure, the situation is<br />
a bit complex because several properties of the text box<br />
are involved:<br />
Value: This property is the value before the user<br />
started editing the text box. Note that Value is the<br />
default property for a text box, so if you don't specify<br />
another property in your address expression,<br />
VBA will use Value. When the Value property is<br />
empty, it has the value Null, similar to a database<br />
field<br />
Text: The value the user enters, but hasn't finished yet.<br />
This is the text the user sees on the screen, but it is<br />
not yet stored in Value. You can only access this<br />
property when the text box has the focus. At other<br />
times, the Text variable doesn't exist at all. When<br />
the Text property is empty, it is a zero-length text<br />
with the value "", similar to a VBA string variable.<br />
OldValue: The value before the user started editing the<br />
text. For bound controls (bound to a field in the<br />
database), this is the same as the value in the<br />
database. When the entire record is complete,<br />
<strong>Access</strong> transfers Value to OldValue. OldValue is<br />
useful when the editing must be undone for some<br />
reason. For unbound controls, OldValue and Value<br />
are always the same.<br />
72 5. <strong>Access</strong> through Visual Basic
Fig 5.2A An event procedure<br />
Click three dots.<br />
Select Code Builder<br />
Form<br />
Form<br />
module<br />
Important Textbox attributes<br />
Value: Last value completed by user (default attribute)<br />
Text: What user sees during editing<br />
OldValue: Value saved in database<br />
Change event<br />
We will now make txtName respond to each keystroke.<br />
Proceed in this way:<br />
7. On the event tab for txtName, choose OnChange<br />
and the three dots. You now see the event procedure<br />
for the Change-event.<br />
8. Write these statements in the procedure body (Figure<br />
5.2A):<br />
Me.txtName = Me.txtName.Text<br />
Me.subStayList.Requery<br />
Me.txtName.SelStart = 100<br />
9. Try it in user mode. As soon as you enter something<br />
in the text box, the stay list changes accordingly.<br />
The first procedure line copies Text to the Value of the<br />
control. As a result, Value becomes what the user has<br />
entered until now. Then the program recomputes the<br />
stay list. During this it gets the search criterion from<br />
the value of txtName. This is why we moved Text to<br />
Value.<br />
The last procedure line is more of a mystery. If you try<br />
using the system without this line, the entire text box<br />
becomes selected whenever you enter something. This<br />
seems to be an undocumented side-effect of setting the<br />
Value. To compensate for it, we let the program define<br />
what is selected. We define the selection start point<br />
(SelStart) to be character 100 of the text. Since the text<br />
is much shorter, <strong>Access</strong> interprets it as being the end of<br />
the text.<br />
This solution works, but not very well. If you for instance<br />
try to change a few characters in the middle of<br />
the search criterion, the system annoyingly moves the<br />
cursor to the end of the text. We could repair it by<br />
storing the position before we set the Value, and set it<br />
back afterwards. This is messy, and in the next section<br />
we will show a more professional solution.<br />
5. <strong>Access</strong> through Visual Basic 73
5.2.2 Computed SQL and live search<br />
We will now the professional solution. We don't<br />
change Value at all, but compute the SQL-statement to<br />
be used for the stay list. Let us first assume that the<br />
user has entered the search criterion john. The event<br />
procedure could then compute the list of stays in this<br />
way:<br />
Me.subStayList.Form . RecordSource = _<br />
"select * from qryStayList where name like ( '*john*' );"<br />
This is one long Visual Basic statement split into two<br />
lines by means of the space and underscore at the end<br />
of the first line.<br />
Now, what does the statement do? The first line refers<br />
to the open form in subStayList. The form has a record<br />
source property, which defines the records to display.<br />
We had bound the form to qryStayList, so the record<br />
source was "qryStayList".<br />
Now the procedure changes the record source to the<br />
SQL statement in the second line. This statement takes<br />
all records in qryStayList where the name contains<br />
john. And it selects all attributes from the records. This<br />
is what we need.<br />
Notice that the SQL statement is a text surrounded by<br />
double quotes. Inside the statement we have another<br />
text string '*john*'. This text string is surrounded by<br />
single quotes to distinguish it from the large text. We<br />
haven't cared to write SELECT etc. with caps. The<br />
SQL engine accepts the statement anyway.<br />
The only problem is that john should be the text that<br />
the user has entered. So the event procedure has to<br />
compose the SQL statement from three parts, like this:<br />
"select * from qryStayList where name like ('*" & _<br />
Me.txtName.Text & "*');"<br />
Note: Some developers don't use single quotes for the<br />
text inside the text. They use double quotes for the<br />
inner text. So instead of<br />
" . . . like ('*" & they would write<br />
" . . . like (""*" &<br />
The rule is that inside a text string, the characters ""<br />
mean a single ".<br />
Try it out<br />
You may try the solution right away, but take care. The<br />
next time you open frmFindStay and try to search,<br />
<strong>Access</strong> remembers the SQL statement your program<br />
has set. It uses this statement as the initial query for the<br />
future. (I would call this an error.)<br />
To avoid problems do as follows:<br />
1. In qryStayList, remove the user criterion that we<br />
defined earlier (like . . . ). We don't need it anymore.<br />
2. In fsubStayList, the record source is qryStayList.<br />
Change it to select * from qryStayList;<br />
3. Change the event procedure and try it out (see<br />
Figure 5.2B).<br />
You should now have a live search similar to the one<br />
used in the real system.<br />
(If <strong>Access</strong> still remembers the previous search criterion,<br />
open frmFindStay in design mode and set once<br />
more the Source Object of subStayList to fsubStayList.)<br />
Computed SQL may seem very cumbersome. Yes - it<br />
is, no doubt! However, when we need complex user<br />
criteria, for instance a combination of name and/or<br />
phone and/or date, the easiest way is to let the program<br />
compute the SQL statement. In general, computed SQL<br />
is the professional way to make complex systems.<br />
In the next section we will use computed SQL to deal<br />
with combinations of search criteria, some of them live<br />
and some lazy.<br />
74 5. <strong>Access</strong> through Visual Basic
Fig 5.2B Computed SQL and live search<br />
Define new<br />
record source<br />
Compute SQL from<br />
part1 & part2 & part3<br />
Note single quotes<br />
around inner text strings<br />
To make it work properly:<br />
Remove the old user criterion from qryStayList.<br />
Set record source of fsubStayList to: select * from qryStayList;<br />
Change the event procedure as above. Try it out.<br />
5. <strong>Access</strong> through Visual Basic 75
5.2.3 Composite search criteria<br />
Figure 5.2C shows an example where the user can use<br />
one or more criteria in any combination - composite<br />
search criteria. The figure also shows the programmer<br />
names of the various controls. The name criterion is<br />
called txtName, the booked criterion chkBooked, etc.<br />
The user may fill in part of the guest's name, and/or<br />
parts of his address, etc. The user may also restrict the<br />
search to booked stays, and/or checked-in stays, etc.<br />
To achieve this, the program must generate a suitable<br />
SQL statement for each combination of criteria. The<br />
pattern in the final SQL should be this, with optional<br />
parts shown in square brackets:<br />
SELECT * FROM ... WHERE TRUE<br />
[ AND name Like( "*john*") ]<br />
[ AND address1 Like( "*buf*") ]<br />
[ AND phone Like( "*3700*") ]<br />
[ AND arrival = #21-10-02# ]<br />
AND (FALSE [ OR state=1 ] [OR state=2 ]<br />
[ OR state>2 OR ISNULL(state) ] );<br />
Notice that we start with a useless TRUE before the<br />
optional AND's, and a useless FALSE before the<br />
optional OR's. This is a trick that makes the program<br />
far simpler. Each piece of the program doesn't have to<br />
care whether it adds the first element to an AND/OR<br />
list, or a later element.<br />
The figure shows the program that generates the SQL<br />
statement. It gradually builds up the SQL-statement in<br />
the string variable s. First it puts SELECT * . . . TRUE<br />
into s. Next it tests whether the name criteria holds<br />
something. If so, it appends AND name Like . . . to s.<br />
And so on. Finally, it stores the SQL statement as the<br />
records source of the stay list.<br />
In the places where the pattern has john, buf, etc., the<br />
program inserts the value from the appropriate text<br />
box.<br />
Notice how we have written SQL parts in caps.<br />
Professionals do so to make the SQL pattern stand out<br />
more clearly. We explain the details below.<br />
Shared procedure<br />
When should this tricky piece of program be executed?<br />
If the screen used an ordinary Search button, the<br />
program should be the event procedure for the button.<br />
However, we want to make a live search. In this case<br />
the program must be executed whenever one of the<br />
criteria changes value, i.e. for a whole bunch of event<br />
procedures.<br />
The solution is to make the program piece a separate<br />
procedure. It starts with Private Sub and ends with End<br />
Sub (see more on procedures in section 6.2). The<br />
appropriate event procedures call this procedure as<br />
shown for txtName_Change, txtArrival_AfterUpdate<br />
and chkBooked_AfterUpdate.<br />
Live search criteria<br />
In order to make a live search, the program must<br />
respond whenever the user has typed something. The<br />
partially finished criteria are used for the search, and<br />
the stay list shrinks gradually. While the user types, the<br />
result is not in the box's Value, but in the temporary<br />
variable Text. The other text box values are in Value.<br />
It would complicate the search procedure to deal with<br />
this too. The solution is to let the event procedures<br />
store the current criteria in the variables copyName,<br />
copyStreet and copyPhone. The event procedure<br />
txtName_Change shows how. The search procedure<br />
uses these copies to generate the SQL statement.<br />
Note how we have declared the copy variables in the<br />
first line of the form (see more in section 6.2).<br />
Lazy search criteria<br />
Some of the search criteria should not be live. The<br />
check boxes, for instance, are either true or false. It is<br />
sufficient to let their AfterUpdate procedure call the<br />
search procedure and let it use the checkbox values. No<br />
copy is needed.<br />
The arrival date might be live, but while the user types<br />
the date, the intermediate value has little meaning. The<br />
stay list would just flicker and confuse the user. For<br />
this reason, the arrival date reacts only at AfterUpdate.<br />
Date comparison<br />
In Figure 5.2C, the arrival date is a text box control<br />
with the format property short date. <strong>Access</strong> will check<br />
that the text corresponds to a valid date. It will show<br />
the date according to the format property, but it will<br />
store it as a Double number - the number of days since<br />
the end of 1899 (see page 11).<br />
When generating the SQL statement, the program uses<br />
the CDbl function (Convert to Double) to show the<br />
date as a number:<br />
" AND arrival = " & CDbl(txtArrival)<br />
This would generate an SQL fragment like this:<br />
AND arrival = 37550<br />
Later, the SQL engine will compare the dates in their<br />
number form, and everything works fine.<br />
Why all this fuzz? Couldn't we simply write:<br />
" AND arrival = " & txtArrival<br />
When <strong>Access</strong> appends txtArrival, it converts it to text<br />
format by means of the CStr function. This function<br />
produces a date in the regional date format set up in<br />
MS Windows. With a European date format, we would<br />
get this SQL fragment:<br />
AND arrival = 21-10-07<br />
SQL would reject it since dates have to be enclosed by<br />
# #. So what about this:<br />
" AND arrival = #" & txtArrival & "#"<br />
76 5. <strong>Access</strong> through Visual Basic
Fig 5.2C Composite criteria<br />
txtName<br />
txtStreet<br />
txtPhone<br />
chkBooked<br />
chkCheckedIn<br />
chkOther<br />
txtArrival<br />
Dim copyName As String, copyStreet As String, copyPhone As String<br />
Private Sub search()<br />
frmFindStay3<br />
Dim s As String<br />
s = "SELECT * FROM qryStayList WHERE TRUE "<br />
If copyName "" Then s = s & " AND name Like( '*" & copyName & "*' ) "<br />
If copyStreet "" Then s = s & " AND address1 Like( '*" & copyStreet & "*' ) "<br />
If copyPhone "" Then s = s & " AND phone Like( '*" & copyPhone & "*' ) "<br />
if txtArrival > 0 Then s = s & " AND arrival = " & CDbl(txtArrival)<br />
s = s & " AND (FALSE "<br />
If chkBooked Then s = s & " OR state = 1 "<br />
If chkCheckedIn Then s = s & " OR state = 2 "<br />
If chkOther Then s = s & " OR state > 2 OR ISNULL(state) "<br />
s = s & ");"<br />
Me.subStayList.Form.RecordSource = s<br />
End Sub<br />
Private Sub txtName_Change()<br />
copyName = txtName.Text<br />
Call search<br />
End Sub<br />
Private Sub txtArrival_AfterUpdate()<br />
Call search<br />
End Sub<br />
Private Sub chkBooked_AfterUpdate()<br />
Call search<br />
End Sub<br />
Sub search doesn't know whether criteria<br />
are in Value or Text. So they are always here.<br />
SELECT * FROM qryStayList WHERE<br />
TRUE AND name Like('*joh*') . . .<br />
AND (FALSE OR state = 1 . . .<br />
. . . );<br />
Now we would get this fragment:<br />
" AND arrival = #21-10-07#<br />
Looks all right, but unfortunately, SQL expects dates in<br />
the US format. In this case it would reject 21 as a nonexisting<br />
month, in other cases produce a wrong result.<br />
Fortunately, the <strong>Access</strong> database engine can treat dates<br />
as double numbers, but other databases may not. In<br />
such cases you would have to generate the dates with<br />
an explicit US-format, for instance in this way:<br />
" AND arrival = #" & Format(txtArrival, "mm/dd/yyyy") & "#"<br />
Empty texts<br />
An empty field in the database has the value Null for<br />
all types of fields. The same applies for the Value in an<br />
empty text box. To test for an empty field , we would<br />
ask for IsNull(f). In a VBA string variable, an empty<br />
text is a zero-length text with the value "". Since<br />
copyName is a string variable, we ask whether the text<br />
is different from "".<br />
Null values<br />
Notice how the program deals with Other stays, i.e.<br />
stays that are neither booked nor checked-in. These<br />
stays include those with state > 2 and those without a<br />
state (a NULL state). Stays with a NULL state are not<br />
real stays, but records generated by the outer join for<br />
guests that don't have a stay.<br />
Initialize the form<br />
A final touch is to make the Find Guest screen<br />
initialize itself properly:<br />
• Let the three checkboxes have a mark initially.<br />
Otherwise, the stay list will be empty initially and<br />
the user may panic. To do this, set the initial value<br />
of the boxes through their property sheet.<br />
• Let the Form's Load event procedure call the<br />
search procedure in order to make the stay list<br />
match the initial criteria:<br />
Private Sub Form_Load()<br />
Call search<br />
End Sub<br />
Try it out<br />
You should try to make the solution work in practice. It<br />
is a challenge, but fun. Make a copy of frmFindStay<br />
and use it for the experiment.<br />
5. <strong>Access</strong> through Visual Basic 77
5.2.4 Event sequence for text box<br />
We have now looked at two events for the text box,<br />
Change and AfterUpdate. However, there are many<br />
more, as you can tell from the Event tab in the property<br />
box. (Select the event procedure and click F1 to get an<br />
explanation of the event.) Figure 5.2D shows typical<br />
event sequences for a text box. We will explain what<br />
happens.<br />
User clicks in the text box. First, the text box's Form<br />
object may get a Current event. This happens if the<br />
text box is in a record that wasn't selected before.<br />
Next, the text box receives two events, Enter and<br />
GotFocus. Enter signals that now the control is<br />
active. Before calling the Enter event-procedure,<br />
<strong>Access</strong> creates the Text property and sets it to the<br />
current Value of the text box. GotFocus signals that<br />
typing will now go to this control.<br />
Then the textbox receives this series of events:<br />
MouseDown, MouseUp, Click and maybe also a<br />
DblClick.<br />
User types an Ascii character. The text box receives<br />
four events: KeyDown, KeyPress, Change, KeyUp<br />
(plus mouse events if the mouse is used). KeyDown<br />
occurs when the user depresses any key. The event<br />
procedure has parameters that give details of the<br />
physical key and other keys depressed at the same<br />
time, for instance Shift and Ctrl. KeyPress occurs<br />
when the key has generated an Ascii character, for<br />
instance a letter, digit, space, tab or backspace. All<br />
of these correspond to characters in the Ascii alphabet.<br />
The Change event occurs when the visible content<br />
of the control has changed, for instance that a character<br />
was added to the text or a character was deleted.<br />
Before calling this event procedure, <strong>Access</strong><br />
updates the Text property so that it contains what<br />
the user sees.<br />
The KeyUp event occurs when the user releases the<br />
key. If the user keeps the key down to generate for<br />
instance a whole sequence of x's, each x generates<br />
KeyDown, KeyPress and Change. The KeyUp occurs<br />
only when the user releases the key.<br />
User types a non-Ascii character, for instance Arrow<br />
left or F6. This generates only the KeyDown-event<br />
(and the KeyUp). Nothing happens to Text or<br />
Value, and no Change event is generated.<br />
User types Delete. Delete is not an Ascii character, so<br />
no KeyPress-event occurs. However, one or more<br />
characters may be deleted, and then a Change event<br />
occurs. KeyDown and KeyUp occur too.<br />
User tabs to the next field. <strong>Access</strong> generates several<br />
events. KeyDown occurs since the user pressed the<br />
Tab key. BeforeUpdate shows that the user has finished<br />
the field, but it is not yet accepted. Before<br />
calling the event procedure, <strong>Access</strong> has copied Text<br />
to Value. BeforeUpdate may check the value, and<br />
in case something is wrong reject the update.<br />
Rejecting the update means that focus remains on<br />
the text box and no AfterUpdate event is generated<br />
yet. The user may edit the field or click Esc to set<br />
the value back to its old value.<br />
If it is an unbound control (not connected to a<br />
database record), <strong>Access</strong> will also copy Text to<br />
OldValue before calling the procedure. This is quite<br />
illogical because OldValue is intended for letting<br />
the program restore an erroneous field. This is not<br />
possible for unbound controls.<br />
Next comes the AfterUpdate-event. The value has<br />
been checked and the procedure may act on it. In<br />
the example above we used this opportunity to recompute<br />
the stay list. If it is a bound control, the<br />
value will not yet be stored in the database, nor will<br />
OldValue be changed. Storing the value in the<br />
database doesn't happen until the user moves to<br />
another record or explicitly saves the record with<br />
Shift+Enter (or Records -> Save Record).<br />
Next comes the Exit event. It signals that the field is<br />
not active anymore. Finally, LostFocus occurs and<br />
signals that typing will go to another control. When<br />
both events have occurred, the Text property disappears.<br />
What about KeyUp? It happens in the next field,<br />
which accordingly receives the KeyUp event.<br />
Before that, the next field receives Enter and<br />
GotFocus - in the same way as if the user clicked in<br />
the next field.<br />
What about errors in what the user has typed, for<br />
instance an incorrect date? <strong>Access</strong> shows an error<br />
message to the user instead of calling Before-<br />
Update, and the cursor remains in the field. Can't<br />
the program interfere before this error message?<br />
Yes it can. The form receives a Form_Error event,<br />
which may take action and cancel the error message<br />
that <strong>Access</strong> was about to show (see section 5.5.10).<br />
User clicks in next field. <strong>Access</strong> does almost the same<br />
as when the user tabs to the next field. The only difference<br />
is that there is no KeyDown event.<br />
User moves to next record. First the text box in focus<br />
will receive the same events as if the user moved to<br />
another control in the same record.<br />
Next, the Form object receives three events.<br />
BeforeUpdate signals that the record is about to be<br />
saved and that the program may check that values<br />
are correct and consistent with each other. The Be-<br />
78 5. <strong>Access</strong> through Visual Basic
Fig 5.2D Event sequence, textbox<br />
User action Events Property changes before call<br />
Click in textbox (Form: Current)<br />
Enter.<br />
Text = Value, OldValue = Value<br />
GotFocus.<br />
MouseDown, MouseUp<br />
Click, (DblClick).<br />
Type Ascii character KeyDown, KeyPress.<br />
(letter,digit, tab . . . ) Change. Text = Modified text<br />
KeyUp.<br />
Type ArrowLeft or F6 KeyDown, KeyUp.<br />
Type Delete KeyDown.<br />
Change.<br />
Text = Modified text<br />
KeyUp.<br />
Tab to next field KeyDown.<br />
in same record BeforeUpdate. Value = Text. Unbound controls<br />
(or Form: Error) also have OldValue = Text<br />
(Program may cancel update)<br />
AfterUpdate.<br />
Exit, LostFocus. Text property disappears<br />
Next field gets: Enter,<br />
GotFocus, KeyUp.<br />
Click in next field As tab to next field,<br />
but no KeyDown event.<br />
Move to next record Form: BeforeUpdate. (Program may cancel update)<br />
Form: AfterUpdate. All bound controls in the form:<br />
Database = OldValue = Value<br />
Form: Current.<br />
Click outside form LostFocus. (no action)<br />
Click in form again GotFocus. (no action)<br />
Click outside <strong>Access</strong> (no event)<br />
foreUpdate procedure may cancel further event<br />
processing so that the database is not updated.<br />
If everything is okay, <strong>Access</strong> stores all the bound<br />
control values in the database and in OldValue,<br />
then calls the AfterUpdate procedure. Finally,<br />
<strong>Access</strong> calls the Current procedure to signal that a<br />
new record is selected.<br />
User clicks outside the form, but inside the same<br />
<strong>Access</strong> window. <strong>Access</strong> generates a LostFocus<br />
event to show that typing will go to another object<br />
in <strong>Access</strong>. In this case the Text property does not<br />
disappear.<br />
User clicks in form again. The active text box<br />
receives a GotFocus event. The Text property has<br />
survived.<br />
User clicks outside <strong>Access</strong>. The text box does not receive<br />
any events (except for MouseMove events).<br />
All properties survive. When the user clicks on the<br />
Form again - even on the title bar - focus will be<br />
back at the text box, but it receives no events at that<br />
point.<br />
The OldValue property allows the program to undo<br />
changes to bound controls until the moment when the<br />
form receives an AfterUpdate event. To undo a change,<br />
the program sets Value=OldValue.<br />
Key Preview. In some cases we want a key or key<br />
combination to perform the same thing no matter<br />
which control is selected. One example is function<br />
keys. For instance we may want F2 to mean Reset<br />
Criteria no matter where in the form the cursor is. This<br />
can be handled by letting the Form look at the key<br />
before any control gets to know about it. See section<br />
5.5.9 for this Key Preview function.<br />
5. <strong>Access</strong> through Visual Basic 79
5.3 Visual Basic tools<br />
Before we go on writing more complex event procedures,<br />
we will show some tools that Visual Basic offers.<br />
1. Open a form in Design mode. Now click the Code<br />
icon on the toolbar (close to the Toolbox icon).<br />
You are now in the Visual Basic window. (You might<br />
also get there by choosing an event procedure in the<br />
property box, as we did above.)<br />
Docking and undocking, <strong>Access</strong> 2000 and 2003<br />
The Visual Basic window may contain many frames. In<br />
<strong>Access</strong> 2000 and 2003, they may be docked inside the<br />
window or undocked, i.e. floating as separate small<br />
windows. By accident you may dock or undock them,<br />
and it may be very frustrating trying to get them back<br />
where you want. So better learn how to deal with it:<br />
2. Make sure the Visual Basic window occupies only<br />
part of the screen.<br />
3. Make sure the Docking settings are all on: Go to<br />
Tools -> Options -> Docking and make sure that all<br />
the checkboxes are set. Close the option box.<br />
4. Click the Project Explorer icon. The window may<br />
now look like Figure 5.3A with a list of forms at the<br />
left (the Explorer frame) and some program code at<br />
the right. However, it may also show only the Explorer<br />
frame, or show the Explorer frame as a small,<br />
floating window.<br />
5. Drag the Explorer frame to somewhere outside the<br />
Visual Basic window. The Explorer frame is now<br />
undocked.<br />
6. Drag the Explorer frame to somewhere inside the<br />
Visual Basic window. The frame will dock somewhere<br />
along a side of the window. Where it docks<br />
does not depend on where the frame is when you<br />
release the mouse button. It depends on where the<br />
mouse pointer is when you release the button.<br />
7. Try dragging the frame around in the Visual Basic<br />
window. Notice that when the mouse pointer is<br />
close to one of the sides, the frame changes to a thin<br />
line showing the new shape of the frame. Release<br />
the button to dock the frame accordingly.<br />
8. Try double-clicking the title bar of the frame. The<br />
frame toggles between docked and undocked.<br />
Leave it docked as on Figure 5.3A.<br />
Project Explorer<br />
To the left you see a list of all forms in the database. In<br />
object-oriented terminology, each form is a class. The<br />
class has a code module with event procedures for the<br />
controls on the form. When you double-click a form on<br />
the list, you will see the code module to the right in the<br />
Visual Basic window.<br />
The database may also contain code modules (classes)<br />
that are not forms. They are shown at the bottom of the<br />
Project Explorer list.<br />
All code modules may contain procedures and declare<br />
variables. VBA offers three kinds of modules:<br />
Form module. A form module has event procedures<br />
for all controls on the form, and it may have ordinary<br />
procedures too. It may declare variables.<br />
When you open a form, you get an object based on<br />
the form class. The object is a visible form and it<br />
has a set of variables corresponding to the declarations.<br />
You cannot open several versions of the form just by<br />
clicking multiple times in the database window, but<br />
you may do it from Visual Basic. Then you get more<br />
form objects, appearing as other open copies of the<br />
form. Each copy has its own variables, but the same<br />
code. When the code uses addresses such as<br />
Me.txtName, it refers to the controls and variables of<br />
this particular copy of the form.<br />
When you create a form, you don't get its form module<br />
until you create its first event procedure.<br />
Class module. A class module corresponds to a class<br />
in other object-oriented languages. It has procedures<br />
and declares variables, and you can create<br />
multiple objects based on the class, each with their<br />
own variables. The only difference between form<br />
modules and class modules is that the latter are not<br />
visible to the user and have no controls.<br />
See section 5.7 on how to create modules.<br />
Module (simple). A simple module is similar to a class<br />
but there is only one object based on the module.<br />
The system creates this object automatically. The<br />
first versions of Visual Basic had no class modules,<br />
only simple modules.<br />
Code window<br />
To the right in the Visual Basic window, you see the<br />
code window with the Visual Basic program. Figure<br />
5.3A shows the code module for frmFindStay. You see<br />
three event procedures for the txtName control. You<br />
can scroll to other event procedures and controls, or<br />
you can select them by means of the two combo boxes<br />
at the top.<br />
Creating an event procedure. Initially, the event procedures<br />
are not in the code, but if you select one of<br />
them by means of the combo boxes, Visual Basic creates<br />
it. The same thing happens if you select an event<br />
procedure through the control's property window.<br />
However, <strong>Access</strong> doesn't always coordinate these two<br />
things. You may experience that you have created an<br />
event procedure in the code window, but it doesn't<br />
appear in the property box. As a result, <strong>Access</strong> never<br />
calls the event procedure. This may for instance happen<br />
80 5. <strong>Access</strong> through Visual Basic
Fig 5.3A VBA window and debugger<br />
List of controls<br />
Project Explorer<br />
Object Browser<br />
Events in<br />
the control<br />
Project explorer:<br />
One class per form<br />
Code module<br />
if you have created the event procedure while looking<br />
at the code in debug mode (see page 82).<br />
The cure may be to select the event procedure from the<br />
property box and compile the module (Debug -><br />
Compile), then close and open the form.<br />
9. Create the missing event procedures for txtName as<br />
shown on the Figure. Use the combo boxes to<br />
create them. If you have followed the previous steps<br />
closely, only the Enter procedure should be missing.<br />
10. Type the debug statements shown in the procedures,<br />
for instance:<br />
Debug.Print "After", Me.txtName, Me.txtName.Text<br />
When executed, this statement prints something in<br />
the Immediate window. We will explain more on<br />
the Debug statement below.<br />
Note that VBA automatically capitalizes the words that<br />
it recognizes. If it doesn't, it may be because you have<br />
spelled the word incorrectly, but it may also be because<br />
the word comes after the bang operator (!). VBA cannot<br />
recognize things after the bang at edit time, but it<br />
will check all the words at execution time. At that time<br />
it will give you an error message if it cannot recognize<br />
the word.<br />
Deleting an event procedure. If you want to delete an<br />
event procedure, simply delete all the lines of the procedure.<br />
Don't try to delete it on the Event tab.<br />
Closing the VBA window. You can close the VBA<br />
window at any time. It only hides the window. Saving<br />
the code doesn't happen until you close the form it belongs<br />
to. Sometimes you may want to save the code<br />
explicitly. Use File -> Save (or Ctrl+S).<br />
Debug command and event logging<br />
The statement Debug.Print prints its parameters in the<br />
Immediate window (also called the debug window). As<br />
an example, when the AfterUpdate event occurs, the<br />
event procedure will print the text "After" followed by<br />
the current Value and Text. The event procedure for<br />
Change behaves similarly, and as a result, the Immediate<br />
window will show a log of what happened. Try it:<br />
11. Open the Immediate window with Ctrl+G. Adjust<br />
the sizes so that you can see the Immediate window<br />
as well as frmFindStay.<br />
12. Type something in txtName. The Immediate window<br />
should log what happens.<br />
This is the hard way to find out exactly which events<br />
occur and what the situation is at these points. During<br />
such experiments, you may want to temporarily disable<br />
some statements. For instance, we might want to disable<br />
one of the debug statements to avoid too many<br />
lines in the Immediate window.<br />
13. Comment-away statements that you don't want for<br />
the moment. Set an apostrophe (a "ping") at the beginning<br />
of the line. When you move the cursor, the<br />
line turns green to show that this is a comment for<br />
humans only.<br />
5. <strong>Access</strong> through Visual Basic 81
Breakpoints and debug<br />
We are able to stop the program in the middle of an<br />
event procedure. To do this, we set a breakpoint at the<br />
code line where we want the program to stop. Figure<br />
5.3A shows a breakpoint in the last event procedure -<br />
marked with a big dot in the left margin. Try it:<br />
14. Click at the left margin of the Debug.Print line. The<br />
dot should appear and the line be high-lighted as on<br />
the figure. You have set a breakpoint. (Clicking<br />
again will remove the breakpoint. Don't worry<br />
about the line Msgbox. We will add it later.)<br />
15. Click in some other field on FindStay, then click in<br />
txtName. This generates an Enter event in txtName.<br />
As a result, the program stops just before executing<br />
Debug.Print.<br />
16. Current value. Try moving the cursor to an expression,<br />
for instance the Debug parameter<br />
Me.txtName. After a moment, VBA shows the current<br />
value of this expression. You can see the value<br />
of expressions in the procedure where the execution<br />
stopped, but not values in other procedures because<br />
they are not active at present.<br />
17. You can use the Immediate window to try out various<br />
statements. The statements are executed as if<br />
they were written where the breakpoint is. Try for<br />
instance<br />
Me.txtName.Text = "abc" (should change the text in<br />
the form)<br />
? Me.subStayList.Form!name (should print the<br />
name of the first guest in the list)<br />
In section 5.1 we used the Immediate window with<br />
statements such as<br />
Forms!frmFindStay!txtName = . . .<br />
Now you can use Me. The reason is that now the Immediate<br />
window runs in the context of the event procedure.<br />
It can address the form object in the same way as<br />
the program.<br />
Correcting bugs at breakpoints. Using the Immediate<br />
window in connection with a breakpoint is an important<br />
way to find out what the program does. If you find<br />
an error in the program, you may usually correct it<br />
while at the breakpoint. However, sometimes VBA<br />
cannot do the correction, for instance if you delete an<br />
event procedure. It asks whether you want to "reset the<br />
project". This question sounds threatening, but simply<br />
means "stop the program execution and restart it from<br />
the beginning". Nothing to worry about - nothing is<br />
lost.<br />
Continue after breakpoint. When you have made<br />
your experiments at the breakpoint, you can resume<br />
ordinary program execution. There are several ways to<br />
resume execution (Figure 5.3A):<br />
• Run (F5). The program continues in the normal<br />
fashion.<br />
• Step Into (F8). The program executes the next<br />
statement, then stops again in breakpoint mode.<br />
With repeated use of F8, you can execute the program<br />
step by step. If the program calls another<br />
procedure, you will step into it statement by statement.<br />
• Step Over (Shift+F8). As F8, but if the program<br />
calls another procedure, it executes all of the procedure<br />
without stopping, then stops at the return<br />
from the procedure.<br />
Stop an endless loop. If the program gets into an endless<br />
loop, you can stop it with Ctrl+Break.<br />
Pop-up help<br />
You have probably noticed that as you type a statement,<br />
<strong>Access</strong> often shows a list of what you can type at<br />
this point. You may bring up several kinds of lists:<br />
• Ctrl+J brings up the property list. It shows you<br />
the possible properties, procedures, and controls at<br />
this point of typing. You may choose one with the<br />
Tab-key.<br />
• Ctrl+Shift+J brings up the Constant list. It shows<br />
you the possible named constants at this point of<br />
typing. (Ctrl+J may be used too, but it brings up<br />
the full list of named constants.)<br />
• Ctrl+I brings up the Quick Info list. It shows the<br />
data type you are dealing with, or the list of parameters<br />
to the procedure you call, or the value of<br />
a named constant.<br />
Try the pop-up help<br />
18. Start entering this statement in the Change procedure<br />
(Figure 5.3B):<br />
MsgBox "test", vbYesNo<br />
When you have typed MsgBox, use Ctrl+I to bring<br />
up the list of parameters. Notice that most of the parameters<br />
are optional (enclosed in brackets). When<br />
you have typed the comma, bring up the list of possible<br />
constants with Ctrl+Shift+J. Select the right<br />
constant with the Tab-key.<br />
When executed, the MsgBox statement will show a<br />
message to the user and ask for a Yes or No. (In section<br />
3.6, we used MsgBox to print messages for a toolbased<br />
mockup.)<br />
19. Put the cursor on RecordSource and use Ctrl+J to<br />
bring up a list of possible properties and procedures<br />
at this point.<br />
20. Put the cursor on txtName and use Ctrl+J to bring<br />
up a list of possible controls at this point.<br />
82 5. <strong>Access</strong> through Visual Basic
Fig 5.3B Breakpoint, pop-up help and object browser<br />
Debug actions:<br />
Run<br />
F5<br />
Step Into<br />
F8<br />
Step Over<br />
Shift F8<br />
Break<br />
Ctrl+Break<br />
Open Immediate window Ctrl+G<br />
Property list<br />
Ctrl+J<br />
Breakpoint<br />
Quick Info<br />
Ctrl+I<br />
Constant list<br />
Ctrl+Shift+J<br />
Object Browser<br />
F2<br />
Classes<br />
(objects)<br />
Properties and<br />
procedures for<br />
the class<br />
Sometimes a<br />
good explanation.<br />
Else use F1.<br />
Object Browser (F2) and Help (F1)<br />
The Object Browser gives an overview of the classes in<br />
<strong>Access</strong>, Visual Basic, and your own database. Open the<br />
browser with F2 (Figure 5.3B). To the left you see a<br />
list of the classes, to the right all properties and procedures<br />
of the selected class (called "members" in the<br />
window). In the figure we have selected the SubForm<br />
class. The right-hand side shows the properties and<br />
event procedures.<br />
For some properties and procedures, VBA shows a<br />
good explanation at the bottom of the window, for others<br />
you get a good explanation with F1 (Help). The<br />
Object Browser doesn't show all the classes available.<br />
For instance you will look in vain for the Debug class,<br />
which we have used several times already.<br />
Another way to get help about classes, properties, and<br />
language structures such as if-then, is to position the<br />
cursor on the word in the VBA code, then use F1. Usually<br />
you get good help. Try it:<br />
21. Put the cursor on the word MsgBox and use F1.<br />
You get an excellent explanation of the procedure<br />
and its parameters.<br />
22. Put the cursor on the word RecordSource in the<br />
code and use F1. You get a reasonable explanation.<br />
23. The quality of the help information varies. Put the<br />
cursor on the word Debug in the code and use F1.<br />
You may get the message Can't find project or library.<br />
Or you get an explanation, but not an exciting<br />
one. You may try F1 with the cursor on the<br />
word Print. You get a lot of information, although it<br />
is hard to find out what it means.<br />
5. <strong>Access</strong> through Visual Basic 83
5.4 Command buttons<br />
When the user clicks a command button, it receives a<br />
Click event. The event procedure must perform what<br />
the button is planned to do. We will look at a few typical<br />
examples.<br />
Make a button open another form<br />
We will first let the New guest button open a stay form<br />
in the simplest way (Figure 5.4).<br />
1. On frmFindStay give the NewGuest button the<br />
name cmdNewGuest. (The usual prefix for a command<br />
button is cmd.)<br />
2. Define the event procedure for the OnClick event.<br />
The procedure body should be:<br />
DoCmd.OpenForm "frmStay"<br />
The object DoCmd can do various things. Here we use<br />
it to open a form. You can use PgDown to step through<br />
all the stays, and even add a new stay at the end.<br />
Open a form to show only one record<br />
You may use OpenForm to open a specific stay:<br />
3. Try to change the procedure body to<br />
DoCmd.OpenForm "frmStay", , , "stayid=2"<br />
If you try it in user mode, you see that stay 2 is visible<br />
and the user may edit it. Parameter 4 did the trick. It is<br />
a filter - a text that automatically enters an SQL-<br />
WHERE clause and restricts the visible stays. In practice,<br />
the program must compute the filter text so that 2<br />
in the example becomes the stayID the user has chosen.<br />
Section 5.5.2 explains more about opening a form for<br />
various purposes. Section 5.5.3 explains the many<br />
parameters for OpenForm.<br />
Make a button reset the search criteria<br />
The real FindGuest window has a button for resetting<br />
the search criteria. Try to add it:<br />
4. In design mode, add a button to frmFindStay. Give<br />
it the label Reset criteria and the name cmdReset.<br />
5. Define the event procedure for the OnClick event.<br />
The procedure body should be:<br />
Me.subStayList.Form.RecordSource = _<br />
"select * from qryStayList; "<br />
Me.txtName = ""<br />
This procedure sets the record source to the full list of<br />
stays, and it sets the search criterion to an empty text. If<br />
there are more search criteria, for instance also the<br />
phone number, they should be set too, of course.<br />
Other button events<br />
The click event happens if the user clicks the button.<br />
What happens if the user tabs to the button and then<br />
presses Enter? Or if the user uses a shortcut key? The<br />
button doesn't notice. It receives a click event in all<br />
these cases.<br />
A command button also receives the same events as a<br />
text box, for instance Enter, GotFocus, MouseDown,<br />
KeyPress. There is rarely a need to do something for<br />
these events. A button doesn't receive Change, Before-<br />
Update and AfterUpdate. These events deal with storing<br />
some data, and a command button doesn't store<br />
anything.<br />
Default button and Cancel button<br />
A form may have a default button. If the focus is<br />
somewhere on the form or its subforms, and the user<br />
presses Enter, the default button gets a click event.<br />
(The exception is when the focus is on another button.<br />
Then this button gets the click, of course.)<br />
You may define any button as the default. In the property<br />
box for the button, select the Other tab and set<br />
Default = Yes<br />
<strong>Access</strong> will automatically set Default = No for the<br />
previous default button on the form.<br />
A form may also have a cancel button. If the focus is<br />
somewhere on the form or its subforms, and the user<br />
presses Escape, the cancel button gets a click event.<br />
You may select any button as the cancel button. In the<br />
property box, select the Other tab and set<br />
Cancel = Yes<br />
You will typically let the cancel button close the form<br />
without saving anything. This can be done with these<br />
statements in the event procedure:<br />
Me.Undo<br />
DoCmd.Close<br />
The Undo procedure sets all fields on the form to their<br />
OldValue. As a result, <strong>Access</strong> will not save them at<br />
close.<br />
84 5. <strong>Access</strong> through Visual Basic
Fig 5.4 Command buttons, default and cancel buttons<br />
Default button - responds at Enter:<br />
Other tab -> Default = Yes<br />
Private Sub cmdNewGuest_Click()<br />
DoCmd.OpenForm "frmStay"<br />
End Sub<br />
Or open only one stay:<br />
DoCmd.OpenForm "frmStay", , , "stayid=2"<br />
Cancel button - responds at Esc:<br />
Other tab -> Cancel = Yes<br />
Private Sub cmdReset_Click()<br />
Me.subStayList.Form.RecordSource = "select * from qryStayList; "<br />
Me.txtName = ""<br />
End Sub<br />
5. <strong>Access</strong> through Visual Basic 85
5.5 Forms<br />
Forms are very complex. They handle many events and<br />
have many properties. Below we explain the more<br />
important ones.<br />
5.5.1 Open, close, and events<br />
In Visual Basic you can open a form in this way:<br />
DoCmd.OpenForm "name of the form"<br />
OpenForm can have many parameters, as explained in<br />
section 5.5.3. You can close the form that is in focus<br />
with<br />
DoCmd.Close<br />
As an example, a button on the form could close the<br />
form in this way. When the user clicks the button, the<br />
form is in focus.<br />
If you want to close another form than the one currently<br />
in focus, you can specify the form through two<br />
parameters, for instance:<br />
DoCmd.Close acForm, "frmStay"<br />
The parameter acForm says it is a form. The last parameter<br />
is the form name.<br />
An alternative is to set the form in focus, and then<br />
close it, for instance like this:<br />
Forms!frmStay.SetFocus<br />
DoCmd.Close<br />
Event sequence<br />
During open and close, the form receives many events.<br />
Figure 5.5A gives an overview.<br />
Open(Cancel). This is the first event that the form receives.<br />
At this point in time, the various data structures<br />
in the form have been created, including all<br />
controls. The subforms have been opened and have<br />
received their first Current event. Most controls<br />
also have the right value, but some have not. The<br />
form is invisible to the user at this point. The event<br />
procedure may set the parameter Cancel=True,<br />
thereby refusing to open the form.<br />
Load event( ). Next the form receives a Load event.<br />
The form is still invisible, but all unbound controls<br />
have a value. Controls bound to a database record<br />
may still not have the right value. <strong>Access</strong>ing data in<br />
the database proceeds in parallel with opening the<br />
form, and bound controls gradually get the right<br />
value.<br />
Resize( ). This event occurs during opening of the<br />
form, and when the user resizes the form by dragging<br />
its borders. The event procedure may adjust<br />
the controls on the form to better utilize the available<br />
space. As an example, a subform area may expand<br />
and contract in step with the main form. See<br />
section 5.5.13.<br />
Activate( ). This event signals that the form, or one of<br />
its controls, will get the focus (the title bar becomes<br />
blue). The event doesn't occur when the user clicks<br />
from another application. Subforms never receive<br />
an Activate event. They are active when their main<br />
form is active.<br />
GotFocus( ). This event occurs only when the form<br />
has no controls that can get the focus.<br />
Current().This event occurs at open no matter whether<br />
the form is bound to the database or not. For bound<br />
forms, it also occurs when the user moves to<br />
another record, for instance with PageDown. This<br />
event is the place to update controls that depend on<br />
the current record, for instance detail windows.<br />
When Current is called during open, the form is<br />
still invisible, but the controls have the right value.<br />
When Current returns, the form becomes visible.<br />
Dirty(Cancel). This event occurs the first time the user<br />
edits some bound data in the current record. The<br />
event occurs right before the Change event of the<br />
control changed by the user. At return the Form<br />
property Dirty becomes True.<br />
BeforeUpdate(Cancel). This event occurs when the<br />
form has data that is about to be saved in the database.<br />
The event is an opportunity to check consistency<br />
between pieces of data before they are saved.<br />
The event procedure may set Cancel=True to stop<br />
saving and let the user change the data. It may also<br />
use Me.Undo to restore the old values and in that<br />
way skip the saving.<br />
BeforeUpdate will occur when the form is to be closed<br />
or when focus moves to another record on the form.<br />
Canceling the update means that the form will not be<br />
closed or focus not moved.<br />
BeforeUpdate will not occur when focus moves to another<br />
<strong>Access</strong> form. However, it will occur when focus<br />
moves to a subform on the same form, or when the user<br />
switches to a different tab sheet on the same form. This<br />
makes it difficult to maintain consistency between data<br />
in the main form and data in its subforms.<br />
AfterUpdate( ). This event occurs when values have<br />
been saved in the database. Also the OldValue<br />
properties have been set to the saved values. The<br />
event is an opportunity to act on the new data.<br />
Unload(Cancel). This is the first event when a form is<br />
closed. The event procedure may check that everything<br />
is okay. If it returns Cancel=True, the form<br />
will remain open.<br />
86 5. <strong>Access</strong> through Visual Basic
Fig 5.5A Event sequence, Form open and close<br />
User action Events<br />
Property changes before call<br />
Open Open(Cancel) The Form and its controls are created, but not<br />
visible. Some controls are not initialized. Subforms<br />
are open. The procedure may refuse to open the<br />
form (Cancel=True).<br />
Load<br />
All controls are initialized, except bound ones.<br />
The Form is still invisible.<br />
Resize<br />
(Opportunity to reposition controls)<br />
Activate<br />
(Signals that the form will get focus)<br />
(GotFocus)<br />
(Only for Forms where no control can get the<br />
focus)<br />
Current<br />
A current record has been selected. Bound controls<br />
have a value. At return, the form becomes visible.<br />
Edit Dirty First time the user edits some data in the record.<br />
PageDown, BeforeUpdate(Cancel) Some bound fields to be saved.<br />
etc.<br />
The procedure may refuse to save.<br />
AfterUpdate<br />
Bound fields saved. All values = OldValue.<br />
Current<br />
Form is invisible. A new record is current.<br />
At return, the Form becomes visible.<br />
Click in BeforeUpdate(Cancel) As for PageDown.<br />
subform AfterUpdate As for PageDown.<br />
Close Unload(Cancel) Form to be closed. The procedure may refuse and<br />
the form stays open.<br />
Deactivate<br />
(Signals that the form will lose focus)<br />
Close<br />
At return, the form becomes invisible and the<br />
subforms are closed. Memory is released.<br />
Deactivate( ). This event signals that the form will lose<br />
focus. It occurs during close and when the user<br />
clicks in another main form. It doesn't occur when<br />
the user clicks in another application. Subforms<br />
never receive a Deactivate event.<br />
Close( ). This is the last event the form receives. The<br />
form is still visible and all subforms are still open.<br />
When Close returns, the form becomes invisible, all<br />
subforms are closed, and data structures are deleted.<br />
5.5.2 CRUD control in Forms<br />
When you create a form in the default way and open it<br />
with DoCmd.OpenForm, the user is allowed to step<br />
through all records, and add several new records. Depending<br />
on circumstances, we may want a more restricted<br />
behavior. We may for instance want the user to<br />
see and edit only one single stay. Or we may want the<br />
user to create only one new record.<br />
CRUD and filter properties<br />
The way to control this is through the following properties,<br />
called CRUD properties because they specify<br />
Create, Read, Update, and Delete of records (Figure<br />
5.5B gives an overview). You can see their initial values<br />
on the form's data tab. You can change them at run<br />
time through Visual Basic:<br />
AllowEdits. If True, the user can edit fields in existing<br />
records. Default=True.<br />
AllowDeletions. If True, the user can delete a record<br />
with the Del key. (Requires that the record selector<br />
is displayed in the form.) Default=True.<br />
AllowAdditions. If True, there will be an empty record<br />
at the end of the list for adding new records.<br />
Default = True.<br />
Filter. A text that works as a WHERE clause in the<br />
query behind the form. For instance, you may set<br />
filter to "stayID=740". The result will be that the<br />
user only sees the stay with ID=740. (Don't write<br />
the word WHERE itself.)<br />
FilterOn. If True, the Filter property works and selects<br />
records. If False, the filter has no effect. FilterOn is<br />
a property that you cannot see in the form's property<br />
box, but you can set it through the program or<br />
5. <strong>Access</strong> through Visual Basic 87
the Immediate window. The user can toggle Filter-<br />
On with the filter icon on the toolbar.<br />
AllowFilters. If True, the user is allowed to set filters<br />
on and off through icons on the toolbar. The program<br />
can always set filters independently of AllowFilters.<br />
DataEntry. If True, the user will not be able to see old<br />
records. If AllowAdditions is also True, the user is<br />
allowed to add new records. If the program sets<br />
AllowAdditions to False while the user is editing a<br />
new record, the user is allowed to finish editing the<br />
record, but cannot add further records. Default =<br />
False.<br />
Setting DataEntry to False has an undocumented<br />
side effect: It also sets FilterOn to False, in that<br />
way blocking filters set up by the program. In this<br />
case, let your program set FilterOn after setting<br />
DataEntry.<br />
All of these properties are dialog variables that don't<br />
survive closing of the form. What you have specified in<br />
the form's property box are simply the default value for<br />
these variables. You may try out the properties in this<br />
way:<br />
1. Open frmStay in Datasheet mode. You should see<br />
all records from the stay query. At the end of the<br />
datasheet you should see an empty line for entering<br />
a new record.<br />
2. Open the Immediate window with Ctrl+G. Adjust<br />
the sizes so that you see the datasheet and the Immediate<br />
window at the same time. Try to change<br />
the settings with statements such as:<br />
Forms!frmStay.AllowAdditions = False<br />
Forms!frmStay.Filter = "stayid=740"<br />
Forms!frmStay.FilterOn = True<br />
The datasheet should change accordingly, removing<br />
the empty line, showing only one record, etc.<br />
See and edit a single record<br />
In order to see and edit a single record, set these properties<br />
in the form's property box (see overview in Figure<br />
5.5B):<br />
AllowEdits = True<br />
AllowDeletions, AllowAdditions, DataEntry = False<br />
Then open the form with a filter, for instance:<br />
DoCmd.OpenForm "frmStay", , , "StayID=2"<br />
In practice, the program must compute the filter text so<br />
that 2 in the example becomes the stayID the user has<br />
chosen.<br />
Update the record. When the user enters something, it<br />
is not stored in the database until he closes the form (or<br />
enters a subform). Sometimes storing is needed earlier.<br />
The program can do it with this statement:<br />
Me.Recordset.Move(0)<br />
This trick assumes that <strong>Access</strong> is configured for DAO<br />
3.6 (see section 5.6). The statement works on the open<br />
recordset bound to the form. It moves current record<br />
back or forth a number of records, and as part of this it<br />
saves the current record. In our case we move zero<br />
records away - to the same record. But we get the<br />
update anyway. (See more in section 5.6.3.)<br />
Create a single record<br />
In order to create a single record without seeing existing<br />
records, set these properties in the form's property<br />
box (see overview in Figure 5.5B):<br />
AllowAdditions = True<br />
DataEntry = True<br />
This will still allow the user to enter a record and then<br />
move on to enter a new record. To avoid this, block<br />
further record creation when the first record is updated:<br />
Private Sub Form_AfterUpdate()<br />
Me.AllowAdditions = False<br />
End Sub<br />
Open the form with<br />
DoCmd.OpenForm "frmStay"<br />
Prevent two blank lines in datasheet<br />
The method above for creating a single record works<br />
okay when the Form is shown in normal mode. In<br />
Datasheet mode, however, the user may be confused at<br />
what happens. The user sees the blank record at the end<br />
of the datasheet, but as soon as he starts typing in it,<br />
another blank line appears.<br />
<strong>Access</strong> creates the second blank line right after calling<br />
the Dirty-event procedure. However, it is impossible to<br />
adjust things at this point because the user's character<br />
hasn't yet ended where it should be.<br />
The solution is to store something in the new blank<br />
record before the user types anything. This initiates a<br />
temporary record for further editing. Then AllowAdditions<br />
is set to False to prevent further new records. This<br />
can be done at the Current event:<br />
Private Sub Form_Current()<br />
If Not IsNull(Me.someField) Then Exit Sub<br />
Me.someField = " "<br />
Me.AllowAdditions = False<br />
Me.someField = Null<br />
End Sub<br />
The first statement checks whether something has been<br />
stored in the field to be initialized. In this case the user<br />
has selected an existing record and nothing should be<br />
done now. The next statement stores a space in the<br />
field. This creates the temporary record. Next Allow-<br />
Additions is set to False. This prevents further records<br />
being created. Finally the field is set back to the initial<br />
empty state.<br />
The solution must be extended with means to add another<br />
record, for instance a button or a response to<br />
Enter. Care must also be taken not to leave empty<br />
88 5. <strong>Access</strong> through Visual Basic
Fig 5.5B Controlling Open, CRUD, and filter<br />
Form properties: CRUD and Filter<br />
AllowEdits: See and edit data<br />
AllowDeletions: Del-key works<br />
AllowAdditions: Empty record at end<br />
DataEntry: Old data invisible<br />
Filter: e.g. StayID=740<br />
FilterOn: Use filter<br />
AllowFilters: User-controlled filter<br />
AllowEdits<br />
Allow-<br />
Deletions<br />
Allow-<br />
Additions<br />
To see and edit a single record: True False False False<br />
(Also set the filter)<br />
To create a single record:<br />
Initially x False True True<br />
At Form_AfterUpdate x False False True<br />
acFormEdit True True True False<br />
acFormAdd True True True True<br />
acFormReadOnly False False False False<br />
acFormPropertySettings (default) x x x x<br />
DataEntry<br />
DoCmd.OpenForm “frmStay”, view, , “StayID=5”, CRUDproperties, windowMode, openArgs<br />
Datasheet<br />
view<br />
Print<br />
preview<br />
acDesign<br />
acFormDS<br />
acNormal<br />
acPreview<br />
Filter name<br />
?<br />
Filter<br />
acDialog<br />
acHidden<br />
acIcon<br />
acWindowNormal<br />
Available to the<br />
Form procedures<br />
records in the database in case the user doesn't enter<br />
something.<br />
5.5.3 The OpenForm parameters<br />
From VBA you normally open a form with<br />
DoCmd.OpenForm. A lot of parameters determine<br />
what goes on (see the details on Figure 5.5B).<br />
Form name. The first parameter is the name of the<br />
form, for instance "frmStay".<br />
View. The second parameter specifies whether the<br />
form is to be shown in design view, as a datasheet,<br />
as a normal form (default), or as a preview of a<br />
print.<br />
Filter name. The name of a query, for instance<br />
"qryStay". (I have not been able to figure out what<br />
this parameter does.)<br />
Filter. A WHERE condition for the records to show,<br />
for instance "StayID=5".<br />
CRUDproperties. A choice of CRUD combinations<br />
that determine whether records can be edited,<br />
added, etc. Figure 5.5B shows that acFormEdit sets<br />
AllowEdits, AllowDeletions, AllowAdditions to<br />
True and DataEntry to False. In other words, the<br />
user can do anything to the records. At run time<br />
these settings overrule the initial settings from the<br />
Form's property box.<br />
As another example, acFormPropertySettings (the<br />
default), doesn't set any of the CRUD properties but<br />
lets the initial settings rule.<br />
WindowMode. Specifies whether the form is to be<br />
shown as a dialog box, a hidden window, an icon,<br />
or a normal window. A dialog box keeps the focus<br />
until the user closes it. It has borders that cannot be<br />
resized. A hidden window is like a normal window<br />
except that it is invisible. The event procedures can<br />
make it visible with me.Visible=True. The window<br />
mode acIcon seems to have no effect.<br />
OpenArgs. This parameter is stored in the property<br />
OpenArgs in the Form. It can tell the event procedures<br />
in the Form what to do. The parameter might<br />
for instance specify whether the form is to be used<br />
for creating a new record or viewing an existing<br />
one, in this way allowing the Form to do it in its<br />
own way. Below we show how this is used in the<br />
hotel system to let the same form handle a new<br />
guest, a new stay, or an existing stay.<br />
5. <strong>Access</strong> through Visual Basic 89
5.5.4 Multi-purpose forms (hotel system)<br />
In the hotel system we use frmStay for creating guest<br />
and stay records, as well as editing existing records.<br />
Using the same Form is an advantage to the user (for<br />
recognition) and for the developer (he needs to maintain<br />
only one Form).<br />
Now, how does the Form know what it should do?<br />
OpenArgs is intended for such things. In the hotel system,<br />
we use OpenArgs in this way:<br />
• OpenArgs < 0: Open an existing stay. The<br />
WhereCondition parameter in the OpenForm<br />
statement selects the right one.<br />
• OpenArgs = 0: Create a new guest and a new<br />
stay.<br />
• OpenArgs > 0: Create a new stay for an existing<br />
guest. OpenArgs is the guestID for the existing<br />
guest.<br />
Figure 5.5C shows the full solution. It deals also with<br />
error cases where the user for instance clicks the<br />
ShowStay button, but hasn't selected a stay. The Find<br />
Guest screen has three buttons for opening a stay. The<br />
figure shows the three click-event procedures.<br />
cmdNewGuest<br />
This is the simplest of the buttons. Independent of what<br />
the user has chosen, the button should create a new<br />
guest and a stay for him. What is needed is to open the<br />
form with OpenArgs=0.<br />
cmdNewStay<br />
Here we have two situations. (1) The user has selected<br />
a line, and thus a guest. (2) The list is empty so the user<br />
has not chosen anything. The property CurrentRecord<br />
allows the program to distinguish the two situations.<br />
CurrentRecord gives the sequential number of the selected<br />
record. It is zero if nothing is selected. If the list<br />
is empty, we might claim it is an error to make a new<br />
stay for a non-existing guest, but it turns out that users<br />
find it natural to create a new guest in this case. So this<br />
is what the program does; it opens the form with Open-<br />
Args = 0. If a line is selected, it opens the form with<br />
OpenArgs = guestID.<br />
Notice the If-Then-Else-EndIf construct that makes the<br />
program choose alternative paths, either executing the<br />
Then-statements or the Else-statements. The linebreaks<br />
must be as shown, with Else and EndIf on lines<br />
of their own.<br />
Notice also the comment we have put after Then to<br />
explain to the reader what situation the program deals<br />
with after Then.<br />
cmdShowStay<br />
Here we have three situations. (1) A stay is selected.<br />
(2) A guest without stay is selected. (3) The list is<br />
empty. In the last two cases, the program cannot open a<br />
stay. The current value of stayID allows the program to<br />
distinguish. StayID is >0 in the first case, and Null in<br />
the last two cases. Notice that stayID exists even if the<br />
list is empty and CurrentRecord is zero. The value of<br />
stayID is just Null.<br />
When stayID>0, we open the form with OpenArgs=-1.<br />
We also have to set the filter so that only this stay is<br />
visible. The WhereCondition-parameter to OpenForm<br />
allows us to do this in a simple manner. If the user for<br />
instance has selected a line with stayID=740, the<br />
WhereCondition has to be the text<br />
stayID=740<br />
In the program we compute this text by concatenating<br />
the text "stayID=" with the current stayID using the &-<br />
operator. StayID is a number, but Visual Basic converts<br />
it to a text before the concatenation.<br />
When stayID is Null (or a number
Fig 5.5C Edit or create connected records through a form<br />
Bind to one<br />
old Stay<br />
Bind to old Guest<br />
+ new Stay<br />
Bind to new Guest<br />
+ new Stay<br />
Private Sub cmdNewGuest_Click()<br />
DoCmd.OpenForm "frmStay", , , , , , 0<br />
End Sub<br />
OpenArgs<br />
Private Sub cmdNewStay_Click()<br />
If Me.subStayList.Form.CurrentRecord = 0 Then 'No guest selected<br />
DoCmd.OpenForm "frmStay", , , , , , 0<br />
Else<br />
DoCmd.OpenForm "frmStay", , , , , , Me.subStayList.Form!guestID<br />
End If<br />
End Sub<br />
OpenArgs<br />
Private Sub cmdShowStay_Click()<br />
If Me.subStayList.Form.stayID > 0 Then 'Stay selected<br />
DoCmd.OpenForm "frmStay", , , "stayID=" & Me.subStayList.Form!stayID, , , -1<br />
Else<br />
DoCmd.Beep<br />
End If<br />
End Sub<br />
frmFindStay<br />
WhereCondition.<br />
Becomes the Filter<br />
Private Sub Form_Load()<br />
' OpenArgs: -1: existing stay, filter set; 0: new guest; >0: new stay for existing guest, OpenArgs = guestID.<br />
' Assumed CRUD settings: AllowEdits = True, DataEntry = False.<br />
If OpenArgs >= 0 Then ’ NewStay or NewGuest<br />
Me.AllowAdditions = True<br />
frmStay<br />
Me.DataEntry = True ’ Don't see existing records<br />
If OpenArgs = 0 Then ’ NewGuest<br />
Me!name = " ” ’ Set blank name to create a dummy guest. <strong>Access</strong> makes guestID<br />
Me.[tblStay.guestID] = Me.[tblGuest.guestID] ' Create a stay record. <strong>Access</strong> makes stayID<br />
Me!name = Null ‘ Remove the blank name<br />
Else<br />
‘ New stay for existing guest<br />
Me.[tblStay.guestID] = OpenArgs ‘Create a stay record. <strong>Access</strong> makes stayID<br />
End If<br />
End If<br />
Me.AllowAdditions = False ' All cases. No more additions<br />
End Sub<br />
Finally we set AllowAdditions to False so that Page-<br />
Down will not bring the user to a new empty record.<br />
OpenArgs is > 0: The guest exists already and Open-<br />
Args is the guestID. First we allow additions and data<br />
entry. Data entry makes the current record a new<br />
"blank line". Next we set the foreign key of the stay<br />
record. This creates the stay record and links it to the<br />
guest. <strong>Access</strong> automatically joins it to the guest, so the<br />
guest data is now in the "blank line".<br />
Finally we set AllowAdditions to False to prevent further<br />
record creation.<br />
The strange [ ]<br />
The program has a strange use of square parentheses.<br />
The reason is that the query behind the form has two<br />
guestID fields, one from each table. None of these are<br />
visible on the form, but they are available anyway as<br />
fields. The SQL-engine has given them the names<br />
5. <strong>Access</strong> through Visual Basic 91
tblStay.guestID and tblGuest.guestID<br />
In SQL-view of the query they sometimes appear as<br />
[tblStay].[guestID] and [tblGuest].[guestID]<br />
However, when we address them in Visual Basic, we<br />
have to write<br />
Me.[tblStay.guestID] and Me.[tblGuest.guestID]<br />
Confusing? Yes, very, but Visual Basic needs these<br />
parentheses to indicate that tblStay.guestID is one single<br />
name.<br />
Note that we use the dot-operator after Me to address<br />
these fields. This allows us to use Ctrl+J to get a list of<br />
all properties and fields. You will find tblStay.guestID<br />
on the list, but you have to add the parenthesis yourself.<br />
See the mechanisms live<br />
The Load event is the more interesting part of the solution.<br />
You may try it out in this way:<br />
1. Open frmStay and use the property sheet to give it a<br />
Load-event procedure. Type in the procedure from<br />
Figure 5.5C. Set a breakpoint at the first line. Close<br />
the form.<br />
2. Open the Immediate window with Ctrl+G. Now<br />
simulate the NewStay button with this command in<br />
the Immediate window:<br />
docmd.OpenForm "frmstaymono",acFormDS , , , , ,2<br />
3. The command starts opening the form and will<br />
show it in Datasheet mode. The Load procedure<br />
stops at the breakpoint, but the form is not yet visible.<br />
Make it visible with this command in the Immediate<br />
window:<br />
me.Visible = True<br />
4. The form should now appear in Datasheet mode.<br />
Step through the Load procedure with F8 to see<br />
what happens to the datasheet. When the procedure<br />
sets DataEntry, the datasheet should reduce to a<br />
blank line. When the procedure stores OpenArgs in<br />
the record, the guest data should appear in the blank<br />
line.<br />
You may try out the other cases in the same manner.<br />
5.5.5 Dialog boxes (modal dialog)<br />
Many of the boxes you see in Windows applications<br />
are dialog boxes. When a dialog box pops up, you have<br />
to fill in what is asked for and then close the box. You<br />
cannot look around at other windows until you have<br />
closed that dialog box. This is a modal dialog. One<br />
example is a message box. Another example is the Options<br />
box that many applications have.<br />
A dialog box is a special case of a Form. Apart from<br />
being modal, it has narrow borders, and the user cannot<br />
drag the borders to change the size of the box.<br />
There are several ways to open a dialog box:<br />
Message box<br />
• Use the MsgBox function, for instance:<br />
MsgBox "the message", vbYesNo+vbQuestion<br />
This opens a box with the message and shows a number<br />
of buttons (Yes and No in the example), plus an<br />
icon (a question bubble in the example). You can check<br />
the return value to see which button the user chose, for<br />
instance:<br />
If MsgBox("the message", vbYesNo) = vbYes Then . . .<br />
Notice that we write MsgBox with parameters in a parenthesis<br />
when we need to look at the return value. Use<br />
F1 to see the help information about MsgBox. There is<br />
an excellent explanation of all the details.<br />
Multi-line message<br />
When the message is more than one line, you have to<br />
compose it in this way:<br />
MsgBox "line 1" & Chr(10) & "line 2", vbYesNo<br />
Chr(10) is the new-line character, or more precisely a<br />
text consisting of the new-line character. In Visual<br />
Basic you cannot write a new-line character inside the<br />
text string itself.<br />
Use OpenForm with acDialog<br />
• Make a Form in the usual way with data fields,<br />
buttons, etc. Open it with DoCmd and the acDialog<br />
parameter, for instance:<br />
DoCmd.OpenForm "form name", , , , ,acDialog<br />
OpenForm sets the right border on the form and makes<br />
it modal. There is no return value. The form has to<br />
store results somewhere, for instance in global variables<br />
or in the database.<br />
Set the dialog properties of the Form<br />
The last way to make a dialog box is to set the Form<br />
properties yourself:<br />
• On the Format tab for the form, set Border Style to<br />
Dialog. The effect of this is that the border of the<br />
Form is narrow and the user cannot drag the borders<br />
to change the size.<br />
• On the Other tab set PopUp to Yes. When you<br />
open the form, it stays on top of other forms. It is<br />
not modal however. You can work with other<br />
forms while the dialog form is open.<br />
• On the Other tab set Modal to Yes. In <strong>Access</strong> 97<br />
this makes the form modal. When open, the user<br />
cannot work with other forms. In <strong>Access</strong> 2000 and<br />
2003 the Modal property has no effect at all (although<br />
the help text says it has).<br />
You may then open the form with DoCmd.OpenForm<br />
without specifying the acDialog parameter.<br />
92 5. <strong>Access</strong> through Visual Basic
5.5.6 Controlling record selection<br />
A bound form is connected to a record set (a database<br />
table or a query). At any given time one of the records<br />
is the current record. When you see the recordset in<br />
datasheet mode, the current record is marked with an<br />
arrow. When you see it in Form mode (normal mode)<br />
only the current record is visible.<br />
In many cases we want the program to move to another<br />
current record. Figure 5.5D illustrates some ways to do<br />
this. The Form is bound to tblGuest and shows one<br />
guest at a time. At the top of the form we have added<br />
some navigation controls. One is a combo box where<br />
the user can select a guestID from a drop down list.<br />
The list shows guestID as well as guest name. There<br />
are also two buttons that navigate to the previous and<br />
the next record.<br />
Move and see one record<br />
First we will look at the situation where we want to<br />
navigate to the guest selected by the guestID. The user<br />
should not see other guests than this one.<br />
The solution is to set the filter properties of the Form<br />
when the user selects something with the combo box.<br />
The AfterUpdate procedure for the combo box could<br />
look like this (top left of the figure):<br />
Private Sub cboGuestID_AfterUpdate()<br />
Me.FilterOn = True<br />
Me.Filter = "guestID=" & Me.cboGuestID<br />
End Sub<br />
The filter is a condition to be used by <strong>Access</strong> in a hidden<br />
WHERE clause when retrieving the Form's record<br />
set. It is a computed text. For instance, when the user<br />
selects guest 2, the text becomes<br />
guestID=2<br />
Scroll to a record<br />
Next we will look at the situation where we want to<br />
navigate to the guest, but the user should be allowed to<br />
move back and forth from there. In this case we cannot<br />
use the filter. The solution is to work directly on the<br />
Form's recordset. The AfterUpdate procedure for the<br />
combo box could look like this (top right of the figure):<br />
Private Sub cboGuestID_AfterUpdate()<br />
Me.Recordset.FindFirst ("guestID=" & Me.cboGuestID)<br />
' Might also be written without a parenthesis<br />
End Sub<br />
The recordset has a FindFirst function with a condition<br />
as a parameter. It finds the first record in the set that<br />
matches this condition. Then it makes this record the<br />
current record.<br />
The two arrow buttons also work directly on the recordset.<br />
They use the MovePrevious and MoveNext<br />
functions for moving current to the previous or next<br />
record. Actually, these buttons do the same as Page-<br />
Down and PageUp. Section 5.6 explains more about<br />
recordsets.<br />
Fig 5.5D Controlling record selection<br />
See only<br />
guestID=2<br />
Scroll to<br />
guestID=2<br />
Unbound<br />
control<br />
Scroll to<br />
previous<br />
Scroll to<br />
next<br />
5. <strong>Access</strong> through Visual Basic 93
5.5.7 Column order, column hidden, etc.<br />
When a form (or subform) is shown in table view, the<br />
user can rearrange and hide columns. To rearrange<br />
columns, the user selects a column and drags it to a<br />
new position. To hide it, he selects the column and uses<br />
Format -> Hide columns.<br />
The program may need to know these settings or it may<br />
need to change them.<br />
Remember that each column corresponds to a control<br />
on the form (section 3.2.1). As an example, column 2<br />
on Figure 5.5E corresponds to a text box control bound<br />
to the description field of the table. The column<br />
heading (Class) is the label associated with the text box<br />
(or the name of the text box if there is no label).<br />
The program can detect and set column order, etc.<br />
through these three attributes of the controls:<br />
ColumnHidden (attribute, read and write). True or<br />
False.<br />
ColumnOrder (attribute, read and write). The number<br />
of the column. Columns are counted from 1 and up<br />
in the sequence that the user sees. However, hidden<br />
columns are included in the counts.<br />
ColumnWidth (attribute, read and write). The width of<br />
the column measured in twips (see section 5.5.13).<br />
If the program sets ColumnWidth to -2, the width is<br />
adjusted to fit the data in the column. Width = -1<br />
means a default width. Width = 0 makes the column<br />
hidden (and you have to explicitly unhide it -<br />
setting the width is not enough).<br />
Example: Suppose the program needs to change the<br />
column width of Class (the description control) in<br />
Figure 5.5E. An event procedure on the main form<br />
could do it in this way:<br />
Me.subRoomGrid.Form ! description.ColumnWidth = 1500<br />
5.5.8 Area selection, SelTop, etc.<br />
When a subform is shown in table view, the user can<br />
select a rectangular area of the subform. Figure 5.5E<br />
shows an example where the user has selected column<br />
3 and 4 from the fourth and fifth row (see more about<br />
the room grid in sections 7.4 and 7.5).<br />
The program can detect which area the user has<br />
selected. The figure shows how we can try it out<br />
through the Immediate window (Ctrl+G). We address<br />
the first open form, its subform control, and the<br />
subform it is bound to. When asking for the value of<br />
SelTop, we get 4 because the top row in the selected<br />
area is record number 4.<br />
As the figure shows, we can also change the area size<br />
and location. We have changed the area width to 2. The<br />
following four attributes of the form control the area.<br />
SelTop (attribute, read and write). The number of the<br />
top row in the selected area. The first record in the<br />
table behind the form is row 1, the next 2, etc.<br />
Notice that the first records may be scrolled out of<br />
sight.<br />
SelHeight (attribute, read and write). The number of<br />
rows selected. If SelHeight is zero, no area is<br />
selected, but the record is still selected.<br />
SelWidth (attribute, read and write). The number of<br />
columns selected. Hidden columns are included. If<br />
SelWidth is zero, no area is selected, but the record<br />
is still selected.<br />
SelLeft (attribute, read and write). The number of the<br />
left column in the selected area. In <strong>Access</strong> 97 the<br />
columns are numbered from 1 and up. In <strong>Access</strong><br />
2000 they are numbered from 2 and up when an<br />
area is selected.<br />
Beware: The strange change from 1-based numbering<br />
to 2-based numbering must have puzzled quite a<br />
number of developers. Obviously it is an error. The<br />
situation is even stranger when only a record is<br />
selected, but not an area. In this case you set SelLeft<br />
with 1-based numbers, but retrieve it with 2-based<br />
numbers.<br />
If columns have been reordered, their numbers follow<br />
what the user sees. However, hidden columns are<br />
included in the counts.<br />
Keeping the area selected<br />
In the hotel system, the user selects rooms through a<br />
form like Figure 5.5E. In principle this is easy.<br />
However, as soon as focus moves from the subform to<br />
the main form, <strong>Access</strong> removes the area selection. This<br />
happens for instance when the user clicks a button in<br />
the main form. The event procedure behind the button<br />
wouldn't even know which area was selected.<br />
The program has to compensate for <strong>Access</strong>'s strange<br />
behavior. When focus leaves the subform, the Exit<br />
event procedure saves the area size attributes before<br />
<strong>Access</strong> removes the area selection. When some control<br />
on the main form gets the focus, its event procedure<br />
sets them back. There is no common event on the main<br />
form that can do it, so each control has to act.<br />
Main form<br />
In the main form, declare these variables:<br />
Public aWidth As Long, aHeight As Long, aLeft As Long<br />
' These variables keep track of the current area size. aleft is<br />
the correct column number, not the <strong>Access</strong>2000 distortion.<br />
SelTop is not saved since current record always is the top.<br />
The following procedures on the main form update and<br />
use these variables (shown in the <strong>Access</strong> 2000 version).<br />
94 5. <strong>Access</strong> through Visual Basic
Fig 5.5E Selected area, SelLeft, SelTop, SelWidth, SelHeight<br />
ColumnHidden = False<br />
ColumnOrder = 2<br />
ColumnWidth = 920 (twips)<br />
SelTop = 4<br />
SelLeft = 4 (3 in <strong>Access</strong> 97)<br />
SelHeight = 2<br />
SelWidth = 2<br />
Private Sub subRoomGrid_Exit(Cancel As Integer)<br />
' This event happens when focus moves from the subform to<br />
the main form. Save the current area size before <strong>Access</strong><br />
removes it.<br />
aWidth = subRoomGrid.Form.SelWidth<br />
aHeight = subRoomGrid.Form.SelHeight<br />
aLeft = subRoomGrid.Form.SelLeft - 1<br />
' -1 to correct for the <strong>Access</strong>2000 error<br />
End Sub<br />
Private Sub resetSelection() ' Shared procedure<br />
subRoomGrid.Form.SelWidth = aWidth<br />
subRoomGrid.Form.SelHeight = aHeight<br />
' Make sure to set Width and Height before setting Left<br />
subRoomGrid.Form.SelLeft = aLeft + 1<br />
' +1 to compensate for the <strong>Access</strong> 2000 error.<br />
End Sub<br />
Private Sub txt . . ._GotFocus()<br />
' Reset the area size when a main-form control gets the focus.<br />
Call resetSelection()<br />
End Sub<br />
. . . (GotFocus for other controls)<br />
Private Sub subRoomGrid_Enter()<br />
' When focus moves from the main form to the subform.<br />
<strong>Access</strong> removes the area selection just before this event<br />
(<strong>Access</strong> 2000 only). So reset the area size<br />
Call resetSelection()<br />
End Sub<br />
User actions in the subform<br />
The solution above works fine when an area is selected<br />
in the subform. For the hotel system, the program<br />
selects a suitable area corresponding to a free room. If<br />
the user clicks Check in, for instance, everything is<br />
okay.<br />
If the user expands the area by means of Shift + arrow<br />
key, everything is fine too.<br />
But what happens if the user clicks a cell to move the<br />
area to another room? <strong>Access</strong> will remove the area<br />
selection and the user will just see the cursor flashing<br />
in the cell he clicked. The user may drag the cursor to<br />
select an area, or use Shift + click, but it is not<br />
intuitive. The program should make sure that a suitable<br />
area is selected at any time.<br />
One problem is that as soon as the user clicks a cell,<br />
<strong>Access</strong> removes the area selection before calling any<br />
event procedure. The program cannot catch the old<br />
selection at this point.<br />
The solution is to let the program act at MouseUp and<br />
KeyUp. There are two situations:<br />
An area is selected: This happens if the user expanded<br />
the area with Shift + arrow key, or if the user<br />
dragged an area with the mouse. The program<br />
should save the area size.<br />
No area is selected: This happens if the user has<br />
clicked a cell or moved to the cell with an arrow<br />
key. The program should reset the area size so that<br />
the selected cell becomes the top left of the area.<br />
Each single control on the subform has to react this<br />
way. Although there is a Form_MouseUp and a<br />
Form_KeyUp, they don't respond to clicks inside the<br />
grid. They respond only to clicks on the grid border,<br />
i.e. the headings and the record selectors.<br />
In the hotel system, fsubRoomGrid has one control for<br />
each column in the grid. The names of these controls<br />
are cbo1, cbo2, etc. (see section 7.5 for details). So we<br />
need these procedures on the subform:<br />
5. <strong>Access</strong> through Visual Basic 95
Public Sub saveSelection() ' Save the current area selection<br />
after key up or mouse up, or reset it after clicks, etc.<br />
If SelHeight = 0 Then ' No area selected. Reset area.<br />
' Check first that the new area is within the grid.<br />
SelHeight = Parent.aHeight<br />
SelWidth = Parent.aWidth<br />
End If<br />
Parent.aWidth = SelWidth<br />
Parent.aHeight = SelHeight<br />
Parent.aLeft = SelLeft - 1 ' <strong>Access</strong> 2000 compensation<br />
End Sub<br />
Private Sub cbo1_KeyUp(KeyCode As Integer, Shift As<br />
Integer)<br />
Call saveSelection()<br />
End Sub<br />
Private Sub cbo1_MouseUp(Button As Integer, Shift As<br />
Integer, X As Single, Y As Single)<br />
Call saveSelection()<br />
End Sub<br />
. . . (KeyUp and MouseUp for the other controls)<br />
Notice that when saveSelection resets the area size, it<br />
should first check that the area is within the grid. The<br />
user may for instance have clicked at the far right with<br />
a wide area selected.<br />
Also notice how the program uses Parent to address<br />
the saved area size.<br />
This solution works okay. The user can use mouse or<br />
keyboard to move an area around in the grid. However,<br />
the screen flickers. It is clearly visible that <strong>Access</strong><br />
removes the area selection before the program resets it.<br />
Below we explain how to deal with it.<br />
By the way, since the subform saves the area size on its<br />
own, there is no reason that the subform control on the<br />
main form saves it too. So the event procedure<br />
subRoomGrid_Exit may be removed.<br />
Clicking in the grid border<br />
If the user clicks in the grid header, <strong>Access</strong> selects the<br />
entire column. If he clicks in the record selector in the<br />
left border, <strong>Access</strong> removes the area selection and<br />
selects the record the user clicked. In both cases we<br />
want the old area selection to be reset.<br />
The place to deal with this is the MouseUp procedure<br />
for the subform, Form_MouseUp. It should set the area<br />
size in the same way as saveSelection(). However, here<br />
is another <strong>Access</strong> error. <strong>Access</strong> refuses to change<br />
SelHeight etc. The work-around is to start out with<br />
SelHeight = 0<br />
This is necessary even if SelHeight is 0 already (at<br />
least in <strong>Access</strong> 2000).<br />
Avoiding flicker<br />
It is possible to avoid the flicker by letting the program<br />
take action before <strong>Access</strong> removes the area selection.<br />
Two event procedures on the subform are involved:<br />
Form_KeyDown(KeyCode As Integer, Shift As Integer)<br />
This is the Key preview procedure (see section<br />
5.5.9). It must handle arrow keys and tabs to the left<br />
or right by setting SelLeft and aLeft - after<br />
checking that the area is inside the grid, of course.<br />
Setting SelLeft causes <strong>Access</strong> to not remove the<br />
area.<br />
Form_Current()<br />
Is called when the user uses arrow up or down, or<br />
clicks in a new row. It is called before MouseUp or<br />
KeyUp occurs. Sets SelWidth and SelHeight early<br />
on to avoid flicker. If Current doesn't do anything,<br />
the area will be set at MouseUp or KeyUp, but<br />
<strong>Access</strong> will remove the area in between, causing<br />
flicker.<br />
Getting the selected data<br />
When a function acts on the selected area, it needs to<br />
know which data the area contains. If the area is only<br />
one row high, it can directly address the controls in the<br />
current subform record. In general, however, it needs to<br />
retrieve data for several rows. The data has to be<br />
retrieved from the recordset bound to the form.<br />
One solution is to retrieve a number of rows from the<br />
recordset by means of the GetRows property. Here is<br />
an outline of the solution for the hotel case.<br />
In the main form, declare a variant array:<br />
Dim A()<br />
' The A-array will receive a number of records<br />
The basic idea is to use this piece of code inside the<br />
button event procedure:<br />
A = Me.subRoomGrid.Form. Recordset. GetRows(n)<br />
We address the subform (fsubRoomGrid) in the usual<br />
way. The property Recordset is the recordset bound to<br />
the subform. The property GetRows copies n records<br />
from the current record and on. It stores the copies in<br />
the array A.<br />
While the area size and position is 1-based (and 2-<br />
based), the A array is zero-based. As a result, A will<br />
hold this:<br />
A(0, 0): The first field in the first record.<br />
A(0, 1): The first field in the second record.<br />
A(1, 0): The second field in the first record.<br />
. . . and so on.<br />
As a side effect, GetRows moves the current record<br />
forward so that it points to the row after the selection.<br />
To avoid this, use the built-in clone of the recordset,<br />
make it point to the current record, and then copy the<br />
rows through it:<br />
Me.subRoomGrid.Form.RecordsetClone.Bookmark = _<br />
Me.subRoomGrid.Form.Recordset.Bookmark<br />
A = Me.subRoomGrid.Form.RecordsetClone.GetRows(n)<br />
Section 5.6 explains more on this.<br />
96 5. <strong>Access</strong> through Visual Basic
Dealing with re-ordered columns<br />
A small problem remains. If the user has re-ordered the<br />
columns in the datasheet, the order of the record fields<br />
and the datasheet columns don't match.<br />
To overcome this, use the ColumnOrder property of the<br />
subform controls. This property gives you the column<br />
number (1-based) for the control. The ControlSource<br />
property of the control gives you the field name that<br />
the control is bound to. See section 5.5.7 for more on<br />
ColumnOrder.<br />
5.5.9 Key preview<br />
When the user clicks something on the keyboard, the<br />
control in focus will receive several key events. However,<br />
the Form can have a look at the key events before<br />
the control gets the events. This is useful when no specific<br />
control has to take action.<br />
One example is function keys. For instance we may<br />
want F2 to mean Reset Criteria no matter where in the<br />
form the cursor is. For the Find Guest window it can be<br />
done in this way:<br />
• On frmFindStay, open the Form-property box, select<br />
the Event tab and set Key Preview to Yes.<br />
• Define an event procedure for the Form's KeyDown<br />
event. It should look like this:<br />
Private Sub Form_KeyDown (KeyCode As Integer, _<br />
Shift As Integer)<br />
If KeyCode = vbKeyF2 Then<br />
Me.subStayList. Form. RecordSource = _<br />
"select * from qryStayList; "<br />
Me.txtName = ""<br />
End If<br />
End Sub<br />
The KeyDown event has two parameters. KeyCode (an<br />
integer) shows which key is pressed. There are predefined<br />
constants for the various keys. For instance<br />
vbKeyF2 means the F2 key, vbKeyA the A-key and<br />
vbKeyEscape the Esc key.<br />
If the procedure returns with KeyCode = 0, <strong>Access</strong><br />
stops further processing of the KeyDown event.<br />
Shift (an integer) shows whether some of the shift keys<br />
were down at the same time (Shift, Alt, Ctrl). There are<br />
predefined constants for the shift keys: acShiftMask<br />
(=1), acCtrlMask (=2), acAltMask (=4). The program<br />
can for instance test whether Shift and Ctrl are down at<br />
the same time with this statement<br />
If Shift = acShiftMask + acCtrlMask Then . . .<br />
In the example above, the procedure tests whether the<br />
F2 key was used. In this case it sets record source to<br />
the full list of stays, and it sets the search criterion to an<br />
empty text.<br />
Parent form<br />
If you try it, you may notice that F2 works okay if the<br />
focus is in the main form, but not when it is in the subform.<br />
You have to define key preview actions also for<br />
the subform if F2 is to work here too. However, from<br />
the subform you have to address the items in the main<br />
form slightly differently:<br />
' In the subform:<br />
Me. Parent. subStayList. Form. RecordSource = _<br />
"select * from qryStayList; "<br />
Me. Parent. txtName = ""<br />
Me refers to the subform, and Me.Parent refers to the<br />
parent form, i.e. the master form.<br />
Return value<br />
At return from the preview procedure, <strong>Access</strong> continues<br />
processing the event. It sends it to the control in<br />
focus, or makes its own response to the event. In case<br />
of F2 the control ignores F2, but <strong>Access</strong> has a standard<br />
response: it toggles between selecting the entire field<br />
and just showing the simple cursor.<br />
The preview procedure can skip further processing by<br />
setting KeyCode=0 at return. In case of F2, the result<br />
would be that <strong>Access</strong> didn't toggle between field selection<br />
and the simple cursor.<br />
5.5.10 Error preview<br />
<strong>Access</strong> detects various kinds of user errors, for instance<br />
that the user enters a non-existing date, or the user<br />
forgets to select a related record where referential<br />
integrity is required. <strong>Access</strong> will show an error<br />
message that often is entirely gibberish to the user.<br />
When for instance the referential integrity is violated,<br />
<strong>Access</strong> will say:<br />
You cannot add or change a record because a related<br />
record is required in table 'tblGuest'.<br />
How can the program show a meaningful message<br />
instead? The BeforeUpdate procedure is intended to let<br />
the program check the data, but when <strong>Access</strong> detects<br />
the error it doesn't even call BeforeUpdate.<br />
However, the Form has an Error event procedure that<br />
can interfere before <strong>Access</strong> shows the error message to<br />
the user. To use it, define the event procedure for the<br />
Error event:<br />
Private Sub Form_Error(DataErr As Integer, _<br />
Response As Integer)<br />
If DataErr = 3201 Then<br />
MsgBox "Select a guest", vbOKOnly + vbExclamation<br />
Response = acDataErrContinue<br />
End If<br />
End Sub<br />
The Error event has two parameters. DataErr is an ID<br />
for the error. Response tells <strong>Access</strong> what to do at return.<br />
When Response = acDataErrContinue, <strong>Access</strong><br />
will not show its own error message. When Response =<br />
5. <strong>Access</strong> through Visual Basic 97
acDataErrDisplay (the default), <strong>Access</strong> will show its<br />
own error message.<br />
In the example, the event handler tests whether the<br />
error is "You cannot add or change . . ." (ID 3201). In<br />
this case it shows a message box with a more useroriented<br />
text. Then it tells <strong>Access</strong> to keep its mouth<br />
shut about the error.<br />
At return, <strong>Access</strong> keeps the focus on the Form where<br />
the error occurred, so that the user can correct the data -<br />
or use Esc to undo changes. This happens no matter<br />
whether Response is acDataErrContinue or not.<br />
The main problem when using the Error event is to find<br />
out what the error ID means. I have not been able to<br />
find a list of the codes.<br />
Don't confuse the Error event with VBA's handling of<br />
program errors. The Error event handles errors caused<br />
by the user's actions. VBA handles cases where the<br />
program tries to divide by zero, access a non-existing<br />
object, etc. VBA has statements such as On Error<br />
GoTo x to let the programmer deal with the error. See<br />
section 6.1 for a detailed explanation of this kind of<br />
error handling.<br />
5.5.11 Timer and loop breaking<br />
A Form responds to user actions such as editing a field<br />
or clicking a button. Sometimes we want the Form to<br />
act on its own. It might for instance update a list of data<br />
every minute. This would be useful in a multi-user<br />
application where several people update the database.<br />
Timer handling<br />
Start the timer by setting the Form's TimerInterval, for<br />
instance in the Form's Load event procedure:<br />
Me.TimerInterval = 60 000 ' One minute is 60 000 ms.<br />
Next define an event procedure for the Timer event:<br />
Private Sub Form_Timer()<br />
Me.Requery<br />
End Sub<br />
When the Form opens, it sets the timer interval to one<br />
minute and waits for some event. The event may be the<br />
user doing something or one minute having passed.<br />
When the minute has passed, <strong>Access</strong> calls the Timer<br />
event procedure, which recalculates all bound data in<br />
the form.<br />
The next timer event will occur one minute after the<br />
first timer event, even if the recalculation has taken<br />
several seconds. How would the program stop the timer<br />
events? Set the timer interval to 0:<br />
Me.TimerInterval = 0 ' Stop the timer.<br />
Let user break a loop - SendKeys<br />
Assume the user should be allowed to stop the periodic<br />
updating. It is easy. Provide a button labeled Stop. Let<br />
its click procedure set the timer interval to 0.<br />
This works because when the Form waits for the timer,<br />
it also responds to user events. It will handle the events<br />
in the sequence they occur.<br />
Now imagine that the Form runs a long calculation or<br />
scans the Internet for hours. It runs in a loop and it<br />
doesn't wait for events at any point. How can we allow<br />
the user to break the loop? If we provide a Stop button<br />
as above, the user may click it, but the Form doesn't<br />
listen to events. However, <strong>Access</strong> stores the event in a<br />
queue for later processing.<br />
The user could use Ctrl+Break. It will in a very rough<br />
way stop the program, probably in the middle of<br />
something, so that data is left in an inconsistent state.<br />
Actually, Ctrl+Break is the only way you can stop a<br />
very long-lasting database query. In this case the<br />
database engine takes care that the database ends up in<br />
a consistent state. For a long calculation in our own<br />
program, we need a structured way to stop.<br />
The trick is to let the program use SendKeys every now<br />
and then to generate an event and wait for the event to<br />
be processed. This allows <strong>Access</strong> to process all events<br />
in the queue. It also allows <strong>Access</strong> to update the screen,<br />
for instance to show controls that the program has<br />
changed during the calculation.<br />
Here is an outline of such a program. We declare a<br />
module-level Boolean in the Form, which becomes true<br />
when the user clicks the Stop button:<br />
Dim bStop As Boolean<br />
When <strong>Access</strong> responds to the click, this event<br />
procedure sets bStop:<br />
Private Sub cmdStop_Click()<br />
bStop = True<br />
End Sub<br />
A long computation runs in a loop until the computation<br />
is finished. Once in the loop it displays the<br />
progress of the computation by storing a result in a text<br />
box control. It could look like this:<br />
Private Sub cmdCompute_Click() ' Plain loop<br />
While . . . ' Until calculation is finished<br />
. . . ' One step in a long calculation<br />
txt . . . = . . . ' Display progress<br />
Wend<br />
End Sub<br />
In order to respond to the stop, we modify the loop so<br />
that it runs until bStop is True or the computation is<br />
finished. In addition we use the SendKey operation to<br />
send a character to <strong>Access</strong> and wait for <strong>Access</strong> to<br />
98 5. <strong>Access</strong> through Visual Basic
process it - and process other events too. Here is the<br />
new program:<br />
Private Sub cmdCompute_Click() ' Test once in loop<br />
bStop = False<br />
While Not bStop And . . . ' Until stop or calculation finished<br />
. . . ' One step in a long calculation<br />
txt . . . = . . . ' Display progress<br />
SendKeys "{home}", True ' Type a character and wait.<br />
' Allows <strong>Access</strong> to handle all events and<br />
' update the screen.<br />
Wend<br />
End Sub<br />
SendKeys has two parameters. The first is a string of<br />
characters. They are sent to <strong>Access</strong> as if the user typed<br />
them. The second is a Boolean. If it is True, SendKeys<br />
waits for <strong>Access</strong> to process all pending events and<br />
update the screen. The string can hold several<br />
characters, e.g. "abc{home}+-". Special characters are<br />
shown as a mnemonic in { }. We have chosen {home}<br />
since it is a rather harmless character in the user dialog.<br />
SendKeys takes around 1 ms on a plain computer. In<br />
the IT world this is quite slow. If the calculation step<br />
for instance takes 0.01 ms, the program suddenly<br />
becomes 100 times slower.<br />
One solution is to let the program listen and update the<br />
screen only once a second. In the procedure below, we<br />
use the Time() function to find out when a second has<br />
passed. It returns the number of seconds since<br />
midnight, with fractional seconds too. The Time<br />
function itself takes around 0.0005 ms, so it will rarely<br />
slow down the loop significantly.<br />
Private Sub cmdCompute_Click() ' Test once a second<br />
Dim startTime As Double<br />
bStop = False<br />
startTime = Timer() +1<br />
While Not bStop And . . . ' Until stop or calculation finished<br />
. . . ' One step in a long calculation<br />
If Timer() > startTime Then ' A second has passed<br />
txt . . . = . . . ' Display progress<br />
startTime = startTime + 1 ' Next in one second<br />
SendKeys "{home}", True ' "Type" a character and wait.<br />
' Allows <strong>Access</strong> to handle all events and<br />
' update the screen.<br />
End If<br />
Wend<br />
End Sub<br />
5.5.12 Multiple form instances<br />
When we open a form with DoCmd.OpenForm, we get<br />
only one instance of the form. If we try to open it<br />
again, nothing happens.<br />
In order to open multiple instances, we need to use the<br />
basic VBA mechanism of creating an object. Here is a<br />
program piece that opens two instances of frmStay:<br />
Dim stay1 As Form, stay2 As Form<br />
' References to open forms<br />
. . .<br />
Set stay1 = New Form_frmStay<br />
Call stay1.Init(740)<br />
stay1.Visible = True<br />
Set stay2 = New Form_frmStay<br />
Call stay2.Init(753)<br />
stay2.Visible = True<br />
The first line declares two references to an open form,<br />
stay1 and stay2. The declarations may be in a global<br />
module that remains open as long as <strong>Access</strong> is open.<br />
In an event procedure somewhere else, the statement<br />
Set stay1 = . . . creates a new object of the class<br />
Form_frmStay. The reference stay1 will now refer to this<br />
object. During the creation, the form object receives the<br />
usual open-events: Open, Load, Activate. The form is<br />
still invisible.<br />
When we open a form in this way, we cannot give it<br />
OpenArgs like those we use with DoCmd.OpenForm.<br />
The form has a property called OpenArgs, but it is<br />
ReadOnly so we cannot store anything in it. For this<br />
reason we have written a procedure for initializing the<br />
form, the procedure Init. We call it with a parameter<br />
that tells it to open stay 740. The procedure will set the<br />
filter of the form to show this stay.<br />
Finally, we set the Visible attribute of the form to True.<br />
This generates the Current event and makes the form<br />
visible.<br />
Then we repeat the whole thing using stay2 instead of<br />
stay1. The result is that one more form instance opens,<br />
this time showing stay 753.<br />
Closing the forms<br />
Usually the form closes itself, for instance when the<br />
user clicks the close button. <strong>Access</strong> automatically sets<br />
references to it to Nothing. We may also close the form<br />
by setting references to it to Nothing, like this:<br />
Set stay2 = Nothing<br />
The reason we have stay1 and stay2 in a global module<br />
is that they have to be there all the time. If we made<br />
them local variables in a procedure, the opened forms<br />
would close as soon as the procedure returned. See<br />
more about variables and their life-time in section 6.2.<br />
Handling many open forms<br />
When we need many open instances, we have to make<br />
an array of references. A click event could then open a<br />
new instance in this way:<br />
Dim stay(1 To 10)<br />
. . .<br />
Private Sub cmdOpenStay_Click( )<br />
' Find an unused reference, let it be j<br />
Set stay(j) = New Form_frmStay<br />
Call stay(j).Init( . . . )<br />
stay(j).Visible = True<br />
End Sub<br />
5. <strong>Access</strong> through Visual Basic 99
5.5.13 Resize<br />
When the user drags the border of a form, <strong>Access</strong> calls<br />
the Resize event procedure of the Form. The procedure<br />
is called for every few pixels the user drags, depending<br />
on how fast he drags. <strong>Access</strong> also calls the Resize procedure<br />
once during open.<br />
If the program doesn't do anything at these events, the<br />
user will just see a larger or smaller gray area. Usually<br />
the user expects that the controls somehow adjust to the<br />
new size, for instance that a subform area expands or<br />
contracts.<br />
The way to handle this is to let the Resize procedure<br />
recompute sizes and positions for the controls. Figure<br />
5.5F shows a simple example. The form has a couple<br />
of controls, one of them being a text box (txtTest) and<br />
another a subform (subTest). As the user drags the<br />
right border, these controls adjust their width so that<br />
they keep the same distance from the right border of<br />
the form. Care must be taken when a control becomes<br />
so narrow that it cannot keep its distance from the border.<br />
Trying to set its width to a negative number will<br />
cause a run-time error - and the mouse gets trapped<br />
inside <strong>Access</strong>! On the lower version of the form, the<br />
text box has width zero, and as a result the controls<br />
don't adjust their width anymore.<br />
At the time Resize is called, the situation is as follows:<br />
me.WindowWidth: The new width of the form, including<br />
the border.<br />
me.WindowHeight: The new height of the form, including<br />
the border.<br />
me.WindowTop: The distance between the form and<br />
the top of the surrounding <strong>Access</strong> window.<br />
(<strong>Access</strong> 2003 only).<br />
me.WindowLeft: The distance between the form and<br />
the left side of the surrounding <strong>Access</strong> window.<br />
(<strong>Access</strong> 2003 only).<br />
The figure shows the Resize procedure. It declares two<br />
important variables:<br />
formWidth: The previous width of the form. When the<br />
form opens, the variable has its default value,<br />
zero. It is declared as Static, meaning that it survives<br />
from one call of Resize to the next.<br />
dif: The difference to add to the control widths. Initially,<br />
when the form opens, dif becomes zero.<br />
Later, it is the difference between the new form<br />
width and the previous form width.<br />
The procedure computes the new width of txtTest, the<br />
smallest of the controls. When the new width is larger<br />
than zero, it adjusts the widths of txtTest and subTest.<br />
It also saves the new form width in order to calculate<br />
future changes relative to this.<br />
For subforms it may be necessary to change the width<br />
not only of the subform control, but also of the subform<br />
itself. See below.<br />
Size unit<br />
All positions and sizes are computed in twips.<br />
One twip is 1/20 typographical point =<br />
1/567 cm =<br />
1/1440 inch<br />
Resizing a form<br />
It is easy to change the width of a control, so it is<br />
tempting to change the width of a form in a similar<br />
way:<br />
me.WindowWidth = me.WindowWidth + dif<br />
However, this works in none of the <strong>Access</strong> versions.<br />
You have to use this statement to change position or<br />
size of a form:<br />
DoCmd.MoveSize right, down, width, height<br />
right:<br />
down:<br />
Distance between form and the left side<br />
of the surrounding <strong>Access</strong> window. (The<br />
same as the property WindowLeft.)<br />
Distance between form and the top of the<br />
surrounding <strong>Access</strong> window. (The same<br />
as the property WindowTop.)<br />
width: The width of the form including the<br />
frame. (The same as the property WindowWidth.)<br />
height: The height of the form including the<br />
frame. (The same as the property WindowHeight.)<br />
In order to increase the width of the form by dif, you<br />
have to set the form in focus and use<br />
DoCmd.MoveSize , , oldWidth + dif<br />
When you do this, the form receives a Resize event.<br />
Resizing a subform<br />
Resizing with DoCmd works fine for a main form, but<br />
not for a subform. You cannot bring the subform in<br />
focus. However, it doesn't matter because an open subform<br />
automatically has a width that matches the subform<br />
control.<br />
When resizing the subform control, you just have to<br />
make the program resize and/or reposition the controls<br />
on the open subform too. You can do this from the<br />
Resize procedure in the main form. It soon becomes<br />
messy to let the main form know about the controls<br />
inside the subform. So a better approach is to call a<br />
procedure in the subform that resizes its own controls,<br />
in much the same way as its resize procedure would do<br />
it.<br />
When the subform is shown as a datasheet, it has no<br />
effect to adjust widths and heights of the controls. In-<br />
100 5. <strong>Access</strong> through Visual Basic
Fig 5.5F Resizing a form<br />
Private Sub Form_Resize()<br />
Static formWidth As Long ' Initially zero, survives calls<br />
Dim dif As Long ‘ The width adjustment<br />
dif = IIf(formWidth = 0, 0, Me.WindowWidth - formWidth)<br />
If Me.txtTest.Width + dif > 0 Then<br />
Me.txtTest.Width = Me.txtTest.Width + dif<br />
Me.subTest.Width = Me.subTest.Width + dif<br />
formWidth = Me.WindowWidth<br />
End If<br />
End Sub<br />
down =<br />
WindowTop<br />
height =<br />
WindowHeight<br />
Resizing and moving a form:<br />
DoCmd.MoveSize right, down, width, height<br />
right =<br />
WindowLeft<br />
width =<br />
WindowWidth<br />
stead of setting the width, set the ColumnWidth properties<br />
of the controls (see section 5.5.7). You might for<br />
instance extend all the columns in a proportional way.<br />
5. <strong>Access</strong> through Visual Basic 101
5.6 Record sets (DAO)<br />
When we need complex record handling, there are two<br />
ways to go: through SQL statements that update<br />
records, or through programmed record access. In this<br />
section we look at the latter possibility. The SQL way<br />
is explained in section 7.1)<br />
Select the database model. Before you can try the<br />
following example, you should make sure that your<br />
program accesses the database with the right method.<br />
Over the years, <strong>Access</strong> has used different methods to<br />
access the tables, trying at all times to be compatible<br />
with earlier versions. Below we will use the DAO approach<br />
which works across all <strong>Access</strong> versions. <strong>Access</strong><br />
97 is born with DAO, but in <strong>Access</strong> 2000 and 2003 you<br />
have to select DAO. Do as follows:<br />
1. Open Visual Basic and select Tools -> References.<br />
You now see a list of the libraries that <strong>Access</strong> may<br />
use. At the top of the list, you see those selected at<br />
present. When VBA looks for a built-in class name,<br />
it first looks in the top library. If the name is not<br />
there, it looks in the next library, and so on.<br />
2. If MicroSoft DAO 3.6 Object Library is not selected,<br />
go far down the list and select it. Next move<br />
it to the top of the list. The easiest way is to close<br />
the list, then reopen it. Now DAO 3.6 is in the top<br />
list. Move it further up as far as it can go. Then<br />
VBA will find the DAO 3.6 names first.<br />
There is no reason to restart the system. You may notice<br />
that in the Object Browser and with Ctrl+J you will<br />
now see two RecordSet classes. Use the one with an<br />
Edit property.<br />
5.6.1 Programmed record updates<br />
As the first example we will outline how the CheckIn<br />
button on the Stay form could work (Figure 5.6A).<br />
3. Open frmStay in design view. (If you followed the<br />
earlier exercises closely, there are no buttons on the<br />
form.)<br />
4. Create a Book button and a CheckIn button and<br />
give them names with the cmd prefix.<br />
5. Define the event procedure for the OnClick event<br />
on the CheckIn button. Figure 5.6A shows the body<br />
of the procedure. It demonstrates many new things<br />
that we explain below.<br />
Declarations. The first lines of the procedure declare<br />
two variables. The variable s can hold a text string. The<br />
variable rs can hold a Recordset, or more precisely, it<br />
holds a reference (a pointer) to a Recordset. These<br />
variables are local for the procedure, which means that<br />
VBA creates them when it calls the procedure, and deletes<br />
them when it returns from the procedure. Initially<br />
they both have the value Nothing.<br />
Computed SQL<br />
The statement s="SELECT . . . " computes a text and<br />
stores it in the variable s. If the form shows stay 728,<br />
then s will hold this text:<br />
SELECT * FROM tblRoomState<br />
WHERE stayID=728;<br />
It is an SQL statement that selects all fields from the<br />
RoomState records that belong to the stay. As you see,<br />
the program computes this SQL statement from three<br />
parts, the text "SELECT . . . ", the expression<br />
Me.stayID and the text ";".<br />
If you are not fluent in SQL, it may be easier to make<br />
the query with the query grid. Then switch to SQLview<br />
and copy and paste the statement into the program.<br />
VBA makes a lot of noise about this non-VBA<br />
statement, but just modify the statement with quotation<br />
marks, &-operators, and so on. As usual, don't care<br />
about capitalization. SELECT may for instance be<br />
written with small letters. VBA doesn't look at what is<br />
inside the quotes and the SQL-engine doesn't care<br />
about caps.<br />
Warning. You may wonder why we have to compute<br />
the SQL. When working with the query grid, we could<br />
write things like<br />
WHERE stayID=Forms!frmStay!stayID<br />
Why don't we write something similar here, for instance<br />
WHERE stayID=Me.stayID<br />
The answer is that in VBA we compose the final SQLstatements<br />
directly. When working with the query grid,<br />
<strong>Access</strong> translates our SQL-statement into the final SQL<br />
version. As part of this, <strong>Access</strong> finds the current value<br />
of Forms!frmStay!stayID and inserts it into the SQLstring<br />
that it passes to the database engine. In other<br />
words, it does the same kind of work that our VBA<br />
program does.<br />
Open the Recordset. The statement<br />
Set rs = CurrentDB.OpenRecordset(s)<br />
creates a Recordset and stores a reference to it in rs.<br />
The command Set says that we want to store the reference,<br />
not the Recordset itself. CurrentDB is the database<br />
currently used by the program, and we ask it to<br />
open a record set that gives us the records specified by<br />
the SQL statement in s. When <strong>Access</strong> has opened the<br />
record set, the first record in the set becomes the current<br />
record. If the set is empty, there is no current<br />
record, and End Of File (EOF) is true.<br />
While loop. The statements from While to Wend are a<br />
loop. The four statements inside the loop are repeated<br />
until rs.EOF becomes True. This happens when the<br />
program tries to move the current record beyond the<br />
102 5. <strong>Access</strong> through Visual Basic
Fig 5.6A Recordset, updating records<br />
Set StayState to CheckedIn and<br />
set all its RoomStates to CheckedIn<br />
Private Sub cmdCheckin_Click()<br />
Dim s As String<br />
Dim rs As Recordset<br />
Declare variables.<br />
Local for this procedure.<br />
Compute SQL<br />
s = "SELECT * FROM tblRoomState WHERE stayID=" & Me.stayID & ";"<br />
Set rs = CurrentDb.OpenRecordset(s)<br />
While Not rs.EOF<br />
rs.Edit<br />
Repeat to End Of File<br />
rs!state = 2 ‘ CheckedIn<br />
rs.Update<br />
rs.MoveNext<br />
Wend<br />
Me!state = 2<br />
rs.Close ‘ Not needed when rs is a local variable<br />
End Sub<br />
frmStay<br />
Update FindGuest window<br />
Me.Recordset.Move (0) ‘ Save records<br />
Forms!frmFindStay!subStayList.Requery<br />
end of the set. If the record set is empty, EOF is True<br />
from the beginning and the loop terminates immediately.<br />
Updating a record. The first statement inside the loop<br />
starts editing the current record. VBA transfers the<br />
fields to an edit buffer. If we don't transfer the fields to<br />
the edit buffer, the program can read the fields but not<br />
change them.<br />
The next statement changes the state of the RoomState<br />
record to 2, meaning CheckedIn. The change takes<br />
place in the edit buffer - not in the database table. Notice<br />
the bang-operator that ensures that we get the field,<br />
not a possible built-in property.<br />
The rs.Update statement transfers the changed fields to<br />
the database table. At this time <strong>Access</strong> checks that<br />
mandatory fields are filled in, that referential integrity<br />
is okay, etc. There are several ways the program can<br />
catch these errors so that the user doesn't see the cryptic<br />
messages produced by <strong>Access</strong>. See sections 5.5.10<br />
and 6.1.<br />
Move to next record. The rs.MoveNext statement<br />
moves to the next record, that now becomes the current<br />
record. If there is no next record, EOF becomes True<br />
and the loop will terminate. When EOF is true, there is<br />
no current record in the record set, and attempts to<br />
address fields in it will fail.<br />
Updating the stay record. When the loop is finished,<br />
the program sets Me!state to 2, thus updating the stay<br />
record as well.<br />
Close the Recordset. The last statement closes the record<br />
set. It is customary to do so, but in this case it is<br />
unnecessary. When the procedure returns, VBA will<br />
delete the local variables. Since rs contains a reference<br />
to a record set, it will close it before deleting rs.<br />
Try the program<br />
6. Close the program and try out the CheckIn button.<br />
You should see the state field change in the stay<br />
window.<br />
7. To ease experimentation with the system, program<br />
the Book button so that it does exactly the same as<br />
5. <strong>Access</strong> through Visual Basic 103
CheckIn, but sets the states to one, meaning<br />
Booked.<br />
Update the stay list. You may notice that the Find-<br />
Guest window doesn't update its own stay list automatically.<br />
In this list, the stay doesn't seem to change to<br />
CheckedIn, etc. It is tempting to repair it by letting<br />
CheckIn make a requery on the stay list. Try it:<br />
8. Insert this statement at the end of the CheckIn and<br />
Book procedures:<br />
Forms!frmFindStay!subStayList.Requery<br />
9. Try to book and check in while watching the stay<br />
list. Nothing changes in the list. Why?<br />
Because the stay state is not yet saved in the table.<br />
Saving doesn't happen until the user closes the stay<br />
window, but at that time the Requery has been performed<br />
already.<br />
One way to deal with the requery is to do it in the<br />
AfterUpdate procedure for the stay form. This event is<br />
intended for things to be done after the update, i.e. after<br />
saving the stay and guest records from the query. However,<br />
in our user dialog we don't want the user to close<br />
the stay window all the time. He might want to change<br />
other things for the stay. Here is a tricky way to update<br />
the stay record before doing the requery:<br />
10. Insert this magical statement in CheckIn and Book<br />
just before the Requery:<br />
Me.Recordset.Move(0)<br />
This statement works on the open recordset bound to<br />
the form. It moves current record back or forth a number<br />
of records, and as part of this it saves the current<br />
record. In our case we move zero records away - to the<br />
same record. But we got the update anyway. (See more<br />
in section 5.6.3.)<br />
11. Try to book and check in while watching the stay<br />
list. It should now update automatically.<br />
Notice that this version of CheckIn and Book is very<br />
experimental. In the real system we have to check<br />
many things. For instance we shouldn't be able to book<br />
someone if he hasn't any rooms. The action of Book<br />
should also depend on the current state of the stay, for<br />
instance so that if the user tries to book a stay that is<br />
checked in, the system asks him whether he wants to<br />
undo the checkin.<br />
5.6.2 How the record set works<br />
Figure 5.6B shows how a record set works. The record<br />
set consists of a record list and some properties for<br />
navigating in it. The current record is the one the program<br />
can access with rs!fieldX. The operations<br />
rs.MoveNext and rs.MovePrevious<br />
move current one record ahead or back. There are other<br />
Move operations too:<br />
rs.Move(n), rs.MoveLast and rs.MoveFirst<br />
The first one moves current n records (forward or<br />
backwards depending on the sign of n). The next two<br />
move current to the last or first record in the record set.<br />
If the program tries to move beyond the last record,<br />
rs.EOF becomes True. If it tries to move before the<br />
first record, rs.BOF becomes True.<br />
In order to edit the current record, we have to move it<br />
to the edit buffer with the operation<br />
rs.Edit<br />
When we have finished editing it, we move it back to<br />
the record set with<br />
rs.Update<br />
If we move to another record without using rs.Update,<br />
the changes will be lost.<br />
Clone. Figure 5.6B also shows a Clone object. It is<br />
another set of navigation properties working on the<br />
same record list. It has its own current record pointer.<br />
By means of clones, the program can access several<br />
records in the list at the same time. It may for instance<br />
compare two records in the list, one accessed with the<br />
record set and one accessed with the clone.<br />
To the right in the figure, you see how a Clone is created<br />
and used. You declare the clone rc exactly as a<br />
record set. However, instead of opening the clone, you<br />
ask the record set rs to create a clone of itself. You may<br />
now use rc exactly as the record set itself, for instance<br />
moving the current record of rc back and forth. We<br />
have shown how you could compare the current record<br />
of rc with the record of rs.<br />
Add a record. The figure also shows how to create<br />
new records. First we use rs.AddNew to fill in the edit<br />
buffer with a Null record. Next we fill in the fields we<br />
want, and then we use rs.Update to create a new record<br />
in the record set and transfer the edit buffer to it. Before<br />
doing rs.Update, <strong>Access</strong> will check that referential<br />
integrity is okay, that mandatory fields are filled in, etc.<br />
Delete a record. Finally the figure shows how to delete<br />
a record. We simply use rs.Delete. After this there<br />
is no current record. When we execute rs.MoveNext,<br />
the record after the deleted record will be the current<br />
record.<br />
104 5. <strong>Access</strong> through Visual Basic
Fig 5.6B Recordset, clone, add and delete<br />
Recordset<br />
MovePrevious<br />
Current record<br />
MoveNext<br />
Clone<br />
MovePrevious<br />
Current record<br />
MoveNext<br />
BOF<br />
EOF<br />
Edit buffer<br />
Edit buffer<br />
. . .<br />
Dim rs As Recordset, rc As Recordset<br />
s = "SELECT * . . . “<br />
Set rs = CurrentDb.OpenRecordset(s)<br />
Set rc = rs.Clone<br />
If rs.roomID = rc.roomID Then . . .<br />
While . . .<br />
rs.AddNew<br />
rs!fieldX = . . .<br />
rs.Update<br />
rs.MoveNext<br />
Wend<br />
While Not rs.EOF<br />
rs.Delete<br />
rs.MoveNext<br />
Wend<br />
Add<br />
records<br />
Delete<br />
records<br />
5. <strong>Access</strong> through Visual Basic 105
5.6.3 The bound record set in a Form<br />
Above, the program has explicitly created a record set.<br />
However, when we open a form such as frmStay it becomes<br />
bound to a record set. Can our program reference<br />
this record set explicitly? Yes, it can.<br />
Figure 5.6C shows how it works. We have opened<br />
frmStay directly from the database window, and although<br />
the form shows only one stay at a time - the<br />
current record, we can scan through all the stays with<br />
PageDown. Behind the form is a record set with all the<br />
stays. We can access this record set with Me.Recordset.<br />
Furthermore, <strong>Access</strong> offers a clone of this record set,<br />
called Me.RecordsetClone.<br />
<strong>Access</strong> uses Me.Recordset in much the same way as<br />
our program would do with a record set. There are<br />
small differences, however. When the user for instance<br />
types something into a field, <strong>Access</strong> doesn't use the edit<br />
buffer, but a hidden buffer of its own. (This hidden<br />
buffer deals with the Value and Text properties of text<br />
controls.) If our program tries to do something with<br />
Me.Recordset, <strong>Access</strong> will first save the hidden buffer<br />
and call BeforeUpdate and AfterUpdate for the<br />
changed record.<br />
Try the mechanisms at work (also shown on Figure<br />
5.6C):<br />
1. Set a breakpoint in the beginning of the CheckIn<br />
procedure on frmStay.<br />
2. Open frmStay in form view and also open tblGuest<br />
to see what happens.<br />
3. Change a letter in the name field on the form. Then<br />
click CheckIn. You will now be at the breakpoint in<br />
the CheckIn procedure. Open the Immediate window<br />
with Ctrl+G and adjust window sizes so that<br />
you see the guest table, the form, and the Immediate<br />
window at the same time.<br />
4. Notice that the name of the guest hasn't changed in<br />
the guest table. Now enter this statement in the Immediate<br />
window<br />
Me.Recordset.Move(0)<br />
Notice that this changes the guest name in the guest<br />
table. What happened? <strong>Access</strong> was editing the name<br />
field through the hidden buffer, but now updated the<br />
record in the table to allow current to move. This is the<br />
trick we used at the end of CheckIn to update the database<br />
and then update frmFindStay.<br />
5. Try this statement in the Immediate window<br />
Me.Recordset.MoveNext<br />
The current record moves one record ahead and the<br />
form will show the next stay.<br />
6. Use the clone. Try moving the current record of the<br />
clone with this statement<br />
Me.RecordsetClone.FindFirst("stayID=740")<br />
This causes the clone to point to the first record with<br />
stayID=740 (use another stayID to match your own<br />
data). You cannot see any effect of this on the form,<br />
because the form is bound to the record set, not to the<br />
clone.<br />
7. Now try to move the record set to the same place as<br />
the clone. To do this we use the Bookmark concept.<br />
Bookmarks are built-in, unique identifications of<br />
the records in the record set. They are generated<br />
when the recordset is opened and don't survive<br />
closing the set. The property Recordset.Bookmark<br />
is the bookmark of the current record. You can read<br />
the bookmark property and set it. Try this:<br />
Me.Recordset.Bookmark =<br />
Me.RecordsetClone.Bookmark<br />
The form should now show stay 740 (or the stay you<br />
have chosen). What happened? VBA read the bookmark<br />
for the current record in the clone. Then VBA<br />
moved current to this bookmark.<br />
This approach is often useful when we want to let the<br />
user move from one record to another, for instance<br />
based on a complex criterion. The program first finds<br />
the record using the clone, in that way avoiding that the<br />
user sees intermediate steps of the search or sees unsuccessful<br />
attempts. When the search succeeds, the<br />
program moves current to the right place.<br />
Me versus Me.Recordset. Notice that we can access a<br />
field in the current record in two ways: through the<br />
form with Me.field and through the record set with<br />
Me.Recordset.field. There are some important differences<br />
between these two approaches.<br />
If the program reads past the last record in the record<br />
set, EOF becomes true and there is no current record in<br />
the record set. If we try to use Me.Recordset.field we<br />
will get an error message. However, there is a current<br />
record in the form - the last record - and we can access<br />
it in the program with Me.field.<br />
If the record set is empty, EOF is true and there is no<br />
current record in the record set. However, there is a<br />
Null record in the form, the user sees blank fields, and<br />
the program can access them with Me.field. The fields<br />
are all Null and we cannot store anything in them.<br />
106 5. <strong>Access</strong> through Visual Basic
Fig 5.6C Me.Recordset, Me.RecordsetClone<br />
Me.Recordset<br />
BOF<br />
MovePrevious<br />
Current record<br />
MoveNext<br />
Me.RecordsetClone<br />
MovePrevious<br />
Current record<br />
MoveNext<br />
Edit buffer<br />
Hidden buffer<br />
(Text)<br />
Edit buffer<br />
EOF<br />
Me.Recordset.Move(0)<br />
‘ Updates Me-changes.<br />
Me.Recordset.MoveNext ‘ Updates Me-changes. Moves to next record.<br />
Me.RecordsetClone.FindFirst(“stayID=740”)<br />
Me.Recordset.Bookmark=Me.RecordsetClone.Bookmark<br />
5. <strong>Access</strong> through Visual Basic 107
5.6.4 Record set properties, survey<br />
In this section we give a summary of the record-set<br />
properties. There are more properties than those shown,<br />
but they are for special, technical use. Section 5.6 is a<br />
tutorial introduction to record sets.<br />
AbsolutePosition (attribute, read and write). The position<br />
in the record set of the current record. The<br />
first record in the set has AbsolutePosition 0, the<br />
next AbsolutePosition 1, and so on. Setting AbsolutePosition<br />
to x will make record x current. If you<br />
- or a concurrent user of the database - insert or delete<br />
records, the Absolute positions may change.<br />
AddNew( ). Sets a Null record in the edit buffer. The<br />
Update operation will transfer the edit buffer as a<br />
new record to the record set.<br />
BOF (attribute, read only). True if the program has<br />
tried to move current record before the first record.<br />
Also True for empty record sets. When True there<br />
is no current record.<br />
Bookmark (attribute, read and write). A unique identification<br />
of the current record in the record set.<br />
You can set the bookmark property to the bookmark<br />
of some other record in the same record set.<br />
This will make this record current. The method is<br />
advantageous to setting AbsolutePosition because<br />
bookmarks don't change when records are inserted<br />
or deleted.<br />
Clone( ). Creates a clone object that behaves like a record<br />
set but works on the same set of records. It has<br />
its own pointer to a current record. Returns a reference<br />
to the Clone object. Example:<br />
Set cloneRecordset = rs.Clone<br />
Close( ). Closes the record set and frees the associated<br />
memory.<br />
DateCreated (attribute, read only). The date and time<br />
the current record was created. Only available when<br />
the record set is based on a table, not on an SQLquery.<br />
This means that it must be opened like this:<br />
Set rs = currentDB.OpenRecordset ("tblGuest")<br />
(See also OpenRecordset below.)<br />
Delete( ). Deletes the current record. After Delete there<br />
is no current record, but after a MoveNext the<br />
record after the deleted record will be current.<br />
Edit( ). Transfers the current record to the edit buffer.<br />
Edits can then take place in the edit buffer. The<br />
Update operation will transfer the edit buffer to the<br />
current record in the record set. Any operation that<br />
moves current record (e.g. MoveNext or Find) will<br />
cancel what is in the edit buffer.<br />
EOF (attribute, read only). True if the program has<br />
tried to move beyond the last record. Also True for<br />
empty record sets. When true there is no current record.<br />
FindFirst(criterion As String). Finds the first record<br />
in the set that matches the criterion. Makes this record<br />
current. The attribute NoMatch is False or<br />
True depending on whether a matching record was<br />
found or not. The criterion is a text looking like a<br />
Where-clause in SQL but without the word Where.<br />
For instance "stayID=740".<br />
FindLast(Criterion As String). Similar to FindFirst,<br />
but finds the last matching record in the set.<br />
FindNext(Criterion As String). Similar to FindFirst,<br />
but searches forwards from the current record.<br />
FindPrevious(Criterion As String). Similar to Find-<br />
First, but searches backwards from the current<br />
record.<br />
GetRows(n As Long). Copies n records to an array of<br />
variant data. The first record is current. Moves current<br />
forward n records to the first record after the<br />
ones copied. If there are less than n records left,<br />
GetRows only transfers what is left.<br />
Example: Assume that rs is a record set. The<br />
records have 3 fields.<br />
Dim A( )<br />
A = rs.GetRows(7)<br />
' A(f, r) is now field f of record r<br />
This program piece transfers the next 7 records and<br />
sets the range of A to A(0 To 2, 0 To 6). The indexes<br />
of A are zero-based and A(0, 3) will thus<br />
contain the first field of the fourth record.<br />
LastUpdated (attribute, read only). The date and time<br />
the current record was last changed. Only available<br />
when the record set is based on a table, not on an<br />
SQL-query. This means that it must be opened like<br />
this:<br />
Set rs = currentDB.OpenRecordset ("tblGuest")<br />
(See also OpenRecordset below.)<br />
Move(n As Long). Moves current n records away.<br />
When n>0 the movement is forward, if n
Name (attribute, read only). The SQL query behind the<br />
record set. In order to define the SQL-statement,<br />
use OpenRecordSet.<br />
NoMatch (attribute, read only). Is False or True depending<br />
on whether the previous Find operation<br />
found a record or not.<br />
OpenRecordSet(s As String). This is not an operation<br />
in the record set but in a database object. Opens a<br />
record set and returns a reference to it. The text s<br />
may be an SQL-statement, a table name, or a query<br />
name. Examples:<br />
Dim rs As Recordset<br />
Set rs = currentDB.OpenRecordset ("SELECT * FROM<br />
tblGuest WHERE . . . ; ")<br />
. . .<br />
Set rs = currentDB.OpenRecordset ("tblGuest")<br />
RecordCount (attribute, read only). Shows the number<br />
of records in the set that are presently loaded by the<br />
SQL-engine. After a MoveLast, it will show the<br />
total number of records in the set. When the record<br />
set has just been opened, it will be zero for an<br />
empty set, usually one in other cases. Use EOF as a<br />
safe way to determine whether the set is empty.<br />
Requery( ). Re-computes the query behind the record<br />
set. Useful if the records behind the query have<br />
been changed by other means than this record set.<br />
Update( ). Transfers the edit buffer to the record set,<br />
either to the record from which it came (after Edit)<br />
or as a new record (after AddNew).<br />
5. <strong>Access</strong> through Visual Basic 109
5.7 Modules and menu functions<br />
One way to implement functions is by means of command<br />
buttons and the Click event. Another important<br />
way is through a menu. This section explains how to<br />
implement menu functions. Figure 5.7A shows the<br />
principle.<br />
For command buttons, we utilize that each Form has a<br />
module with code. In this Form module you write the<br />
event procedures that responded to clicks and other<br />
events. For menus, the situation is slightly different - a<br />
menu doesn't belong to any particular Form. Where<br />
should we write the procedures that handle clicks in the<br />
menu? The answer is to make a simple module - one<br />
that doesn't belong to a form. In this module we write<br />
the procedures. Next we set the OnAction properties<br />
for the menu items so that they will call the procedures.<br />
We explain the details below.<br />
5.7.1 Create a menu function<br />
We will show how to implement the menu item CancelStay.<br />
If you followed the book closely, your hotel<br />
system should already have this menu point under the<br />
menu heading Stays, but it doesn't work yet (see section<br />
3.5.2). Proceed as follows:<br />
1. Create module. In the database window, select the<br />
Module tab. There is no Wizard here to help you<br />
create a module, so click New in the database<br />
window heading. You should now be in the VBA<br />
editor.<br />
2. Enter the procedure mniCancelStay as shown on<br />
Figure 5.7A. The central part of the procedure is<br />
similar to cmdCheckin (Figure 5.6A), so you may<br />
simply copy the check-in event procedure and<br />
modify it. (We use the prefix mni for menu-item<br />
procedures.)<br />
The CancelStay procedure uses several new VBA concepts.<br />
Look at the first line:<br />
Public Function mniCancelStay() As Integer<br />
First of all it is not a Private Sub like the event procedure,<br />
but a Public Function. It is public because it must<br />
be accessible from other modules and from the menu<br />
mechanisms. It is function because it has to return a<br />
result. We have arbitrarily specified As Integer meaning<br />
that it returns an integer value. The only reason to<br />
make it a function is that the menu mechanisms insist<br />
on it being that way. The result is not used for anything<br />
as far as I can tell.<br />
The first part of the procedure body tries to find the<br />
stay that was selected when the user clicked Cancel-<br />
Stay. This statement does it:<br />
Stay = Screen.ActiveForm!stayID<br />
Screen is the VBA concept of the computer screen. The<br />
property ActiveForm gives us the form that was in focus.<br />
Finally, we use the bang-operator to find the<br />
stayID of this form.<br />
However, what happens if there is no open stay window<br />
when the user clicks CancelStay? VBA would not<br />
be able to find stayID and would show strange messages<br />
to the user. It would also halt the program. Fortunately,<br />
VBA has a mechanism that allows us to catch<br />
such errors:<br />
On Error GoTo NoStay<br />
After this statement, any error will cause the program<br />
to continue at the line NoStay. In VBA terms this<br />
statement has enabled the error handler of the procedure.<br />
(See more on error handling in section 6.1.)<br />
In the line NoStay, the program uses MsgBox to tell the<br />
user to open a stay window.<br />
The central part of the procedure is like CheckIn<br />
(Figure 5.6A), but sets the states to 4, meaning<br />
Canceled. We might delete the stay and the connected<br />
room states entirely, but for auditing purposes and<br />
undo-purposes, we just change the states. By the way,<br />
it also allows you to experiment with the procedure<br />
easily, since you can cancel a stay, then book it again,<br />
etc.<br />
Note that we set the state of the stay itself through this<br />
statement:<br />
Screen.ActiveForm!state = 4<br />
This will always work since the program has checked<br />
that a stay form is active.<br />
Finally, we have to let the program return from the<br />
procedure without continuing into the error handling,<br />
where it would ask the user wrong things. The statement<br />
Exit Funtion<br />
takes care of this.<br />
3. Save the module. Use File -> Save (or Ctrl+S).<br />
This saves the module, but keeps it open. Give the<br />
module the name basCommon for common base<br />
module.<br />
If you just close the VBA window, the window<br />
disappears and the module is not visible in the database<br />
window. Very scaring! It is not gone, however, just<br />
hidden. The VBA window shows it. When you close<br />
the database, <strong>Access</strong> will ask for a name for the<br />
module. Section 5.7.3 explains more about creating and<br />
naming modules.<br />
110 5. <strong>Access</strong> through Visual Basic
Fig 5.7A Modules and menu functions<br />
Form module<br />
Form<br />
Simple module<br />
basCommon<br />
Catch error when no<br />
stay window is selected<br />
Get stayID in the<br />
selected Stay window<br />
Change state for the<br />
selected Stay window<br />
Ask user to<br />
select a stay window<br />
5. <strong>Access</strong> through Visual Basic 111
5.7.2 Define the menu item<br />
We have now written the menu function. It is time to<br />
connect it to the menu.<br />
4. Close VBA, right-click the toolbar area and select<br />
Customize.<br />
5. Roll down the Stays menu, right-click CancelStay,<br />
and select Properties (Figure 5.7B). Set the<br />
OnAction property to:<br />
=mniCancelStay( )<br />
6. Close the customize boxes and try out the menu:<br />
Open a stay through FindGuest, select the stay,<br />
and use the menu point CancelStay. Unless you are<br />
very, very lucky and careful, there will be errors in<br />
your mni-procedure. Don't worry - it is normal.<br />
Find the errors and repair them.<br />
You may later set the stay back to booked or checkedin<br />
with the buttons in the stay window. Also check that<br />
the program behaves correctly when you use Cancel-<br />
Stay without having a stay window in focus.<br />
Menu procedures in the form module<br />
Above, we put the menu procedure in a simple module.<br />
The advantage is that we can call the procedure independently<br />
of which forms are open or in focus. The<br />
disadvantage is that we have to check that the right<br />
form is in focus.<br />
In some cases it is more convenient to have the menu<br />
procedure in the form module. If you like, you can<br />
make an experiment with how to do it.<br />
• Add another menu item to the Stays menu. Call it<br />
CancelLocal as on Figure 5.7B. Set its OnAction<br />
property to<br />
=mniCancelLocal( )<br />
• Open the VBA module for frmStay and insert a<br />
function that looks like mniCancelStay. However,<br />
it should have the name mniCancelLocal. Further,<br />
it should not use Screen.ActiveForm but Me instead.<br />
The reason is that this function will be<br />
called in the context of the form module, meaning<br />
that the controls are always available. As a result,<br />
you don't need all the error handling stuff.<br />
• Try out the new menu item. It should work correctly<br />
when used from a stay window, but gives<br />
<strong>Access</strong>-language error messages when used from<br />
other forms. Actually, <strong>Access</strong> cannot even find the<br />
function if the form is not in focus.<br />
This way of calling a menu function is particularly<br />
suited when the menu is in a toolbar that is specific for<br />
the form. You may remember (section 3.5.3) that toolbars<br />
may be attached to a form in such a way that the<br />
toolbar is only shown when this form is in focus. In<br />
this way the menu functions on the toolbar are always<br />
available when the user can click on the menu item.<br />
5.7.3 Managing modules and class modules<br />
You can create a module through the database<br />
window's Module tab, but the usual way is to do it<br />
through the VBA editor. However, things work in a<br />
strange way here. Figure 5.7C shows how to manage.<br />
• To create a module, right click an item in the<br />
Project Explorer window. Select Insert and either<br />
Module or Class Module.<br />
You can now edit the module in the code window.<br />
• To name or rename a module, select it and use the<br />
property icon on the tool bar. (You cannot right<br />
click to change it.) Edit the name in the property<br />
window.<br />
• To delete a module, select it, right click and use<br />
Remove . . .<br />
Class module<br />
A class module corresponds to a class in other objectoriented<br />
languages. It has procedures and declares<br />
variables. You can create multiple objects based on the<br />
class, each with their own variables. The only<br />
difference between form modules and class modules is<br />
that the latter are not visible to the user and have no<br />
controls.<br />
In order to create an object of class claGuest, declare a<br />
reference to it and create it with New. Address public<br />
variables and procedures in the object with the dot<br />
notation:<br />
Dim guest As claGuest<br />
' References to a Guest object<br />
. . .<br />
Set guest = New claGuest<br />
guest.address = . . .<br />
guest.SendLetter(" . . . ")<br />
This is similar to creating multiple open forms (section<br />
5.5.12). Beware: the claGuest objects are just for<br />
illustration. They exist only in memory. They are not<br />
stored in the database and they have nothing to do with<br />
the guest records in the database.<br />
Module (simple)<br />
A simple module is similar to a class but there is only<br />
one object based on the module. The system creates<br />
this object automatically. In order to address a public<br />
procedure or variable in the module basCommon, use<br />
the dot notation:<br />
basCommon.simDate = . . .<br />
d = basCommon.getDate()<br />
112 5. <strong>Access</strong> through Visual Basic
Fig 5.7B Action for menu items<br />
Call mniCancelStay<br />
Properties for<br />
Cancel stay menu item<br />
Fig 5.7C Managing modules and class modules<br />
Select properties<br />
to change module name<br />
Property<br />
window<br />
Right click to<br />
insert Module or<br />
Class Module<br />
Project<br />
explorer<br />
Delete module<br />
5. <strong>Access</strong> through Visual Basic 113
5.7.4 Global variables<br />
The only persistent data in our application is the data in<br />
the database. Until now the only dialog data has been<br />
some data in the forms, for instance the value of the<br />
unbound controls. This data disappears when the form<br />
closes, so we need some way to handle dialog data that<br />
lives across the entire dialog with the user. Modules is<br />
the solution to the problem because a module is open<br />
and holds data as long as the application is running.<br />
As a simple example, we will see how to handle a<br />
simulated today's date. In the real system, we need to<br />
show today's date in many places, for instance as the<br />
default search criterion for arrival date. It is easy to do<br />
by means of the built-in function Date( ) which always<br />
gives us today's date (or rather the current date setting<br />
in the computer).<br />
However, when testing the system, our test data is<br />
planned for some specific dates. We cannot change the<br />
test data every day we need it. We might instead<br />
change the current date setting of the system to the<br />
simulated date, but this is not recommended because it<br />
has side effects on other things, for instance the date of<br />
files created or changed, which again may create havoc<br />
in automatic backup procedures.<br />
So let us create a simulated date and keep it in the bas-<br />
Common module. Figure 5.7D shows the solution.<br />
1. Open the basCommon module and enter this line at<br />
the top<br />
Public simDate As Date<br />
Also create the public function getDate( ) as<br />
shown.<br />
The variable simDate is a variable in the simple module<br />
and lives as long as the application is open. The<br />
function getDate simply retrieves the simulated date<br />
and returns it as its own value.<br />
2. Open the module for frmFindStay and create the<br />
load procedure as shown.<br />
This is the place where the program will set the simulated<br />
day to be used. The first thing we will do in the<br />
hotel system is to open frmFindStay, and at that moment<br />
the Load procedure will be executed. It will set<br />
the simulated date to the 23rd October 2002, the date<br />
used in several pictures in the User Interface Design<br />
book. Note how a date is written inside VBA. The format<br />
is a US date, independent of any regional settings<br />
in <strong>Microsoft</strong> Windows. Note also how we address<br />
simDate through basCommon. We might omit bas-<br />
Common, but if we have many modules, we resolve<br />
any name ambiguity in the way written. It also allows<br />
the VBA editor to guide us in selecting the right element<br />
in basCommon.<br />
3. Look at the property box for the arrival date. Define<br />
the default value as this expression:<br />
=getData( )<br />
4. Open frmFindStay and check that the default value<br />
for the arrival date is correct. The user can of<br />
course change the arrival date to what he likes.<br />
The arrival date is a combo box and the real system<br />
provides a list of dates around today for the user to<br />
choose. The default day is still important, however.<br />
You may wonder why we write basCommon.simDate<br />
in the Load-procedure and =getDate() in the property.<br />
The answer is that in properties we can only use public<br />
functions, not public variables. Furthermore we cannot<br />
use the basCommon prefix. The same rule applied<br />
when we specified the OnAction property of the menu<br />
item.<br />
Once our system is tested and ready for use, how do we<br />
let it use the real date? One simple way is to keep everything<br />
and just change the getDate function to<br />
Public Function getDate( ) As Date<br />
getDate = Date( )<br />
End Function<br />
The system will work exactly as before except that it<br />
gets the real today instead of the simulated one.<br />
114 5. <strong>Access</strong> through Visual Basic
Fig 5.7D Global variables<br />
Global variable<br />
Simple module<br />
basCommon<br />
<strong>Access</strong> function<br />
Form module<br />
frmFindStay<br />
Reference to<br />
global variable<br />
Property box<br />
cboArrival<br />
5. <strong>Access</strong> through Visual Basic 115
6. Visual Basic reference<br />
In this chapter we give an overview of VBA, the Visual<br />
Basic language for Applications. We assume that you<br />
know something about programming already. We also<br />
assume that you have looked at some of the Visual<br />
Basic examples in the booklet so that you have seen<br />
program pieces written in this language.<br />
Our discussion is mainly based on the examples shown<br />
on the figures. Most of these figures are also available<br />
as the VBA Reference Card. It may be downloaded<br />
from www.itu.dk/people/slauesen.<br />
If you want additional explanation, you have to use the<br />
on-line help or experiment on your own. Be prepared<br />
that the official documentation (on-line help) is often<br />
incomplete or outright wrong, in the sense that the<br />
system does something different than described. The<br />
examples we show in the figures are based on testing<br />
what the system actually does.<br />
Using VBA functions outside VBA. Although we describe<br />
VBA below, most of the built-in functions and<br />
operators are available also in SQL-statements and in<br />
some control properties (e.g. ControlSource). In these<br />
places you may for instance use the functions<br />
IIF(a, b, c) and<br />
DMin("roomId", "tblRooms", "roomType=2")<br />
However, the regional settings may influence the syntax.<br />
As an example, with Central European settings,<br />
you have to separate parameters with semicolon when<br />
working outside VBA. (See more in section 6.6.)<br />
Also notice that when you use the functions from<br />
VBA, you get excellent help and excellent error messages,<br />
but when using them in SQL or ControlSource,<br />
you get little help and very confusing error reactions.<br />
6.1 Statements<br />
Line continuation. A simple VBA statement consists<br />
of a line of text. If the statement is too long for a line,<br />
you can split it into two or more lines. To do this, you<br />
write a space followed by an underscore at the end of<br />
the line (Figure 6.1A). You cannot break the line in the<br />
middle of a text string. You have to compose a long<br />
text from shorter texts joined with the &-operator.<br />
Comment. You can write a comment at the end of the<br />
line. It starts with an apostrophe ( ' ). The compiler then<br />
ignores the rest of the line. You can only have comments<br />
on the last of the continued lines.<br />
Assignment statement. An assignment statement<br />
computes a value and stores it in the variable to the left<br />
of the =. The Set statement is a special version of assignment.<br />
It doesn't store a computed value, but a reference<br />
to some object. The figure shows how it stores a<br />
reference to the first open Form, how it creates a new<br />
open form object and stores a reference to it, and how<br />
it can set the reference to point at nothing.<br />
Whenever you set a reference, VBA checks whether<br />
this overwrites an earlier reference. If so, VBA also<br />
checks whether this is the last reference to the object,<br />
and if so it deletes the object since nobody can refer to<br />
it any more (this is called garbage collection).<br />
Conditional statements<br />
Conditional statements are executed when some condition<br />
is met. They are examples of compound statements,<br />
which may consist of more than one simple<br />
statement. As Figure 6.1A shows, there are several<br />
kinds of conditional statements.<br />
Simple If-Then. The simplest version consists of an If-<br />
Then clause followed by a single statement, which is<br />
executed when the condition is True. It must all be on<br />
one line, possibly broken with line continuations.<br />
If-Then-Else. The more general version consists of an<br />
If-Then clause followed by one or more statements,<br />
which may be compound themselves. These statements<br />
are executed when the condition is True. If the condition<br />
is False, the program continues with any ElseIf-<br />
Then clauses, each testing their own condition, and<br />
passing the control on if the condition is False. If all<br />
these conditions are False, the program continues with<br />
the statements after any Else clause. The net result is<br />
that the statements after at most one of the clauses are<br />
executed.<br />
Select-Case is often a more elegant way to choose<br />
between statements. In the example, we test the variable<br />
zip. If zip is 4000 the program executes the statements<br />
after Case 4000. If zip is 4001 or between 5000<br />
and 5999, it executes the statements after this clause.<br />
And if none of this is True, the program executes any<br />
Case-Else statements. Again, the net result is that the<br />
statements after at most one of the clauses are executed.<br />
116 6. Visual Basic reference
Error handling<br />
On-Error statements switch error trapping on and off<br />
inside the current procedure. In order to allow the program<br />
to handle errors at all, you have to set an option<br />
in VBA:<br />
<strong>Access</strong> 2000 and 2003:<br />
Tools -> Options -> General -><br />
Break on Unhandled Errors<br />
<strong>Access</strong> 97:<br />
Tools -> Options -> Advanced -><br />
Break on Unhandled Errors<br />
After On Error Resume Next, any program error or<br />
other unexpected situation just skips the statement<br />
where the error occurred. For instance, if the error<br />
occurred during an assignment to x, nothing will be<br />
assigned to x, so x is left unchanged.<br />
After On Error GoTo L, any unexpected situation<br />
causes the program to continue at label L. Should further<br />
errors occur here, they cause the procedure to return<br />
with an error condition to be treated by the calling<br />
procedure.<br />
After On Error GoTo 0 (zero), VBA will handle all<br />
unexpected situations, halting the program if necessary.<br />
When the procedure returns, the calling procedure will<br />
handle all errors according to its own On-Error settings.<br />
When <strong>Access</strong> detects a program error, it sets an Err<br />
object with information about the error. Err has several<br />
properties, for instance<br />
Err.Number (or just Err): The error ID. Err = 0<br />
means no error.<br />
Err.Source: The program that generated the error.<br />
Err.Description: A text describing the error (or giving<br />
the error message).<br />
Notice that <strong>Access</strong> doesn't clear the Err object until the<br />
procedure returns. This can be confusing in program<br />
patterns where the program tries various things to<br />
succeed:<br />
On Error Resume Next<br />
. . . Do something that may cause an error<br />
If Err > 0 Then<br />
. . . Try something else<br />
If Err > 0 Then . . . Give up<br />
Fig 6.1A Visual Basic Statements<br />
Line continuation, comments, assignment<br />
i = i+2 ‘ Comment<br />
s = “long text A” & _<br />
“long text B” ‘ Comment in last line only<br />
Set f = Forms(0) Store a reference<br />
Set f = New Form_frmG Create object, store ref<br />
Set f = Nothing Delete object if last ref<br />
Conditional statements<br />
If a=1 Then c=d+2 ‘ Single statement<br />
If a=1 Then<br />
c=d+2 . . . ‘ Multiple statements<br />
ElseIf a=2 Then<br />
c=d/2 . . .<br />
Optional<br />
Else<br />
c=0 . . . Optional<br />
End If<br />
Select Case zip<br />
Case 4000<br />
type = a . . .<br />
Case 4001, 5000 To 5999<br />
type = b . . .<br />
Case Else<br />
type = c . . . Optional<br />
End Select<br />
On Error Resume Next ‘ Ignore error<br />
. . . If Err > 0 Then . . . ' Test for error<br />
On Error GoTo fail ‘ Enable error handler<br />
. . .<br />
fail: MsgBox( . . . ) ‘ Continue here at error<br />
On Error GoTo 0 ‘ Let VBA handle errors<br />
If Try something else actually succeeds, Err is still > 0<br />
and the program gives up by mistake. The right pattern<br />
is to use<br />
Err.Clear or Err = 0<br />
just before Try something else.<br />
The main problem when using the Err object is to find<br />
out what the error ID means. I have not seen a list of<br />
the codes. The idea is that each subsystem defines its<br />
own error ID's, but this makes it even harder to know<br />
the ID's.<br />
6. Visual Basic reference 117
Loop statements<br />
Loop statements repeat one or more statements until<br />
some condition is met or until an explicit Exit from the<br />
loop (Figure 6.1B). The repeated statements may be<br />
compound themselves.<br />
While-Wend repeats the statements as long as the<br />
While-condition is True. If the condition is False from<br />
the beginning, none of the statements in the loop will<br />
be executed. It is not possible to break the loop with an<br />
Exit-statement.<br />
Do-While-Loop is similar to While-Wend, the only<br />
difference being that it is possible to break out of the<br />
loop with an Exit Do.<br />
Do-Loop-While is also similar, but the condition is<br />
tested at the end of the loop, meaning that the statements<br />
will be executed at least once.<br />
For-To-Next updates the loop variable (i in the example)<br />
for each trip around the loop. In the example, i was<br />
one for the first round through the loop. Then i was<br />
increased by 2 before the next trip, and so on. When i<br />
>last, the loop terminates. If i >last from the beginning,<br />
the loop is not executed at all. Statements inside the<br />
loop may break out of the loop with an Exit For. In this<br />
case the value of i is defined. However, if the loop terminates<br />
due to i >last, it is not defined what the value<br />
of i will be. So don't even rely on it being >last.<br />
For-Each-Next scans through all objects in a collection.<br />
The example shows how to scan through all<br />
Forms in the collection of open Forms. The reference<br />
variable f will in turn point to each of the objects in the<br />
collection. It is possible to break out of the loop with<br />
an Exit For.<br />
118 6. Visual Basic reference
Fig 6.1B Loop statements<br />
Loops<br />
While a
6.2 Declarations<br />
The ancestor of Visual Basic, the programming language<br />
Basic, was designed for teaching programming<br />
with a minimum of formalities about the writing. This<br />
meant that there was no need to declare variables at all.<br />
Basic created the necessary variables as they were<br />
needed. This is still possible in Visual Basic, but software<br />
developers agree that when developing larger<br />
programs it is a huge advantage to declare all variables.<br />
You can tell VBA to insist on declarations. Write this<br />
specification at the beginning of the module<br />
Option Explicit<br />
Variant type. Even if you declare a variable, you don't<br />
have to specify its type. Without an explicit type, the<br />
variable is of type Variant. This means that its actual<br />
type may change dynamically according to what the<br />
program stores into it. It may thus hold a number at one<br />
point in time, a text string at another point in time.<br />
Apart from the value in the variable, VBA also stores a<br />
tag telling what the type is at present.<br />
Simple variables<br />
Declarations of variables usually start with the word<br />
Dim (for dimension) followed by a list of the variables.<br />
Figure 6.2A shows such a list<br />
Dim B, C As Byte<br />
The result is that variable B is of type Variant and variable<br />
C of type Byte. Unfortunately this is counterintuitive<br />
and cumbersome. Most people would believe that<br />
B as well as C are of type Byte. You have to specify a<br />
type for each of the variables to avoid them becoming<br />
variants.<br />
Simple variables may be of the types shown on the figure:<br />
Byte, Boolean, Integer, etc. We have met most of<br />
them already. Byte, Integer and Long hold integers<br />
with different range. Single and Double hold floating<br />
point numbers with at least 6 significant digits (Single)<br />
or 14 significant digits (Double). (See section 2.2 for<br />
details.)<br />
Currency. The Currency type is a funny in-between<br />
intended for keeping track of monetary amounts. It is a<br />
very long integer (64 bits) interpreted as this integer<br />
divided by 10,000. This means that the integer 147,000<br />
is the number 14.7 exactly. Why this rule? It is because<br />
we can guarantee that amounts are rounded correctly as<br />
a bookkeeper would do it. With floating point numbers<br />
you have no control over the round-off.<br />
Date. A date value is technically a Double. The integer<br />
part is the number of days since 12/30-1899 0:00, the<br />
fractional part is the time within the day. As an example,<br />
the number 1 corresponds to 12/31-1899 at 0:00,<br />
the number 1.75 to 12/31-1899 at 18:00 (6 PM).<br />
Object and Form variables are references to objects,<br />
not the objects themselves. You can set the references<br />
by means of the Set-assignment and test them by<br />
means of the Is-operator.<br />
Variant. You can explicitly declare the variable as<br />
Variant, but if you don't specify a type, the variable is<br />
Variant anyway. Variants can not only hold the simple<br />
values above, but also values such as Null or Empty.<br />
Notice that VBA treats all fields in database records as<br />
Variant.<br />
Initial values. When a record field is empty, it has the<br />
value Null. When a Variant is just created, it has the<br />
value Empty, because no memory is allocated for the<br />
value. When a String is just created, it holds a text of<br />
length 0. When a numerical variable is just created, it<br />
holds the value 0.<br />
Strings come in two versions. Strings of variable<br />
length and strings of fixed length. The former change<br />
their length to match what the program stores in them.<br />
The length may be very long, nominally 2 billion, in<br />
practice limited by memory space. Strings of fixed<br />
length always use space from the left, and fill up the<br />
remaining characters with spaces (blanks).<br />
The field types text and memo correspond to VBA<br />
strings of variable length.<br />
Arrays<br />
Arrays can have one or more dimensions. In Figure<br />
6.2A, array c has two dimensions. The first index<br />
ranges from zero to 5 (zero is the default), the second<br />
from 1 to 6. You may specify the type of the elements<br />
of the array. If omitted, they are Variants.<br />
The second array, d, is dynamic, meaning that its dimensions<br />
and index ranges can change over time. The<br />
program can dynamically change the dimensions and<br />
ranges by means of the Redim statement, but in general<br />
the values stored in the array don't survive this operation.<br />
You can use Redim Preserve if you only change<br />
the range of the last dimension. In that case, the values<br />
survive.<br />
You can release the memory occupied by a dynamic<br />
array by means of the Erase statement.<br />
Type declarations<br />
You can declare types of your own (user-defined<br />
types). They will typically take the form of a record<br />
declaration as shown on the figure. Notice that each<br />
field of the record must be specified on a line of its<br />
own.<br />
You can only declare types in simple modules, not in<br />
Form modules. Once you have declared a type, you can<br />
use it for declaring variables and arrays.<br />
Procedures<br />
There are two kinds of procedures: subroutines and<br />
functions. The only difference is that a function returns<br />
a value. For this reason you can store the result of a<br />
120 6. Visual Basic reference
Fig 6.2A Visual Basic declarations<br />
Declarations<br />
Dim B, C As Byte B is Variant, C is 0..255<br />
Boolean True (0, False (=0)<br />
Integer 16 bit, -32,786 .. 32,767<br />
Long 32 bit integer, -2.14E9 .. 2.14E9<br />
Currency 64 bit integer / 10,000<br />
Single 32 bit, -3.4E38 .. 3.4E38, 6 digits<br />
Double 64 bit, -1.8E308 .. 1.8E308, 14 digits<br />
Date Double, days since 30. Dec 1899 0:00<br />
Object Reference to any object<br />
Form<br />
Variant<br />
Reference to any Form<br />
Any of the types or Null, Empty,<br />
Error, Nothing - plus a type tag.<br />
All database fields are Variant<br />
String Variable length, max 2E9 characters<br />
String * 50<br />
Fixed length, space filled<br />
Initial values String = “”, Boolean =False<br />
Number, Date = 0 Database field = Null<br />
Object = Nothing Variant = Empty<br />
Dim c(5, 1 To 6) As t Same as c(0..5, 1..6)<br />
Dim d( ) As Single Dynamic array declaration<br />
ReDim d(5, 1 To 6) Statement<br />
Index range (re)defined, data lost<br />
ReDim Preserve d(5, 1 To 8)<br />
Last index range redefined, data preserved<br />
Erase d Releases memory for dynamic array<br />
Type Customer ‘ Simple modules only<br />
custID As Long<br />
custName As String * 50<br />
custAddress As String<br />
End Type<br />
Dim custTable(20) As Customer<br />
Procedures = Subroutines and Functions<br />
proc a, b, , d ‘ Parenthesis-free notation<br />
Call show(a, b, , d) ‘ Subroutines only<br />
res = fnc(a, b, , Me) ‘ Functions only<br />
Sub show(a, b As t, Optional c, d)<br />
If IsMissing(c) Then . . .<br />
Exit Sub ‘ Optional<br />
. . .<br />
End Sub<br />
Function fnc(a, b As t, Optional c, d As Object) _<br />
As String ‘ As String is optional<br />
If IsMissing(c) Then . . .<br />
fnc= result . . .<br />
Exit Function ‘ Exit optional<br />
. . .<br />
End Function<br />
Enumeration Type<br />
Public Enum RoomState ' Visible to all modules<br />
rmBooked = 1<br />
rmOccupied = 2<br />
rmRepair = 3<br />
End Enum<br />
Public states(12) As RoomState<br />
. . . states(i) = rmRepair<br />
function call as shown in Figure 6.2A, while you have<br />
to call a subroutine with the word Call. You may call<br />
either of them with the parenthesis-free notation as<br />
shown on the figure. It means exactly the same, but<br />
you cannot store the result in case you call a function<br />
this way.<br />
The figure also shows how subroutines and functions<br />
are declared. Note how you specify that a specific type<br />
of parameter is required, and how you specify that a<br />
parameter may be omitted (optional). The procedure<br />
can check whether an optional parameter is present<br />
with the operator IsMissing.<br />
Enumeration type - constant declaration<br />
You can define enumeration types as shown on Figure<br />
6.2A. A variable of type RoomState can have the value<br />
rmBooked, rmOccupied or rmRepair.<br />
VBA doesn't restrict the value of the variables to<br />
rmBooked, etc. The Enum declaration is primarily a<br />
structured way of defining the constants rmBooked, etc.<br />
See section 6.3 for other ways of defining constants.<br />
Note how you can use Me as a parameter when you call<br />
a procedure. Inside the procedure, the parameter must<br />
be specified as Object, not as Form as you might<br />
expect.<br />
When control passes to the end of the procedure, it<br />
returns to the point it was called. The program can also<br />
exit from the procedure with Exit Sub or Exit Function.<br />
6. Visual Basic reference 121
Module and scope<br />
You create simple modules with the VBA editor (see<br />
section 5.7.3). Declare module variables at the top of<br />
the module, procedures below (Figure 6.2B). The<br />
module variables live as long as the application runs. If<br />
they are declared with Public instead of Dim, they are<br />
accessible from other modules and from Forms.<br />
You create class modules the same way. Objects of the<br />
class are created dynamically (see section 5.7.3). You<br />
can address Public variables and procedures in an<br />
object through an object reference.<br />
Procedures can declare variables of their own. If declared<br />
with Dim, the variable is created at the time the<br />
procedure is called and deleted when it returns. However,<br />
if it is declared with Static, it survives from one<br />
call to the next. Variables declared inside a procedure<br />
are never accessible from outside the procedure.<br />
6.3 Constants and addresses<br />
Constants<br />
Figure 6.3 shows the various ways to write constant<br />
values in VBA.<br />
Numeric constants can be written in the usual decimal<br />
way, in octal (preceded by &o) or in hexadecimal (preceded<br />
by &h). Note the scientific notation<br />
-4.9E-20 meaning -4.9 * 10 -20<br />
Color values consist of 8 bits for the amount of blue,<br />
followed by 8 bits for green and 8 bits for red. This is<br />
conveniently written in hex, e.g. &h09A0FF. Note that<br />
colors on the web (HTML) are similar, but use the<br />
opposite sequence, RGB.<br />
String constants are enclosed in quotes. There is no<br />
way to write special characters inside the string constant.<br />
You have to generate a string with a single special<br />
character using Chr(x), where x is the Ascii value<br />
of the character. As an example, Chr(10) is a line feed.<br />
Next you concatenate these string parts by means of the<br />
&-operator. A quote inside a string constant is written<br />
as two quotes. When you have to compute SQL-statements<br />
in VBA, these statements will often include<br />
string constants in quotes. Fortunately, SQL accepts<br />
double quotes as well as single quotes. Generate the<br />
single quotes-version with VBA to avoid conflicts with<br />
VBA double quotes.<br />
Date/time constants are enclosed in # #. The date<br />
format between # and # is always US format mm/dd/yy<br />
or mm/dd/yyyy. Time may be part of the date/time<br />
constant as shown.<br />
Null and Empty can be used for testing, for instance<br />
If x = Empty Then . . .<br />
If IsNull(x) Then . . .<br />
If x = Null Then ' Always gives Null, never True<br />
Notice that comparing with Null always gives Null.<br />
You have to use IsNull to test whether something is<br />
Null. See section 6.4 for more on Null.<br />
You can assign Null to a variant variable. You cannot<br />
assign an empty string to a record field in a database,<br />
you have to assign Null:<br />
rs . f = Null ' Okay, works as an empty string<br />
rs . f = ""<br />
rs . f = " "<br />
' Empty string not allowed<br />
' Okay, spaces as a text<br />
Nothing. The value Nothing can be used for testing<br />
with the Is-operator and for assigning to a reference<br />
variable with the Set statement, for instance<br />
If x = Nothing Then . . .<br />
Set x = Nothing<br />
Constant declaration. You can declare constants, i.e.<br />
give them a name. In the example, we have given the<br />
constant 10 the name max and the constant 24th March<br />
2002 the name start. VBA has many predefined constants,<br />
for instance vbKeyA to denote the Ascii value<br />
of the letter A and vbYes to denote the result of<br />
MsgBox when the user has chosen Yes.<br />
Define constants for your project in a simple module,<br />
e.g. basCommon.<br />
Addressing variables and objects<br />
Figure 6.3 also shows the various ways to address a<br />
variable or an object. The first examples address the<br />
members of the Forms collection in different ways. The<br />
first version uses an integer index as a reference, the<br />
second a computed string as the name of the Form, the<br />
third a short-hand notation with a fixed string as the<br />
name of the form.<br />
The next examples address Form properties and fields<br />
from code in the Form itself. The property Name is<br />
addressed with the dot-operator, while the name field is<br />
addressed with the bang-operator. In this case there is a<br />
name conflict between the two meanings of name. If<br />
there was no conflict, the dot could also be used to<br />
address the field. A property in a subform is addressed<br />
with the name of the subform control followed by<br />
Form to get a reference to the open subform object.<br />
From a subform, the main form can be addressed with<br />
Me.Parent.<br />
Note that Me and Parent are of type Object, not type<br />
Form as one might expect.<br />
In most cases, you can omit Me. The exception is when<br />
a built-in function has the same name as the property or<br />
control.<br />
122 6. Visual Basic reference
Fig 6.2B Module and Scope<br />
Module and Scope<br />
Dim a<br />
‘ Visible in this module only<br />
Public b ‘ Visible to all modules<br />
Private Sub show(p) ‘ Visible in this module only<br />
Dim c ‘ Visible in this sub only<br />
Static d ‘ Visible in this sub only,<br />
‘ but survives calls<br />
If . . . Then . . .<br />
End Sub<br />
Public Sub show(p) ‘ Visible to all modules<br />
Dim c ‘ Visible in this sub only<br />
. . .<br />
End Sub<br />
Fig 6.3 Visual Basic constants and addresses<br />
Constants<br />
23, -23, 0, -4.9E-20 Decimal numbers<br />
&h09A0FF, &o177 Hex and Octal, color: bgr<br />
“Letter to:”<br />
Strings<br />
Chr(65), Chr(vbKeyA) The text “A”<br />
“John” & Chr(10) & “Doe” Two-line text<br />
“Don’t say “”No”” “ Don’t say “no”<br />
“select * from g where a=‘simpson’ ;”<br />
Single quotes are suited for SQL<br />
True, False Booleans<br />
Date/time<br />
#10/24/02# 24th Oct 2002<br />
#10/24/02 14:15:00# 24th Oct 02 at 14:15<br />
#10/24/02 2:15 pm# 24th Oct 02 at 14:15<br />
Null, Empty Special values<br />
Nothing Object reference to nothing<br />
Constant declaration<br />
Const max=10, start=#3/24/2#<br />
Addressing<br />
Forms(i)<br />
Element in collection<br />
Forms(“frmCst” & i)<br />
Forms!frmCst2 Bang-operator<br />
Me.Name, Me!name Property and Control in<br />
this Object (e.g. form)<br />
Me.subLst.Form.name Property in subform<br />
Me.Parent.txtName Control in main form<br />
basCommon.simDate Var in foreign module<br />
c(row, col)<br />
Indexing an array<br />
custTable(i).custID Field in array of records<br />
With Me.Recordset Apply before dot and bang<br />
.addr = .addr & zip<br />
!name = Null<br />
!phone = “ “<br />
.MoveNext<br />
. . .<br />
End With<br />
A public variable in a foreign, simple module can be<br />
addressed as moduleName.variableName as shown.<br />
Array elements are addressed with indexes in parenthesis.<br />
Arrays of records are addressed with index and<br />
the dot-operator to get a field in element i.<br />
With-End. There is a short-hand notation for addressing<br />
an object. The With-End statement specifies a partial<br />
address, for instance an object. Inside the With-<br />
End, all dot and bang-operators are automatically prefixed<br />
with this partial address.<br />
6. Visual Basic reference 123
6.4 Operators and conversion functions<br />
Operators<br />
Figure 6.4A shows the operators available in VBA.<br />
The operators are shown in decreasing precedence,<br />
meaning that high-precedence operators are computed<br />
before low-precedence operators. This is the rule that<br />
ensures that for instance<br />
a*b+c*d<br />
is computed as (a*b) + (c*d) rather than a* (b+c) *d.<br />
The top operators are the conventional mathematical<br />
operators. In general Visual Basic does a good job of<br />
converting the operands to the best possible data type<br />
before applying the operator.<br />
Null<br />
Null values need attention. Think of Null as Unknown.<br />
As a general rule, if one of the operands is Null, the<br />
result is Null too. Look at<br />
If x = Null Then . . .<br />
X = Null will always give Null. This is not True and<br />
the statement after Then will never be executed. See<br />
section 4.5 for examples of handling Null in queries.<br />
There are a few exceptions to the general rule:<br />
Null and False is False.<br />
No matter what the unknown is, the result will be false.<br />
Null or True is True.<br />
No matter what the unknown is, the result will be true.<br />
The &-operator concatenates two string operands into<br />
one. If one or both operands are non-string, it converts<br />
them to strings before concatenation. This also applies<br />
to concatenating with Null, which in this case is converted<br />
to an empty string. Note that & converts dates to<br />
the regional date format. To avoid this, use the Format<br />
function to explicitly convert to a specific string<br />
format.<br />
Other operators<br />
There are the usual comparison operators, equal, unequal,<br />
etc. They can compare numbers as well as texts.<br />
The Is-operator compares two object references to see<br />
whether they refer to the same object. It may also help<br />
checking whether an object reference is Nothing, i.e.<br />
refers to no object.<br />
The Partition operator translates a value into an<br />
interval of values, shown as a string. It takes four<br />
parameters:<br />
Value: An integer.<br />
Lower: The lowest value considered.<br />
Upper: The highest value considered.<br />
Int.length: The range of values is divided into<br />
intervals of this length.<br />
As an example Partition(22, 0, 100, 10) = "20:29". The<br />
entire range 0:100 is divided into intervals of length 10.<br />
The first interval is 0:9, the next 10:19, etc. The value<br />
22 belongs to the interval 20:29.<br />
Between and In. Most VBA operators may be used in<br />
SQL too. However, Between and In may only be used<br />
in SQL:<br />
WHERE a BETWEEN 3 AND 9<br />
WHERE a IN (2, 3, 5, 7)<br />
Finally, we have the logical operators. Usually they<br />
work on Boolean values, for instance<br />
If a Or b Then<br />
But if a and b are integers, they work in parallel on all<br />
the bits of these integers.<br />
Like operator, wildcarding<br />
The Like operator can compare string patterns. It treats<br />
some characters in its right-hand operand in a special<br />
way. As an example, the character * means any<br />
sequence of characters. The expression<br />
s Like "sim*an"<br />
will thus check whether s starts with the characters<br />
"sim" and ends with the characters "an" with any characters<br />
in between.<br />
The character ? means any single character here. The<br />
expression<br />
s Like "b?n"<br />
will thus check whether s starts with b, ends with n,<br />
and has exactly one character in between.<br />
The character # means any digit here. The sequence<br />
[ad3] means either a, d, or 3 here. The sequence [a-d3]<br />
means either a letter between a and d here, or the digit<br />
3. We can even negate the rules: [!ad3] means neither<br />
a, d, or 3 here. The Like operator is also called the<br />
wildcard operator.<br />
124 6. Visual Basic reference
Fig 6.4A Operators and conversion functions<br />
Operators, decreasing precedence<br />
Nulls: A Null operand usually gives a Null result.<br />
^ Exponentiation<br />
- Unary minus, 2*-3 = -6<br />
* Multiply, Result type is Integer, Double, etc.<br />
/ Divide, Single or Double result<br />
\ Integer divide, result truncated, 5\3 = 1<br />
Mod Modulus (remainder), 5 Mod 3 = 2<br />
+ - Add and subtract<br />
& Concatenation, String result (local format)<br />
= < > = Equal, unequal, less than, etc.<br />
Is Compare two object references, e.g.<br />
If r Is Nothing (Test for nil-reference)<br />
Partition(22, 0, 100, 10) = "20:29"<br />
a Between 3 and 9 Not in VBA, okay in SQL<br />
a IN (2, 3, 5, 7) Not in VBA, okay in SQL<br />
Not Negation. Bit-wise negation for integers<br />
And Logical And. Bit-wise And of integers<br />
Or Logical Or. Bit-wise Or of integers<br />
X Exclusive Or. Bitwise on integers<br />
Eqv Logical equivalence. Bitwise on integers<br />
Imp Logical implication. Bitwise on integers<br />
s Like “s?n” Wildcard compare. ? any char here.<br />
# any digit here. * any char sequence here.<br />
[a-k] any letter between a and k here.<br />
Conversion to Integer, Double, Date . . .<br />
Errors: “Invalid use of Null” for Null parameters<br />
Overflow or type mismatch for bad parameters.<br />
CByte(“37”) =37. Overflow outside 0..255<br />
CInt(“2.6”) = 3<br />
Round(2.6) = 3.0000 (as Double)<br />
Rounding down: See Math functions Int, Fix<br />
CLng(“99456”) = 99456<br />
CCur(1/3) =0.3333 (always 4 decimals)<br />
CSng(“-2.6e-2”) = -0.026<br />
CDbl(“-2.6”) = -2.6<br />
CDbl(#12/31/1899#) = 1.0<br />
CDate(“23-10-03”) = #10/23/2003# (as Double)<br />
Uses regional setting for input date<br />
CDate(1) = #12/31/1899# (as Double)<br />
CStr(23) = “23”. No preceding space.<br />
Str(23) = “ 23”.<br />
Preceding space for numbers >= 0<br />
CStr(#10/23/2003#) = “23-10-03”<br />
Converts to regional date format<br />
CVar(X) = X As Variant. X may be Null<br />
Conversion to Integer, Double, Date, etc.<br />
There is a conversion function for most of the types. It<br />
converts an expression of another type to its own type.<br />
For instance, CInt(D) converts D to an integer - if possible<br />
- and returns the result as the value of the function.<br />
D might for instance be a string. If D is a decimal<br />
number, it is rounded to the nearest integer (up or<br />
down).<br />
The function Round(D) does exactly the same as<br />
CInt(D) but returns the integer as a Double. See Math<br />
Functions, section 6.5, for rounding down with Int and<br />
Fix.<br />
CDate(D) converts D to a date/time value (technically a<br />
Double number). Often D is a string, and CDate is<br />
quite liberal in its interpretation of the string. However,<br />
some dates are ambiguous. For instance the string<br />
"02/03/04" can be interpreted in many ways as a date.<br />
In these cases, CDate uses the regional setting for the<br />
date format.<br />
CStr( ) can convert a number to a string. It never puts a<br />
space (blank) in front of the digits. In contrast, Str( )<br />
puts a space in front of numbers >= 0, a minus in front<br />
of negative numbers. Notice that both functions<br />
convert dates to the regional date format. To avoid this,<br />
use the Format function to convert to a specific date<br />
format.<br />
CVar(X) converts X to a variant type. It doesn't really<br />
change anything, but sets a type tag on the result it returns.<br />
6. Visual Basic reference 125
Format function<br />
The Format function has two parameters: a value to be<br />
converted to a text, and the format of the result. The<br />
format is a string and its details are a complex affair.<br />
Basically each character in the format is either a<br />
placeholder that causes VBA to show part of the value,<br />
or it is a literal character that is shown as it is. As an<br />
example, # will show a digit from the value, while / is<br />
not a placeholder and will show up as a / in the result.<br />
If a placeholder character is to be shown as the character<br />
itself, precede it with a backslash. As an example, \#<br />
will show a # in the result.<br />
There are separate placeholders for numbers, strings,<br />
and dates. Apparently, the first placeholder determines<br />
whether to show the value as a number, a string or<br />
date/time. From this point on, the format characters are<br />
interpreted according to the type to be shown.<br />
For numbers, the format string can contain from one to<br />
four sections separated by semicolons. The first section<br />
is used for positive numbers, the second for negative,<br />
the third for zeroes, and the fourth for Null values (no<br />
value).<br />
The details of the format strings and their effect are<br />
best studied through the examples on Figure 6.4B.<br />
Week number<br />
The week number for a date is shown with the ww<br />
placeholder. Since different regions of the globe have<br />
different rules for what is the first day in the week, the<br />
Format function needs a third parameter in this case. It<br />
is vbSunday (1) if Sunday is the first day of the week.<br />
It is vbMonday (2) if Monday is the first day of the<br />
week, etc.<br />
As an example, Sunday 3rd February, 2002 gives these<br />
results depending on whether Monday or Sunday is the<br />
first day of a week:<br />
Format(#2/3/2002#, "ww", 2) = 5 (week 5)<br />
Format(#2/3/2002#, "ww", 1) = 6 (week 6)<br />
Formats for controls, etc.<br />
Many control properties require formats of the same<br />
kind, for instance the date format for a textbox or a<br />
DateTime Picker. Usually the format follows the same<br />
rules as VBA's Format function, but there may be<br />
deviations. Some very annoying ones are:<br />
MM for month and mm for minute.<br />
HH for 24 hours, hh for hours with AM/PM.<br />
Named formats<br />
The format string may also be the name of a regional<br />
(local) format. As an example, the named format<br />
"Currency" will show a number with a $ in the US and<br />
with a £ in UK. The user can define the regional<br />
formats in Window's Control Panel -> Regional and<br />
Language Options. The following named formats exist:<br />
Named numeric<br />
formats<br />
General Number<br />
Currency<br />
Fixed<br />
Standard<br />
Percent<br />
Scientific<br />
Yes/No<br />
True/False<br />
On/Off<br />
Named date/time formats<br />
General Date<br />
Long Date<br />
Medium Date<br />
Short Date<br />
Long Time<br />
Medium Time<br />
Short Time<br />
126 6. Visual Basic reference
Fig 6.4B Format function<br />
Format function<br />
Converts a value to a string, based on a format<br />
string. Format characters that are not<br />
placeholders, are shown as they are.<br />
Backslash+character is shown as the character<br />
alone, e.g. \d is shown as d.<br />
Numeric placeholders:<br />
0 Digit, leading and trailing zero okay here<br />
# Digit, no leading or trailing zero here<br />
. Decimal point (or regional variant)<br />
E- or e- Exponent, use all placeholders<br />
E+ or e+ Show exponent with plus or minus<br />
% Show number as percent<br />
Format(2.3, “00.00”) = “02.30”<br />
Format(2.36, “#0.0”) = “2.4”<br />
Format(0.3, “##.0#”) = “.3”<br />
Format(32448, “(00)00 00”) = “(03)24 48”<br />
Format(32448, “##.#E+”) = “32.4E+3”<br />
Format(32448, “##.#E-”) = “32.4E3”<br />
Format(0.5, “#0.0%”) = “50.0%”<br />
; Separator between formats for positive,<br />
negative, zero, and null values.<br />
Format(-3, "000;(000);zero;---") = “(003)”<br />
String placeholders<br />
@ Character or space<br />
& Character or nothing<br />
! Cut off from left<br />
Format(“A123”, “@@@@@@”) = “¬¬A123”<br />
Format(“A123”, “&&&&&&”) = “A123”<br />
Format(“A123”, “(@@)-@”) = “(A1)-23”<br />
Format(“A123”, “!(@@)-@”) = “(12)-3”<br />
Date/time placeholders<br />
Example: DT = #2/3/2002 14:07:09# (Sunday)<br />
Format(DT, “yyyy-mm-dd hh:nn:ss”, vbMonday)<br />
= “2002-02-03 14:07:09”<br />
Format(DT, “yy-mmm-d at h:nn am/pm”)<br />
= “02-feb-3 at 2:07 pm”<br />
Format(DT, “dddd t\he y’t\h \da\y of yyyy”)<br />
= “Sunday the 34’th day of 2002”<br />
d Day of month, no leading zero “3”<br />
dd Day of month, two digits “03”<br />
ddd Day of week, short text “Sun”<br />
dddd<br />
ww<br />
Day of week, full text “Sunday”<br />
Week number. First day of week as<br />
third parameter, e.g. vbMonday<br />
m Month, no leading zero “2”<br />
(Interpreted as minutes after h)<br />
mm Month, two digits “02”<br />
(Interpreted as minutes after h)<br />
mmm Month, short text “Feb”<br />
mmmm Month, full text “February”<br />
y Day of year “34”<br />
yy Year, two digits “02”<br />
yyyy Year, four digits “2002”<br />
h Hour, no leading zero “14” or “2”<br />
hh Hour, two digits “14” or “02”<br />
AM/PM Show AM or PM here, hours 12-based<br />
am/pm Show am or pm here, hours 12-based<br />
n Minutes, no leading zero “7”<br />
nn Minutes, two digits “07”<br />
s Seconds, no leading zero “9”<br />
ss Seconds, two digits “09”<br />
Named formats (local format)<br />
Format(2.3, "Currency") = "£2.30" (in UK)<br />
also "Percent", "Yes/No", "Long Date" . . .<br />
6. Visual Basic reference 127
6.5 Other functions<br />
String functions<br />
String functions work on strings and characters. Figure<br />
6.5A shows the most important ones.<br />
Asc(s) takes the first character of s and returns it as an<br />
integer, the Ascii code for that character. Chr(c) works<br />
the other way and returns an Ascii code as a string of<br />
one character.<br />
A set of functions return the length of a string (Len),<br />
extract the left, right or middle part of a string (Left,<br />
Right, Mid), or trim a string of leading or trailing<br />
spaces (LTrim, RTrim, Trim).<br />
The functions LCase and UCase transform all letters to<br />
upper or lower case. Space(n) generates a string of n<br />
spaces.<br />
Comparing strings is in principle easy, in practice difficult<br />
due to regional variations of the alphabet, how to<br />
treat upper and lower case letters, etc. In each module,<br />
you can specify how strings are to be compared. They<br />
may be compared according to their Ascii codes<br />
(Option Compare Binary), according to the regional<br />
alphabet and without case sensitivity (Option Compare<br />
Text), or according to the rules of the database (Option<br />
Compare Database). In the <strong>Access</strong> database engine,<br />
Option Compare Database seems to work exactly as<br />
Option Compare Text.<br />
The function StrComp(s1, s2) compares s1 to find out<br />
whether s1 comes before s2 in the alphabetical sequence<br />
(result=-1), are equal (result=0), or comes later<br />
(result=1). Strings may also be compared simply with<br />
s1
Fig 6.5A String functions and miscellaneous<br />
String functions<br />
Null parameters: A Null string as input will give<br />
the result Null. Null as another parameter is an<br />
error.<br />
Asc(“AB”) = 65, Ascii code for first character<br />
Chr(65) = “A”, a one-letter string with this<br />
ascii character<br />
Len(“A_B”) = 3, length of string.<br />
Left(“abc”, 2) = “ab”, leftmost two characters<br />
Left(“abc”, 8) = “abc”, as many as available<br />
Right(“abc”, 2) = “bc”, rightmost two characters<br />
Mid(“abcdef”, 2, 3) = “bcd”,<br />
three characters from character 2<br />
LTrim(“ ab ”) = “ab ”, leading spaces removed<br />
RTrim(“ ab “) = “ ab”, trailing spaces removed<br />
Trim(“ ab “) = “ab”, leading and trailing removed<br />
Lcase(“A-b”) = “a-b”, lower case of all letters<br />
Ucase(“A-b”) = “A-B”, upper case of all letters<br />
Space(5) = String of 5 spaces<br />
Option Compare Text | Binary | Database<br />
Option in start of module. Text: string comparison<br />
is case insensitive and follows regional settings.<br />
Binary: comparison is based on the internal<br />
ASCII code.<br />
Database: comparison is defined by the SQLengine.<br />
StrComp(“ab”, “abc”) = -1, first string smallest<br />
StrComp(“ab”, “ab”) = 0, strings equal<br />
StrComp(“ac”, “abc”) = 1, first string largest<br />
If “ab” < “abc” . . . ‘ Works just as well<br />
Iif and Choose<br />
Iif(a=a, b, c) = b<br />
Iif(aa, b, c) = c<br />
Iif(Null, b, c) = c<br />
Choose(2, a, b, c) = b<br />
Choose(4, a, b, c) = Null<br />
Choose(Null, a, b, c) Error<br />
Array bounds<br />
LBound(d) Lower bound for first index<br />
LBound(d, 2) Lower bound for second index<br />
UBound(d) Upper bound for first index<br />
UBound(d, 3) Upper bound for third index<br />
DLookup, DMin, DMax, DSum<br />
DLookup(“name”, “tblGuest”, “guestID=7”)<br />
= name of guest with guestID=7.<br />
DMin(“roomID”, “tblRooms”, “roomType=2”)<br />
= smallest room number among double rooms.<br />
All three parameters are texts inserted into SQL.<br />
DMax, Dsum, DCount, DAvg<br />
Similar, just finds largest, sum, number of,<br />
average. Null treatment, see SQL<br />
MsgBox<br />
MsgBox(“Text”, vbYesNo+vbCritical) =vbYes<br />
Also: vbInformation, vbQuestion, vbExclamation<br />
6. Visual Basic reference 129
Type check functions<br />
Figure 6.5B shows a set of functions that can check the<br />
type of an operand or an expression. As an example,<br />
IsDate(d) checks whether d is of type Date or is a string<br />
that could be converted to a date by means of<br />
CDate(d).<br />
An interesting check function is VarType(v). It returns<br />
a number that shows the type of v. The figure shows<br />
the many possibilities and the constant name for each<br />
of them. In case of an array, two constants are added,<br />
vbArray (8192) and the constant for the type of the<br />
array. As an example, an array of integers will have the<br />
type number vbArray+vbInteger.<br />
Date and time functions<br />
Figure 6.5B also shows a set of functions to handle<br />
date and time. Three functions return the current date,<br />
the current time, and the current date+time (Date,<br />
Time, Now). The function Timer( ) returns the number<br />
of seconds since midnight, with the highest accuracy<br />
available to the computer. It is a good tool for timing<br />
program parts to find the bottleneck in a slow program.<br />
DateSerial computes a date value from the integer arguments<br />
year, month, and day. TimeSerial computes a<br />
time value from hour, minute, and second.<br />
Math functions<br />
Figure 6.5C shows the mathematical functions available.<br />
We find the square root, the trigonometric functions,<br />
exponential function and logarithm. There is also<br />
a random number generator.<br />
Abs(x) returns the absolute value of x. Sgn(x) returns<br />
the signum of x (1, 0, or -1). Int(x) and Fix(x) rounds<br />
the argument with different rules for negative numbers<br />
(for positive numbers they are equal).<br />
Hex(x) and Oct(x) shows x as a string in hexadecimal<br />
or octal notation.<br />
Financial functions<br />
Figure 6.5C also shows two of the many financial<br />
functions available. NPV returns the Net Present Value<br />
of a sequence of payments (positive and negative). It<br />
calculates what these values would total today at a<br />
given interest rate.<br />
IRR calculates the Internal Rate of Return for a sequence<br />
of payments. IRR is the interest rate at which<br />
the Net Present Value of the payments would be zero.<br />
There are many other financial functions available, but<br />
we don't explain them here.<br />
Finally a set of functions can extract day, month, etc. as<br />
integers from a date value. Refer to the figure for details.<br />
130 6. Visual Basic reference
Fig 6.5B Type check and date/time functions<br />
Type check functions<br />
Returns True if v is declared with the type tested<br />
for, is a Variant currently with this type, or is a<br />
constant of this type. IsDate and IsNumeric also<br />
test whether v is a text that can be converted to<br />
that type.<br />
IsArray(v) Tests for any type of array<br />
IsDate(v) Tests whether v is a date or a string<br />
that can be converted to a date<br />
IsEmpty(v) Tests whether v is unallocated<br />
(Strings of length 0 are not Empty)<br />
IsError (v) Tests whether v is an error code<br />
IsMissing (v) Tests whether v is a parameter that<br />
IsNull (v)<br />
is missing in the current call.<br />
Tests whether v is of type Null.<br />
(Strings of length 0 are not Null)<br />
IsNumeric(v) Tests whether v is a numeric type<br />
(Byte, Integer, Currency, etc.) or a<br />
string that can be converted to a<br />
numeric type.<br />
IsObject(v)<br />
Tests whether v is a reference to<br />
an object, for instance a Form. True<br />
also if v is Nothing (the nil-pointer)<br />
VarType(v) Integer showing the type:<br />
0 vbEmpty 8 vbString<br />
1 vbNull 9 vbObject<br />
2 vbInteger 10 vbError<br />
3 vbLong 11 vbBoolean<br />
4 vbSingle 12 vbVariant (array)<br />
5 vbDouble 17 vbByte<br />
6 vbCurrency 36 vbUserDefinedType<br />
7 vbDate 8192 vbArray (added)<br />
Date and time functions<br />
A date value is technically a Double. The integer<br />
part is the number of days since 12/30-1899, the<br />
fractional part is the time within the day.<br />
Several functions accept date parameters as well<br />
as strings representing a date and/or time.<br />
Null parameters: Always give the result Null.<br />
Now( ) = current system date and time<br />
Date( ) = current date, integral date part<br />
Time( )<br />
Timer( )<br />
= current time, fractional date part<br />
= Number of seconds since<br />
midnight, with fractional seconds.<br />
Date = . . . Sets current system date<br />
Time = . . . Sets current system time<br />
DateSerial(2002, 12, 25) = #12/25/2002#<br />
TimeSerial(12, 28, 48) = 0.52 (Time 12:28:48)<br />
Day(#12/25/02#) = 25, the day as Integer<br />
Month(#12/25/02#) = 12, the month as Integer<br />
Year(#12/25/02#) = 2002, the year as Integer<br />
Weekday(#12/25/02#) = 4 (Sunday=1)<br />
Hour(35656.52) = 12 (Time 12:28:48)<br />
Minute(35656.52) = 28<br />
Second(35656.52) = 48<br />
Fig 6.5C Math and financial functions<br />
Math functions. Don't accept x = Null:<br />
Sqr(x) Square root of x. Sqr(9) = 3.<br />
Sin(x), Cos(x), Tan(x), Atn(x) Trigonometric<br />
functions. X measured in radian (180<br />
degrees = p = 3.141592 radian)<br />
Sin(0) = 0, Sin(3.141592 / 2) = 1<br />
Exp(x) e to the power of x (e = 2.7182...)<br />
Log(x) Natural logarithm of x. Log(e) = 1.<br />
Rnd( ) A random number between 0 and 1.<br />
Type is Single.<br />
The following functions accept x = Null:<br />
Abs(x) Returns x for x>=0, -x otherwise.<br />
Sgn(x) Returns 1 for x>0, 0 for x=0, -1 for x
6.6 Display formats and regional settings<br />
Different regions of the world use different formats for<br />
numbers, dates, and other things. The user can define<br />
the regional formats in Window's Control Panel -><br />
Regional and Language Options.<br />
This not only influences the input and output format for<br />
user data, but also formats inside the program, the<br />
control properties, and the query grid. For a developer<br />
working outside the US, it can be a nightmare to figure<br />
out how it all works. Below I illustrate the issues with<br />
the small regional difference I know about, the<br />
difference between US formats and central European<br />
formats. I cannot even imagine the problems if we talk<br />
about regions with different alphabets, writing<br />
directions, and calendar systems such as Chinese and<br />
Arabic.<br />
Figure 6.6 gives an overview of the situations. The<br />
main regional differences relate to the format of dates<br />
for input and output, the list separator, and the decimal<br />
characters. The regional differences show up in different<br />
ways in the three main developer and user environments:<br />
• Designer environment: The designer defines<br />
controls and their properties. He may also define<br />
queries through the query grid.<br />
• Programmer environment: The programmer<br />
works in Visual Basic and defines SQL-statements<br />
rather than queries through the grid.<br />
• User environment: The user sees data through<br />
controls and datasheets.<br />
Input date. Let us first look at the entry of dates. In the<br />
designer and programmer environments, <strong>Access</strong> makes<br />
a good guess at the format for dates. If we for instance<br />
enter #2003-13-5# into the query grid or SQL, <strong>Access</strong><br />
guesses what is year, month and day. However, in the<br />
many situations where this is impossible, such as the<br />
date #02-03-04#, <strong>Access</strong> guesses differently in the two<br />
environments. In the designer environment, it uses the<br />
regional date format, which in Central Europe is #ddmm-yy#.<br />
In the programmer environment, it uses the<br />
US format #mm/dd/yy#.<br />
Input mask property. What about the user environment?<br />
Here the designer defines what the user sees by<br />
means of the Input mask in the Control Property box.<br />
When the user starts entering a date, the field switches<br />
to showing the date according to the Input mask. This<br />
mask is similar to the format string in the Format function,<br />
but uses quite different placeholders. When an<br />
input mask is specified, the user can only use Overwrite<br />
mode, not the ordinary edit mode.<br />
Output date. How is a date shown? In the designer<br />
environment, it is always shown according to the regional<br />
date format (Short Date).<br />
In the programmer environment it is always shown in<br />
US format with one exception: The concatenation<br />
operator & converts the operands to texts if needed,<br />
and dates are converted to regional format. Thus we<br />
get this with a central European setting:<br />
"Xmas " & #12/25/2007# = "Xmas 25-12-2007"<br />
But this with a US setting:<br />
"Xmas " & #12/25/2007# = "Xmas 12/25/2007"<br />
Format property. The user sees the date in the format<br />
defined by the Format property. This format may be<br />
different from the input mask, so the user enters one<br />
thing, then the system shows it differently. The designer<br />
has to make sure that these formats match.<br />
List separator. In Central Europe, the list separator is<br />
a semicolon since the comma is used to denote the<br />
decimal separator. In the US the list separator is a<br />
comma. As a result, the designer has to write for instance<br />
Iif(a; b; c) in the query grid or in Control Source<br />
properties, while the programmer has to write Iif(a, b,<br />
c). To make things worse, if the designer uses commas<br />
in the Control Source or the grid, the error reaction is<br />
completely confusing.<br />
Fortunately, there is no reason to worry about the user<br />
environment for the list separator. Users normally don't<br />
see it at all.<br />
Number format. The number format in Central<br />
Europe has comma as decimal separator and dot as<br />
thousand separator. In the designer environment you<br />
have to use these characters, while you use the US<br />
format in the programmer environment. In the user environment,<br />
the Format property and the Input mask<br />
determine the format.<br />
Practice. Developers are sometimes designers and<br />
sometimes programmers. It is no wonder that they usually<br />
set up their development system in pure US mode.<br />
They can ship the system to the users with little change<br />
since the users don't see the designer stuff. But if they<br />
have to change something at the user's site, they have<br />
to take care since the developer formats now look different<br />
from back home.<br />
132 6. Visual Basic reference
Fig 6.6 Regional settings<br />
Display format depends on regional setting<br />
and designer environment:<br />
Designer Programmer User<br />
Query grid, SQL, Table field,<br />
Property line VBA Textbox<br />
Input VBA guess, e.g. #2003-13-5# According to<br />
date In doubt, e.g. #02-03-04#: Input mask<br />
dd-mm-yy mm-dd-yy<br />
Output EU-regional: US: mm/dd/yy According to<br />
date dd-mm-yy Except & which Format<br />
uses regional format<br />
List EU-regional: US:<br />
separator semicolon: comma:<br />
iif( a ; b ; c) iif( a , b , c)<br />
Number 12.300,25 12,300.25 Format ...<br />
6. Visual Basic reference 133
7. <strong>Access</strong> and SQL<br />
In this chapter we look at more complex SQL issues,<br />
for instance how we can create and delete records<br />
through SQL, how we can use queries inside queries,<br />
7.1 Action queries - CRUD with SQL<br />
Section 5.6 explains how the program can Create,<br />
Read, Update and Delete records in the database by<br />
means of recordsets. In this section we will see how<br />
the program can make such CRUD operations by<br />
means of SQL.<br />
We have four kinds of SQL queries available:<br />
INSERT INTO . . . (Create)<br />
This query inserts new records into a table.<br />
SELECT . . . FROM . . . (Read)<br />
This query extracts data from the tables. It is the<br />
query we have used in the rest of the booklet<br />
(e.g. sections 4.1 to 4.4). In many cases it also<br />
allows the user to edit the data. We will not<br />
explain it further in this section.<br />
UPDATE . . . (Update)<br />
This query changes records in a table.<br />
DELETE FROM . . . (Delete)<br />
This query deletes records from a table.<br />
The term action query means INSERT, UPDATE or<br />
DELETE - the queries that change something in the<br />
database.<br />
We will explain the mechanisms through the examples<br />
in Figure 7.1. To execute an action query, we use this<br />
VBA function:<br />
CurrentDb.Execute ”INSERT . . . ", dbFailOnError<br />
CurrentDB is the database currently used by the<br />
program. We ask it to execute the INSERT query.<br />
Usually the query statement is a computed string that<br />
includes dialog variables, for instance the customer the<br />
user works with.<br />
The last parameter dbFailOnError is optional. It asks<br />
the database to give an error message if something goes<br />
wrong during the query, for instance if we try to insert<br />
a record that violates referential integrity. If we omit it,<br />
there is no response in case of errors - nothing changes<br />
in the database, and the program doesn't know about it.<br />
Include dbFailOnError, particularly while you are<br />
testing the program.<br />
INSERT<br />
The figure shows a full INSERT statement. It inserts a<br />
single record into tblRoomState. It sets the roomID to<br />
14, the date to 27th Oct 2002, and the state to 1. The<br />
and how we can show matrices of data where the table<br />
headings vary according to the data.<br />
remaining fields of the record become Null. Note how<br />
we have put date in brackets. If we omit the brackets,<br />
the database engine believes we try to use the built-in<br />
date function and reports it as a syntax error (independent<br />
of whether we have included dfFailOnError).<br />
The INSERT statement can also insert a bunch of<br />
records extracted from another table or query. The<br />
bottom of the figure shows an example (explained<br />
below).<br />
AutoNumber<br />
Assume you have a table with a field of type Auto-<br />
Number. When you insert a record into the table,<br />
<strong>Access</strong> will automatically fill in the AutoNumber field.<br />
However, if you explicitly specify a value for the field,<br />
<strong>Access</strong> will accept it if it is unique (different from<br />
other values of this field).<br />
When <strong>Access</strong> generates the number automatically, it<br />
will use the highest used number plus one. (The highest<br />
used number may have been used by a record now<br />
deleted.) As an example, assume we want the booking<br />
numbers in the hotel to consist of a year number and a<br />
sequence number, for instance 20040001, 20040002<br />
etc. We can then generate the first booking of the year<br />
with this query:<br />
INSERT INTO tblStay (stayID) VALUES (20040001)<br />
New stay records will then be auto-numbered from this<br />
value and on. Deleting some of the records still makes<br />
the number grow sequentially.<br />
UPDATE<br />
The UPDATE statement sets room state to 2 and<br />
personCount to 1 for all roomState records where<br />
roomID=14 and date=27/10/2002. In this case there is<br />
only one such record because roomID and date make<br />
up the primary key for the table.<br />
Confused about the dates? <strong>Access</strong> SQL uses American<br />
dates, while the explanations in the booklet use middle<br />
European dates. See more in section 6.6.<br />
DELETE<br />
The DELETE statement deletes all roomState records<br />
where roomID=14 and date=27/10/2002. In this case<br />
there is only one such record.<br />
7.1.1 Temporary table for editing<br />
The user (or the program) can edit the fields in a simple<br />
query. However, if the query contains a GROUP BY,<br />
134 7. <strong>Access</strong> and SQL
Fig 7.1 Action queries - CRUD with SQL<br />
Execution of an action query.<br />
Show a message in<br />
case of errors<br />
CurrentDb.Execute ”INSERT . . . ", dbFailOnError<br />
INSERT INTO tblRoomState (roomID, [date], state)<br />
VALUES (14, #10/27/02#, 1);<br />
Insert one record in tblRoomState.<br />
Only these three fields get a value.<br />
(The rest become Null.)<br />
Note the brackets on name to<br />
distinguish from the built-in name<br />
function<br />
UPDATE tblRoomState SET state=2, personCount=1<br />
WHERE roomID=14 and [date]=#10/27/02#;<br />
DELETE FROM tblRoomState<br />
WHERE roomID=14 AND [date]=#10/27/02#;<br />
Set state to 2 and personCount to 1 for<br />
all RoomStates with roomID=14 and<br />
date=27-10-2002 (there is only one)<br />
Delete all RoomStates with roomID=14<br />
and date=27-10-2002 (there is only one)<br />
Allow user to edit a GROUP BY query:<br />
Make a temporary copy<br />
Delete all records from tblTemp.<br />
Then copy all query records from<br />
the current stay to tblTemp<br />
CurrentDb.Execute ”DELETE FROM tblTemp;", dbFailOnError<br />
CurrentDb.Execute ”INSERT INTO tblTemp SELECT * FROM qryStayRooms “ _<br />
& “WHERE stayID=” & me.stayID & “;” , dbfailonerror<br />
an outer join, or another complex query, the result can<br />
not be edited. From a usability perspective, there is<br />
often a need to edit such a query anyway. It can either<br />
be done through a dialog box (low usability), or<br />
through a temporary table that holds a copy of the<br />
GROUP BY result. The user will edit the temporary<br />
table directly. The bottom of the figure shows an<br />
example of this. Let us see how it works.<br />
In the hotel system the user sees a single record for<br />
each room booked by the guest. In the database there is<br />
a roomState record for each date the room is booked,<br />
but on the user interface we aggregate it to a single line<br />
with start date and number of nights. The query<br />
qryStayRooms does this, but the user can not edit the<br />
result directly.<br />
The solution is to have a temporary table tblTemp with<br />
the same fields as qryStayRooms. The first statement<br />
deletes the present records in tblTemp. The next<br />
statement copies all the query records that belong to the<br />
current stay into tblTemp. Note how the program<br />
computes the SQL statement from several parts, one of<br />
them being me.StayID, the current stay number the user<br />
is working on. Since the SQL statement is very long, it<br />
is split into two lines with an underscore at the end of<br />
the first line.<br />
Note also the SELECT * part that extracts all fields of<br />
the query. This only works if tblTemp has the same<br />
fields - and with the same names. It is possible to<br />
extract only some of the fields - or rename them - in<br />
order to match the fields in tblTemp. We could for<br />
instance extract roomID (renamed to Room) and<br />
Nights:<br />
INSERT INTO tblTemp SELECT roomID AS Room, Nights . . .<br />
After the INSERT, the program can show tblTemp in a<br />
form so that the user can edit it. The program may<br />
either update the real database each time the user<br />
changes something in tblTemp, or it may update the<br />
whole thing when the user closes the form.<br />
7. <strong>Access</strong> and SQL 135
7.2 UNION query<br />
A UNION query combines two queries so that the<br />
result contains all the records:<br />
SELECT . . . FROM . . . UNION<br />
SELECT . . . FROM . . . ;<br />
The two queries must have the same number of fields.<br />
The queries need not have matching names or types.<br />
The first field of each query goes into the first field of<br />
the result, the second field into the second field of the<br />
result, etc. The field name of the result is the field<br />
name from the first query. The field type of the result is<br />
compatible with all the queries, for instance Long<br />
Integer if one query has a simple integer, the other a<br />
Long.<br />
The query grid cannot show a union query. You have<br />
to work in SQL view. You may make one of the<br />
queries with the query grid, then switch to SQL view to<br />
add the second query.<br />
You can set the presentation format of the fields in<br />
grid view, for instance date or number formats. Rightclick<br />
the field column and select properties. When you<br />
switch to SQL and add the union part, the presentation<br />
format remains. (Editing the SQL version and<br />
switching back and forth between SQL view and grid<br />
view, may remove the format information.)<br />
Example: Service charges<br />
The first example in Figure 7.2 takes a list of breakfast<br />
services and adds a list of telephone charges to give a<br />
combined list of service charges. (The breakfast<br />
services are recorded by the receptionist, while the<br />
telephone charges may be produced by a separate<br />
telephone system.)<br />
The combination is not quite straightforward because<br />
the breakfast list has a stayID field which is not wanted<br />
in the result. Furthermore, the telephone charges lack a<br />
serviceID; they should end up with a serviceID of 5<br />
(meaning telephone). Finally, what is called ticks in the<br />
telephone charges is called quantity in the result.<br />
The first part of the SQL statement selects the required<br />
fields from tblServiceReceived. The second part selects<br />
roomID from the telephone charges, computes a<br />
second field with the value 5, selects the date field and<br />
finally the ticks field. It doesn't even care to rename the<br />
ticks field.<br />
The figure shows the result ordered by roomID. Notice<br />
that the last field is named quantity according to the<br />
field name in the first query.<br />
In the real hotel system, the result must be joined with<br />
the roomState records to add the stayIDs, so that the<br />
data end up on the right guest invoice. To do this<br />
properly, we also need time of day for the telephone<br />
charges. We don't discuss this here.<br />
Example 2: Combo box with a New option<br />
The second example in Figure 7.2 shows a list of<br />
service prices extended with a New option. The list is<br />
intended for a Combo Box and gives a convenient way<br />
for the user to select an existing choice or add a new<br />
one.<br />
The list is computed with a union query. The last part<br />
is a simple select of the fields in tblServiceType. The<br />
first part computes a constant record with the name<br />
New, serviceID = 0 (dummy value), and price = Null.<br />
Formally, this record is computed based on<br />
tblServiceID, but any table might be used. However, to<br />
save computer time, it is a good idea to use a short<br />
table. Some developers use a dummy table with a<br />
single record for the purpose.<br />
This query is used as the Control Source in the Combo<br />
Box.<br />
Note how we managed to get the currency sign ($) on<br />
the list. We first used the query grid to make the last<br />
part of the union. We set Property -> Format to<br />
Currency for the price field. Then we switched to SQL<br />
view and added the first part.<br />
An alternative is to compute the price field using the<br />
Format function, for instance with the named format<br />
Currency, which adds the regional currency symbol:<br />
Format(tblServiceType.price, "currency") AS Price<br />
136 7. <strong>Access</strong> and SQL
Fig 7.2 Union: Concatenate two tables<br />
List of breakfast services, etc.<br />
List of telephone charges<br />
from the telephone system.<br />
Combined list of all services.<br />
SELECT roomID, serviceID, date, quantity FROM tblServiceReceived<br />
UNION SELECT roomID, 5 AS serviceID, date, ticks FROM tblPhone;<br />
List of service types extended with<br />
New. Shown in table view, and as<br />
drop-down list.<br />
SELECT 0 AS serviceID, "New . . ." AS name, Null AS price<br />
FROM tblServiceType<br />
UNION SELECT serviceID, name, price FROM tblServiceType;<br />
Start with query grid and last part.<br />
Set column property for price<br />
column to currency.<br />
Switch to SQL and add the first<br />
part (SELECT . . . UNION).<br />
7. <strong>Access</strong> and SQL 137
7.3 Subqueries (EXISTS, IN, ANY, ALL . . .)<br />
A subquery is a select statement used inside another<br />
select statement. As an example, this statement selects<br />
records from tblA that have a value that is in tblB:<br />
SELECT . . . FROM tblA WHERE<br />
v IN (SELECT w FROM tblB)<br />
Notice the comparison operator BETWEEN. It is part<br />
of standard SQL, but not of VBA. This is one of the<br />
few exceptions where an expression in SQL doesn't<br />
work in VBA. The other way around, lots of VBA<br />
expressions don't work in standard SQL although they<br />
work in <strong>Access</strong> SQL.<br />
You can use subqueries in this way:<br />
EXISTS (SELECT * FROM . . . )<br />
True if the subquery returns one or more records.<br />
You can also write NOT EXISTS (. . .)<br />
v IN (SELECT w FROM . . . )<br />
True if the set of w's returned by the query contains<br />
the value v. You can also write v NOT IN (. . .)<br />
v IN (3, 7, a+b)<br />
True if v is in the list of values 3, 7, a+b. This is not<br />
really a subquery, because we write the list of<br />
values explicitly.<br />
v > ANY (SELECT w FROM . . . )<br />
True if the value v is larger than one or more of the<br />
w's returned by the query. You can also write v=,<br />
v>, v>=, etc. You can write SOME instead of ANY.<br />
The meaning to the computer is the same.<br />
v > ALL (SELECT w FROM . . . )<br />
True if the value v is larger than all of the w's<br />
returned by the query. You can also write v=, v>,<br />
v>=, etc.<br />
An alternative to v > ANY is:<br />
v > (SELECT Min(w) FROM . . . )<br />
Similarly an alternative to v > ALL is:<br />
v > (SELECT Max(w) FROM . . . )<br />
EXISTS (SELECT . . . ) AND v > ANY (SELECT . . .)<br />
You can combine subqueries in the same way as<br />
other logical expressions.<br />
In summary, you can use a subquery in a logical<br />
expression. You cannot join a subquery with other<br />
subqueries, group it, etc. In order to do such things,<br />
you have to store the subquery as a named query (we<br />
show an example in section 7.4).<br />
Example: Used and free rooms<br />
The first example in Figure 7.3 shows a list of rooms<br />
with an indication of those used in the period 23/10 to<br />
26/10.<br />
In principle the query is quite simple. We query<br />
tblRoom and select the roomID and a computed value.<br />
The computed value makes the trick. It tests whether<br />
the room has a roomState record in the period 23/10 to<br />
26/10. The result will be True or False. We give the<br />
result the name Used.<br />
In this case we show the result as Yes/No. We have set<br />
Property -> Format to Yes/No for the Used field.<br />
Example 2: List of free rooms using NOT EXISTS<br />
The second example lists only the free rooms. Again<br />
we select roomID from tblRoom, but in the WHERE<br />
clause we check that the room has no roomStates in the<br />
period we consider.<br />
Example 3: List of free rooms using NOT IN<br />
The third example also lists the free rooms, but selects<br />
them in a different way. In the WHERE clause the<br />
subquery lists all roomStates in the period we consider.<br />
The WHERE clause checks that the roomID from<br />
tblRoom is not in this list.<br />
Correlated queries<br />
SQL specialists talk about correlated queries. The<br />
subquery is correlated with the main query if it<br />
references fields in the main query. In the figure, the<br />
first two queries have correlated subqueries while<br />
qryTest3 has not.<br />
Example 4: DISTINCT values only<br />
A query may produce a list of records with duplicates.<br />
QryTest 4 shows an example. It extracts all roomState<br />
records in the period we consider, and selects the<br />
roomID. Since many rooms are occupied multiple<br />
times in this period, the same roomID will appear<br />
many times.<br />
QryTest 4A has added the word DISTINCT. This<br />
causes SQL to remove all duplicates.<br />
Example 5: Self-correlation<br />
The fifth example shows how we can select records<br />
based on other records in the same table.<br />
The example is from the hotel system. A guest may<br />
have booked several rooms for different periods. When<br />
guests arrive, we want the receptionist to see a list of<br />
the rooms booked for the arrival date.<br />
The query looks at each roomState record to see<br />
whether it must be included in the list. It must be if the<br />
date of this roomState is the arrival date for the<br />
corresponding stay. The subquery finds the arrival date<br />
by looking at all roomStates that belong to this stay.<br />
The arrival date is the first date among these<br />
roomStates.<br />
Note how the subquery selects tblRoomState. It gives<br />
the table an alias-name (T2) in order to compare these<br />
room states with those from the outermost query. This<br />
is called a self-correlation.<br />
138 7. <strong>Access</strong> and SQL
Fig 7.3 Subqueries (Exists, In, etc.)<br />
qryTest:<br />
SELECT roomID,<br />
EXISTS (SELECT * FROM tblRoomState<br />
WHERE tblRoomState.roomID = tblRoom.roomID AND<br />
(tblRoomState.date BETWEEN #10/23/02# AND #10/26/02#))<br />
AS Used<br />
FROM tblRoom;<br />
Room list with indication<br />
whether the room was used<br />
between 23/10 and 26/10.<br />
qryTest2:<br />
SELECT roomID FROM tblRoom WHERE<br />
NOT EXISTS (SELECT * FROM tblRoomState<br />
WHERE tblRoomState.roomID = tblRoom.roomID AND<br />
(tblRoomState.date BETWEEN #10/23/02# AND #10/26/02#));<br />
Rooms free between<br />
23/10 and 26/10<br />
qryTest3:<br />
SELECT roomID FROM tblRoom WHERE<br />
roomID NOT IN (SELECT roomID FROM tblRoomState WHERE<br />
tblRoomState.date BETWEEN #10/23/02# AND #10/26/02#);<br />
qryTest4:<br />
SELECT roomID FROM tblRoomState<br />
WHERE tblRoomState.date BETWEEN #10/23/02# AND<br />
#10/26/02#;<br />
Duplicates removed<br />
Room states in the period. Same<br />
roomID occurs multiple times<br />
qryTest4A:<br />
SELECT DISTINCT roomID FROM tblRoomState<br />
WHERE tblRoomState.date BETWEEN #10/23/02# AND<br />
#10/26/02#;<br />
Rooms for the arrival date, i.e.<br />
the first date of the stay.<br />
qryTest5:<br />
SELECT stayID, roomID, [date] FROM tblRoomState<br />
WHERE [date] =<br />
(SELECT Min([date]) FROM tblRoomState AS T2 WHERE<br />
tblRoomState.stayID = T2.stayID)<br />
ORDER BY stayID;<br />
Self-correlation with alias.<br />
7. <strong>Access</strong> and SQL 139
7.4 Multiple join and matrix presentation<br />
In this section we will look at queries that present data<br />
in a matrix. A matrix is a table where the headings<br />
aren't fixed but vary according to data in the database.<br />
Figure 7.4 shows an example from the hotel system. It<br />
is part of the rooms window, which shows when rooms<br />
are occupied. The rooms are listed vertically and the<br />
dates horizontally. Whether a room is booked,<br />
occupied, etc. on a given date is shown as a number<br />
code. This is just to simplify the example a bit. In the<br />
real system the code is replaced with a mnemonic text,<br />
for instance Booked.<br />
The principle<br />
The query behind the table follows this idea:<br />
SELECT roomID . . . , r1.date, r2.date, r3.date<br />
FROM tblRoom<br />
LEFT JOIN (tblRoomState AS r1 WHERE date=first) ON . . .<br />
LEFT JOIN (tblRoomState AS r2 WHERE date=first+1) ON . . .<br />
LEFT JOIN (tblRoomState AS r3 WHERE date=first+2) ON . . .<br />
We start with tblRoom and left-join it with the room<br />
states belonging to the first date. This would give us<br />
the roomID column and the first date column in the<br />
result. Next we left-join the result with the room states<br />
belonging to the next date. This would add the second<br />
date column in the result. And so on.<br />
Practice<br />
Unfortunately this is wishful thinking, but not SQL.<br />
The main problem is that we cannot have a subquery<br />
with WHERE after JOIN. It doesn't help to add<br />
SELECT . . . FROM inside the parenthesis. Could we<br />
have a WHERE after the last ON, such as this?<br />
LEFT JOIN tblRoomState AS r3 ON . . .<br />
WHERE r1.date=first AND r2.date=first+1 AND r3.date=first+2<br />
This would work okay if we were using INNER JOINs,<br />
but we need outer joins to produce all the empty cells<br />
in the table. Another guess would be to set the<br />
necessary conditions in the ON criterion. This too is<br />
not allowed in <strong>Access</strong> SQL.<br />
Named query. The solution is to use a named query<br />
for each of the parentheses. Figure 7.4 shows the full<br />
solution. Using the query grid in <strong>Access</strong>, we create a<br />
query for each of the date columns in the result. The<br />
figure shows qryRoom1, the query for the first date<br />
column. It simply selects the roomState records for the<br />
first date in the period. QryRoom2 selects the<br />
roomState records for the second date, and so on.<br />
The room grid is now computed with the big query. It<br />
follows the idea above, but uses the named queries<br />
instead of the parentheses. It also adds room<br />
descriptions through an INNER JOIN with<br />
tblRoomType. Finally, it renames the date columns to<br />
the proper headings, for instance [21-10-02] for the<br />
first date column.<br />
The big query was actually made with the query grid,<br />
as shown on the figure. This helped set the proper<br />
parentheses inside the SQL statement. As long as the<br />
statement contains only inner joins, the grouping with<br />
parentheses doesn't matter. The result will be the same<br />
no matter in which sequence the joins are made.<br />
However, when outer joins are used, the sequence does<br />
matter.<br />
Standard SQL allows outer joins to be freely grouped<br />
with parentheses, but <strong>Access</strong> SQL does not. The<br />
<strong>Access</strong> rule is that a table with an arrow pointing to it<br />
cannot have another arrow pointing to it, nor be<br />
connected with an arrow-less connection. If needed,<br />
you can get around this rule by means of named<br />
queries.<br />
Dynamic headings, Form versus table<br />
In order to make a true data matrix, we need to change<br />
the column headings according to the data. In the<br />
example, the user chooses the period of dates. The<br />
program then computes the corresponding SQL<br />
statements and inserts the appropriate dates. This is<br />
rather straightforward.<br />
All of this works okay if we just want to show the user<br />
the result as a table. The query determines the table<br />
headings.<br />
However, the table presentation provides a poor user<br />
interface. We may connect the table to a subform<br />
control (<strong>Access</strong> 2000 and 2003), but this gives us no<br />
possibility to change the appearance, for instance<br />
removing navigation buttons or coloring the fields. The<br />
user may select an area of the table, but the program<br />
has no way to detect which area the user selects.<br />
The solution is to make a Form based on the query, and<br />
set its default view to Datasheet. (A datasheet looks<br />
like a table, but behaves differently.) We may use the<br />
form as it is or connect it to a subform control. Now we<br />
can control the appearance of the datasheet, and the<br />
program can "see" the user's selections of data cells.<br />
Unfortunately this introduces another problem. The<br />
query doesn't any more determine the headings. They<br />
are defined by the field labels on the form. In the next<br />
section we show how to manage all of this.<br />
140 7. <strong>Access</strong> and SQL
Fig 7.4 Multiple join and matrix presentation<br />
qryRoom1:<br />
SELECT roomID, state FROM tblRoomState<br />
WHERE tblRoomState.date=#10/21/2002#;<br />
qryRoomGrid:<br />
SELECT tblRoom.roomID, tblRoomType.description, qryRoom1.state AS [21-10-02],<br />
qryRoom2.state AS [22-10-02], qryRoom3.state AS [23-10-02]<br />
FROM tblRoomType INNER JOIN (((tblRoom<br />
LEFT JOIN qryRoom1 ON tblRoom.roomID = qryRoom1.roomID)<br />
LEFT JOIN qryRoom2 ON tblRoom.roomID = qryRoom2.roomID)<br />
LEFT JOIN qryRoom3 ON tblRoom.roomID = qryRoom3.roomID)<br />
ON tblRoomType.roomType = tblRoom.roomType;<br />
7. <strong>Access</strong> and SQL 141
7.5 Dynamic matrix presentation<br />
In this section we show how to make a dynamic matrix<br />
as a Form in datasheet view. Compared to showing the<br />
matrix as a query table, the Form approach allows us to<br />
control the presentation better and let the program<br />
"see" what the user selects.<br />
Figure 7.5 shows the details of the solution. The form<br />
at the top left is an outline of the hotel system's rooms<br />
window. The user can enter the first date of the period,<br />
click Find, and the system updates the subform (the<br />
datasheet) to show room occupation from that date and<br />
on. Initially, we assume that the period is always three<br />
days.<br />
QryRoomGrid is exactly as the version in the previous<br />
section, except for the AS parts of the SELECT clause.<br />
The room states are now renamed to C1, C2, C3 rather<br />
than the dates in the period. This ensures that the states<br />
always end up in the proper form fields, no matter<br />
which dates we work with.<br />
The datasheet is based on the subform shown to the<br />
right. This subform was generated with the Form<br />
Wizard using qryRoomGrid as the record source. It<br />
uses a columnar layout (see section 3.2.1). The date<br />
fields are bound to C1, C2, and C3 in the query. (The<br />
names of the controls will be cbo1, cbo2, etc., but this<br />
is not important.) We have manually given the labels<br />
the names L1, L2, L3.<br />
The program doesn't have to compute the SQLstatement<br />
in qryRoomGrid. This query is based on the<br />
named queries qryRoom1, 2, and 3, and the program<br />
has to compute these when the user clicks Find. The<br />
figure shows the Click procedure for cmdFindRoom.<br />
First the procedure stores the main part of the query in<br />
the string variable s. This is only to save a lot of<br />
writing since the string is used in three queries.<br />
Next the procedure computes the SQL-statement in<br />
qryRoom1. The procedure computes qryRoom2 and<br />
qryRoom3 in the same way. Note how we address the<br />
named query from VBA, using<br />
CurrentDB.QueryDefs<br />
Notice how we compute the date comparison, for<br />
instance<br />
SELECT . . . WHERE date = 37550;<br />
We explicitly convert the contents of txtDate (the user's<br />
search criterion) to Double. The &-operation will then<br />
translate it to the string "37550". (See more on date<br />
comparison in section 5.2.3.)<br />
Changing the headings<br />
The next part of the procedure sets the dynamic<br />
headings. It sets the captions of the three labels to the<br />
proper date. Notice how we first address the subform<br />
control, then the Form connected to the control, and<br />
finally the label in the form.<br />
We use the automatic date conversion when setting the<br />
caption. It uses the regional date format - exactly what<br />
we want when showing the date to the user.<br />
Updating the subform<br />
Finally the procedure has to update the subform<br />
according to the new queries. This is done by setting<br />
the record source once more to qryRoomGrid. This<br />
causes <strong>Access</strong> to compute the query from scratch.<br />
Updating the various parts of a form is a mystery - at<br />
least to me. Through experiments I have found the<br />
solution above. It seemed more natural to use the builtin<br />
requery method for a form, for instance in this way:<br />
Me.subRoomGrid.Form.Requery<br />
However, <strong>Access</strong> (or the Jet engine) doesn't figure out<br />
that something has changed in the named queries, and<br />
as a result doesn't update anything.<br />
Handling varying number of columns<br />
The techniques above can be generalized to a period of<br />
N days, where N is defined by the user. First the Click<br />
procedure needs to compute also qryRoomGrid with<br />
C1, C2 . . . CN and N nested parentheses. This is not<br />
too hard.<br />
We might create a variable number of named queries in<br />
a loop where i runs from 1 to N. The inner part of the<br />
loop would use this statement to create a named query:<br />
Call currentdb.CreateQueryDef ("qryRoom" & i, "select . . . ")<br />
However, making a variable number of fields on the<br />
form cannot be made dynamically. Adding fields can<br />
only be made in design mode.<br />
In practice we have to plan for a maximum number of<br />
date columns, for instance 20. We construct<br />
fsubRoomGrid with 20 date fields, cbo1, cbo2 . . .<br />
cbo20, and bind them to C1, C2 . . . C20. We also<br />
make 20 named queries, qryRoom1 . . . qryRoom20.<br />
With a proper Click procedure this works fine except<br />
for a little detail: The datasheet always shows 20<br />
columns even if the user only asked for 3. The last<br />
columns will be blank if the query didn't generate<br />
something.<br />
This is easy to correct. The procedure can hide the last<br />
columns. It can for instance hide the 4th date column in<br />
this way:<br />
Me.subRoomGrid.Form!cbo4.ColumnHidden=True<br />
In the procedure, the number 4 is given by a variable,<br />
for instance j. The statement would then be:<br />
142 7. <strong>Access</strong> and SQL
Fig 7.5 Dynamic matrix presentation<br />
txtDate<br />
subRoomGrid<br />
Column headings are the label captions.<br />
qryRoomGrid:<br />
Label names: L1, L2, L3<br />
SELECT tblRoom.roomID, tblRoomType.description,<br />
qryRoom1.state AS C1, qryRoom2.state AS C2, qryRoom3.state AS C3<br />
FROM tblRoomType INNER JOIN (((tblRoom LEFT JOIN qryRoom1 . . .<br />
frmRooms:<br />
Private Sub cmdFindRoom_Click()<br />
Dim s As String<br />
s = "SELECT roomID, state From tblRoomState WHERE date = "<br />
CurrentDb.QueryDefs!qryRoom1.SQL = s & CDbl(Me.txtDate) & ";"<br />
CurrentDb.QueryDefs!qryRoom2.SQL = s & CDbl(Me.txtDate+1) & ";"<br />
CurrentDb.QueryDefs!qryRoom3.SQL = s & CDbl(Me.txtDate+2) & ";"<br />
Me.subRoomGrid.Form!L1.Caption = Me.txtDate<br />
Me.subRoomGrid.Form!L2.Caption = Me.txtDate + 1<br />
Me.subRoomGrid.Form!L3.Caption = Me.txtDate + 2<br />
Me.subRoomGrid.Form.RecordSource = "qryRoomGrid"<br />
End Sub<br />
. . . WHERE date = 37550;<br />
. . . WHERE date = 37551;<br />
Set RecordSource again.<br />
(Requery doesn’t notice that the<br />
named queries changed.)<br />
Me.subRoomGrid.Form("cbo" & j).ColumnHidden=True<br />
See section 5.5.7 for more on hiding columns,<br />
adjusting their width, etc.<br />
The real rooms window<br />
In the real hotel system, the user sees the days around<br />
the first day he asks for and the days around the last<br />
day. When the period is long, all the days in the middle<br />
are lumped together with a heading saying ". . . ".<br />
The queries are also more complex because the user<br />
can ask for rooms that are free in a certain period,<br />
rooms of a certain type, etc. However, the solution<br />
follows the ideas above.<br />
Another issue is to let the user select rooms and period<br />
from the matrix. This is discussed in section 5.5.8.<br />
7. <strong>Access</strong> and SQL 143
7.6 Crosstab and matrix presentation<br />
The previous sections show how hard it is to make a<br />
data matrix. So there is a good reason that <strong>Access</strong><br />
provides a non-standard SQL feature for making data<br />
matrices: the Crosstab query.<br />
A simple example - room number versus date<br />
Figure 7.6A shows a simple example. We want a<br />
matrix with dates running horizontally and rooms<br />
running vertically. In the matrix we show the room<br />
state for each date (as a numeric code for simplicity).<br />
This matrix is made with the query shown to the right.<br />
It is based on tblRoomState. We have used the menu<br />
Query -> Crosstab Query<br />
to add the Crosstab gridline to the grid. We have<br />
marked roomId as a row heading and date as a column<br />
heading. Note how we group data by roomId and date.<br />
Each group is a bundle of room state records to be<br />
shown somehow in the matrix cell. In the hotel system,<br />
each bundle will contain at most one record since a<br />
room cannot have more than one state for a given date.<br />
This is just how it happens to be in the hotel case,<br />
however.<br />
Finally, we have marked state as the value to be shown<br />
inside the matrix. Since a crosstab is a kind of<br />
aggregate query, we can only show data as aggregate<br />
functions. In this case we have used the aggregate<br />
function First. Since the bundle has at most one room<br />
state, we could as well have used Max or Min.<br />
The figure also shows the SQL version of the query.<br />
The inner part of the query is an ordinary SELECT -<br />
GROUP BY query. The group-by attribute becomes<br />
the row heading. There may be several group-by<br />
attributes, and then there will be several row headings.<br />
The first part of the query is a non-standard thing, the<br />
TRANSFORM part. It defines the value to be shown in<br />
a cell. The last part is another non-standard thing, the<br />
PIVOT part. It defines the attribute to be used as the<br />
column heading.<br />
Note the query name: qxtbRoomGrid. The prefix qxtb<br />
tells the programmer that it is a crosstab query.<br />
Fig 7.6A Crosstab query<br />
Query -><br />
Crosstab<br />
Row heading<br />
Column heading<br />
Ordinary SELECT<br />
. . . GROUP BY<br />
qxtbRoomGrid:<br />
TRANSFORM First(tblRoomState.state) AS FirstOfstate<br />
SELECT tblRoomState.roomID<br />
FROM tblRoomState<br />
GROUP BY tblRoomState.roomID<br />
PIVOT tblRoomState.date;<br />
Column heading<br />
Row heading<br />
Value in cell –<br />
aggregate data<br />
144 7. <strong>Access</strong> and SQL
Outer join and several row headings<br />
Figure 7.6B shows a more complex crosstab. We want<br />
to show also the room description. Furthermore we<br />
want to show all rooms, whether they are used or not.<br />
(In the top of the figure, room 22 wasn't shown because<br />
it wasn't used.)<br />
The new crosstab is based on three tables: tblRoom-<br />
State, tblRoom, and tblRoomType. We use an outer<br />
join for tblRoomStates and tblRoom in order to include<br />
all rooms. We mark roomID and description as row<br />
headings.<br />
The result is as shown. We have now got room 22 in<br />
the matrix. Unfortunately, we have also got a strange<br />
column with the heading . It is caused by the outer<br />
join producing a row with a Null date since no room<br />
state matched room 22.<br />
Figure 7.6C shows how to get rid of the Null column<br />
(). Instead of grouping by date, we group by a<br />
computed date:<br />
d: IIf( IsNull(date), #24-10-02#, date)<br />
The effect of this is that Null dates are replaced by a<br />
specific date in the range of dates we consider. Records<br />
with a Null date also have a Null state, so they don't<br />
show up as being used.<br />
Fig 7.6B Outer join and two row headings<br />
Unused room<br />
now included<br />
Null date for the<br />
unused room<br />
Fig 7.6C Avoiding the Null date<br />
Avoiding the Null date<br />
Dates with no used<br />
rooms are excluded<br />
7. <strong>Access</strong> and SQL 145
Fig 7.6D Restricting the date range<br />
Avoiding the Null date<br />
Dates with no used<br />
rooms are excluded<br />
Restricting the date range<br />
to 24/10 - 27/10<br />
Restricting the date range<br />
In practice we cannot show a matrix with all the dates.<br />
It would require hundreds of columns. We want to<br />
restrict the query to a specific range of dates.<br />
In Figure 7.6D we restrict the range of computed dates<br />
to those between 24-10-02 and 27-10-02 (European<br />
date format).<br />
The result is as shown. We got rid of the column<br />
and see only the dates in the restricted range. The only<br />
problem is that we don't get a column for every date in<br />
the range. For instance 26-10-02 is missing because no<br />
room is used this date.<br />
Including all dates in the range<br />
We might include all dates in the range by means of an<br />
additional outer join. To do this we need a table of all<br />
dates in the range, but this is not an existing part of the<br />
data model. The program might generate such a table,<br />
but let as utilize another feature in the crosstab.<br />
In Figure 7.6E we have added an IN-clause to the<br />
PIVOT part of the SQL statement. The PIVOT part<br />
specifies the column headings, and now we have<br />
explicitly asked for all the dates in the range. Notice<br />
that we have to use US date formats in SQL.<br />
The IN-clause also causes the computer to discard all<br />
dates that are not in the IN-list. Thus we don't need the<br />
WHERE-clause anymore.<br />
If you try to look for the IN-clause in design view (the<br />
query grid), you won't find it. It has become a property<br />
of the query grid. To see it, right click inside the<br />
diagram area and select Properties.<br />
Unfortunately, the result looks ugly. The column<br />
headings have the programmer format, and I have not<br />
been able to find a way to change it. For other fields of<br />
the query, we can set field properties, for instance the<br />
display format. But not for the column headings. (I<br />
would call this a bug in <strong>Access</strong>.)<br />
The IN-trick works okay if we use something else than<br />
dates for the headings. We will see an example now.<br />
Using the query in a subform<br />
In a good user interface, we wouldn't present the query<br />
directly to the user, but embed it in a subform. To make<br />
the column headings change dynamically, we make the<br />
same trick as in section 7.5.<br />
We let the query generate column headings that are the<br />
texts C0, C1, C2 etc. They will bind to the controls C0,<br />
C1, etc. in the subform. The program will dynamically<br />
set the labels of these controls to the real dates.<br />
146 7. <strong>Access</strong> and SQL
Fig 7.6E Including all dates<br />
Headings cannot be formatted<br />
(Looks like an error in <strong>Access</strong>)<br />
26-10-2002 is<br />
now included<br />
qxtbRoomGrid4:<br />
TRANSFORM First(tblRoomState.state) AS FirstOfstate<br />
SELECT tblRoom.roomID, tblRoomType.description<br />
FROM tblRoomType INNER JOIN (tblRoom LEFT JOIN tblRoomState ON . . . )<br />
GROUP BY tblRoom.roomID, tblRoomType.description<br />
PIVOT IIf(IsNull(date), #10/24/2002#, date)<br />
IN (#10/24/2002#, #10/25/2002#, #10/26/2002#, #10/27/2002#);<br />
Required column headings<br />
In design view, this list appears as the<br />
Column Heading property of the query<br />
qxtbRoomGrid5:<br />
TRANSFORM First(tblRoomState.state) AS FirstOfstate<br />
SELECT . . .<br />
PIVOT IIf(IsNull(date), "C0", "C" & (date-#10/24/2002#))<br />
IN ("C0", "C1", "C2", "C3");<br />
Column headings are used as<br />
control names in the subform<br />
The bottom of Figure 7.6E shows the query to be used.<br />
We compute the column heading with this expression:<br />
IIf( IsNull(date), "C0", "C" & (date - #10/24/2002#))<br />
Null dates are replaced by the text C0. Other dates are<br />
replaced by a C followed by the date index: 0 for the<br />
first day in the period, 1 for the next day, and so on.<br />
Notice that although the IN-clause has the texts in<br />
quotes, the result shows the text in user format without<br />
quotes.<br />
Crosstab restrictions<br />
Crosstab is great for quick and dirty solutions where<br />
you want to show the relationship between two<br />
attributes in a query. This is for instance the case for<br />
experimental data mining where the user defines<br />
queries on his own.<br />
However, when designing a production system such as<br />
a hotel system, Crosstab provides too little flexibility.<br />
Crosstab can for instance not handle subqueries or<br />
Having, even if they occur in named queries.<br />
7. <strong>Access</strong> and SQL 147
8. References<br />
Jennings, Roger (1999): Using <strong>Microsoft</strong> <strong>Access</strong> 2000<br />
- special edition. ISBN 0-7897-1606-2. QUE, Indianapolis<br />
(1300 pages). An advanced textbook for<br />
learning how to make <strong>Access</strong> applications. Only<br />
200 of the pages use Visual Basic. Comprehensive<br />
lists of all icons and shortcut keys, all functions<br />
used in expressions, all date formats, etc. Also covers<br />
using <strong>Access</strong> for Web applications and combining<br />
<strong>Access</strong> with other MS-Office applications<br />
("automation"). The index in this version is fine.<br />
(The 1997 version had a useless index.)<br />
Litwin, Paul; Getz, Ken & Gilbert, Mike (1997):<br />
<strong>Access</strong> 97 - Developer's Handbook. Sybex, San<br />
Francisco. ISBN 0-7821-1941-7 (1500 pages). The<br />
professional developer's handbook for making<br />
<strong>Access</strong> applications with Visual Basic. Has a<br />
comprehensive chapter on SQL and the differences<br />
between <strong>Access</strong> SQL and standard SQL. Also covers<br />
how to combine <strong>Access</strong> with other MS-Office<br />
applications in a programmed fashion ("automation"),<br />
multi-user aspects, and configuration management.<br />
It is a book for looking up advanced topics,<br />
not a book to study from the beginning.<br />
148 8. References
Index<br />
! (bang operator), 41, 69<br />
! versus dot, 71<br />
" (quotes inside quotes), 74<br />
" (strings), 122<br />
#Error, 40<br />
#Name?, 41<br />
& (concatenation, VBA), 124<br />
& (label control), 22<br />
* (all fields), 52<br />
[ ] (name parenthesis), 40, 54, 91<br />
+ - * / (VBA), 124<br />
<
- rectangle, 22<br />
- subform, 32<br />
- tab order, 28<br />
- tab sheet, 44<br />
- text box, 18<br />
- events, 72, 78<br />
- properties, 28, 72<br />
ControlTip (text box), 28<br />
conversion functions (type,<br />
VBA), 125<br />
correlated query (SQL), 138<br />
COUNT (query), 60<br />
create<br />
- controls, 18<br />
- database, 6<br />
- event procedure, 80<br />
- forms, 18<br />
- menu, 46<br />
- module (class), 110, 112<br />
- relationships, 12<br />
- single record (VBA), 88<br />
- table and fields, 7<br />
criteria (composite), 76<br />
criteria (live search), 74<br />
criteria (user-defined), 64<br />
Crosstab (SQL), 144<br />
CRUD (Create, Read . . . )<br />
- form, 87, 90<br />
- recordset, 102<br />
- SQL, 134<br />
currency (data type), 120<br />
Current (form event), 78, 86<br />
current record (in a form), 38, 93<br />
current record (in recordset), 68,<br />
104<br />
CurrentDb, 102, 134<br />
D<br />
DAO 3.6 (recordset), 102<br />
data entry<br />
- into table, 8<br />
- shortcut keys, 8<br />
data type, 10, 120<br />
- array, 120<br />
- AutoNumber, 11<br />
- AutoNumber (setting the<br />
value), 134<br />
- Boolean, 11, 120<br />
- Byte, 120<br />
- currency, 120<br />
- date/time, 11, 120<br />
- double, 11, 120<br />
- enumeration (lookup), 14<br />
- foreign key (type match), 11,<br />
12<br />
- form, 120<br />
- integer, 11, 120<br />
- long integer, 11, 120<br />
- memo, 10, 120<br />
- number, 10<br />
- object, 120<br />
- single, 120<br />
- static, 122<br />
- string, 120<br />
- text, 10, 120<br />
- type, 120<br />
- variant, 120<br />
- yes/no, 11<br />
database<br />
- compaction, 15<br />
- creation, 6<br />
- multiple connectors, 16<br />
- network structure, 16<br />
- objects, 68<br />
- self-reference, 16<br />
- SQL-engines, 55, 68<br />
- tree structure, 16<br />
- versus files, 6<br />
DataEntry (form property), 88<br />
datasheet<br />
- area selection (VBA), 94<br />
- as subform, 31, 36<br />
- column hidden (VBA), 94<br />
- column sequence, 34<br />
- column sequence (VBA), 94<br />
- column width, 34<br />
- column width (VBA), 94<br />
- font and color, 34, 42<br />
- mockup, 36<br />
- sorting, 34<br />
- versus form view, 38<br />
date comparison, 76<br />
date format<br />
- Format function, 126<br />
- in controls, 126<br />
- regional settings, 132<br />
date/time field, 11<br />
date/time functions (VBA), 130<br />
DateCreated (recordset), 108<br />
DateTime Picker, 22<br />
dbFailOnError, 134<br />
Deactivate (form event), 87<br />
debug (Visual Basic code), 81<br />
debug window (immediate), 50,<br />
69<br />
declarations (variables, VBA),<br />
120<br />
Default (button property), 84<br />
DELETE (record, SQL), 134<br />
Delete (recordset), 108<br />
delete event procedures, 81<br />
designer role, 6<br />
detail area (connected to a list),<br />
42<br />
developer role, 6, 132<br />
Dialog box (form), 92<br />
Dim (declaration, VBA), 120<br />
Dirty (form event), 86<br />
display formats (regional<br />
settings), 132<br />
DISTINCT (SQL), 138<br />
DLookup, DMin . . . (VBA), 128<br />
Docking windows, 80<br />
double field (in table), 11<br />
dynaset, 52<br />
- editing the data, 53<br />
- group by, 61<br />
E<br />
Edit (recordset), 108<br />
Empty (VBA), 122<br />
Enabled (text box property), 28<br />
engine (database), 55, 68<br />
Enter (text box event), 78<br />
enumeration type<br />
- combo box, 24<br />
- table field, 10<br />
- VBA, 121<br />
EOF (end-of-file, recordset), 108<br />
Err (error object), 117<br />
Error (in computed value), 40<br />
error handling<br />
- before update, 78<br />
- Error preview, 97<br />
- MsgBox, 50<br />
- On Error GoTo, 110, 117<br />
error messages (MsgBox), 50<br />
events, 72–79<br />
- Activate (form), 86<br />
- AfterUpdate (form), 86<br />
- AfterUpdate (text box), 72, 78<br />
- BeforeUpdate (form), 86<br />
- BeforeUpdate (text box), 78<br />
- Change (text box), 73, 78<br />
- Click (text box), 84<br />
- Close (form), 87<br />
- command button, 84<br />
- creating event procedures, 80<br />
- Current (form), 78, 86<br />
- Deactivate (form), 87<br />
- deleting event procedures, 81<br />
- Dirty (form), 86<br />
- Enter (text box), 78<br />
- Error (form), 97<br />
- form, 86<br />
- form (sequence), 86<br />
- GotFocus (form), 86<br />
- GotFocus (text box), 78<br />
- KeyDown (text box), 78<br />
- KeyPress (text box), 78<br />
- KeyUp (text box), 78<br />
- Load (form), 86<br />
- logging, 81<br />
- MouseDown, Click, etc., 78<br />
- Open (form), 86<br />
- Resize (form), 86, 100<br />
- text box, 72<br />
- text box (sequence), 78<br />
- Timer, 98<br />
- Unload (form), 86<br />
- wait for, 98<br />
Execute (CurrentDb), 134<br />
150 Index
EXISTS (SQL), 138<br />
F<br />
field (in table). See also data type<br />
- combo box, 14<br />
- enumeration type, 10<br />
field list (for adding controls), 34<br />
file formats (<strong>Access</strong> versions), 8<br />
filter properties (form), 87<br />
financial functions (VBA), 130<br />
FindFirst, FindNext . . .<br />
(recordset), 108<br />
FIRST/LAST (query), 60<br />
focus<br />
- dialog box, 89<br />
- GotFocus (form event), 86<br />
- SetFocus, 86<br />
font (datasheet), 34, 42<br />
For Next statements (VBA), 118<br />
foreign key, 11, 12<br />
- combo box, 26<br />
form, 86–101<br />
- Activate (event), 86<br />
- ActiveForm (current), 110<br />
- AfterUpdate (event), 86<br />
- AllowAdditions, 87<br />
- AllowDeletions, 87<br />
- AllowEdits, 87<br />
- area selection (VBA), 94<br />
- autoformat, 21<br />
- BeforeUpdate (event), 86<br />
- Border Style, 21<br />
- bound, 32<br />
- bound main and subform, 66<br />
- caption, 21<br />
- close, 86<br />
- Close (event), 87<br />
- column sequence, 34<br />
- column sequence (VBA), 94<br />
- column width, 34<br />
- column width (VBA), 94<br />
- continuous form, 30<br />
- Control Box, 21<br />
- create single record (VBA), 88<br />
- creation, 18<br />
- CRUD (multi-purpose, VBA),<br />
90<br />
- CRUD control, 87<br />
- Current (event), 78, 86<br />
- DataEntry property, 88<br />
- datasheet view for subform, 31<br />
- Deactivate (event), 87<br />
- design view (shortcut keys), 22<br />
- Dialog box, 92<br />
- Dirty (event), 86<br />
- edit single record (VBA), 88<br />
- error preview, 97<br />
- event sequence, 86<br />
- Filter, 87<br />
- form view for subform, 36<br />
- form view versus datasheet<br />
view, 38<br />
- Forms object, 69<br />
- GotFocus (event), 86<br />
- grid, 18<br />
- KeyPreview, 97<br />
- Load (event), 86<br />
- main form, 30<br />
- menu connection, 48<br />
- MinMax buttons, 21<br />
- mockup, 36<br />
- moving and sizing (VBA), 100<br />
- multiple instances, 99<br />
- navigation buttons, 21<br />
- New (create open form), 99<br />
- open, 86<br />
- Open (event), 86<br />
- OpenArgs, 89<br />
- OpenForm parameters, 89<br />
- record selection (current<br />
record), 93<br />
- record selector, 21<br />
- Recordset, 106<br />
- RecordSetClone, 106<br />
- Resize (event), 86, 100<br />
- saving, 22<br />
- Scroll Bars, 21<br />
- SelTop, SelHeight, etc. (VBA),<br />
94<br />
- size, 100<br />
- sorting datasheet rows, 34<br />
- style (AutoFormat), 21<br />
- subform, 30–39<br />
- Timer, 98<br />
- Unload (event), 86<br />
Form reference (in subform), 71,<br />
122<br />
format<br />
- columns, 136<br />
- date in controls, 126<br />
- Format function (VBA), 126<br />
- input mask, 28, 132<br />
- regional settings, 132<br />
- text box property, 28<br />
Forms object, 69<br />
front/back (on forms), 22<br />
function (in menu), 112<br />
function (procedure), 110, 120<br />
function keys (F2, F3 . . .VBA),<br />
97<br />
G<br />
GetRows (recordset), 96, 108<br />
global variables (in modules), 114<br />
GotFocus (form event), 86<br />
GotFocus (text box event), 78<br />
grid (for queries), 52<br />
grid (on forms), 18<br />
GROUP BY (aggregate query),<br />
54, 58<br />
- editing the data, 67, 134<br />
- in subform, 66<br />
H<br />
HAVING (aggregate query), 54,<br />
60<br />
Height (size property), 28, 100<br />
help (for field types), 7<br />
help (in Visual Basic code), 82,<br />
83<br />
help (pop-up), 50<br />
Hex function (VBA), 130<br />
hotel system, 4<br />
hotel system (room grid), 4, 94,<br />
140<br />
I<br />
If Then (VBA), 116<br />
IIf function (VBA), 128<br />
immediate window (debug), 50,<br />
69<br />
IN (operator), 124<br />
IN (SQL), 138<br />
initial values (VBA), 120<br />
Input Mask (text box), 28<br />
INSERT (record, SQL), 134<br />
integer field (in table), 11<br />
IRR (internal-rate-of-return,<br />
VBA), 130<br />
Is operator (VBA), 124<br />
IsArray, IsDate . . . (VBA), 130<br />
J<br />
Jet engine (database), 68<br />
JOIN (multiple joins), 140<br />
JOIN (query), 52, 54, 56<br />
K<br />
key field (foreign key), 11, 12<br />
key field (primary key), 7<br />
keyboard handling<br />
- function keys, 97<br />
- shortcut keys on controls, 22<br />
- shortcuts (built in), 8, 22<br />
- tab order, 28<br />
KeyCode (VBA), 97<br />
KeyDown (text box event), 78<br />
KeyPress (text box event), 78<br />
KeyPreview (form), 97<br />
KeyUp (text box event), 78<br />
L<br />
label (Caption), 28<br />
label (delete/add), 20<br />
label (for text box), 18<br />
LastUpdated (recordset), 108<br />
LBound (array bound, VBA), 128<br />
LCase function (VBA), 128<br />
Left (position property), 28, 100<br />
Left function . . . (VBA), 128<br />
Len function (VBA), 128<br />
Like (text comparison), 64, 124<br />
Index 151
limit to list (in Combo Box), 24<br />
line (on form), 22<br />
list separator (regional settings),<br />
132<br />
list with detail area, 42<br />
live search, 74<br />
Load (form event), 86<br />
Locked (text box property), 28<br />
logging (of events), 81<br />
logical operators (And, Or), 124<br />
long integer field (in table), 11<br />
lookup field<br />
- combo box, 26<br />
- enumeration type, 14<br />
- hiding the code (Column<br />
Width), 34<br />
lookup Wizard, 14, 24, 26<br />
loop (forced break), 98<br />
Loop statements (VBA), 118<br />
M<br />
main form, 30<br />
math functions (VBA), 130<br />
matrix presentation (with SQL),<br />
140, 142<br />
Me (as parameter, VBA), 121<br />
Me (this object/form, VBA), 72,<br />
122<br />
memo field (in table), 10<br />
menus (toolbars), 46–49<br />
- commands, 48<br />
- commands (VBA), 112<br />
- connect to form, 48<br />
- creation, 46<br />
- pop-up, 46<br />
- show all on list, 20<br />
- startup settings, 48<br />
messages (MsgBox), 50, 92<br />
MIN/MAX (query), 60<br />
MinMax buttons (on form), 21<br />
mockup<br />
- datasheet, 36<br />
- screen prints, 50<br />
Modal dialog (form), 92<br />
module (class), 80, 110, 122<br />
- creating and naming, 112<br />
- global variables, 114, 122<br />
MouseDown, MouseUp (events),<br />
78<br />
Move, MoveFirst . . . (recordset),<br />
108<br />
moving and sizing<br />
- controls, 20<br />
- forms, 100<br />
MsgBox, 50, 92<br />
multiple connectors (in database),<br />
16<br />
multiple form instances, 99<br />
N<br />
Name (recordset), 109<br />
name of control, 28<br />
Name? (error in computed value),<br />
41<br />
named query (SQL), 140, 142<br />
national settings, 132<br />
navigation (current record), 93<br />
navigation (shortcut keys), 8<br />
navigation buttons (on form), 21<br />
network structure (in database),<br />
16<br />
New (create new object), 99<br />
new-line character Chr(10), 92<br />
NoMatch (recordset), 109<br />
Nothing (VBA), 122<br />
NPV (net-present-value, VBA),<br />
130<br />
Null<br />
- blank fields at outer join, 56<br />
- comparing with, 62, 77, 122<br />
- in computations, 62, 124<br />
number field (in table), 10<br />
number format (regional<br />
settings), 132<br />
O<br />
object browser (Visual Basic), 83<br />
objects<br />
- addressing, 69<br />
- controls, 70<br />
- database, 68<br />
- Forms, 69<br />
- in <strong>Access</strong>, 68–71<br />
- recordset, 68<br />
- screen, 110<br />
- through VBA, 69<br />
Oct function (VBA), 130<br />
OldValue (text box), 72<br />
On Error (VBA), 117<br />
Open (form event), 86<br />
OpenArgs (form parameter), 89<br />
OpenForm (parameters), 89<br />
OpenRecordSet, 109<br />
operators (VBA), 124<br />
Option Compare (VBA), 128<br />
option group (radio buttons), 44<br />
ORDER BY (query), 54, 62<br />
ordering<br />
- controls (front/back), 22<br />
- controls (tab order), 28<br />
- datasheet rows, 34<br />
- records in query, 62<br />
OUTER JOIN (query), 56<br />
P<br />
Parent reference (from subform),<br />
97, 122<br />
partial referential integrity, 12<br />
Partition (operator), 124<br />
pop-up help, 50<br />
pop-up menu, 46<br />
prefixes (for controls, etc.), 38<br />
primary key, 7<br />
printing (mockup screens), 50<br />
procedure (in menu), 112<br />
procedure (public function), 110,<br />
120<br />
procedure (shared), 76<br />
program break, 98<br />
project explorer (VBA tool), 80<br />
properties<br />
- AllowAdditions (form), 87<br />
- AllowDeletions (form), 87<br />
- AllowEdits (form), 87<br />
- Border Style (form), 21<br />
- Cancel (command button), 84<br />
- Caption (label), 28<br />
- Caption (on form), 21<br />
- ColumnHidden (text box, etc.),<br />
94<br />
- ColumnOrder (text box, etc.),<br />
94<br />
- ColumnWidth (text box, etc.),<br />
94<br />
- command button, 84<br />
- Control Box (form), 21<br />
- Control Source (text box), 28<br />
- ControlTip, 28<br />
- DataEntry (form), 88<br />
- Default (command button), 84<br />
- Enabled (text box), 28<br />
- Filter (form), 87<br />
- Format (text box), 28<br />
- KeyPreview (form), 97<br />
- label, 28<br />
- Left, 28, 100<br />
- Locked (text box), 28<br />
- MinMax buttons (form), 21<br />
- Name (programmer's), 28<br />
- OldValue (text box), 72<br />
- record set, 104, 108<br />
- Scroll Bars (on form), 21<br />
- Scroll Bars (text box), 28<br />
- SelHeight (on form), 94<br />
- SelLeft (on form), 94<br />
- SelTop (on form), 94<br />
- SelWidth (on form), 94<br />
- size and position, 28, 100<br />
- subform, 38, 70<br />
- Tab Index, 28<br />
- Text (text box), 72<br />
- Text Align (text box), 28<br />
- text box, 28, 72<br />
- through VBA, 69, 70<br />
- TimerInterval, 98<br />
- Top, 28, 100<br />
- Value (text box), 72<br />
- Width, 28, 100<br />
property list (Visual Basic help),<br />
82<br />
public (function), 110<br />
152 Index
Q<br />
queries, 52–67<br />
- action, 134<br />
- aggregate, 58<br />
- in subform, 66<br />
- alias (AS), 58<br />
- ALL, 138<br />
- all fields (*), 52<br />
- ANY, 138<br />
- average (AVG), 60<br />
- Cartesian product, 54<br />
- computed fields, 58<br />
- computed SQL, 74, 76, 102<br />
- correlated, 138<br />
- COUNT, 60<br />
- Crosstab, 144<br />
- CRUD, 134<br />
- DELETE, 134<br />
- DISTINCT, 138<br />
- dynaset, 52<br />
- group by, 61, 134<br />
- editing the data, 53, 134<br />
- EXISTS, 138<br />
- FIRST/LAST, 60<br />
- grid, 52<br />
- GROUP BY, 54, 58<br />
- editing the data, 67, 134<br />
- in subform, 66<br />
- HAVING, 54, 60<br />
- IN, 138<br />
- INSERT, 134<br />
- JOIN, 52, 54<br />
- JOIN (multiple), 140<br />
- live search, 74<br />
- MIN/MAX, 60<br />
- named (stored), 140, 142<br />
- ORDER BY, 54, 62<br />
- OUTER JOIN, 56<br />
- SELECT, 54, 55<br />
- SQL, 54<br />
- SQL-engine, 55, 68<br />
- StDev, 60<br />
- subquery, 138<br />
- SUM, 60<br />
- UNION, 136<br />
- UPDATE, 134<br />
- user criteria in grid, 64<br />
- Var, 60<br />
- WHERE, 54<br />
QueryDefs (VBA), 142<br />
quick info (Visual Basic help), 82<br />
quotes (nested "), 74<br />
R<br />
radio buttons (option group), 44<br />
record<br />
- saving, 8<br />
- saving (VBA), 88<br />
record selector (on form), 21<br />
RecordCount (recordset), 109<br />
recordset, 68, 102–9<br />
- bound to form, 106<br />
- clone, 104, 106<br />
- CRUD control, 102<br />
- DAO 3.6, 102<br />
- properties, 104, 108<br />
rectangle (on form), 22<br />
reference card (VBA), 116<br />
referential integrity, 12<br />
regional settings, 132<br />
relationships, 12<br />
- referential integrity, 12<br />
repair database, 15<br />
Requery (recordset), 109<br />
Resize (form event), 86, 100<br />
role<br />
- developer, 6, 132<br />
- user, 6, 132<br />
room grid (hotel system), 4, 94,<br />
140<br />
row source (in Combo Box), 26<br />
S<br />
save<br />
- form, 22<br />
- module (class), 110<br />
- record, 8<br />
- record (VBA), 88<br />
- Visual Basic code, 81<br />
Screen (VBA object), 110<br />
Scroll Bars (on form), 21<br />
Scroll Bars (on text box), 28<br />
searching<br />
- live search, 74<br />
- many criteria, 76<br />
- user criteria in grid, 64<br />
security (when opening a<br />
database), 8<br />
SELECT (query), 54, 55<br />
Select Case (VBA), 116<br />
self-reference (in computed<br />
expressions), 40<br />
self-reference (in database), 16<br />
SelTop, SelHeight, SelWidth,<br />
SelLeft (datasheet, VBA), 94<br />
SendKeys, 98<br />
Set statement (VBA), 116<br />
SetFocus (VBA), 86<br />
shadow table, 16<br />
shared procedure, 76<br />
Shift (KeyCode, VBA), 97<br />
shortcut keys<br />
- data entry, 8<br />
- for change of view, 22<br />
- navigation, 8<br />
- underlined letter on control, 22<br />
shortcut menu (pop-up menu), 46<br />
size unit (twips), 100<br />
sizing and moving<br />
- controls, 20<br />
- forms, 100<br />
sorting<br />
- datasheet rows, 34<br />
- records in query, 55, 62<br />
Space function (VBA), 128<br />
SQL. See also queries<br />
- computed, 74, 76, 102<br />
- how it works, 54<br />
SQL engine (database), 55, 68<br />
square brackets [name<br />
parenthesis], 40, 54, 91<br />
startup settings (menus etc.), 48<br />
statements (VBA), 116<br />
Static (declaration, VBA), 122<br />
StDev (query), 60<br />
stop program, 98<br />
StrComp (VBA), 128<br />
string functions (VBA), 128<br />
strings ", 122<br />
strings (nested), 74<br />
strings, multi-line, Chr(10), 92<br />
style (on form), 21<br />
subform, 30–39<br />
- columnar, 31<br />
- datasheet versus form view, 38<br />
- datasheet view, 31<br />
- Form property, 71, 122<br />
- form view, 36, 38<br />
- Parent property, 97, 122<br />
- properties, 38, 70<br />
- subform control, 32<br />
subquery (SQL), 138<br />
subroutine (procedure, VBA),<br />
120<br />
SUM (query), 60<br />
T<br />
Tab Index (cursor movement), 28<br />
tab sheet (control), 44<br />
table<br />
- as subform, 36<br />
- creation, 7<br />
- data entry, 8<br />
- shadow copy, 16<br />
Text (text box property), 72<br />
text box, 18<br />
- AfterUpdate (event), 72, 78<br />
- BeforeUpdate (event), 78<br />
- Change (event), 73, 78<br />
- Control Source, 28<br />
- ControlTip, 28<br />
- Enabled, 28<br />
- Enter (event), 78<br />
- event sequence, 78<br />
- events, 72<br />
- Format, 28<br />
- GotFocus (event), 78<br />
- KeyDown (event), 78<br />
- KeyPress (event), 78<br />
- KeyUp (event), 78<br />
- Locked, 28<br />
- MouseDown, Click, etc., 78<br />
- OldValue, 72<br />
Index 153
- properties, 28, 72<br />
- Scroll Bars, 28<br />
- Text (property), 72<br />
- Text Align, 28<br />
- Value, 72<br />
text comparison (Like), 64, 124<br />
text field (in table), 10<br />
time/date field (in table), 11<br />
time/date functions (VBA), 130<br />
Timer event, 98<br />
TimerInterval, 98<br />
toolbars. See menus<br />
toolbox (for drawing), 18<br />
tools (Visual Basic), 80–83<br />
Top (position property), 28, 100<br />
tree structure (in database), 16<br />
trim functions (VBA), 128<br />
twips (size unit), 100<br />
type check functions (VBA), 130<br />
type conversion (VBA), 125<br />
type declaration (VBA), 120<br />
types of data. See data type<br />
U<br />
UBound (array bound, VBA),<br />
128<br />
Ucase function (VBA), 128<br />
unbound controls, 20, 40<br />
undo data entry, 8<br />
undo drawing, 20<br />
undo lookup-Wizard, 14<br />
undo update (VBA), 79, 84<br />
UNION (SQL), 136, 138<br />
Unload (form event), 86<br />
unsafe expressions (when<br />
opening a database), 8<br />
update (record), 8<br />
UPDATE (record, SQL), 134<br />
update (record, VBA), 88<br />
Update (recordset), 109<br />
user role, 6, 132<br />
user windows (forms), 18<br />
V<br />
Value (text box), 72<br />
Var (query), 60<br />
variables (declarations, VBA),<br />
120<br />
variables (initial values), 120<br />
variant data type (VBA), 120<br />
VarType (VBA), 130<br />
vbKey . . . (VBA), 97<br />
view (of form)<br />
- datasheet advantages, 38<br />
- form view advantages, 38<br />
- shortcut keys for changing, 22<br />
Visual Basic, 68–115, 116–34<br />
- breakpoints, 82<br />
- debug command, 81<br />
- help, 83<br />
- object browser, 83<br />
- objects in <strong>Access</strong>, 68–71<br />
- pop-up help, 82<br />
- project explorer, 80<br />
- reference card, 116<br />
- saving the code, 81<br />
- tools, 80–83<br />
W<br />
wait for event, 98<br />
week number (Format function),<br />
126<br />
WHERE (query), 54<br />
While statements (VBA), 118<br />
Width (size property), 28, 100<br />
wildcarding (text comparison),<br />
64, 124<br />
windows (forms), 18<br />
With-End (VBA), 123<br />
Wizard<br />
- form, 31<br />
- lookup, 14<br />
Y<br />
yes/no field, 11<br />
154 Index