Baker N1 Shift Drum Install - Baker Drivetrain
Baker N1 Shift Drum Install - Baker Drivetrain
Baker N1 Shift Drum Install - Baker Drivetrain

Create successful ePaper yourself
Turn your PDF publications into a flip-book with our unique Google optimized e-Paper software.
BAKER DRIVETRAIN’S<br />
N-1shift drum install<br />
Intro by Fab Kevin, how-to by Dan Roedel<br />
When James Simonelli first told me<br />
that BAKER <strong>Drivetrain</strong> was working<br />
on an N-1 <strong>Shift</strong> <strong>Drum</strong> for ratchet top 4<br />
speeds, I couldn’t wait to get my hands<br />
on one. Jockey shifters would now<br />
be able to build their own “ultimate<br />
jockey trans” with off the shelf parts.<br />
When it came in the mail, I called up my<br />
friend Dan Roedel to see if he wanted<br />
to install and test it on his ‘76. His<br />
bike is the perfect candidate, mainly<br />
because he rides it - a lot. It also gave<br />
us an excuse to get together and goof<br />
around on motorcycles (like we need<br />
an excuse). Dan can take it from here.<br />
BAKER DRIVETRAIN N-1shift drum install<br />
What is it about 4-speed transmissions? For me, they speak<br />
tradition, simplicity, and durability. Let’s face it, a 4-speed<br />
big twin has been in production nearly fifty years - a pretty<br />
good run in my eyes. What other product of any type on the<br />
open market can say the same? Starting in the early eighties,<br />
the 5-speeds started to take over. Bikes got heavier, engine<br />
power started going down, and some would have said there<br />
was a need for more gear ratios. That may very well be<br />
true for the general public, but what about us geezers who<br />
dearly love our shovels, pans, knuckles and flatheads with<br />
4-speeds? How many companies are there that produce parts<br />
who truly understand what high quality and long lasting is?<br />
Very few producers, including OEM, all seem to be mostly<br />
imported junk. Sorry for getting side tracked, but I feel this<br />
strongly about my 4-speed.<br />
When I first heard that a local transmission builder started<br />
building replacement 4-speeds, I was excited to say the<br />
least. At last, us 4-speed shifting geezers can trash the junk<br />
replacement parts and never look back. For me, a complete<br />
BAKER replacement 4-speed sounds like I can have my cake<br />
and eat it too. After I started looking into it some, the BAKER<br />
DRIVETRAIN crew didn’t just build a simple replacement<br />
copy, but instead they came up with what they call the N-1<br />
shifter. On a hand shifted 4-speed with their drum installed,<br />
neutral will now be the last notch forward. No longer will<br />
you need to hope and guess if you found neutral between<br />
THE HORSE Page 58<br />
first and second when you set your foot on the ground.<br />
Racers will like the new set up if they are foot shifting as<br />
well. With the N-1 shifter and normal FLH type foot lever<br />
parts used from 52 through early 79, the shift pattern is<br />
neutral up top and stomp down for every gear with fourth<br />
gear the last stomp down.<br />
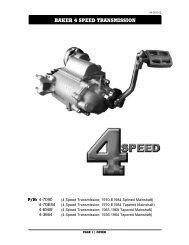
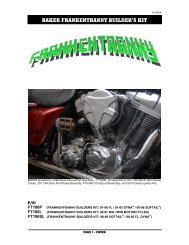
The BAKER N-1 shifter kit is a basic, all you need kit, to<br />
convert any 52 through early 79 Harley ratchet top trans.<br />
There is no machine work involved, and it’s truly a simple<br />
bolt in conversion. Included in the kit are gaskets, the all<br />
important shifter drum, matching ratchet gear, and ratchet<br />
shaft.<br />
The complete kit must be used, not just the drum only. The<br />
ratchet gear has a different tooth count than the OEM part,<br />
and the ratchet shaft also is designed for the extra amount of<br />
rotation needed to properly shift the N-1 drum. I found the<br />
BAKER replacement parts to be fully machined from solid<br />
stock, not some die cast recycled junk. I have no idea what<br />
the exact material used is, but I am sure someone at BAKER<br />
tech support could tell the story on all materials used if need<br />
be.<br />
Today’s victim is a 76’ FLH turned rigid with the trans top in<br />
pretty open view. It was a pretty simple matter to remove the<br />
trans shifter top, with everything else left mostly untouched.<br />
How you get at your transmission may differ depending on<br />
the bike, but the conversion inside the transmission lid will<br />
be the same.<br />
If you’re rebuilding a swap meet 4 speed for a new project,<br />
you will find it’s no more difficult to install the <strong>Baker</strong> kit<br />
than OEM parts. To install this kit, you won’t need special<br />
tools or machine work - it’s truly as simple as yank out the<br />
old, poke in the new, and go. Well, it may be slightly more<br />
involved than that, but with a few hours of quality time, your<br />
4 speed will be a happy shifter again. The only special tool<br />
I used was a shifter fork gauge. I wanted to confirm that the<br />
shifter forks and clutches stayed centered between gear, as<br />
they must be.<br />
Always remove the battery cables negative cable first, before<br />
starting any motorcycle repairs. The first real step was remove<br />
the shifter lever and clutch lever to gain working room. Some<br />
clown decided to run the exhaust close, but I could still get at<br />
all of shifter lid mounting screws. The two screws closest to<br />
the seat post are a bit tricky on this bike, and guessing most<br />
others are too, but they will come out. Once the lid is off the<br />
transmission, beware of dropping anything inside. Watch out<br />
for dropping the two shifter rollers, or any road grunge and<br />
grit. Place a rag inside to catch all things that may want to<br />
spoil your day, including the gasket material that yet needs<br />
to be removed. Once the transmission lid is safely on the<br />
bench, the conversion can begin.
After all gasket material is removed from the lid, install and<br />
adjust the shifter fork gauge. I use a Jims P/N 16-0641, and<br />
it’s a copy of the OEM P/N 96384-39. Next off is any outside<br />
shift levers, and the dust shield if not removed before. I<br />
scrapped the dust shield on this one years ago, so don’t look<br />
for it here.<br />
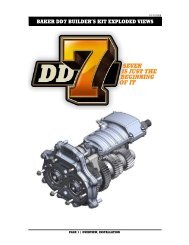
1. Contents of the <strong>Baker</strong> kit.<br />
2. Gear tooth count.<br />
Next, remove the 6 flathead screws from the ratchet cover<br />
(stainless Phillips heads on this one) and the nut from the<br />
bottom screw. With a light tap, the outer ratchet cover should<br />
pop off. Under the cover is the shifter pawl carrier, springs,<br />
and most likely some grunge. Carefully slide the pawl carrier<br />
off the shift shaft, watching for springs to pop out and go<br />
into orbit, or up you nose, or wherever. The actual shifter<br />
pawls and springs will also pop out, but they have less force<br />
behind them, so look for them. Once all the ratchet parts<br />
are removed, there will be a single fillister head slot screw<br />
between the shift shaft and the spring channels, hiding in<br />
the old grease and grunge. Remove it. After that screw is<br />
removed, the steel back plate can be removed. The gasket<br />
may have it stuck, so with a light tap, pop it off.<br />
With the ratchet parts off, the shift drum detent and neutral<br />
switch is next. Now, locate and remove the shift drum shaft<br />
lock screw. Once the lock screw is removed, tap the drum<br />
shaft out from the ratchet end. There should be a rubber O<br />
ring on the shaft that seals it in the lid. When the shaft has<br />
been removed, the drum should slide out. It may take a bit<br />
of fumbling around, but it will fall out. After the drum is<br />
removed, pull the cotter pin that holds the gear in the shift<br />
shaft. Sometimes the gear will just slide off the shaft, but I<br />
always expect to tap the shaft out of the gear. There is not<br />
room to go straight at it, so use some caution.<br />
Once that shaft is removed, the gear has a spring behind it.<br />
It may take a bit of fumbling around with a screw driver or<br />
whatever to get the gear and spring out of the lid. Once all<br />
parts are removed, it’s clean everything time: old gaskets,<br />
old gear oil, and whatever else that shouldn’t be inside the<br />
trans.<br />
3. Note the teflon bushings!<br />
4. <strong>Install</strong> the drum.<br />
Once all is clean, inspect the lids ratchet shaft bushing for<br />
fit with the shaft. The ratchet shaft should slide in freely,<br />
without any binding or sloppy loose clearance. If all is well,<br />
install the ratchet gear and spring inside the lid. The spring<br />
fits into the BAKER gear recess, same as it did with the<br />
OEM gear. When the gear and spring are roughly in place,<br />
slide the ratchet shaft in, making sure to time the shaft and<br />
gear properly. You have a chance of screwing up here, so<br />
match the gear and shaft timing marks. Once the shaft and<br />
gear are timed properly, compress the gear and spring some,<br />
and install the new cotter pin provided in the kit.<br />
The shift drum is next to go in. It took me a bit of fumbling<br />
around to slip the gear in, as end clearances of the drum<br />
are tighter than the worn out OEM shift drum was. Once<br />
roughly in place, match up the timing marks with the drum,<br />
and ratchet gear. BAKER did us all a favor, by painting the<br />
gear teeth green so it’s easy to see. However, OEM timing<br />
marks are not so easy. Now that the timing marks are in line,<br />
slide the drum pin into the lid, and through drum.<br />
That’s about the time I noticed that the new N-1 BAKER<br />
THE HORSE Page 59
drum rides on Teflon bushings, not “metal to metal” like<br />
factory drums. The new drum fit precise on the shaft, unlike<br />
this old OEM drum. End play of the drum should be checked,<br />
and corrected (if needed) at this time. <strong>Baker</strong> recommends<br />
end play of 0.0005’ to 0.0065’ on the shift drum. I was lucky<br />
with the 0.005’ on this one so no further work needed. If you<br />
find yours is out of spec, a shim stock washer should take<br />
care of it.<br />
At this time, I like to confirm there is no binding of the ratchet<br />
gear or drum. This one rotated freely, and without excessive<br />
gear tooth lash, other than the spring pressure on the ratchet<br />
gear. <strong>Baker</strong> also recommends, that the detent plunger has all<br />
burrs removed, where it contacts the drum detent locations.<br />
Any burrs, or other defects in the plunger, or spring, will<br />
make shifting not as smooth as it should be. I had used a wet<br />
stone on mine during the rebuild of the trans years ago, and<br />
all was still fine. I like to install the detent, and then roll the<br />
drum into every location, to check for binding at this time.<br />
This drum, with the Teflon bushings, slipped from one detent<br />
location to the next very nicely. I’m guessing that the Teflon<br />
bushings, with their lower friction than metal on metal, is a<br />
big part of it.<br />
Ratchet parts are next to be installed. Loosely install the<br />
steel ratchet back plate, gasket, and screw. There is a notch<br />
in the back plate, that must align with a ratchet shaft notch,<br />
before the screw is locked down. If the notch is not aligned<br />
properly, the ratchet will never work as intended. I like to<br />
use a water proof grease, in the back plate curved spring<br />
slots. Grease will prevent wear, and binding of the springs.<br />
These springs are still in good shape, but always check them<br />
for wear.<br />
It is not uncommon to see flat spots, or broken coils, in a well<br />
used trans. The shift pawl carrier has a small flat head screw,<br />
mounting the pawl carrier spring retainer plate, so remove<br />
it now. With the pawl spring retainer removed, it’s a simple<br />
matter to install the carrier onto the ratchet shaft, with the tab<br />
between the curved return springs. I say simple, but at times<br />
the springs will want to escape, and hide under benches or<br />
whatever, slinging the grease all the way. After the pawl<br />
carrier is safely in place on the ratchet shaft, lightly lube the<br />
actual pawls, and light springs. The pawls have slots along<br />
their sides, and those slots slide over small dowel pins in<br />
the carrier, to keep them from spinning. The pawls “beveled<br />
end” is what grabs the notches, or spline if you will, in the<br />
ratchet shaft. The back plate timing notch is what lets them<br />
grab the proper spline, or notch, for an up shift, or down shift.<br />
Compress the pawl springs, and mount the spring retainer,<br />
with the single flat head screw. Lightly grease the outer face<br />
of the shifter pawl carrier, where it will rub on inside of the<br />
cover. <strong>Install</strong> the gasket, ratchet cover, and the six screws.<br />
I like to test the ratchet at this time, and this one worked<br />
better than perfect. That is, it was perfect, until I installed<br />
the neutral light sender switch, uh-oh. With the switch out,<br />
or loose, it shifted fine, but when tight, it bound up. This<br />
turned out to be my fault, because I didn’t use a gasket, only<br />
a thread sealer. That missing gasket acts as a shim, to locate<br />
the switch at the proper depth. No gasket, and the switch<br />
went too deep. With a copper oil drain plug gasket from the<br />
auto parts store, all was well again. I have no need for the<br />
neutral switch on this bike, and it’s only there to plug the<br />
5. <strong>Drum</strong> end play check.<br />
6. Fork gauge new drum.<br />
7. Gasket goo.<br />
8. <strong>Shift</strong>er pawl.<br />
THE HORSE Page 60
hole. Once the shifter lid is completed, I mounted the shifter<br />
fork gauge. I wanted to see just how close the grooves lined<br />
up with the old OEM drum. I was very happy to notice, that<br />
the neutral area of the drum slot in the BAKER drum was<br />
spot on to the neutral area on the old drum. That same slot<br />
alignment, meant no shimming changes in my shift forks.<br />
Not all drums will be the same, so check yours, I got lucky.<br />
9. Time back plate.<br />
10. Ratchet cover goes on.<br />
11. Hook up clutch arm.<br />
Now that your shifter lid is assembled, adjusted, and ready to<br />
install, it is time to clean the case gasket surface. Use extreme<br />
care to not drop loose gasket material, grit or anything else<br />
into the transmission. There is no room for grit to ride<br />
between the gears. I like to mount the shift fork rollers on<br />
the fork guides, with a heavy, sticky grease. It will help hold<br />
them in place when installing the lid. Drop a fork roller into<br />
the gears, and it will never shift properly, and most likely<br />
will cost you hundreds of dollars very soon after. There are<br />
several of the lid mounting screws that pass through the<br />
case, and have threads exposed to the gear oil. I like to use<br />
a sealer on those mounting screws, to prevent leaks. A light<br />
coating of anti-seize compound works well on the screws in<br />
blind holes. Be sure to install the single vented screw in the<br />
second hole back from the front, on the kicker end. After<br />
the lid is mounted, it’s just a matter of bolting on the rest<br />
of removed parts, shift lever, clutch arm, and whatever else<br />
you may have taken off to get to lid out. <strong>Install</strong> the battery<br />
cables when all other work is done, hooking the negative<br />
cable up last.<br />
This BAKER DRIVETRAIN N-1 conversion, took about two<br />
hours of goofing around on the simple rigid bike I installed<br />
it on. I had to road test it, just to see how slick the shifting<br />
action was. This conversion was done on New Year’s Day,<br />
with temps about 25 degrees, and the synthetic gear oil was<br />
thick to say the least. I was very pleased, to now have an<br />
easy to move lever, with a positive shift, and a great feel<br />
through every gear. Best of all, neutral is easy to find every<br />
time-- just jam it forward. I have no doubt after a few of<br />
those “oops, what way does it shift now?” moments, I will be<br />
hand jamming gears just like I know what I’m doing!<br />
We all owe BAKER DRIVETRAIN a big thanks, for such<br />
high quality products, made just for us grumpy “set in our<br />
ways” 4-speed riders. I also want to thank Fabricator Kevin,<br />
for the warm shop, the photos, and the good humor while we<br />
both got our New Years off to a good start.<br />
12. Ready to go!<br />
13. The fruits of our labor, the test ride.<br />
THE HORSE Page 61