f3d3sp/f3d3p - FFSNorge
f3d3sp/f3d3p - FFSNorge
f3d3sp/f3d3p - FFSNorge

Create successful ePaper yourself
Turn your PDF publications into a flip-book with our unique Google optimized e-Paper software.
USER MANUAL<br />
Original user manual<br />
en<br />
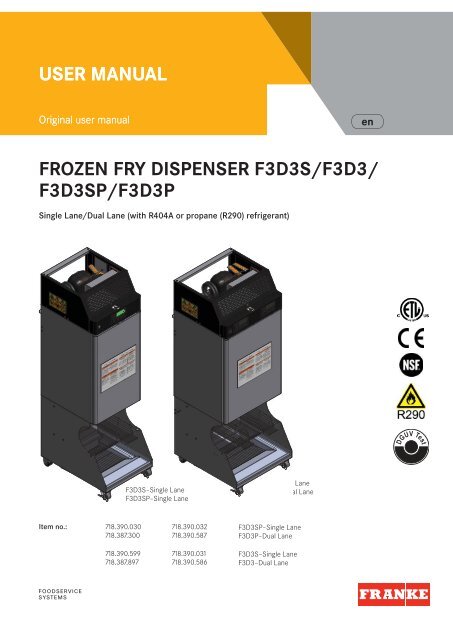
FROZEN FRY DISPENSER F3D3S/F3D3/<br />
F3D3SP/F3D3P<br />
Single Lane/Dual Lane (with R404A or propane (R290) refrigerant)<br />
DGUV Test<br />
F3D3S–Single Lane<br />
F3D3SP–Single Lane<br />
F3D3–Dual Lane<br />
F3D3P–Dual Lane<br />
Item no.:<br />
718.390.030<br />
718.387.300<br />
718.390.032<br />
718.390.587<br />
F3D3SP–Single Lane<br />
F3D3P–Dual Lane<br />
718.390.599<br />
718.387.897<br />
718.390.031<br />
718.390.586<br />
F3D3S–Single Lane<br />
F3D3–Dual Lane
Franke Foodservice Systems<br />
As one of the world’s leading providers of comprehensive kitchen solutions, we support restaurant<br />
chains with efficient product developments and professional services. We have stood for excellent<br />
quality and maximum flexibility for over 35 years. More than 27,000 kitchen projects and<br />
services that make your daily work easier and more profitable are a measure of our success.<br />
You have decided to purchase a product from Franke Foodservice Systems – a great choice! We<br />
would like to thank you for your trust and assure you that we will continue to do everything in our<br />
power to be an excellent partner. Direct contact with you is especially important to us. That's<br />
why our expert staff are happy to support you. Throughout the world.<br />
Declaration of Conformity<br />
Franke Foodservice Systems Poland Sp. z. o. o.<br />
declares under its sole responsibility that this/these<br />
appliance(s) set forth in this declaration conform(s)<br />
to the regulations of these directives:<br />
2004/108/EC (EMC Directive)<br />
2006/42/EC (Machinery Directive)<br />
The conformity was tested using the harmonized EN<br />
standards:<br />
EMC: EN 55014-1:2007, EN 55014-2:2007<br />
MD: EN 60204-1:2006, EN ISO 14121-1:2007, EN<br />
ISO 12100-1:2003 + A1:2009, EN ISO 12100-2:2003<br />
+ A1:2009<br />
Responsible for Declaration of Conformity:<br />
Mikolaj Liskin<br />
Franke Foodservice Systems<br />
Poland Sp. z o.o.<br />
ul. Polnocna 11<br />
81–029 Gdynia<br />
Poland<br />
Switchboard: +48 58 6609 100<br />
Direct phone: +48 58 6609 146<br />
Direct fax: +48 58 6609 149<br />
Email: Mikolaj.Liskin@Franke.com<br />
User manual Item no.:<br />
Revision date:<br />
19004639<br />
06.07.2012<br />
This document reflects the technical status at the time of the revision.<br />
We reserve the right to make technical changes.<br />
2<br />
en
CONTENT<br />
1 Safety ..................................................................................................................................4<br />
1.1 Symbols from the user manual ...................................................................................4<br />
1.2 Warning and prohibitory signs ................................................................................... 5<br />
1.3 Proper use ................................................................................................................ 5<br />
1.4 Safety instructions .................................................................................................... 6<br />
2 Installation ..........................................................................................................................9<br />
1.5 Technical data ........................................................................................................... 9<br />
2.1 Removing the packaging box ..................................................................................... 11<br />
2.2 Removing the pallet .................................................................................................. 12<br />
2.3 Setting up the appliance ........................................................................................... 12<br />
2.4 Changing the door hinge ........................................................................................... 13<br />
2.6 Electrical connection ................................................................................................ 13<br />
2.5 Final steps ................................................................................................................13<br />
3 Appliance description ....................................................................................................... 15<br />
3.1 Before starting up for the fi rst time ........................................................................... 18<br />
3.2 Daily procedure for starting up/switching on ............................................................ 19<br />
3.3 Filling with fries ........................................................................................................ 21<br />
3.4 Dispensing fries .......................................................................................................22<br />
3.5 Daily procedure for decommissioning/switching off .................................................23<br />
4 Cleaning ............................................................................................................................24<br />
4.1 Defrosting ................................................................................................................24<br />
4.2 Daily cleaning procedure ..........................................................................................25<br />
5 Preventive maintenance ...................................................................................................26<br />
5.1 Cleaning the fi lter .....................................................................................................26<br />
5.2 Cleaning the condenser ribs .....................................................................................26<br />
5.3 Customer service (electric components) ..................................................................27<br />
5.4 Customer service (cooling system)* .........................................................................28<br />
6 Malfunctions/Troubleshooting ........................................................................................29<br />
6.1 Error messages ........................................................................................................29<br />
6.2 Malfunctions ............................................................................................................29<br />
7 Decommissioning (storage/disposal)..............................................................................32<br />
7.1 Storage ....................................................................................................................32<br />
7.2 Disposal ...................................................................................................................32<br />
* only F3D3SP/F3D3P<br />
Frozen fry dispenser F3D3S/F3D3/ F3D3SP/F3D3P en Status:<br />
07/2012<br />
3
1 SAFETY<br />
!<br />
IMPORTANT!<br />
Before initial use, the instructions on operating safety, use and maintenance must be read carefully<br />
and understood. Keep the user manual in the vicinity of the appliance for later reference.<br />
1.1 SYMBOLS FROM THE USER MANUAL<br />
DANGER<br />
DANGER indicates a potentially hazardous situation which, if not avoided, may<br />
result in fatal or serious injury.<br />
WARNING<br />
WARNING indicates a potentially hazardous situation which, if not avoided,<br />
may result in injury.<br />
CAUTION<br />
CAUTION indicates a potentially hazardous situation which, if not avoided, may<br />
result in minor or moderate injury.<br />
NOTICE<br />
NOTICE indicates a situation which, if not avoided, may result in damage to the<br />
appliance.<br />
!<br />
i<br />
Important information can be found here.<br />
Additional information, tips and recommendations can be found here.<br />
4 Frozen fry dispenser F3D3S/F3D3/ F3D3SP/F3D3P en Status:<br />
07/2012
1.2 WARNING AND PROHIBITORY SIGNS<br />
General warning<br />
Fire, open flames and<br />
smoking is prohibited<br />
Warning of flammable<br />
materials<br />
Access is prohibited to<br />
unauthorized persons<br />
Warning of dangerous<br />
electric<br />
voltage<br />
Maintenance and repair<br />
work by unauthorized<br />
persons is prohibited.<br />
1.3 PROPER USE<br />
This is technical equipment that is only intended for use in the food service industry.<br />
The appliance may only be used for its intended purpose, i.e. for the intermediate storage and<br />
filling of frozen products (french fries). Any other use is considered inappropriate.<br />
!<br />
IMPORTANT!<br />
- The appliance must only be operated by trained personnel. Each operator of the appliance<br />
must have read and understood the user manual.<br />
- Children and people with restricted physical, sensory or cognitive abilities must never be left<br />
alone with the appliance and must always be supervised.<br />
- Adhere to the maintenance and cleaning intervals. Regular maintenance and cleaning preserves<br />
the operating safety and performance of the appliance.<br />
- Give the user manual to the next owner if the appliance is sold or passed on to a new owner.<br />
- The appliance is not suitable for storing frozen products (french fries) for extended periods; it<br />
is only intended as an intermediate storage location between the freezer room and the deep<br />
fryer.<br />
Frozen fry dispenser F3D3S/F3D3/ F3D3SP/F3D3P en Status:<br />
07/2012<br />
5
- It may only be used for its intended purpose.<br />
- The appliance is not suitable to be set up and used outdoors. It is intended for use in kitchens<br />
where it is protected against the weather, excessively high temperatures and humidity, and a<br />
corrosive atmosphere.<br />
1.4 SAFETY INSTRUCTIONS<br />
DANGER<br />
Risk of fatal injury from electric shock!<br />
- If the appliance is damaged or malfunctioning, disconnect it from the power supply before performing<br />
repair, maintenance or cleaning work.<br />
- Adhere to the safety instructions on the appliance itself (see figure), such as on the power<br />
supply filter housing.<br />
- Do not connect the appliance to the power supply if the connection cable is damaged. Have<br />
the damaged cable replaced with an equivalent cable by a qualified electrician. Do not put the<br />
appliance back into service beforehand.<br />
- Never repair the appliance yourself.<br />
- Have the necessary repairs carried out by a qualified specialist with original spare parts.<br />
Moisture on the electrical components can lead to a short circuit and to serious or even<br />
fatal injury on contact.<br />
- Never clean the appliance with a direct water jet, a sponge or a high-pressure water jet.<br />
- Never connect the appliance to the power supply while the appliance is wet.<br />
- Disconnect the appliance from the power supply immediately if the appliance becomes wet<br />
during operation.<br />
WARNING<br />
Danger of fire!<br />
The cooling circuit is filled with R290 (propane)*. Propane is highly flammable. The cooling<br />
coils are contained in the side walls. If the cooling coils are damaged, highly flammable<br />
propane will escape.<br />
An analysis or repair of the cooling system is only allowed under certain conditions!<br />
- Never repair the cooling system yourself!<br />
- If you experience problems, contact the technical customer service. The appliance may only<br />
be repaired by a refrigeration technician under certain conditions!<br />
- Read the chapter “Maintenance/repair”!<br />
* only F3D3SP/F3D3P<br />
6 Frozen fry dispenser F3D3S/F3D3/ F3D3SP/F3D3P en Status:<br />
07/2012
CAUTION<br />
Risk of injury when unpacking!<br />
A tilt indicator is mounted on the shipping box. It must show the correct display (see Fig.<br />
01).<br />
- Only unpack the appliance if the tilt indicator shows the correct display.<br />
- Do not unpack the appliance if the tilt indicator display is incorrect. Contact technical customer<br />
service.<br />
The straps on the shipping box are under tension. The wood of the pallet can splinter.<br />
- Keep an adequate distance when cutting the straps.<br />
- Wear gloves and goggles when unpacking.<br />
The appliance is very heavy, top heavy and can easily tip. Therefore, the pallet is designed<br />
so the appliance can only be pushed forward off the pallet with the aid of 2 metal ramps.<br />
- Do not unpack the appliance alone. The appliance should be unpacked by two or three people.<br />
- Do not try to push the appliance off the pallet sideways or toward the rear.<br />
CAUTION<br />
Danger of molds, microbes and viruses!<br />
If the appliance is inadequately cleaned, food residues will deposit on interior surfaces<br />
(especially in the hoppers) and on the wire racks.<br />
- Adhere to the cleaning intervals.<br />
- Read the “Cleaning” chapter.<br />
CAUTION<br />
Risk of injury!<br />
The condenser ribs are sharp and can cause cutting injuries.<br />
- Do not touch the condenser ribs while cleaning.<br />
- Wear suitable gloves while cleaning.<br />
The cooling lines can become very hot and cause burns.<br />
- Do not touch the cooling lines while cleaning.<br />
- Wear suitable gloves while cleaning.<br />
Frozen fry dispenser F3D3S/F3D3/ F3D3SP/F3D3P en Status:<br />
07/2012<br />
7
NOTICE<br />
Appliance damage!<br />
Rinsing with water that is too hot can deform the hopper(s).<br />
- Clean the hopper(s) with lukewarm water only.<br />
Components that are frozen together may damage the appliance.<br />
- Never place wet components into the freezer.<br />
- Carefully dry the components after cleaning.<br />
Heavy objects may damage the basket wire racks and the drip pans.<br />
- Only place frying baskets on the basket wire racks and drip pans when the baskets are empty.<br />
NOTICE<br />
Rust on stainless steel surfaces!<br />
Abrasive cleaning agents and sharp objects cause iron residue that can rust.<br />
- Do not use abrasive cleaning agents, steel wool, brushes, scrapers or other sharp objects for<br />
cleaning.<br />
- Use cleaning fleece made of artificial fibers to remove stubborn dirt.<br />
8 Frozen fry dispenser F3D3S/F3D3/ F3D3SP/F3D3P en Status:<br />
07/2012
2 INSTALLATION<br />
The appliance must be installed by qualified specialists according to the manufacturer's instructions<br />
and building, food and electrical regulations.<br />
Locally applicable accident prevention regulations must be followed. If accident prevention regulations<br />
are not observed, the manufacturer is released from any liability.<br />
1.5 TECHNICAL DATA<br />
Model Single Lane Dual Lane<br />
Noise emission < 70 dB (A) < 70 dB (A)<br />
Dimensions (mm)<br />
Width X 558.5 714.3<br />
Depth Y1* 689.3 689.3<br />
Depth Y2* 814.1 814.1<br />
Depth Y3** 655.8 655.8<br />
Depth Y4** 781.1 781.1<br />
Height Z1 1983.0 1983.0<br />
Height Z2 723.0 723.0<br />
Height Z3 940.0 940.0<br />
Height Z4 320.1 320.1<br />
Weight (kg)<br />
Net -.- -.-<br />
Shipping weight -.- -.-<br />
Electrical connection (F3D3P/F3D3SP)<br />
Voltage 230 V 230 V<br />
Phases 1 Ph/L/N/PE 1 Ph/L/N/PE<br />
Power 0.6 kW 0.6 kW<br />
Frequency 50 Hz 50 Hz<br />
Amperes 3.7 A 3.7 A<br />
Single Lane<br />
X<br />
Y1<br />
Y3<br />
Dual Lane<br />
X<br />
Y1<br />
Y3<br />
* F3D3SP/F3D3P<br />
** F3D3S/F3D3<br />
Z4 Z3<br />
Z1<br />
Z1<br />
Z2 Z3 Z4<br />
Z2<br />
Y4<br />
Y2<br />
Y4<br />
Y2<br />
Frozen fry dispenser F3D3S/F3D3/ F3D3SP/F3D3P<br />
en Status:<br />
07/2012<br />
9
Model Single Lane Dual Lane<br />
Electrical connection (F3D3/F3D3S)<br />
Voltage 230 V 120 V 230 V 120 V<br />
Phases 1 Ph/L/N/PE 1 Ph/L/N/PE<br />
Power 1.3 kW 1.3 kW 1.3 kW 1.3 kW<br />
Frequency<br />
50 & 60<br />
Hz<br />
60 Hz<br />
50 & 60<br />
Hz<br />
60 Hz<br />
Amperes 5.5 A 11.0 A 5.5 A 11.0 A<br />
Operating conditions and installation requirements<br />
Max. ambient temperature 33 °C 33 °C<br />
Max. humidity 60 % 60 %<br />
Minimum rear clearance 30 mm 30 mm<br />
Minimum top clearance 100 mm 100 mm<br />
Minimum side clearance None None<br />
Energy consumption (24 h) (F3D3P/F3D3SP) 4.05 kWh 5.1 kWh<br />
Energy consumption (24 h) (F3D3/F3D3S) 6.2 kWh 7.5 kWh<br />
Cooling system<br />
Closed system, cold wall construction<br />
Refrigerant (F3D3P/F3D3SP) R290 R290<br />
Refrigerant (F3D3/F3D3S) R404A R404A<br />
Climate class N N<br />
Operating temperature –18 °C to –23 °C –18 °C to –23 °C<br />
French fry capacity Up to 18 kg Up to 26 kg<br />
Dispensing rate<br />
Up to 350 baskets<br />
per hour<br />
Up to 700 baskets<br />
per hour<br />
Dispensing accuracy<br />
Plus/minus 10% of the calibration weight<br />
for the large dosing quantity<br />
Load size **<br />
Dosing quantity* (for international<br />
calibration)<br />
[Small] 0.75 lb. (340 g) 0.75 lb. (340 g)<br />
[Medium] 1.0 lb. (454 g) 1.0 lb. (454 g)<br />
[Large] 1.5 lb. (680 g) 1.5 lb. (680 g)<br />
Dosing quantity* (for EU calibration)<br />
[Small] 0.69 lb. (312 g) 0.69 lb. (312 g)<br />
[Medium] 0.92 lb. (418 g) 0.92 lb. (418 g)<br />
[Large] 1.38 lb. (625 g) 1.38 lb. (625 g)<br />
Load size ***<br />
[Small] 417 g 417 g<br />
[Medium] 500 g 500 g<br />
[Large] 625 g 625 g<br />
* The dosing quantity calibration can be changed (instructions on calibrating the dosing quantity can be found in<br />
the Service Manual).<br />
** 718.390.599, 718.387.897, 718.390.030, 718.387.300<br />
*** 718.390.031, 718.390.586, 718.390.031, 718.390.586<br />
10 Frozen fry dispenser F3D3S/F3D3/ F3D3SP/F3D3P en Status:<br />
07/2012
2.1 REMOVING THE PACKAGING BOX<br />
CAUTION<br />
Risk of injury!<br />
A tilt indicator is mounted on the shipping box. The tilt indicator must show the correct<br />
display (see Fig. 01).<br />
- Only unpack the appliance if the tilt indicator shows the correct display.<br />
- Do not unpack the appliance if the tilt indicator display is incorrect. Contact technical customer<br />
service.<br />
Fig. 01: Tilt indicator:<br />
Correct: The appliance<br />
can be<br />
unpacked.<br />
Incorrect: The appliance<br />
must not be<br />
unpacked; contact<br />
technical customer<br />
service.<br />
Procedure:<br />
The tilt indicator must show the correct display (see Fig. 01).<br />
CAUTION<br />
Risk of injury!<br />
The straps on the shipping box are under tension. The wood of the pallet can splinter.<br />
- Keep an adequate distance when cutting the straps.<br />
- Wear gloves and goggles when unpacking.<br />
- Cut the plastic straps with scissors.<br />
- Lift off the packaging box (with 2 people, see Fig.<br />
02).<br />
- Cut the plastic straps of the accessories box with<br />
scissors (see Fig. 03).<br />
The accessories box contains removable components.<br />
Do not discard.<br />
Fig. 02: Lifting<br />
off the packaging<br />
box.<br />
Fig. 03: Removing<br />
the accessories box.<br />
Frozen fry dispenser F3D3S/F3D3/ F3D3SP/F3D3P en Status:<br />
07/2012<br />
11
2.2 REMOVING THE PALLET<br />
CAUTION<br />
Risk of injury!<br />
The appliance is very heavy, top heavy and can easily tip. Therefore, the pallet is designed<br />
so the appliance can only be pushed forward off the pallet with the aid of 2 metal ramps.<br />
- Do not unpack the appliance alone. The appliance should be unpacked by two or three people.<br />
- Do not try to push the appliance off the pallet sideways or toward the rear.<br />
- Get two people to grasp the appliance at both sides.<br />
- Carefully push the appliance forward. Hold the pallet<br />
in place. If necessary, carefully shift the appliance<br />
back and forth (see Fig. 04).<br />
Pushing the appliance forward causes 2 metal<br />
ramps to be extended which can be used to<br />
push the appliance off the pallet without requiring<br />
a fork lift.<br />
- Push the appliance down along the metal ramps until<br />
the front castors touch the ground.<br />
- Carefully push the appliance off the metal ramps<br />
until all 4 castors are on the floor.<br />
Fig. 04: Pushing the appliance<br />
off the pallet.<br />
2.3 SETTING UP THE APPLIANCE<br />
The appliance must be set up horizontally. The ventilation openings in the housing must be kept<br />
clear. Note the minimum clearances (see "Technical data").<br />
The setup location must be suitable for cleaning the appliance and for rolling it forward for rear<br />
access (for maintenance).<br />
The appliance is set up next to the frying station. The following configurations are possible:<br />
Configuration 1<br />
Bagging station Deep fryers Frozen fry dispenser<br />
Configuration 2<br />
Frozen fry dispenser Deep fryers Bagging station<br />
12 Frozen fry dispenser F3D3S/F3D3/ F3D3SP/F3D3P en Status:<br />
07/2012
2.4 CHANGING THE DOOR HINGE<br />
The freezer should open on the side from which the fries are easier to fill.<br />
The appliance is delivered with a right-hinged door by default. Depending on the situation, the<br />
hinges may need to be changed. Instructions on changing the hinges can be found in the Service<br />
Manual.<br />
2.6 ELECTRICAL CONNECTION<br />
Locally applicable electrical installation and safety regulations must be observed.<br />
The connection to the electrical supply grid must conform to the relevant standards.<br />
Before establishing the power connection, check that the voltage and frequency given on the<br />
rating plate match the values of the electrical supply grid.<br />
- Move the appliance into position and lock the brakes of the two front castors.<br />
- F3D3P/F3D3SP: Insert the connector into a 230 V (50 Hz) power socket. The power cable<br />
provided is 3 m long.<br />
- F3D3/F3D3S: Insert the connector into a 230 V (50 & 60 Hz) or 120 V (60 Hz) power socket.<br />
The power cable provided is 3 m long.<br />
IMPORTANT!<br />
The appliance must be integrated in a potential equalization system. The corresponding clamp<br />
is marked with a label. This connection must comply with regulations and must be tested for<br />
effectiveness.<br />
2.5 FINAL STEPS<br />
Pulling off the protective films<br />
- Carefully pull the protective film off the stainless steel surfaces.<br />
- Remove any glue residues with a suitable solvent.<br />
Frozen fry dispenser F3D3S/F3D3/ F3D3SP/F3D3P en Status:<br />
07/2012<br />
13
Cleaning the stainless steel surfaces<br />
NOTICE<br />
Rust on stainless steel surfaces!<br />
Abrasive cleaning agents and sharp objects cause iron residue that can rust.<br />
- Do not use abrasive cleaning agents, steel wool, brushes, scrapers or other sharp objects for<br />
cleaning.<br />
- Use cleaning fleece made of artificial fibers to remove stubborn dirt.<br />
- Clean the stainless steel surfaces with a moist cloth (lukewarm water and neutral soap).<br />
- Wipe clean with clear water.<br />
- Wipe dry thoroughly.<br />
i<br />
Removing limescale deposits and lime stains<br />
If cleaning with a neutral soap is not sufficient, limescale deposits can be removed with a 25%<br />
solution of vinegar. Give the vinegar solution time to act, rinse with clear water and wipe dry.<br />
14 Frozen fry dispenser F3D3S/F3D3/ F3D3SP/F3D3P en Status:<br />
07/2012
3 APPLIANCE DESCRIPTION<br />
The F3D3 is used to easily portion frozen fries without a loss in quality. The semi-automatic<br />
equipment ensures that filled frying baskets are made available according to need. The F3D3<br />
Dual Lane is particularly flexible due to the two separately operable dispenser lanes.<br />
R404A or the environmentally friendly R290 is used as the refrigerant. R290 has no damaging<br />
influence on the ozone layer (ODP), a negligible greenhouse effect (GWP) and is available<br />
worldwide. Because of its efficient energy properties, R290 is highly suitable as a coolant for<br />
this application. Special precautions must be taken into consideration due to the coolant's high<br />
flammability.<br />
The F3D3 is available in 4 different models:<br />
- F3D3S Single Lane: with one dispenser lane, using R404A refrigerant<br />
- F3D3SP Single Lane: with one dispenser lane, using propane refrigerant<br />
- F3D3 Dual Lane: with two dispenser lanes, using R404A refrigerant<br />
- F3D3P Dual Lane: with two dispenser lanes, using propane refrigerant<br />
Scope of delivery (components)<br />
Non-removable components (permanently installed in the freezer):<br />
- Bucket with filler doors<br />
Removable components (in appliance):<br />
- Hopper (Single Lane: 1 unit, Dual Lane: 2 units)<br />
- Deflector (Single Lane: 1 unit, Dual Lane: 2 units)<br />
- Freezer bottom (1 unit)<br />
- Wire rack (1 unit)<br />
Removable components (in accessories box):<br />
- Upper basket wire rack with basket guides (1 unit)<br />
- Lower basket wire rack (1 unit)<br />
- Lower drip pan (1 unit)<br />
- Crumb tray (1 unit) (option)<br />
Accessories (optional), only for the dual lane models<br />
- Side basket wire rack<br />
- Collecting pan for the side basket wire rack<br />
Frozen fry dispenser F3D3S/F3D3/ F3D3SP/F3D3P en Status:<br />
07/2012<br />
15
F3D3S und F3D3SP–Single Lane<br />
Compressor cabinet<br />
Access plates to condenser<br />
Warning and prohibitory<br />
signs<br />
Control panel of the<br />
dispenser lane<br />
Power switch<br />
Hopper with<br />
drum<br />
Deflector (rubber)<br />
Handles for manually turning the drum<br />
Freezer bottom<br />
Storage area for<br />
unused baskets<br />
Upper basket wire rack with basket guide<br />
Castors without brake<br />
Lower basket wire rack<br />
Lower drip pan (plastic)<br />
Castors with brake<br />
Crumb Tray (option)<br />
F3D3S type label behind<br />
the air filter<br />
F3D3SP Type label<br />
16 Frozen fry dispenser F3D3S/F3D3/ F3D3SP/F3D3P en Status:<br />
07/2012
F3D3 und F3D3P–Dual Lane<br />
Compressor cabinet<br />
Access plates to condenser<br />
Warning and prohibitory<br />
signs<br />
Control panels of the<br />
dispenser lanes<br />
Power switch<br />
Wire rack<br />
Hopper with<br />
drum<br />
Deflector (rubber)<br />
Handles for manually<br />
turning the drum<br />
Storage area for<br />
unused baskets<br />
Freezer bottom<br />
Upper basket wire rack with basket guides<br />
Castors without brake<br />
Lower basket wire rack<br />
Lower drip pan (plastic)<br />
Castors with brake<br />
Crumb Tray (option)<br />
F3D3S type label behind<br />
the air filter<br />
F3D3P Type label<br />
Frozen fry dispenser F3D3S/F3D3/ F3D3SP/F3D3P en Status:<br />
07/2012<br />
17
Control panel for the dispenser lane<br />
There is one control panel for each dispenser lane. The dispenser lanes can be operated separately.<br />
If necessary, one of the dispenser lanes can be switched off (F3D3P–Dual Lane).<br />
BASKET symbol (with 7 green<br />
LEDs):<br />
When the BASKET symbol<br />
lights up, the dispenser lane is<br />
ready to dispense the product<br />
into the frying basket.<br />
ATTENTION symbol (with 3 LEDs at the corners):<br />
Indicates the status of the dispenser lane:<br />
- Lamps are off: The appliance is ready to operate.<br />
- Lamps light up: Indicates a low filling level. The appliance continues to dispense fries.<br />
- Lamps flash: Indicates an error. The screen displays an error message.<br />
LCD screen:<br />
- Displays the current operating<br />
temperature of the freezer.<br />
- Displays error messages and possible<br />
causes.<br />
- Displays the appliance setup and<br />
diagnosis programs with possible<br />
measures or decision options.<br />
ON/OFF button: For switching on the<br />
dispenser lane. Press for 4 seconds until<br />
both LEDs light up.<br />
ACTION–1 button: Performs the actions<br />
that are displayed on the screen<br />
– Inc (= increase)<br />
ACTION–2 button: Performs the actions<br />
displayed on the screen – Dec<br />
(= decrease).<br />
ACTION–3 button: Performs the actions that are displayed<br />
on the screen – OK (= confirm), Reset, 2 LEDs<br />
flash!<br />
3.1 BEFORE STARTING UP FOR THE FIRST TIME<br />
Before starting up for the first time, all components of the appliance must be cleaned.<br />
Cleaning removable components<br />
The removable components are located, firstly, in the appliance itself and, secondly, in the accessories<br />
box (see scope of delivery).<br />
18 Frozen fry dispenser F3D3S/F3D3/ F3D3SP/F3D3P en Status:<br />
07/2012
NOTICE<br />
Appliance damage!<br />
Rinsing with water that is too hot can deform the hopper(s).<br />
- Clean the hopper(s) with lukewarm water only.<br />
Components that are frozen together may damage the appliance.<br />
- Never place wet components into the freezer.<br />
- Carefully dry the components after cleaning.<br />
- Wash and disinfect all components in the rinsing sink one after the other.<br />
- Set all components upright to air dry.<br />
- Place the hopper upside down so the water can drain out of it.<br />
Cleaning the interior and non-removable components<br />
- Wipe off and disinfect the refrigerator and the bucket (see Fig. 05) with a cloth.<br />
- In particular, wipe off and disinfect the front and back of the filler doors and the entire bucket.<br />
- Carefully wipe all parts dry with a sterile fabric.<br />
Fig. 05: Bucket with filler doors<br />
i<br />
Tip:<br />
The filler doors of the bucket are spring-loaded and can be opened by pushing on them carefully.<br />
All parts of the bucket are more easily accessible for cleaning with the filler doors fully open.<br />
3.2 DAILY PROCEDURE FOR STARTING UP/SWITCHING<br />
ON<br />
Assembling the appliance<br />
NOTICE<br />
Appliance damage!<br />
Components that are frozen together may damage the appliance.<br />
- Never place wet components into the freezer.<br />
Frozen fry dispenser F3D3S/F3D3/ F3D3SP/F3D3P en Status:<br />
07/2012<br />
19
1<br />
2<br />
3<br />
i<br />
Tip:<br />
If the hub is not fully engaged,<br />
the hopper will not be in the<br />
right position and the freezer<br />
will not be able to close.<br />
In this case, turn the drum<br />
slightly at the handle until the<br />
hub fully engages.<br />
Insert the freezer bottom<br />
with the right orientation. The<br />
slanted surface must face<br />
down and toward the rear.<br />
Press it down.<br />
4 5<br />
Slide the deflector into the<br />
hopper with the short side<br />
first.<br />
Insert the hopper. Ensure that<br />
the hub is fully engaged in the<br />
drum. Turn the drum at the<br />
handle if necessary until the<br />
hub engages.<br />
6<br />
Insert the lower drip pan.<br />
Insert the lower basket wire<br />
rack.<br />
Place the upper basket wire<br />
rack onto the cross supports.<br />
7<br />
Option<br />
8 9 Option 10<br />
Roll the appliance into position<br />
and block the brakes of<br />
the front castors.<br />
Insert the crumb tray.<br />
Insert the wire rack (in the<br />
freezer above the hopper(s)).<br />
Only for dual lane models<br />
Mount the side basket wire<br />
rack (if present)<br />
Position the collecting pan<br />
under the basket wire rack.<br />
20 Frozen fry dispenser F3D3S/F3D3/ F3D3SP/F3D3P en Status:<br />
07/2012
Switching on/letting cool to the operating temperature<br />
- Close the freezer.<br />
- Switch the cooling system on at the power switch. The indicator lamp in the switch lights up.<br />
Fig. 06: Display with temperature<br />
(actual value).<br />
The cooling process begins. The current temperature is shown on the display as the<br />
freezer cools (see Fig. 06). After approx. 3 hours, the appliance will have reached the<br />
required operating temperature (–18 to –23 °C). Depending on the ambient conditions<br />
(room temperature and humidity), cooling may take longer.<br />
3.3 FILLING WITH FRIES<br />
!<br />
IMPORTANT!<br />
The products should not be filled until the required operating temperature is reached.<br />
1<br />
2<br />
3<br />
NOTICE<br />
Ice on the freezer walls<br />
prevents the appliance<br />
from reaching its operating<br />
temperature.<br />
- Do not leave the freezer<br />
door open longer than is<br />
necessary for filling.<br />
- Defrost the appliance daily<br />
(see the "Cleaning" chapter).<br />
Remove the wire rack.<br />
Check the hopper. Remove<br />
any product remnants.<br />
Fully tear open the bag holding<br />
the frozen fries. Be careful<br />
not to break or crush the<br />
fries.<br />
Carefully pour the fries into<br />
the hopper from above, being<br />
careful that the fries do not<br />
break. Hold the bag in such a<br />
way that most fries fall parallel<br />
to the drum.<br />
4 5<br />
Repeat steps 2 and 3 until<br />
the hopper(s) is/are full (see<br />
"Technical data", french fry<br />
capacity).<br />
Close the freezer.<br />
Frozen fry dispenser F3D3S/F3D3/ F3D3SP/F3D3P en Status:<br />
07/2012<br />
21
3.4 DISPENSING FRIES<br />
NOTICE<br />
Loss in quality!<br />
The product thaws quickly in the filled frying basket. The filled baskets should not be<br />
stored on the storage areas of the frozen fry dispensers or on the deep fryer for long<br />
periods.<br />
- Only fill a basket if the deep fryer is ready to use.<br />
i<br />
1<br />
2 Option 3<br />
Setting the load size<br />
The current load size is<br />
displayed at the bottom left<br />
of the screen (e.g. small =<br />
standard)<br />
Press the ACTION–3 button.<br />
The display changes to the<br />
next load size (e.g. medium).<br />
Press until the desired load<br />
size is displayed on the<br />
screen.<br />
Press the ON/OFF button for<br />
4 seconds until the button<br />
LEDs light up. The dispenser<br />
lane is switched on.<br />
Change the load size if necessary.<br />
The load size is set to<br />
[small] by default.<br />
The appliance is ready to dispense<br />
fries when the BASKET<br />
symbol lights up. [Ready]<br />
appears on the screen.<br />
4 5 6<br />
Remove the filled basket and<br />
immediately place it into the<br />
deep fryer.<br />
Place an empty deep fryer<br />
basket under the dispenser<br />
and push it back against the<br />
dispensing pressure switch.<br />
The basket is filled.<br />
The screen displays [Filling].<br />
The filling process is displayed<br />
on the screen by a growing,<br />
horizontal bar.<br />
22 Frozen fry dispenser F3D3S/F3D3/ F3D3SP/F3D3P en Status:<br />
07/2012
Setting down the empty frying baskets<br />
NOTICE<br />
Appliance damage!<br />
Heavy objects may damage the basket wire racks and the drip pans.<br />
- Only place frying baskets on the basket wire racks and drip pans when the baskets are empty.<br />
Empty frying baskets can be set down on the intended area in the appliance until they are<br />
refilled:<br />
Location Single Lane Dual Lane<br />
Lower basket wire rack 3 baskets 4 baskets<br />
Upper basket wire rack (+<br />
dispensing stations)<br />
2 (+1) baskets 2 (+2) baskets<br />
Side basket wire rack (if<br />
present)<br />
3.5 DAILY PROCEDURE FOR DECOMMISSIONING/<br />
SWITCHING OFF<br />
The appliance must be emptied, defrosted and cleaned every day after closing.<br />
i<br />
Tip:<br />
In restaurants with continuous opening hours, the freezer should be switched off for 2-3 hours<br />
daily.<br />
It is recommended to keep the filling quantity of the hopper relatively low before closing the<br />
restaurant for the day so that only a small quantity of fries needs to be kept in the freezer room<br />
overnight.<br />
For a more convenient timing of the cleaning process, the F3D3/F3D3P–Dual Lane offers the<br />
option of switching off only one of the two dispenser lanes before closing for the day. The components<br />
can then be taken out of the appliance and cleaned.<br />
1. Press the ON/OFF button for 4 seconds until the button LEDs go out. The dispenser lane is<br />
switched off.<br />
2. Press the power switch to disconnect the appliance from the power supply. The indicator<br />
lamp in the switch goes out.<br />
3. Take the hopper out of the appliance.<br />
4. Fill the remaining fries from the hopper into a suitable storage container and store them in<br />
the freezer room.<br />
Frozen fry dispenser F3D3S/F3D3/ F3D3SP/F3D3P en Status:<br />
07/2012<br />
23
4 CLEANING<br />
DANGER<br />
Risk of fatal injury from electric shock!<br />
- Before cleaning: Disconnect the appliance from the power supply.<br />
Moisture on the electrical components can lead to a short circuit and to serious or even<br />
fatal injury on contact.<br />
- Never clean the appliance with a direct water jet, a sponge or a high-pressure water jet.<br />
4.1 DEFROSTING<br />
The appliance must be disconnected from the power supply. No products must be located inside<br />
the appliance.<br />
1. Take all removable components except for the bottom drip pan out of the appliance. The drip<br />
pan will catch the dripping melt water.<br />
2. Remove the deflector from the hopper(s).<br />
NOTICE<br />
Damage!<br />
The freezer should only be defrosted passively.<br />
- Switch off the appliance at the power switch and leave the door open.<br />
- Never scratch the ice layers off the freezer walls to accelerate the defrosting process.<br />
3. Let the appliance defrost with the door open.<br />
4. Remove the collecting pan of the side basket wire rack (if present).<br />
24 Frozen fry dispenser F3D3S/F3D3/ F3D3SP/F3D3P en Status:<br />
07/2012
4.2 DAILY CLEANING PROCEDURE<br />
NOTICE<br />
Appliance damage!<br />
Rinsing with water that is too hot can deform the hopper(s).<br />
- Clean the hopper(s) with lukewarm water only.<br />
Components that are frozen together may damage the appliance.<br />
- Never place wet components into the freezer.<br />
- Carefully dry the components after cleaning.<br />
- Wash and disinfect all components taken out of the appliance in the rinsing sink one after the<br />
other.<br />
- Set all components upright to air dry.<br />
- Place the hopper upside down so the water can drain out of it.<br />
After the appliance is fully defrosted:<br />
- Wipe off and disinfect the refrigerator and the bucket (see Fig. 07) with a cloth.<br />
- In particular, wipe off and disinfect the front and back of the filler doors and the entire bucket.<br />
Fig. 07: Bucket with filler doors<br />
i<br />
Tip:<br />
The filler doors of the bucket are spring-loaded and can be opened by pushing on them carefully.<br />
All parts of the bucket are more easily accessible for cleaning with the filler doors fully open.<br />
- Remove the lower drip pan, wash it in the rinsing sink and set it upright to dry.<br />
- Wipe off and disinfect the entire basket wire rack area with the cross supports, side walls and<br />
the rear wall using a cloth.<br />
- Thoroughly dry the interior and the basket wire rack area with a sterile cloth.<br />
- Close the freezer door.<br />
Frozen fry dispenser F3D3S/F3D3/ F3D3SP/F3D3P en Status:<br />
07/2012<br />
25
5 PREVENTIVE MAINTENANCE<br />
DANGER<br />
Risk of fatal injury from electric shock!<br />
- Before performing maintenance: Disconnect the appliance from the power supply.<br />
- Have the necessary repairs carried out by a qualified specialist with original spare parts.<br />
5.1 CLEANING THE FILTER<br />
Cleaning interval<br />
1 x monthly<br />
Required tools/material<br />
Dishwashing detergent<br />
Alternative:<br />
Dishwasher<br />
- Remove the access plate to the condenser.<br />
- Remove the filter from the appliance.<br />
- Clean the filter in the rinsing sink using a household dishwashing detergent.<br />
- Rinse with clear water.<br />
- Let dry.<br />
- Alternative: Rinse the filter in the dishwasher.<br />
- Insert the filter.<br />
- Close the access plate.<br />
5.2 CLEANING THE CONDENSER RIBS<br />
!<br />
IMPORTANT!<br />
Clean condensers have a major influence on the service life of the compressor.<br />
26 Frozen fry dispenser F3D3S/F3D3/ F3D3SP/F3D3P en Status:<br />
07/2012
CAUTION<br />
Risk of injury!<br />
The condenser ribs are sharp. Contact may result in cutting injuries.<br />
- Do not touch the condenser ribs.<br />
- Wear gloves if necessary.<br />
Cleaning interval<br />
1 x monthly<br />
Required tools/material<br />
Brush with soft bristles<br />
Alternative:<br />
Vacuum cleaner<br />
- Remove the access plate to the condenser.<br />
- Remove the filter from the appliance.<br />
- Free the condenser ribs of dust and dirt using a brush with soft bristles or a vacuum cleaner.<br />
- Insert the filter.<br />
- Close the access plate.<br />
5.3 CUSTOMER SERVICE (ELECTRIC COMPONENTS)<br />
- In case of malfunction, contact technical customer service.<br />
- Please provide the item number and type. This information is located on the rating plate.<br />
Frozen fry dispenser F3D3S/F3D3/ F3D3SP/F3D3P en Status:<br />
07/2012<br />
27
5.4 CUSTOMER SERVICE (COOLING SYSTEM)*<br />
WARNING<br />
Danger of fire!<br />
The cooling circuit is filled with R290 (propane). Propane is highly flammable.<br />
Work (analysis/repair/maintenance) on the cooling system is only allowed under certain<br />
conditions!<br />
- Never repair the cooling system yourself!<br />
- If you experience problems, contact the technical customer service. The appliance may only<br />
be repaired by a refrigeration technician under certain conditions!<br />
Certain requirements apply to work (analysis/repair/maintenance) on cooling systems that must<br />
be strictly observed. If these requirements are not fulfilled then this will result in the expiry of<br />
the guarantee cover and the manufacturer accepts no liability.<br />
- Work on cooling systems must never be carried out in rooms at the restaurant.<br />
- The appliance may be repaired in a suitable workshop. It is important to ensure that there is<br />
sufficient ventilation!<br />
- The appliance may only be kept outside in the open air for the duration of the work on the<br />
cooling system.<br />
- The work may only be carried out by a qualified (certified) specialist company. The relevant<br />
local standards and laws for this qualification are valid.<br />
* only F3D3SP/F3D3P<br />
28 Frozen fry dispenser F3D3S/F3D3/ F3D3SP/F3D3P en Status:<br />
07/2012
6 MALFUNCTIONS/TROUBLESHOOTING<br />
6.1 ERROR MESSAGES<br />
The error messages are displayed on the control panel screen.<br />
Error message Problem Remedies<br />
Filling level in hopper is<br />
low (enough for filling 3<br />
to 4 baskets)<br />
Fill the hopper with fries.<br />
ATTENTION: If the machine continues dispensing until the hopper<br />
is almost empty, the filling process is interrupted and error message<br />
Err04 is displayed.<br />
Bucket error<br />
1. Check the bucket and filler door module.<br />
2. Press [Reset] (ACTION–3 button).<br />
1. The hopper is empty<br />
2. There is a clump<br />
of fries (bridge) in the<br />
hopper<br />
1. Fill with fries.<br />
or<br />
2. Check the hopper for clumped fries and release/remove the bridge if<br />
necessary.<br />
3. Press [Reset] (ACTION–3 button).<br />
The filler doors are<br />
blocked<br />
1. Check the filler doors for blockage.<br />
2. Press [Reset] (ACTION–3 button).<br />
Load cell problem<br />
Call technical customer service.<br />
6.2 MALFUNCTIONS<br />
Problem Cause Remedy<br />
1<br />
The power<br />
switch is<br />
switched on but<br />
the freezer is not<br />
running.<br />
The connector is not plugged into<br />
the socket.<br />
The power socket is faulty.<br />
The fuse tripped.<br />
Connect the power connector (switch on the power switch).<br />
Plug the connector into another socket. Have the faulty power<br />
socket repaired by an electrician.<br />
Check if the fuse tripped. Reset it if necessary.<br />
Frozen fry dispenser F3D3S/F3D3/ F3D3SP/F3D3P en Status:<br />
07/2012<br />
29
Problem Cause Remedy<br />
2<br />
The freezer is<br />
running but<br />
cannot reach the<br />
required operating<br />
temperature<br />
(-18 °C).<br />
Ice formation on the inside walls,<br />
especially on the temperature<br />
sensor.<br />
The filter is soiled.<br />
The condenser ribs are soiled.<br />
None of the measures taken<br />
correct the problem (defrosting,<br />
cleaning of the filter and condenser<br />
ribs).<br />
Take all products and components out of the appliance and defrost<br />
the appliance (see the "Cleaning" chapter). Recommendation:<br />
To avoid ice formation, do not keep the freezer door open<br />
longer than necessary. Defrost daily.<br />
Clean the filter (see the "Preventive maintenance" chapter).<br />
Clean the condenser ribs (see the "Preventive maintenance"<br />
chapter).<br />
Call technical customer service.<br />
3<br />
The dispenser<br />
lanes cannot be<br />
switched on.<br />
No line power.<br />
The ON/OFF button was not<br />
pressed long enough.<br />
Switch on the power switch. (Start up the appliance, see the<br />
"Daily startup" chapter).<br />
Plug in the connector (start up the appliance, see the "Daily<br />
procedure for starting up" chapter).<br />
Press the ON/OFF button for 4 seconds until the button LEDs<br />
light up.<br />
4<br />
The freezer door<br />
does not close<br />
properly.<br />
The hopper(s) is/are not properly<br />
engaged in the drum hub.<br />
Press the hopper into the appliance, turning the drum at the<br />
handle if necessary.<br />
5<br />
The drum does<br />
not turn.<br />
The hopper is empty. The screen<br />
displays the error message Err04<br />
and the Action–3 [Reset] button<br />
flashes.<br />
In the hopper, fries are baked<br />
together to form a "bridge". The<br />
screen displays the error message<br />
Err04 and the ACTION–3 [Reset]<br />
button flashes.<br />
Fill the hopper with fries. Press [Reset]. The filling process<br />
begins.<br />
Shake the hopper and redistribute the fries to break up the<br />
bridge. Proceed carefully so as not to break the fries. Press<br />
[Reset]. The filling process begins.<br />
6<br />
The lifting module<br />
does not go<br />
up or down.<br />
The lift motor is faulty.<br />
Call technical customer service.<br />
7<br />
The basket<br />
symbol does not<br />
light up.<br />
The dispenser lane is switched off.<br />
The required loading size was not<br />
reached.<br />
Press the ON/OFF button for 4 seconds until the button LEDs<br />
light up.<br />
See no. 12<br />
The filling process is aborted prematurely.<br />
Press [Reset]. The filling process begins.<br />
8<br />
The ACTION–3<br />
button [Reset]<br />
flashes.<br />
In the hopper, fries are baked<br />
together to form a "bridge". The<br />
screen displays error message<br />
Err04 and the ACTION–3 [Reset]<br />
button flashes.<br />
Shake the hopper and redistribute the fries to break up the<br />
bridge. Proceed carefully so as not to break the fries.<br />
30 Frozen fry dispenser F3D3S/F3D3/ F3D3SP/F3D3P en Status:<br />
07/2012
Problem Cause Remedy<br />
9<br />
The appliance<br />
does not dispense<br />
the product<br />
and error<br />
message Err04<br />
is displayed.<br />
The hopper is empty.<br />
In the hopper, the fries are baked<br />
together to form a "bridge" (very<br />
hard).<br />
Fill the hopper with fries. Press [Reset]. The filling process<br />
begins.<br />
Shake the hopper and redistribute the fries to break up the<br />
bridge. Proceed carefully so as not to break the fries. If necessary,<br />
remove very hard clumps. Press [Reset]. The filling<br />
process begins.<br />
10<br />
The appliance<br />
does not<br />
dispense the<br />
product and<br />
error message<br />
Err02 or Err07 is<br />
displayed.<br />
The bucket is missing.<br />
The filler door motor is faulty.<br />
Insert the bucket.<br />
Call technical customer service.<br />
11<br />
The [Low product<br />
warning]<br />
error message<br />
appears.<br />
The filling level in the hopper is low<br />
(only 3–4 fillings).<br />
The frozen fries created a hollow<br />
space around the sensor in the<br />
hopper.<br />
Fill the hopper with fries. Attention: If the machine continues<br />
dispensing until the hopper is empty, the filling process is<br />
aborted and error message Err04 is displayed.<br />
Shake the hopper and redistribute the fries to close the hollow<br />
space. Proceed carefully so as not to break the fries.<br />
12<br />
The hopper is<br />
empty but error<br />
message Err04<br />
is not displayed.<br />
The "Low product" sensor is soiled.<br />
The "Low product" sensor is faulty.<br />
Clean the "Low product" sensor.<br />
Call technical customer service.<br />
13<br />
The loading<br />
weights are<br />
permanently<br />
incorrect (either<br />
too light or too<br />
heavy).<br />
The deflector is missing from the<br />
hopper.<br />
The deflector is damaged (e.g.<br />
cracked on the side).<br />
The freezer bottom is not correctly<br />
positioned.<br />
Slide in the deflector.<br />
Replace the deflector. (The deflector is a wear part and should<br />
be replaced in good time).<br />
Take out the freezer bottom and insert it correctly.<br />
The basket symbol does not light<br />
up.<br />
Wait for the BASKET symbol to light up. The fries are now<br />
dispensed.<br />
14<br />
The filler doors<br />
do not open to<br />
dispense fries.<br />
The basket wire rack is not positioned<br />
correctly.<br />
The Err04 and [Low product warning]<br />
error messages appear.<br />
Take out the basket wire rack and insert it correctly.<br />
Fill the hopper with fries.<br />
The ACTION–3 button [Reset]<br />
flashes.<br />
See error 8.<br />
15<br />
The filler doors<br />
do not close after<br />
the fries are<br />
dispensed.<br />
Fries are jammed in the filler<br />
doors.<br />
The return spring of the filler door<br />
is broken.<br />
The filler door sensor is faulty.<br />
Remove all fries from the filler doors.<br />
Close the filler doors manually. If the filler doors open again by<br />
themselves, call technical customer service.<br />
If the filler doors cannot be closed manually, call technical<br />
customer service.<br />
16<br />
The load size<br />
cannot be<br />
changed on the<br />
operator panel.<br />
The filling process is not yet finished.<br />
The filling process is finished when the BASKET symbol LEDs<br />
light up and [Ready] appears on the screen. The load size can<br />
now be changed.<br />
Frozen fry dispenser F3D3S/F3D3/ F3D3SP/F3D3P en Status:<br />
07/2012<br />
31
7 DECOMMISSIONING (STORAGE/DISPOSAL)<br />
7.1 STORAGE<br />
Storage conditions<br />
The storage area must be dry and well ventilated.<br />
Procedure<br />
- Disconnect the appliance from the power supply.<br />
- Remove all food and beverages from the appliance.<br />
- Clean the interior and the accessories.<br />
- Using a cloth, apply a thin protective film of Vaseline oil onto the metal surfaces.<br />
- Leave the doors and drawers slightly open to guarantee good air circulation.<br />
7.2 DISPOSAL<br />
DANGER<br />
Risk of fatal injury from electric shock!<br />
- Ensure that the appliance is disconnected from the power supply.<br />
Disassembly of the appliance must be performed by qualified specialists according to the manufacturer's<br />
instructions.<br />
- Follow the local safety regulations.<br />
- Dispose of the appliance in accordance with local regulations.<br />
- It is essential that you observe the laws and regulations for the disposal of environmentally<br />
harmful substances. Obtain detailed information about their disposal – such substances<br />
include refrigerants or plastics.<br />
- Before disassembly, all food remnants must be removed and the appliance must be thoroughly<br />
cleaned.<br />
32 Frozen fry dispenser F3D3S/F3D3/ F3D3SP/F3D3P en Status:<br />
07/2012
Special regulations apply when disposing of used<br />
electrical appliances:<br />
The customer assumes responsibility for proper disposal of the delivered product after the end<br />
of its service life at the customer's own expense, in accordance with legal regulations. The<br />
customer releases Franke from the obligations under Section 10, Paragraph 2, of the German<br />
Electrical and Electronic Equipment Act (ElektroG) and claims by third parties in this connection.<br />
The entitlement by Franke to be released by the customer is not subject to any statute of limitations<br />
and ends after utilization with proper disposal by the customer. If the product is passed<br />
on to a third party, the customer must ensure that the disposal requirement is fulfilled upon the<br />
end of service life. In the event that the customer requests disposal by Franke, Franke GmbH will<br />
prepare a quotation for the customer for the return and disposal of the waste appliance at the<br />
time of disposal. The customer will be charged for transport and disposal costs.<br />
Special regulations apply when disposing of refrigerant:<br />
!<br />
IMPORTANT!<br />
Releasing refrigerant into the atmosphere is strictly forbidden!<br />
The refrigerant used is either R404A or R290. The necessary specifications on handling the<br />
coolant are given in the manufacturer's data sheet. If you would like more information about this<br />
product, please contact the manufacturer:<br />
R290<br />
Linde AG<br />
Werksgruppe Technische Gase<br />
Seitnerstrasse 70<br />
82049 Höllriegelskreuth<br />
Germany<br />
Tel. +49 (0) 89/7446–0<br />
R404a<br />
Arkema Direction de la Communication<br />
Financière<br />
4-8, cours Michelet – La Défense 10<br />
92091 Paris La Défense Cedex<br />
France<br />
Tel. +33 (0) 1 49 00 74 63<br />
Fax +33 (0) 1 49 00 50 24<br />
Frozen fry dispenser F3D3S/F3D3/ F3D3SP/F3D3P en Status:<br />
07/2012<br />
33
Locations<br />
Germany<br />
Franke Foodservice Systems GmbH<br />
Jurastrasse 3<br />
79713 Bad Säckingen<br />
Germany<br />
Phone: +49 7761 5533 0<br />
Fax: +49 7761 5533 8700<br />
Poland<br />
Franke Foodservice Systems<br />
Poland Sp. z o. o.<br />
ul. Polnocna 11<br />
81-029 Gdynia<br />
Poland<br />
Phone: +48 58 6609100<br />
Fax: +48 58 6609119<br />
United Kingdom<br />
Franke Foodservice Systems GmbH<br />
Unit 2A Broom Business Park<br />
Bridge Way<br />
Chesterfield<br />
S419QG<br />
UK<br />
Phone: +44(0)1246 264 280<br />
Fax: +44(0)1246 264 288<br />
France<br />
Franke Foodservice Systems GmbH<br />
France<br />
Phone: 0033 (0) 626 35 11 58<br />
Fax: 0049 (0) 7761 55 33 93 83<br />
Email: thierry.krukar@franke.com<br />
Italy<br />
Franke Foodservice Systems GmbH<br />
Italy<br />
Phone 1: 0039 345 76 60 050<br />
Phone 2: 0039 347 34 06 220<br />
Fax: 0049 7761 5533 8700<br />
Email: carlo.recchia@franke.com<br />
Email: alessandro.figus@franke.com<br />
Spain<br />
Franke Foodservice Systems GmbH<br />
Rodríguez San Pedro, 2, 6º<br />
Edificio Inter - Oficina 603<br />
28015 Madrid<br />
Spain<br />
Direct phone: +34 91 367 63 64<br />
Direct fax: +34 91 406 13 78<br />
G:\FCE_Engineering\100_user_manuals\GM\Frozen_fry_dispenser_F3D\FrozenFryDispenserF3D_allversions.indd<br />
en