c) Installing the software - Sekonic
c) Installing the software - Sekonic
c) Installing the software - Sekonic

You also want an ePaper? Increase the reach of your titles
YUMPU automatically turns print PDFs into web optimized ePapers that Google loves.
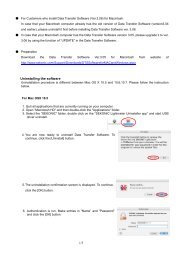
● For Customers who install Data Transfer Software (Ver.3.07) for Macintosh.<br />
In case that your Macintosh computer already has <strong>the</strong> old version of Data Transfer Software (version3.04<br />
and earlier), please uninstall it first before installing Data Transfer Software ver. 3.07.<br />
● In case that your Macintosh computer has <strong>the</strong> Data Transfer Software version 3.05 or 3.06, please upgrade<br />
it to ver. 3.07 by using <strong>the</strong> function of “UPDATE” in <strong>the</strong> Data Transfer Software. (No need to follow <strong>the</strong><br />
procedure hereunder.)<br />
● Preparation<br />
Download <strong>the</strong> Data Transfer Software Ver.3.05 for Macintosh from website of<br />
http://www.sekonic.com/Support/Downloads/DTSSoftwareforMACandWindows.aspx<br />
Uninstalling <strong>the</strong> <strong>software</strong><br />
Uninstallation procedure is different between Mac OS X 10.5 and 10.6 & 10.7. Please follow <strong>the</strong> instruction<br />
below.<br />
For Mac OSX 10.5<br />
1. Quit all applications that are currently running on your computer.<br />
2. Open "Macintosh HD" and <strong>the</strong>n double-click <strong>the</strong> "Applications" folder.<br />
3. Select <strong>the</strong> “SEKONIC” folder, double click on <strong>the</strong> “SEKONIC Lightmeter Uninstaller app” and start USB<br />
driver uninstall.<br />
4. You are now ready to uninstall Data Transfer Software. To<br />
continue, click <strong>the</strong> [Uninstall] button.<br />
5. The uninstallation confirmation screen is displayed. To continue,<br />
click <strong>the</strong> [OK] button.<br />
6. Au<strong>the</strong>ntication is run. Make entries in “Name” and “Password”<br />
and click <strong>the</strong> [OK] button.<br />
1/5
7. Uninstallation is now complete. Click <strong>the</strong> [OK] button.<br />
8. Now delete <strong>the</strong> application. Select <strong>the</strong> “SEKONIC” folder in <strong>the</strong> “Application Folder” and<br />
drag-and-drop it in <strong>the</strong> Recycle Bin (Trash) to delete it.<br />
For Mac OSX 10.6 and 10.7<br />
1. Quit all applications that are currently running on your computer.<br />
2. Open "Macintosh HD" and <strong>the</strong>n double-click <strong>the</strong> "Applications" folder.<br />
3. Select <strong>the</strong> “SEKONIC” folder, double click on <strong>the</strong><br />
“SEKONIC_Lightmeter_Uninstaller(MACOS10.6_10.7).pkg”<br />
and start USB driver uninstall.<br />
4. Click <strong>the</strong> [Continue] button.<br />
5. Select a Destination, and click <strong>the</strong> [Continue] button.<br />
6. You are now ready to install Data Transfer Software.<br />
To continue, click <strong>the</strong> [Install] button.<br />
2/5
10. Au<strong>the</strong>ntication is run.<br />
Make entries in “Name” and “Password” and click <strong>the</strong> [Install<br />
Software] button.<br />
11. Next , uninstall <strong>the</strong> USB driver.<br />
To continue installing, click <strong>the</strong> [Continue Installation] button.<br />
12. Uninstallation is now complete. You must restart your computer after <strong>the</strong> installation, so click <strong>the</strong> [Restart]<br />
button.<br />
The computer restarts.<br />
13. Now delete <strong>the</strong> application. Select <strong>the</strong> “SEKONIC” folder in<br />
<strong>the</strong> “Application Folder” and drag-and-drop it in <strong>the</strong> Recycle Bin (Trash) to delete it.<br />
3/5
<strong>Installing</strong> <strong>the</strong> <strong>software</strong><br />
1. Restart Macintosh computer<br />
2. Double-click <strong>the</strong> ZIP file of Data Transfer Software ver. 3.05 for Mac to unzip.<br />
3. Open <strong>the</strong> folder which is applied to <strong>the</strong> OS version to install in CD-ROM.<br />
4. To start <strong>the</strong> installation, double-click <strong>the</strong> "Data Transfer Software(3.0). pkg" icon.<br />
5. Click <strong>the</strong> [Continue] button.<br />
6. The license agreement is displayed. Select [English], read<br />
<strong>the</strong> agreement, and <strong>the</strong>n click <strong>the</strong> [Continue] button.<br />
◆NOTE!<br />
・ If you select a language that differs from that of <strong>the</strong> OS on your computer, Data Transfer Software can<br />
be installed, but corrupted characters may be displayed.<br />
If you accidentally install <strong>the</strong> wrong language version of Data Transfer Software, first uninstall it, and<br />
<strong>the</strong>n re-install <strong>the</strong> correct language version.<br />
For information about uninstalling <strong>the</strong> <strong>software</strong>, see "Uninstalling <strong>the</strong> <strong>software</strong>".<br />
7. After reading <strong>the</strong> license agreement, click <strong>the</strong> [Agree] button if<br />
you agree to its terms and conditions.<br />
4/5
8. Confirm that <strong>the</strong> installation folder volume is correct, and <strong>the</strong>n click <strong>the</strong> [Continue] button.<br />
If you want to install in a different [folder], click <strong>the</strong> [Select] button and<br />
<strong>the</strong>n select <strong>the</strong> folder you want.<br />
9. You are now ready to install Data Transfer Software.<br />
To continue, click <strong>the</strong> [Install] button.<br />
10. Au<strong>the</strong>ntication is run.<br />
Make entries in “Name” and “Password” and click <strong>the</strong> [Install<br />
Software] button.<br />
11. Next , install <strong>the</strong> USB driver.<br />
To continue installing, click <strong>the</strong> [Continue] button.<br />
12. Installation is now complete. You must restart your computer after <strong>the</strong> installation, so click <strong>the</strong> [Restart]<br />
button.<br />
The computer restarts.<br />
5/5