Sekonic Handy Lumi 246 Illuminometer: English Quick Guide ...
Sekonic Handy Lumi 246 Illuminometer: English Quick Guide ...
Sekonic Handy Lumi 246 Illuminometer: English Quick Guide ...

You also want an ePaper? Increase the reach of your titles
YUMPU automatically turns print PDFs into web optimized ePapers that Google loves.
Specifications<br />
Measuring Range of Illuminance:<br />
Low: 0 -1000 Lx (Red scale)<br />
Ordinary: 0-5000 Lx (Black scale)<br />
High: 0-50000 Lx (by using the Slide of x10 multiplier)<br />
Accuracy : ± 10% (tested by a standard parallel-light tungsten lamp of color<br />
temperature 2854°K) without including the resolution for<br />
the meter (the value deserves minimal scale 1/2)in this<br />
accuracy.<br />
Angle Allowance : 30'---Iess than -3% 60°---less than -10%<br />
Correction of<br />
sight sensitivity<br />
0-1000 Lx (No correction-light source factor used<br />
0-5000 Lx (Correction used)<br />
Power Source : No battery used<br />
Condition of Use : Temperature: 5 - 35° C Humidity: 45 -85<br />
Accessories :<br />
<strong>Lumi</strong>disc for low measurement<br />
<strong>Lumi</strong>disc for ordinary measurement<br />
Slide ( x10 multiplier)<br />
Dimensions : 112X58X27mm Weight : 135g<br />
Characteristics : Compact, light weight, handy to carry, and most easy -to-use<br />
swivel-head system<br />
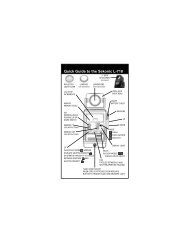
Name of<br />
Parts
How to operate the <strong>Illuminometer</strong><br />
1. Getting ready for measurement<br />
All you do for preparation is just to insert the LUMIDISC into position. To insert it,<br />
match the white dot (or the red dot for low measurement) on the lumidisc to the white<br />
dot on the swivel-head of the meter. Turn the lumidisc clockwise lightly to about 45°<br />
until it tightly fits.<br />
2. Ordinary measurement: 0--5000 Lx<br />
To measure the range of 0--5000 Lx, use the lumidisc for ordinary measurement (with<br />
a white dot at the outer ring of the disc and a green filter attached at the back).<br />
Insert it into position as mentioned in 1. "Getting ready". Then place the meter at the<br />
surface to be measured so that the lumidisc is parallel to the surface. Read the BLACK<br />
figure on the scale. The figure the pointer indicates is the correct lux to use.<br />
3. Measurement of High range: 0 --50000 Lx<br />
To measure the range of 0--50000 Lx, use the lumidisc for ordinary measurement (see<br />
2. above). Insert it into position in the same procedure as in 2. Then INSERT THE<br />
SLIDE (x10 multiplier) into the slit located at the top of the swivel-head. Measure in<br />
the same way as mentioned in 2. "Ordinary measurement". Read the BLACK figure the<br />
pointer indicates, then MULTIPLY the figure by 10 to get the correct lux.<br />
4. Measurement of Low range: 0--1000 Lx<br />
To measure the range of 0-1000 Lx, use the lumidisc for low measurement (with a red<br />
dot at the outer ring of the disc and no filter at the back). Insert it into position and<br />
measure in the same way as in 2. Read the RED figure on the scale. Then MULTIPLY<br />
the figure by the correction factor of each light source shown in the table below.<br />
Correction factor<br />
Mercury arc lamp...............................1.1<br />
Fluorescent lamp ...............................1.0<br />
Incandescent light..............................1.0<br />
Day light..........................................0.8<br />
Example<br />
In case the pointer indicates 600 Lx<br />
under mercury arc lamp, the correct<br />
lux is, 600 Lx X 1.1-=660 Lx
5. Swivel-Head<br />
The swivel-head is one of the most advantageous features of this meter. Swivel the<br />
head of the meter to the right or left when the measurement is difficult due to the<br />
position of the surface to be measured.<br />
6. Zero setting adjustment<br />
When the light receptor is completely covered by hand (a condition where no light<br />
enters into the light receptor), the pointer should be at zero. If it isn't, turn the zero<br />
adjusting screw on the back until the pointer comes to the zero position.<br />
7. General Precautions<br />
1) Be careful not to give any shadow on the light receptor at every<br />
measurement.<br />
2) Position the meter (more exactly the surface of <strong>Lumi</strong>disc) in parallel to the<br />
surface to be measured.<br />
3) Avoid to leave the meter for long hours in a place of high temperature and<br />
humidity.<br />
4) Store it in the case and keep in a dry place when not in use.<br />
SEKONIC CO., LTD.<br />
7-24-14, Oizumigakuen-cho, Nerima-ku, Tokyo, Japan<br />
Printed in Japan