domino frameless square/round domino frameless square ... - Planlicht
domino frameless square/round domino frameless square ... - Planlicht
domino frameless square/round domino frameless square ... - Planlicht

Create successful ePaper yourself
Turn your PDF publications into a flip-book with our unique Google optimized e-Paper software.
<strong>domino</strong> <strong>frameless</strong> <strong>square</strong>/<strong>round</strong> <strong>domino</strong> <strong>frameless</strong> <strong>square</strong>/<strong>round</strong><br />
Montageanleitung<br />
Assembly instructions<br />
Instruction de montage<br />
Diese Montageanleitung entspricht unserem derzeitigen Kenntnisstand und unterliegt der Überarbeitung, sobald sich neue Erkenntnisse und Erfahrungen ergeben.<br />
The given assembly instructions are based on our current state of knowledge and will be reviewed as soon as new facts or experiences are gained.<br />
Cette instruction de montage correspond à notre niveau actuel de connaissances et peut être remaniée dès que de nouvelles informations et expériences apparaissent.<br />
<strong>Planlicht</strong> Gmbh & Co. KG - Fiecht Au 25 - A-6130 Schwaz-Vomp - Austria - Tel.Nr.: +43-(0)5242-71608 - Fax: +43-(0)5242-71283 - FN: 24492v - Landesgericht Innsbruck<br />
11/2010 - Copyright by <strong>Planlicht</strong> HandelsgesmbH & Co. KG<br />
Montageanleitung<br />
Assembly instructions<br />
Instruction de montage<br />
Sicherheit<br />
● Die Montage, der Anschluss und die Inbetriebnahme dieser Leuchte darf nur durch eine<br />
autorisierte Elektrofachkraft erfolgen.<br />
● Vor dem Arbeiten Spannung abschalten.<br />
● Jede nicht in der Montageanleitung beschriebene Veränderung an der Leuchte ist<br />
verboten. (Gewährleistung)<br />
● Nur in trockenen, explosionsfreien Räumen montieren.<br />
● Es sind alle landesüblichen Normen, Vorschriften und Hinweise zu beachten.<br />
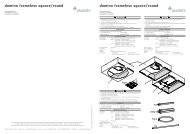
Lieferumfang<br />
● Deckeneinbauleuchte (a) mit Diffusorplatte (b)<br />
● 8 Montagebleche (c) ● 16 Schrauben (d)<br />
● Montageanleitung ● Verpackungsmaterial<br />
Technische Daten<br />
Beschreibung: Rahmenlose Deckeneinbauleuchte für Hohlraumdecken<br />
Abmessungen: <strong>square</strong>: 932x932mm; h=125mm (6x21W oder 6x39W)<br />
1180x1180mm; h=125mm (8x28W oder 8x54W)<br />
<strong>round</strong>: 888x888mm; h=125mm (6x21W oder 6x39W)<br />
1180x1180mm; h=125mm (8x28W oder 8x54W)<br />
Systemspannung: 230/240V<br />
Schutzklasse: I<br />
Schutzart: IP20<br />
Material: Stahlblec, weiss pulverbeschichtet<br />
Leuchtmittel: T16<br />
b<br />
Sécurité<br />
● Le montage, le raccordement et la mise en service de ce luminaire ne doivent être effectués<br />
que par un électricien autorisé.<br />
● Mettre hors tension avant de travailler.<br />
● Toute modification sur le luminaire, qui n’est pas décrite dans l’instruction de montage,<br />
est interdite. (Garantie)<br />
● Ne monter que dans des pièces sèches et non soumises à des risques d’explosion.<br />
● Les normes, directives et indications en vigueur dans le pays doivent être respectées.<br />
Fourniture<br />
● Plafonnier sans cadre pour faux plafonds (a) avec plaque de diffuseur (b)<br />
● 8 tôles d‘assemblage (c) ● 16 vis (d)<br />
● Instruction de montage ● Matériau d’emballage<br />
Données techniques<br />
Description: Plafonnier sans cadre pour faux plafonds<br />
Dimension: <strong>square</strong>: 932x932mm; h=125mm (6x21W ou 6x39W)<br />
1180x1180mm; h=125mm (8x28W ou 8x54W)<br />
<strong>round</strong>: 888x888mm; h=125mm (6x21W oder 6x39W)<br />
1180x1180mm; h=125mm (8x28W ou 8x54W)<br />
Tension du système: 230/240V<br />
Catégorie de protection: I<br />
Degré de protection: IP20<br />
Matériau: Tole en acier; blanc revêtu par poudre<br />
Lampe: T16<br />
c<br />
Safety<br />
● Assembly, connection and commissioning of this luminaire must be carried out by an<br />
authorized electrician.<br />
● Disconnect voltage supply before starting any work.<br />
● Any modification of the luminaire not described in the assembly instructions is prohibited.<br />
(warranty)<br />
● Assemble only in dry rooms without any explosion hazard.<br />
● Follow all customary standards, rules and instructions.<br />
Scope of delivery<br />
● Frameless recess celling light (a) with diffusor plate (b)<br />
● 8 fitting panels (c) ● 16 screws (d)<br />
● Assembly instructions ● Packaging material<br />
Technical data<br />
Description: Frameless recess celling light<br />
Dimensions: <strong>square</strong>: 932x932mm; h=125mm (6x21W or 6x39W)<br />
1180x1180mm; h=125mm (8x28W or 8x54W)<br />
<strong>round</strong>: 888x888mm; h=125mm (6x21W oder 6x39W)<br />
1180x1180mm; h=125mm (8x28W or 8x54W)<br />
System voltage: 230/240V<br />
Class of protection: I<br />
Type of protection: IP20<br />
Material: Plated steel, white powder-coated<br />
Lamp: T16<br />
a<br />
d<br />
T16<br />
b
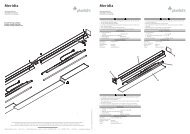
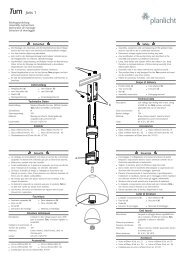
● Ausschnitt herstellen<br />
Montage<br />
● Decken-C-Profil (e) montieren (nicht im Lieferumfang)<br />
● Zuleitung (f) durch die Öse (g) fädeln<br />
● Leuchte (a) einsetzen<br />
● 8 Montagebleche (c) einsetzen und anschrauben - je 2 Schrauben (d)<br />
● Randbereich mit Gips (h) spachteln - Glasfaserband (i) verwenden<br />
● Überstehenden Gips (h) am Randbereich entfernen<br />
● Zugentlastung (k) abnehmen - Schrauben (j) entfernen<br />
● Zuleitung (f) kürzen und ca. 7mm abisolieren<br />
● Zuleitung (f) an Klemme (l) anklemmen<br />
● Zugentlastung (k) mit Schrauben (j) montieren<br />
Leuchtstoffröhre (m) einsetzen<br />
● Leuchtstoffröhre (m) einsetzen<br />
● Diffusorplatte (b) einsetzen<br />
Synchronisieren von switch-dim-Geräten<br />
● Lichttaster ca. 10 Sekunden drücken<br />
f<br />
7mm<br />
k<br />
g<br />
j<br />
l<br />
ohne Dimmer<br />
without dimmer<br />
sans gradateur<br />
SL<br />
L N<br />
m<br />
DALI Dimmer<br />
Gradateur DALI<br />
SL<br />
L N D1 D2<br />
● Make cutout<br />
Assembly<br />
● Mount ceiling-C-profile (e) (not included in scope of delivery)<br />
● Insert supply line (f) through the eyes (g)<br />
● Insert luminaire (a)<br />
● Insert and screw on the 8 mounting sheet metals (c) - ever 2 screws (d)<br />
● Level out area with gypsum (h) - use fibreglass tape (i)<br />
● Remove overlap plaster (h) at the border area<br />
● Remove pull relieve (k) - remove screws (j)<br />
● Cut and strip of supply line (f) approx. 7mm<br />
● Connect supply line (f) on the strip connector (l)<br />
● Install pull relief (k) using screws (j)<br />
Insert fluorescent lamp (m)<br />
● Insert fluorescent lamp (m)<br />
● Put in diffusor plate (b)<br />
Synochronize of switch-dim-equipment<br />
● Press light switch approx. 10 seconds<br />
b<br />
Switch DIM<br />
SL<br />
L N D1 D2<br />
h<br />
i<br />
Montage<br />
● Faire le découpure<br />
● Monter plafond-C-profile (e) (non fourni)<br />
● Introduire la conduite d’alimentation (f) à travers l’oeillet (g)<br />
● Insérer la luminaire (a)<br />
● Insérer le 8 tôles d‘assemblage (c) avec 8x 2 vis (d)<br />
● Mettre gypse (h) sur le secteur - utiliser una bande de fibre de verre (i)<br />
● Enlever le reste du plâtre (h) sur le bord<br />
● Retirer la décharge de traction (k) - retirer les vis (j)<br />
● Raccourcir et dénuder la conduite d’alimentation (f) de env. 7mm<br />
● Brancher la conduite d’alimentation (f) a le borne (l)<br />
● Monter la décharge de traction (k) avec les vis (j)<br />
Insérer la luminaire fluorescent (m)<br />
● Insérer la luminaire fluorescent (m)<br />
● Insérer la plaque de diffuseur (b)<br />
Synchroniser de switch-dim-equipement<br />
● Presser le commutateur env. 10 sec.<br />
h<br />
h<br />
h<br />
f g<br />
c<br />
d<br />
e<br />
888x888mm 890x890mm<br />
932x932mm 934x934mm<br />
1180x1180mm 1182x1182mm<br />
a f<br />
15mm<br />
e<br />
g<br />
12,5mm