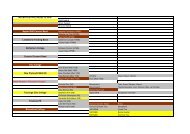
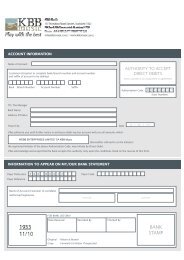
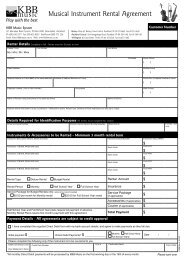
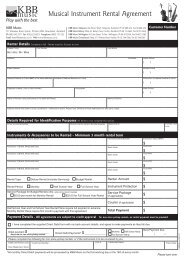
KBB Music Festival
KBB Music Festival
KBB Music Festival

Create successful ePaper yourself
Turn your PDF publications into a flip-book with our unique Google optimized e-Paper software.
an<br />
dom<br />
R<br />
MUSIC MAINTENANCE<br />
How to Look After<br />
your Clarinet<br />
Look after your valuable wooden or plastic clarinets<br />
by following these simple steps as recommended by<br />
<strong>KBB</strong> <strong>Music</strong>’s Repair Technicians<br />
Image Source: Discovery Education<br />
Assembling the Clarinet<br />
We see more clarinets in our workshop with problems<br />
caused by faulty assembly technique than for any other<br />
cause, so please be careful and save yourself unnecessary<br />
maintenance costs!<br />
1<br />
Rub a small amount of cork grease onto the tenon corks<br />
before assembly when the clarinet is new. After about a<br />
week only apply as necessary to make assembly easy, removing<br />
old grease first before applying new grease. Parts should slip<br />
together easily - if they don’t, bring the clarinet in for adjustment,<br />
as you may be putting unnecessary strain on the clarinet parts<br />
you are holding during assembly.<br />
2<br />
Place the lower joint in the palm of your left hand with the<br />
mechanism upwards. Grip the joint by letting your fingers<br />
press down on the two lowest keys (pressing them shut). Take<br />
the bell in your right hand and attach it to the lower joint with a<br />
gentle twisting motion.<br />
3<br />
Hold the upper joint in the palm of the left hand with the<br />
mechanism up. Grip the joint by allowing your fingers to<br />
grip the ring keys - pressing them down. Twist the upper and<br />
lower joints together - make sure the bridge key on the upper<br />
joint lays directly over the key on the lower joint.<br />
4<br />
5<br />
Continue to hold the upper joint of the clarinet in the way<br />
described above and twist the barrel on to the top.<br />
Insert the mouthpiece into the top joint with a gentle<br />
twisting motion. Ensure the mouthpiece table (the flat part)<br />
lines up with the register key. This is the long key on its own on<br />
the opposite side to the row of tone holes on the upper joint.<br />
6<br />
To put the reed on the mouthpiece, first place the flat<br />
side of the reed against the flat table of the mouthpiece,<br />
holding both with your left hand, your thumb holding down<br />
the reed. Slip the ligature over the reed and mouthpiece with<br />
the screws above the reed. If you are using a single screw type<br />
ligature, the screw is usually on the opposite side to the reed.<br />
Take great care not to touch the very delicate tip of the reed<br />
during this process. Tighten up the screws when the reed is<br />
straight and the tip of the mouthpiece is just visible above the reed.<br />
Disassembling & Cleaning<br />
Take as much care in taking your clarinet apart as in assembly!<br />
But first you must clean your instrument.<br />
1<br />
Remove the mouthpiece and drop the<br />
weight from your pull through cleaner<br />
cloth or swab into the bell and then draw it<br />
carefully through<br />
your instrument.<br />
Repeat a couple<br />
of times to<br />
be thorough.<br />
Pull the swab<br />
through your<br />
mouthpiece to<br />
clean and dry it.<br />
2<br />
3<br />
Take all the sections of your clarinet apart using the reverse<br />
of the assembly process. Be very particular with wooden<br />
clarinets!<br />
Wipe down the body and the keys with a polishing cloth.<br />
This is important because the acids from your skin can<br />
cause the playing or lacquer to deteriorate.<br />
Ongoing Maintenance<br />
1<br />
Bore oil may need to be applied to the interior of wooden<br />
clarinets occasionally. This prevents the bore of your<br />
instrument absorbing moisture. Excess moisture absorption<br />
can cause cracking and swelling of the instrument. Use bore oil<br />
sparingly and take care to avoid getting any on the pads. Too little<br />
oil is better than too much, too much can cause problems.<br />
2<br />
The moving parts need to be lubricated periodically. This should<br />
be done with great care as lubricating oil will damage pads/<br />
corks if any should accidentally run onto them. Many people prefer to<br />
leave this to be done by our workshop at their regular service checks.<br />
3It is advisable not to drink any sugar based drinks or eat food<br />
before playing your instrument as this may cause sticky pads.<br />
Drinking a glass of water before you play is helpful to reduce these<br />
problems. •<br />
ALWAYS store the instrument in its case when not in use.<br />
NEVER close your clarinet case with anything sitting on top of the<br />
clarinet keys, such as polishing cloths, music books, sheet music etc.<br />
NEVER leave the instrument in the sun or near a heat source, even<br />
if it’s in the case as heat can cause damage.<br />
www.kbbmusic.co.nz<br />
10 Printed on Paper from Sustainable Forests