From The “horror Of Skullmaster†- Iwata Medea
From The “horror Of Skullmaster†- Iwata Medea
From The “horror Of Skullmaster†- Iwata Medea

You also want an ePaper? Increase the reach of your titles
YUMPU automatically turns print PDFs into web optimized ePapers that Google loves.
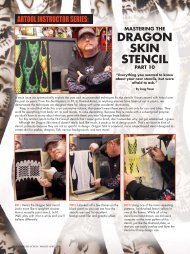
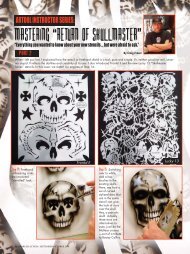
PAINTING A<br />
FROM THE “HORROR OF SKULLMASTER” SERIES BY CRAIG FRASER<br />
IN EACH ISSUE WE DEMONSTRATE AND EXPLAIN THE USES OF THE STENCILS I HAVE<br />
created for Artool over the past six years. <strong>The</strong> stencils featured here are not only<br />
for use on cars and bikes. <strong>The</strong>y work for everything from body art, to wall murals,<br />
to cake decorating. Because they’re made with a solvent-proof polymer, you don’t<br />
have to worry about your choice of paint; you won’t damage these babies!<br />
In the last column we had some fun messing around with Dolla Bill and <strong>The</strong> Blob,<br />
both point-and-shoot stencils (they require little if any freehand skills to paint with).<br />
Now, we’re gonna tackle <strong>The</strong> Horror of Skullmaster, the latest in the Skullmaster line.<br />
Heck, these suckers are so new, they’re not even out as I write this. Hopefully, my<br />
timing will be just right, or I can imagine the hate mail! <strong>The</strong> stencil we’re going to<br />
use is one of the first ones I have designed that comes with both a positive and<br />
negative sheet. This means that you have complete control of all aspects of the<br />
design. Horror of Skullmaster is also the first time we’ve gone for a more anatomically<br />
correct skull. With all the stylizing I’ve been doing over the years, it’s time to<br />
introduce a more accurate anatomy. I also gave each of the stencils in the set three<br />
different sizes to accommodate what you’re painting on, with the largest being lifesize.<br />
For this demo, I rendered realistic fire painted onto one of Coast Airbrush’s<br />
fiberglass tank blanks—a perfect canvas and lightweight display sample for your<br />
shop’s wall. Well, ’nuff talking, lets’ paint.<br />
34 AIRBRUSH ACTION | JULY–AUGUST 2006<br />
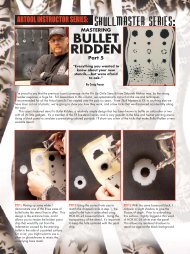
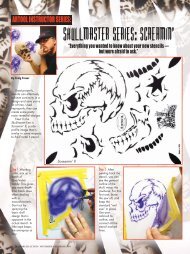
STEP 1. Coast’s tank blanks come gel-coated.<br />
To prep the surface, I sanded the gelcoat with<br />
220-grit sandpaper, then applied primer,<br />
based in black, and cleared it with House of<br />
Kolor UC-35 clear. Artwork always comes out<br />
nicer when it’s applied over sanded clear.<br />
Notice the negative and positive stencils for<br />
the profile skull.<br />
STEP 2. Using a few pieces of tape to hold<br />
down the stencil and to prevent overspray, I<br />
lightly sprayed SG-101 lemon yellow for my<br />
base color. I mainly emphasized the outside<br />
edge and details of the stencil, leaving the<br />
center alone for later.<br />
STEP 3. Taking advantage of the whole stencil,<br />
I threw in a few other side profile skulls of<br />
different sizes. I’ll use the realistic fire effect to<br />
connect and tie in the overall design. With the<br />
jaws in the open position, you can always mask<br />
them off in the stencil, and reposition them any<br />
way you wish. Pretty cool, huh!?
STEP 4. With the yellow sprayed<br />
into the negative shape, I then<br />
used the positive stencil to lay in<br />
the details with the same yellow.<br />
Normally, I would use a darker<br />
color for these fine details, but<br />
don’t forget these skulls are on<br />
fire! Another cool thing about<br />
these designs is that they feature<br />
four registration marks at each<br />
corner to line up the designs<br />
easily and accurately. <strong>The</strong>se work<br />
great when incorporating both<br />
stencils in a design.<br />
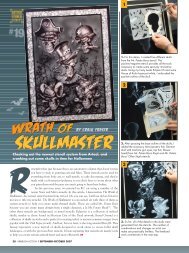
STEP 7. With the yellow sketching<br />
completed, I switched gears and<br />
separately mixed a batch of KK-08<br />
Tangerine and KK-11 Kandy Apple<br />
red—be sure to mix them only 20% by<br />
volume to the SG-100 intercoat clear<br />
before reducing. I then layered the<br />
kandy basecoats over the yellow for<br />
added color and killer depth to my fire.<br />
STEP 5. Using one of my H stencils, (keep an eye out<br />
for the new H is for Hybrid stencil line and DVD from<br />
Artool… shameless plug,) I brought in the realistic fire<br />
effect and connected the separate skull elements in the<br />
design. I used this stencil to bring in long sweeping<br />
flames and to tie in the tight radius of the same flame<br />
licks. <strong>The</strong> trick with all realistic fire is to try and keep the<br />
appearance random. Oddly enough, the best versions<br />
of fire I’ve painted were created with stencils that looked<br />
nothing like fire…hmmmmm.<br />
STEP 8. Keeping the tangerine in<br />
the gun, I added some KK-17 violet<br />
kandy and a bit more intercoat clear.<br />
This produced a nice reddish-brown<br />
color, and allowed me to darken the<br />
details without killing the colors with<br />
a black. Even when painting a mural<br />
over black, I will rarely use black<br />
because colors are so much cleaner<br />
to darken with. <strong>The</strong> positive stencil<br />
allows me to revive the details that<br />
disappeared with the airbrushing.<br />
STEP 6. Putting the H aside, I<br />
returned to my old faithfuls, the<br />
FH1 and FH2 stencils from Eddie<br />
Young. <strong>The</strong>se French curve-style<br />
shields are killer, and remain my<br />
two favorite workhorse stencils. I<br />
used them here to add<br />
interesting shapes, and to give<br />
the fire a bit more chaos.<br />
STEP 9. Using the same violet/tangerine kandy<br />
mix, I rendered the details of the skull with the<br />
new Eclipse CS Kustom airbrush. You must<br />
connect all the stencil lines and soften them<br />
enough so the final image doesn’t look like a<br />
stencil was used. With proper stencil application,<br />
the final result should look freehanded.<br />
www.airbrushaction.com 35
STEP 10. I switched back to kandy<br />
apple red and blended more color<br />
into the flames. This also softens the<br />
tight details and eliminates any<br />
leftover violet that may have been<br />
showing through. Even when working<br />
on small projects, you should always<br />
wear, at the very least, a dualcartridge<br />
active charcoal respirator.<br />
36 AIRBRUSH ACTION | JULY–AUGUST 2006<br />
STEP 11. I returned to the SG-101<br />
lemon yellow using the <strong>Iwata</strong> HP-CH<br />
Kustom detail airbrush. I get killer<br />
detail with this gun and the ability to<br />
control the air pressure at the<br />
airbrush to eliminate spitting. <strong>The</strong><br />
yellow initially kills the depth with its<br />
opaque overspray, but in the long<br />
run it really benefits the overlapping<br />
fire look I’m after.<br />
STEP 13. To knock down some of the yellow overspray, and to really<br />
bring back the brightness of the fire and richness of color, I airbrushed<br />
a mixture of KK-12 Pagan gold, and SG-100 intercoat clear. This is<br />
one of my favorite colors for brightening a mural. If you want<br />
something less orange, you can also use Spanish Gold kandy. Or, if<br />
you desire a green tint (as in lime green flames) the Limegold kandy is<br />
killer. If used properly, any kandy will eliminate the visual clouding of<br />
overspray and liven up your mural.<br />
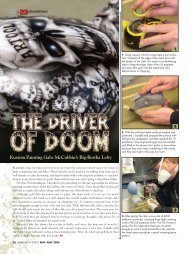
Craig Fraser, author of Automotive Cheap Tricks & Special F/X,<br />
has been airbrushing for nearly two decades. <strong>The</strong> owner and<br />
operator of Air Syndicate, Fraser has also been the in-house<br />
airbrush artist and designer for Kal Koncepts since 1992.<br />
Located in Bakersfield, California, Kal Koncepts/Air Syndicate<br />
specializes in custom graphics, automotive airbrush, and the fine<br />
art of the custom culture. Craig divides his time between working<br />
STEP 12. Along with freehanding, I also use the<br />
stencil. This allows me to create those killer soft, yet<br />
sharp edges that are necessary to show the actual<br />
anatomy of the flame. For this application, I don’t<br />
use the airbrush’s air cap for two reasons: With the<br />
cap removed, I can tell when the airbrush is going<br />
to spit by being able to see the amount of paint<br />
build-up on the needle, and, I can spray closer to<br />
the surface for better details. Barring that, I typically<br />
keep the cap on to protect the needle.<br />
STEP 14. <strong>The</strong> final touches are always the last<br />
highlights. I do these with an overly reduced<br />
mix of SG-101 lemon yellow and just a drop of<br />
white. Use this mix sparingly or it will generate<br />
a lot of overspray and undo all your hard kandy<br />
work. <strong>Of</strong>ten, I’ll use this mix to create smoke,<br />
too, since the white dominates.<br />
in his shop, writing magazine articles, and instructing. He has<br />
also appeared in a number of instructional videos, and is<br />
credited with pioneering the original automotive custom paint<br />
workshop for the Airbrush Getaway more than 10 years ago.<br />
Craig works directly with a number of manufacturers to develop<br />
new and innovative custom paint products. You can check out his<br />
artwork at www.gotpaint.com.
FINAL: Amazing what you can do with<br />
a few stencils. <strong>The</strong> new Horror of<br />
Skullmaster stencils are perfect for bikes<br />
and cars. And because they’re what I like<br />
to call rendering stencils, they act as great<br />
sketching tools, leaving your own style<br />
and creativity to turn them into anything<br />
your imagination can come up with.<br />
Remember that a stencil is only a tool.<br />
<strong>The</strong>y can make your work go faster, and<br />
give you better continuity in your designs,<br />
but they never replace freehand<br />
airbrushing. That’s why I always<br />
incorporate additional effects and<br />
freehand work with each of my stencil<br />
demos. I hope you enjoy using them as<br />
much as I enjoyed making them. Until<br />
next time, keep on stencilling.<br />
Tune in next issue for the continuation of <strong>The</strong><br />
Horror of Skullmaster series. I told you that I like to<br />
jump around a lot!! Who knows what top secret<br />
stencil will appear on my desk next from Artool. If<br />
you have any comments, suggestions, or requests,<br />
please submit them to Craig Fraser at<br />
Fraser@gotpaint.com. You can also cruise the new<br />
Q&A forum at www.kustomkulturelounge.com<br />
where you can get any of your stencil questions<br />
answered, not to mention step-by--steps from time<br />
to time. See ya there!!<br />
Paint to live, live to paint... and sometimes<br />
with stencils. —Fraser<br />
www.airbrushaction.com 37