VCC-4790P - sanyocctvrepairs.co.uk
VCC-4790P - sanyocctvrepairs.co.uk
VCC-4790P - sanyocctvrepairs.co.uk

You also want an ePaper? Increase the reach of your titles
YUMPU automatically turns print PDFs into web optimized ePapers that Google loves.
English<br />
Deutsch<br />
Français<br />
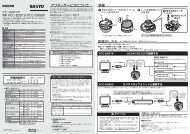
DIMENSIONS (Unit: mm)<br />
PRECAUTIONS<br />
INSTRUCTION MANUAL<br />
Color CCD Camera<br />
<strong>VCC</strong>-<strong>4790P</strong><br />
3<br />
54<br />
67<br />
28<br />
1<br />
15.4<br />
24.4<br />
136<br />
127<br />
11<br />
1/4”-20 UNC<br />
■ In case of a problem<br />
Do not use the unit if smoke or a strange odor <strong>co</strong>mes from the unit,<br />
or if it seems not to function <strong>co</strong>rrectly. Turn off the power<br />
immediately and dis<strong>co</strong>nnect the power <strong>co</strong>rd, and then <strong>co</strong>nsult your<br />
dealer or an Authorized Sanyo Service Center.<br />
■ Do not open or modify<br />
Do not open the cabinet, as it may be dangerous and cause damage<br />
to the unit. For repairs, <strong>co</strong>nsult your dealer or an Authorized Sanyo<br />
Service Center.<br />
■ Do not put objects inside the unit<br />
Make sure that no metal objects or flammable substance get inside<br />
the unit. If used with a foreign object inside, it <strong>co</strong>uld cause a fire, a<br />
short-circuit or damage. Be careful to protect the unit from rain, sea<br />
water, etc. If water or liquid gets inside the unit, turn off the power<br />
immediately and dis<strong>co</strong>nnect the power <strong>co</strong>rd, and then <strong>co</strong>nsult your<br />
dealer or an Authorized Sanyo Service Center.<br />
■ Be careful when handling the unit<br />
To prevent damage, do not drop the unit or subject it to strong shock<br />
or vibration.<br />
■ Protect from high temperatures<br />
Do not install close to stoves, or other heat sources, such as<br />
spotlights, etc., or where it <strong>co</strong>uld be subject to direct sunlight, as this<br />
<strong>co</strong>uld cause deformation, dis<strong>co</strong>loration or other damages.<br />
Be careful when installing close to the ceiling, in a kitchen or boiler<br />
room, as the temperature may rise to high levels.<br />
■ Cleaning<br />
• Dirt can be removed from the cabinet by wiping it with a soft cloth.<br />
To remove stains, wipe with a soft cloth moistened with a soft<br />
detergent solution and wrung dry, then dry by wiping with a soft<br />
cloth.<br />
• Do not use benzine, thinner or other chemical products on the<br />
cabinet, as this may cause deformation and paint peeling. Before<br />
using a chemical cloth, make sure to read all ac<strong>co</strong>mpanying<br />
instructions. Make sure that no plastic or rubber material <strong>co</strong>mes<br />
into <strong>co</strong>ntact with the cabinet for a long period of time, as this may<br />
cause damage or paint peeling.<br />
About this manual<br />
Before installing and using the camera, please read this manual carefully.<br />
Be sure to keep it handy for later reference.<br />
Depending on the <strong>co</strong>nditions of use, installation and environment,<br />
please be sure to make the appropriate settings and adjustments.<br />
If you need help with installation and/or settings, please <strong>co</strong>nsult<br />
your dealer or an Authorized Sanyo Service Center.<br />
■ Do not install this unit close to magnetic fields<br />
The magnetic fields may result in unstable operation.<br />
■ Protect from humidity and dust<br />
To prevent damage, do not install the unit where there is greasy<br />
smoke or steam, where the humidity may get too high, or where<br />
there is a lot of dust.<br />
Printed on recycled paper<br />
1AC6P1P2981--<br />
L5BG5/XE, UK (1105KP-SY)a<br />
SANYO Electric Co., Ltd.<br />
Printed in Japan<br />
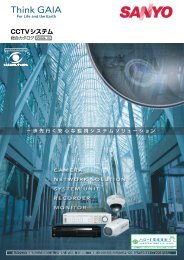
CONNECTION EXAMPLE<br />
[Monitoring system]<br />
Monitoring<br />
Monitor display<br />
[Monitoring/Re<strong>co</strong>rding system]<br />
SPECIFICATIONS<br />
Scanning system : PAL standard 625 lines, 50 fields/sec.<br />
Image sensor<br />
: 1/3" interline transfer method CCD<br />
Number of effective pixels : 752 (H) x 582 (V)<br />
Horizontal resolution : More than 520 TV lines<br />
Minimum illumination<br />
(approx.)<br />
: Gain high: 0.01 lx (F 1.2, B/W mode),<br />
0.45 lx (F1.2, <strong>co</strong>lor mode)<br />
Gain normal: 0.02 lx (F 1.2, B/W mode),<br />
0.6 lx (F1.2, <strong>co</strong>lor mode)<br />
Video output<br />
: 1.0 V(p-p)/75 Ω, <strong>co</strong>mposite, BNC<br />
Video S/N ratio<br />
: More than 48 dB (AGC off: More than 50 dB)<br />
Backlight <strong>co</strong>mpensation : OFF, Multi-spot metering (High/Normal), Center zone<br />
metering<br />
White balance<br />
: ATW/Manual<br />
Gain <strong>co</strong>ntrol<br />
: Normal/High<br />
Light <strong>co</strong>ntrol<br />
: Optical auto iris lens/Electronic iris (indoor use)<br />
Lens mount<br />
: CS mount<br />
Flange back<br />
: 12.5 mm ± 0.5 mm adjustment<br />
Electronic shutter : 1/50, 1/120, 1/500, 1/1000, 1/2000, 1/4000, 1/10000 sec.<br />
Aperture <strong>co</strong>mpensation : Sharp/Normal<br />
Sync system<br />
: Internal sync/Line lock<br />
Day/Night mode<br />
: Auto (High/Low), Manual (at CONTROL terminal)<br />
Operating Environment : Temperature: –10°C – +50°C (14°F – 122°F)<br />
Humidity: less than 90 % RH (no <strong>co</strong>ndensation)<br />
Power supply<br />
: 220 – 230 V AC, 50 Hz<br />
Power <strong>co</strong>nsumption<br />
(approx.)<br />
: 3.6 W (with auto-iris lens)<br />
Weight (approx.) : 600 g (without lens)<br />
• UK: 640 g (without lens)<br />
TROUBLESHOOTING<br />
Before sending the camera out for repair, check the items below.<br />
If the problem persists after checking these items, <strong>co</strong>nsult your<br />
dealer or an Authorized Sanyo Service Center.<br />
■ If no image appears<br />
• Is the <strong>co</strong>axial cable attached securely?<br />
• Are the power and voltage normal?<br />
• Has the iris of the lens been adjusted <strong>co</strong>rrectly (with the LEVEL<br />
dial)?<br />
• Is there adequate illumination?<br />
■ If the image is unclear<br />
• Is the monitor adjusted <strong>co</strong>rrectly?<br />
• Is the flange-back position <strong>co</strong>rrectly set?<br />
• Is the lens in focus?<br />
• Is the lens clean?<br />
Dirt or fingerprints on the lens can adversely affect the image.<br />
Gently wipe any dirt or fingerprints off the lens with a soft cloth or<br />
lens cleaning paper and cleaning fluid (<strong>co</strong>mmercially available).<br />
Please note:<br />
Your SANYO product is designed and<br />
manufactured with high quality materials and<br />
<strong>co</strong>mponents which can be recycled and<br />
reused.<br />
This symbol means that electrical and<br />
electronic equipment, at their end-of-life,<br />
should be disposed of separately from your<br />
household waste.<br />
Please dispose of this equipment at your local<br />
<strong>co</strong>mmunity waste <strong>co</strong>llection/recycling centre.<br />
In the European Union there are separate<br />
<strong>co</strong>llection systems for used electrical and<br />
electronic products.<br />
Please help us to <strong>co</strong>nserve the environment<br />
we live in!<br />
This symbol mark and recycle system<br />
are applied only to EU <strong>co</strong>untries and<br />
not applied to <strong>co</strong>untries in other areas<br />
of the world.<br />
Re<strong>co</strong>rding<br />
Digital Video Re<strong>co</strong>rder<br />
Monitoring<br />
Monitor display<br />
Appearance and specifications are subject to change without prior notice<br />
or obligations.<br />
SERVICE<br />
The camera is a precision instrument. Handle it carefully and always<br />
follow the safety precautions. If the camera requires service, never<br />
try to repair it yourself or open the casing.<br />
For servicing, maintenance, or repairs, <strong>co</strong>nsult your dealer or an<br />
Authorized Sanyo Service Center.
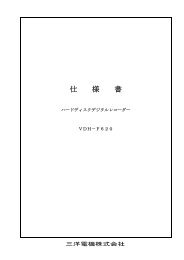
CONNECTIONS AND ADJUSTMENTS<br />
Français<br />
Deutsch<br />
English<br />
b Attaching the lens<br />
Use any DC type and CS mounting lens equipped with an auto iris (sold separately).<br />
Brake <strong>co</strong>il (–)<br />
Brake <strong>co</strong>il (+)<br />
1<br />
Pin layout for LENS terminal<br />
Drive <strong>co</strong>il (+)<br />
Drive <strong>co</strong>il (–)<br />
3 2<br />
5 mm max.<br />
• Depending on the type of the lens, the shape of<br />
the lens plug may differ. In this case, <strong>co</strong>nsult your<br />
dealer or an Authorized Sanyo Service Center.<br />
• Apply adapter ring (sold separately) when you use<br />
any C mounting lens.<br />
b Camera attachment<br />
When attaching the camera, make sure to verify that the attachment surface will allow full<br />
tightening of the screws. Plaster board, etc., may not give a strong enough attachment, and<br />
it is re<strong>co</strong>mmended to use a reinforcement, or other method so that the screws are anchored<br />
securely.<br />
When monitoring lighting or other extremely bright objects (which<br />
exceed the maximum required illumination), smearing may occur in<br />
the vertical or horizontal direction (either above and below the<br />
high-brightness object or as a perpendicular band). In such a case,<br />
adjust the angle of illumination and other factors while observing<br />
the monitor.<br />
Changing the<br />
bracket topside out<br />
b Flange-back adjustment<br />
This normally does not need adjustment. If the picture is out of focus at the telephoto position,<br />
adjust the flange-back position as described below.<br />
3 Set to the maximum<br />
wide-angle position<br />
and focus the picture.<br />
1<br />
4<br />
Loosen.<br />
Tighten.<br />
Repeat steps 2 and 3 until the image stays in-focus when changing from a wide-angle position to<br />
a telephoto position.<br />
2<br />
Set to the maximum<br />
telephoto position and<br />
focus the picture.<br />
POWER lamp<br />
LINE PHASE<br />
dial<br />
Make sure to use the<br />
screws to secure the<br />
bracket.<br />
b Supported <strong>co</strong>axial cables<br />
Cable type – Length: RG-59U (3C-2V) – 250 m max.,<br />
RG-6U (5C-2V) – 500 m max., RG-11U (7C-2V) – 600 m max.<br />
• When using an RG-59U (3C-2V) cable, do not use it<br />
on piping or air wiring.<br />
• If you use a cable other than the type above, the<br />
image or sync signal will be attenuated and will not be<br />
transmitted <strong>co</strong>rrectly.<br />
POWER<br />
VIDEO<br />
OUT<br />
CONTROL<br />
C B G<br />
LINE<br />
PHASE<br />
b Camera adjustments/settings<br />
The camera <strong>co</strong>mes pre-adjusted and ready to install at the time of<br />
factory shipment, but you can make adjustments or settings if you<br />
need.<br />
If you have trouble adjusting the camera, <strong>co</strong>nsult your dealer or an<br />
Authorized Sanyo Service Center.<br />
ON<br />
H H S M C MWB LL<br />
1 2 3 4 5 6 7 8 9 10<br />
MSB LSB L N N OFF ATW INT<br />
ES/EI C-BW AP BLC WB SYNC RED<br />
L H<br />
GAIN<br />
LEVEL<br />
BLUE<br />
A. I.<br />
LENS<br />
Day/Night function switchover point<br />
This switch is used to set the timing for automatic switching<br />
between <strong>co</strong>lor and black-and-white images.<br />
a Set the switchover point to brighter side so that the automatic<br />
switch may trip in brighter <strong>co</strong>ndition for switchover between <strong>co</strong>lor<br />
and black-and-white images.<br />
High<br />
a Set the switchover point to darker side so that the automatic switch<br />
may trip in darker <strong>co</strong>ndition for switchover between <strong>co</strong>lor and<br />
black-and-white images.<br />
Low<br />
4<br />
4<br />
B/W<br />
B/W<br />
Switchover point<br />
Switchover point<br />
Color<br />
Color<br />
Backlight<br />
<strong>co</strong>mpensation<br />
Only when using an auto-iris lens<br />
Multi-spot metering<br />
Backlight <strong>co</strong>mpensation<br />
to the entire screen*<br />
High Normal<br />
Center zone metering<br />
Backlight <strong>co</strong>mpensation<br />
to the central portion of<br />
the screen<br />
7 8 7 8<br />
7 8<br />
7 8<br />
* If the background of the object is extremely dark, set to Center zone<br />
metering.<br />
White balance (<strong>co</strong>lor <strong>co</strong>mpensation)<br />
OFF<br />
b Power <strong>co</strong>rd<br />
Insert the plug of this power <strong>co</strong>rd into a wall outlet.<br />
b When a hunting reaction occurs<br />
Under near infrared lighting or other similar <strong>co</strong>nditions, hunting reaction may occur because the<br />
Day/Night function is not carried out normally. In such case, refer to the following diagram for cable<br />
<strong>co</strong>nnection to fix the image either to <strong>co</strong>lor or black-and-white by using an external switch, etc.<br />
Fixing the image to <strong>co</strong>lor<br />
Fixing the image to back-and-white<br />
CONTROL<br />
CBG<br />
AWG24: 600 m max.<br />
CONTROL<br />
CBG<br />
You cannot <strong>co</strong>ntrol the switchover operation by using an external switch, etc., while switching between<br />
<strong>co</strong>lor and black-and-white images is actually in progress by the Day/Night function.<br />
EI setting (for indoor use)<br />
Only when using a manual or fixed iris lens (EI)<br />
1<br />
2<br />
3<br />
• Set the lens aperture to the shortest F-stop.<br />
• When using a manual or fixed iris lens under fluorescent light, the<br />
image may flicker.<br />
Electronic shutter speed setting<br />
(unit: se<strong>co</strong>nd)<br />
1/50 1/120 1/500 1/1000<br />
1 2 3 1 2 3 1 2 3 1 2 3<br />
1/2000 1/4000 1/10000<br />
1 2 3 1 2 3 1 2 3<br />
• Using the high speed electronic shutter indoors with low lighting,<br />
will give darker pictures. In such a case, add some lights to make<br />
sure the lighting is sufficient.<br />
• If the lighting is very bright, pay attention to the light angle in order<br />
to avoid or minimize the smear phenomenon effect.<br />
• When using an auto-iris lens, if the entire image is too dark or too<br />
bright, adjust the <strong>co</strong>ntrast by using the LEVEL dial.<br />
• The <strong>co</strong>lor image will be displayed first when the power is turned on.<br />
• When switching between <strong>co</strong>lor and black-and-white images<br />
automatically, it is normal for movement of the optical filter to be<br />
heard and for a vertical black band to move across the screen.<br />
• Switching from black-and-white to <strong>co</strong>lor may occur if there is a<br />
significant degree of reflection from the object when using infrared<br />
illumination in black-and-white image. Adjust the illumination to<br />
avoid switching to <strong>co</strong>lor image.<br />
• The focus setting position may differ between <strong>co</strong>lor and<br />
black-and-white images. Carry out adjustment to ensure that the<br />
focus for both images is in the optimum position.<br />
Auto gain <strong>co</strong>ntrol (AGC)<br />
High sensitivity<br />
Increased electronic sensitivity to obtain a<br />
bright image in a lower illuminance*<br />
* This setting causes noise generation and a grainy image.<br />
Aperture <strong>co</strong>mpensation<br />
Sharp outline<br />
Normal<br />
sensitivity<br />
5 5<br />
Normal outline<br />
6 6<br />
Manual White Balance<br />
Sync setting<br />
Line-Lock<br />
Synchronizes the unit with power<br />
frequency*<br />
Auto-Tracing<br />
White balance<br />
Turn clockwise to<br />
augment the <strong>co</strong>lor.<br />
9 9<br />
RED<br />
BLUE<br />
LINE<br />
PHASE<br />
Internal sync<br />
10 (Rear panel)<br />
10<br />
* Adjust the roll by turning the LINE PHASE dial on the se<strong>co</strong>nd and<br />
subsequent cameras.<br />
If the vertical roll cannot be <strong>co</strong>rrected by adjusting the LINE PHASE<br />
dial on the se<strong>co</strong>nd and subsequent cameras, try adjusting the LINE<br />
PHASE dial on the first camera. If it still cannot be <strong>co</strong>rrected, please<br />
check that the polarity of the power <strong>co</strong>rds of all <strong>co</strong>nnected devices is<br />
<strong>co</strong>rrect.<br />
Lens iris level adjustment<br />
When using an auto-iris lens, if the entire image is too dark or too<br />
bright, adjust the <strong>co</strong>ntrast.<br />
Low (darker)<br />
High (brighter)<br />
L H<br />
LEVEL<br />
A. I.<br />
LENS