technical data
technical data
technical data

You also want an ePaper? Increase the reach of your titles
YUMPU automatically turns print PDFs into web optimized ePapers that Google loves.
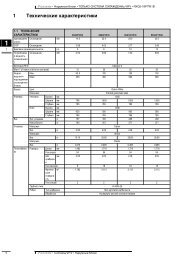
• Wall mounted unit • FXAQ20-63MVE<br />
10 Installation<br />
10-3 Drain piping<br />
1 Install the drain piping<br />
• The drain pipe should be short with a downward slope and should prevent the formation of air pockets.<br />
Make sure the drain hose is at a<br />
downward slope.<br />
Drain hose<br />
(Downward slope)<br />
Drain hose<br />
Make sure the tip does not go<br />
underwater even when water is added.<br />
• When extending the drain hose, use a commercially available drain extension hose, and be sure to insulate the extended section of the drain<br />
hose which is indoors.<br />
Indoor unit drain hose<br />
Extension drain piping (locally procured)<br />
Insulating tube (locally procured)<br />
Insulating tape (accessory)<br />
• Make sure the diameter of the piping is the same as the piping (hard vinyl chloride, nominal diameter 13mm) or bigger.<br />
• When directly connecting a hard vinyl chloride pipe joint (nominal diameter 13mm) to the drain hose connected to the indoor unit (i.e. for<br />
embedded piping, etc.), use a commercially available hard vinyl chloride pipe joint (nominal diameter 13mm).<br />
10<br />
Drain hose connected to the indoor unit<br />
Commercially available hard vinyl chloride pipe joint<br />
(nominal diameter 13mm)<br />
Commercially available hard vinyl chloride pipe (nominal<br />
diameter 13mm)<br />
• Systems • Indoor Units 17