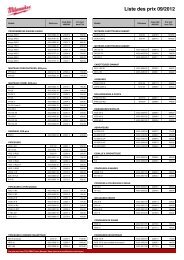
REPAIR & SUPPLIES - Auto-Mecanique
REPAIR & SUPPLIES - Auto-Mecanique
REPAIR & SUPPLIES - Auto-Mecanique

Create successful ePaper yourself
Turn your PDF publications into a flip-book with our unique Google optimized e-Paper software.
TPMS Service procedure<br />
INITIAL INSPECTION<br />
A. Before performing wheel<br />
service on any vehicle,<br />
check to see if the wheels<br />
are equipped with TPMS<br />
sensors.<br />
B. Following the diagnostic<br />
tool manufacturer’s<br />
instructions, check each<br />
sensor to ensure each is<br />
working properly and note<br />
the state of each on the<br />
service ticket.<br />
C. If a sensor is not working<br />
properly, inform the vehicle<br />
owner that it will need to<br />
be replaced.<br />
SENSOR IDENTIFICATION<br />
D. Identify which type TPMS<br />
sensor is on the vehicle:<br />
Clamp-In sensors<br />
Have an aluminum valve stem<br />
mounted directly to the wheel<br />
through the valve hole using a<br />
special aluminum nut.<br />
Snap-In sensors<br />
Have a rubber snap-in valve<br />
stem mounted directly to the<br />
wheel through the valve hole.<br />
Typically identified by the long,<br />
black plastic cap and/or the<br />
extended brass shoulder.<br />
Banded sensors<br />
Mounted in the drop center of<br />
the wheel using a metal band<br />
typically 180° from the valve<br />
stem. Ford is the only vehicle<br />
manufacturer using banded<br />
sensors as original equipment.<br />
E. SERVICING CLAMP-IN<br />
TPMS SENSORS<br />
1. Remove the tire from<br />
the vehicle following<br />
industry recommended<br />
procedures.<br />
2. Deflate the tire by removing the<br />
valve core using a valve core removal<br />
tool and releasing the air completely.<br />
3. Remove the sensor nut and push the sensor<br />
inside the tire.<br />
4. Break the tire beads at 90° and 270° from the<br />
valve stem and remove the sensor from<br />
the wheel.<br />
5. Dispose of the valve cap, core, nut and rubber<br />
grommet.<br />
6. Using the appropriate new service kit, replace<br />
the valve core and grommet.<br />
7. Reinstall the sensor through the rim hole with<br />
the flat side of the sensor facing the rim.<br />
8. Install the new nut using a torque wrench and<br />
tighten to the proper torque specification.<br />
9. Install the new sealing valve cap.<br />
10. Service the tire / wheel as required following<br />
all industry and tire manufacturer guidelines.<br />
11. Mount the tire onto the wheel taking special<br />
care not to damage the TPMS sensor.<br />
12. Inflate the tire to the recommended placard<br />
pressure.<br />
E. SERVICING SNAP-IN<br />
TPMS SENSORS<br />
1. Remove the tire from the<br />
vehicle following industry<br />
recommended procedures.<br />
2. Deflate the tire by removing the<br />
valve core using a valve core removal<br />
tool and releasing the air completely.<br />
3. Break the tire beads at 90° and 270° from the<br />
valve stem and remove the sensor from<br />
the wheel.<br />
4. Remove the screw from the base of the sensor<br />
using a T-10 torque screwdriver tool and carefully<br />
remove the sensor from the valve stem.<br />
5. Dispose of the old screw.<br />
6. Remove the rubber snap-in valve from the<br />
wheel as normal.<br />
7. Attach the sensor to the rubber snap-in valve<br />
using a new T-10 TORX screw, then torque the<br />
screw to 11.5 in-lbs (1.3 N.m.)<br />
8. Apply mounting lube to the rubber snap-in<br />
valve stem.<br />
9. Align the sensor with the rim hole and attach<br />
a standard valve installation tool.<br />
10. Pull the valve stem straight into the valve hole<br />
until it is properly seated.<br />
11. Service the tire / wheel as required following<br />
all industry and tire manufacturer guidelines.<br />
12. Mount the tire onto the wheel taking special<br />
care not to damage the TPMS sensor.<br />
13. Inflate the tire to the recommended placard<br />
pressure and install the new sealing valve cap.<br />
E. SERVICING<br />
BANDED<br />
TPMS SENSORS<br />
1. Remove the tire from the vehicle<br />
following industry recommended<br />
procedures.<br />
2. Deflate the tire by removing the valve core<br />
using a valve core removal tool and releasing<br />
the air completely.<br />
3. Break the tire beads at 90° and 270° from the<br />
valve stem and remove the sensor from the wheel.<br />
4. Remove the mounting clip to release the sensor<br />
from the mounting bracket.<br />
5. Gently pry the sensor from the open end of the<br />
bracket and discard the mounting clip.<br />
6. If the mounting band and/or mounting bracket<br />
show signs of wear or corrosion, replace with<br />
a new band and/or mounting bracket.<br />
7. Install a new sensor using a new retaining clip.<br />
8. Service the tire / wheel as required following all<br />
industry and tire manufacturer guidelines.<br />
9. Mount the tire onto the wheel taking special care<br />
not to damage the TPMS sensor.<br />
10. Inflate the tire to the recommended placard<br />
pressure.<br />
F. SERVICE COMPLETION<br />
1. Using your TPMS sensor activation tool, check all sensors making sure each is working properly.<br />
2. Refer to your Motor TPMS Guide or vehicle owner’s manual to determine if a TPMS relearn is<br />
necessary. A TPMS relearn tool may be required to reset the system.<br />
3. If necessary, follow the instructions for resetting the vehicles TPMS system.<br />
60