The FAT-O for Fatties User's Manual & Guide What it is ... - Deaf Eddie
The FAT-O for Fatties User's Manual & Guide What it is ... - Deaf Eddie
The FAT-O for Fatties User's Manual & Guide What it is ... - Deaf Eddie

Create successful ePaper yourself
Turn your PDF publications into a flip-book with our unique Google optimized e-Paper software.
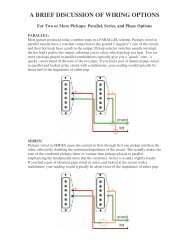
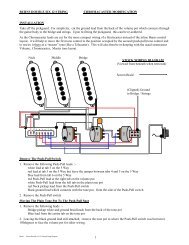
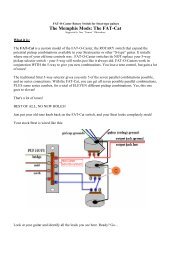
WIRING THE <strong>FAT</strong>-O-Caster Sw<strong>it</strong>ch:<br />
STEP ONE - the shunt leads:<br />
Identify the bridge pup’s SHUNT LEADS. <strong>The</strong> Fender bridge humbucker usually has four leads:<br />
red, green, black, and wh<strong>it</strong>e. On a Lone Star or Texas Special, you will typically find the red and<br />
wh<strong>it</strong>e wires together on a single lug. On a Deluxe Fat Strat, <strong>it</strong> will be the black and wh<strong>it</strong>e leads<br />
together. <strong>The</strong>se are the shunt leads (see drawing three).<br />
Remove the shunt leads from the 5-way pup selector, and solder them to the middle ring of lugs on<br />
the <strong>FAT</strong>-O-Caster sw<strong>it</strong>ch, being certain to get them on lug “1” (the one w<strong>it</strong>h the string through <strong>it</strong>)<br />
(see drawings three).<br />
For non-Fender brands of pickups, please refer to your pickup's manufacturer's in<strong>for</strong>mation to<br />
determine the color code of the shunt leads. For Seymour Duncan, <strong>it</strong> <strong>is</strong> typically the red and wh<strong>it</strong>e<br />
leads. For DiMarzio, <strong>it</strong> <strong>is</strong> typically black and wh<strong>it</strong>e leads.<br />
STEP TWO - the other "inner lug":<br />
Unsolder the middle pup's negative (GROUND) lead from where <strong>it</strong> <strong>is</strong> currently in your gu<strong>it</strong>ar -<br />
usually the back of the volume pot. Solder <strong>it</strong> to the next center lug, clockw<strong>is</strong>e, on the <strong>FAT</strong>-O (see<br />
drawing four).<br />
NOTE: Sometimes there <strong>is</strong> not enough wire on the ground leads to make <strong>it</strong> to the <strong>FAT</strong>-O, so just<br />
add on a l<strong>it</strong>tle "tail" to the lead to get there. Be sure you insulate the solder joint on th<strong>is</strong> "tail" to<br />
prevent contact w<strong>it</strong>h the pots or any other grounded surface in the control cav<strong>it</strong>y – black electrical<br />
tape will do…<br />
STEP THREE - the <strong>FAT</strong>-O's pre-wired leads:<br />
Solder the leads from the <strong>FAT</strong>-O to the circu<strong>it</strong> as follows (see drawing four):<br />
<strong>The</strong> RED lead <strong>is</strong> soldered to lug on the 5-way where you removed the coil-shunts, and jumpered<br />
over to the last lug on that pole. <strong>The</strong> lead from the common lug <strong>for</strong> that pole <strong>is</strong> moved from the back<br />
of the volume pot (ground) to the input of the volume pot. Please see drawing.<br />
<strong>The</strong> BLACK lead <strong>is</strong> added to the neck pup's lug on the 5-way. It's the wire that will allow the<br />
ground (or "negative") lead of the middle pup to go back through the neck pup <strong>for</strong> the "Series"<br />
settings, and allows the neck pup's hot lead to go to the 5-way sw<strong>it</strong>ch's output <strong>for</strong> the "Neck Always<br />
On" setting.<br />
<strong>The</strong> BARE wire <strong>is</strong> soldered to (any) ground.<br />
Put your pickguard back on, and you're ready to rip!