
You also want an ePaper? Increase the reach of your titles
YUMPU automatically turns print PDFs into web optimized ePapers that Google loves.
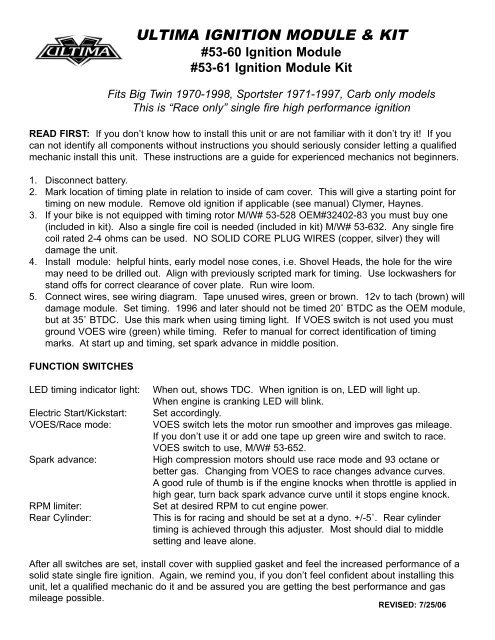
ULTIMA IGNITION MODULE & KIT<br />
#<strong>53</strong>-<strong>60</strong> Ignition Module<br />
#<strong>53</strong>-61 Ignition Module Kit<br />
Fits Big Twin 1970-1998, Sportster 1971-1997, Carb only models<br />
This is “Race only” single fire high performance ignition<br />
READ FIRST: If you don’t know how to install this unit or are not familiar with it don’t try it! If you<br />
can not identify all components without <strong>instructions</strong> you should seriously consider letting a qualified<br />
mechanic install this unit. These <strong>instructions</strong> are a guide for experienced mechanics not beginners.<br />
1. Disconnect battery.<br />
2. Mark location of timing plate in relation to inside of cam cover. This will give a starting point for<br />
timing on new module. Remove old ignition if applicable (see manual) Clymer, Haynes.<br />
3. If your bike is not equipped with timing rotor M/W# <strong>53</strong>-528 OEM#32402-83 you must buy one<br />
(included in kit). Also a single fire coil is needed (included in kit) M/W# <strong>53</strong>-632. Any single fire<br />
coil rated 2-4 ohms can be used. NO SOLID CORE PLUG WIRES (copper, silver) they will<br />
damage the unit.<br />
4. Install module: helpful hints, early model nose cones, i.e. Shovel Heads, the hole for the wire<br />
may need to be drilled out. Align with previously scripted mark for timing. Use lockwashers for<br />
stand offs for correct clearance of cover plate. Run wire loom.<br />
5. Connect wires, see wiring diagram. Tape unused wires, green or brown. 12v to tach (brown) will<br />
damage module. Set timing. 1996 and later should not be timed 20˚ BTDC as the OEM module,<br />
but at 35˚ BTDC. Use this mark when using timing light. If VOES switch is not used you must<br />
ground VOES wire (green) while timing. Refer to manual for correct identification of timing<br />
marks. At start up and timing, set spark advance in middle position.<br />
FUNCTION SWITCHES<br />
LED timing indicator light:<br />
Electric Start/Kickstart:<br />
VOES/Race mode:<br />
Spark advance:<br />
RPM limiter:<br />
Rear Cylinder:<br />
When out, shows TDC. When ignition is on, LED will light up.<br />
When engine is cranking LED will blink.<br />
Set accordingly.<br />
VOES switch lets the motor run smoother and improves gas mileage.<br />
If you don’t use it or add one tape up green wire and switch to race.<br />
VOES switch to use, M/W# <strong>53</strong>-652.<br />
High compression motors should use race mode and 93 octane or<br />
better gas. Changing from VOES to race changes advance curves.<br />
A good rule of thumb is if the engine knocks when throttle is applied in<br />
high gear, turn back spark advance curve until it stops engine knock.<br />
Set at desired RPM to cut engine power.<br />
This is for racing and should be set at a dyno. +/-5˚. Rear cylinder<br />
timing is achieved through this adjuster. Most should dial to middle<br />
setting and leave alone.<br />
After all switches are set, install cover with supplied gasket and feel the increased performance of a<br />
solid state single fire ignition. Again, we remind you, if you don’t feel confident about installing this<br />
unit, let a qualified mechanic do it and be assured you are getting the best performance and gas<br />
mileage possible.<br />
REVISED: 7/25/06
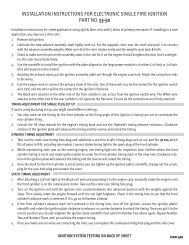
Midwest Part# <strong>53</strong>-<strong>60</strong>/61<br />
IGNITION<br />
SWITCH<br />
- +<br />
12 VOLT<br />
BATTERY<br />
GROUND<br />
O.E. WHITE WIRE TO<br />
COIL +<br />
BLACK<br />
RED<br />
WHITE<br />
BROWN<br />
GREEN<br />
VOES<br />
(VACUUM SWITCH<br />
TACH<br />
FRONT<br />
SPARK PLUG<br />
REAR<br />
SPARK PLUG<br />
NOTE: Tape up unused wires.<br />
VOES: Green/ Tach: Brown<br />
12v to Brown will damage unit.