Organ 3 - LinPlug Virtual Instruments
Organ 3 - LinPlug Virtual Instruments
Organ 3 - LinPlug Virtual Instruments

You also want an ePaper? Increase the reach of your titles
YUMPU automatically turns print PDFs into web optimized ePapers that Google loves.
<strong>Organ</strong> 3<br />
Drawbar <strong>Organ</strong><br />
User Guide
Copyright <strong>LinPlug</strong> <strong>Virtual</strong> <strong>Instruments</strong> GmbH 2006-2014<br />
All rights reserved<br />
Instrument<br />
Sounds<br />
Manual<br />
Peter Linsener & Pavol Markovic<br />
Big!Tone (BT), dubhad(DH), Ján Ančic (JA)<br />
Tobias Birkenbeil & Peter Linsener<br />
All technical specifications of the products specified in this manual may be subject to change without<br />
notice. The documents may not be changed, especially copyright notices may not be removed or<br />
changed. <strong>LinPlug</strong> and all <strong>LinPlug</strong> product names are trademarks of <strong>LinPlug</strong> <strong>Virtual</strong> <strong>Instruments</strong> GmbH.<br />
Cubase and VST are registered trademarks of Steinberg Media Technologies AG. All other trademarks<br />
are the property of their respective owners.<br />
<strong>LinPlug</strong> <strong>Organ</strong> 3 User Guide Page 2
Welcome<br />
Thank you for licensing <strong>Organ</strong> 3!<br />
In the late 1930s, Hammond released the B3 organ. Since then, the<br />
sound of the Hammond B3 has become one of the most common and<br />
most recognisable sounds in popular music. The presence of the<br />
Hammond B3 is virtually everywhere; from Gospel, Blues and Jazz, to<br />
Funk, Rock, Reggae and Dance styles. The original Hammond B3<br />
weighed in at over 180 kilograms and required a separate Leslie speaker<br />
cabinet that was six feet tall and weighed almost as much as the organ<br />
itself!<br />
<strong>Organ</strong> 3 is a software emulation of the original Hammond B3 and further<br />
historical electronic organs designed for creating music on your PC or<br />
Macintosh. <strong>Organ</strong> 3 features all of the controls found on the original B3.<br />
These include the drawbars, a vibrato and percussion section, as well as<br />
a sophisticated dual-effects processor with a fully sync-able Leslie-<br />
Emulation. All these features have been incorporated into an easy-to-use<br />
interface, capable of producing a wide range of classic and modern<br />
organ sounds.<br />
This manual describes all aspects of <strong>Organ</strong> 3 and is designed so that<br />
your use of this instrument is as efficient and enjoyable as possible.<br />
At <strong>LinPlug</strong> we're very proud of <strong>Organ</strong> 3; it's the result of a long and<br />
extensive period of research into the famous Hammond B3 organ and its<br />
various components. We hope you get a lot of pleasure using <strong>Organ</strong> 3<br />
and that it becomes an integral part of your music-making.<br />
<strong>LinPlug</strong> <strong>Organ</strong> 3 User Guide Page 3
Table of Contents<br />
INSTALLATION........................................................................... 5<br />
OVERVIEW................................................................................. 6<br />
STRUCTURE.............................................................................. 7<br />
WHAT’S NEW IN ORGAN 3........................................................9<br />
CONTROLS.............................................................................. 10<br />
THE MAIN SECTION................................................................ 11<br />
MANUAL CONTROLS................................11<br />
THE “DRAWBAR” SECTION.......................13<br />
THE PRESET BROWSER .........................15<br />
THE „ORGAN“ PAGE................................................................ 17<br />
THE PERCUSSION SECTION.....................17<br />
THE VIBRATO SECTION...........................18<br />
THE MASTER SECTION...........................19<br />
GLIDE .................................................. 20<br />
PITCH BEND...........................................21<br />
PLAY MODE...........................................21<br />
ECS.....................................................23<br />
THE „EFFECTS“ PAGE.............................................................24<br />
ROTARY................................................ 25<br />
REVERB................................................ 28<br />
DELAY.................................................. 29<br />
CHORUS...............................................31<br />
GATOR..................................................32<br />
CRUSHER.............................................. 34<br />
THE „SETTINGS“ PAGE........................................................... 36<br />
B3 MODE.............................................38<br />
ENVELOPES........................................... 40<br />
SPLIT POINTS & OCTAVE.........................41<br />
APPENDIX A: MIDI IMPLEMENTATION CHART......................42<br />
APPENDIX B: PREDEFINED ECS ASSIGNMENTS................43<br />
APPENDIX C: SYNC SETTINGS..............................................44<br />
APPENDIX D: USING TUN FILES............................................ 45<br />
<strong>LinPlug</strong> <strong>Organ</strong> 3 User Guide Page 4
Installation<br />
Installation on Mac<br />
The <strong>LinPlug</strong> <strong>Organ</strong> 3 comes with its own Installer. After downloading the<br />
<strong>Organ</strong> 3 you will find a file named "<strong>Organ</strong>Installer3xx.dmg " located in<br />
your download folder. Double-click this file to decompress and open the<br />
image, then double-click the installer program to begin the installation<br />
process. You will be guided through the installation process.<br />
The instrument file "<strong>Organ</strong> 3" and the 3 presets will now be placed in the<br />
right directory for virtual instruments on your Mac. The next time you<br />
start your host software the <strong>LinPlug</strong> <strong>Organ</strong> 3 will be listed in the host's<br />
instrument list.<br />
Installation on PC<br />
The <strong>LinPlug</strong> <strong>Organ</strong> 3 comes with its own Installer. After downloading the<br />
<strong>Organ</strong> 3 you will find a file named " <strong>Organ</strong>Installer3xx.exe " located in<br />
your download folder. Start this program to begin the installation process.<br />
The Installer will guide you through the installation process.<br />
Make sure you choose the right directory, so your host software finds the<br />
<strong>Organ</strong> 3. Refer to your host software's manual if you are unsure about<br />
where the host software plug-in directory is located.<br />
The instrument file "<strong>Organ</strong>3.DLL" and the presets will be placed in the<br />
chosen directory. The next time you start your host software the <strong>Organ</strong> 3<br />
will be listed in the host's instrument list.<br />
Common to Mac and PC<br />
After you've installed and opened the full version of the <strong>Organ</strong> 3, go to<br />
the instrument's “Settings” tab. The S/N edit box should read "Enter<br />
here". Enter the serial number you have received into the S/N edit box. If<br />
the serial number has not been entered or it has been entered<br />
incorrectly, the full version of the <strong>Organ</strong> 3 will not play any notes.<br />
If you have any questions regarding the installation of <strong>Organ</strong> 3 please<br />
contact our support team at www.linplug.com/support/support.htm.<br />
<strong>LinPlug</strong> <strong>Organ</strong> 3 User Guide Page 5
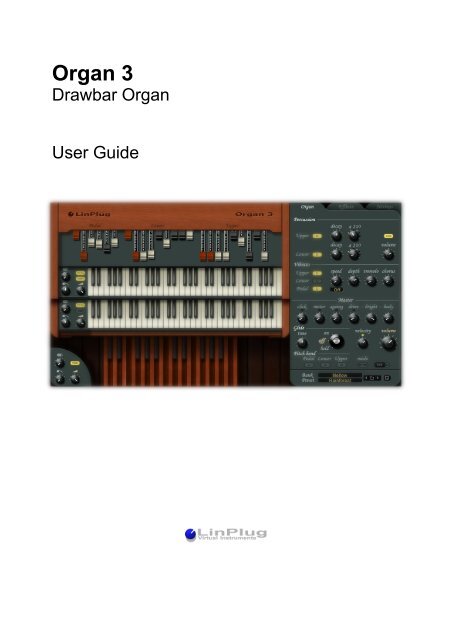
Overview<br />
<strong>Organ</strong> 3 is a 64 note-polyphonic* drawbar organ with some extraordinary<br />
features. It is based upon the classic drawbar organ concept und<br />
features 3 manuals (Pedal, Lower, Upper), each with independent<br />
drawbars and MIDI channel. The manuals can be combined using the<br />
various stack & split modes. The output of the drawbars is then sent to<br />
the excellent <strong>Organ</strong> 3 dual-effects processor.<br />
The structure of <strong>Organ</strong> 3 can be divided into the following sections: on<br />
the left you find the instrument (Main Section) with its three manuals.<br />
Located above the manuals is the Drawbar Section. To the left of each<br />
manual are individual controls for Spread, the switches for Percussion<br />
and Vibrato as well as the controls for Release and Volume.<br />
The right side of <strong>Organ</strong> 3 contains the additional functions, divided into<br />
the menus “<strong>Organ</strong>”, “Effects” and “Settings”. You open these menus by<br />
clicking on the specific tab.<br />
The “<strong>Organ</strong>” Menu contains the controls for Percussion, Vibrato, Master,<br />
Glide, Volume, Pitch Bend, stack/split-modes and ECS.<br />
<strong>LinPlug</strong> <strong>Organ</strong> 3 User Guide Page 6
The “Effects” Section contains all controls of the dual-effects processor.<br />
In the “Settings” menu you find the Master Tune, MIDI-settings, the<br />
tonewheel, B3 mode and the envelopes of the three manuals.<br />
The “Preset Browser” is located at the bottom of the right side. It is<br />
always visible.<br />
*depending on the power of your computer’s CPU.<br />
Structure<br />
Audio signals are generated by the tonewheels using the pitch<br />
information from <strong>Organ</strong> 3´s MIDI input. The MIDI input is automatically<br />
connected to the MIDI output of your host software.<br />
The output of the drawbars is sent to the Vibrato section. The output of<br />
the Vibrato section is then sent to the Amplifier (Drive) section. The<br />
Percussion section and the Keyclick section both send their output to the<br />
<strong>LinPlug</strong> <strong>Organ</strong> 3 User Guide Page 7
Amplifier (Drive) section. The output of the Amplifier (Drive) section is<br />
then sent to the dual-effects processor. In the “Master Section” you can<br />
also add Motor Noise, Keyclick and adjust the simulated “age” of the<br />
organ.<br />
The audio outputs of <strong>Organ</strong> 3 are automatically connected to the inputs<br />
of your host software's mixer. Here you can set the pan position of <strong>Organ</strong><br />
3's output.<br />
The design of <strong>Organ</strong> 3 imitates that of a real drawbar organ. As a result,<br />
when notes in a higher keyboard range are played, the overall sound<br />
becomes less bright. This is because a drawbar organ utilises a limited<br />
range of harmonics, which wrap around at particular points in the<br />
instrument's upper range. However, this property can also be<br />
deactivated (described in the chapter “B3 mode”).<br />
Hopefully, this chapter has given you a brief overview of how <strong>Organ</strong> 3<br />
works. More detailed information can be found in the following chapters.<br />
<strong>LinPlug</strong> <strong>Organ</strong> 3 User Guide Page 8
What’s new in <strong>Organ</strong> 3<br />
· now 3 individual manuals (Upper, Lower, Pedal)<br />
· manual settings can be saved/loaded and copied/pasted<br />
· Percussion<br />
- separately adjustable for Upper and Lower<br />
- adjustable volume<br />
- adjustable pitch<br />
· separately switchable Vibrato for Upper, Lower and Pedal<br />
· Spread for Upper, Lower and Pedal<br />
· adjustable “age”<br />
· drive with adjustable brightness and body<br />
· adjustable velocity response (from off to full)<br />
· new Glide mode with “Held” mode and adjustable time<br />
· per manual switchable Pitch Bend response<br />
· now two effect units with either Rotary, Reverb, Delay, Chorus, Gator<br />
or Crusher effect, all programmable<br />
· enhanced ECS with support for endless dials and predefined<br />
settings for the NI B4D controller and the Doepfer d3c<br />
· controller-sliders can be inverted (for use of e.g. Behringer<br />
BCF2000)<br />
· microtonal support of TUN files<br />
· 12 tonewheels to choose from including Farfisa and Vox waves<br />
· ADSR envelope per manual<br />
· layer and split modes with adjustable split point<br />
· +- 4 octaves transpose per manual<br />
· switchable B3 compatibility<br />
- foldback<br />
- tonewheel sync<br />
- drawbar volume<br />
- percussion switch behaviour<br />
- drawbar continuous / step mode<br />
<strong>LinPlug</strong> <strong>Organ</strong> 3 User Guide Page 9
Controls<br />
Users have the option of controlling <strong>Organ</strong> 3´s dials in either a circular or<br />
a linear manner depending on the Dial Mode setting, located under the<br />
“Settings” menu.<br />
Holding down the ALT key while clicking on a control changes the<br />
selected control's value a minimum step upwards (when clicking in the<br />
upper half of the control) or a minimum step downwards (when clicking in<br />
the lower half of the control).<br />
Holding down the CTRL key (PC) respectively COMMAND key (Apple)<br />
while clicking on a control sets the control to its default value (e.g. for<br />
volume controls it sets the control's value to -6 dB).<br />
All controls can be automated using external MIDI messages. To do this<br />
you need to use <strong>Organ</strong> 3's ECS (Easy Controller Setup) which is<br />
described in the “<strong>Organ</strong> Menu”- section of this manual.<br />
<strong>LinPlug</strong> <strong>Organ</strong> 3 User Guide Page 10
The Main Section<br />
The “Main Section” of <strong>Organ</strong> 3 is located on the left side of the user<br />
interface. This section contains the drawbars, the three manuals and –to<br />
the left of the manuals- the special controls for each of the manuals.<br />
The three manuals are called: the “Upper Manual“, the “Lower Manual”<br />
(the one in the middle) and the “Pedal” (at the bottom).<br />
Manual Controls<br />
To the left of the three manuals you can find individual controls for the<br />
Spread effect (the “two circles”-symbol), the Release time (the decay<br />
time of the sound after you’ve released a key) and Volume control. There<br />
are also two buttons: „Perc“ & „Vibr“. „Perc“ switches the Percussion<br />
Section on and off, „Vibr“ activates/deactivates Vibrato for the according<br />
manual.<br />
<strong>LinPlug</strong> <strong>Organ</strong> 3 User Guide Page 11
The Spread dial controls the intensity of the polyphonic unison, creating<br />
a sound as if several organs were played simultaneously. Turning the<br />
Spread dial to the right detunes those “imaginary” organs and the sound<br />
of the manual becomes fatter. Spread doesn’t affect the polyphony of<br />
<strong>Organ</strong> 3 but increases the utilisation of your computer’s CPU.<br />
Note: Pedal can’t make use of the Percussion Section.<br />
<strong>LinPlug</strong> <strong>Organ</strong> 3 User Guide Page 12
The “Drawbar” Section<br />
The Drawbar Section is the most important part of <strong>Organ</strong> 3, as this is<br />
where the instrument's overall sound is determined. The Drawbar section<br />
is located above the three manuals.<br />
One of the reasons why the original Hammond B-3 became popular, and<br />
remains so to this day, was because of its versatility. And just like its<br />
predecessor, <strong>LinPlug</strong>'s <strong>Organ</strong> 3 can sound like a wide range of<br />
instruments and ensembles ranging from a carnival, a horn section and a<br />
big band, to a small jazz combo, a funk group, a percussion section or a<br />
flute. How can all these different sounds be created with one instrument?<br />
The answer lies in the drawbars.<br />
<strong>Organ</strong> 3's drawbars are used to set the level of the up to nine harmonics<br />
that make up the instrument's sound. Moving from left to right these<br />
harmonics are:<br />
<strong>LinPlug</strong> <strong>Organ</strong> 3 User Guide Page 13
16" the sub-octave -12 semitones 0.5 th harmonic<br />
5 1/3" the fifth +7 semitones 1.5 th harmonic<br />
8" the fundamental<br />
4" the octave +12 semitones 2 nd harmonic<br />
2 2/3" one octave and one fifth higher +19 semitones 3 rd harmonic<br />
2" two octaves higher +24 semitones 4 th harmonic<br />
1 3/5" two octaves and a third higher +28 semitones 5 th harmonic<br />
1 1/3” two octaves and a fifth higher +31 semitones 6 th harmonic<br />
1" three octaves higher +36 semitones 8 th harmonic<br />
All of these except the 1 3/5" drawbar are either roots or fifths. The 1 3/5"<br />
is a third. Each drawbar's colour indicates its relationship to the<br />
fundamental pitch. The white and brown drawbars are called the<br />
“consonants” and comprise all the roots and the lower fifths. The black<br />
drawbars are called the “dissonants” and consist of the higher fifths and<br />
the third. Using this set of harmonics, a wide range of sounds can be<br />
created.<br />
The Pedal only contains drawbars for the 16", 5 1/3", 8", 4", 2 2/3" and<br />
2".<br />
Each drawbar has eight continuously-variable degrees to which it can be<br />
"drawn" or pulled out. A setting of eight is the loudest, while all the way in<br />
silences the drawbar. Thus, each drawbar or "stop" can be "voiced" or<br />
individually altered, even while the instrument is being played.<br />
On its own, the fundamental drawbar generates a sine wave, thus<br />
producing a pure flute-like tone. Adding odd harmonics creates a square<br />
wave, producing a more clarinet-like tone. The odd harmonics "squared"<br />
generate a triangle wave, thus producing a string-like tone. Finally, all<br />
harmonics together generate a sawtooth wave, producing an oboe-like<br />
tone.<br />
Drawbar settings use the same kind of premise; various levels and<br />
volumes of harmonics are used to create different sounds. There are a<br />
limitless number of tone qualities and endless shades of dynamic level<br />
available on the <strong>LinPlug</strong> <strong>Organ</strong> 3. Drawbar setting (00 6200 000) is an<br />
example of a flute tone. Drawbar setting (00 4345 554) is an example of<br />
<strong>LinPlug</strong> <strong>Organ</strong> 3 User Guide Page 14
a violin tone. Drawbar setting (00 6876 540) is an example of a trumpet-like<br />
tone, and Drawbar setting (54 5444 222) is an example of an organ-like<br />
tone. A typical jazz setting is 88 8000 000. This used by most<br />
jazz players 90% of the time, with 88 8400 080 being used for a bit more<br />
of a whistle during solos, while 80 0000 088 is used for high-end choral<br />
voicings.<br />
You may have heard the expression, "pulling out all the stops". The<br />
drawbars on <strong>Organ</strong> 3 are the stops referred to in this expression. "Pulling<br />
out all the stops" (drawbar setting 88 8888 888) is the biggest sound<br />
possible on <strong>Organ</strong> 3. It is usually reserved for loud chord solos,<br />
crescendos and climaxes. Of course, there are an endless number of<br />
other possibilities, and every player has his or her own particular setting,<br />
or 'sound'. Experiment and see what you can come up with!<br />
The Preset Browser<br />
The “Preset Browser” is located at the bottom of the right side. It is<br />
always visible.<br />
„Bank“: Bank is the name of the folder, in which the actual preset had<br />
been saved. New banks can be made by creating new folders in the<br />
<strong>LinPlug</strong> <strong>Organ</strong> 3 User Guide Page 15
“<strong>Organ</strong> 3 Banks” directory. You can select a different Bank by left-clicking<br />
on the Bank name.<br />
„Presets“: the preset name is displayed for your reference. It’s also the<br />
file name under which the preset had been saved. By left-clicking a<br />
Preset name you open up a menu where you can select a different<br />
preset.<br />
load: the button labelled with the "folder" icon allows you to load <strong>Organ</strong> 3<br />
presets.<br />
Prev/Next: once you have loaded a preset you can use the "arrow" icons<br />
on either side of the "folder" icon to browse within the currently selected<br />
directory. This significantly reduces the time taken to locate and load<br />
presets.<br />
Save: the button labelled with the "disk" icon enables you to export<br />
<strong>Organ</strong> 3 presets. Clicking on this button opens a file dialogue allowing<br />
you to choose the directory and file into which you want the preset to be<br />
saved.<br />
<strong>Organ</strong> 3 loads and saves all of its presets directly to hard disk so your<br />
computer's RAM does not limit the number of available presets<br />
<strong>LinPlug</strong> <strong>Organ</strong> 3 User Guide Page 16
The „<strong>Organ</strong>“ page<br />
The “<strong>Organ</strong>” page is located on the right side and is accessed by<br />
clicking the “<strong>Organ</strong>”-tab. The “<strong>Organ</strong>” Menu contains the controls of<br />
the Percussion Section, Vibrato, Master, Glide, Volume Pitch bend<br />
on/off for each manual, the Play Mode and ECS.<br />
The Percussion Section<br />
To the right of the „Upper“ and „Lower“ titles are two buttons which turn<br />
Percussion for the Upper and Lower manual on / off. (This can also be<br />
done using the “PERC”-buttons to the left side of the manuals.)<br />
To the right of these on/off-buttons are the controls for the Decay time of<br />
Percussion and the drawbar-selector that is to be used by Percussion.<br />
The “Leg” button determines whether the percussion is triggered for<br />
legato notes.<br />
“Volume” controls the overall volume of the Percussion Section.<br />
<strong>LinPlug</strong> <strong>Organ</strong> 3 User Guide Page 17
The Vibrato Section<br />
The Vibrato section is located in the middle of the “<strong>Organ</strong>” Menu. The<br />
controls in this section are used to add vibrato and tremolo to <strong>Organ</strong> 3's<br />
output.<br />
The leftmost buttons turn vibrato on or off for each of the three manuals .<br />
This can also be done using the “VIBR” Button to the left of the manuals.<br />
Speed: sets the speed of the vibrato. Vibrato speed can be synched to<br />
the song tempo using the pop up menu under the speed dial. See<br />
Appendix C for a list of all sync settings.<br />
Depth: determines the depth of the vibrato effect (periodic change of the<br />
pitch).<br />
Tremolo: determines the depth of the tremolo effect (periodic change of<br />
the amplitude).<br />
The dial to the right of the Tremolo control is the “Chorus” dial. Mixing the<br />
vibrato-signal with the unprocessed sound creates a special, Hammond<br />
B3-typical Chorus effect. The original B3 offered only three<br />
intensity-“steps”. The <strong>Organ</strong> 3´s Chorus dial is continuously adjustable.<br />
<strong>LinPlug</strong> <strong>Organ</strong> 3 User Guide Page 18
The Master Section<br />
The Master Section is located under the Vibrato Section. It contains<br />
controls for Click, Motor, Age, Drive, Bright and Body as well as Volume<br />
and Velocity dials.<br />
“Click”: sets the amount of keyclick applied to each note being played.<br />
The "click" is a very short sound that was produced on classic drawbar<br />
organs when a key was pressed.<br />
Motor: adjusts the amount of motor noise that is added to the output. On<br />
classic tonewheel organs this sound was always present to some<br />
degree.<br />
„Age“: simulates the “age” of the organ. This is done by adding random<br />
changes to the sound of the instrument that were typical for old and<br />
hardly-used mechanical organs.<br />
„Drive“: determines the degree to which <strong>Organ</strong> 3's output is distorted.<br />
„Bright“: changes the sound of “Drive”. Turned to the left the sound will<br />
be darker, turned to the right will cause <strong>Organ</strong> 3 to “scream”. “Bright”<br />
works like a Lowpass-Filter.<br />
<strong>LinPlug</strong> <strong>Organ</strong> 3 User Guide Page 19
„Body“: further changes the sound of “Drive”, too. It functions like a<br />
Highpass-Filter.<br />
The small indicators above the controls for Click, Motor, Age and Drive<br />
make clear whether the according control is in use or not.<br />
“Velocity” To the right of the Glide Section you can find a small dial that<br />
controls the velocity range that is used to modulate the overall volume of<br />
<strong>Organ</strong> 3. Turned to the left means that all notes will sound at maximum<br />
volume, no matter how hard you hit a key. Turned to the right <strong>Organ</strong> 3´s<br />
volume will fully depend on how hard you touch your keyboard.<br />
The big „Volume“ dial sets the overall volume of <strong>Organ</strong> 3.<br />
Glide<br />
The “Glide” controls are located under the Master controls. When you<br />
activate Glide, the pitch of the notes you play “glide” from one note to the<br />
next note (also known as “Portamento”).<br />
<strong>LinPlug</strong> <strong>Organ</strong> 3 User Guide Page 20
„Time” controls how fast the pitch “glides” from one note to the next one.<br />
To the right of the Time dial is the on/off/held control. On/off simply turns<br />
Glide on (all notes “glide” into another) and off (none of the notes you<br />
play will “glide”). Held activates a special Glide mode: the pitch will only<br />
glide when you press and hold a key and then press another key.<br />
Pitch bend<br />
At the bottom of the “<strong>Organ</strong>” Menu, (above the Preset Browser) are three<br />
buttons that activate/deactivate Pitch bend-recognition for each of the<br />
three manuals. The intensity of the Pitch bend can be adjusted in the<br />
“Settings” menu.<br />
Play Mode<br />
Located to the right of the Pitch bend-buttons is a small button that lets<br />
you select one of five possible “Play Modes”:<br />
<strong>LinPlug</strong> <strong>Organ</strong> 3 User Guide Page 21
Norm: the three manuals receive on individual MIDI-channels. If the<br />
MIDI-Channel in the “Settings” Menu is set on channel 5, the Upper<br />
Manual receives its MIDI-information in channel 5, the Lower Manual on<br />
channel 6 and the Pedal on channel 7. If the MIDI-Channel in the<br />
“Settings”-Menu is set on channel 16, the Upper Manual receives its<br />
MIDI-information on channel 16, the Lower Manual on channel 1 and the<br />
Pedal on channel 2.<br />
Lay 1: the manuals are „layered“ and receive MIDI-information on all<br />
three MIDI-channels simultaneously. The volume of the Upper and<br />
Lower Manual are faded into each other according to the velocity value.<br />
At low velocity values the Lower Manual will sound louder than the<br />
Upper Manual. At high velocity values the Upper Manual will sound<br />
louder than the Lower Manual.<br />
Lay 2: the manuals are „layered“ and receive MIDI-information on all<br />
three MIDI-channels simultaneously. The volume of the Upper and<br />
Lower Manual are faded into each other according to the played MIDInote<br />
number. When you play lower keys the Lower Manual will sound<br />
louder than the Upper Manual. When you play higher keys the Upper<br />
Manual will sound louder than the Lower Manual. Downwards MIDI-note<br />
number 36 only the Lower Manual will be heard, upwards MIDI-note<br />
number 84 only the Upper Manual will be heard.<br />
<strong>LinPlug</strong> <strong>Organ</strong> 3 User Guide Page 22
Spl 1: Upper and Lower Manual are “split” at the split points which are<br />
defined in the “Settings” Menu. At the split point and above you hear the<br />
Upper Manual. Under the split point you hear the Lower Manual. <strong>Organ</strong> 3<br />
receives on the MIDI-channels of the Upper and Lower Manuals<br />
simultaneously. The Pedal receives on the third MIDI-channel and is not<br />
affected by the split points.<br />
Spl 2: complete-split. Upper Manual, Lower Manual and Pedal are “split”<br />
at the split points that are set in the “Settings” Menu. <strong>Organ</strong> 3 receives its<br />
MIDI-information on all three MIDI-channels simultaneously.<br />
ECS<br />
The ECS (Easy Controller Setup) buttons to the right of the Play Mode<br />
button make it simple to control <strong>Organ</strong> 3 from an external MIDI controller<br />
(either hardware or software).<br />
All you have to do is switch on the small button to the right of the ECS<br />
button, select a <strong>Organ</strong> 3 parameter with the mouse and then send some<br />
MIDI messages from your MIDI source. That's all there is to it! From now<br />
on you can change this parameter with that controller. In addition to this,<br />
more than one controller can be defined to change a particular parameter.<br />
In fact, you can define up to 128 parameter-controller-combinations.<br />
This does not depend on the type of controller you have nor the particular<br />
MIDI Control Change messages it sends. Don't forget to switch off the<br />
small ECS button after you have finished using it! As long as ECS learn<br />
is activated the small button will be shining.<br />
Left-clicking the ECS-button opens up a menu where you can select one<br />
of the following ECS-functions:<br />
<strong>LinPlug</strong> <strong>Organ</strong> 3 User Guide Page 23
Off:<br />
Learn:<br />
switches the ECS learn- & clear-mode off.<br />
activates the ECS-learn mode. Don’t forget to switch “Learn”<br />
off after assigning combinations!<br />
Clear: clear parameter-controller combinations of <strong>Organ</strong> 3<br />
parameters. Simply select “clear” and change the parameter<br />
you want to get rid of the according MIDI-controller. Don’t<br />
forget to switch “Clear” off after erasing combinations!<br />
Clear all: clear all parameter-controller combinations of <strong>Organ</strong> 3.<br />
Load:<br />
Save:<br />
load parameter-controller combinations.<br />
save parameter-controller combinations.<br />
See Appendix B for a list of all predefined ECS assignments. The<br />
predefined assignments can be replaced with the assignments of your<br />
choice by the procedure we described in this chapter.<br />
The „Effects“ page<br />
The „Effects“ page is located on the right side of <strong>Organ</strong> 3’s user<br />
interface. You open it by clicking the “Effects”-tab. In the “Effects” Menu<br />
are the controls of the dual-effects processor.<br />
First, the output of the drawbars is sent to Fx 1 and then passes Fx 2.<br />
You can turn Fx 1 and Fx 2 on and off, using the buttons to the right of<br />
the effect type-selections.<br />
The following effects types are available: Rotary, Reverb, Delay, Chorus,<br />
Gator and Crusher.<br />
<strong>LinPlug</strong> <strong>Organ</strong> 3 User Guide Page 24
Rotary<br />
The „Rotary“ effect simulates the sound of a Leslie Speaker Cabinet.<br />
The original Leslie speakers that usually accompanied the B3 consisted<br />
of a single cabinet containing two speakers, one for the higher frequencies<br />
and one for the lower frequencies. Both speakers were mounted on<br />
a separate motor that rotated the speaker at two speeds; slow and fast<br />
(the speaker could also be stopped). <strong>Organ</strong> 3's rotary speaker simulation<br />
enables you to control a wide range of speaker parameters including the<br />
slow and fast speed settings, as well as the motor acceleration settings<br />
and the crossover frequency of the low and high frequency speakers.<br />
The Rotary effect contains three basic functions, which are controlled by<br />
the buttons to the left of the effect’s dials.<br />
on/off: starts and stops the rotation of the Leslie’s speakers. This<br />
function is NOT identical with the on/off buttons to the right of the effect<br />
type! These buttons switch the signal processing on and off, while the<br />
on/off of the Leslie cause the speakers to start or stop rotating.<br />
SLO: sets the speaker rotation to the slow speed settings.<br />
<strong>LinPlug</strong> <strong>Organ</strong> 3 User Guide Page 25
FAS: sets the speaker rotation to the fast speed settings.<br />
To the right of the on/off, SLO and FAS buttons are the dials for the<br />
speed and acceleration of the high frequency speaker and the low<br />
frequency speaker.<br />
lo slow: sets the slow rotation speed of the low frequency speaker. The<br />
lo slow speed can be synched to the song tempo using the pop up menu<br />
beneath the lo slow dial. See Appendix C for a list of all Sync settings.<br />
hi slow: sets the slow rotation speed of the high frequency speaker.<br />
The hi slow speed can be synched to the song tempo using the pop up<br />
menu beneath the hi slow dial.<br />
lo accel: sets the rate of change in speaker rotation speed for the low<br />
frequency speaker from Off to Slo(w) to Fas(t) and vice versa. lo accel<br />
speed can be synched to the song tempo using the pop up menu<br />
beneath the lo accel dial.<br />
hi accel: sets the rate of change in speaker rotation speed for the high<br />
frequency speaker from Off to Slo(w) to Fas(t) and vice versa. hi accel<br />
speed can be synched to the song tempo using the pop up menu<br />
beneath the hi accel dial.<br />
X-Over: sets the crossover frequency between the rotary speaker's low<br />
and high frequency speakers.<br />
lo fast: sets the fast rotation speed of the low frequency speaker. The lo<br />
fast speed can be synched to the song tempo using the pop up menu<br />
beneath the lo fast dial.<br />
hi fast: sets the fast rotation speed of the high frequency speaker. The<br />
hi fast speed can be synched to the song tempo using the pop up menu<br />
beneath the hi fast dial.<br />
width: sets the "size" of the speaker cabinet and influences the<br />
brightness of the sound.<br />
depth: sets the intensity of the Doppler effect.<br />
<strong>LinPlug</strong> <strong>Organ</strong> 3 User Guide Page 26
An example for acceleration settings:<br />
If “lo accel” is set to 1/1, “hi accel” to ½ and you switch the speed of<br />
Rotary from slow to fast, the acceleration of the low frequency speaker<br />
will take one note (4 beats in a 4/4 bar) to reach the fast speed, while the<br />
acceleration of the high frequency speaker will take a half-note (2 beats<br />
in a 4/4 bar).<br />
And now....“pulling out all the stops” of the Rotary:<br />
As the speed settings are also sync-able, you could change the speed of<br />
a 1/16-note-synced tempo to an ¼-note-synced tempo in the duration of<br />
a ½ note. Give it a try! The sound of such a precise working Rotary is<br />
absolute fantastic and <strong>Organ</strong> 3 is the very first organ providing such a<br />
Rotary effect!<br />
NOTE: When using ECS to automate the Slow/Fast switch make<br />
sure to use a “Switch” type Controller to actually switch between<br />
Fast and Slow using the Acceleration parameter. If you apply a<br />
“Continuous” type Controller like a dial or slider, the speed will<br />
adjust exactly as you move the Controller (ignorning the<br />
Acceleration parameter)!<br />
<strong>LinPlug</strong> <strong>Organ</strong> 3 User Guide Page 27
Reverb<br />
The Reverb effect is used to add ambience to the sound. It features the<br />
following controls:<br />
predelay: the predelay dial enables you to delay the processed signal by<br />
a given amount so as to achieve a more natural reverberation. Normally,<br />
shorter predelay times are applied in the case of smaller room sizes<br />
while longer predelay times are applied in the case of bigger room sizes.<br />
The predelay time can be synched to the song tempo using the pop up<br />
menu beneath the predelay dial. See Appendix C for a list of all sync<br />
settings.<br />
room: the room dial is used to set the size of the simulated room. The<br />
room size varies from a small chamber up to a huge hall.<br />
damp: the simulated room's wall materials can be adjusted with the<br />
damp (Damping) control. This parameter ranges from practically lossfree<br />
reflecting walls up to very absorbent walls. In practical terms, the<br />
amount of damping determines the amount of higher frequencies that<br />
are contained in the processed signal: The higher the damp setting, the<br />
less higher frequencies are contained in the processed signal.<br />
<strong>LinPlug</strong> <strong>Organ</strong> 3 User Guide Page 28
diffusion: The diffusion control is used to set the number of diversion<br />
stages that are applied to the input signal. As the value of the dif control<br />
is increased the reverberation becomes smoother and more<br />
homogeneous. Lower values produce a rougher, lower quality sound.<br />
wet: The wet dial allows you to set the balance between the processed<br />
"wet" signal and the original unprocessed "dry" signal.<br />
Delay<br />
The Delay effect can be used to create "echoes" and other related<br />
effects. <strong>Organ</strong> 3´s Delay offers three delayed channels: center, left and<br />
right.<br />
Center: the center dial is used for setting the center delay time. The<br />
delay time can be synched to the song tempo using the pop up menu<br />
beneath the delay dial. See Appendix C for a list of all Sync settings.<br />
left: the left dial is used for setting the left delay time. The delay time<br />
can be synched to the song tempo using the pop up menu beneath the<br />
<strong>LinPlug</strong> <strong>Organ</strong> 3 User Guide Page 29
delay dial.<br />
right: the right dial is used for setting the right delay time. The delay time<br />
can be synched to the song tempo using the pop up menu beneath the<br />
delay dial.<br />
pan L: sets the stereo-panorama-position of the “left“-delay.<br />
pan R: sets the stereo-panorama-position of the “right“-delay.<br />
feedback: the "feedback” dial allows you to set the number of times the<br />
signal repeats or "echoes".<br />
center/LR balance: the volume of the center-delay relating to the<br />
volume of the left & right delay.<br />
wet: the balance of the volume between delayed and original signal. .<br />
<strong>LinPlug</strong> <strong>Organ</strong> 3 User Guide Page 30
Chorus<br />
The Chorus effect can be used to "thicken" a single sound creating the<br />
impression that it contains multiple voices. The Chorus works by mixing<br />
delayed signals with the original signal.<br />
The <strong>Organ</strong> 3´s Chorus features the following controls:<br />
time the time dial is used for setting the delay time. Longer times<br />
produce a "chorusing" effect while shorter times create a "flanging"<br />
effect.<br />
rate: the rate dial sets the rate at which the signal is modulated.<br />
width: controls the stereo-width of the Chorus effect. To the very left the<br />
Chorus will sound mono, moved to the right the stereo-width increases.<br />
dry: the volume of the unprocessed signal.<br />
wet: the volume of the processed signal.<br />
<strong>LinPlug</strong> <strong>Organ</strong> 3 User Guide Page 31
Gator<br />
The Gator effect is a step-controlled audio gate that can be used to create<br />
rhythmic, stuttering and pulsing effects. The effect is unique in that it<br />
separates the input signal into left and right components, each of which<br />
can be gated independently.<br />
It contains controls for soft, edit mode, sync and wet.<br />
soft: the soft control sets the envelope shape of the gate for each step<br />
value. A lower setting of the soft control creates a sharper envelope<br />
shape that produces a more pronounced gating effect. increasing the<br />
value of the control “smoothes” the envelope creating a more pulsing,<br />
tremolo-like sound.<br />
edit mode: the edit mode is used to set the way that the Gator's step<br />
buttons respond to user input. This control has three settings: normal,<br />
Link and XLink. When set to “normal”, each step button can be switched<br />
on and off independently of any other button. When set to Link, the step<br />
buttons for the left and right patterns are linked together so that switching<br />
either button turns both buttons on or off. When set to XLink, the step<br />
buttons for the left and right patterns are linked together, however in this<br />
case they work in a complementary manner—when one button is on, the<br />
<strong>LinPlug</strong> <strong>Organ</strong> 3 User Guide Page 32
other will be off. In this case only one of the two left and right channel<br />
buttons can be switched on at the same time.<br />
sync: the sync control sets the duration of each step. For example, a<br />
setting of 1/16 means that each pattern step is equivalent to a 16th note.<br />
Note that the overall tempo at which the Gator effect operates is set in<br />
the host software.<br />
wet: the wet control sets the balance between the dry input audio signal<br />
and the “wet” gated audio signal. Increasing the value of the wet control<br />
also increases the width of panning between the left and right step<br />
channels.<br />
The Steps control consists of two rows of sixteen “buttons”, one for each<br />
rhythmic step of the pattern. When a button is on, the signal is passed<br />
through the effect. Alternately, when a button is off, the signal is gated.<br />
The duration of each step depends on the setting used in the sync control.<br />
<strong>LinPlug</strong> <strong>Organ</strong> 3 User Guide Page 33
Crusher<br />
The Crusher is a distortion effect that combines bit-depth and samplerate<br />
reduction allowing the resolution of the signal to be decreased,<br />
thereby making the sound rougher and noisier. This effect processor also<br />
includes a filter.<br />
This effect has the following controls: bits, filter type, cutoff, reso (resonance),<br />
divider, divider mode, mode and wet.<br />
bits: the bits control enables you to reduce the bit depth of the output.<br />
Reducing the bit depth adds a harsh, noisy quality to the sound.<br />
filter type: the filter type pop up menu allows you to select one of four 12<br />
dB filter types: LP12 (Low Pass 12 dB), HP12 (High Pass 12 dB), BP12<br />
(Band Pass 12 dB) and BR12 (Band Reject 12 dB).<br />
cutoff: the cutoff control is used to set the frequency above which<br />
frequencies are filtered out of the signal. Higher settings produce brighter<br />
sounds while lower settings result in darker sounds.<br />
<strong>LinPlug</strong> <strong>Organ</strong> 3 User Guide Page 34
eso: reso(nance) is used to set the amount of emphasis around the<br />
cutoff frequency. Higher settings create a more pronounced peak in the<br />
signal while lower settings produce a flatter response.<br />
divider: the divider control sets a sample-rate divider that divides the<br />
current sample-rate by the current control setting.<br />
divider mode: the divider mode pop up menu determines how the<br />
output sample value is created from the input samples. Three options<br />
are available: “AVG”, “STP” and “SLD”. The “AVG” (“Average”) option<br />
calculates the average of the input samples and uses this as the output<br />
sample value for each of the input samples. The “STP” (“Step”) option<br />
takes the first sample in each group of input samples and uses this as<br />
the output sample value for each of the input samples. The “SLD”<br />
(“Slide”) option takes the first sample in each group of input samples,<br />
interpolates between them and uses the interpolated value as the output<br />
sample value for each of the input samples.<br />
mode: changes the signal flow of the Crusher:<br />
1 = bit-reduction -> filter -> divider<br />
2 = bit-reduction -> divider -> filter<br />
wet: the wet dial allows you to set the balance between the processed<br />
"wet" signal and the original unprocessed "dry" signal.<br />
<strong>LinPlug</strong> <strong>Organ</strong> 3 User Guide Page 35
The „Settings“ page<br />
The Settings page is located on the right side of the user interface. You<br />
open it by clicking the “Settings” tab. The following controls can be found<br />
in the Settings Menu: the number of the version of <strong>Organ</strong> 3, the serial<br />
number, the Dial Mode, MIDI Config, Master Tune, Pitch bend Up, Pitch<br />
bend down, Invert bar CC, MIDI Channel, Scale, Wave, the B3 mode<br />
with its controls for Foldback, Sync, Vol, Perc 9 & Steps, the envelopes<br />
of the three manuals and the split points of the manuals.<br />
Version: the number of the version of your <strong>Organ</strong> 3 installation.<br />
S/N: please enter your personal serial number of <strong>Organ</strong> 3 in this field.<br />
Note: to prevent the stealing of serial numbers the shown number is<br />
shortened.<br />
Dial Mode: Dial Mode is used to select the <strong>Organ</strong> 3´s dial operation<br />
mode. Two modes are available: "Cir" (Circular) and "Lin" (Linear). In<br />
"Cir" mode the <strong>Organ</strong> 3´s dials track cursor movement in a circular<br />
fashion around the dial. In "Lin" mode the <strong>Organ</strong> 3’s dials track vertical<br />
cursor movement.<br />
MIDI Config: determines whether <strong>Organ</strong> 3 only receives MIDI-data or is<br />
<strong>LinPlug</strong> <strong>Organ</strong> 3 User Guide Page 36
also able of sending MIDI-data. Sending MIDI-data is especially useful<br />
when using a MIDI-controller like the Doepfer d3c, the Native<br />
<strong>Instruments</strong> B4D or the Behringer BCF2000, which are able to display<br />
several settings of <strong>Organ</strong> 3 on their user-interface.<br />
Master tune: Master tune is used to set the overall tuning of the <strong>Organ</strong> 3<br />
if no microtuning file is loaded . Tuning can be set from 415.3 Hz to<br />
466.2 Hz.<br />
P.bend up: the P.bend up range control is used to set the <strong>Organ</strong> 3's<br />
response to upwards pitch bend messages.<br />
P.bend down: the P.bend down range control is used to set the <strong>Organ</strong><br />
3's response to downwards pitch bend messages. This control can also<br />
be set to “Link” in which case the Bend down range is the same as the<br />
Bend up range.<br />
Scale: lets you choose the scale of <strong>Organ</strong> 3. The setting “Tonewheel”<br />
slightly differs from the equal-tempered scale because the mechanical<br />
construction of the tonewheels wasn’t able to exactly reproduce all of the<br />
equal-tempered frequencies.<br />
Clicking the disk symbol opens up a dialogue from where you can load<br />
TUN-files containing microtuning-data. See Appendix D for a complete<br />
description of the microtuning capabilities of <strong>Organ</strong> 3.<br />
Invert Bar CC: inverts the function of MIDI-faders, so the volume of the<br />
drawbars become louder when you move the fader downwards. At<br />
normal operation the volume would decrease.<br />
MIDI Channel: the basic MIDI-channel of <strong>Organ</strong> 3. If the MIDI-channel is<br />
set on channel 5, the Upper Manual receives its MIDI-information in<br />
channel 5, the Lower Manual on channel 6 and the Pedal on channel 7.<br />
If the MIDI-Channel is set on channel 16, the Upper Manual receives its<br />
MIDI-information in channel 16, the Lower Manual on channel 1 and the<br />
Pedal on channel 2.<br />
Wave: the Wave pop up menu lets you select the basic waveforms<br />
generated by the tonewheels of <strong>Organ</strong> 3.<br />
<strong>LinPlug</strong> <strong>Organ</strong> 3 User Guide Page 37
Three of them are basic waveforms: sine, triangle and sine/triangle (a<br />
mixture of sine & triangle).<br />
Ther others are different sample sets of the B3, Vox and Farfisa (B3 1,<br />
B3 2, B3 3, Farfisa 1, Farfisa 2, Vox 1, Vox 2 and Vox 3) each with<br />
different brilliance, allowing to create brighter as well as darker sounds.<br />
There is also a set of “da<strong>Organ</strong>”, the predecessor of <strong>Organ</strong> 3 .<br />
Note: the sound of organs like the Vox Continental or the Farfisa is very<br />
unique and that’s not only because of different basic waveforms. Simply<br />
loading samples of those organs will not create an exact reproduction of<br />
those instruments.<br />
B3 Mode<br />
B3 mode contains the controls for the following functions: Foldback,<br />
Sync, Vol, Perc 9 and Steps.<br />
Foldback: this function simulates a property of the historical electronic<br />
organs. The tonewheels of those instruments weren’t able of producing<br />
extremely high frequencies and the upper tone range of the high<br />
drawbars was limited. The notes that were too high to be generated by<br />
<strong>LinPlug</strong> <strong>Organ</strong> 3 User Guide Page 38
the tonewheels jumped one octave lower. When you activate the<br />
Foldback button the drawbars of <strong>Organ</strong> 3 behave like those historical<br />
electronic organs. Above MIDI-note number 79 the high drawbars jump<br />
one octave lower.<br />
Sync: as the tonewheels of the historical electronic organs rotated<br />
synchronous, all the played notes had a defined phase. This property<br />
can be imitated by switching the Sync button on. When switched off,<br />
each played note has its own starting phase.<br />
Vol: the original Hammond B3´s drawbars had a preset maximumvolume.<br />
The high drawbars had a lower maximum-volume than the<br />
deeper registers. If you turn Vol on, <strong>Organ</strong> 3 provides the same<br />
maximum-volume presets as the Hammond B3. When turned off, all the<br />
drawbars have an equally high maximum-volume.<br />
Perc 9: whenever “Percussion” was used on the original Hammond B3,<br />
the 9 th drawbar wasn’t sounding anymore. The Percussion was “stolen”<br />
from that stop. When you switch Per 9 on, <strong>Organ</strong> 3 behaves like the<br />
Hammond B3: as soon as you use Percussion, the 9 th drawbar will be<br />
quiet. With Perc 9 deactivated, the 9 th drawbar is available, even if<br />
Percussion is in use.<br />
Steps: activate/deactivates the “9-steps-only” volume adjusting of the<br />
original Hammond B3. When activated the drawbars behave like the<br />
original drawbars. This setting is useful when programming sounds “from<br />
the paper” as there are only 9-step-volume settings written (like 80 8800<br />
408). With Steps deactivated the drawbar’s volume can be set without<br />
steps, allowing more precise settings.<br />
<strong>LinPlug</strong> <strong>Organ</strong> 3 User Guide Page 39
Envelopes<br />
An envelope is a time-varying signal used to control the development of<br />
another signal after it has been triggered. Envelopes are most often used<br />
for controlling a signal's amplitude. That’s what the envelopes of <strong>Organ</strong> 3<br />
are for. The Envelopes of the Upper Manual, Lower Manual and Pedal<br />
contain the following controls: Attack, Decay, Sustain, Release.<br />
Attack: the time the sounds takes to reach the full volume after pressing<br />
a key .<br />
Decay: the time to fall from the Attack volume to the Sustain volume.<br />
Sustain: the volume of the sound while keeping a key pressed.<br />
Release: the time the sound takes to fade out after a key has been<br />
released. This parameter can also be altered using the Release dial to<br />
the left of each manual.<br />
Note: to create a classical organ-envelope, the Attack-time has to be set<br />
to minimum, Sustain to maximum and Release to minimum. With<br />
Sustain set to maximum the Decay-time has no effect.<br />
<strong>LinPlug</strong> <strong>Organ</strong> 3 User Guide Page 40
Split Points & Octave<br />
To the right of the Envelope dials are the controls for setting the manual’s<br />
split points as well as the octave.<br />
The one-digit number represents the octave of the respective manual. It<br />
can be set from –4 over 0 to +4 octaves.<br />
Beneath the octave is the split point of the according manual. It can be<br />
set from C-2 to G8.<br />
A split point can be set between Upper and Lower Manual, as well as<br />
between the Lower Manual and the Pedal.<br />
You can alter both parameters by left-clicking, keeping the mouse-key<br />
pressed and drawing the mouse upwards / downwards.<br />
Note: the split point between Lower Manual and Pedal has no effect in<br />
Split-Mode 1.<br />
<strong>LinPlug</strong> <strong>Organ</strong> 3 User Guide Page 41
Appendix A: MIDI Implementation Chart<br />
Product: <strong>LinPlug</strong> <strong>Organ</strong> 3 Version 3.x Date: 27.Oct 2006<br />
Manufacturer<br />
<strong>LinPlug</strong> <strong>Virtual</strong> <strong>Instruments</strong> GmbH<br />
Function Transmitted Recognized Remarks<br />
Basic Channel<br />
Default no no<br />
Changed no no<br />
Mode<br />
Default no Omni<br />
Changed no no<br />
Note Number<br />
no yes<br />
True Voice no no<br />
Velocity<br />
Note On no yes<br />
Note Off no no<br />
Aftertouch<br />
Poly (Key) no yes<br />
Mono (Channel) no yes<br />
Pitch Bend no yes<br />
Control Change no yes see Appendix B<br />
Program Change no no<br />
System Exclusive no no<br />
System Common<br />
Song Position no no<br />
Song Select no no<br />
Tune Request no no<br />
System Realtime<br />
Clock no no<br />
Commands no no<br />
Aux Messages<br />
Local On/Off no no<br />
All Notes Off no yes<br />
Active Sensing no no<br />
System Reset no yes<br />
<strong>LinPlug</strong> <strong>Organ</strong> 3 User Guide Page 42
Appendix B: Predefined ECS assignments<br />
The following MIDI-CC-parameter-assignments are automatically set up<br />
on start-up of <strong>Organ</strong> 3. Of course, the assignments can be replaced with<br />
your own preferences using the ECS button.<br />
Ch 0 CC 1 Rotary Speed<br />
Ch 0 CC 7 Main Volume<br />
Ch 0 CC 12 Upper 16<br />
Ch 0 CC 13 Upper 5 1/2<br />
Ch 0 CC 14 Upper 8<br />
Ch 0 CC 15 Upper 4<br />
Ch 0 CC 16 Upper 2 2/3<br />
Ch 0 CC 17 Upper 2<br />
Ch 0 CC 18 Upper 1 3/5<br />
Ch 0 CC 19 Upper 1 1/3<br />
Ch 0 CC 20 Upper 1<br />
Ch 1 CC 12 Lower 16<br />
Ch 1 CC 13 Lower 5 1/2<br />
Ch 1 CC 14 Lower 8<br />
Ch 1 CC 15 Lower 4<br />
Ch 1 CC 16 Lower 2 2/3<br />
Ch 1 CC 17 Lower 2<br />
Ch 1 CC 18 Lower 1 3/5<br />
Ch 1 CC 19 Lower 1 1/3<br />
Ch 1 CC 20 Lower 1<br />
Ch 2 CC 12 Pedal 16<br />
Ch 2 CC 13 Pedal 5 1/2<br />
Ch 2 CC 14 Pedal 8<br />
Ch 2 CC 15 Pedal 4<br />
Ch 2 CC 16 Pedal 2 2/3<br />
Ch 2 CC 17 Pedal 2<br />
Ch 0 CC 21 Lower 16<br />
Ch 0 CC 22 Lower 5 1/2<br />
Ch 0 CC 23 Loweer 8<br />
Ch 0 CC 24 Lower 4<br />
Ch 0 CC 25 Lower 2 2/3<br />
Ch 0 CC 26 Lower 2<br />
Ch 0 CC 27 Lower 1 3/5<br />
Ch 0 CC 28 Lower 1 1/3<br />
Ch 0 CC 29 Lower 1<br />
Ch 0 CC 30 Lower Vibrato on/off<br />
Ch 0 CC 31 Upper Vibrato on/off<br />
Ch 0 CC 33 Pedal 16<br />
Ch 0 CC 35 Pedal 8<br />
Ch 0 CC 66 Upper Percussion on/off<br />
Ch 1 CC 66 Lower Percussion on/off<br />
Ch 0 CC 67 Pedal Vibrato on/off<br />
Ch 0 CC 68 Rotary Stop<br />
Ch 0 CC 69 Velocity Responce<br />
Ch 0 CC 70 Percussion Volume<br />
Ch 0 CC 71 Upper Percussion Decay<br />
Ch 1 CC 71 Lower Percussion Decay<br />
Ch 0 CC 72 Upper Percussion Harmonic<br />
Ch 1 CC 72 Lower Percussion Harmonic<br />
Ch 0 CC 73 Vibrato Chorus<br />
Ch 0 CC 74 Vibrato Intense<br />
Ch 0 CC 75 Keyclick<br />
Ch 0 CC 76 Overdrive<br />
Ch 0 CC 78 Overdrive Body<br />
Ch 0 CC 79 Overdrive Brightness<br />
Ch 0 CC 81 Rotary Slow High-Speaker<br />
Ch 0 CC 82 Rotary Fast High-Speaker<br />
Ch 0 CC 83 Rotary Acceleration High-Speaker<br />
Ch 0 CC 84 Reverb wet<br />
Ch 0 CC 85 Reverb Predelay<br />
Ch 0 CC 86 Reverb Roomsize<br />
Ch 0 CC 87 Reverb Modulation<br />
Ch 0 CC 88 Reverb Damp<br />
Ch 0 CC 91 Rotary Slow Low-Speaker<br />
Ch 0 CC 92 Rotary Fast Low-Speaker<br />
Ch 0 CC 93 Rotary Acceleration Low-Speaker<br />
Ch 0 CC 102 Vibrato Speed<br />
Ch 0 CC 103 Vibrato Tremolo<br />
Ch 0 CC 104 Rotary Crossover<br />
Ch 0 CC 105 Rotary Width<br />
Ch 0 CC 106 Rotary Depth<br />
Ch 0 CC 107 Spread Upper<br />
Ch 0 CC 108 Spread Lower<br />
Ch 0 CC 109 Spread Pedal<br />
<strong>LinPlug</strong> <strong>Organ</strong> 3 User Guide Page 43
Appendix C: Sync settings<br />
Off, 1/2, 1/2T, 1/4*, 1/4, 1/4T, 1/8*, 1/8, 1/8T, 1/16*,1/16, 1/16T, 1/32*,<br />
1/32, 1/32T.<br />
Note: "T" stands for Triplet and "*" stands for a dotted note. In the case<br />
of a dotted note, the note duration is equal to 1.5 times its original<br />
undotted value.<br />
<strong>LinPlug</strong> <strong>Organ</strong> 3 User Guide Page 44
Appendix D: Using TUN Files<br />
By Jacky Ligon<br />
About Microtuning<br />
Microtuning, or "microtonality" are methods for tuning musical<br />
instruments whereby musicians may explore and compose with ethnic,<br />
historical and contemporary tuning-systems. Microtuning musical<br />
instruments allows one to use scales which may have pitches lying<br />
between the notes of our familiar Western 12 tone scale. These pitches<br />
which are found in the 'cracks' of 12 Tone Equal Temperament are one of<br />
the things that give music's of Bali, India, Africa, Thailand, Turkey and<br />
the Middle East (to name but a few) a special intonational flavor, but is<br />
something that is of immeasurable value to the contemporary acoustic<br />
and electronic composer, who may require a more broad palette of<br />
musical pitches for their music.<br />
The quest for creating beautiful and musically useful tuning-systems has<br />
been an unending process of discovery and debate amongst musical<br />
theorists, mathematicians, physicists and musicians going back to early<br />
history. Quite often the reasons for microtuning instruments may involve<br />
improving the consonant intervals of a tuning-system for sweeter<br />
sounding harmonies, as well as offering wider variety of choices for<br />
melody. "Microtuning" an instrument can sometimes mean there may be<br />
less or more than 12 tones in an octave, or even that the octave itself<br />
may be stretched or compressed. Microtuning is a vast topic, rich with<br />
lore, music and an infinity of musical possibilities for the sonic explorer.<br />
Creating TUN microtuning files with SCALA<br />
Scala is a freeware utility developed by Manuel Op de Coul in the<br />
Netherlands, which can be used for the creation and analysis of<br />
historical, ethnic and contemporary microtunings. A powerful capability<br />
of Scala is that it enables the user to create the proprietary tuning data<br />
required for microtuning a wide range of hardware and software<br />
synthesizers and samplers.<br />
Scala may be used to create the TUN format microtuning-files needed to<br />
explore microtunings with this instrument.<br />
<strong>LinPlug</strong> <strong>Organ</strong> 3 User Guide Page 45
The Scala home page is http://www.xs4all.nl/~huygensf/scala/<br />
Specifying the Reference Frequency of a Microtuning<br />
One of the powerful capabilities of the TUN file format and Scala, is the<br />
ability to specify the pitch and midi note which will be the reference pitch<br />
for the microtuning in use. This becomes a very important consideration<br />
when one is using a number of different synthesizers and wishes to keep<br />
them in tune with a given base frequency. It is very common for one to<br />
specify a chosen concert pitch such as A440 Hz or C261.6256 Hz as a<br />
reference for a microtuning, however, the flexibility of the TUN format<br />
and Scala enables one to specify this frequency arbitrarily. In Scala this<br />
reference is called Map Frequency.<br />
As well as being able to specify the Map Frequency, one can also<br />
specify a central midi-note, which will become the starting point for the<br />
microtuning in use. Being able to specify a particular midi-note on the<br />
controller, provides a way to map a microtuning beginning on any<br />
desired midi key, making it easier to navigate the keyboard when there<br />
may be more or less than 12 tones per octave, or where one may desire<br />
to have the notes of a tuning fall on certain physical keys.<br />
Important Note<br />
When one uses a TUN microtuning-file in the , the above specified<br />
mapping properties will override the Master Tuning reference. Normally<br />
when one is using the default 12 Tone Equal Tempered Scale, the<br />
Master Tuning will be used to make fine pitch adjustments around the<br />
standard concert pitch of A440 Hz, but when one has specified another<br />
pitch base for a microtuning when the TUN file is created in Scala, such<br />
as C261.6256 Hz, the data in the TUN microtuning-file will provide a new<br />
pitch reference.<br />
<strong>LinPlug</strong> <strong>Organ</strong> 3 User Guide Page 46