Alpha Series User Manual - LinPlug Virtual Instruments
Alpha Series User Manual - LinPlug Virtual Instruments
Alpha Series User Manual - LinPlug Virtual Instruments

You also want an ePaper? Increase the reach of your titles
YUMPU automatically turns print PDFs into web optimized ePapers that Google loves.
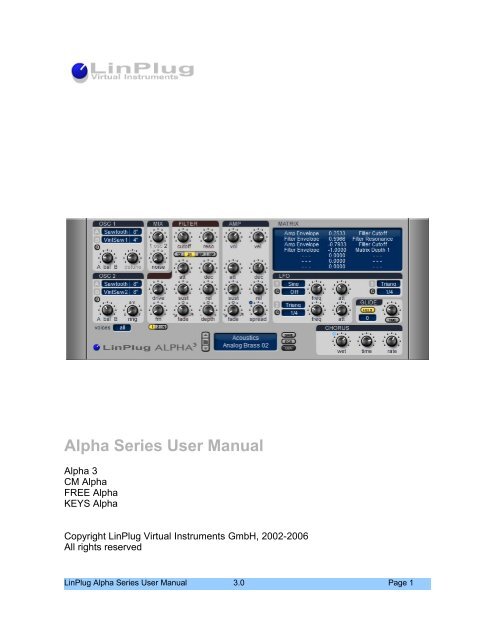
<strong>Alpha</strong> <strong>Series</strong> <strong>User</strong> <strong>Manual</strong><br />
<strong>Alpha</strong> 3<br />
CM <strong>Alpha</strong><br />
FREE <strong>Alpha</strong><br />
KEYS <strong>Alpha</strong><br />
Copyright <strong>LinPlug</strong> <strong>Virtual</strong> <strong>Instruments</strong> GmbH, 2002-2006<br />
All rights reserved<br />
<strong>LinPlug</strong> <strong>Alpha</strong> <strong>Series</strong> <strong>User</strong> <strong>Manual</strong> 3.0 Page 1
Welcome<br />
The <strong>Alpha</strong> <strong>Series</strong> are software synthesizers designed for creating music on your<br />
personal computer. The <strong>Alpha</strong> features a subtractive design with special attention<br />
being paid to recreating the warmth and feel typically found in early-1980s analog<br />
synthesizers. Its key features include an easy-to-use interface, a wide range of<br />
oscillator waveforms, fat, rich-sounding filters, as well as numerous processing and<br />
modulation options.<br />
This manual describes all aspects of the <strong>Alpha</strong> Synthesizer and is designed so that<br />
your use of this software is as efficient and enjoyable as possible. At <strong>LinPlug</strong> we're<br />
very proud of the <strong>Alpha</strong> Synthesizer; it's the result of many years of research and<br />
synthesizer programming experience. We hope you get a lot of pleasure using the<br />
<strong>Alpha</strong> Synthesizer and that it becomes an integral part of your music-making.<br />
Your <strong>LinPlug</strong> Team,<br />
Berlin, Germany, January 2007<br />
<strong>LinPlug</strong> <strong>Alpha</strong> <strong>Series</strong> <strong>User</strong> <strong>Manual</strong> 3.0 Page 2
Credits<br />
Instrument by<br />
<strong>Manual</strong> by<br />
Peter Linsener and Pavol Markovič<br />
Chris Share and Peter Linsener<br />
<strong>Alpha</strong> Presets by (alphabetic order)<br />
Dubhad – dh presets<br />
Frank Von Haeven - fvh presets<br />
Frank Neumann – Xnx presets<br />
Guilherme Kalfelz aka WilliamK<br />
Ken Fennell<br />
Klaus-Dieter Pollak aka Summa – sum presets<br />
Laurent Gaudin - ksn-presets<br />
Nico Herz - BT presets<br />
Peter Schelfhout - PS-presets<br />
Sean Steele - LS-presets<br />
Stephan Müsch - SM-presets<br />
T.O.T.C – (T)-presets<br />
<strong>Alpha</strong> GUI by<br />
Branislav Pakić branispak@beocity.net<br />
All technical specifications of the products specified in this manual may be subject to change without notice. The documents<br />
may not be changed, especially copyright notices may not be removed or changed. <strong>LinPlug</strong> and all <strong>LinPlug</strong> product names are<br />
<strong>LinPlug</strong> <strong>Alpha</strong> <strong>Series</strong> <strong>User</strong> <strong>Manual</strong> 3.0 Page 3
trademarks of <strong>LinPlug</strong> <strong>Virtual</strong> <strong>Instruments</strong> GmbH. Cubase and VST are registered trademarks of Steinberg Media Technologies<br />
GmbH. All other trademarks are the property of their respective owners.<br />
<strong>LinPlug</strong> <strong>Alpha</strong> <strong>Series</strong> <strong>User</strong> <strong>Manual</strong> 3.0 Page 4
Table of Contents<br />
Welcome...................................................................................................................................................2<br />
Credits.......................................................................................................................................................3<br />
Overview...................................................................................................................................................5<br />
Controls.....................................................................................................................................................6<br />
Oscillators.................................................................................................................................................7<br />
Mixer.........................................................................................................................................................8<br />
Filter..........................................................................................................................................................9<br />
Amplifier..................................................................................................................................................11<br />
Modulation Matrix....................................................................................................................................13<br />
LFO.........................................................................................................................................................14<br />
Glide........................................................................................................................................................15<br />
Chorus.....................................................................................................................................................16<br />
Preset / Main...........................................................................................................................................17<br />
Rear Panel..............................................................................................................................................19<br />
Get The Full Version...............................................................................................................................20<br />
Glossary..................................................................................................................................................21<br />
Appendix A: MIDI Implementation Chart.................................................................................................22<br />
Appendix B: Oscillator Waveform Types and Ranges............................................................................23<br />
Appendix C: LFO Sync Settings..............................................................................................................23<br />
Appendix D: Modulation Sources and Destinations................................................................................24<br />
Appendix E: Using TUN Files.................................................................................................................27<br />
Appendix F: Technical Specifications.....................................................................................................29<br />
Appendix G: Predefined ECS assignments............................................................................................30<br />
Appendix H: Flow Diagram.....................................................................................................................31<br />
Appendix I: Midi CC mapping on Behringer BCR 2000..........................................................................32<br />
<strong>LinPlug</strong> <strong>Alpha</strong> <strong>Series</strong> <strong>User</strong> <strong>Manual</strong> 3.0 Page 5
Overview<br />
There are multiple versions of the <strong>Alpha</strong> synthesizer available: the full <strong>Alpha</strong> 3, a<br />
couple of custom <strong>Alpha</strong> synthesizers with a somewhat reduced featureset and the<br />
<strong>Alpha</strong>FREE which is publicly available but has the fewest features. See Appendix E<br />
for the differences between the <strong>Alpha</strong> and the <strong>Alpha</strong>FREE. This manual describes<br />
the <strong>Alpha</strong> so some parts may not be applicable to the custom versions of <strong>Alpha</strong> and<br />
the <strong>Alpha</strong>FREE.<br />
The <strong>Alpha</strong> synthesizer is a monotimbral, 32 note-polyphonic AU and VST analoguestyle<br />
synthesizer with some extraordinary features. The synthesizer is based upon a<br />
classic subtractive design and includes three oscillator modules, a filter module,<br />
envelope and LFO modules, a chorus effect module and an easy-to-use and<br />
powerful Modulation Matrix.<br />
The structure of the <strong>Alpha</strong> synthesizer can be divided into 6 sections: Oscillator,<br />
Filter, Amplifier, Modulation (Matrix, LFOs and Glide), Chorus and Master.<br />
Audio signals are generated by an oscillator that gets pitch information from the<br />
synthesizer's MIDI input. The MIDI input is automatically connected to MIDI output of<br />
the host software. The <strong>Alpha</strong> receives MIDI on all channels simultaneously.<br />
The <strong>Alpha</strong> contains three oscillators. Each oscillator's pitch, amplitude and symmetry<br />
can be modulated using the Modulation Matrix (Noise can be only modulated in<br />
amplitude).<br />
The output of all oscillators is mixed and routed to the Filter section. The filter<br />
modifies the harmonic spectrum of the oscillator's output mix and has its own<br />
dedicated envelope for controlling the filter cutoff parameter.<br />
The output of the Filter section is then sent to the Chorus section.<br />
The audio outputs of the <strong>Alpha</strong> are automatically connected to the input of your host<br />
software's mixer. Here you can set the pan position of the <strong>Alpha</strong>'s output.<br />
At various points throughout the signal path you can modulate the signal using either<br />
envelopes, LFOs or MIDI controllers. The <strong>Alpha</strong> contains 2 independent envelopes<br />
and three LFOs that can be routed to any available modulation destination.<br />
<strong>LinPlug</strong> <strong>Alpha</strong> <strong>Series</strong> <strong>User</strong> <strong>Manual</strong> 3.0 Page 6
Controls<br />
<strong>User</strong>s have the option of controlling all <strong>Alpha</strong> synthesizer dials in either a circular or a<br />
linear manner depending on the Dial Mode setting on the <strong>Alpha</strong>'s rear panel (see the<br />
"Main" section of this manual for more information about the <strong>Alpha</strong>'s rear panel).<br />
Holding down the ALT key while clicking on a control changes the selected control's<br />
value a minimum step upwards (when clicking in the upper half of the control) or a<br />
minimum step downwards (when clicking in the lower half of the control).<br />
Holding down the CTRL key on PC and Command (Apple) key on Mac while clicking<br />
on a control sets the control to its default value.<br />
.<br />
Holding down the SHIFT key while changing a control's value enables finer control<br />
values to be set.<br />
Double clicking once in a Modulation Matrix slot sets the value of the slot to 0.00.<br />
Double clicking in the same slot a second time resets the slot to its previous value.<br />
All Controls can be automated using external MIDI messages. To do this you need to<br />
use the <strong>Alpha</strong>'s ECS (Easy Controller Setup) which is described in the "Main" section<br />
of this manual.<br />
<strong>LinPlug</strong> <strong>Alpha</strong> <strong>Series</strong> <strong>User</strong> <strong>Manual</strong> 3.0 Page 7
Oscillators<br />
The <strong>Alpha</strong>'s oscillator module is very versatile because it contains many waveforms,<br />
and uses a high quality signal generation algorithm so it sounds smoother and more<br />
powerful as ever before.<br />
The <strong>Alpha</strong>'s two main oscillators are located on the left of the front panel. Each of the<br />
<strong>Alpha</strong>'s two oscillator modules outputs a waveform that is a combination of two basic<br />
waveforms. So the amount of available waveforms it literally endless.<br />
Each waveform type is set by clicking on the waveform name in the <strong>Alpha</strong>'s OSC<br />
1/OSC 2 sections. This opens a menu that allows you to select from the available<br />
waveforms. See Appendix B for a complete list of all waveforms. The oscillators pitch<br />
range is set in a similar manner right of the waveform.<br />
The “F” switch on the left allows you to switch between freerun (when switched on)<br />
and retriggered start of the oscillator (when switched off).<br />
Below these controls is the “A bal B” (Balance) dial. This dial allows you to<br />
interpolate between the two waveforms. When the dial is at its leftmost setting, the<br />
waveform consists purely of waveform A. Similarly, if the dial is moved all the way to<br />
the right the waveform consists purely of waveform B. When in an intermediate<br />
position, the waveform consists of a mixture of the two waveforms. It's probably<br />
easier to understand this by trying it for yourself rather than having it explained to<br />
you. As an example, set one wave to Sine and the other to a different wave such as<br />
Sawtooth. As you rotate the dial from one end of its range to the other you can hear<br />
the wave "morph" from one waveshape to the other.<br />
The detune dial in OSC 1 section determines the amount of detuning between the<br />
two oscillator modules. A small amount of detuning can be used to create the<br />
swirling sound typical of many analog synth patches.<br />
<strong>LinPlug</strong> <strong>Alpha</strong> <strong>Series</strong> <strong>User</strong> <strong>Manual</strong> 3.0 Page 8
The “ringmod” parameter in Osc 2 section allows a gradually adjustment of how the<br />
output of oscillator 2 is made from oscillator 2 and the integrated Ring Modulator<br />
(see glossary for explanation of AM and ring modulation).<br />
Turned fully left the output of oscillator 2 is purely oscillator 2. Turned fully right the<br />
output of oscillator 2 is fully the ring modulation result of oscillator 1 and oscillator 2.<br />
In middle position the output is mix of oscillator 2 and the ring modulation result of<br />
oscillator 1 and oscillator 2 (in synthesizers often called AM).<br />
The “voices” control below the oscillator controls is used to set the number of<br />
available voices ("polyphony"). The maximum polyphony is 32 voices, but sometimes<br />
it might be useful to restrict the polyphony to save CPU.<br />
Mixer<br />
The upper dial in the Mix section is used to set the relative output volume of each<br />
oscillator module. When the dial is set to 1 (i.e. it is turned all the way counterclockwise)<br />
the output signal consists entirely of oscillator 1. When the dial is set to 2<br />
(i.e. it is turned all the way clockwise) the output signal consists entirely of oscillator<br />
2. The mid position provides an equal mixture of oscillator 1 and oscillator 2.<br />
The lower dial is the “noise” parameter that allows to mix gradually some white noise<br />
to the two oscillators mix. Turned fully left no noise is added, turned fully right the<br />
oscillators are suppressed and only noise is audible. The generated noise is white<br />
noise.<br />
<strong>LinPlug</strong> <strong>Alpha</strong> <strong>Series</strong> <strong>User</strong> <strong>Manual</strong> 3.0 Page 9
Filter<br />
The <strong>Alpha</strong>'s filter module is located right of the oscillators.<br />
The “drive” (or saturation) dial on the left can be used to overdrive the <strong>Alpha</strong>'s filter.<br />
This can be used to produce warmer, fatter sounds or a thinner sound depending on<br />
the amount of drive applied and depending on the basic waveform.<br />
Below the drive there is the filter “fm” dial and filter fm source selector. With the “fm”<br />
dial the amount of filter cutoff modulation is adjusted from no modulation when<br />
turned fully left to maximum modulation. As the modulation source is in audible<br />
range we have a true “FM” or cutoff Frequency Modulation.<br />
With the fm source selector the source of the modulation is selected, either oscillator<br />
1 , oscillator 2 or noise. Note that the filter cutoff FM does not depend on the setting<br />
in the Mix section of the oscillators. If oscillator 2 is selected then its purely oscillator<br />
2 and does not depend on the ring modulation setting in oscillator 2 section (the Ring<br />
Modulator is not available as source for filter FM).<br />
The “cutoff” dial is used to set the frequency (in Hz) at which the filter begins to take<br />
effect. In the case of the Low Pass Filter, higher settings produce brighter sounds<br />
while lower settings result in darker sounds. In the case of the High Pass filter, higher<br />
settings produce thinner sounds while lower settings result in fuller sounds. The<br />
Band Pass filter combines a Low Pass and a High Pass filter. In this case, the Cutoff<br />
dial sets the midpoint of the filter's pass band.<br />
The “reso” (Resonance) dial is used to set the amount of emphasis around the cutoff<br />
frequency. Higher settings create a more pronounced peak in the signal while lower<br />
settings produce a flatter response.<br />
Below cutoff and resonance is the filter type selector. It allows selection of 4 types of<br />
filter. These are: 12 ("Low Pass 12 dB/Oct."), 24 ("Low Pass 24 dB/Oct."), HP ("High<br />
<strong>LinPlug</strong> <strong>Alpha</strong> <strong>Series</strong> <strong>User</strong> <strong>Manual</strong> 3.0 Page 10
Pass 12 dB/Oct.") and BP ("Band Pass 12 dB/Oct.").<br />
The envelope parameters follow below the type selector, these are the classic attack,<br />
decay, sustain and release as well as an additional “fade” parameter. Note that the<br />
envelope has only an effect if the filter envelope depth (described below) is not 0.<br />
The following description of the envelope parameter assumes that the depth is<br />
positive.<br />
The “att” (Attack Time) dial is used to set the length of time it takes for the cutoff<br />
envelope to reach the full envelope depth. For example, if the att dial is set to 0%<br />
(i.e. the dial is turned completely counter-clockwise), the filters cutoff will move from<br />
cutoff parameters value to maximum envelope depth immediately. If the ATT dial is<br />
turned completely clockwise the filters cutoff will move from cutoff parameters value<br />
to maximum envelope depth in 10 seconds.<br />
The “dec” (Decay Time) dial setting determines the length of time (in seconds) that<br />
the filter cutoff envelope takes to move from the maximum envelope depth to the<br />
Sustain value. For example, if the dec dial is set to 0% (i.e. the dial is turned<br />
completely counter-clockwise), the filters cutoff will move from the Attack peak value<br />
to the Sustain value immediately. If the DEC dial is set to 100% (i.e. the dial is turned<br />
completely clockwise) the same change in cutoff frequency will take 10 seconds.<br />
The “sust” (Sustain) dial setting determines the cutoff frequency after the initial<br />
Attack/Decay phase while a note is being held.<br />
The “rel” (Release Time) dial is used to set the length of time (in seconds) that the<br />
cutoff frequency takes to move from current Sustain/Fade value to silence after the<br />
note is released. If the REL dial is set to 0% (i.e. the dial is turned completely<br />
counter-clockwise), the filters cutoff will move from the current level to the cutoff<br />
parameters value immediately. If the REL dial is set to 100% (i.e. the dial is turned<br />
completely clockwise) it takes full 10 seconds.<br />
The “fade” (Fade Time) dial is used to set the rate at which the filters cutoff<br />
frequency moves from the Sustain value to either the cutoff parameters value (when<br />
the dial is turned completely counter-clockwise) or maximum envelope depth (when<br />
the dial is turned completely clockwise). A middle “fade” setting (dial is set to 12<br />
o'clock position) means that the filters cutoff frequency remains at the Sustain level<br />
until the note is released.<br />
The “depth” dial is used to set the degree to which the filter's envelope effects the<br />
signal. Setting “depth” to -100% (i.e. turning the dial completely counter-clockwise)<br />
means that the envelope has full negative effect on the filter. Adjusting the dial to the<br />
middle position means that it has no effect on the filter. Setting “depth” to 100% (i.e.<br />
turning the dial completely clockwise) means that the filter is modulated by the<br />
envelope's full range.<br />
The negative envelope depth can be used in example for opening the Filter when a<br />
note is released (this is impossible with a non-inverted ADSR envelope).<br />
<strong>LinPlug</strong> <strong>Alpha</strong> <strong>Series</strong> <strong>User</strong> <strong>Manual</strong> 3.0 Page 11
Amplifier<br />
The amplifier sections follows right of the filter section. It features both a “vol” volume<br />
control to adjust the overall output volume. The “vel” velocity control allows<br />
adjustment of the influence that the notes velocity has on volume. When turned fully<br />
to the left the Velocity has no influence on the volume while turned fully right meants<br />
that the volume is completely controlled by velocity.<br />
The “att” (Attack Time) dial is used to set the length of time it takes for the amplitude<br />
envelope to reach the full envelope depth. For example, if the att dial is set to 0%<br />
(i.e. the dial is turned completely counter-clockwise), the signal's amplitude will move<br />
from zero to full volume immediately. If the ATT dial is turned completely clockwise<br />
the signal's amplitude will move from zero to full volume in the maximum time of 10<br />
seconds.<br />
The “dec” (Decay Time) dial setting determines the length of time (in seconds) that<br />
the amplitude envelope takes to move from the Attack peak level to the Sustain<br />
level. For example, if the dec dial is set to 0% (i.e. the dial is turned completely<br />
counter-clockwise), the signal's amplitude will move from the Attack peak level to the<br />
Sustain level immediately. If the DEC dial is set to 100% (i.e. the dial is turned<br />
completely clockwise), the signal's amplitude will move from the Attack peak level to<br />
the Sustain level in 10 seconds.<br />
The “sust” (Sustain Level) dial setting determines the amplitude level after the initial<br />
Attack/Decay phase while a note is being held.<br />
The “rel” (Release Time) dial is used to set the length of time (in seconds) that the<br />
amplitude envelope takes to move from current Sustain/Fade level to silence after<br />
the note is released. If the REL dial is set to 0% (i.e. the dial is turned completely<br />
counter-clockwise), the signal's amplitude will move from the current Fade level to<br />
zero immediately. If the REL dial is set to 100% (i.e. the dial is turned completely<br />
<strong>LinPlug</strong> <strong>Alpha</strong> <strong>Series</strong> <strong>User</strong> <strong>Manual</strong> 3.0 Page 12
clockwise), the signal's amplitude will move from the current Fade level to the zero in<br />
10 seconds.<br />
The “fade” (Fade Time) dial is used to set the rate at which the signal amplitude<br />
moves from the Sustain level to either silence (when the dial is turned completely<br />
counter-clockwise) or full output (when the dial is turned completely clockwise). A<br />
middle “fade” setting (dial is set to 12 o'clock position) means that the signal<br />
amplitude remains at the Sustain level until the note is released.<br />
The “spread” dial allows you to play 3 voices simultaneously. If the “spread” dial is<br />
set to 0% (i.e. the dial is turned completely counter-clockwise), Spread is disabled. If<br />
the “spread” dial is set to anything other than 0%, the <strong>Alpha</strong>'s six oscillators are<br />
continuously detuned with one another. Higher settings create more detuning, so<br />
producing a fatter, thicker sound. A small indicator light shows when Spread is<br />
enabled.<br />
<strong>LinPlug</strong> <strong>Alpha</strong> <strong>Series</strong> <strong>User</strong> <strong>Manual</strong> 3.0 Page 13
Modulation Matrix<br />
The <strong>Alpha</strong>'s Modulation Matrix allows you to create seven user-defined modulation<br />
routings. See Appendix D for a listing of all modulation sources and destinations.<br />
The <strong>Alpha</strong>'s Modulation Matrix is located in the top right of the front panel.<br />
Modulation sources are shown in a column on the left of the display, while the<br />
destinations are shown on the right. The modulation amount is displayed in the<br />
middle. To change a routing click on the source or destination that you want to<br />
change. A menu will appear which lets you select the new source or destination. To<br />
remove a modulation source or destination select the "- - - - -" entry in the menu.<br />
To change the modulation depth click on the amount display and move the mouse<br />
(while keeping the mouse button pressed) upwards or downwards (increasing or<br />
decreasing the value) until the desired amount has been reached. A negative<br />
modulation depth inverts the waveform of the modulation source.<br />
A double click on the modulation depth sets it to 0, another double click will revert it<br />
to its original value, so you can quickly disable certain modulations to check their<br />
effect.<br />
The modulation of pitch has a special display for modulation depth. In example a<br />
modulation depth of "2:40" means that the pitch is modulated to a depth of 2<br />
semitones and 40 cents.<br />
<strong>LinPlug</strong> <strong>Alpha</strong> <strong>Series</strong> <strong>User</strong> <strong>Manual</strong> 3.0 Page 14
LFO<br />
An LFO (Low Frequency Oscillator) is an oscillator that generates a low frequency<br />
signal that can be used to modulate other aspects of the audio signal. The <strong>Alpha</strong><br />
contains up to three LFOs below the matrix on the right of the front panel.<br />
First, the LFO can be set to either “M” Mono or “P” Poly mode with the switch below<br />
the LFO number. In Mono mode, one LFO is shared by all voices. In Poly Mode,<br />
each voice has its own LFO which is triggered by a Note-On MIDI message.<br />
The waveform parameter is used to select one of the LFO waveforms. To select a<br />
waveform, click in the box to the right of the LFO number. A popup menu containing<br />
six LFO waveforms will be displayed. The six available LFO waveforms are: Sine,<br />
Triangle, Sawtooth, Square, Noise and SamHo (Sample and Hold).<br />
The Sync popup menu below the waveform allows you to set the LFO so that it is<br />
"synced" to the tempo of the current song. In this case, the LFO will sync its tempo to<br />
the song tempo (see Appendix C for the range of possible sync settings) For<br />
example, a setting of 1/4 will make the LFO cycle last exactly one quarter note.<br />
The value “Off” indicates that the LFO is not synchronized to the song tempo.<br />
Instead the LFO speed can be adjusted with the “freq” parameter.<br />
The “freq” (Frequency) dial is used to set the the LFO's frequency. If the FREQ dial<br />
is set to 0% (i.e. the dial is turned completely counter-clockwise), the LFO oscillates<br />
at 0.01 Hz (that is 1 complete cycle every 100 seconds). If the FREQ dial is set to<br />
100% (i.e. the dial is turned completely clockwise), the LFO oscillates at 32.0 Hz (32<br />
cycles per second). This parameter is not available for the third LFO. This parameter<br />
is not active whenever a sync value is selected from the Sync popup menu.<br />
The “att” (Attack Time) dial is used to set the length of time it takes for the LFO to<br />
reach the full modulation depth. This can be used to slowly increase the amount of<br />
<strong>LinPlug</strong> <strong>Alpha</strong> <strong>Series</strong> <strong>User</strong> <strong>Manual</strong> 3.0 Page 15
modulation applied to the audio signal. If the “att” dial is set to 0% (i.e. the dial is<br />
turned completely counter-clockwise), modulation commences immediately. If the<br />
ATT dial is set to 100% (i.e. the dial is turned completely clockwise), modulation<br />
depth moves from zero to the maximum modulation depth in 10 seconds. This<br />
parameter is not available for the third LFO.<br />
Glide<br />
The Glide or "portamento" section allows you to set the <strong>Alpha</strong>'s portamento<br />
parameters. "Glide" continuously changes the pitch from one note to the next,<br />
connecting the notes and letting you smoothly "glide" from one to the other. The<br />
Glide section is located on the right of the front panel beneath the LFO section.<br />
The Glide Mode button has 4 values: Off, On,<br />
Held and Bend. The On and Off functions turn<br />
"Glide" on and off. When "Glide" is on, the<br />
Time/Rate dial is used to set the length of time<br />
it takes for the pitch of one note to reach that<br />
of a following note. The "Held" setting works<br />
as follows. If notes overlap then Glide is<br />
applied, however if they don't then the notes<br />
are played without Glide. This makes it<br />
possible to apply Glide only to selected notes.<br />
"Bend" allows you to apply a predetermined<br />
pitch bend to each note.<br />
The bend range is set using the Bend control. A bend range of -48 to +48 semitones<br />
is available. This parameter only has a meaning when the Glide Mode button is set<br />
to “Bend”.<br />
The Time/Rate dial is used to adjust the time it takes for the glide to happen. Turned<br />
fully counter clockwise the glide is so fast that its hardly noticeable. If the dial is<br />
turned fully clockwise it takes very long for the notes to glide from the previous notes<br />
pitch to their own pitch.<br />
The Time/Rate button has two settings: Time and Rate. These settings determine<br />
the manner in which the pitch of one note moves to that of the a following note.<br />
When set to "Time", it takes a constant amount of time to move from one note to the<br />
next. In this case it will take the same amount of time to reach the destination pitch<br />
regardless of whether the preceding note was a semitone away or an octave away.<br />
When set to "Rate", the pitch of one note moves to that of a following note at a<br />
constant rate. This means that the amount of time it takes to move from one note to<br />
the next depends upon how far apart the pitches of the two notes are. The further<br />
apart the notes, the longer it will take for the pitch of the first note to reach that of the<br />
following note.<br />
<strong>LinPlug</strong> <strong>Alpha</strong> <strong>Series</strong> <strong>User</strong> <strong>Manual</strong> 3.0 Page 16
Chorus<br />
The Chorus effect can be used to "thicken" a single sound creating the impression<br />
that it contains multiple voices. The Chorus works by mixing delayed signals with the<br />
original signal. The <strong>Alpha</strong>'s Chorus features controls for WET, TIME and RATE and<br />
is located in the lower right section of the front panel.<br />
The “wet” dial allows you to set the balance between the processed "wet" signal and<br />
the original unprocessed "dry" signal. A small indicator light shows when Chorus is<br />
enabled.<br />
The “time” dial is used for setting the chorus' delay time (in milliseconds). Longer<br />
times produce a "chorusing" effect while shorter times create a "flanging" effect.<br />
The “rate” dial sets the rate at which the signal is modulated.<br />
To set the chorus' sound we suggest you start with all controls at a medium position<br />
and successively change them until you find a sound that you like.<br />
<strong>LinPlug</strong> <strong>Alpha</strong> <strong>Series</strong> <strong>User</strong> <strong>Manual</strong> 3.0 Page 17
Preset / Main<br />
The <strong>Alpha</strong>'s Preset section is located on the bottom middle of the front panel. It<br />
contains various controls for dealing with presets.<br />
The Preset control is used for all File-related operations. The Load button (the<br />
middle button on the left) opens a dialog that lets you select a file for loading. The<br />
Up/Previous and Down/Next buttons allow you to traverse a list of files.<br />
The “save” button allows you to save the current preset settings. The <strong>Alpha</strong> loads<br />
and saves all of its presets directly to hard disk so your computer's RAM does not<br />
limit the number of available presets.<br />
Clicking on the bank or preset name allows you to directly access another bank or<br />
preset within the current bank.<br />
The ECS (Easy Controller Setup) section makes it simple to control the <strong>Alpha</strong> 3 from<br />
an external MIDI controller. All you have to do is switch on the ECS (a menu pops up<br />
when you click at the ECS letters, choose Learn), select a <strong>Alpha</strong> 3 parameter with<br />
the mouse and then send some MIDI messages to the <strong>Alpha</strong> 3 from you MIDI<br />
source. That's all there is to it! From now on you can change the parameter with that<br />
controller.<br />
In addition to this, more than one controller can be defined to change a particular<br />
parameter. In fact, you can define up to 128 parameter-controller-combinations. This<br />
does not depend on the type of controller you have nor the particular MIDI Control<br />
Change messages it sends.<br />
Don't forget to switch off the ECS (pick Off from the menu) after you have finished<br />
using it (the ECS button remains red during ECS activity as a reminder)!<br />
ECS settings can be saved and restored using the "Load" and "Save" functions from<br />
the menu. In addition, a single controller assignment can be cleared using the<br />
<strong>LinPlug</strong> <strong>Alpha</strong> <strong>Series</strong> <strong>User</strong> <strong>Manual</strong> 3.0 Page 18
"Clear" menu entry. All you have to do is select Clear and select a controls that you<br />
wish to be cleared (deassigned from MIDI CC's). Don't forget to switch off the ECS<br />
control after you have finished clearing assignments!<br />
The “Clear All” function clears all controller assignments at once and the Rest.Fact.<br />
Function means Restore Factory, thus restoring the factory settings as described in<br />
Appendix G.<br />
The GEN button is used to generate random patch settings. To generate a new<br />
patch click on the button and some or all of the current parameter settings will be<br />
changed to new settings. The Gen range is set on the <strong>Alpha</strong>'s rear panel (see<br />
below).<br />
<strong>LinPlug</strong> <strong>Alpha</strong> <strong>Series</strong> <strong>User</strong> <strong>Manual</strong> 3.0 Page 19
Rear Panel<br />
The "Rear Panel" of the <strong>Alpha</strong> is accessed by clicking on the <strong>LinPlug</strong> logo at the<br />
bottom of the <strong>Alpha</strong>'s front panel. Several master controls have been located on the<br />
rear panel to make the front panel less crowded, and also so that they are not<br />
changed accidentally while the <strong>Alpha</strong> is in use. The controls located here are Dial<br />
Mode, MasterTune, Gen Range, Bend Range, Precision and Microtuning.<br />
Dial Mode is used to select the <strong>Alpha</strong>'s dial operation mode. Two modes are<br />
available: "Cir" (Circular) and "Lin" (Linear). In "Cir" mode the <strong>Alpha</strong>'s dials track<br />
cursor movement in a circular fashion around the dial. In "Lin" mode the <strong>Alpha</strong>'s dials<br />
track vertical cursor movement.<br />
Master Tune is used to set the overall tuning of the <strong>Alpha</strong>. Tuning can be set from<br />
415 Hz to 466 Hz.<br />
The Gen. Range control is used to set the range for random parameter generation.<br />
It has a range of 0% to 100%. Using lower values will effect the patch less than using<br />
higher values. Not all parameters are changed with each new random patch. With<br />
lower settings (e.g. 5%) less parameters are affected. Normally, a setting in the<br />
range of 2 to 10% will produce the most interesting and useable results.<br />
The P (Pitch) Bend Up control is used to set the <strong>Alpha</strong>s response to pitch bend<br />
messages. Bend Range can be set from 0 to 24 semitones.<br />
The Bend Down control is used to set the <strong>Alpha</strong>s response to pitch bend messages.<br />
Bend Down Range can be set from 0 to 24 semitones.<br />
The Bend Down Range control can also be set to “Link” in which case the Bend<br />
Down Range is the same as the Bend Up Range.<br />
<strong>LinPlug</strong> <strong>Alpha</strong> <strong>Series</strong> <strong>User</strong> <strong>Manual</strong> 3.0 Page 20
The PRECISION control is used to set the accuracy of the <strong>Alpha</strong>'s signal generation.<br />
When the "Precision" control is set to less than 100% small inaccuracies are<br />
introduced into the waveform at various point in the <strong>Alpha</strong>'s signal chain. This is<br />
useful if you're trying to replicate the warmth of an old analog synthesizer. Precision<br />
can be set in a range from 90% to 100%.<br />
With the Scale control you can load TUN-scaling files. See appendix E for more<br />
details.<br />
Finally, the rear panel also contains your <strong>Alpha</strong> Synthesizer's truncated serial<br />
number and the version number.<br />
To switch back to the front panel click the <strong>LinPlug</strong> logo on the rear panel.<br />
Get The Full Version<br />
Obtaining the Full Version of the <strong>Alpha</strong> is very easy. All you have to do is visit our<br />
online shop at www.linplug.com and purchase a license. As soon as your transaction<br />
has been authorized you will be sent a personal serial number. In most cases this<br />
will only take a few minutes.<br />
After you've installed and opened the full version of the <strong>Alpha</strong>, go to the instrument's<br />
rear panel. The S/N edit box should read "Enter here". Enter the serial number you<br />
have received into the S/N edit box. If the serial number has not been entered or it<br />
has been entered incorrectly, the full version of the <strong>Alpha</strong> will not play any notes.<br />
After entering the serial number return to the <strong>Alpha</strong>'s front panel. Now send the<br />
<strong>Alpha</strong> a few note-on messages. After the <strong>Alpha</strong> receives the first few note-on<br />
messages it automatically becomes registered.<br />
If you have any questions regarding the <strong>Alpha</strong>'s registration process, please visit our<br />
support-area at www.linplug.com.<br />
<strong>LinPlug</strong> <strong>Alpha</strong> <strong>Series</strong> <strong>User</strong> <strong>Manual</strong> 3.0 Page 21
Glossary<br />
AM: AM or "Amplitude Modulation" is a process where the amplitude of one<br />
generator (the carrier) is controlled by another (the modulator). When the frequency<br />
of the modulator is periodic and below the audio range (less than 20 Hz) tremolo is<br />
produced. When the modulation frequency is within the audio range, Ring<br />
Modulation is produced. See also Ring Modulation below.<br />
Amplifier: A signal processing device that changes the amplitude, and hence the<br />
volume, of a signal.<br />
Envelope: A time-varying signal used to control the development of another signal<br />
after it has been triggered. Envelopes are most often used for controlling a signal's<br />
amplitude. The shape of the envelope is determined by the number of control<br />
parameters. Usually four parameters are available: Attack Time, Decay Time,<br />
Sustain Level and Release Time.<br />
Filter: A signal processing device that suppresses or "filters" out specific parts of a<br />
signal's frequency spectrum. Numerous types of filter are used in audio synthesis.<br />
These include Low Pass, High Pass, Band Pass and Notch. The tone controls on a<br />
stereo amplifier are one example of an audio filter.<br />
LFO: An LFO or "Low Frequency Oscillator" is a periodic signal source (usually<br />
below audio frequency range) used to modulate another signal parameter. An LFO<br />
can be used for a variety of effects including vibrato (by modulating the pitch) and<br />
tremolo (by modulating the volume).<br />
Modulation Matrix: A signal "junction" where a source signal can be patched so that<br />
it controls a destination signal. The <strong>Alpha</strong>'s Modulation Matrix is used for tasks such<br />
as modulating an oscillator's amplitude by an LFO.<br />
Oscillator: A signal source that generates a periodic waveform at a given frequency.<br />
Ring Modulation: The process of combining two audio signals by multiplication.<br />
Ring Modulation produces sidebands but suppresses both the carrier and<br />
modulating frequencies. Though Ring Modulation is only a special form of AM, in<br />
practice “AM” is considered Ring Modulation plus the carrier (one of the oscillators, in<br />
<strong>Alpha</strong> its the oscillator 2) and “Ring Modulation” is considered pure Ring Modulation<br />
with no carrier.<br />
<strong>LinPlug</strong> <strong>Alpha</strong> <strong>Series</strong> <strong>User</strong> <strong>Manual</strong> 3.0 Page 22
Appendix A: MIDI Implementation Chart<br />
Product: <strong>LinPlug</strong> <strong>Alpha</strong> Synthesizer Version 3.0x Date: 15.September 2006<br />
Function Transmitted Recognized Remarks<br />
Basic Channel<br />
Default no no<br />
Changed no no<br />
Mode<br />
Default no Omni<br />
Changed no no<br />
Note Number<br />
no yes<br />
True Voice no no<br />
Velocity<br />
Note On no yes<br />
Note Off no no<br />
Aftertouch<br />
Poly (Key) no yes<br />
Mono (Channel) no yes<br />
Pitch Bend no yes<br />
Control Change no yes<br />
Program Change no yes<br />
System Exclusive no no<br />
System Common<br />
Song Position no no<br />
Song Select no no<br />
Tune Request no no<br />
System Realtime<br />
Clock no no<br />
Commands no no<br />
Aux Messages<br />
Local On/Off no no<br />
All Notes Off no yes<br />
Active Sensing no no<br />
System Reset no yes<br />
<strong>LinPlug</strong> <strong>Alpha</strong> <strong>Series</strong> <strong>User</strong> <strong>Manual</strong> 3.0 Page 23
Appendix B: Oscillator Waveform Types and Ranges<br />
Types:<br />
Sine, Triangle, Sawtooth, Square1, Square2, Square3, Organ1, Organ2, Organ3,<br />
Spectra1, Spectra2, Spectra3, Spectra4, RichSaw1, RichSaw2, RichSaw3,<br />
RichSaw4, SawSpec1, SawSpec2, VintSaw1, VintSaw2, VintSaw3, SawBass1,<br />
SawBass2, SawBass3, SawBass4, SawBass5, SawBass6, SawBass7, SawBass8<br />
Waveform Ranges:<br />
32", 16", 8", 4", 2"<br />
Appendix C: LFO Sync Settings<br />
Off, 16/1*, 16/1, 16/1T, 8/1*, 8/1, 8/1T, 4/1*, 4/1, 4/1T, 2/1*, 2/1, 2/1T, 1/1*, 1/1, 1/1T,<br />
1/2*, 1/2, 1/2T, 1/4*, 1/4, 1/4T, 1/8*, 1/8, 1/8T, 1/16*, 1/16, 1/16T, 1/32*, 1/32, 1/32T,<br />
1/64, 5/16, 7/16, 9/16, 5/8, 11/16, 13/16, 7/8, 15/16.<br />
Note: "T" stands for Triplet and "*" stands for a dotted note. In the case of a dotted<br />
note, the note duration is equal to 1.5 times its original undotted value.<br />
<strong>LinPlug</strong> <strong>Alpha</strong> <strong>Series</strong> <strong>User</strong> <strong>Manual</strong> 3.0 Page 24
Appendix D: Modulation Sources and Destinations<br />
Modulation Sources:<br />
--- (Off), Note played (log = logarithmic), Note played (lin = linear), Velocity,<br />
Aftertouch(poly and mono), Pitch Wheel, Modulation Wheel, Breath Controller, Foot<br />
Controller, ExpressionContr, CC16 Controller, CC17 Controller, CC18 Controller,<br />
CC19 Controller, Amp envelope, Filter envelope, LFO1, LFO2, LFO 3 and Constant<br />
Modulation Destinations:<br />
---(Off), Osc 1 Amplitude, Osc 1 Pitch, Osc 1 Symmetry, Osc 2 Amplitude, Osc 2<br />
Pitch, Osc 2 Symmetry, Osc 2 Ringmod, Noise Amplitude, Filter Cutoff, Filter Cutoff<br />
FM, Filter Resonance, Main Amplitude, Main Pitch, Matrix Depth 1, Matrix Depth 2,<br />
Matrix Depth 3, LFO 1 Speed, LFO 2 Speed<br />
Modulation Sources<br />
Note played Log<br />
Note played Lin<br />
Velocity<br />
Aftertouch<br />
Pitch Wheel<br />
The note being played with exponential<br />
response. The modulation value follows the<br />
frequency of the played note (bipolar).<br />
The note being played with a linear<br />
response. The modulation value follows the<br />
note number (bipolar).<br />
The MIDI note-on velocity information. The harder the key is hit,<br />
the higher the modulation value (unipolar).<br />
MIDI pressure / aftertouch information. Either polyphone or<br />
monophone (unipolar)<br />
The value of the pitch-Wheel is takes as modulation source,<br />
maybe it makes sense to reduce the Pitch Wheel range to 0<br />
when using the Pitch Wheel as modulation source. The Pitch<br />
Wheel is bipolar<br />
Modulation Wheel The MIDI modulation wheel (MIDI CC 1) (unipolar )<br />
Breath Controller<br />
Foot Controller<br />
Expression Contr.<br />
MIDI CC 2 (unipolar).<br />
MIDI CC 4 (unipolar).<br />
MIDI CC 11 (unipolar).<br />
<strong>LinPlug</strong> <strong>Alpha</strong> <strong>Series</strong> <strong>User</strong> <strong>Manual</strong> 3.0 Page 25
CC16 Controller<br />
CC17 Controller<br />
CC18 Controller<br />
CC19 Controller<br />
LFO 1<br />
LFO 2<br />
LFO 3<br />
Amp Envelope<br />
Filter Envelope<br />
Constant<br />
MIDI CC 16 (bipolar).<br />
MIDI CC 17 (bipolar).<br />
MIDI CC 18 (bipolar).<br />
MIDI CC 19 (bipolar).<br />
LFO 1 (bipolar).<br />
LFO 2 (bipolar).<br />
LFO 3 (bipolar).<br />
The envelope of the Main Amplitude. This envelopes control the<br />
overall Volume, however if it makes sense within the preset to do<br />
so, the envelope can be used as a modulation source (unipolar).<br />
The envelope of the Filters Cutoff. This envelopes control the<br />
Filter cutoff frequency, however if it makes sense within the<br />
preset to do so, the envelope can be used as a modulation<br />
source (unipolar).<br />
A constant value of 1, sometimes useful to apply static<br />
modulation, e.g. of the oscillator symmetry. (unipolar)<br />
Modulation Destinations<br />
Osc 1,2 Amplitude The amplitude of Oscillator 1 to 2, used in example for tremolo<br />
or for adjusting the balance of the oscillators in the sound.<br />
N.B. In order to create the classic tremolo effect it is better to<br />
use Main Amplitude as the modulation destination as this is<br />
applied to the whole voice.<br />
Osc 1,2 Pitch<br />
The pitch of the respective Oscillator, used in example for<br />
vibrato or to control detuning of the oscillators.<br />
N.B. In order to create the classic vibrato effect it is better to use<br />
Main Pitch as the modulation destination as this is applied to the<br />
whole voice.<br />
Osc 1,2 Symmetry Symmetry of the respective Oscillator waveform, used to thicken<br />
a sound or make it swirl, effect depends on intensity and<br />
modulation speed, typically with LFO.<br />
<strong>LinPlug</strong> <strong>Alpha</strong> <strong>Series</strong> <strong>User</strong> <strong>Manual</strong> 3.0 Page 26
Osc 2 Ringmod<br />
Noise Amplitude<br />
Filter Cutoff<br />
Filter Cutoff FM<br />
Filter Resonance<br />
Main Amplitude<br />
Controls the Ringmod parameter of Osc 2, thus allows to<br />
dynamically change the mix of oscillator 2 and the ring<br />
modulators output.<br />
The amplitude of noise oscillator, mainly used for dynamically<br />
adjusting the balance of the noise oscillators in the sound.<br />
Cutoff frequency of the Filter, often used with an LFO to create<br />
filter sweeps or with Velocity to simulate an acoustic instrument's<br />
response to note attack.<br />
The intensity of the FM modulation of the filters cutoff frequency.<br />
Resonance of Filter 1 or 2, a rather subtle effect, sometimes<br />
used with an LFO or for Keyscaling (Note Lin or Note Exp<br />
source) to adjust Resonance over the key range.<br />
Overall amplitude of all Oscillators. Often used for tremolo or<br />
with Key Lin to adjust the volume over the keyboard.<br />
Main Pitch<br />
Overall pitch of all oscillators. Often used for vibrato.<br />
Matrix Depth 1,2,3 Intensity of the first three entries (line 1 to 3) in the Modulation<br />
Matrix, often used with the ModWheel as source to control a<br />
specific modulation parameter (e.g. Vibrato).<br />
LFO Speed 1,2<br />
Speed of LFO 1 or 2, this allows tempo changes of the LFO to<br />
be programmed. Typically this is used with Key Lin to make the<br />
LFO run faster with higher notes.<br />
<strong>LinPlug</strong> <strong>Alpha</strong> <strong>Series</strong> <strong>User</strong> <strong>Manual</strong> 3.0 Page 27
Appendix E: Using TUN Files<br />
By Jacky Ligon<br />
About Microtuning<br />
Microtuning, or "microtonality" are methods for tuning musical instruments whereby<br />
musicians may explore and compose with ethnic, historical and contemporary tuningsystems.<br />
Microtuning musical instruments allows one to use scales which may have<br />
pitches lying between the notes of our familiar Western 12 tone scale. These<br />
pitches which are found in the 'cracks' of 12 Tone Equal Temperament are one of<br />
the things that give music's of Bali, India, Africa, Thailand, Turkey and the Middle<br />
East (to name but a few) a special intonational flavor, but is something that is of<br />
immeasurable value to the contemporary acoustic and electronic composer, who<br />
may require a more broad palette of musical pitches for their music.<br />
The quest for creating beautiful and musically useful tuning-systems has been an<br />
unending process of discovery and debate amongst musical theorists,<br />
mathematicians, physicists and musicians going back to early history. Quite often<br />
the reasons for microtuning instruments may involve improving the consonant<br />
intervals of a tuning-system for sweeter sounding harmonies, as well as offering<br />
wider variety of choices for melody. "Microtuning" an instrument can sometimes<br />
mean there may be less or more than 12 tones in an octave, or even that the octave<br />
itself may be stretched or compressed. Microtuning is a vast topic, rich with lore,<br />
music and an infinity of musical possibilities for the sonic explorer.<br />
Creating TUN microtuning files with SCALA<br />
Scala is a freeware utility developed by Manuel Op de Coul in the Netherlands,<br />
which can be used for the creation and analysis of historical, ethnic and<br />
contemporary microtunings. A powerful capability of Scala is that it enables the user<br />
to create the proprietary tuning data required for microtuning a wide range of<br />
hardware and software synthesizers and samplers.<br />
Scala may be used to create the TUN format microtuning-files needed to explore<br />
microtunings with this instrument.<br />
The Scala home page is http://www.xs4all.nl/~huygensf/scala/<br />
Specifying the Reference Frequency of a Microtuning<br />
One of the powerful capabilities of the TUN file format and Scala, is the ability to<br />
specify the pitch and midi note which will be the reference pitch for the microtuning in<br />
use. This becomes a very important consideration when one is using a number of<br />
different synthesizers and wishes to keep them in tune with a given base frequency.<br />
It is very common for one to specify a chosen concert pitch such as A440 Hz or<br />
<strong>LinPlug</strong> <strong>Alpha</strong> <strong>Series</strong> <strong>User</strong> <strong>Manual</strong> 3.0 Page 28
C261.6256 Hz as a reference for a microtuning, however, the flexibility of the TUN<br />
format and Scala enables one to specify this frequency arbitrarily. In Scala this<br />
reference is called Map Frequency.<br />
As well as being able to specify the Map Frequency, one can also specify a central<br />
midi-note, which will become the starting point for the microtuning in use. Being able<br />
to specify a particular midi-note on the controller, provides a way to map a<br />
microtuning beginning on any desired midi key, making it easier to navigate the<br />
keyboard when there may be more or less than 12 tones per octave, or where one<br />
may desire to have the notes of a tuning fall on certain physical keys.<br />
Important Note<br />
When one uses a TUN microtuning-file in the , the above specified mapping<br />
properties will override the Master Tuning reference. Normally when one is using the<br />
default 12 Tone Equal Tempered Scale, the Master Tuning will be used to make fine<br />
pitch adjustments around the standard concert pitch of A440 Hz, but when one has<br />
specified another pitch base for a microtuning when the TUN file is created in Scala,<br />
such as C261.6256 Hz, the data in the TUN microtuning-file will provide a new pitch<br />
reference.<br />
<strong>LinPlug</strong> <strong>Alpha</strong> <strong>Series</strong> <strong>User</strong> <strong>Manual</strong> 3.0 Page 29
Appendix F: Technical Specifications<br />
ALPHA 3<br />
ALPHA FREE<br />
Polyphony 32 voices 8 voices<br />
Preset Memory Unlimited (direct disk based) Unlimited (direct disk based)<br />
Oscillators<br />
2 + Noise (Osc Pitch, Amplitude and<br />
Symmetry modulateable), freerun<br />
switchable, Ring Modulator<br />
2 (Pitch, Amplitude and Symmetry<br />
modulateable)<br />
Waveforms 30 x 30 Waveforms 30 x 30 Waveforms<br />
Filter<br />
Envelopes<br />
LFO<br />
Portamento/Glide<br />
LP12, LP24, BP12, HP12 with<br />
Saturation and Filter FM<br />
ADSFR for Amplitude and Cutoff (may<br />
be inverted)<br />
3 LFO's 6 Waveforms, Syncable to<br />
Tempo, Attack adjustable, Mono/Poly<br />
Mode<br />
Mono & polyphonic<br />
Normal, Held and Auto-Bend (+- 48<br />
semitones) Mode<br />
with adjustable Time or Rate<br />
LP12, LP24, BP12, HP12<br />
ADSFR for Amplitude and Cutoff (may<br />
be inverted)<br />
1 LFO, 6 Waveforms, Syncable to<br />
Tempo, Attack adjustable<br />
Mono & polyphonic<br />
Normal, Held and Auto-Bend (+- 48<br />
semitones) Mode<br />
with adjustable Time<br />
Voice Limit 1 to 12 voices or All (32 voices) 1 to 8 voices<br />
Polyphonic Unison Yes, spread adjustable No<br />
Precision Yes, 90 (analog warmth) to 100%<br />
(digital cold)<br />
MIDI Learn Yes (ECS) Yes (ECS)<br />
Yes, 90 (analog warmth) to 100%<br />
(digital cold)<br />
Chorus Yes, adjustable Depth and Speed Yes, adjustable Depth and Speed<br />
Master Tune Yes, 430.0 to 450.0 Hz No<br />
Modulation Matrix 7 slot, 19 sources, 18 destinations 7 slot, 17 sources, 14 destinations<br />
Pitch Bend Range<br />
Separately adjustable up/down<br />
1 to 24 semitones<br />
Fixed 2 semitones<br />
Patch Creator Yes, adjustable No<br />
Microtuning TUN File support No<br />
True Mono-Mode Yes No<br />
<strong>LinPlug</strong> <strong>Alpha</strong> <strong>Series</strong> <strong>User</strong> <strong>Manual</strong> 3.0 Page 30
Appendix G: Predefined ECS assignments<br />
The following MIDI-CC-parameter-assignments are automatically set up on start-up<br />
of Organ 3. Of course, the assignments can be replaced with your own preferences<br />
using the ECS function.<br />
CC 12 Main Level<br />
CC 14 Spread<br />
CC 15 Exactness<br />
CC 20 Osc 1 Waveform 1<br />
CC 21 Osc 1 Range 1<br />
CC 22 Osc 1 Waveform 2<br />
CC 23 Osc 1 Range 2<br />
CC 24 Osc 1 Waveform Mix<br />
CC 26 Osc 2 Waveform 1<br />
CC 27 Osc 2 Range 1<br />
CC 28 Osc 2 Waveform 2<br />
CC 29 Osc 2 Range 2<br />
CC 30 Osc 2 Waveform Mix<br />
CC 31 Filter FM Source<br />
CC 69 Osc Detune<br />
CC 70 Osc Ringmodulation<br />
CC 71 Osc Balance<br />
CC 72 Noise Level<br />
CC 73 Filter FM Depth<br />
CC 74 Filter Envelope Depth<br />
CC 75 Filter Envelope Attack<br />
CC 76 Filter Envelope Decay<br />
CC 77 Filter Envelope Sustain<br />
CC 78 Filter Envelope Fade<br />
CC 79 Filter Envelope Release<br />
CC 80 Filter Cutoff Frequency<br />
CC 81 Filter Resonance<br />
CC 82 Filter Drive<br />
CC 83 Filter Type<br />
CC 84 Glide Time<br />
CC 85 Glide Mode<br />
CC 86 Glide Bend<br />
CC 88 Amplitude Evelope Attack<br />
CC 89 Amplitude Evelope Decay<br />
CC 90 Amplitude Evelope Sustain<br />
CC 102 Amplitude Evelope Fade<br />
CC 103 Amplitude Evelope Release<br />
CC 104 Amplitude Velocity Responce<br />
CC 105 LFO 1 Attack<br />
CC 106 LFO 1 Waveform<br />
CC 107 LFO 1 Frequency<br />
CC 108 LFO 1 Sync<br />
CC 110 LFO 2 Attack<br />
CC 111 LFO 2 Waveform<br />
CC 112 LFO 2 Frequency<br />
CC 113 LFO 2 Sync<br />
CC 115 LFO 3 Waveform<br />
CC 116 LFO 3 Sync<br />
CC 117 Chorus Wet<br />
CC 118 Chorus Time<br />
CC 119 Chorus Rate<br />
CC 25 Matrix Modulation Amount 1<br />
CC 87 Matrix Modulation Amount 2<br />
CC 109 Matrix Modulation Amount 3<br />
NRPN 1024/1025 Preset previous/next<br />
NRPN 1026/1027 Bank previous/next<br />
<strong>LinPlug</strong> <strong>Alpha</strong> <strong>Series</strong> <strong>User</strong> <strong>Manual</strong> 3.0 Page 31
Appendix H: Flow Diagram<br />
<strong>LinPlug</strong> <strong>Alpha</strong> <strong>Series</strong> <strong>User</strong> <strong>Manual</strong> 3.0 Page 32
Appendix I: Midi CC mapping on Behringer BCR 2000<br />
On the <strong>LinPlug</strong> website you find a MIDI CC mapping for owners of the Behringer BCR 2000 controller,<br />
so the BCR2000 can be optimally used with the <strong>Alpha</strong> 3 synthesizer.<br />
Only the first row of switches below the top row of dials is used for this “<strong>Alpha</strong>3 BCR2000.syx”<br />
template. The Fade F and Fade A switches are a quick option to set the Fade parameter of the Filter<br />
and Amplitude envelope to neutral (no fade, thus a standard ADSR). The MW assignment is the<br />
Modulation Wheel (just in case you not have any on your MIDI keyboard).<br />
All other assignments should be pretty clear from the drawing below. We suggest you print it and put it<br />
aside your BCR 2000 until you got familiar with it.<br />
To load the mapping into your BCR2000 you need to transfer the MIDI system exclusive data file<br />
“<strong>Alpha</strong>3 BCR2000.syx. This might be able right from your host or with a MIDI tool like “SysEx Librarian”<br />
on Mac or “MIDI-OX” on PC.<br />
Note that the mapping only works as expected with the ECS Factory Settings as described in<br />
Appendix G.<br />
<strong>LinPlug</strong> <strong>Alpha</strong> <strong>Series</strong> <strong>User</strong> <strong>Manual</strong> 3.0 Page 33